


s
Issued by
Siemens Home and Office Communication Devices GmbH & Co. KG Schlavenhorst 66
D-46395 Bocholt
© Siemens Home and Office Communication Devices GmbH & Co. KG 20067 All rights reserved. Subject to availability.
Rights of modification reserved.
www.siemens.com/gigaset
Gigaset C450 IP
The handset at a glance
|
|
|
|
|
|
|
|
|
|
|
1 |
|||
|
|
|
|
|
|
|
|
|
|
|
||||
15 |
|
|
|
|
|
|
|
|
|
2 |
||||
|
|
¨ |
|
V |
|
|
|
|
||||||
|
|
|
|
|
|
|
||||||||
|
|
11.03.06 |
11:56 |
|
|
|
|
|
||||||
|
|
|
§§§§§§INT§§§§§ |
|
§§§§Menu§ |
|
|
|
3 |
|||||
|
|
|
|
|
|
|
||||||||
|
|
|
|
|
|
|
|
|
|
|
|
|
||
|
|
|
|
|
|
|
|
|
|
|
|
|
||
|
|
|
|
|
|
|
|
|
|
|
4 |
|||
|
|
|
|
|
|
|
|
|
|
|
||||
14 |
|
|
|
|
|
|
|
|
|
|
|
5 |
||
|
|
|
|
|
|
|
|
|
|
|
||||
|
|
|
|
|
|
|
|
|
|
|
||||
|
|
|
|
|
|
|
|
|
|
|
||||
13 |
|
|
|
|
|
|
|
|
|
|
|
6 |
||
|
|
|
|
|
|
|
|
|
|
|
||||
12 |
|
|
|
|
|
|
|
|
|
|
|
|
|
|
|
|
|
|
|
|
|
|
|
|
|
|
|
|
|
11 |
|
|
|
|
|
|
|
7 |
|
|
|
||||||
10 |
|
|
|
|
|
|
8 |
|
|
|
|
|
|
|
|||
|
|
|
|
|
|
|
9 |
|
|
|
|
|
|
|
|
||
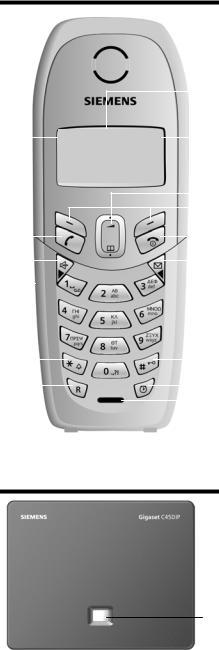
Base station at a glance
1
The handset at a glance
Handset keys
1Display in idle status (example)
2Battery charge status
eVU(1/3 charged to fully
charged)
=flashes: battery nearly empty
eVUflashes: battery charging
3Control key (page 21)
4Display keys (page 22)
5End call key, On/Off key
End call, cancel function, go back one menu level (press briefly), back to idle status (press and hold), activate/deactivate handset (press and hold in idle status)
6Message key
Opens calls and message lists Flashes: new message or new call
7Hash key
Keypad lock on/off (press and hold, page 21)
Toggle between upper/lower case letters and digits for text entry (page 77)
8Alarm clock key (page 44) Activating/deactivating the alarm clock
9Microphone
10 Recall key (not for VoIP connections) Enter flash (press briefly)
Insert a pause (press and hold)
11 Star key
Ringer tones on/off (press and hold in idle status)
12 Connection socket for headset (page 13)
13 Handsfree key
Switch between earpiece and handsfree mode
Lights up: handsfree talking activated Flashes: incoming call
14 Talk key
Accept a call, open last number redial list (press briefly in idle status), select connection type and start dialling (press briefly/ press and hold after entering the number)
15 Signal strength
¦§¨(low to high) ¥flashes: no reception
Base station key
1Paging key
Lights up: LAN connection active (phone is connected to router)
Flashes: Data transfer to LAN connection Press briefly: start paging (page 40)
Press and hold: set base station to registration mode (page 39)
1
Contents
Contents
The handset at a glance . . . . . . . . 1 Base station at a glance . . . . . . . . 1 Safety precautions . . . . . . . . . . . . 4
Gigaset C450 IP –
more than just making calls . . . . . 5
VoIP – Making calls via the Internet . . . . . . . . . . . . . . . . . . . . . 6
First steps . . . . . . . . . . . . . . . . . . . . 6
Pack contents . . . . . . . . . . . . . . . . . . . . 6 Setting up the handset for use . . . . . . . 6 Installing the base station . . . . . . . . . . 8 Connecting the base station . . . . . . . . 8 Making settings for VoIP telephony . . 10 Belt clip and headset . . . . . . . . . . . . . 13
Menu trees . . . . . . . . . . . . . . . . . . 14
Phone menu . . . . . . . . . . . . . . . . . . . . 14 Web configurator menu . . . . . . . . . . . 17
Making calls with VoIP and
the fixed network . . . . . . . . . . . . 18
Making an external call . . . . . . . . . . . 18 Ending a call . . . . . . . . . . . . . . . . . . . . 18 Accepting a call . . . . . . . . . . . . . . . . . 19 Calling Line Identification . . . . . . . . . 19 Handsfree talking . . . . . . . . . . . . . . . . 20 Muting the handset . . . . . . . . . . . . . . 21 Dialling the emergency number . . . . 21
Operating the handset . . . . . . . . 21
Switching the handset on/off . . . . . . |
21 |
Activating/deactivating the |
|
keypad lock . . . . . . . . . . . . . . . . . . . . . |
21 |
Control key . . . . . . . . . . . . . . . . . . . . |
21 |
Display keys . . . . . . . . . . . . . . . . . . . . |
22 |
Returning to idle status . . . . . . . . . . . |
22 |
Menu guidance . . . . . . . . . . . . . . . . . |
22 |
Correcting incorrect entries . . . . . . . . |
23 |
VoIP telephony via the
Gigaset.net . . . . . . . . . . . . . . . . . 24
Search subscribers in
Gigaset.net directory . . . . . . . . . . . . . 24 Calling a Gigaset.net subscriber . . . . . 26
Network services – VoIP . . . . . . 27
Settings for all calls . . . . . . . . . . . . . . . 27
Network services – |
|
fixed network . . . . . . . . . . . . . . . |
27 |
Making settings for all calls . . . . . . . . |
27 |
Functions during a call . . . . . . . . . . . . |
28 |
Using the directory and lists . . 29
Directory . . . . . . . . . . . . . . . . . . . . . . . 29 Last number redial list . . . . . . . . . . . . 31 Opening lists with the
message key . . . . . . . . . . . . . . . . . . . . 31
Making cost-effective calls . . . . 32
Displaying the call duration . . . . . . . . 32
SMS (text messages) . . . . . . . . . 33
Registering for SMS using the registration wizard . . . . . . . . . . . . . . . 33 Writing/sending an SMS . . . . . . . . . . . 34 Receiving an SMS . . . . . . . . . . . . . . . . 35 Setting SMS centre . . . . . . . . . . . . . . . 36 SMS on a PABX . . . . . . . . . . . . . . . . . . 36 Activating/deactivating the SMS
function . . . . . . . . . . . . . . . . . . . . . . . . 36 SMS troubleshooting . . . . . . . . . . . . . 37
Using the network mailbox . . . 38
Configuring the network mailbox
for fast access . . . . . . . . . . . . . . . . . . . 38 Viewing the network mailbox
message . . . . . . . . . . . . . . . . . . . . . . . 38
Using several handsets . . . . . . . 39
Registering handsets . . . . . . . . . . . . . . 39 De-registering handsets . . . . . . . . . . . 40 Changing a handset's internal
number . . . . . . . . . . . . . . . . . . . . . . . . 40 Changing the name of a handset . . . . 40 Locating a handset ("Paging") . . . . . . . 40 Making internal calls . . . . . . . . . . . . . . 41
Handset settings . . . . . . . . . . . . 42
Change display language . . . . . . . . . . 42 Setting the display . . . . . . . . . . . . . . . 42 Activating/deactivating auto-answer . 42 Adjusting the loudspeaker volume . . . 42 Changing ringer tones . . . . . . . . . . . . 43 Advisory tones . . . . . . . . . . . . . . . . . . 43
2
Using the handset as an
alarm clock . . . . . . . . . . . . . . . . . . . . . 44 Restoring the handset default
settings . . . . . . . . . . . . . . . . . . . . . . . . 44
Base station settings . . . . . . . . . . 45
Restoring the base station to
factory settings . . . . . . . . . . . . . . . . . . 45 Activating/deactivating repeater
mode . . . . . . . . . . . . . . . . . . . . . . . . . 45 Set default connection . . . . . . . . . . . . 46 Updating the base station firmware . 46
Making VoIP settings . . . . . . . . . 47
Using the connection wizard . . . . . . . 47 Changing settings without the connection wizard . . . . . . . . . . . . . . . 47 Setting the phone's IP address
in LAN . . . . . . . . . . . . . . . . . . . . . . . . . 48 Activating/deactivating display
of VoIP status codes . . . . . . . . . . . . . . 49 Check the base station MAC
address . . . . . . . . . . . . . . . . . . . . . . . . 49
Operating the base station
on the PABX . . . . . . . . . . . . . . . . . 50
Changing the dialling mode . . . . . . . . 50 Setting the flash time . . . . . . . . . . . . . 50 Setting pauses . . . . . . . . . . . . . . . . . . 50 Switching temporarily to tone
dialling (DTMF) . . . . . . . . . . . . . . . . . . 50
Web configurator . . . . . . . . . . . . 51
Configuring the phone via your PC . . 51 Connecting your PC to the
Web configurator . . . . . . . . . . . . . . . . 51 Registering, setting the Web configurator language . . . . . . . . . . . . 51 De-registering . . . . . . . . . . . . . . . . . . . 52 Structure of the Web pages . . . . . . . . 52 Opening Web pages . . . . . . . . . . . . . . 54 Setting phone with
Web configurator . . . . . . . . . . . . . . . . 54 IP Configuration . . . . . . . . . . . . . . . . . 54 Configuring telephone connections . 56 Setting DTMF signalling for VoIP . . . . 63
Contents
Defining local communication
ports for VoIP . . . . . . . . . . . . . . . . . . . 64 Defining dialling plans . . . . . . . . . . . . 64 Specifying the server for
firmware updates and
starting the update . . . . . . . . . . . . . . . 65 Activating/deactivating the
automatic version check . . . . . . . . . . . 66 Activating VoIP status message
display . . . . . . . . . . . . . . . . . . . . . . . . . 66 Checking status information via
your phone . . . . . . . . . . . . . . . . . . . . . 67
Appendix . . . . . . . . . . . . . . . . . . |
68 |
Symbols and typographical
conventions used . . . . . . . . . . . . . . . . 68 Care . . . . . . . . . . . . . . . . . . . . . . . . . . . 68 Contact with liquid . . . . . . . . . . . . . . . 68 Questions and answers . . . . . . . . . . . . 69 Voice quality and infrastructure . . . . . 73 Searching for service information . . . 73 Service (Customer Care) . . . . . . . . . . . 74 Authorisation . . . . . . . . . . . . . . . . . . . 74 Guarantee Certificate . . . . . . . . . . . . . 75 Specifications . . . . . . . . . . . . . . . . . . . 76 Writing and editing a text message . . 77 Gigaset C450 IP – Free software . . . . . 78
Accessories . . . . . . . . . . . . . . . . . 85 Glossary . . . . . . . . . . . . . . . . . . . 86 Index . . . . . . . . . . . . . . . . . . . . . . 96
3
Safety precautions
Safety precautions
Caution:
Read the safety precautions and the user guide before use.
Explain their contents to your children, and the potential hazards associated with using the telephone.
$ Only use the mains adapter supplied, as indicated on the underside of the base station.
Fit only the recommended rechargeable batteries (page 76) of the same type! This means: do not use any other battery type or non-rechargeable batteries as this could result in significant health risks and personal injury.
‹Insert rechargeable batteries with the correct polarity, and use them according to this user
Œguide (polarity symbols can be seen in the handset's battery compartment, page 6).
The operation of medical appliances may be affected. Be aware of the technical conditions in your particular environment, e.g. doctor's surgery.
Do not hold the rear side of the handset to the ear when it rings or when you have activated on the handsfree function. Otherwise you risk serious and permanent damage to your hearing.
The handset may cause an unpleasant humming noise in hearing aids.
Do not install the base station in bathrooms or shower rooms. The handset and base station are not splashproof (page 68).
Do not use your phone in environments with a potential explosion hazard (e.g. paint shops).
ƒIf you give your Gigaset to someone else, make sure you also give them the user guide.
All electrical and electronic products should be disposed of separately from the municipal waste stream via designated collection facilities appointed by the government or the local authorities.
This crossed-out wheeled bin symbol on the product means the product is covered by the European Directive 2002/96/EC.
The correct disposal and separate collection of your old appliance will help prevent potential negative consequences for the environment and human health. It is a precondition for reuse and recycling of used electrical and electronic equipment.
For more detailed information about disposal of your old appliance, please contact your city office, waste disposal service or the shop where you purchased the product.
Please note:
When the keypad lock is active you cannot even call emergency numbers!
Not all of the functions described in this user guide are available in all countries.
4

Gigaset C450 IP –
more than just making calls
Your phone lets you make calls both via the fixed network and (cost effectively) via the Internet (VoIP) without using a PC.
And your phone can do much more besides:
uPress a button each time you make a call to indicate whether you want to make a call via the fixed network or via the Internet (page 18).
uRegister up to six handsets on your base station. Your base station allows you to use one handset to make a call via the fixed network and another to make a call via the Internet at the same time.
uUse the Gigaset.net for VoIP calls. Connect your phone to the power supply and the Internet, and enjoy free phone calls on the Gigaset.net – no need to make any other settings (page 24).
uConfigure the phone connection for VoIP without a PC. Your phone's connection wizard downloads general data about your VoIP provider from the Internet and guides you through entering your personal data (account). This makes it easy for you to start using VoIP (page 10).
uIf necessary, establish any further VoIP settings on a PC. The phone has a Web interface (Web configurator) that can be accessed via your PC's Web browser (page 51).
uAssign your own password (system PIN) to protect your device and the Web configurator from unauthorised access (page 45).
uSend and receive SMS messages via the fixed network (page 33).
Gigaset C450 IP – more than just making calls
uSave 100 phone numbers on your handset (page 29).
uYou can programme the keys of your phone with important phone numbers. The phone number is then dialled by simply pressing the respective key (page 30).
uKeep your hands free when making a call. Use the handsfree function on your handset (page 20) or use the convenient headset to make calls (accessory: not included in the scope of delivery).
uMake sure your phone is always up-to- date. Keep yourself informed about firmware updates on the Internet and load them onto your phone (page 46).
uUse your handset as an alarm clock (page 44).
Your Gigaset C450 IP has a protected operating system that offers increased security against viruses from the Internet.
Have fun using your new telephone!
5
VoIP – Making calls via the Internet
VoIP – Making calls via the Internet
With VoIP (Voice over Internet Protocol), your calls are not made via a fixed connection as in the telephone network, but rather they are transmitted via the Internet in the form of data packets.
You can take advantage of all the benefits of VoIP with your phone:
uYou can make cost-effective calls with high voice quality with subscribers on the Internet, the fixed network or the mobile phone network.
uYour SIP provider will give you a personal number, with which you can be reached from the Internet, the fixed network and any mobile phone network.
To be able to use VoIP, you need the following:
uA broadband Internet connection (e.g. DSL) with flat rate or volumebased price.
uInternet access, i.e. you need a router that will connect your phone to the Internet.
uAccess to the services of a VoIP provider. Open an account with a VoIP provider.
First steps
Pack contents
The pack contains:
u one Gigaset C450 IP base station u one Gigaset C45 handset
u one mains adapter for the base station u one charging cradle incl. mains adapter u one phone cord
u one Ethernet cable (LAN cable) u two batteries
u one battery cover u one belt clip
u one quick guide
Setting up the handset for use
The display is protected with a plastic film. Please remove the protective film!
Inserting the batteries
Caution:
Use only the rechargeable batteries recommended by Siemens Home and Office Communication Devices GmbH & Co. KG on page 76! This means: on no account may conventional (non-rechargeable) batteries or other battery types be used, otherwise serious damage to health and property cannot be ruled out, e.g. the outer casing of the batteries could be destroyed or the batteries could explode. The phone could also malfunction or be damaged as a result of using batteries that are not of the recommended type.
¤Insert the batteries the right way round (see figure).
6
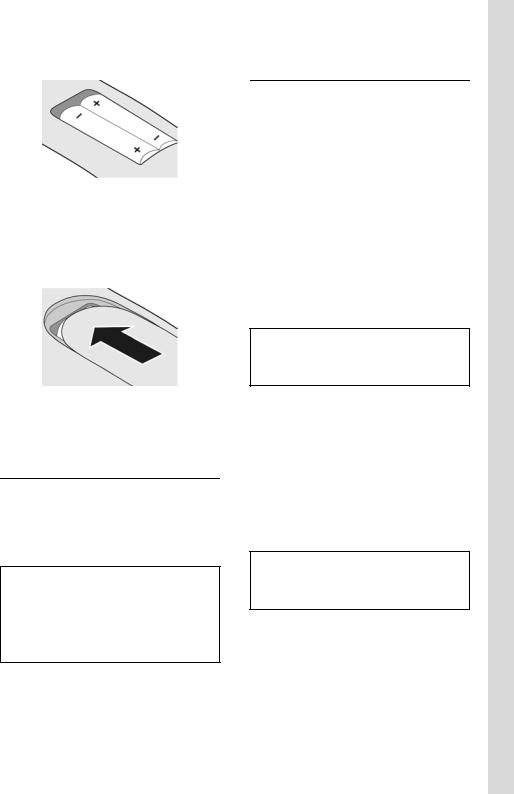
The polarity is indicated in the battery compartment.
The handset switches on automatically. You will hear a confirmation tone.
Closing the battery cover
¤Place the cover on the battery compartment as shown in the diagram, then push it up until it clicks into position.
Opening the battery cover
¤Press down on the battery cover below its upper end and slide the cover down.
Connecting the charging cradle
Connecting up the charging cradle and mounting it on the wall (if required) is described at the end of this user guide.
¤To charge the batteries, leave the handset in the charging cradle.
Please note:
–Only place the handset in the charging cradle that is intended for it.
–If the handset has switched itself off because the batteries are flat and if it is then placed in the charging cradle, it will switch itself on automatically.
For questions and problems see page 69.
First steps
Initial charging and discharging of batteries
Battery charging is indicated in the top right of the display by a flashing battery icon e, Vor U. During handset operation, the battery icon indicates the charge status of the batteries (page 1).
The correct charge status can only be displayed when the batteries are first fully charged and discharged through use.
¤To do this, leave the handset in the charging cradle without interruption until the battery icon stops flashing in the display (approx. 13 hours).
¤Once the batteries are fully charged, remove the handset from the charging cradle and do not put it back again until the batteries are fully discharged.
Please note:
After the first battery charge and discharge, you may replace your handset in the charging cradle after every call.
Please note:
uAlways repeat the charging and discharging procedure if you remove the batteries from the handset and insert them in again.
uThe batteries may warm up as they are charging. This is not dangerous.
uAfter a while the charge capacity of the batteries will decrease for technical reasons.
Please note:
You will find explanations for the symbols and typographical conventions used in this user guide in the appendix, page 68.
7
First steps
Setting the date and time
§Menu§ ¢Settings ¢Date/Time
~Enter the day, month and year
with 6 digits and press §OK§. Use qto move between the fields.
~Enter hours and minutes with
4 digits (e.g. 0 7 1 5 for 07.15 hrs) and press §OK§. Use qto move between the fields.
The date and time are shown in the handset's idle display page 1.
Registering the handset to the base station
Your handset is registered to the base station by default.
Instructions on how to register further handsets to the base station are given on page 39.
4
LAN
1
3 |
2 |
Installing the base station
The base station is designed for use in closed, dry rooms with a temperature range of +5 °C to +45 °C.
¤Place or hang the base station in a central position in your flat or house.
Please note:
uNever expose the telephone to heat sources, direct sunlight, other electrical appliances.
uProtect your Gigaset from moisture, dust, corrosive liquids and vapours.
Connecting the base station
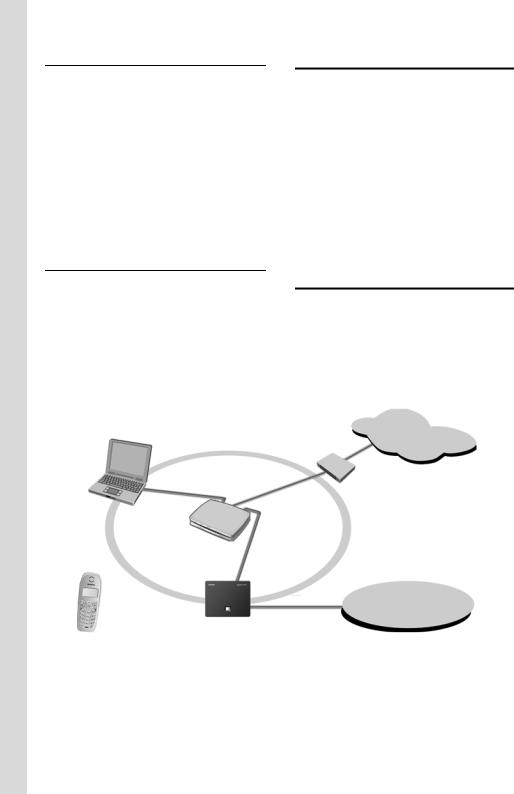
In order to be able to make calls with your phone via the fixed network and via VoIP, you must connect the base station to the fixed network and the Internet, see Figure 1.
Internet
1
Fixed network
Figure 1 Connecting the phone to the fixed network and the Internet
1Internet connection:
Router with integrated modem or router and modem
2Gigaset C450 IP base station
3Gigaset C45 handset
4PC in LAN
8

Follow the steps in the order given below:
1.Connect the base station with the phone connection
2.Connect the base station with the mains power supply
3.Connect the base station with the router
Connecting the base station with the fixed network and the mains power supply
¤Please first connect the phone jack and then the mains adapter, as shown below.
1 |
3 |
2
1Phone jack with phone cord
2Underside of the base station
3Mains adapter 230 V
Please note:
uKeep the mains adapter plugged in at all times for operation, as the phone does not work without mains connection.
uIf you buy a replacement phone cord from a retailer, ensure that the phone jack is connected correctly.
Correct phone jack assignment
3 |
|
|
|
|
4 |
1 unused |
||||
2 |
|
|
|
|
|
|
5 |
2 unused |
||
1 |
|
|
|
|
|
|
|
|
6 |
3 a |
|
|
|
|
|
|
|
|
4 b |
||
|
|
|
|
|
|
|
|
|
|
|
|
|
|
|
|
|
|
|
|
|
5 unused |
|
|
|
|
|
|
|
|
|
|
|
|
|
|
|
|
|
|
|
|
|
6 unused |
|
|
|
|
|
|
|
|
|
|
|
First steps
You can now use your phone to make calls via the fixed network and can be reached at your fixed network number!
Connecting the base station with the router
For Internet access you need a router, connected to the Internet via a modem (if necessary, this can be integrated in the router).
3
1 3
2
1Side view of the base station
2Network plug (LAN) with network cable
3Router network plug
As soon as the cable connecting the phone and router is plugged in, the paging key lights up on the front of the base station.
You are now able to establish VoIP connections within the Gigaset.net (page 24).
9
First steps
Making settings for VoIP telephony
Before you can use the Internet (VoIP) to phone any other users on the Internet, the fixed network or the mobile phone network, you need the services of a VoIP provider who supports the VoIP SIP standard.
Precondition: You have registered with a VoIP provider (e.g.via your PC) and set up an account. The provider must support the VoIP SIP standard.
The following phone settings are necessary in order for you to use VoIP. You will receive all information from your VoIP provider.
uYour user name with the VoIP provider, if this is required by the VoIP provider
u Your registration name
u Your password with the VoIP provider u VoIP provider general settings
The connection wizard will help you with the settings.
Starting the connection wizard
Precondition: The base station is connected to the mains power supply and a router. Your router is connected to the Internet.
Tip: If VoIP (IP) is activated as the default connection for your phone (default setting see page 46), the phone will attempt to make a direct connection to the server belonging to your VoIP provider after the connection assistant is closed. If incorrect/ incomplete information means that the connection cannot be established, messages will be displayed (page 12).
Please note:
Your phone is preconfigured for dynamic assignment of the IP address. In order for your router to "recognise" the phone, dynamic IP address assignment must also be activated on the router, i.e. the router's DHCP server is activated. Turn to page 48 to find out how to assign your phone a static IP address if necessary.
If the handset battery is sufficiently charged, the message key fon the handset will flash (around 20 minutes after you have put the handset in the charging cra-
dle).
¤
You will see the following display:
Start VoIP
Connection
Assistant?
§§§§No§§§§ §§§§§Yes§§§§
§Yes§ |
Press the display key to start |
|
the connection assistant. |
~Enter the system PIN of the base station (the default is 0000) and press §OK§.
If you press §No§, the procedure that follows is described under "Entering names in the Gigaset.net directory" on page 11.
Please note:
The connection wizard will also start automatically if you try to establish a connection via the Internet, before you have made the necessary settings.
You can also call up the connection wizard at any time via the menu (page 47).
10

Downloading VoIP provider data
The phone establishes a connection with the Siemens server on the Internet. Profiles with general access data for various VoIP providers can be downloaded here. The message Select country is displayed.
After changing the display:
q |
Select country and press §OK§. |
Select provider is displayed.
After changing the display:
qSelect VoIP provider and press
§OK§.
The necessary data for your VoIP provider is downloaded and saved on the phone.
Please note:
If the data for your VoIP provider is not offered for download, you must make the necessary settings with the Web configurator at a later
stage (page 57).
Press the display key §Back§. You can then conduct the following steps with the connection assistant (see "Entering VoIP user data").
Entering VoIP user data
Depending on the VoIP provider, the following information will be requested in sequence:
Username:
If this is required by your provider, enter name and press
§OK§.
Authentication Name:
Enter name and press §OK§.
Authentication Password:
Enter password and press §OK§.
Please note:
Please note when making these entries that the VoIP user data is case sensitive. If necessary, press and hold the #key to switch between upper and lower case and digits
First steps
Entering names in the Gigaset.net directory
With Gigaset.net you can call other Gigaset.net users directly over the Internet free of charge, without setting up an account with a VoIP provider and without making any further settings. You can find Gigaset.net subscribers by carrying out a name search in the Gigaset.net directory (page 24).
The following appears in the handset's display:
|
|
Start |
|
|
|
Gigaset.net |
|
|
§§§§No§§§§ |
assistant? |
|
|
§§§§§Yes§§§§ |
|
|
§Yes§ |
|
|
|
Press the display key if you |
|||
|
want to enter yourself in the |
||
Gigaset.net directory. If you press §No§, the procedure that follows is described under "Completing the VoIP settings".
Own Gigaset.net name:
Enter the name that you would like to be listed under in the Gigaset directory and press §OK§. The name may contain up to 25 characters.
A connection to the Gigaset.net server is established.
If there is already an entry under this name, you receive a message to this effect and you will be asked to enter a name again.
If an entry in the Gigaset.net directory is successful, the message "Name added to Gigaset.net!" is displayed briefly.
If the attempt to create the entry fails (e.g. because the phone is not connected to the Internet), a message to this effect is displayed briefly, see page 12. You can then create the entry later via the Gigaset.net directory (page 24).
11
First steps
Completing the VoIP settings
Once all the necessary entries have been made, the handset reverts to idle status.
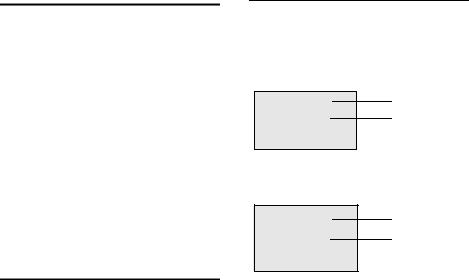
If all the settings are correct and if the phone can establish a connection to the VoIP server, then the internal name of the handset will be displayed:
¨ V
INT 1
11.07.06 11:56
§§§§§§INT§§§§§ §§§§Menu§
You can now use your phone to make calls via the fixed network and the Internet! Callers can reach you on your fixed network number and your VoIP number!
Please note:
To ensure that you can always be reached via the Internet, the router should be permanently connected to the Internet.
No connection to the Internet/VoIP server
If one of the following messages is displayed instead of the internal name after the connection assistant is closed, then either a fault has occurred or your information was incomplete:
Server not accessible!
The phone has no connection to the Internet.
¤Check the cable connection between the base station and the router (the LED on the base station must light up) and the connection between the router and the modem/Internet connection.
¤Check whether the phone is connected to the LAN.
–It may not have been possible to dynamically assign an IP address to the phone
or
–You have assigned a static IP address to the phone that has either already been assigned to another LAN sub-
scriber or does not belong to the router's address block.
¤Find the IP address using the hand-
set menu:
§Menu§ ¢Settings ¢Base
¢Local Network ¢(enter system PIN) ¢IP Address
¤Start the Web configurator with the IP address (page 51).
¤If no connection can be established: change the settings on the router (activate DHCP server) or the phone's (static) IP address.
SIP registration failed!
uYour personal data for registering with the VoIP provider may have been entered incompletely or incorrectly.
¤Check your entries for Username,
Authentication Name and Authentication Password. In particular, check your use of upper and lower case.
To do this, open the following menu
on your handset:
§Menu§ ¢Settings ¢Base ¢Telephony ¢VoIP
uThe server address for the VoIP server has not yet been entered, or has been entered incorrectly.
¤Start the Web configurator.
¤Open Settings ¢Telephony
¢VoIP Web page.
¤Edit the server address where necessary.
Please note:
If port forwarding is activated on your router for the ports that have been registered as the SIP port (Standard 5060) and the RTP port (Standard 5004), then it makes sense to switch off DHCP and assign the phone a static IP address (otherwise you may not be able to hear the other party during VoIP calls), see page 48.
Please note that the IP address and subnet mask depend on the router's address block.
You must also enter the default gateway and DNS server via the Web configurator
(page 54). The IP address for the router is generally entered here.
12

First steps
You will find other messages and possible measures in the Questions and answers section on page 69.
Belt clip and headset
By using a belt clip and headset (optional) you can easily make your handset a constant companion both inside the building and in its immediate vicinity.
Attaching the belt clip
There are notches for attaching the belt clip on the side of the handset at approximately the same height as the display.
¤Press the belt clip onto the back of the handset so that the protrusions on the belt clip engage with the notches.
The tongue of the belt clip must face the battery compartment.
Connection socket for headset
You can use headsets with jack connectors. The following models have been tested and are therefore recommended: HAMA Plantronics M40, MX100 and MX150.
The transmission quality of other models cannot be guaranteed.
13

Menu trees
Menu trees
Phone menu
There are two ways to select a function:
Using number combinations ("shortcut")
¤To open the main menu, press §Menu§ with the handset in idle status.
¤Enter the number combination that is in front of the function in the menu tree.
¤Example: §Menu§ 422for "Set handset language".
Scrolling through the menus
¤To open the main menu, press §Menu§ with the handset in idle status.
¤Scroll to the function with the control key sand press §OK§.
1 |
SMS |
|
|
|
|
|
|
1-1 |
Write Message |
|
|
|
|
|
page 34 |
|
|
|
|
|
|
|
|
1-2 |
Incoming 00+00 |
|
|
|
|
|
|
|
|
|
|
|
|
|
|
1-3 |
Outgoing |
|
|
|
|
|
|
|
|
|
|
|
|
|
|
1-6 |
Settings |
1-6-1 |
Service Centres |
1-6-1-1 |
Service Centre 1 |
page 36 |
|
|
|
|
|
|
|
|
|
|
|
|
|
|
… |
[to] |
|
|
|
|
|
|
|
|
|
|
|
|
|
1-6-1-4 |
Service Centre 4 |
|
|
|
|
|
|
|
|
|
|
|
|
|
|
|
|
|
|
|
|
1-6-2 |
Status Report |
|
|
|
|
|
|
|
|
|
|
|
|
|
|
1-6-3 |
Register to Service |
|
|
|
|
|
|
|
Centres |
|
|
|
|
|
|
|
|
|
|
|
|
2 |
Alarm Clock |
|
|
|
|
|
page 44 |
|
|
|
|
|
|
|
|
2-1 |
Activation |
|
|
|
|
|
|
|
|
|
|
|
|
|
|
2-2 |
Wake up time |
|
|
|
|
|
|
|
|
|
|
|
|
|
|
3 |
Audio Settings |
|
|
|
|
|
|
|
|
|
|
|
|
|
|
3-1 |
Ringer Volume |
|
|
|
|
|
page 43 |
|
|
|
|
|
|
|
|
3-2 |
Ringer Melody |
3-2-1 |
External Calls |
|
|
|
page 43 |
|
|
|
|
|
|
|
|
|
|
3-2-2 |
Internal Calls |
|
|
|
|
|
|
|
|
|
|
|
|
|
|
3-2-3 |
Alarm Clock |
|
|
|
|
|
|
|
|
|
|
|
|
|
|
|
|
|
|
|
|
3-3 |
Advisory Tones |
|
|
|
|
|
page 44 |
|
|
|
|
|
|
|
|
14
|
|
|
|
|
|
|
Menu trees |
|
|
|
|
|
|
|
|
3-4 |
Battery Low |
3-4-1 |
Off |
|
|
|
page 44 |
|
|
|
|
|
|
|
|
|
|
3-4-2 |
On |
|
|
|
|
|
|
|
|
|
|
|
|
|
|
3-4-3 |
During Call |
|
|
|
|
|
|
|
|
|
|
|
|
4 |
Settings |
|
|
|
|
|
|
|
|
|
|
|
|
|
|
4-1 |
Date/Time |
|
|
|
|
|
page 8 |
|
|
|
|
|
|
|
|
4-2 |
Handset |
4-2-1 |
Display |
4-2-1-1 |
Screensaver |
page 42 |
|
|
|
|
|
|
|
|
|
|
|
|
|
4-2-1-2 |
Colour Scheme |
|
|
|
|
|
|
|
|
|
|
|
|
|
|
4-2-1-3 |
Contrast |
|
|
|
|
|
|
|
|
|
|
|
|
|
|
4-2-1-4 |
Backlight |
|
|
|
|
|
|
|
|
|
|
|
|
|
|
|
|
|
|
|
|
4-2-2 |
Language |
|
|
|
page 42 |
|
|
|
|
|
|
|
|
|
|
4-2-3 |
Auto Answer |
|
|
|
page 42 |
|
|
|
|
|
|
|
|
|
|
4-2-4 |
Register Handset |
|
|
|
page 39 |
|
|
|
|
|
|
|
|
|
|
4-2-5 |
Reset Handset |
|
|
|
page 44 |
|
|
|
|
|
|
|
|
|
|
|
|
|
|
|
|
4-3 |
Base |
4-3-2 |
Music on hold |
|
|
|
|
|
|
|
|
|
|
|
|
|
|
4-3-3 |
System PIN |
|
|
|
|
|
|
|
|
|
|
|
|
|
|
4-3-4 |
Base Reset |
|
|
|
|
|
|
|
|
|
|
|
|
|
|
4-3-5 |
Additional Fea- |
4-3-5-1 |
Repeater Mode |
page 45 |
|
|
|
|
tures |
|
|
|
|
|
|
|
|
|
|
|
|
|
|
|
|
|
|
|
|
|
|
4-3-6 |
Local Network |
4-3-6-1 |
dynamic |
|
|
|
|
|
|
|
|
IP address |
|
|
|
|
|
|
|
|
|
|
|
|
|
4-3-6-2 |
IP Address |
|
|
|
|
|
|
|
|
|
|
|
|
|
|
4-3-6-3 |
Subnet Mask |
|
|
|
|
|
|
|
|
|
|
|
|
|
|
4-3-6-4 |
DNS Server |
|
|
|
|
|
|
|
|
|
|
|
|
|
|
4-3-6-5 |
Default Gateway |
|
|
|
|
|
|
|
|
|
|
|
|
|
|
|
|
|
|
|
|
4-3-7 |
Telephony |
|
Submenu see page 16 |
|
|
|
|
|
|
|
|
|
|
|
|
4-3-8 |
Firmware Update |
|
|
|
page 46 |
|
|
|
|
|
|
|
|
5 |
Voice Mail |
|
|
|
|
|
page 38 |
|
|
|
|
|
|
|
|
5-1 |
Set Key 1 |
5-1-1 |
Network Mailbox |
|
|
|
|
|
|
|
|
|
|
|
|
15
Menu trees |
|
|
|
|
|
|
6 |
Select Services * |
|
|
|
|
|
|
|
|
|
|
|
|
6-1 |
VoIP |
6-1-6 |
For All Calls |
6-1-6-1 |
Call Divert |
page 27 |
|
|
|
|
|
|
|
|
|
|
|
|
|
|
6-2 |
Fixed line |
6-2-6 |
For All Calls |
6-2-6-1 |
Call Divert |
page 27 |
|
|
|
|
|
|
|
|
|
|
|
6-2-6-3 |
Call Waiting |
page 28 |
|
|
|
|
|
|
|
* Please note: Following a firmware update, the network services are only displayed if you de-register and then reregister your handset.
Submenu "Settings ¢Base ¢Telephony" 4-3-7
4-3-7 |
Telephony |
4-3-7-1 |
Default Line Type |
4-3-7-1-1 |
IP |
page 46 |
|
|
|
|
|
|
|
|
|
|
|
4-3-7-1-2 |
fixed line |
|
|
|
|
|
|
|
|
|
|
|
|
|
|
|
|
|
4-3-7-2 |
Connection Assistant |
|
|
page 47 |
|
|
|
|
|
||
|
|
4-3-7-6 |
Fixed line |
4-3-7-6-1 |
Dialling Mode |
page 50 |
|
|
|
|
|
|
|
|
|
|
|
4-3-7-6-2 |
Recall |
page 50 |
|
|
|
|
|
|
|
|
|
|
|
|
|
|
|
|
4-3-7-7 |
VoIP |
4-3-7-7-1 |
Status on HS |
|
|
|
|
|
|
|
|
|
|
|
|
4-3-7-7-2 |
Select VoIP Pro- |
|
|
|
|
|
|
vider |
|
|
|
|
|
|
|
|
|
|
|
|
4-3-7-7-3 |
Username |
|
|
|
|
|
|
|
|
|
|
|
|
4-3-7-7-4 |
Authentication |
|
|
|
|
|
|
Name |
|
|
|
|
|
|
|
|
|
|
|
|
4-3-7-7-5 |
Authentication |
|
|
|
|
|
|
Password |
|
|
|
|
|
|
|
|
16

Menu trees
Web configurator menu
Please note:
For Gigaset C450IP base stations manufactured before June 2006, "VoIP" is displayed instead of "Connections" after a firmware update.
Home |
|
|
|
page 51 |
|
|
|
|
|
|
|
Settings |
|
|
|
|
|
|
|
|
|
|
|
|
|
IP Configuration |
|
page 54 |
|
|
|
|
|
|
|
|
|
Telephony |
|
|
|
|
|
|
|
|
|
|
|
|
|
Connections |
page 57 |
|
|
|
|
|
|
|
|
|
|
Dialing Plans |
page 64 |
|
|
|
|
|
|
|
|
|
|
Advanced Settings |
page 63 |
|
|
Miscellaneous |
|
page 65, |
|
|
|
|
|
|
page 66 |
Status |
|
|
|
|
|
|
|
|
|
|
|
|
|
Device |
|
page 67 |
|
|
|
|
|
|
|
17

Making calls with VoIP and the fixed network
Making calls with VoIP and the fixed network
Making an external call
External calls are calls made via the public telephone network (fixed network) or via the Internet (VoIP). You can use the talk key cwhen dialling to select what type of connection you want to use (fixed network or VoIP). One particular connection type is set as the default connection for your phone. The default is VoIP (for how to change the setting if required, see
page 46).
¤Enter the required number/IP address using the keypad.
¤Press the talk key cbriefly if you want to make the call via the default connection.
Or:
¤Press and hold the talk key cif you want to make a phone call via the other connection type (the non-default connection).
Please note:
–If there are at least two handsets registered to your base station, you can use one to make a call via the fixed network and the other to make a call via the Internet (VoIP) at the same time.
–If you use a different GAP-compatible handset to the Gigaset C45, all calls will be made
via the default connection, even if you press and hold the talk key c. If you want to use the non-default connection to make a call, enter a star (*) at the end of the number.
–If you use VoIP to make a call to the fixed network, you may also have to dial the area code for local calls (depending on the VoIP provider). You can avoid this by entering the area code in the configuration of the base station (via the Web configurator, see page 64). It will then be inserted automatically for local calls.
Cancelling the dialling operation
You can cancel the dialling operation with the end call key a.
Entering an IP address
If you are making a call via VoIP, you can enter an IP address instead of a phone number.
PPress the star key to separate the parts of the IP address (e.g. 149*246*122*28).
#If necessary, press the hash key to attach the SIP port number of the person you are calling (page 93) to the IP address (e.g. 149*246*122*28#5060).
Please note:
–Dialling with the directory (page 29) or last number redial list (page 31) saves repeated keying of phone numbers.
–You can assign a number from the directory to a key for speed dialling (page 30).
–You can edit or add to any phone number selected by means of quick dial or from the directory and use it for the current call.
Ending a call
a |
Press the end call key. |
18
Accepting a call
The handset indicates an incoming call in three ways: by ringing, by a display on the
screen and by the flashing handsfree key d.
You can answer the call by:
¤Pressing the talk key c.
¤Pressing the handsfree key d.
If the handset is in the charging cradle and the Auto Answer function is activated (page 42), the handset will take a call automatically when you lift it out of the cradle.
If the ringer tone is intrusive, press
§Menu§ Silent. You can accept the call so long as it is displayed on the screen.
Calling Line Identification
When you receive a call from the Internet, the caller's number and/or the name they have specified is displayed on the screen.
When you receive a call from the fixed network, the caller's number and/or name is displayed on the screen if the following conditions are met:
uYour fixed network provider supports CLIP, CLI and CNIP:
–CLI (Calling Line Identification): the caller's number is transmitted
–CLIP (Calling Line Identification Presentation): the caller's number is displayed
–CNIP (Calling Name Identification Presentation): the caller's name is displayed
uYou have arranged CLIP or CNIP with your network provider.
uThe caller has arranged CLI with the network provider.
If the phone number is identified and the caller's number is saved in your directory, the name will be displayed from the directory.
Making calls with VoIP and the fixed network
Call display
By means of the ringer tone icon on the screen, you can decide whether the call is directed to your fixed network number or to your VoIP number.
Calls to your fixed network number
®1
1234567890 2
Menu§
1Ringer tone icon
2Number or name of caller
Calls to your VoIP number
W 1
1234567890 2
Menu§
1Ringer tone icon
2Number or name of caller
Display when Calling Line Identification is withheld
For calls from the fixed network, the caller can withhold calling line identification or not request it. In this case the number is not displayed. The following is displayed in place of the number:
uExternal Call, if no number is transmitted.
uWithheld, if the caller has withheld Calling Line Identification.
uUnavailable , if the caller has not arranged Calling Line Identification.
19
Making calls with VoIP and the fixed network
Display with CNIP
Precondition: Call from the fixed network.
If you have CNIP, then the name (town) that is registered with your network provider for that calling number will also be displayed. If the caller's number is saved in your directory then the directory entry will be shown.
1234567890 |
|
|
1 |
|
|
||
Anna Fielding, |
|
|
2 |
London |
IP |
|
|
|
§Menu
1Caller's number
2Name and town (IP is displayed for calls made via the Internet)
The display shows:
uExternal Call, if no number is transmitted.
uWithheld, if the caller has withheld Calling Line Identification.
uUnavailable , if the caller has not arranged Calling Line Identification.
Handsfree talking
In handsfree mode, instead of holding the handset to your ear you can put it down, e.g. on the table in front of you, to allow others to participate in the call.
Activating/deactivating handsfree mode
Activating while dialling
~d Enter number and press briefly/press and hold the handsfree key to select the connection type (page 18).
¤ You should inform your caller before you use the handsfree function so that they know someone else is listening.
Switching between earpiece and handsfree mode
d |
Press the handsfree key. |
Switch handsfree on and off during a call.
If you wish to place the handset in the charging cradle during a call:
¤Press and hold the handsfree key d
while placing the handset in the charging cradle. If the handsfree key ddoes not light up, press the key again.
For how to adjust the loudspeaker volume, see page 42.
20

Muting the handset
You can deactivate the microphone in your handset during an external call. The other party hears a wait melody.
Muting the handset
§INT§ |
Press the display key. |
Cancelling muting
§Back§ Press the display key.
Dialling the emergency number
You can store up to 5 emergency numbers in your telephone.
The default setting for your phone is that these numbers are automatically dialled via the fixed network, irrespective of whether you press the talk key cbriefly or press and hold it.
You can deactivate this function via the Web configurator (Dialing Plans, page 65), e.g. if you use the phone without a fixed network. Ask beforehand, however, whether your VoIP provider supports emergency numbers.
~c Enter the emergency number and press the talk key.
Emergency numbers may have been preset in your phone. You can use the Web configurator to display these, enter more emergency numbers or delete/edit emergency numbers (page 64).
Please note:
–If you have used the Web configurator to deactivate the Emergency calls always via fixed line function and have entered an automatic area code for VoIP calls
(page 64), the area code will also be prefixed to the emergency numbers when they are dialled via VoIP.
–Even emergency numbers cannot be dialled if the keypad lock is activated.
Before dialling, press and hold the hash key #, to release the keypad lock.
Operating the handset
Operating the handset
Switching the handset on/off
aPress and hold the end call key.
You will hear the confirmation tone.
Activating/deactivating the keypad lock
#Press and hold the hash key.
You will hear the confirmation tone. The Øicon appears in the display when the keypad lock is activated.
The keypad lock deactivates automatically when you receive a call and activates again after the call.
Please note:
The handset displays an advisory message if you press a key by accident while the keypad lock is on. To deactivate the keypad lock, press and hold the hash key #.
Control key
§§§§INT§§§ §§Menu
1
1 Control key
In this user guide, the side of the control key that you must press in the given operating situation is shown in black (top, bottom). Example: tfor "press the top of the control key".
The control key has a number of different functions:
21

Operating the handset
When the handset is in idle status
sOpen the directory.
tAdjust the ringer volume of the handset (page 43).
In lists and menus
t/ s Scroll up/down line by line.
In an input field
t/ s Move the cursor left or right.
During an external call
sOpen the directory.
tAdjust loudspeaker volume for earpiece and handsfree mode.
Display keys
The current display functions are shown in the bottom display line in reversed highlights. The function of the display keys changes depending on the particular operating situation.
Example:
§§§§INT§§§ |
§§Menu |
|
1 |
||
|
|||||
|
|
|
|
|
2 |
|
|
|
|
|
|
|
|
|
|
|
|
|
|
|
|
|
|
|
|
|
|
|
|
1Current display key functions
2Display keys
The most important display symbols are:
§Back§ |
Go back one menu level or |
|
cancel the operation. |
§INT§ |
Make an internal call |
|
(page 41). |
§Menu§ |
Open the main menu or a con- |
|
text-dependent menu. |
§OK§ |
Confirm highlighted selection. |
˜Delete key: deletes one character at a time from right to left.
Returning to idle status
You wish to return to idle status from anywhere in the menu:
¤Press the end call key aand hold. Or:
¤Do not press any key: after 2 minutes the display will automatically revert to idle status.
Changes that you have not confirmed/ saved by pressing §OK§ will be rejected.
For an example of the display in idle status, page 1.
Menu guidance
Your telephone's functions are accessed using a menu that has a number of levels.
Main menu (first menu level)
¤To open the main menu, press §Menu§ with the handset in idle status.
Accessing a function
¤Scroll to the function with the control key qand press §OK§.
Or:
¤Enter the number that is in front of the function in the menu tree (page 14).
The corresponding submenu (the next menu level) is opened.
22

Operating the handset
Submenus
The functions in the submenus are displayed as lists.
To access a function:
¤Scroll to the function with the control key qand press §OK§.
Or:
¤Enter the number combination that is in front of the function in the menu tree (page 14).
A short press on the end call key areturns you to the previous menu level / cancels the operation.
Correcting incorrect entries
uNavigate to the incorrect input with the control key if ûis displayed.
uPress ˜to delete the character to the left of the cursor.
uInsert new character to the left of the cursor.
uWhen entering the time and date etc., edit the flashing character.
You will find explanations for the symbols and typographical conventions used in this user guide in the appendix, page 68.
23

VoIP telephony via the Gigaset.net
VoIP telephony via the Gigaset.net
You can use the Gigaset.net to make free phone calls via the Internet directly to other Gigaset.net users, without having to set up an account with a VoIP provider or make any further settings! You simply have to connect your phone to the power supply and the Internet connection and, if necessary, enter yourself in the Gigaset.net online directory under a name of your choice (S. 11/S. 26).
The Gigaset Net is a VoIP service provided by Siemens Home and Office Communication Devices GmbH und Co KG, which is available to all users with a Gigaset VoIP device.
You can call other subscribers to Gigaset.net free of charge, i.e. there are no telephone charges other than the costs for your Internet connection. Connections to/ from other networks are not possible.
Every Gigaset VoIP device is assigned a Gigaset.net phone number by default (S. 73).
All registered subscribers are included in the Gigaset.net directory, which you are able to access.
Exclusion of liability
Gigaset.net is a voluntary service provided by Siemens Home and Office Communication GmbH & Co KG with no liability or guarantee for the availability of the network. This service can be terminated at any time with a notice period of three months.
Please note:
If you do not use your Gigaset.net connection for six weeks, it is automatically deactivated. You cannot be reached for calls from the Gigaset.net.
The connection is reactivated:
–as soon as you start a search in the Gigaset.net directory or
–make a call via the Gigaset.net (dial a number with #9 at the end) or
–activate the connection via the Web configurator (S. 63)
Search subscribers in
Gigaset.net directory
Your handset is in idle status. The VoIP connection is free.
¤Open the directory with the sbutton.
¤Select the <Gigaset.net> entry and press the talk key c.
Please note:
–Calls to the Gigaset.net directory are always free of charge.
–If the <Gigaset.net> entry has been accidentally deleted from your handset directory,
dial 1188#9 (the Gigaset.net directory phone number) and press the talk key c. Or create a new directory entry with this number.
Once the connection has been established, you will be asked to enter a name that you want to search for.
Nickname: Enter the name or part of a name (max. 25 characters).
§Menu§ Press the display key.
Start search
Select and press §OK§.
If the search has been successful, a hit list will be displayed of all the names that begin with the specified character string.
24

Example:
|
2/50 |
|
|
|
1 |
|
|
|
|
|
|||
Sand, Anna Magd |
|
|
2 |
|||
|
|
|||||
alena |
U |
§Menu |
|
|
|
|
§View§ |
|
|
|
|||
1.2/50: Entry number/number of hits
2.Name of the entry, the name is displayed in full, if necessary over several lines
You can scroll through the hit list with q.
If it has not been possible to find a matching entry, a corresponding message is displayed. You have the following options:
¤Press the display key §New§ to start a new search.
Or
¤Press the display key §Change§ to change the search criteria. The previously entered name is copied and can be edited.
If there are too many matching entries in the Gigaset.net directory, the message
Too many entries found! is displayed instead of a hit list.
¤Press the display key §Refine§ to start a refined search. The previously entered name is copied and can be edited/ expanded.
Calling subscribers
qSelect the subscriber from the hit list.
c |
Press the talk key. |
Viewing the subscriber's number
qSelect the subscriber from the hit list.
§View§ Press the display key.
The Gigaset.net number and name will be shown in full, if necessary using more than one line.
VoIP telephony via the Gigaset.net
Please note:
–Connections to Gigaset.net are always established via VoIP. Irrespective of which
default connection is set on your phone. Pressing and holding cor pressing it briefly and a "*" at the end of the number have no effect.
–You can open the Gigaset.net directory and establish connections, even if you have not entered yourself in the Gigaset.net directory.
Using other functions
Precondition: The hit list is displayed. q(Select entry) ¢§Menu§
The following functions can be selected with q:
Copy to Directory
Accept the number in the handset directory. The number and name (where appropriate abbreviated,
max. 16 characters) are accepted in the directory.
¤Edit and save entry where appropriate (S. 29).
The hit list is displayed again.
New search
Start a search with a new name (S. 24).
Refine search
You can use the refined search to limit the number of hits for a previous search. The name from the previous search is copied and can be edited/ expanded.
Own information
See "Entering, editing and deleting own entry"
Please note:
If you select a Gigaset.net number from the handset directory, the connection is automatically established via VoIP.
25

VoIP telephony via the Gigaset.net
Entering, editing and deleting own entry
You have the following options:
uEdit the name of your entry in the Gigaset.net directory
u Delete your entry from the directory
uIf you did not enter a name when using the phone for the first time (S. 11), specify a name and enter yourself in the directory.
Viewing own entry
You are connected to the Gigaset.net directory:
¤ Select §Menu§ ¢ Own information and press §OK§.
Your Gigaset.net number and, where applicable, your currently entered name are displayed.
Entering/editing a name
§Edit§ |
Press the display key. |
~Edit name or enter new name (max. 25 characters) and press
§OK§.
You can delete the name with
˜.
If there is not yet an entry with this name in the Gigaset.net directory, the name is saved. A message to this effect is displayed. The handset switches to idle status.
If there is already an entry with this name or the entered name contains impermissible characters, you will be requested to enter a different name.
Please note:
If you delete the name, your entry will be deleted from the directory. You are no longer "visible" to other Gigaset.net subscribers. But you can still be reached via your Gigaset.net number. For information on how to display the number, s. S. 73.
Calling a Gigaset.net subscriber
You can call a Gigaset.net subscriber directly via the Gigaset.net directory (see above) or via his/her Gigaset.net number:
~/s |
Enter the Gigaset.net number |
|
(including the #9) or select |
|
from the handset directory. |
c |
Press the talk key. |
Every number ending with #9 is dialled via Gigaset.net.
26

Network services – VoIP
You can use the following network services to make calls via the VoIP connection.
Settings for all calls
Call forwarding takes place locally in your base station.
Please note that call forwarding may incur additional costs. Ask your VoIP provider.
Setting up call forwarding
§Menu§ ¢Select Services ¢VoIP ¢For All Calls ¢Call Divert
All Calls / No Answer / When Busy
Select and press §OK§ (‰= on).
On |
Select and press §OK§. |
~If necessary, enter the number to which the call is to be forwarded. You can enter a fixed network, VoIP or mobile number.
§OK§ |
Press the display key. |
a |
Press and hold (idle status). |
Call forwarding is activated for the VoIP phone number (receiving number). This does not result in calls for your fixed network number being forwarded. For information on how to forward calls to your fixed network number, see page 27.
Deactivating call forwarding
§OK§ |
Press the display key. |
Off |
Select and press §OK§. |
a |
Press and hold (idle status). |
Call forwarding is deactivated.
Network services – VoIP
Network services – fixed network
The following network services can only be used for making calls via the fixed network.
Network services are functions that your network provider makes available to you. You have to request these services from your network provider.
¤If you require assistance, please contact your network provider.
Making settings for all calls
If you have completed one of the following procedures, a code is sent.
¤After confirmation from the telephone network, press the end call key a.
Setting up call diversion
§Menu§ ¢ Select Services ¢Fixed line ¢For All Calls ¢Call Divert
Setting up call forwarding
All Calls / No Answer / When Busy
|
Select and press §OK§. |
On |
Select and press §OK§. |
~Enter number and press §OK§.
After confirmation from the fixed network:
a Press and hold (idle status).
Deactivating call forwarding
All Calls / No Answer / When Busy Off Select and press §OK§.
After confirmation from the fixed network:
a |
Press and hold (idle status). |
Call forwarding is deactivated.
27

Network services – fixed network
Activating/deactivating call waiting
When call waiting is activated, the caller will hear the ringing tone if you are already making a call. This call is announced acoustically and visually on your handset screen.
Accepting/rejecting call waiting, see page 28.
§Menu§ ¢Select Services ¢Fixed line ¢For All Calls ¢Call Waiting
On / Off Select and press §OK§.
After confirmation from the fixed network:
a |
Press and hold (idle status). |
Functions during a call
Consultation
During a call:
§Menu§ ¢External Call
~Enter a number or copy it from the directory and press §OK§.
The number is dialled via the fixed network.
Please note:
After a few seconds, the number selected for a consultation call is saved in the last number redial list.
You have the following options:
uToggling:
¤Use qto toggle between the participants.
–End call with active participant:
§Menu§ End Active Call.
uConference call:
–Talk to both participants:
§Menu§ Conference Call.
–End conference call (toggle):
§Menu§ End Conference.
–End call with both participants: Press the end call key a.
Accepting a waiting call
Precondition: Call waiting is activated (page 28).
§Menu§ ¢Accept Call Waiting
You have the option of toggling or holding a conference call.
Please note:
–Without CLIP a waiting call is only announced with a beep.
–If the first call was an internal call, the internal connection is ended.
–An internal call waiting is shown on the display. You can neither accept the internal call nor reject it.
Rejecting a waiting call
§Menu§ ¢Reject Call Waiting
Select and press §OK§.
28

Using the directory and lists
The options are: u Directory
u Last number redial list u SMS list
u Calls list
You can save 100 entries in the directory.
You can create a personalised directory for your own individual handset. However, you can send the list or individual entries to other handsets (page 30).
Directory
In the directory you store numbers and matching names.
¤With the handset in idle status, open the directory by pressing the skey.
Length of an entry
Number: |
max. 32 digits |
Name: |
max. 16 characters |
Please note:
–You may also have to enter the phone number with the area code for local calls when making VoIP calls to the fixed network (depending on the VoIP provider). You should therefore always save phone numbers in the directory with the area code.
Alternatively, you can also use the Web configurator to define an area code, which is automatically prefixed to all numbers that are dialled without an area code for calls via VoIP (see Defining dialling plans, page 64).
–You can assign a number from the directory to a key for quick dial (page 30).
Using the directory and lists
Saving the first number in the directory
s¢Directory empty New Entry?
~Enter number and press §OK§.
~Enter the name and press §OK§.
Please note:
–To find out how to enter IP addresses, turn to page 18.
–If you enter an asterisk (*) at the end of the number, the number is dialled via the non-
default connection (page 46), even if you briefly press the talk key cor store this number on a key for quick dial.
Saving a number in the directory
s¢§Menu§ ¢New Entry
~Enter number and press §OK§.
~Enter the name and press §OK§.
Selecting a directory entry
s |
Open the directory. |
You have the following options:
uUse qto scroll to the entry until the required name is selected.
uEnter the first character of the name, or scroll to the entry with q.
Dialling with the directory
s¢q(select entry; page 29)
cBriefly press/press and hold the talk key. The number is dialled using the selected connection type (page 18).
Please note:
You can only dial IP addresses via VoIP.
29
 Loading...