


s
mobile
Issued by
Information and Communication mobile
Haidenauplatz 1
D-81667 Munich
Gigaset C340
© Siemens AG 2004
All rights reserved. Subject to availability.
Rights of modification reserved.
Siemens Aktiengesellschaft
www.siemens-mobile.com
Handset at a glance
|
|
|
|
|
|
|
|
|
|
|
|
1 |
||
|
|
|
|
|
|
|
|
|
V |
|
||||
|
|
|
|
|
|
|
|
|
|
2 |
||||
|
|
|
|
|
|
|
|
|
|
|||||
|
|
|
|
|
|
|
|
|
||||||
|
|
|
|
|
|
INT 1 |
|
|
|
|
||||
|
|
|
|
§§§§INT§§§ |
|
|
§§Menu |
|
|
|
|
|||
|
|
|
|
§§§§INT§§§ |
|
|
|
§§Menu |
|
|
3 |
|||
|
|
|
|
|
|
|
|
|
|
|
|
|||
|
|
|
|
|
|
|
|
|
|
|
|
|||
12 |
|
|
|
|
|
|
|
|
|
|
|
|
4 |
|
|
|
|
|
|
|
|
|
|
|
|||||
11 |
|
|
|
|
|
|
|
|
|
|
|
|
5 |
|
10 |
|
|
|
|
|
|
|
|
|
|
|
|||
|
|
|
|
|
|
|
|
|
|
|
||||
|
|
|
|
|
|
|
|
|
|
|||||
9 |
|
|
|
|
|
6 |
|
|
|
|
|
||
8 |
|
|
|
|
|
7 |
|
|
|
|
|
||
|
|
|
|
|
|
|
|
|
|
|
|
|
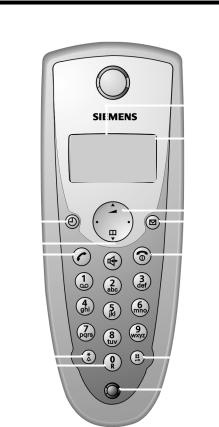
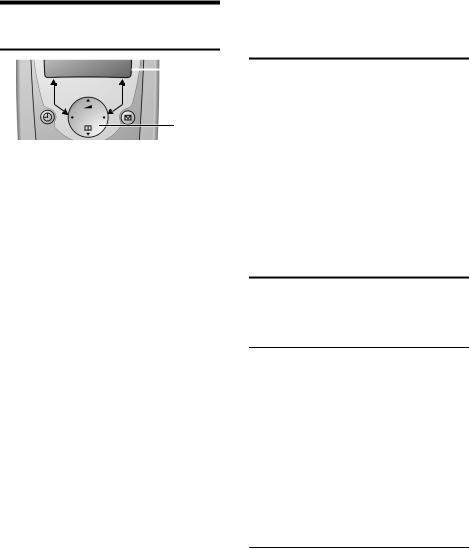
Handset at a glance
1Display in idle status
2Battery charge condition
=eVU(empty to full)
=flashes: battery nearly empty eVUflashes: battery charging
3Control key (page 8)
4Message key
Opens calls and messages lists. Flashes: New message or new call.
5End call key, On/Off key
End call, cancel function, go back one menu level (short press), back to idle status (long press), activate/deactivate handset (long press in idle status)
6Hash key
Keypad lock on/off (long press, page 7)
7Microphone
8Recall key
Enter recall (long press)
9Star key
Ringers on/off (long press in idle status), Enter dial pause (long press when dialling), Switch between upper/lower case letters and digits for text entry (page 37)
10 Talk key
Answer a call, open last number redial list (short press), start dialling (long press)
11 Handsfree Key
Switch between earpiece and handsfree mode;
Lights up: handsfree activated; Flashes: incoming call
12 Timer key (page 30) Start and end timer
1
Contents
Contents
Handset at a glance . . . . . . . . . . . 1 Safety precautions . . . . . . . . . . . . 4
Gigaset C340– More than just a telephone . . . . . . . . . . . . . . . . . . . . . 5
Preparing to use the phone . . . . . 5
Installing the base . . . . . . . . . . . . . . . . 5 Range . . . . . . . . . . . . . . . . . . . . . . . . . . 5 Connecting the base station . . . . . . . . 5 Setting up the handset for use . . . . . . . 6 Activating/deactivating the handset . . 7 Activating/deactivating
the keypad lock . . . . . . . . . . . . . . . . . . 7 Setting the date and time . . . . . . . . . . 7
Handset operation . . . . . . . . . . . . 8
Control key on the handset . . . . . . . . . 8 Return to idle status . . . . . . . . . . . . . . . 8 Menu management . . . . . . . . . . . . . . . 8 Correcting wrong inputs . . . . . . . . . . . 9
Operating information . . . . . . . . . 9
Symbols . . . . . . . . . . . . . . . . . . . . . . . . 9 Step-by-step instructions . . . . . . . . . . . 9
Making calls . . . . . . . . . . . . . . . . 10
Making an external call . . . . . . . . . . . 10 Ending a call . . . . . . . . . . . . . . . . . . . . 10 Answering a call . . . . . . . . . . . . . . . . . 10 Caller ID . . . . . . . . . . . . . . . . . . . . . . . 10 Handsfree talking . . . . . . . . . . . . . . . . 11 Muting . . . . . . . . . . . . . . . . . . . . . . . . 11
Using the directory and lists . . . 12
Directory . . . . . . . . . . . . . . . . . . . . . . . 12 Last number redial list . . . . . . . . . . . . 14 Opening lists with
the message key . . . . . . . . . . . . . . . . . 14
Making cost-effective calls . . . . 16
Automatic network provider
preselection . . . . . . . . . . . . . . . . . . . . 16
SMS (Text Messages) . . . . . . . . . 17
Writing/sending text messages . . . . . 17 Receiving text messages . . . . . . . . . . 19 Using data in message
attachments . . . . . . . . . . . . . . . . . . . . 20
Setting up an SMS centre . . . . . . . . . . 21 SMS and PABX's . . . . . . . . . . . . . . . . . . 21 Activating/deactivating the
SMS function . . . . . . . . . . . . . . . . . . . . 21 SMS Troubleshooting . . . . . . . . . . . . . 21
Using the network mailbox . . . . 23
Specifying the network mailbox
for fast access . . . . . . . . . . . . . . . . . . . 23 Viewing a message from
the network mailbox . . . . . . . . . . . . . . 23
Using several handsets . . . . . . . 24
Registering handsets . . . . . . . . . . . . . . 24 De-registering handsets . . . . . . . . . . . 24 Looking for a handset ("paging") . . . . 25 Making internal calls . . . . . . . . . . . . . . 25 Barging-in to an external call . . . . . . . 26 Changing the name of a handset . . . . 26 Changing a handset's
internal number . . . . . . . . . . . . . . . . . 26 Using a handset as a room monitor . . 26
Handset settings . . . . . . . . . . . . . 28
Changing the display language . . . . . 28 Setting/changing the screen picture . 28 Activating/deactivating Auto talk . . . . 28 Adjusting the loudspeaker volume . . . 28 Changing ringer tones . . . . . . . . . . . . 28 Activating/deactivating the
suppression of the first ring tone . . . . 29 Activating/deactivating
advisory tones . . . . . . . . . . . . . . . . . . . 29 Using the timer . . . . . . . . . . . . . . . . . . 30 Restoring the handset
default settings . . . . . . . . . . . . . . . . . . 30
Base station settings . . . . . . . . . 30
Access control . . . . . . . . . . . . . . . . . . . 30 Repeater support . . . . . . . . . . . . . . . . 31 Restoring the base default settings . . 31
Connecting the base unit
to a PABX . . . . . . . . . . . . . . . . . . . 32
Dialling mode and recall (flash) . . . . . 32 Setting pauses . . . . . . . . . . . . . . . . . . . 32 Switching temporarily to
tone dialling (DTMF) . . . . . . . . . . . . . . 32
2
Contents
Appendix . . . . . . . . . . . . . . . . . . . 33
Care . . . . . . . . . . . . . . . . . . . . . . . . . . 33
Contact with liquid . . . . . . . . . . . . . . 33
Questions and answers . . . . . . . . . . . 33
Service (Customer Care) . . . . . . . . . . 35
Specifications . . . . . . . . . . . . . . . . . . . 36
Default settings . . . . . . . . . . . . . . . . . 37
Writing and editing text . . . . . . . . . . . 37
Menu tree . . . . . . . . . . . . . . . . . . 39
Accessories . . . . . . . . . . . . . . . . . 41
Index . . . . . . . . . . . . . . . . . . . . . . 43
3
Safety precautions
Safety precautions
Caution:
Read the safety precautions and the operating instructions before use.
Explain their contents to your children, and the potential hazards associated with using the telephone.
$ Only use the main adapter supplied, as indicated on the underside of the base.
Fit only the recommended rechargeable batteries (page 36) of the same type! Do not use any other battery type or non-rechargeable batteries as this could result in significant health risks and personal injury.
‹Insert rechargeable batteries as indicated by their polarity symbols, and use them according to these instructions (polarity symbols can be seen in the hand-
Œset's battery compartments).
The operation of medical appliances may be affected. Be aware of the technical conditions in your particular environment, e.g. operation rooms.
The handset may cause an unpleasant humming noise in hearing aids.
Do not install the base station in bathrooms or showers. The handset and base are not waterproof (page 33).
Switch off your phone when onboard aircraft. Ensure that it cannot be switched on again accidentally.
Do not use your phone in environments with a potential explosion hazard,
e.g. auto paint shops.
ƒIf you give your Gigaset to someone else, make sure you also give them the operating manual.
Dispose of the batteries and phone in accordance with environmental regulations.
Note:
Not all of the functions described in this manual are available in all countries.
4
Gigaset C340– More than just a telephone
Your phone not only lets you send and receive text messages over the fixed network and store up to 100 telephone numbers (page 12) – it can do much, much more:
uYou can programme the keys of your phone with important numbers so you can dial at the touch of a button (page 13).
uYou can designate important people as VIPs so you can tell important calls from the ring tone (page 12).
uYou can store birthdays (page 13) in your phone and it will remind you of them in advance.
Have fun using your new phone!
Gigaset C340– More than just a telephone
Please note:
uNever expose the phone to the following: heat sources, direct sunlight, other electrical appliances.
uProtect your Gigaset from moisture, dust, corrosive liquids and vapours.
Range
Range:
u Outdoors: up to 300 m u Indoors: up to 50 m
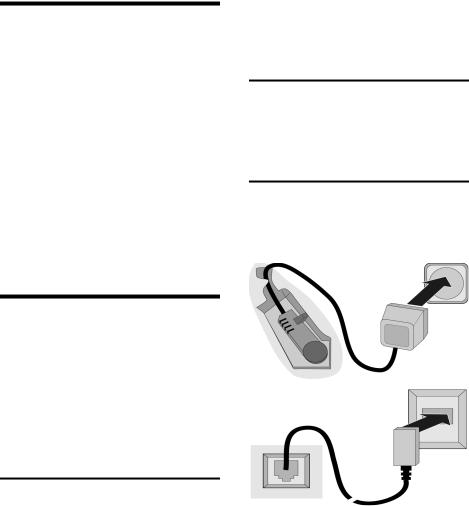
Connecting the base station
¤Please connect the mains unit first and then connect the phone jack as shown below, placing the cords in the cord recesses.
Preparing to use the phone
The pack contains:
u one Gigaset C340 base station, u one Gigaset C34 handset,
u one power supply unit, u one telephone cord,
u two batteries
u one battery cover
u one set of operating instructions.
Installing the base
The base is designed to be operated in enclosed, dry areas at temperatures ranging from +5 °C to +45 °C.
¤Set up the base at a central position within the home.
2
1
3
1
1Underside of the base unit (partial view)
2230 V mains unit
3Phone jack with phone cord
Please note:
uThe mains unit must be left plugged in at all times because the phone will not operate without a mains power supply.
5
Preparing to use the phone
uIf you buy a replacement phone cord in the shops make sure that the phone jack has the correct type of wiring.
Correct phone jack wiring |
|
|||||||
3 |
|
|
|
4 |
1 unused |
|||
2 |
|
|
|
|
|
|
5 |
2 unused |
1 |
|
|
|
|
|
|
6 |
3 a |
|
|
|
|
|
|
|||
|
|
|
|
|
|
4 b |
||
|
|
|
|
|
|
|
|
|
|
|
|
|
|
|
|
|
5 unused |
|
|
|
|
|
|
|
|
|
|
|
|
|
|
|
|
|
6 unused |
|
|
|
|
|
|
|
|
|
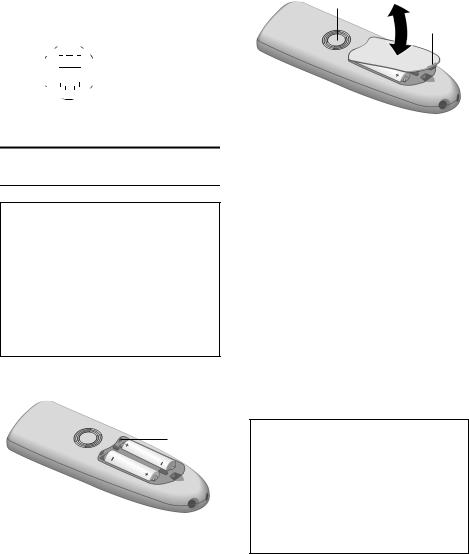
Setting up the handset for use
Inserting the batteries
Caution:
Use only the rechargeable batteries recommended by Siemens on page 36! Under no circumstances should you use a conventional (non rechargeable) battery or other battery types as this could cause significant damage to health and property, e.g. the outer casing of the batteries could be destroyed or the batteries could explode. The phone could also malfunction or be damaged as a result of using batteries that are not of the recommended type.
¤Fit the batteries with the correct polarity.
1
¤Position the battery cover against the edge 1 and push down until it clicks home.
Opening the battery cover
¤Push the catch 2 towards the loudspeaker 1 and lift the cover up.
1
2
Placing the handset in the base and registering it
¤Place the handset in the charging cra- dle of the base unit with its display facing forward.
The handset registers automatically. Registration takes around 1 minute. While this is happening, Registering appears in the display and the name of the base, Base 1, flashes. The handset is given the lowest available internal number (1–6). When the handset has registered, this number appears in the display, e.g. INT 1. This means that the handset has been allocated the first internal number. If all internal numbers 1–6 have been assigned (six handsets are registered on a base), the number 6 is overwritten if that handset is in idle status.
Notes:
–Automatic registration is not possible when the base on which you wish to register the handset is being used to make a call.
–A key press cancels automatic registration.
–If automatic registration does not work the handset will have to be registered manually (page 24).
–The name of the handset can be changed (page 26).
6

¤Leave the handset in the charging cradle in the base to charge up the batteries.
Notes:
–The handset may only be placed in the base provided for it.
–When the handset is in the base, it charges even if it is switched off. You will see the charge status in the display.
–If the handset has switched itself off because the batteries are flat and if it is then placed in the base, it will switch itself on automatically.
If you have any questions or problems see page 33.
First battery charge and discharge
Battery charging is indicated in the top right of the display by a flashing battery icon e, Vor U. During handset operation, the battery icon indicates the charge status of the batteries (page 1).
The correct charge status can only be displayed when the batteries are first fully charged and discharged through use.
¤To do this, leave the handset in the base without interruption until the battery icon stops flashing in the display (approx. 6h). Your handset need not be switched on for it to charge.
¤Once the batteries are fully charged, remove the handset from the base and do not put it back again until the batteries are fully discharged.
Note:
After the first battery charge and discharge you may replace your handset in its base after every call.
Please note:
uAlways repeat the charging and discharging procedure if you remove the batteries from the handset and insert them in again.
uThe batteries may warm up as they are charging. This is not dangerous.
Preparing to use the phone
uAfter a while the charge capacity of the batteries will decrease for technical reasons.
Your telephone is now ready for use
¤Set the date and time (page 7) to ensure that incoming calls are logged with the correct time.
Activating/deactivating the handset
aPress the end call key and hold. You hear the confirmation beep.
Activating/deactivating the keypad lock
#Press the hash key long.
You hear the confirmation beep. The icon Øappears in the display when the keypad lock is activated.
The keypad lock deactivates automatically when you receive a call and activates again after the call.
Note:
The handset displays an advisory message if you press a key by accident while the keypad lock is on. To deactivate the keypad lock, press the hash key #long.
Setting the date and time
§Menu§ ¢Settings ¢Date/Time
~Enter the day, month and year
with 6 digits and press §OK§. Use qto move between the fields.
~Enter hours and minutes with 4 digits (e.g. QM15for 07:15) and press §OK§. Use q to move between the fields.
7
Handset operation
Handset operation
Control key on the handset
§§§§INT§§§ |
§§Menu |
|
1 |
|
2
1Display functions
2Control key
In these instructions, the side of the control key that you must press in the given operating situation is shown in black (top, bottom, right, left). Example: tfor "press the top of the control key".
The control key has a number of different functions:
When the handset is in the idle state
sOpen the directory.
tAdjust the ringer melody volume of the handset (page 29).
In lists
t/ s Scroll up/down line by line.
In menus
t/ s Scroll up/down line by line.
In an input field
t/ s Move the cursor left or right.
During an external call
sOpen the directory.
tAdjust loudspeaker volume for earpiece and handsfree mode.
Using display functions
The current display functions are shown reverse highlighted in the bottom display line.
u/ v Launch left / right display function.
You can use the display icon —to delete text in input fields one character at a time, moving from right to left.
Return to idle status
You wish to return to idle status from anywhere in the menu:
¤Press the end call key along. Or:
¤Press no key: After 2 minutes the display will return automatically to its idle status.
Changes which you have not confirmed/ stored by pressing §OK§ will be rejected.
For an example of the display in idle status, see page 1.
Menu management
Your telephone's functions are accessed from a menu with a number of levels.
Main menu (first menu level)
¤To open the main menu, press §Menu§ with the handset in idle status.
Accessing a function
¤Scroll to the required function with the control key and press §OK§.
Or:
¤Enter the number that is in front of the function in the menu tree (page 39).
The corresponding submenu (the next menu level) is opened.
Submenus
The functions in the submenus are displayed as lists.
Accessing a function:
¤Scroll to the function with the control key qand press §OK§.
8

Or:
¤Enter the number combination that is in front of the function in the menu tree (page 39).
A short press on the end call key a returns you to the previous menu level / cancels the operation.
Correcting wrong inputs
uNavigate to the wrong input with the control key if Tis displayed.
uPress —to delete the character to the left of the cursor.
uInsert characters to the left of the cursor
uWhen entering the time and date etc., overwrite the (flashing) character.
Operating information
This section explains the meaning of certain symbols and typographical conventions that are used in these operating instructions.
Symbols
~Enter digits or letters.
§Menu§ |
The display functions currently |
|
in the bottom display line are |
|
shown reverse highlighted. |
|
Press the corresponding side |
|
of the control key to launch |
|
the function. |
qPress the top or bottom of the control key, e.g. when scrolling.
c/ Q/ Petc.
Press the matching key on the handset.
External Calls / Internal Calls (example) Select one of the menu functions (External Calls or Internal Calls) from the list.
Operating information
Step-by-step instructions
In these operating instructions, sequences of symbols are used to show you which steps you must carry out. This system is explained below using the example of "setting the ringer melody". The things you have to do are explained in the boxes.
§Menu§ ¢
¤With the handset in idle status, press on the right of the control key to open the main menu.
¤With the control key, select qAudio Settings and press on the right of the control key to confirm your selection with §OK§.
¤With the control key, select qRinger Melody and press on the right of the control key to confirm your selection with §OK§.
Select External Calls / Internal
Calls and press §OK§.
¤Press the bottom of the control key repeatedly until External Calls or Internal Calls is selected.
¤Press OK§ (control key right) to confirm your selection.
qSelect melody (‰= on) and press §OK§.
¤Press the top or bottom of the control key to select a melody.
¤Press OK§ (control key right) to confirm your selection.
The selected melody is indicated by a ‰.
a |
Long press (idle status). |
¤Press the end call key and hold until the handset returns to idle status.
9
Making calls
Making calls
Making an external call
External calls are calls using the public telephone network.
~c Enter the number and press the talk key.
Or:
c~ Press the talk key clong and then enter the number.
You can cancel the dialling operation with the end call key a.
Notes:
–Dialling with the directory (page 12) or last number redial list (page 14) saves repeated keying of phone numbers.
–You can assign a number from the directory to a key for speed dialling (page 13).
Ending a call
a |
Press the end call key. |
Answering a call
The handset indicates an incoming call in three ways: it rings, there is a display on the screen and the handsfree key d flashes.
To accept an incoming call:
¤Press the talk key c.
¤Press the handsfree key d.
If the handset is in the base and the Auto Answer function is activated (page 28), the handset will take a call automatically when you lift it out of the base.
Caller ID
When you get a call, the caller's number is shown in the display provided the following conditions are met:
uYour network provider supports CLIP, CLI.
–CLI (Calling Line Identity): The caller's number is transmitted
–CLIP (Calling Line Identity Presentation): The caller's number is displayed
uYou have requested CLIP from your network provider.
uThe caller has requested CLI from his network provider.
Call display with CLIP/CLI
If the caller's number is stored in your directory, you see his name.
®1
1234567890 |
|
2 |
|
§Menu
1Ringer icon
2Caller's number or name
Instead of the number, you see:
uExternal Call, if no number is transmitted.
u Withheld, if the caller withholds his ID.
uUnavailable, if the caller has not requested caller ID.
10

Handsfree talking
With handsfree talking, instead of holding the handset to your ear you can put it down, e.g. on the table in front of you, to allow others to listen and speak to the caller.
Activating/deactivating handsfree
Activating while dialling
~d Enter the number and press the handsfree key.
¤ You should inform your caller before you use the handsfree function so that they know someone else is listening.
Switching between earpiece and handsfree mode
d |
Press the handsfree key. |
Switch handsfree on and off during a call .
If you wish to place the handset in the base during a call:
¤Press the handsfree key dand hold it
while placing the handset in the base. If handsfree key ddoes not light up, press the key again.
To find out how to adjust the volume, see page 28.
Making calls
Muting
You can deactivate the microphone in your handset during an external call.
Muting the handset
§INT§ Press the control key.
Cancelling muting
a Briefly press the end call key.
11

Using the directory and lists
Using the directory and lists
The options are: u Directory,
u Last number redial list u SMS list,
u Calls list.
You can store up to 100 entries in the directory (the actual number depends on the size of the individual entries).
You create a personalised directory for your own individual handset. However you can send the list or individual entries to other handsets (page 13).
Directory
In the directory you store numbers and matching names.
¤With the handset in idle status, open the directory by pressing s.
Length of an entry
Number: |
max. 32 digits |
Name: |
max. 16 characters |
Note:
You can assign a number from the directory to a key for speed dialling (page 13).
Storing a number in the directory
s¢§Menu§ ¢New Entry
~Enter the number and press §OK§.
~Enter the name and press §OK§.
Selecting a directory entry
s |
Open the directory. |
You have the following options:
uUse qto scroll to the entry until the required name is selected.
uEnter the first character of the name, or scroll to the entry with q.
Dialling with the directory
s¢q(select entry; page 12)
cPress the talk key. The number is dialled.
Managing directory entries
You have selected an entry (page 12).
Editing an entry
§Menu§ ¢Edit Entry
~Edit the number if required, and press §OK§.
~Edit the name if required, and press §OK§.
Using other functions
s¢s(select entry; page 12) ¢§Menu
The following functions can be selected with q:
Use Number
Edit or add a stored number. Then dial or use other functions with §Menu§.
Birthday
Add, view, edit or delete a birthday for an existing entry.
Delete Entry
Delete a selected entry.
VIP Entry
Mark a directory entry as VIP (Very Important Person) and assign it a particular ringer melody. You will now be able to tell VIP calls from the ringer melody.
This feature requires caller display (CLI) (page 10).
Send Entry
Send a single entry to another handset (page 13).
Delete List
Delete all directory entries.
Send List
Send the complete list to another handset (page 13).
12

Shortcut
Assign the current entry to a selected key for speed dialling.
Using speed dial keys
¤Press the required speed dial key and hold.
Sending the directory to another handset
Requirements:
uThe sending and receiving handsets must both be registered to the same base unit.
uThe other handset and the base unit can send and receive directory entries.
¢q(select entry; page 12)
¢§Menu§ ¢Send Entry / Send Lists
~Enter the internal number of the receiver handset and press §OK§.
A successful transfer is confirmed by a message and the confirmation tone at the receiver handset.
Please note:
uEntries with identical numbers are not overwritten in the receiver handset.
uThe transfer is cancelled if the phone rings or if the memory of the receiving handset is full.
Copying a displayed number to the directory
You can copy numbers to the directory; they will be displayed in a list, e.g. the calls list or last number redial list, in an SMS or during a call.
Using the directory and lists
A number is displayed:
§Menu§ ¢Copy to Directory
¤ Complete the entry (page 12).
Copying a number from the directory
In many operating situations you can open the directory to copy a number, for example. Your handset need not be in idle status.
¤Depending on the operating situation, open the directory with sor
§Menu§ Directory.
q |
Select an entry (page 12). |
Storing a birthday in the directory
You can store a birthday for every number in the directory, and specify a time when you will receive a reminder call on the birthday.
s¢q(select an entry; page 12)
¢§Menu§ ¢Birthday
~Enter the date and press §OK§.
~Enter the time and press §OK§.
qSelect Visual or the melody that will be used for the reminder on the birthday, and press §OK§.
The entry will now have the icon ¶next to it in the directory.
Editing or deleting a birthday
s¢q(select an entry; page 12)
¢§Menu§ ¢Birthday
If you have stored a birthday for the entry, you can call the following functions with
§Menu§:
Edit Birthday
¤ Edit settings (page 13).
Delete Birthday
13

Using the directory and lists
Reminder call on a birthday
A birthday reminder call is signalled on the handset with the selected ring tone.
§OK§ |
Press the control key to end |
|
the reminder call or acknowl- |
|
edge a missed birthday. |
The corresponding directory entry is displayed.
Last number redial list
The last number redial list shows the last ten numbers dialled on the handset (max. 32 digits). If one of the numbers is in the directory, then the corresponding name will be displayed.
Manual last number redial
c |
Press the key briefly. |
q |
Select an entry. |
cPress the talk key again. The number is dialled.
Managing entries in the last number redial list
c |
Press the key briefly. |
q |
Select an entry. |
§Menu§ |
Press the control key. |
The following functions can be selected with q:
Use Number (as in the directory page 12)
Copy to Directory
Copy an entry to the directory (page 13).
Delete Entry (as in the directory page 12) Delete List (as in the directory page 12)
Opening lists with the message key
You can use the message key fto open the following lists:
u SMS list
u Network mailbox
If your network provider supports this function and the network mailbox is specified for fast access (page 23).
u Caller list
An advisory tone sounds as soon as a new message arrives on a list. The message key fflashes. In idle status, an icon appears in the display for the new message:
Icon |
New message... |
±... in network mailbox
Á... in calls list
À... in SMS list
The number of new entries is shown beneath the corresponding icon.
When you press the flashing key f, you will see all the lists that contain new messages. If only one list contains new messages, it opens immediately.
Key fgoes out when a list opens and the menu is closed. If there are other new entries, you can set the message key flashing again (page 15), e.g. to tell other users about the new entries.
Note:
If calls are stored in the network mailbox you will receive a message if the appropriate settings have been made (see the network mailbox instructions of your network provider).
14
 Loading...