


Published by
Information and Communication Mobile Group Hofmannstr. 51
D-81359 München
© Siemens AG 2001
All rights reserved. Subject to availability. Right of modification reserved.
Printed in Germany (01/01).
Siemens Aktiengesellschaft
http://www.siemens.com/gigaset
Order. no.: A31008-G3070-B100-3-7619
|
s |
*LJDVHW |
|
|
|
3070/75 |
|
|
|
L V G Q |
|
|
|
|
|
|
|
|
|
|
|
|
|
|
|
|
|
|
|
|
|
User Guide
and Safety Precautions |
! |
|

Gigaset 3070isdn, GB, A31008-G3070-B100-3-7619 |
Sicherheitshinweise 09.01.01 |
Safety precautions
Step
by
Step
 Safety precautions
●Install only in covered areas with a temperature range of +5°C to +45°C.
●Do not install in bathrooms or shower rooms.
●Sensitive electronic equipment may be affected.
●When disposing of the base station, the relevant environmental protection guidelines must be observed.
●This Gigaset device should only be passed on to third parties complete with the operating instructions.
●Only the plug-in power supply unit provided should be used (see underside of base station).
●Do not use the base station or handsets in environments where there is a risk of explosion (e.g. paint shops).
Installation notes
●A 220/230V~ mains socket and an ISDN telephone socket must be available at the installation site.
●Install in a central location, e.g. in a hallway.
●The installation site should not be located in the immediate vicinity of other devices such as stereo systems, televisions, office equipment or microwaves, as this could result in interference.
●The base station is suitable for wall installation. The holes are 91.2 mm apart and approx. 45 mm from the top. The device is attached using two 5 mm screws which are not screwed in fully. The base station is then hung onto these screws.
●The outdoor range between the base station and the handset is max. 300 m. An indoor range of max. 50 m is supported.
●If wall mounting is not required, simply stand the base station on a level, non-slip surface. The device feet do not normally leave marks on the installation surface. However, due to the variety of varnishes and polishes in use, marks could be left at the points of contact.
Contents of packaging
●1 base station
●1 mains connection cable with a plug-in power supply unit
●1 ISDN connection cable
●1 USB cable
●1 set of operating instructions
●1 CD-ROM "talk & surf"
●1 set of "talk & surf" installation instructions Gigaset 3075isdn Comfort also includes:
●1 Gigaset 3000 Comfort telephone
●1 Gigaset 3000 L telephone charger
II
Gigaset 3070isdn, GB, A31008-G3070-B100-3-7619 |
Übersicht_U3.fm |
09.01.01 |
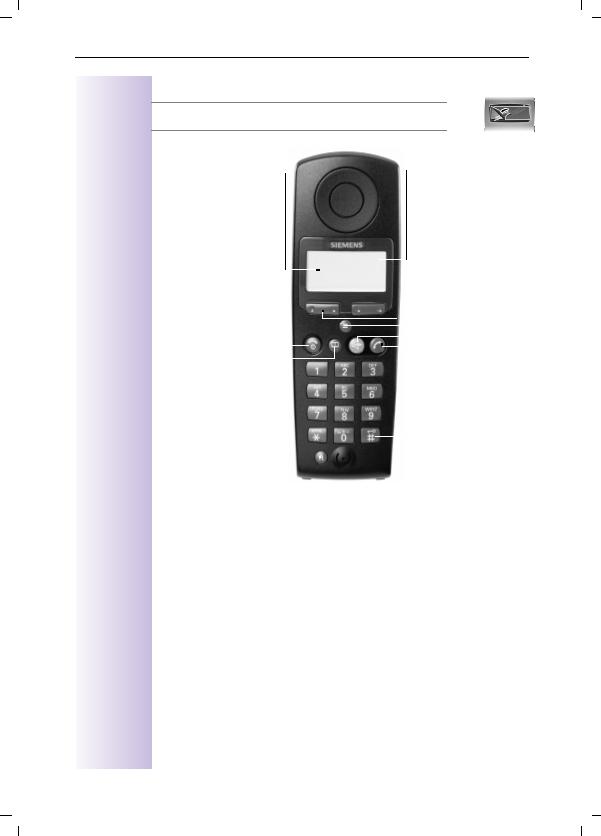
Brief overview - Gigaset 3000 Comfort handset
£The display is protected by a plastic film.
This protective film should be removed before use.
Base name |
|
Battery level |
|
|
7full |
– Constant: ready to |
||
dial/receive call |
|
empty |
–Flashing: no contact with base station
|
|
|
|
|
|
|
|
|
|
|
|
|
|
|
|
|
Softkeys |
|
|||||
|
End call key |
|
” |
8 |
|
|
|
|
See below |
||||||||||||||
|
|
|
|
|
|
|
|
|
|
|
|
|
|
|
|
||||||||
|
– |
End call |
|
|
|
|
|
|
|
|
|
|
|
|
|||||||||
|
|
|
|
|
|
2QcU ! |
|
|
|
|
|
|
|
|
|||||||||
|
– |
Abort function |
|
|
|
|
|
|
|
|
|
|
|
|
|||||||||
|
|
|
M , + [ |
|
|
|
|
|
|
|
|
||||||||||||
|
– |
Handset on/off: |
|
|
|
|
|
|
|
|
|
||||||||||||
|
|
|
|
|
|
|
|
|
|
|
|
|
|
|
Activate menu |
||||||||
|
|
Long press |
|
|
|
|
|
|
|
|
|
|
|
|
|
|
|||||||
|
|
|
|
|
|
|
|
|
|
|
|
|
|
|
|
|
|
|
|
|
|
|
|
|
Directory |
|
|
|
|
|
|
|
|
|
|
|
|
|
|
Speakerphone |
|||||||
|
|
|
|
|
|
|
|
|
|
|
|
|
|
|
|||||||||
|
|
|
|
|
|
|
|
|
|
|
|
|
|
|
|||||||||
|
|
|
|
|
|
|
|
|
|
|
|
|
|
|
|||||||||
|
|
|
|
|
|
|
|
|
|
|
|
|
|
|
|
|
|
|
|
|
|
||
|
|
|
|
|
|
|
|
|
|
|
|
|
|
|
Talk key |
||||||||
|
|
|
|
|
|
|
|
|
|
|
|
|
|
||||||||||
|
|
|
|
|
|
|
|
|
|
|
|
|
|
|
|||||||||
|
|
|
|
|
|
|
|
|
|
|
|
|
|
|
|
|
|||||||
|
Call up |
|
|
|
|
|
|
|
|
|
|
|
|
|
|||||||||
|
|
|
|
|
|
|
|
|
|
|
|
|
|
|
|
|
|
|
|
|
|||
|
|
|
|
|
|
|
|
|
|
|
|
|
|
|
|
|
– |
Accept call |
|||||
|
Recall key |
|
|
|
|
|
|
|
|
|
|
|
|
|
– |
Dial call number |
|||||||
|
|
|
|
|
|
|
|
|
|
|
|
|
|
|
|
|
|
|
|
|
|||
|
|
|
|
|
|
|
|
|
|
|
|
|
|
|
|
|
|
|
|
|
|
|
|
|
– |
For PABXs and Select |
|
|
|
|
|
|
|
|
|
|
|
|
|
|
|
|
|
|
|
|
|
|
|
Services |
|
|
|
|
|
|
|
|
|
|
|
|
|
|
Keypad protection |
||||||
|
– |
Insert pause: |
|
|
|
|
|
|
|
|
|
|
|
|
|
|
|
|
|
|
|
|
|
|
|
|
|
|
|
|
|
|
|
|
|
|
On/off: |
||||||||||
|
|
Long press |
|
|
|
|
|
|
|
|
|
|
|
|
|
|
|||||||
|
|
|
|
|
|
|
|
|
|
|
|
|
|
|
|
|
Long press |
||||||
|
|
|
|
|
|
|
|
|
|
|
|
|
|
|
|
|
|||||||
3

Gigaset 3070isdn, GB, A31008-G3070-B100-3-7619 |
Übersicht_U3.fm |
09.01.01 |
Softkeys and symbols of the Gigaset 3000 Comfort and Gigaset 3000 Classic
Softkeys
+- Make an internal call - Hold call
[Open redial list
,1. This symbol appears if the missed calls list contains new messages or entries.
2.Press the softkey to call up new messages or the missed calls list.
Symbols
µBatterytone run down + warning
•Battery charged to 1/3. Flashes during the charging process.
œBattery charged to 2/3. Flashes during the charging process.
<Go to the next menu line or to the last line
;Go to the previous menu line or to the first line
\Returnmenu to the previous
=- Call a menu command
-Confirm and save entries/ settings
›Battery fully charged
•Signal quality: none or poor
”Signal quality: average
³Signal quality: good
: Backspace |
|
š Lock symbol |
||||
Move the cursor to the left |
|
|
|
|
|
No dial tone |
Move the cursor to the right |
|
|
|
|
|
Volume setting (e.g. 1) |
|
|
|
|
|
||
NCall up supplementary menu: this contains important additional functions.
_ _ _ _ _ |
1. |
Close menu |
|
2. |
Return to previous menu |
7*/*(9 |
Text for function |
|
|
%$&. |
Move up one menu level |
MCall up list of network providers


 Ring tone crescendo


 Volume of melody
4

Gigaset 3070isdn, GB, A31008-G3070-B100-3-7619 |
giga3070IVZ.fm |
09.01.01 |
Contents
Safety precautions . . . . . . . . . . . . . . . . . . . . . . . . . . . II
Brief overview - Gigaset 3000 Comfort handset . . . . . . . . . . . . . 3
Contents. . . . . . . . . . . . . . . . . . . . . . . . . . . . . . . . . . . |
1 |
Getting started . . . . . . . . . . . . . . . . . . . . . . . . . . . . . . |
5 |
Connecting the base station . . . . . . . . . . . . . . . . . . . . . . . . . . . . 5 Connecting supplementary devices. . . . . . . . . . . . . . . . . . . . . . . 6 Registering handsets . . . . . . . . . . . . . . . . . . . . . . . . . . . . . . . . . . 6 Deregistering devices . . . . . . . . . . . . . . . . . . . . . . . . . . . . . . . . . 7
Connecting a PC to the base station . . . . . . . . . . . . . 8
Representation of file names in Windows Explorer. . . . . . . . . . 11 Updating Gigaset 3070/3075isdn. . . . . . . . . . . . . . . . . . . . . . . . 12 Assigning the COM ports to the devices. . . . . . . . . . . . . . . . . . 13 Operating Gigaset talk&surf with a wireless data device . . . . . 13
Getting into the ISDN world is easy . . . . . . . . . . . . . 17
What is an MSN. . . . . . . . . . . . . . . . . . . . . . . . . . . . . . . . . . . . . 17 Configuring Gigaset 3070/3075isdn and MSNs. . . . . . . . . . . . . 17 Ring delay per MSN. . . . . . . . . . . . . . . . . . . . . . . . . . . . . . . . . . 18 Allocating numbers . . . . . . . . . . . . . . . . . . . . . . . . . . . . . . . . . . 18
The Installation Assistant (Comfort handsets only). 19
Starting the Installation Assistant . . . . . . . . . . . . . . . . . . . . . . . 19
Configuring ISDN call numbers (MSNs) . . . . . . . . . 21
Other options for configuring MSNs . . . . . . . . . . . . . . . . . . . . . 21 Answering machine (only 3075isdn) . . . . . . . . . . . . . . . . . . . . . 22
Locking/unlocking ISDN features . . . . . . . . . . . . . . 23
Conducting a call externally or via a second B-channel . . . . . . . 23 Transferring calls - activating/deactivating ECT
(Explicit Call Transfer) . . . . . . . . . . . . . . . . . . . . . . . . . . . . . . . . 23 Call waiting - activating/deactivating CW . . . . . . . . . . . . . . . . . . 23 Busy on Busy (busy signal when MSN is engaged) . . . . . . . . . 23 Setting external/internal enquiry calls . . . . . . . . . . . . . . . . . . . . 24 Answering machine - activating/deactivating direct call pickup . 24 Rejecting calls for all MSN groups . . . . . . . . . . . . . . . . . . . . . . . 24
1

Gigaset 3070isdn, GB, A31008-G3070-B100-3-7619 |
giga3070IVZ.fm |
09.01.01 |
Contents
System settings. . . . . . . . . . . . . . . . . . . . . . . . . . . . . 25
Configuring music-on-hold . . . . . . . . . . . . . . . . . . . . . . . . . . . . . 25 Audio settings . . . . . . . . . . . . . . . . . . . . . . . . . . . . . . . . . . . . . . 25 Entering long-distance codes . . . . . . . . . . . . . . . . . . . . . . . . . . 26 Restoring the factory setting . . . . . . . . . . . . . . . . . . . . . . . . . . . 26 Querying the status . . . . . . . . . . . . . . . . . . . . . . . . . . . . . . . . . . 26
Making comfort calls . . . . . . . . . . . . . . . . . . . . . . . . 27
Making internal calls free of charge. . . . . . . . . . . . . . . . . . . . . . 27 Collective call/Group call . . . . . . . . . . . . . . . . . . . . . . . . . . . . . . 27 Ring delay . . . . . . . . . . . . . . . . . . . . . . . . . . . . . . . . . . . . . . . . . 28 Conducting calls with more than one subscriber. . . . . . . . . . . . 28 Entering numbers in the telephone directory . . . . . . . . . . . . . . 30 Picking up a call while the answering machine is operating . . . 30 Rejecting calls for all MSN groups. . . . . . . . . . . . . . . . . . . . . . . 30 Missed calls. . . . . . . . . . . . . . . . . . . . . . . . . . . . . . . . . . . . . . . . 31 Internal call forwarding . . . . . . . . . . . . . . . . . . . . . . . . . . . . . . . 32 External call forwarding - CF . . . . . . . . . . . . . . . . . . . . . . . . . . . 32 Switching internal/external call forwarding . . . . . . . . . . . . . . . . 33 Transferring incoming calls - CD (Call Deflection) . . . . . . . . . . . 33 Automatic external callback on busy CCBS . . . . . . . . . . . . . . . . 34 Call waiting - CW . . . . . . . . . . . . . . . . . . . . . . . . . . . . . . . . . . . . 34 Holding calls . . . . . . . . . . . . . . . . . . . . . . . . . . . . . . . . . . . . . . . 35 Parking/continuing calls ("unpark") . . . . . . . . . . . . . . . . . . . . . . . 35 Calling line identification restriction (CLIR) . . . . . . . . . . . . . . . . 36 Automatic call forwarding due to inaccessible handset. . . . . . . 36 Tracing switch . . . . . . . . . . . . . . . . . . . . . . . . . . . . . . . . . . . . . . 37
System functions. . . . . . . . . . . . . . . . . . . . . . . . . . . . 38
Missed calls list . . . . . . . . . . . . . . . . . . . . . . . . . . . . . . . . . . . . . 38 Configuring an external destination call number for the room monitor . . . . . . . . . . . . . . . . . . . . . . . . . . . . . . . . . . . . . . . . . . . 39 Night service . . . . . . . . . . . . . . . . . . . . . . . . . . . . . . . . . . . . . . . 39 Entrance telephone . . . . . . . . . . . . . . . . . . . . . . . . . . . . . . . . . . 40 Displaying call charge and call duration . . . . . . . . . . . . . . . . . . . 40 Call by Call . . . . . . . . . . . . . . . . . . . . . . . . . . . . . . . . . . . . . . . . . 42
Answering machine (3075isdn only) . . . . . . . . . . . . . . 43
Access options for the answering machine. . . . . . . . . . . . . . . . 43 Selecting an answering machine . . . . . . . . . . . . . . . . . . . . . . . . 43 Activating/deactivating the answering machine . . . . . . . . . . . . 43 Activating an announcement . . . . . . . . . . . . . . . . . . . . . . . . . . . 43 Recording/modifying announcements . . . . . . . . . . . . . . . . . . . . 44 Playing back/deleting announcements . . . . . . . . . . . . . . . . . . . 44
2

Gigaset 3070isdn, GB, A31008-G3070-B100-3-7619 |
giga3070IVZ.fm |
09.01.01 |
Contents
Recording memos . . . . . . . . . . . . . . . . . . . . . . . . . . . . . . . . . . . 44 Listening to messages . . . . . . . . . . . . . . . . . . . . . . . . . . . . . . . . 45 Listening to memos . . . . . . . . . . . . . . . . . . . . . . . . . . . . . . . . . . 45 Deleting messages and memos . . . . . . . . . . . . . . . . . . . . . . . . 45 Modifying settings . . . . . . . . . . . . . . . . . . . . . . . . . . . . . . . . . . . 46 Remote control . . . . . . . . . . . . . . . . . . . . . . . . . . . . . . . . . . . . . 46 Activating an announcement . . . . . . . . . . . . . . . . . . . . . . . . . . . 47 Locking the answering machine . . . . . . . . . . . . . . . . . . . . . . . . 47 Setting a timer . . . . . . . . . . . . . . . . . . . . . . . . . . . . . . . . . . . . . . 48 Picking up a call from an answering machine . . . . . . . . . . . . . . 48 Remote control of the answering machine . . . . . . . . . . . . . . . . 49
Security settings . . . . . . . . . . . . . . . . . . . . . . . . . . . |
52 |
Change system PIN . . . . . . . . . . . . . . . . . . . . . . . . . . . . . . . . . . 52 Base lock . . . . . . . . . . . . . . . . . . . . . . . . . . . . . . . . . . . . . . . . . . 52 Accesses . . . . . . . . . . . . . . . . . . . . . . . . . . . . . . . . . . . . . . . . . . 52 Emergency numbers . . . . . . . . . . . . . . . . . . . . . . . . . . . . . . . . . 53 Restoring the factory setting . . . . . . . . . . . . . . . . . . . . . . . . . . . 53
Appendix . . . . . . . . . . . . . . . . . . . . . . . . . . . . . . . . . |
54 |
Centrex features . . . . . . . . . . . . . . . . . . . . . . . . . . . . . . . . . . . . 54 In conjunction with a PABX . . . . . . . . . . . . . . . . . . . . . . . . . . . . 54 Reserving a line . . . . . . . . . . . . . . . . . . . . . . . . . . . . . . . . . . . . . 55 Dialling procedures. . . . . . . . . . . . . . . . . . . . . . . . . . . . . . . . . . . 55
Operation with other devices . . . . . . . . . . . . . . . . . 57
Registering a Gigaset 3000 Classic handset . . . . . . . . . . . . . . . 57 Registering the Gigaset 2000S handset. . . . . . . . . . . . . . . . . . . 57 Normal telephone (POT). . . . . . . . . . . . . . . . . . . . . . . . . . . . . . . 57 Registering third-party GAP handsets . . . . . . . . . . . . . . . . . . . . 57 Activating and deactivating the repeater capability . . . . . . . . . . 57 Registering cordless Gigaset 1000TAE . . . . . . . . . . . . . . . . . . . 58 Registering the Gigaset M101 Data and M105 Data modules . 59 Making calls . . . . . . . . . . . . . . . . . . . . . . . . . . . . . . . . . . . . . . . . 60 Making calls with a corded telephone at the TAE connection . . 62
Operation with the entrance telephone. . . . . . . . . . 66
Configuring the entrance telephone. . . . . . . . . . . . . . . . . . . . . . 66
About your system . . . . . . . . . . . . . . . . . . . . . . . . . . |
68 |
Troubleshooting . . . . . . . . . . . . . . . . . . . . . . . . . . . . . . . . . . . . . 69 Technical data . . . . . . . . . . . . . . . . . . . . . . . . . . . . . . . . . . . . . . 69 Contact. . . . . . . . . . . . . . . . . . . . . . . . . . . . . . . . . . . . . . . . . . . . 70 Approval . . . . . . . . . . . . . . . . . . . . . . . . . . . . . . . . . . . . . . . . . . . 70
3

Gigaset 3070isdn, GB, A31008-G3070-B100-3-7619 |
giga3070IVZ.fm |
09.01.01 |
Contents
Menu Displays . . . . . . . . . . . . . . . . . . . . . . . . . . . . . |
71 |
Comfort handset menu . . . . . . . . . . . . . . . . . . . . . . . . . . . . . . . 71
Index. . . . . . . . . . . . . . . . . . . . . . . . . . . . . . . . . . . . . 77
4
Gigaset 3070/3075isdn, GB, A31008-G3070-B100-3-7619 |
giga3070KAP.fm |
09.01.01 |
Getting started
by |
Getting started |
Step |
|
Step |
|
|
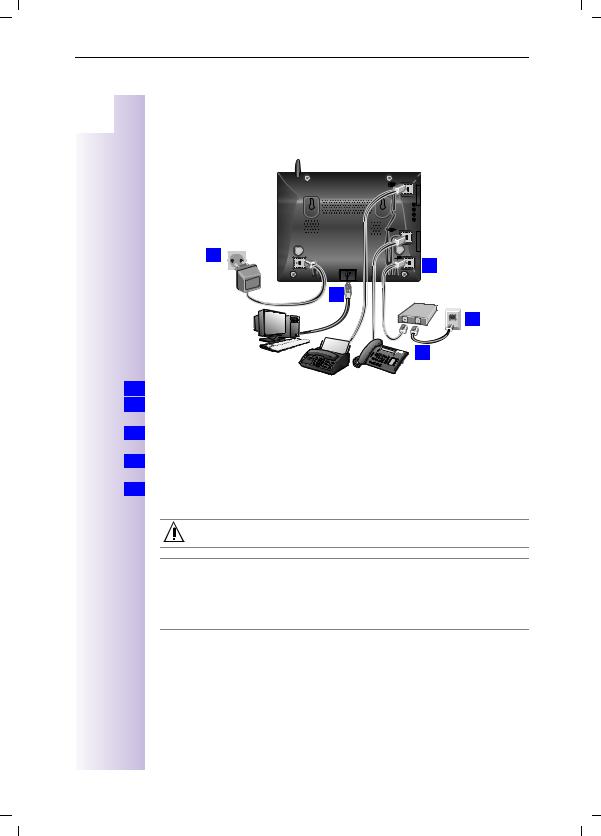
Connecting the base station |
21 |
 22
22
4.
1.
5. |
3.
2.
1.V socket: insert in the ISDN connection cable until the plug locks into place.
2.Insert in the ISDN connection cable in the ISDN socket until the plug locks into
place.
3.In the case of NTBA with self-assembly, insert the cable between the NTBA
and the TAE (old telephone socket) until both plugs lock into place.
4.socket: insert the mains connection cable securely into the plug and insert
the plug into the socket.
5.If required, connect the PC via USB cable to the USB bus (only supported with Windows 98).
Only the plug-in power supply unit provided should be used (see underside of base station).
£Power failure:
In the event of a power failure, your base station, the handsets which are registered at it and any corded terminals are not operational. All settings and saved information (messages, directory entries) are retained for an unlimited period.
Profiset talk&surf:
It is not possible to install Profiset talk&surf and Gigaset talk&surf simultaneously on the same PC. Otherwise, problems will occur as both programs attempt to access the same interface. You must therefore choose either Gigaset talk&surf or Profiset Talk&surf. When upgrading, the old program version must first be deinstalled.
5
Gigaset 3070/3075isdn, GB, A31008-G3070-B100-3-7619 |
giga3070KAP.fm |
09.01.01 |
Getting started
Step |
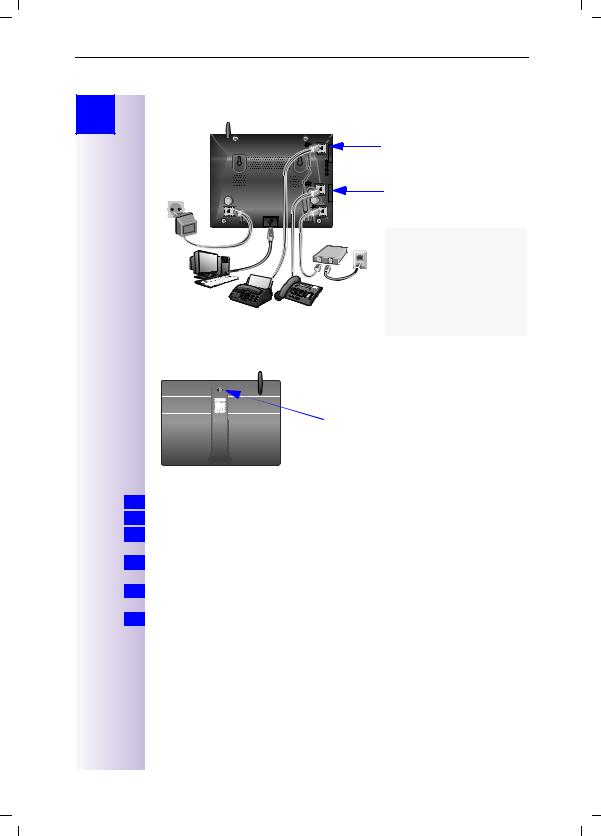
Connecting supplementary devices |
by
Step
21 |
Connection for the |
|
corded terminal |
|
with the internal number 21 |
22 |
Connection for the |
corded terminal |
with the internal number 22 |
The connections are designed for use with most commercial terminals.
Schematic diagram
Registering handsets
Press this green illuminated key
Registering the new Gigaset 3000 Comfort handset
1.Switch on the handset with a long press on the¯key.
2.Confirm "Register?" new handset with [YES] on the handset.
or 2. Existing handset: press → → Stations → Station 1 - 4, select a free station and select → Register. Confirm with [OK] on the handset.
3.Enter the system PIN of the base station (factory setting: 0000) and confirm
with [OK].
4.Press the green illuminated key on the base station, the key flashes steadily.
The base station is only ready for registration as long as the key flashes.
5.Select an unassigned internal call number (11 - 18) with [ˆ] and confirm with [OK].
Successful registration is confirmed on the display.
6
Gigaset 3070/3075isdn, GB, A31008-G3070-B100-3-7619 |
giga3070KAP.fm |
09.01.01 |
Getting started
Step
by
Step
Registering the Gigaset 3000 Classic handset
1.Switch on the handset with a long press on the¯key.
2.Press ®x{ in sequence.
3.Enter the base station number, generally 1, and confirm with 1.
The symbol initially flashes, but then remains steadily lit when the connection to the base station has been established.
4.Enter the base station PIN (factory setting: 0000) and confirm with [OK].
5.Press the green illuminated key on the base station, the key flashes steadily.
6.Select an unassigned internal call number (11 - 18). The handset is then successfully registered (the symbol indicating readiness for registration stops flashing).
Registering other devices
If you would also like to register other handsets (e.g. Gigaset 2000S, GAP handsets) or cordless devices (e.g. Gigaset 1000 TAE, STA), please select the internal numbers 11 - 15. These devices are not called at the numbers 16 - 18!
It is possible to register a maximum of 8 cordless devices (Gigaset handsets in the 3000 and 2000 series, Gigaset 1000 TAE, Gigaset M101 Data, Gigaset M105 Data and GAP handsets from other manufacturers). A Gigaset 1000C behaves at a Gigaset 3070/3075isdn in the same way as a GAP handset.
Please refer to the relevant operating instructions for information on the registration procedures.
A Gigaset repeater for increasing the range of the handsets does not require a free registration location. You can register up to 6 Gigaset repeaters at a single base station.
Deregistering devices
When deregistering devices, unlike when registering devices, no further steps are required on the base station. All devices that remain registered retain their previous internal call numbers.
A handset/data module can be deregistered from any registered Gigaset 3000 Comfort, as can the Gigaset M101 Data and Gigaset 105 Data.
1.Press for selection menus.
2.Select using [ˆ] and [OK]: Service Set up → Settings → Set up user → De-reg.
device.
3.This opens a list of internal numbers.
Select using [ˆ] (desired internal number).
4.Press [OK] to deregister the device with the chosen internal number.
7

Gigaset 3070/3075isdn, GB, A31008-G3070-B100-3-7619 |
giga3070KAP.fm |
09.01.01 |
Connecting a PC to the base station
Step
by
Step
Connecting a PC to the base station
Gigaset talk&surf is a driver software which prepares your PC for Internet access via Gigaset 3070/75isdn. More information is contained on the CD provided with the program. Gigaset talk&surf requires Windows 98 or higher as its operating system.
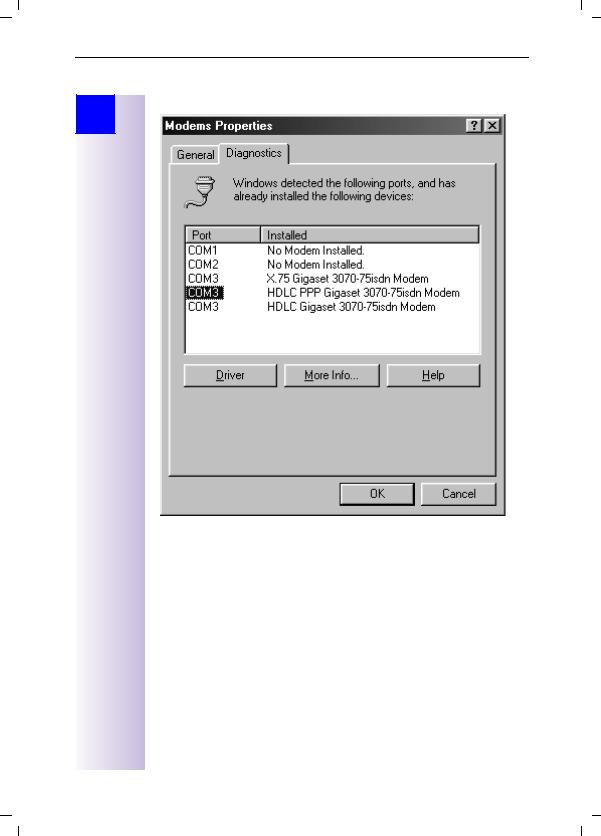
You may be required to make certain settings in the Control Panel of the operating system in order to adapt the modem driver. The Modems icon is located under Start > Settings > Control Panel. The following property settings can be defined here:
8
Gigaset 3070/3075isdn, GB, A31008-G3070-B100-3-7619 |
giga3070KAP.fm |
09.01.01 |
Connecting a PC to the base station
Step |
Under Diagnosis you can view the driver assignment to the COM port. |
|
by
Step
9
Gigaset 3070/3075isdn, GB, A31008-G3070-B100-3-7619 |
giga3070KAP.fm |
09.01.01 |
Connecting a PC to the base station
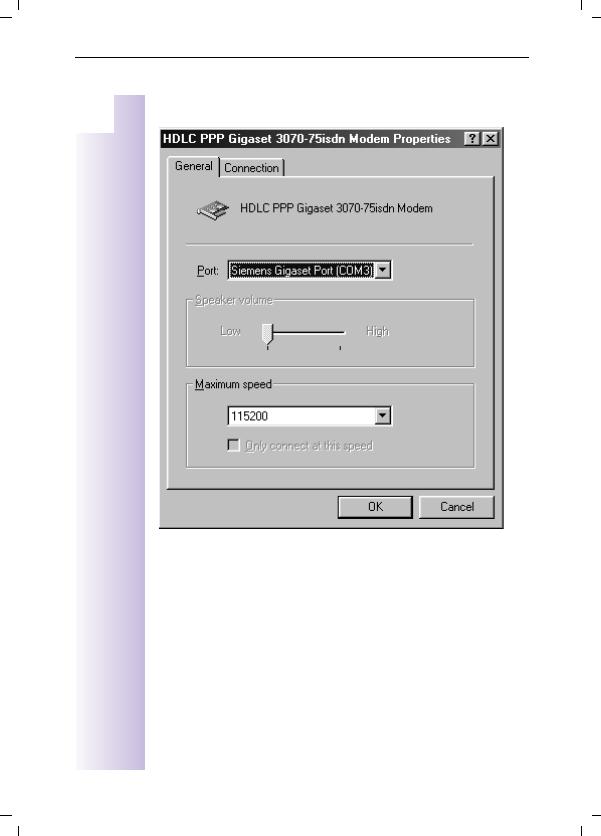
|
Step |
Via the "General" tab and Properties, you can view the default settings for the |
|
COM port. |
|
|
by |
|
|
Step |
|
|
|
|
USB function
To connect a PC via the USB interface, you will need Windows 98 or later or Windows ME. Windows 95 and Windows NT 4.0 do not support USB.
10

Gigaset 3070/3075isdn, GB, A31008-G3070-B100-3-7619 |
giga3070KAP.fm |
09.01.01 |
|
Connecting a PC to the base station |
|
Representation of file names in Windows Explorer |
Step |
|
by |
In Explorer you can define the format for displaying files under |
Step |
> View > Options. |
In these operating instructions it is assumed that a full path name is used, i.e. with a different configuration, the extension after the dot is not included: update.exe becomes update.
11
Gigaset 3070/3075isdn, GB, A31008-G3070-B100-3-7619 |
giga3070KAP.fm |
09.01.01 |
Connecting a PC to the base station
Step
by
Step
Updating Gigaset 3070/3075isdn
This section tells you how to download a new version of the firmware for your Gigaset 3070/75isdn from the Internet and then how to install it in the base station. You can use this function to install new features on your base station as soon as they become available in the Internet.
Downloading software files from the Siemens Server
The following is the URL for the Siemens Server for the Gigaset product family: http://www.ic.siemens.com/mySiemens/full/1,1860,3_GIGASET3070ISDN.html*
These pages will provide you with the latest information on the Gigaset product family. You can also find out when a new version of the firmware for
Gigaset 3070/75isdn will be ready to download.
In order to be able to download files from the Siemens Server you will require an Internet browser and Internet access.
Please note that new versions of the firmware can only be transferred to the base station via the USB interface and thus with Windows 98 and later.
1.Start your Internet browser.
2.Call up the following address http://www.ic.siemens.com/mySiemens/full/1,1860,3_GIGASET3070ISDN_5_1_0,00.html and move to the download area on the page for Gigaset 3070/75isdn.
3.Save the new version of the firmware for Gigaset 3070/75isdn to your hard
disk.
4.Start the EXE file (which unzips automatically) and then follow the instructions in the readme.txt file.
Once the update.exe program has started, do not abort it as it involves transferring sensitive files. An abort could restrict the functionality of your Gigaset 3070/3075isdn.
*. If you are following the online instructions (provided on the CD-ROM, file with the extension PDF) and you see this hand  next to an HTML address, simply click your mouse to go directly to that address. If the address has been changed and a new position created, the system automatically follows the set link. For this purpose, you will need a browser installed on your system and access to the Internet.
12
Gigaset 3070/3075isdn, GB, A31008-G3070-B100-3-7619 |
giga3070KAP.fm |
09.01.01 |
|
|
Connecting a PC to the base station |
|
|
Assigning the COM ports to the devices |
|
Step |
|
|
by |
A PC is equipped with a number of different ports to enable it to communicate |
|
Step |
|
|
with other devices. The most common ports are the following: |
|
|
|
The USB port
COM 1 - 2, on the hardware side
COM 3 - etc. virtual, i.e. only on the software side
The port layout is described briefly below:
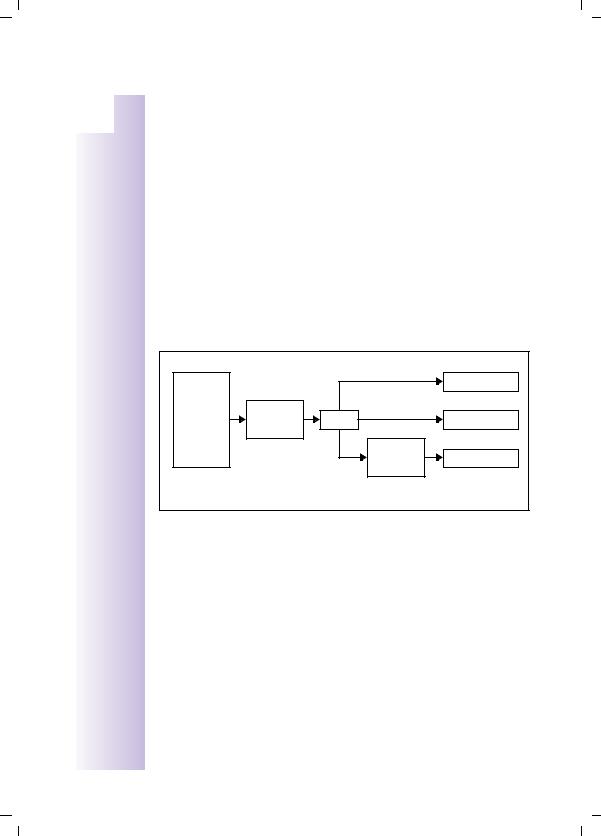
Since there are three different ways in which the connected PC can access Gigaset 3070/3075isdn (via Gigaset M101 Data, Gigaset M105 Data and the USB cable), there are also three different configurations. Data from the Internet (AOL, T-Online, RDT, PPP, X.75) or from another PC is preprocessed by the PC itself over the relevant drivers and a virtual COM port (3 and higher) and sent to the TAPI Service Provider (TAPI = Telephony Application Interface). The TAPI interface then accesses the port that has been appropriately configured. With a connection via USB cable, this is the USB port itself; with Gigaset M101 Data, this is COM port 1 or 2 and with Gigaset 105 Data this is a virtual COM port, which is routed via the USB port.
Overview: |
|
|
|
|
AOL |
|
|
|
COM1 at M101 |
|
|
|
|
|
T-Online |
|
|
|
|
RDT |
Virtual |
TAPI |
|
USB at G3075 |
COM port |
|
|||
PPP |
|
|
|
|
|
|
|
|
|
X.75 |
|
|
Virtual |
USB at M105 |
|
|
|
COM port |
|
|
|
|
|
Since a virtual COM port is upstream of the Gigaset M105 Data, the port must be configured as a serial port in this case and not as a USB.
Operating Gigaset talk&surf with a wireless data device
If it is not possible to use the USB port of Gigaset 3070/3075isdn (lengthy or complex cabling etc.), wireless PC operation at Gigaset 3070/3075isdn devices is also possible.
For this purpose, you will need either
●Gigaset M101 Data with connection via COM port, or
●Gigaset M105 Data with connection via USB and virtual COM port.
13
Gigaset 3070/3075isdn, GB, A31008-G3070-B100-3-7619 |
giga3070KAP.fm |
09.01.01 |
Connecting a PC to the base station
Step
by
Step
Operating Gigaset talk&surf with Windows 98, Win ME
Registering Gigaset M105 Data at Gigaset 3070/3075isdn
Proceed as follows:
1.Install Gigaset M105 Data
2.Start the Gigaset M105 Data configuration program via > Start > Programs > Gigaset M100 Data > Gigaset Setup.
3.Select the window "Local adapter“, a free registration location is selected.
4.Check that your Gigaset M105 Data has been set to the type Portable part (default).
5.Set the Gigaset 3070/3075isdn to registration mode (press LED).
6.Click the Register button and enter the PIN of the partner station (default 0000).
7.Click OK. The registration procedure starts and the message "If the required base is ready for registration, the local adapter logs on. Check that the base is ready for registration." appears on the screen.
The two devices are automatically synchronised. An entry now appears in the Registered adapter list.
8.Close the program with OK.
9.Restart your computer.
Once Gigaset M105 Data has been installed, the telephony driver for your Gigaset 3070/3075isdn has to be updated. You have three options here:
1.You have not yet operated your Gigaset 3070/3075isdn on your PC via the USB cable:
You must follow the instructions in the sections "PC connection via USB" and "Installing Talk&surf Software" in the PC installation instructions provided with Gigaset 3070/3075isdn. When asked which port is to be used for accessing Gigaset 3070/3075isdn, specify the virtual COM port for Gigaset M105 Data.
2.You have operated Gigaset 3070/3075isdn on your PC via the USB cable before:
Install the talk&surf software again. Start the installation procedure for the talk&surf software and when asked which port is to be used for
accessing Gigaset 3070/3075isdn, specify the virtual COM port for Gigaset M105 Data* and continue with the installation.
3.You have operated your Gigaset 3070/3075 isdn on your PC via the USB cable before and you are an experienced PC user:
Reset the telephony driver by selecting the following: > Start > Settings > Control Panel > Telephony. Select the Telephony Drivers tab here. Then select the DECT/ISDN TAPI Service Provider and click on Configure. Click on Port, then on Serial and select the virtual COM port for Gigaset M105 Data (see footnote on page 15). Confirm twice with OK and then Close.
14

Gigaset 3070/3075isdn, GB, A31008-G3070-B100-3-7619 |
giga3070KAP.fm |
09.01.01 |
Connecting a PC to the base station
Step
by
Step
*You can find out which is the virtual COM port for Gigaset M105 Data either by starting the program Gigaset Setup and view the COM port in the Connection tab. (It may take a few seconds for this to be displayed correctly) or you could select > Start > Settings > Control Panel > System, then click on the Device Manager tab and select the ports there (COM and LPT). A list of installed ports is displayed. You will recognise the virtual COM port for Gigaset M105 Data by its name: DECT USB serial Port (COM x).
Operating Gigaset talk&surf with Windows 95/NT
Gigaset M101 Data allows for access using Windows 95/NT via the V.24 interface (COM port). If you wish to use this functionality, proceed as follows:
Registering Gigaset M101 Data at Gigaset 3070isdn/3075isdn
Proceed as follows:
1.Gigaset 3070/3075isdn and Gigaset M101 Data are installed.
2.Start the configuration program for Gigaset M101 Data via
> Start > Programs > Gigaset M100 Data > Gigaset Setup.
Select the window "Local adapter", a free registration location is selected. Check that your Gigaset M101 Data has been set to the type Portable part (default). (If it has not, please refer to the electronic operating instructions on the CD-ROM for information on how to change the station type
> CD-ROM-drive:\M101Data\config\german\M10x.pdf).
3.Switch Gigaset 3070/3075isdn to registration mode (press LED).
4.Click the Register button and enter the PIN of the partner station (default: 0000).
5.Click OK. The registration procedure starts and the message "If the required base is ready for registration, the local adapter logs on. Check that the base is ready for registration.“
The two devices are automatically synchronised. An entry now appears in the Registered adapter list.
15

Gigaset 3070/3075isdn, GB, A31008-G3070-B100-3-7619 |
giga3070KAP.fm |
09.01.01 |
Connecting a PC to the base station
Step
by
Step
Updating Gigaset M101 Data for operation with Gigaset 3070/3075
Before you begin, make sure Gigaset M101 is already connected to the PC, the configuration program is loaded, and the COM port is set correctly.
The firmware version must be ≥ 2.048. This software can be downloaded from http://www.ic.siemens.com/mySiemens/full/. Start the firmware update in the dialog which appears by pressing the [Firmware Update] button. Proceed as follows:
1.Open the browser, enter the address http://www.ic.siemens.com/mySiemens/ lowres/1,1899,3_GIGASETM101DATA_5_0_61,00.html and download the update file onto your hard disk.
2.Start the Explorer and select the directory to which the update file was downloaded (m101data_xyyy_.exe), where xyyy stands for the version number.
3.Navigate to m101data_xyyy_.exe under the selected path M101Data and launch the program by double-clicking on it.
4.Under the new path, open the readme.txt file and read the instructions provided there. Then launch setup.exe by double-clicking on it.
5.In the dialog which appears, start the firmware update by pressing the [Firmware Update] button.
6.The old and new firmware versions are displayed.
7.A message is output indicating when the update process is complete. If you wish, you can repeat this procedure for other Gigaset M101 devices. If two Gigaset M101 devices are interconnected, they must both have either software version 1.yyy or 2.yyy. Ideally, all Gigaset M101 Data devices should be updated with the latest software version.
8.When updating from version 1.yyy to 2.yyy, the registration procedure must be repeated for Gigaset M101 Data on Gigaset M101 Data and the lines configured accordingly.
16
Gigaset 3070/3075isdn, GB, A31008-G3070-B100-3-7619 |
giga3070KAP.fm |
09.01.01 |
|
Getting into the ISDN world is easy |
|
Getting into the ISDN world is |
by |
|
Step |
|
Step |
easy |
|
|
|
Programming the various MSNs (your telephone numbers) for your Gigaset |
|
3070/3075isdn is easy. |
|
What is an MSN |
|
MSN stands for multiple subscriber number. You can apply for a maximum of |
|
ten different telephone numbers for the ISDN multiple device connection. An |
|
MSN is one of the telephone numbers assigned to you without the area code; |
|
it consists of a maximum of 8 digits. |
|
Configuring Gigaset 3070/3075isdn and MSNs |
|
Your telephone system in the Gigaset 3070/3075isdn uses the MSN specifical- |
|
ly according to your requirements. In this regard, the following distinctions are |
|
made: |
–Incoming MSN. This is the number that can also be answered by one of the three answering machines in the case of incoming calls to specific internal numbers or in the case of Gigaset 3075isdn.
–Outgoing MSN. This is the number an internal subscriber places before the number he is dialling when making outgoing calls; it is then also used by the network provider to calculate charges.
–In addition to the above options you can also set the required MSN for the next outgoing call on the handset.
Possible internal subscribers are:
11-18 Handsets
21, 22 Corded analog devices
40 PC via USB port*
41-48 Cordless PC via Gigaset M101 Data or 105 Data*
91-93 Integrated answering machine (AM) 91 = AM 1, 92 = AM 2, 93 = AM 3 (Gigaset 3075isdn only)
*The numbers 40 - 48 are assigned automatically
An example: five MSNs were applied for; two for business use, a fax number and two for personal use.
Use |
Incoming |
Where |
Answering |
Outgoing |
MSN next |
|
MSN |
does it ring |
machine |
MSN |
call |
|
|
|
|
|
|
Business |
11111 |
11,12, 91 |
1 |
11111 |
22222 |
|
|
|
|
|
|
|
22222 |
11,12, 91 |
1 |
11111 |
22222 |
|
|
|
|
|
|
Fax |
33333 |
21 |
- |
33333 |
--- |
|
|
|
|
|
|
Personal |
44444 |
13, 92 |
2 |
44444 |
--- |
|
|
|
|
|
|
|
55555 |
14, 92 |
2 |
55555 |
--- |
|
|
|
|
|
|
17

Gigaset 3070/3075isdn, GB, A31008-G3070-B100-3-7619 |
giga3070KAP.fm |
09.01.01 |
Getting into the ISDN world is easy
|
Step |
You can use the MSN next call feature by allocating two MSNs to the handsets |
|
11 and 12 and switch to the MSN 22222 for this dialling procedure in the proc- |
|
|
by |
|
|
ess. This is not possible for handsets 13 and 14 as an alternative MSN was not |
|
|
Step |
|
|
|
set up. |
|
|
|
|
|
Answering machine (AM) 1 was allocated to business use and AM 2 to person- |
|
|
al use. |
Ring delay per MSN
Using the ring delay feature you can configure a handset for each individual MSN to delay response to the call signal. However, during this ring delay time the handset can accept the call using the "call pickup" function without a call signal queuing. When this feature is being configured, the time allowed by the answering machine for recording a message (default: Automatic 2/4) must be taken into account. When the ring delay that has been set is higher than the setting on the active AM, there is no call signal as the answering machine accepts the call beforehand. For information on setting the ring delay, please refer to "Setting ring delay" on page 28
Allocating numbers
When you switch on the device for the first time, the Installation Assistant is displayed immediately after the handsets have been registered and the service program has been started. The Assistant makes it very easy to perform the initial configuration. After initial installation you can call up the Installation Assistant again at any time; to skip programming of the feature use the [NO] key and the next feature will be displayed.
18
Gigaset 3070/3075isdn, GB, A31008-G3070-B100-3-7619 |
giga3070KAP.fm |
09.01.01 |
The Installation Assistant (Comfort handsets only)
Step
by
Step
The Installation Assistant (Comfort handsets only)
The Installation Assistant can be called up any time to help you set the most important functions. The following settings can be completed in sequence:
●Date and time
●Own call number (MSN)
●Device type (e.g. telephone, fax)
●Incoming MSN, internal call allocation to MSN (for possible subscriber numbers, see page 27) and outgoing MSN (the telephone number assigned to external calls)
●Exchange code (with installation behind a PABX)
Starting the Installation Assistant
1.Press for selection menus.
2.Select using [ˆ] and [OK]: Service Set up → Installation.
3.Confirm the prompt for starting the Installation Assistant with [YES].
Entering the date and time
1.Confirm the prompt for entering the time with [YES].
2.Enter the date in the format " - - . - - . - - " (day, month, year) and the time in the
format " - - : - - " (hour, minute) and confirm with [9].
3.Select using [ˆ] and [OK]: Save entry.
Programming own call numbers (MSNs)
The MSN supplied by your provider can be programmed here. The first time it is switched on, the base station attempts independently to determine the MSNs itself. The result is displayed. You can save up to 10 call numbers.
1.Confirm the prompt for entering the call number with [YES].
2.Confirm the prompt for entering the first MSN with [YES].
3. Enter the name and number and with <move to Change call number, Enter call number and confirm with [9].
4.Select using [ˆ] and [OK]: Save entry.
19
Gigaset 3070/3075isdn, GB, A31008-G3070-B100-3-7619 |
giga3070KAP.fm |
09.01.01 |
The Installation Assistant (Comfort handsets only)
Step
by
Step
Setting the device type
[ Telephone ] is preset for the analog connections Internal 21 and Internal 22. You can make and receive calls once a telephone is connected. If you connect an additional corded device (e.g. fax), the device type must be modified again accordingly. The entry "No function" blocks any additional input for this device in the case of MSN and answering machine configurations.
1.Confirm the prompt for setting the device type for subscribers with [YES].
2.Confirm the prompt for assignment with [YES].
3.Select using [ˆ] and [OK]: (required device).
The assignments for additional internal subscribers are offered.
Selecting the incoming MSN
This is the call number used to contact your handset. You can select several MSNs and corded terminals can also be set via the handset. For possible subscriber numbers see page 27.
1.Confirm the prompt for incoming MSN references with [YES].
2.Confirm the prompt for assignment with [YES].
3.Select using [ˆ] and [OK]: (one or more MSN).
The selection is confirmed with ….
4.Quit with [\].
Selecting the outgoing MSN
You are conducting an outgoing call via this call number. This call number is transmitted to the called party. The provider calculates the call charges incurred using this MSN. You can only select one outgoing MSN.
1.Confirm the prompt for outgoing MSN references with [YES].
2.Confirm the prompt for assignment with [YES].
3.Select using [ˆ] and [OK]: (one MSN).
Connecting to a PABX
If you require a PABX connection:
1.Answer the prompt for the PABX with [YES].
2.Confirm the prompt for the prefix (exchange code) with [YES].
3.Enter the exchange code and confirm with [9].
4.Select using [ˆ] and [OK]: Save entry.
The installation is terminated with the aid of the Installation Assistant.
20
Gigaset 3070/3075isdn, GB, A31008-G3070-B100-3-7619 |
giga3070KAP.fm |
09.01.01 |
Configuring ISDN call numbers (MSNs)
Step
by
Step
Configuring ISDN call numbers (MSNs)
You can configure up to 10 own call numbers (MSNs) at your base station. In this way callers can dial internal subscribers directly. As the costs for each call number are recorded individually, telephone charges for outgoing connections can also be calculated separately.
Other options for configuring MSNs
Modifying own call numbers (MSNs)
Each new call number configured is automatically assigned an individual adjustable ring melody.
1.Press for selection menus.
2.Select using [ˆ] and [OK]: Service Set up → Settings → ISDN settings →
Set up MSN.
3.Select using [ˆ] and [']: (required MSN).
4.Select using [ˆ] and [OK]: Edit entry.
In this menu you can also display or delete an MSN, or configure another ring melody.
5.Enter new or modified MSN and/or names and confirm with ['].
6.Select using [ˆ] and [OK]: Save entry.
Assigning call numbers (MSNs)
Specific own call numbers (MSNs) can be assigned to registered devices. In this way you can define
●the call number under which a registered device will ring (incoming MSN) and
●the call number from which an internal subscriber should dial (Send MSN). You can set one outgoing MSN for each internal subscriber. This MSN is displayed to the called party and any call charges incurred are assigned to the appropriate subscriber.
Assigning an incoming MSN
A newly registered handset will ring under all configured call numbers. If you want to assign a specific incoming MSN to the handset:
1.Press for selection menus.
2.Select using [ˆ] and [OK]: Service Set up → Settings → Set up user →
Set up device.
3.Select using [ˆ] and [']: (required internal subscriber).
4.Select using [ˆ] and [OK]: Receive MSN → (required MSN).
21
 Loading...