


POS TERMINAL |
|
INTER-REGISTER |
|
COMMUNICATION SYSTEM |
MODEL |
UP-820F
UP-820N

TABLE OF CONTENTS
 Introduction ·············································································································································3
1Inline Operation ·······································································································································4
1.Message display·····································································································································4
(1)Message displayed during inline communication··············································································4
(2)Error messages·································································································································5
2.Open store operation (OPXZ mode) – master and satellite ···································································6
3.Close store operation (OPXZ mode) – master and satellite ···································································7
4.Clerk system···········································································································································8
(1)Centralized clerk file system ·············································································································8
(2)Individual clerk file system ················································································································9
5.Sign-on operation (clerk assignment) (REG mode/MGR mode) ··························································10
6.Clerk sign-on report ······························································································································11
7.Sign-off operation (cancellation of clerk assignment) (REG mode/MGR mode) ··································12
8.Downloading the contents of the programming to satellites – master ··················································13
(1)Initial downloading···························································································································13
(2)Maintenance downloading ··············································································································14
9.Look-up and updating of the GLU file···································································································17
(1)Centralized GLU file system············································································································17
(2)Individual GLU file system···············································································································17
10.PLU/EAN stock control ·························································································································18
11.T-LOG polling ·······································································································································19
12.PLU/EAN data control ··························································································································20
13.Price change function ···························································································································22
14.Customer data control ··························································································································22
15.Communication with a remote printer (option)······················································································23
16.Rerouting print data ······························································································································24
2Consolidated and Individual Reports··································································································25
1.Operating modes ··································································································································25
2.Consolidated reports – master/back-up master····················································································26
(1)Report generation procedure ··········································································································26
(2)List of consolidated reports (SYSTEM READING/RESETTING) ····················································27
3.Individual reports – master/back-up master/satellite ············································································29
(1)Report generation procedure ··········································································································29
(2)List of individual reports (READING/RESETTING) ·········································································30
4.Resetting reports in a system with no save file ····················································································32
5.Clerk report···········································································································································33
(1)Centralized clerk file system ···········································································································33
(2)Individual clerk file system ··············································································································34
6.Cashier report·······································································································································35
7.Reports that can be generated when the Compulsory Cash/Check Declaration (CCD) function is enabled·················································································································································36
8.Reset clear operation (X1/Z1 and X2/Z2 modes) – master ··································································37
1

3IRC Programming··································································································································38
1.Setting the machine numbers – master and satellite············································································38
2.Setting the terminal numbers (IRC machine numbers) for satellites ····················································39
3.Initial setting for the master and master list creating/updating ·····························································40
(1)Setting the terminal number for the master and creating the master list·········································40
(2)Deleting a machine from the master list··························································································41
4.Specifying the terminal to serve as a back-up master – master···························································42
5.Specifying whether to enable or disable the system retry function when a transmission error occurs – master and satellite ······························································································································43
6. Choosing whether to search the master or satellite first for the PLU/EAN code – satellite ··················44
7.Reading the contents of the IRC programming – master and satellite ·················································45
8.Programming for the remote printer ·····································································································47
(1)Basic programming for the remote printer – master and satellite ···················································47
(2)Optional programming for the remote printer – master and satellite···············································49
9.Programming for the Manager Work Station (MWS) – master and satellite·········································51
(1)Programming of the MWS terminal number····················································································51
(2)Programming of the time-out time···································································································52
(3)Programming of the gateway number ·····························································································52
10.Reading the contents of the Manager Work Station (MWS) programming – master and satellite ·······53
4System Back-Up ····································································································································54
1.How the IRC back-up system works·····································································································54
2.Master declaration ································································································································55
(1)When the master breaks down – Master declaration at the back-up master ··································55
(2)When the back-up master breaks down – Master declaration at the master ··································57
3.Recovery declaration····························································································································58
(1)When the master recovers from a breakdown – Recovery declaration at the back-up master·······58
(2)When the back-up master recovers from a breakdown – Recovery declaration at the master·······60
5Error Recovery ······································································································································61
1.Manual clear operation ·························································································································61
(1)Manual clearing procedure··············································································································61
(2)List of manual clearing items···········································································································62
2.System retry function····························································································································63
(1)When the system retry function is disabled·····················································································63
(2)When the system retry function is enabled ·····················································································64
6BASIC SPECIFICATIONS for LAN········································································································65
2
Introduction
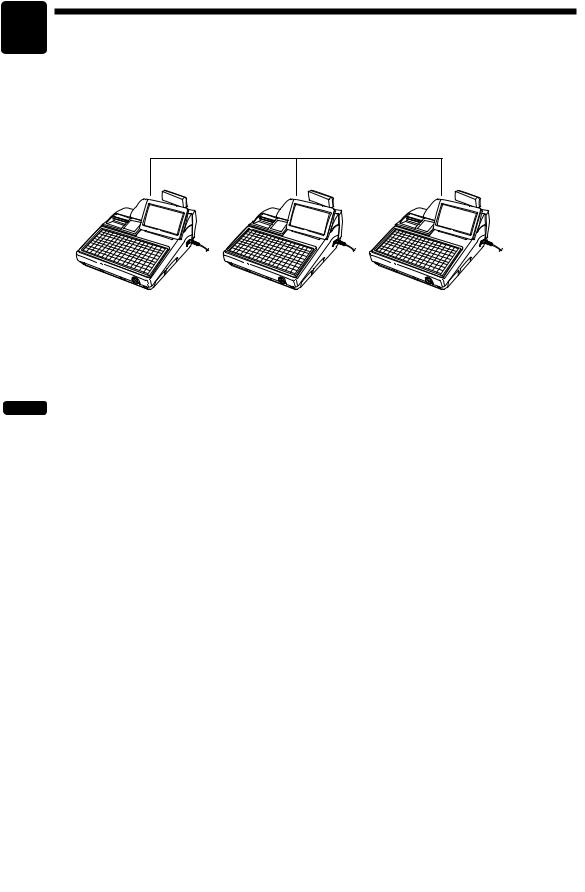
The UP-820F/UP-820N inter-register communication (IRC) system consists of one master machine and up to 31 satellite machines which are all interconnected by the local area network (LAN) to provide data transmission among them. This system allows the manager to exercise centralized control over the satellites through the master.
LAN
Master |
Satellite |
Satellite |
|
|
|
Max. 31 satellites
• One of the satellites may be used as a back-up master.
NOTE |
The additional RAM board, UP-S04MB2, must be installed in the master and, if possible, in each |
|
satellite. |
||
|
3

1Inline Operation
1.Message display
(1)Message displayed during inline communication
1)The message as shown below is displayed at the master which is engaged in IRC transmission. ex.:
SENDING DATA
|
The above message is also displayed at the satellite which is engaged in transmission for |
|
NOTE |
||
system resetting. |
||
|
2)The machine number of the satellite communicating with the master is displayed at the master after the start of IRC transmission.
ex.:
000022
In this case, the machine number of the satellite is “000022.”
4
(2) Error messages
If an error occurs, a corresponding error message is displayed. To clear an error message, press the Lkey.
For error messages, see the table below.
List of error messages
Error messages (Default) |
Description |
|
|
RETRY |
• This message prompts you to retry communication with the machine which you |
|
have failed to communicate. |
BUSY |
• The target machine is busy. |
|
|
CODE NOT FREE |
• The specified clerk has signed on at another machine. |
|
• The entered GLU code is in use. |
|
|
LACKING MEMORY |
• The GLU code or related file memory is not enough. |
LINE ERROR |
• Transmission error |
|
|
MOTOR LOCK |
• The remote printer did not operate correctly. |
|
|
NO AUTHORITY |
• The clerk who entered a GLU code are not authorized. |
|
|
NON RESET |
• IRC initial downloading before resetting |
BACKUP DOWN? |
• The back-up master doesn't reply to the request. |
|
|
MASTER DOWN? |
• The master doesn't reply to the request. |
|
|
OFF LINE |
• Remote printer off-line error |
|
|
POWER OFF |
• The target machine is turned off. |
T-LOG FULL |
• T-LOG buffer is full. |
|
|
TYPE ERROR |
• The file in the master and that in the satellite are not of the same type. |
|
|
UNDEFINED CODE |
• The specified clerk code is not present in the master list. |
|
• The entered GLU code is not listed. |
ENTRY ERROR |
• The entry made is not valid. |
|
|
5
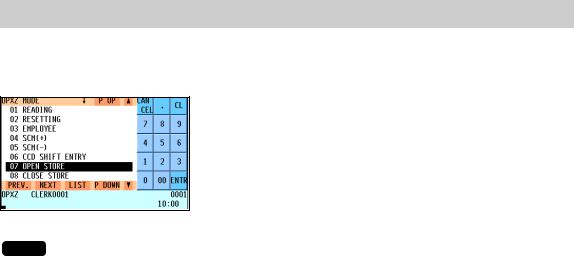
2. Open store operation (OPXZ mode) – master and satellite
When the open store operation is performed at the master, the IRC system is opened. POS can send AT command by this job. This function controls a modem, but doesn't have control over registration and T-LOG. The procedure for the open store operation is as follows.
Select “OPEN STORE” from the OPXZ mode window and press the ekey.
NOTE |
• You can also perform the open store operation at each satellite. |
•The open store operation cannot be performed at any machines whose terminal numbers have not been programmed.
•When a transmission error occurs while the open store operation is being performed, the open store operation is regarded as normally terminated if the system retry function* has been disabled by programming. When the master has been programmed to enable the system retry function, it displays the machine number of the satellite that has encountered the error. Selecting the displayed machine number will display a prompt to retry the open store operation.
* For the system retry function, see page 63–64.
6
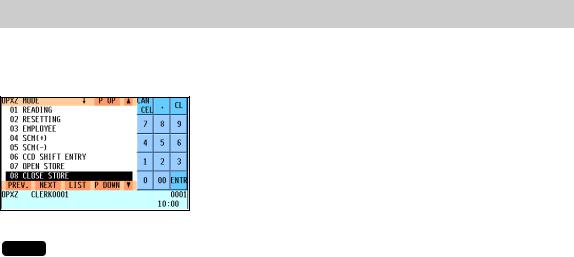
3. Close store operation (OPXZ mode) – master and satellite
When the close store operation is performed at the master, the IRC system is closed. POS can send AT command by this job. This function controls a modem, but doesn’t have control over registration and T-LOG. The procedure for the close store operation is as follows.
Select “CLOSE STORE” from the OPXZ mode window and press the ekey.
NOTE |
• You can also perform the close store operation at each satellite. |
•When the close store operation is performed, the data remaining in the T-LOG buffers of all the satellites is collected by the master.
•When a transmission error occurs during the close store operation, the operation is regarded as normally terminated if the system retry function* has been disabled by programming. When the master has been programmed to enable the system retry function, it displays the machine number of the satellite that has encountered the error. Selecting the displayed machine number will display a prompt to retry the close store operation.
* For the system retry function, see page 63–64.
7

4. Clerk system
In the IRC system, the following two types of clerk file systems are available: a centralized system and an individual system. In the centralized clerk file system, the master manages transaction data on clerks within the IRC system. In the individual clerk file system, each machine manages its clerk transaction data.
In choosing the type of clerk system, consult your authorized SHARP dealer.
(1) Centralized clerk file system
Centralized clerk file system – without the overlapped clerk function
In this system, each clerk file is under the centralized control of the master and programming for clerks has to be done only at the master. When a clerk signs on at a satellite, a communication between the satellite and the master will begin. You can generate a report listing clerks which have signed on. (For further details on clerk sign-on reports, see page 11.)
Centralized clerk file system
– with the overlapped clerk function and without overlapped clerk save files
In this system, each overlapped clerk file is under the centralized control of the master and programming for clerks has to be done only at the master. When a clerk signs on at a satellite, a communication between the satellite and the master will begin.
When the clerk signs off, the overlapped clerk data is transferred to the master and saved in its overlapped clerk file.
Centralized clerk file system
– with the overlapped clerk function and overlapped clerk save files
In this system, each overlapped clerk file is under the centralized control of the master and programming for clerks has to be done only at the master. The way data flows differs depending on whether or not the clerk signs on at the same satellite as the one used in his or her previous operation. (The data which flows in the system includes not only clerk data but also GLU data. In the figure on the next page, the GLU data flows are omitted.)
8
1) When the clerk signs on at a machine other than the one used in his or her previous operation:
In this case, the overlapped clerk data is sent from the master to the satellite (transfer of overlapped clerk data).
2) When the clerk signs on at the same satellite as the one used in his or her previous operation:
In this case, no data transfer occurs between the master and the satellite but the data stored in the save file of the satellite is called back. This permits quicker data look-up than above in 1).
In both cases, the overlapped clerk data is saved in the |
Master |
|
master's overlapped clerk file as well as the satellite's |
||
|
||
overlapped clerk data save file upon sign-off operation. |
|
Whether the centralized clerk file system is used with or without an overlapped clerk save file, the master's overlapped clerk file can be accessed from any machine in the IRC system.
Overlapped clerk file
1)
Satellite |
Satellite |
Overlapped clerk save file 
Overlapped |
|
clerk file |
2) |
NOTE |
• For selecting whether your system should have the overlapped clerk function or not, and whether |
|
it should have overlapped clerk save files or not, consult your authorized SHARP dealer. |
||
|
•To use the overlapped clerk function in the IRC system, the overlapped clerk function must be enabled for all the master and satellite machines.
(2)Individual clerk file system
In this system, each clerk file is under the control of a satellite and you have to do programming for clerks at each satellite. Even if a programmed clerk signs on at a satellite, a communication with the master will not begin.
The overlapped clerk file in a satellite can only be accessed by the satellite itself. The data in the clerk files at all satellites will be collected by the master each time a consolidated report is issued.
9

5. Sign-on operation (clerk assignment) (REG mode/MGR mode)
The sign-on operation is intended to assign a clerk to a machine (satellite/master) and enable him or her to make registrations at the machine.
If a clerk successfully signs on at a machine, his or her clerk code appears on the LCD of the machine.
Sign-on procedure
(This procedure is the same as for clerk assignment at a standalone machine.)
Clerk assignment
•For the contactless clerk key system:
Set a corresponding clerk key to the clerk switch.
*The contactless clerk key is optional.
•For the clerk entry key system:
Press a corresponding clerk entry key on the keyboard.
•For the WMF clerk key system (option):
Insert a corresponding WMF clerk key into the WMF clerk switch.
*The WMF clerk key is not a SHARP product.
•For the code entry system:
Enter a corresponding clerk code and press the ˚key.
If a secret code is programmed, the secret code pop-up window will open. Enter the secret code and press the ekey.
NOTE |
• The sign-on operation can be made only for one clerk at a time. |
•Every clerk that is programmed in the system can sign on at any satellite. (Centralized clerk file system)
•A clerk, who has signed on at a machine using a contactless clerk key, can not sign on at any other machine in the system until he or she signs off at the original machine. (Centralized clerk file system)
•If a clerk, who has signed on at a machine in the system using the clerk entry key system or the code entry system, signs on at any other machine in the system, he or she is automatically signed off at the original machine. (Centralized clerk file system)
•In case of trouble, the sign-on state can be cleared at the master. (Please consult your authorized SHARP dealer for further details.)
NOTE |
Your POS terminal can provide the clerk + cashier system instead of current system (clerk only |
|
system). If you want to change the system, please consult your authorized SHARP dealer. |
||
|
Cashier assignment (Clerk + cashier system)
•For the cashier entry key system:
Press a corresponding cashier key on the keyboard.
•For the code entry system:
Enter a corresponding cashier code and press the jkey.
If a secret code is programmed, the secret code pop-up window will open. Enter the secret code and press the ekey.
*For further detail of the sign-on operation, see the “Clerk assignment” of “Preparations for Entries” section of the UP-820F/UP-820N Instruction Manual.
10
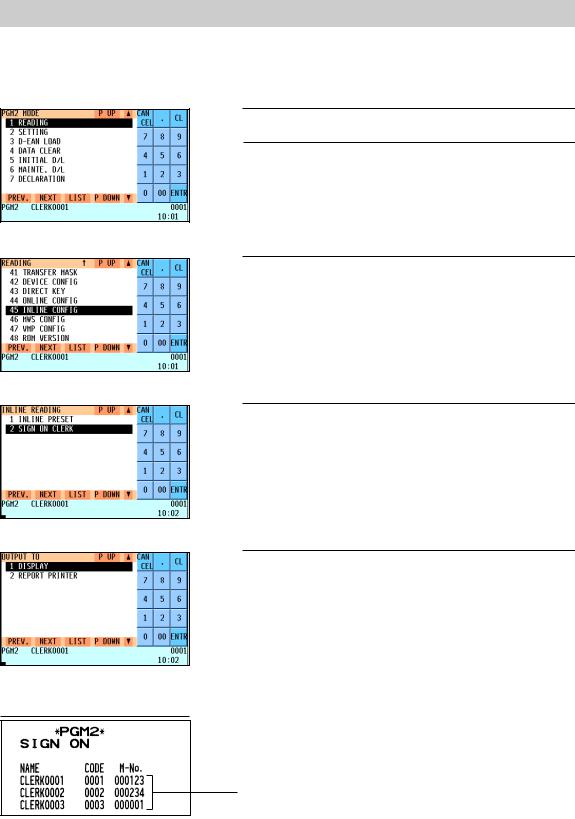
6. Clerk sign-on report
A clerk sign-on report can be generated at the master. This report is used to know which clerks have signed on at which machines.
Report generation procedure
1. Enter the PGM2 mode from the mode selection window.
2. Select “READING” and press the ekey. The READING window will appear.
3. Select “INLINE CONFIG” and press the ekey. The INLINE READING window will appear.
4. Select “SIGN ON CLERK” and press the ekey. The OUTPUT TO window will appear.
5. Select “DISPLAY” or “REPORT PRINTER” and press the e key.
Sample Print (master)
Clerk name, clerk code, machine no. of
the machine at which the clerk has signed on
11

7.Sign-off operation
(cancellation of clerk assignment) (REG mode/MGR mode)
The sign-off operation is intended to cancel the assignment of a clerk to a machine and terminate his or her registration operation.
The sign-off operation at a machine (master or satellite) can be done only for the clerk who has signed on at the machine and are not in the middle of a registration entry.
Sign-off procedure
•For the contactless clerk key system: Remove the contactless clerk key.
*The contactless clerk key is optional.
•For the clerk entry key system:
Press the same clerk entry key that you pressed to sign on.
•For the WMF clerk key system (option): Pull out the WMF clerk key.
*The WMF clerk key is not a SHARP product.
•For the code entry system: Press the ˚key.
NOTE |
• The sign-off operation can be made only for one clerk at a time. |
•If a clerk signs on at a machine while another clerk has already signed on there using the clerk entry key system or the code entry system, the preexisting clerk is automatically signed off unless he or she is halfway through an item entry.
•If the sign-off operation for the contactless clerk key system is done while the corresponding clerk is still in the middle of a registration entry, the transaction is finalized automatically.
NOTE |
Your POS terminal can provide the clerk + cashier system instead of current system (clerk only |
|
system). If you want to change the system, please consult your authorized SHARP dealer. |
||
|
Cashier sign-off procedure
•For the cashier entry key system:
Press the same cashier entry key that you pressed to sign on.
•For the code entry system: Press the jkey.
12
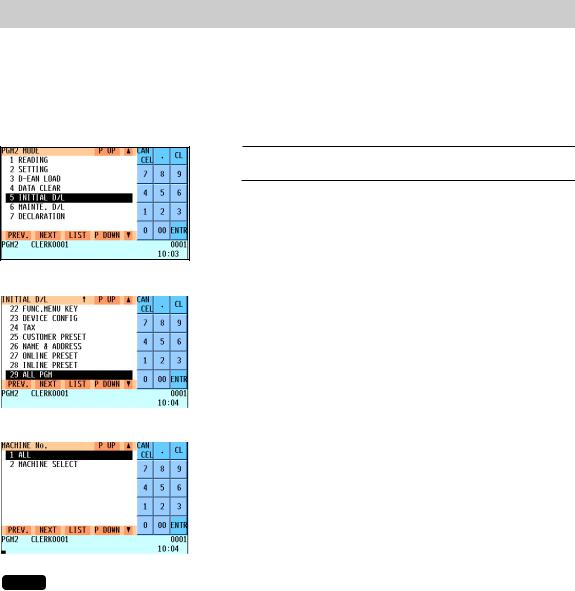
8. Downloading the contents of the programming to satellites – master
When you have completed the programming at the master, you can distribute the preset data from the master to all or desired satellites in the IRC system.
(1) Initial downloading
For initial setup of the IRC system, follow the downloading procedure below. When the preset data in the master is downloaded to each satellite, existing preset data in the satellite, if any, is cleared.
1. Enter the PGM2 mode from the mode selection window.
2. Select “INITIAL D/L” and press the ekey. The INITIAL D/L window will appear.
|
|
|
|
|
|
|
3. If you wish to distribute all preset data files in the master to |
||
|
|
|
satellites, select “ALL PGM” and press the ekey. If you |
|
|
|
|
wish to distribute an individual preset data file, select the |
|
|
|
|
corresponding data item and press the ekey. |
|
|
|
|
Enter an appropriate code range if needed. |
|
|
|
|
The MACHINE No. window will appear. |
|
|
|
4. |
|
|
|
|
|
||
|
|
If you wish to download the preset data to all satellites, select |
||
|
|
|
“ALL” and press the ekey. If you wish to download the data |
|
|
|
|
to certain satellite(s), select “MACHINE SELECT” and press |
|
|
|
|
the ekey. In this case, the MACHINE SELECT window will |
|
|
|
|
open. |
|
|
|
|
Move the cursor to the corresponding machine numbers, |
|
|
|
|
select “YES,” and press the ckey. |
|
NOTE |
Check the contents of the programming of all the satellites in the IRC system that have received |
|||
the preset data. |
||||
|
||||
13
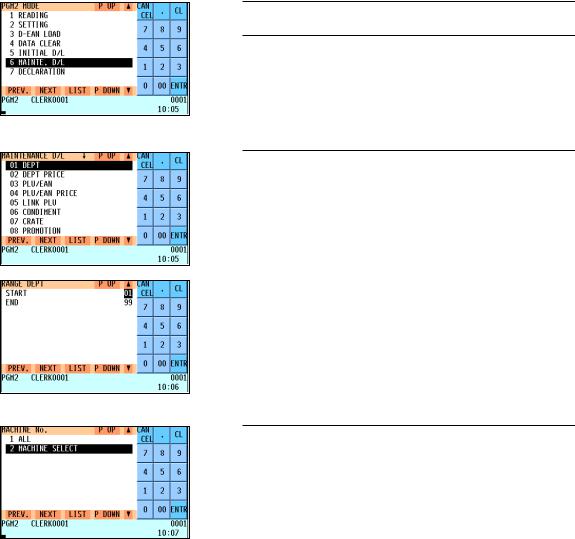
(2) Maintenance downloading
To update the preset data for the IRC system, follow the downloading procedure below. The preset data in the master is downloaded to each satellite without clearing its existing preset data.
1. Enter the PGM2 mode from the mode selection window.
2. Select “MAINTE. D/L” and press the ekey. The MAINTENANCE D/L window will appear.
3. Select a preset data item for maintenance and press the e key.
Enter an appropriate code range if needed. The MACHINE No. window will appear.
4. If you wish to download the preset data to all satellites, select “ALL” and press the ekey. If you wish to download the data to certain satellite(s), select “MACHINE SELECT” and press the ekey. In this case, the MACHINE SELECT window will appear.
Move the cursor to the corresponding machine numbers, select “YES,” and press the ckey.
14
List of downloading jobs (PGM2 mode)
Downloading Jobs |
Item |
Description |
|
|
|
INITIAL D/L |
DEPT |
Department preset data |
|
|
|
(Preset data copying with |
DIRECT KEY |
Dept./PLU key preset data for direct depts./PLUs |
existing data clearing) |
PLU/EAN |
PLU/EAN, link PLU, condiment, promotion, combo, PLU |
|
|
convert, crate and PLU information text preset data |
|
|
|
|
PLU MENU KEY |
PLU menu key preset data |
|
|
|
|
LINK PLU |
Link PLU preset data |
|
CONDIMENT |
Condiment PLU preset data |
|
|
|
|
PLU CONVERT |
EAN/ITF PLU convert preset data |
|
|
|
|
CRATE |
Crate PLU preset data |
|
|
|
|
PROMOTION |
Promotion preset data |
|
COMBO MEAL |
Combo meal preset data |
|
|
|
|
EAN NON-PLU |
EAN non-PLU code format data |
|
|
|
|
PRESS CODE |
EAN press code format data |
|
|
|
|
PLU INFORMATION |
PLU information text preset data |
|
TRANSACTION |
Transaction preset data |
|
|
|
|
TRAINING PRESET |
Training text and training clerk/cashier No. preset data |
|
|
|
|
CLERK |
Clerk preset and contactless clerk key preset data |
|
|
|
|
CASHIER |
Cashier preset data (Only for the clerk + cashier system) |
|
MANAGER |
Manager preset data |
|
|
|
|
DATE/TIME |
Date, time |
|
|
|
|
OPTION |
Other preset data |
|
|
|
|
MESSAGE |
Text preset data |
|
FUNC. MENU KEY |
Function menu key preset data |
|
|
|
|
DEVICE CONFIG |
Device configuration preset data |
|
|
|
|
TAX |
Tax preset data |
|
|
|
|
CUSTOMER PRESET |
Customer preset data |
|
NAME & ADDRESS |
Name & address preset data |
|
|
|
|
ONLINE PRESET |
Online preset data |
|
|
|
|
INLINE PRESET |
Inline preset data |
|
|
|
|
ALL PGM |
All PGM mode preset data excluding Online and Device |
|
|
Config preset data |
|
|
|
MAINTENANCE D/L |
DEPT |
Department preset data |
(Preset data copying only) |
|
|
DEPT PRICE |
Department price preset data |
|
|
|
|
|
PLU/EAN |
PLU/EAN, link PLU, condiment, promotion, combo, PLU |
|
|
convert, crate and PLU information text preset data |
|
|
|
|
PLU/EAN PRICE |
PLU/EAN price preset data |
|
|
|
|
LINK PLU |
Link PLU preset data |
|
|
|
|
CONDIMENT |
Condiment PLU preset data |
|
|
|
|
CRATE |
Crate PLU preset data |
|
|
|
|
PROMOTION |
Promotion preset data |
|
|
|
|
COMBO MEAL |
Combo meal preset data |
|
|
|
|
PLU INFORMATION |
PLU information text preset data |
|
|
|
|
TRANSACTION |
Transaction preset data |
|
|
|
15

NOTE |
• The PLU/EAN file (INITIAL D/L and MAINTENANCE D/L) does not include stock data. |
•The OPTION file includes the following data:
Optional feature preset, EAN deletion term, scale preset, happy hour, zero skip, general report format, trans. report format, clerk report format, hourly report, stacked report, drawer alarm, screen save time, customer control program, bonus point, bonus point redemption table and auto key preset data.
•The MESSAGE file includes the following data:
Logo text, dept. group text, PLU group text, currency descriptor, VP text, slip text, slip footer, payee name, Entertainment bill message, PLU hourly group text, scrolling message for pole display, working time shift text and free text.
•The DEVICE CONFIG file includes the following data:
Journal printer, receipt printer, slip printer, report printer and kitchen printer#1-#9.
•The PLU/EAN file (INITIAL D/L and MAINTENANCE D/L) includes LINK PLU preset data.
•Initial downloading of all preset data (ALL PGM) should not be performed when totals exist in the system. (The totalizers of the receiving satellite are cleared.)
•Performing individual initial D/L jobs will result in a non-reset error when sales data exists in the satellite.
16

9. Look-up and updating of the GLU file
In the IRC system, the following two types of GLU file allocation system are available: a centralized system and an individual system.
In choosing the type of GLU file system, please consult your authorized SHARP dealer.
(1) Centralized GLU file system
In this system, the GLU file exists only in the master. All satellites in the IRC system can access the GLU file in the master for registration.
The GLU file is accessed by satellites for the following purposes:
•New order or reorder
•Payment entry or temporary finalization
•Bill printing
•Slip printing
•Bill transfer/bill totalizing
•Bill separating
•Customer ordering
There are two types of GLU data transmission.
1)The GLU data is transmitted from the master to a satellite for GLU file look up (in case of a new order/reorder). In this case, the GLU reserve counter* is retained at the master.
*The reserve counter reserves some records of GLU files to prevent a “LACKING MEMORY” error in finalization.
2)The GLU data is transmitted from a satellite to the master upon finalization of a transaction (in case of payment entry or temporary finalization).
The data transmitted from the satellite is once saved in the temporary GLU data receiving file and then updated in the GLU file of the master. In this case, the GLU reserve counter is cleared at the master.
If a satellite looks up the GLU file in the master or asks the master to update the file, the backup master performs the same process as the master.
(2) Individual GLU file system
In this system, the master and satellites have their own GLU files and look up them for registration. Therefore, no inline communications are made regarding GLU data.
17

10. PLU/EAN stock control
In the IRC system, the following two systems for PLU/EAN stock control are available: a centralized system and an individual system.
In choosing the type of PLU/EAN stock control system, please consult your authorized SHARP dealer.
Centralized system
Preset stock data is stored only in the master. Stock data in each satellite must be zero before a PLU/EAN entry is made.
When a consolidated report is generated, stock data in respective satellites is consolidated into the stock file in the master and calculated there.
The stock data calculated at the master is displayed or printed out and the stock data in each satellite is reset to zero at the same time.
Individual system
The master and satellites store their own preset stock data. When a consolidated report is generated, the stock data in the master and satellites is consolidated and displayed or printed out.
NOTE |
In the individual system, the consolidation does not affect the stock data in the master. |
|
18
11. T-LOG polling
All REG-mode transaction data in each satellite is saved in its T-LOG buffer. T-LOG polling is a data collecting system in which the master collects data from the T-LOG buffers in satellites.
A request for T-LOG polling is issued from the satellite to the master when the number of data records in its T-LOG buffer exceeds a predetermined number.
As the master detects such a request, it starts collecting T-LOG buffer data. After collecting data from one satellite, the master waits for a preset time and starts collecting data from another satellite. In T-LOG polling, the data transmitted to the master is stored in the corresponding file.
The data flow in T-LOG polling is shown below.
Master
(4)
(1) |
(2) |
(3) |
(5) |
Satellite A |
Satellite B |
Satellite C |
Satellite D |
Polling sequence (see the figure above.)
(1)Satellite A makes a request for polling.
(2)The master detects the request and starts collecting T-LOG data from satellite A.
(3)The T-LOG data is sent to the master.
(4)After receiving T-LOG data from satellite A, the master waits for a preset time.
(5)The master detects a request from another satellite (B, C or D) and starts polling for it.
You can specify in the PGM2 mode whether the entry function of a satellite is disabled (LOCK) or enabled (CONTINUE) when the T-LOG buffer is full.
If it is disabled, an error message “T-LOG FULL” will be displayed and you are not allowed to make any entry in the REG/MGR mode at the satellite.
If it is enabled, you can continue entries but cannot save the entered data. Even if data is entered after the T-LOG buffer becomes full, the previous data saved in the file will not be erased.
NOTE |
• If the T-LOG buffer becomes nearly full, an alarm message pattern appears on the display of |
|
the satellite. |
||
|
•For the programming whether or not to lock a registration entry when the T-LOG file is full, see the “Function selection 2” of “Optional Feature Selection” section of the UP-820F/UP-820N Instruction Manual.
•For the T-LOG polling between the master and MWS, please consult your authorized SHARP dealer.
19
 Loading...