


 Loading...
AR-M230/M270 Series
Online Manual
Start
Click this "Start" button.

 Introduction
This manual describes the printer function of the AR-M230/M270 series digital multifunctional system.
● For information on loading paper, replacing toner cartridges, clearing paper misfeeds, handling peripheral devices, and other
Note
copier-related information, please refer to your operation manual for copier.
●The machine's default settings and default settings for the printer function can be changed using the key operator programs. For more information, see the key operator's guide.
●Where "AR-XXXX" appears in this manual, please substitute the name of your model for "XXXX". For the name of your model, see "PART NAMES AND FUNCTIONS" in the operation manual for copier.
●This manual refers to the Reversing single pass feeder as the "RSPF".
●The screen images and procedures that appear in this manual are mainly for Windows® XP. With other versions of Windows®, some screen images may be different from those in this manual.
●For information on using your operating system, refer to your operating system's manual or online Help.
Trademark Acknowledgments
●Microsoft® Windows® operating system is a trademark or copyright of Microsoft Corporation in the U.S.A. and other countries.
●Windows® 95, Windows® 98, Windows® Me, Windows NT® 4.0, Windows® 2000, and Windows® XP are trademarks or copyrights of Microsoft Corporation in the U.S.A. and other countries.
●Acrobat® Reader Copyright© 19872002 Adobe Systems Incorporated. All rights reserved. Adobe, the Adobe logo, Acrobat, and the Acrobat logo are trademarks of Adobe Systems Incorporated.
●All other trademarks and copyrights are the property of their respective owners.
CONTENTS |
I N D E X |
2 |

 How to use the online manual
This section explains how to view the online manual. Please read this section before using the online manual. For information on using Acrobat Reader, see Acrobat Reader Help.
How to Control the Online Manual
In this manual, the following buttons are displayed at the bottom of each page. Click these buttons to move quickly to pages that you wish to view.
CONTENTS
Displays the Contents of this manual. Click on a topic in the Contents to jump directly to that section.
I N D E X
Displays the Index of this manual. Click on a topic in the Index to jump directly to that section.
Takes you forward page by page.
Following Links
This manual uses a link function that allows you to jump to a related page. If you click green, underlined text, the related page will be displayed. (In the Contents and Index sections, the linked areas are not underlined.)
Example: Contents
To return to the previous page, click the button on the menu bar of Acrobat Reader.
Using Bookmarks
Bookmarks have been created on the left side of this manual. You can click on a bookmark to jump directly to that section.
How to Print Out This Manual
To print this manual, select "Print" from the "File" menu of Acrobat Reader. Select the desired printer settings in the "Print" dialog box, and then click the "OK" button.
Takes you back page by page.
CONTENTS |
I N D E X |
3 |

 Contents
Introduction
How to use the online manual
1 |
Basic printing
Opening the printer driver from the "start" button Printer driver settings
Two-sided printing
Printing multiple pages on one page Fitting the printed image to the paper Rotating the print image 180 degrees Printing a watermark
Stapling printed pages (when a finisher is installed) Giving priority to a print job
Canceling a print job
2 |
PRINTER SHARING |
Sharing the printer using windows networking Shared printer settings
Client settings
2 |
3 |
TROUBLESHOOTING |
|
3 |
|
Troubleshooting |
23 |
|
|
||
|
|
Printing does not take place |
24 |
|
|
Improper printing operation |
28 |
5 |
|
Print quality is not satisfactory |
29 |
|
If a Notice Page is printed |
31 |
|
8 |
|
||
|
Uninstalling the printer driver |
32 |
|
9 |
|
||
|
|
|
|
10 |
4 |
SPECIFICATIONS |
|
11 |
|
||
12 |
|
Printer specifications |
33 |
13 |
|
||
|
|
|
|
14 |
5 |
INDEX |
|
15 |
|
||
16 |
|
|
|
17 |
|
|
|
18
19
20
CONTENTS |
I N D E X |
4 |
1 |
|
|
Basic printing |
(part 1) |
The following example explains how to print a document from WordPad.
Before printing, make sure that the correct size of paper for your document has been loaded in the machine.
|
1 |
Make sure that the ON LINE indicator on the |
|
|
3 |
Select "Print" from the application's "File" |
|
operation panel is lit. |
|
menu. |
|||
COPY 
ON LINE |
||
DATA |
||
|
||
SCAN |
DATA |
If the ON LINE indicator is not on, press the [PRINT] key to switch to printer mode and then touch the [ONLINE] key.
The status of the printer function is indicated by the ON LINE and DATA indicators next to the [PRINT] key.
|
|
|
ON LINE indicator |
|
DATA indicator |
|
|
|
|
|
|
|
|
|
Lit |
|
The machine is online |
|
There is print data in |
|
|
|
|
|
|||
|
|
|
memory that has not |
|
||
|
|
and ready to print. |
|
|
||
|
|
|
|
been printed yet. |
|
|
|
|
|
|
|
|
|
|
|
|
|
|
|
|
|
Blinking |
|
— |
|
The machine is |
|
|
|
|
printing. |
|
||
|
|
|
|
|
|
|
|
|
|
|
|
|
|
|
Off |
|
The machine is offline |
|
The machine is not |
|
|
|
and not ready to print. |
|
printing. |
|
|
|
|
|
|
|
||
|
|
|
|
|
|
|
2 |
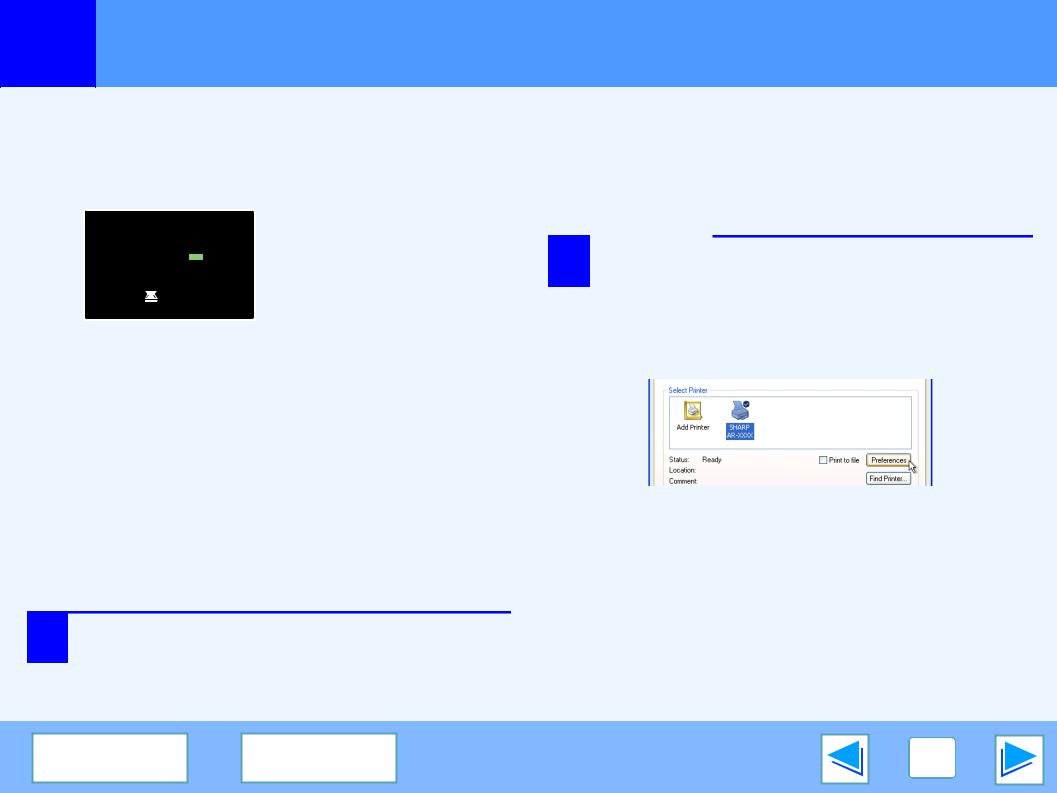
Start WordPad and open the document that you |
wish to print. |
|
The "Print" dialog box will appear. |
4 |
Make sure that "SHARP AR-XXXX" is selected |
as the printer. If you need to change any print |
settings, click the "Preferences" button ("Properties" button in Windows 95/98/Me/NT 4.0) to open the printer driver setup screen.
The printer driver setup screen will appear.
Windows 2000 does not have the "Preferences" button in this dialog box. Select settings as needed on each of the tabs in the setup screen.
Printer driver settings,Two-sided printing, Printing multiple pages on one page, Fitting the printed image to the paper, Rotating the print image 180 degrees, Printing a watermark,
Stapling printed pages (when a finisher is installed)
CONTENTS |
I N D E X |
5 |
1 |
|
|
Basic printing |
(part 2) |
5 |
Click the "Print" button ("OK" button in |
Windows 95/98/Me/NT 4.0). |
Printing begins. The print job is delivered to one of the following trays (depending on which output devices are installed):
●Job separator tray kit is installed: Job separator tray
●Finisher is installed: Offset tray
● The output tray can be selected in the key operator
Note
programs (see "OUTPUT TRAYS" in the key operator's guide).
●The output tray can also be selected in the print settings at the time of printing. To change the tray selection, select the desired tray in "Output" in the "Paper" tab of the printer driver setup screen.
●If the paper type setting in the printer driver is different from the bypass tray's paper type setting in the machine, printing may stop. To resume printing, press the [PRINT] key on the operation panel, touch the
[BYPASS TRAY] key in the touch panel, and specify the same paper type as in the printer driver.
When "Paper Selection" is set to "Auto Select"
If "Paper Selection" is set to "Auto Select" in the "Paper" tab of the printer driver setup screen and the correct size of paper for a print job is not loaded in the machine, the printing procedure will vary depending on the "FORCED OUTPUT OF PRINT" setting in the key operator programs (see the key operator's guide).
When "FORCED OUTPUT OF PRINT" is disabled
If the bypass tray can be used, a message prompting you to print from the bypass tray will appear in the touch panel. Press the [PRINT] key on the operation panel, touch the [BYPASS TRAY] key, touch the [BYPASS] key, and then load paper in the bypass tray. Printing will begin automatically.
When "FORCED OUTPUT OF PRINT" is enabled
Printing will take place using a size of paper that is close to the size of the print image.
If the paper is loaded in a different orientation than the
 Note print image, the image is automatically rotated to match the paper. This setting can be changed in the key operator programs (see "ROTATED PRINT" in the key operator's guide).
CONTENTS |
I N D E X |
6 |
1 |
|
|
Basic printing |
(part 3) |
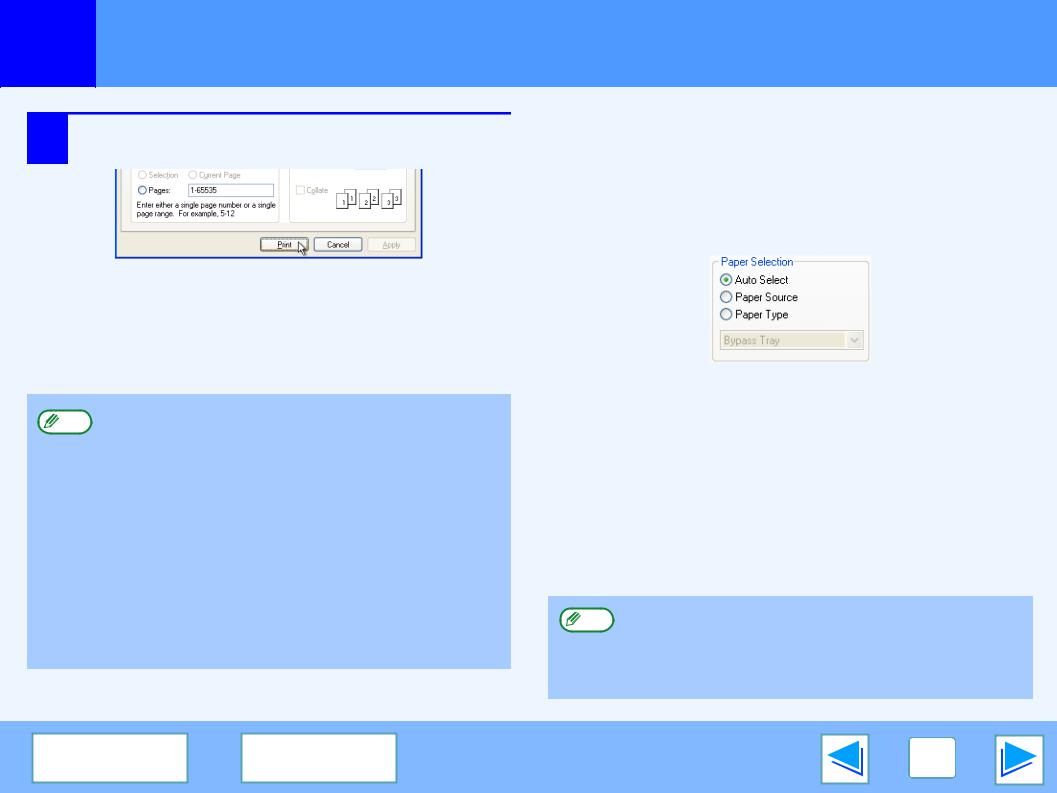
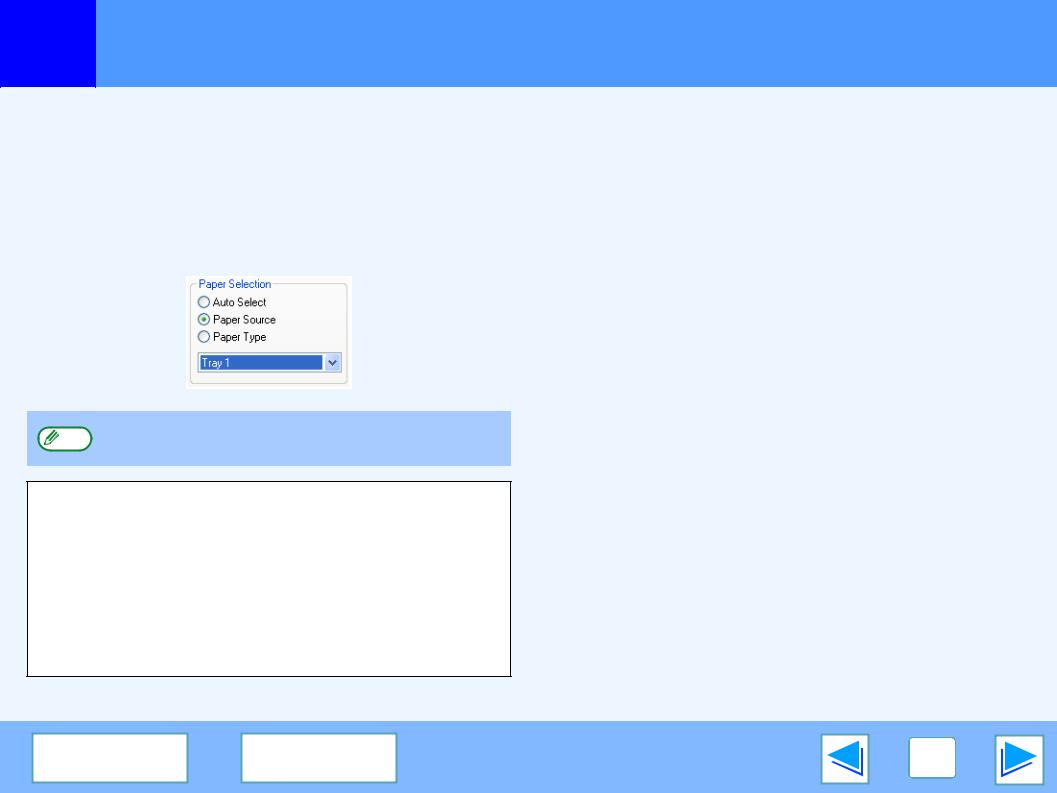
When the "Paper Selection" setting is "Paper Source" or "Paper Type"
When "Paper Selection" in the "Paper" tab of the printer driver setup screen is set to:
●"Paper Source", select the tray that you wish to use for printing from the pull-down menu.
●"Paper Type", select the type of paper that you wish to use for printing from the pull-down menu.
"Paper Source" and "Paper Type" cannot be
Note
simultaneously selected.
The size and type of paper loaded in each tray and whether or not the paper loaded in each tray can be used for printing are specified in the "TRAY SETTINGS" of the custom settings.
(See "CUSTOM SETTINGS" in the operation manual for copier.
If you wish to select the "Paper Source" or "Paper Type" when printing, be sure to select these settings in the "Configuration" tab of the printer driver setup screen. (See "CONFIGURING THE PRINTER DRIVER" in the software setup guide.)
If you selected the "Paper Source" or "Paper Type" in the printer driver setup screen but there is no paper in the trays that matches your selection, printing will take place as follows:
You selected a tray in "Paper Source", but the size of the paper in the selected tray does not match the printing size.
Even though the paper size is different, printing will take place using the paper in the selected tray.
You selected a "Paper Type", and although the selected type of paper is loaded in the machine, it's size does not match the printing size.
Even though the paper size is different, printing will take place using the selected paper type.
However, if "FORCED OUTPUT OF PRINT" is disabled, printing will not take place.
You selected a "Paper Type", but the selected type of paper is not loaded in the machine.
If the bypass tray can be used, a message prompting you to print from the bypass tray will appear. Press the [PRINT] key on the operation panel, touch the [BYPASS TRAY] key, touch the [BYPASS] key, and then load the correct size and type of paper in the bypass tray. Printing will begin automatically.
CONTENTS |
I N D E X |
7 |
1 |
Opening the printer driver from the "start" button
Printer driver settings can be configured by opening the printer driver from the Windows "start" button. Settings adjusted in this way will be the initial settings when you print from an application. (If you change the settings in the printer driver setup screen at the time of printing, the settings will revert to the initial settings when you quit the application.)
Windows 2000/XP |
Windows 95/98/Me/NT 4.0 |
|
1 |
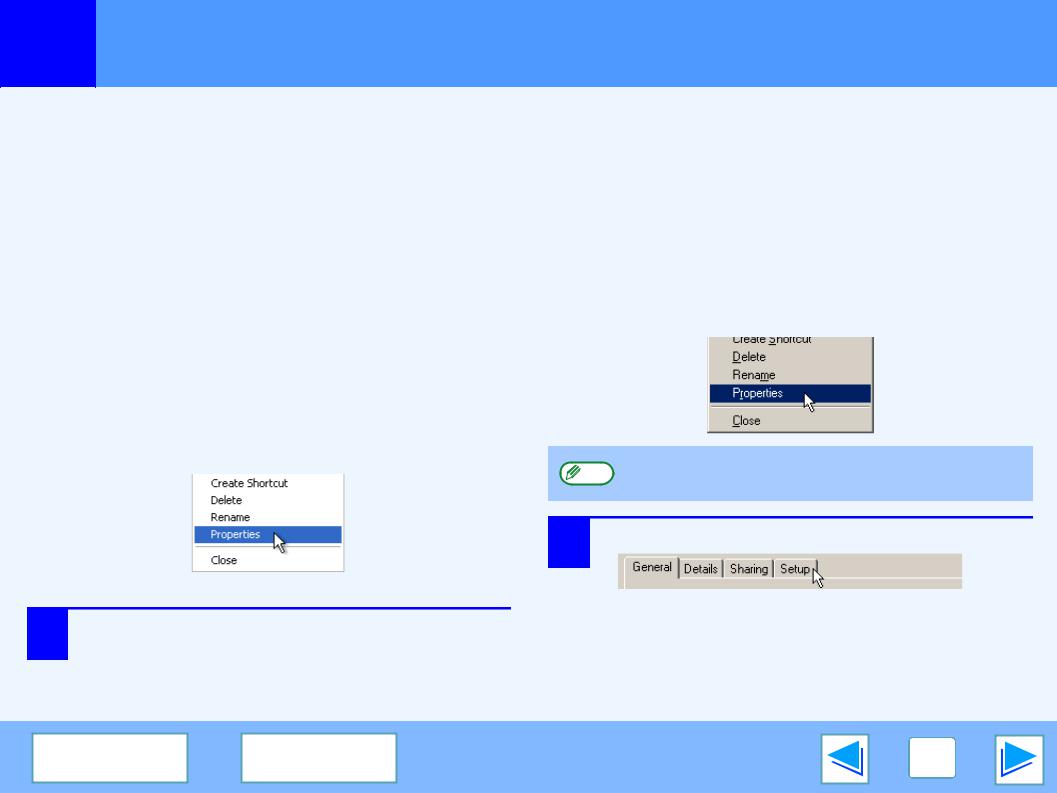
Click the "start" button, and then click "Control |
|
Panel". |
|
|
|
In Windows 2000, click the "Start" button and select |
|
|
"Settings". |
|
|
|
|
2 |
Click "Printers and Other Hardware", and then |
|
click "Printers and Faxes". |
|
|
|
In Windows 2000, click "Printers". |
|
|
|
|
3 |
Click the "SHARP AR-XXXX" printer driver icon |
|
and select "Properties" from the "File" menu. |
4 |
Click the "Printing Preferences" button in the |
"General" tab. |
The printer driver setup screen will appear.Printer driver settings
|
1 |
Click the "Start" button, select "Settings" and |
|
then click "Printers". |
|
|
|
|
|
2 |
Click the "SHARP AR-XXXX" printer driver icon |
|
and select "Properties" from the "File" menu. |
In Windows NT 4.0, select "Document Defaults" to open
Note
the printer driver setup screen.
3 In Windows 95/98/Me, click the "Setup" tab.
The printer driver setup screen will appear.Printer driver settings
CONTENTS |
I N D E X |
8 |

1 |
Printer driver settings
To view Help for a setting, click the  button in the upper right-hand corner of the window and then click the setting.
Some restrictions exist on the combinations of settings that can be selected in the printer driver setup screen. When a restriction is in effect, an information icon (  ) will appear next to the setting. Click the icon to view an explanation of the restriction.
1 
2
3
4
5
6
7
8
9
10
 Note
Note
The settings and the image of the machine will vary depending on the model.
1Tab
The settings are grouped on tabs. Click on a tab to bring it to the front.
2Drop-down list
Allows you to make a selection from a list of choices.
3Print setting image
This shows the effect of the selected print settings.
4Checkbox
Click on a checkbox to activate or deactivate a function.
5Machine image
This shows:
●The paper tray (in blue) selected in "Paper selection" on the "Paper" tab.
●The output tray (in green) selected in "Output" on
the "Paper" tab.
You can also click on a tray to select it.
6Check button
Allows you to select one item from a list of options.
7"OK" button
Click this button to save your settings and exit the dialog box.
8"Cancel" button
Click this button to exit the dialog box without making any changes to the settings.
9"Apply" button
Click to save your settings without closing the dialog box.
●Windows NT 4.0 does not have the "Apply" button.
●The "Apply" button does not appear when you open this window from an application.
10"Help" button
Click this button to display the help file for the printer driver.
CONTENTS |
I N D E X |
9 |
1 |
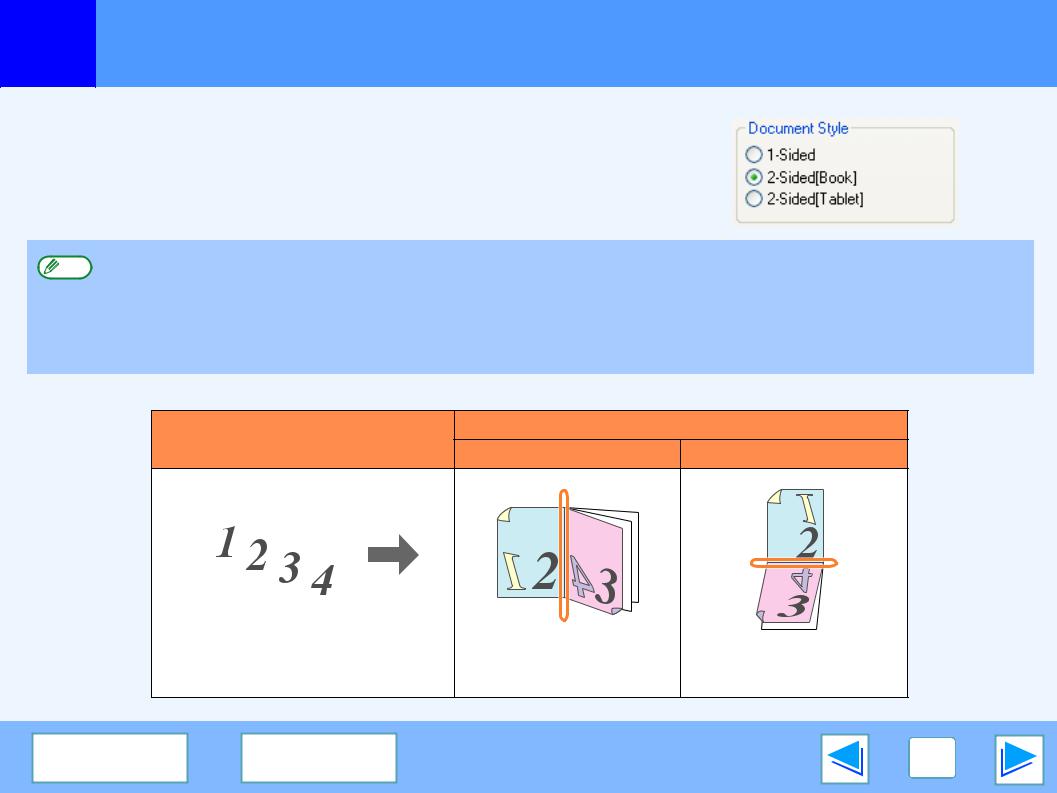
Two-sided printing
This feature allows you to print on both sides of the paper.
To use this function, open the printer driver setup screen and select "2-Sided (Book)" or "2-Sided (Tablet)" from "Document Style" in the "Main" tab.See Basic printing for details on how to open the printer driver.
● Paper sizes that can be used for two-sided printing are Ledger, Letter, Letter-R, Legal, A3, A4, A4R, A5, B4, B5, B5R, and
Note
Foolscap.
●Paper types that can be used for two-sided printing are Plain, Letter Head*, Recycled and Color.
*The use of Letter Head paper for two-sided printing can be prohibited in the "TRAY SETTINGS" of the custom settings. (See "CUSTOM SETTINGS" in the operation manual for copier.)
●Two-sided printing is not possible if disabled in the key operator programs (see "DISABLING OF DUPLEX" in the key operator's guide).
The following example shows the result when portrait data is printed on both sides of the paper.
Printing result
Print data
|
|
|
|
|
|
|
2-Sided (Book) |
2-Sided (Tablet) |
||
|
|
|
|
|
|
|
|
|
|
|
|
|
|
|
|
|
|
|
|
|
|
|
|
|
|
|
|
|
|
|
|
|
|
|
|
|
|
|
|
|
|
|
|
|
|
|
|
|
|
|
|
|
|
|
|
|
|
|
|
|
|
|
|
|
|
|
|
|
|
|
|
|
|
|
|
|
|
|
|
|
|
|
|
|
|
|
|
|
|
|
|
|
|
|
|
|
|
|
The pages are printed so that they can be bound at the side.
The pages are printed so that they can be bound at the top.
CONTENTS |
I N D E X |
10 |
1 |
|
Printing multiple pages on one page |
This feature allows you to reduce and print two or four document pages on a single sheet of paper.
To use this function, open the printer driver setup screen and select "2-Up" or "4-Up" for "N-Up Printing" on the "Main" tab.See Basic printing for details on how to open the printer driver.
The "N-Up Printing" setting is not available when "Fit To Paper Size" is selected.
Note Fitting the printed image to the paper
N-Up |
|
|
Border |
|
|
|
Border |
|||||||||||||
"2-Up" |
|
|
|
|
|
|
|
|
|
|
|
|
|
|
|
|
|
|
|
|
|
|
|
|
|
|
|
|
|
|
|
|
|
|
|
|
|
|
|
|
|
|
|
|
|
|
|
|
|
|
|
|
|
|
|
|
|
|
|
|
|
|
|
|
|
|
|
|
|
|
|
|
|
|
|
|
|
|
|
|
|
|
|
|
|
|
|
|
|
|
|
|
|
|
|
|
|
|
|
|
|
|
|
|
|
|
|
|
|
|
|
|
|
|
|
|
|
|
|
|
|
|
|
|
|
|
|
|
|
|
|
|
|
|
|
|
|
|
|
|
|
|
|
|
|
|
"4-Up"
If you select the "Border" checkbox, borderlines will be printed around each page.
CONTENTS |
I N D E X |
11 |
Loading...