


MODEL
AL-1600
AL-1610
DIGITAL COPYING MACHINE
OPERATION MANUAL
∙ GETTING STARTED |
Page |
2 |
|
∙ MAKING COPIES |
15 |
∙ STATUS INDICATORS |
24 |
∙ GENERAL INFORMATION |
32 |

FOR YOUR PROTECTION...
To aid in reporting this compact copier in case of loss or theft, please record below the model number and serial number located on the back of the unit. We also suggest you record all the information listed and retain for future reference.
MODEL NUMBER |
|
|
|
|
|
|
SERIAL NUMBER |
|
||||||
DATE OF PURCHASE |
|
|
|
|
|
|
|
|
|
|||||
Dealer |
|
|
|
|
|
|
|
|
|
|
||||
Address |
|
|
|
|
City |
|
||||||||
State |
|
|
Zip |
|
|
|
|
Telephone |
|
|||||
Service Station |
|
|
|
|
|
|
|
|
|
|
||||
Address |
|
|
|
|
City |
|
||||||||
State |
|
Zip |
|
|
|
Telephone |
||||||||
|
|
|
|
|
|
|
|
|
|
|
|
|
|
|
For location of the nearest Sharp Authorized Service, or to obtain product literature, accessories, or supplies,
please call 1-(630)378-3590 in the USA
or Toll Free 1-877-SHARP-CC in Canada.
For customer assistance, please visit http://www.sharpusa.com (for USA) or http://www.sharp.ca (for Canada) on the World Wide Web or call 1-(630)378-3590 (for USA).
INTRODUCTION
This copier has been designed to provide convenient copying features in a minimum amount of office space and with maximum operational ease. To get full use of all copier features, be sure to familiarize yourself with this manual and the copier.
For quick reference during copier use, keep this manual in a handy location.
Conventions used in this manual
In this manual, the following icons are used to provide the user with information pertinent to the use of the copier.
Warns the user that injury to the user or damage to the copier may result if the contents of the warning are not properly followed.
Cautions the user that damage to the copier or one of its components may result if the contents of the caution are not properly followed.
Notes provide information relevant to the copier regarding specifications, functions, performance, operation and such, that may be useful to the user.
Indicates a letter displayed in the copy quantity display.
CONTENTS |
Page |
GETTING STARTED |
|
● CAUTIONS . . . . . . . . . . . . . . . . . . . . . . . . . . . . . . . . . . . |
. . . 2 |
● MAIN FEATURES . . . . . . . . . . . . . . . . . . . . . . . . . . . . . |
. . . 3 |
● PART NAMES AND FUNCTIONS . . . . . . . . . . . . . . . . . |
. . . 4 |
– Overall layout . . . . . . . . . . . . . . . . . . . . . . . . . . . . . . . . . . . |
. . . . 4 |
– Operation panel . . . . . . . . . . . . . . . . . . . . . . . . . . . . . . . . . |
. . . . 6 |
● COPIER INSTALLATION . . . . . . . . . . . . . . . . . . . . . . . . |
. . 8 |
● CAUTIONS ON HANDLING . . . . . . . . . . . . . . . . . . . . . . . |
. . 9 |
● CHECKING PACKED COMPONENTS |
|
AND ACCESSORIES . . . . . . . . . . . . . . . . . . . . . . . . . . . . |
. 10 |
● SET-UP . . . . . . . . . . . . . . . . . . . . . . . . . . . . . . . . . . . . . . . |
. 11 |
● LOADING COPY PAPER . . . . . . . . . . . . . . . . . . . . . |
. 13 |
MAKING COPIES |
|
● NORMAL COPYING . . . . . . . . . . . . . . . . . . . . . . . . . . . . . . |
15 |
● REDUCTION/ENLARGEMENT/ZOOM . . . . . . . . . . . . . . . |
17 |
● BYPASS FEED (special paper) . . . . . . . . . . . . . . . . . . . . |
18 |
● TWO-SIDED COPYING . . . . . . . . . . . . . . . . . . . . . . . . . . . |
20 |
● INTERRUPTING A COPY RUN . . . . . . . . . . . . . . . . . . . . . |
21 |
● AUTOMATIC EXPOSURE ADJUSTMENT . . . . . . . . . . . . |
22 |
● TONER SAVE MODE . . . . . . . . . . . . . . . . . . . . . . . . . . . . . |
23 |
STATUS INDICATORS |
|
|
● |
TD CARTRIDGE REPLACEMENT . . . . . . . . . . . . . . . |
24 |
● |
DRUM CARTRIDGE REPLACEMENT . . . . . . . . . . . . |
26 |
● |
MISFEED REMOVAL . . . . . . . . . . . . . . . . . . . . . . . . . |
28 |
GENERAL INFORMATION
● USER PROGRAMS . . . . . . . . . . . . . . . . . . . . . . . . . . . . . . 32 ● POWER SAVE MODES . . . . . . . . . . . . . . . . . . . . . . . . . . . 34 ● USER MAINTENANCE . . . . . . . . . . . . . . . . . . . . . . . . . . . 36 ● COPIER TROUBLE? . . . . . . . . . . . . . . . . . . . . . . . . . . . . . 38 ● SUPPLIES . . . . . . . . . . . . . . . . . . . . . . . . . . . . . . . . . . . . . 40
– Types and sizes of copy paper. . . . . . . . . . . . . . . . . . . . . . . 40
– Supply part numbers. . . . . . . . . . . . . . . . . . . . . . . . . . . . . . 40
– Genuine supplies statement. . . . . . . . . . . . . . . . . . . . . . . . . 41 ● MOVING INSTRUCTIONS . . . . . . . . . . . . . . . . . . . . . . . . . 42 ● SPECIFICATIONS . . . . . . . . . . . . . . . . . . . . . . . . . . . . . . . 43 ● INDEX . . . . . . . . . . . . . . . . . . . . . . . . . . . . . . . . . . . . . . . . . 45
STARTED GETTING
COPIES MAKING
INDICATORS STATUS
INFORMATION GENERAL
1
STARTED GETTING
Cautions
CAUTIONS
Follow the cautions below when using this copier.
●The fusing area is hot. Exercise care in this area when removing misfed paper.
●Do not look directly at the light source. Doing so may damage your eyes.
●The socket-outlet shall be installed near the equipment and shall be easily accessible.
●Place the copier on a firm, level surface.
● Do not install the copier in a humid or dusty location.
● When the copier is not used for a long time, for example, during prolonged holidays, turn the power switch off and remove the power cord from the outlet.
●When moving the copier, be sure to turn the power switch off and remove the power cord from the outlet.
●Do not cover the copier with a dust cover, cloth or plastic film while the power is on. Doing so may prevent heat dissipation, damaging the copier.
SAFETY PRECAUTIONS
This Digital Copier is rated Class 1 and complies with 21 CFR 1040.10 and 1040.11 of the CDRH standards. This means that the copier does not produce hazardous laser radiation. For your safety, observe the precautions below.
●Do not remove the cabinet, operation panel or any other covers.
●The copier’s exterior covers contain several safety interlock switches. Do not bypass any safety interlock by inserting wedges or other items into switch slots.
Use of controls or adjustments or performance of procedures other than those specified herein may result in hazardous laser radiation exposure.
2

MAIN FEATURES
qHigh-speed laser copying
●First-copy time is only 7.2 seconds (except in a power save mode or immediately after power on).
●Copying speed is 16 copies/min., which adapts to business use, allowing improvement of working efficiency.
wHigh-quality digital image
●High-quality copying at 600 dpi is performed.
●In addition to the automatic exposure mode, the manual exposure can be adjusted in five steps.
●The photo mode copying function allows clear copying of delicate halftone original images such as monochrome photos and color photos. Photo mode is adjustable in five steps.
eSubstantial copying features
●Zoom copying from 50% to 200% in 1% increments can be performed.
●Continuous copying of maximum 99 sheets can also be performed.
●Toner save mode reduces toner consumption by approximately 10%.
rScan once/ Print many (AL-1610 only)
●The copier is equipped with a 1-page memory buffer. This memory allows the copier to scan an original 1 time only and make up to 99 copies. This feature allows for improved workflow, reduced operating noise from the copier and reduced wear and tear on the scanning mechanism, which provides for a higher reliability.
tEnvironmentally friendly design
●Paper output tray is housed in the copier for space saving.
●Preheat mode and auto power shut-off mode are provided to reduce power consumption and meet the Energy Star Guidelines.
As an ENERGY STAR® Partner, SHARP has determined that this product meets the
ENERGY STAR® guidelines for energy efficiency.
This copier does not have an internal calendar or clock.
This copier will not be affected by the year 2000.
STARTED GETTING
features Main
3

STARTED GETTING
functions and names Part
PART NAMES AND FUNCTIONS
Overall layout
|
|
|
e |
q |
|
|
|
|
|
o |
|
w |
|
|
!1 |
|
|
|
|
|
y |
!0 |
!2 |
e |
!3 |
||
|
|
|
 u
u
r t
 !4
!4
 i
i
qPlaten cover
Place the original on the original table and close the platen cover before copying starts.
wOriginal table
Place the document to be copied here.
iPaper tray
Holds 250 sheets of copy paper.
oSide cover
Open to remove misfeeds and to service the copier.
!0Side cover handle
eHandles
Use to move the copier.
rPower switch
Press to turn copier power on and off.
tOperation panel
All copier controls are located here for easy operation.
yPaper output tray
Finished copies are deposited in the paper output tray.
uFront cover
Open to remove misfeeds and for copier servicing.
Lift and pull to open the side cover.
!1Bypass tray guides
Adjust to the width of the copy paper.
!2Bypass tray
Special papers (including transparency film) and copy paper can be fed from the bypass tray.
!3Bypass tray extension
Pull out when feeding large paper such as 8-1/2" x 14" and 11" x 17".
!4Charger cleaner
Use to clean the transfer charger.
4
PART NAMES AND FUNCTIONS
!5
!6
!7 !8
!9
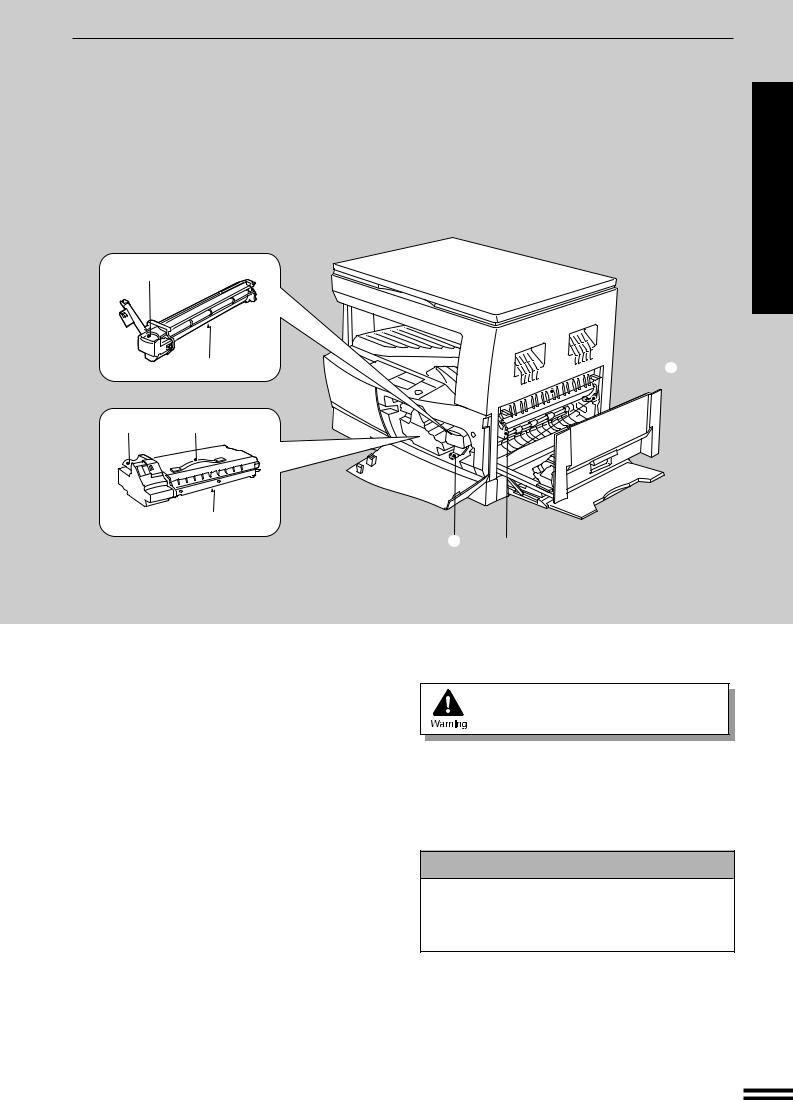
!5Drum cartridge handle
Hold to pull out the drum cartridge.
!6Drum cartridge
Copy images are formed on the photoconductive drum.
!7TD cartridge lock release lever
Use to unlock the TD cartridge.
!8TD cartridge strap
Lift to remove the TD cartridge.
!9TD cartridge
Contains toner.
@0 Roller rotating knob
Turn to remove misfed paper.
 @2
@2
@0  @1
@1
@1 Fusing unit release levers
Lower to remove misfed paper.
The fusing unit is hot.
Take care in removing paper.
@2 Paper guide
Open to remove misfed paper.
Accessories
Operation manual . . . . . . . . . . . . . . . . . . . . . . . 1 TD cartridge . . . . . . . . . . . . . . . . . . . . . . . . . . . 1 Charger cleaner . . . . . . . . . . . . . . . . . . . . . . . . 1
STARTED GETTING
functions and names Part
5
PART NAMES AND FUNCTIONS
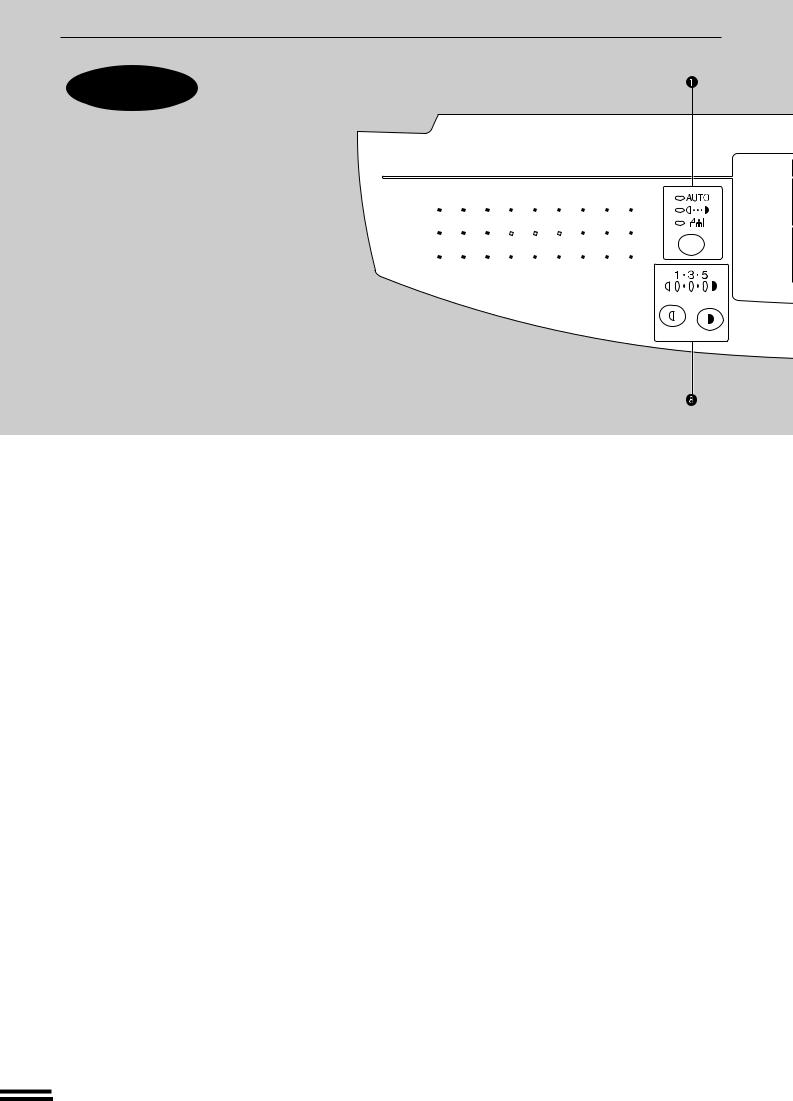
Operation
panel
STARTED GETTING
functions and names Part
q AUTO/MANUAL/PHOTO (  /
/  /
/  ) key and indicators (p. 15)
Use to sequentially select the exposure modes: AUTO, MANUAL (  ), or PHOTO (
  ).
).
wAlarm indicators
 : Paper required indicator (p.13)
 : Misfeed indicator (p.28)
 : TD cartridge replacement required indicator (p.24)
 : Drum replacement required indicator (p.26)
ePaper feed location/misfeed location indicators (p. 28)
The selected paper feed location is shown by a lit indicator ( ).
).
The misfeed location indicator ( ) blinks when a misfeed has occurred.
rINTERRUPT key and indicator (p. 21)
Interrupts a copy run.
tCopy quantity display
Displays the specified copy quantity during the ready condition and displays the copy countdown as copies are made. Also see items !3and !5.
yCLEAR ALL (  ) key
) key
Clears all selected settings and returns the copier to the initial settings.
uPOWER SAVE ( ) indicator (p. 34)
Lights up when the copier is in the preheat mode.
iLight (  ) and dark (
  ) keys and indicators
(p. 15)
Use to adjust the MANUAL (  ) or PHOTO (
  ) exposure level.
oTRAY SELECT (  ) key (p. 15)
Use to manually select a paper tray.
!0PRESET RATIO selector keys and indicators
(p. 17)
Use to sequentially select preset reduction/enlargement copy ratios: 50%, 64%, 77%, 95%, 100%, 121%, 129%, 141%, 200%.
!1ZOOM indicator (p.17)
Lights up when a zoom ratio is set.
6

PART NAMES AND FUNCTIONS
!2Zoom keys (p. 17)
Use to select any reduction or enlargement copy ratio from 50% to 200% in 1% increments.
!3Copy ratio display (  ) key (p. 17)
Press and hold down during standby to display the copy ratio in the copy quantity display.
!4Copy quantity keys
Use to select the desired copy quantity or to make user program entries.
!5CLEAR (  ) key
) key
Clears the copy quantity display or terminates a copy run.
Press during standby to display the total number of copies made to date.
STARTED GETTING
functions and names Part
!6START (  ) key and indicator
Copying is possible when the indicator is on. Press to start copying.
Initial settings
The copier assumes the initial settings when it is first turned on, when the CLEAR ALL (  ) key is pressed, and approximately one minute* after the last copy is made in any mode.
●Copy ratio: 100%
●Exposure: Automatic
●Copy quantity: 0
●Paper feed station: Previously selected paper tray
*This time (auto clear time) can be changed. See page 32, USER PROGRAMS.
1st display |
|
2nd display |
|
|
|
|
|
|
|
|
|
|
|
|
Press and hold down the key. 12,345 sheets output
Note: 11" x 17" size copies are counted as two copies.
7
STARTED GETTING
installation Copier
COPIER INSTALLATION
Improper installation may damage the copier. Please note the following during initial installation and whenever the copier is moved.
If the copier is moved from a cool place to a warm place, condensation may form inside the copier. Operation in this condition will cause poor copy quality and malfunctions. Leave the copier at room temperature for at least 2 hours before use.
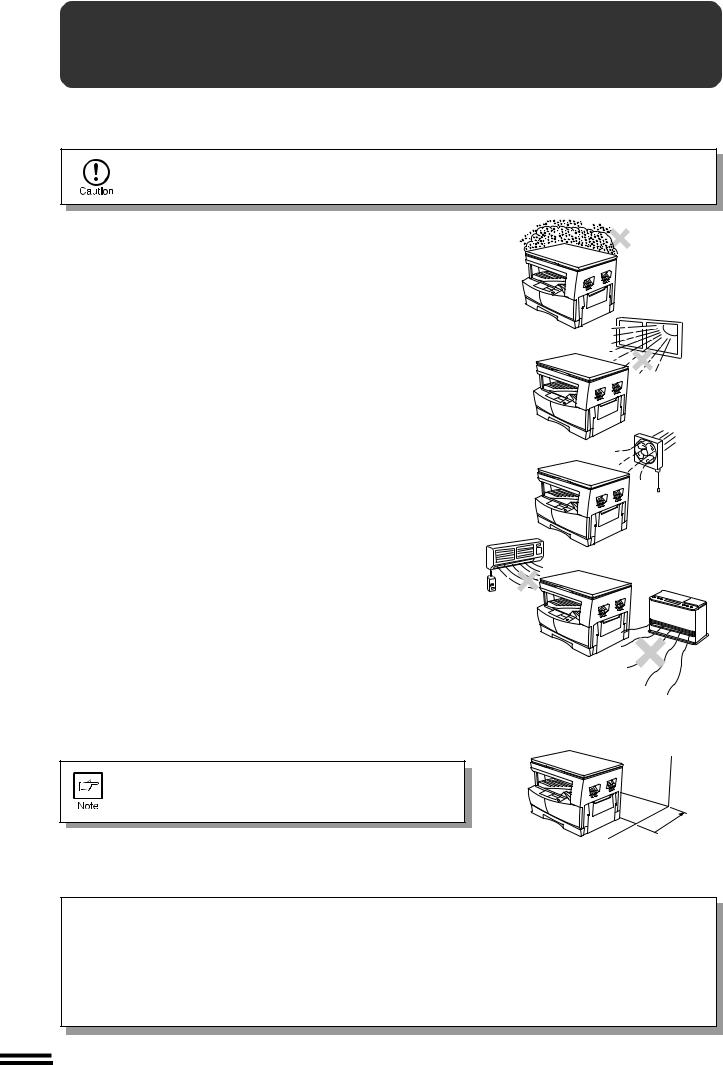
Do not install your copier in areas that are:
● damp, humid, or very dusty
● exposed to direct sunlight
● poorly ventilated
●subject to extreme temperature or humidity changes, e.g., near an air conditioner or heater.
The copier should be installed near an accessible power outlet for easy connection.
Be sure to connect the power cord only to a power outlet that meets the specified voltage and current requirements.
Also make certain the outlet is properly grounded.
Connect the copier to a power outlet which is not used for other electric appliances. If a lighting fixture is connected to the same outlet, the light may flicker.
4" (10 cm)
Be sure to allow the required space around the machine for servicing and proper ventilation.
A small amount of ozone is produced within the copier during operation.The emission level is insufficient to cause any health hazard.
NOTE:
The present recommended long term exposure limit for ozone is 0.1 ppm (0.2 mg/m3) calculated as an 8 hr. time-weighted average concentration.
However, since the small amount that is emitted may have an objectionable odor, it is advisable to place the copier in a ventilated area.
8
CAUTIONS ON HANDLING
Be careful in handling the copier as follows to maintain the performance of this copier.
Do not drop the copier, subject it to shock or strike it against any object.
Do not expose the drum cartridge to direct sunlight.
Doing so will damage the surface (green portion) of the drum cartridge, causing poor copy quality.
Store spare supplies such as drum cartridges and TD cartridges in a dark place without removing from the package before use.
If they are exposed to direct sunlight, poor copies may result.
Do not touch the surface (green portion) of the drum cartridge.
Doing so will damage the surface of the cartridge, causing smudges on copies.
STARTED GETTING
handling on Cautions
9
STARTED GETTING
accessories and components packed Checking
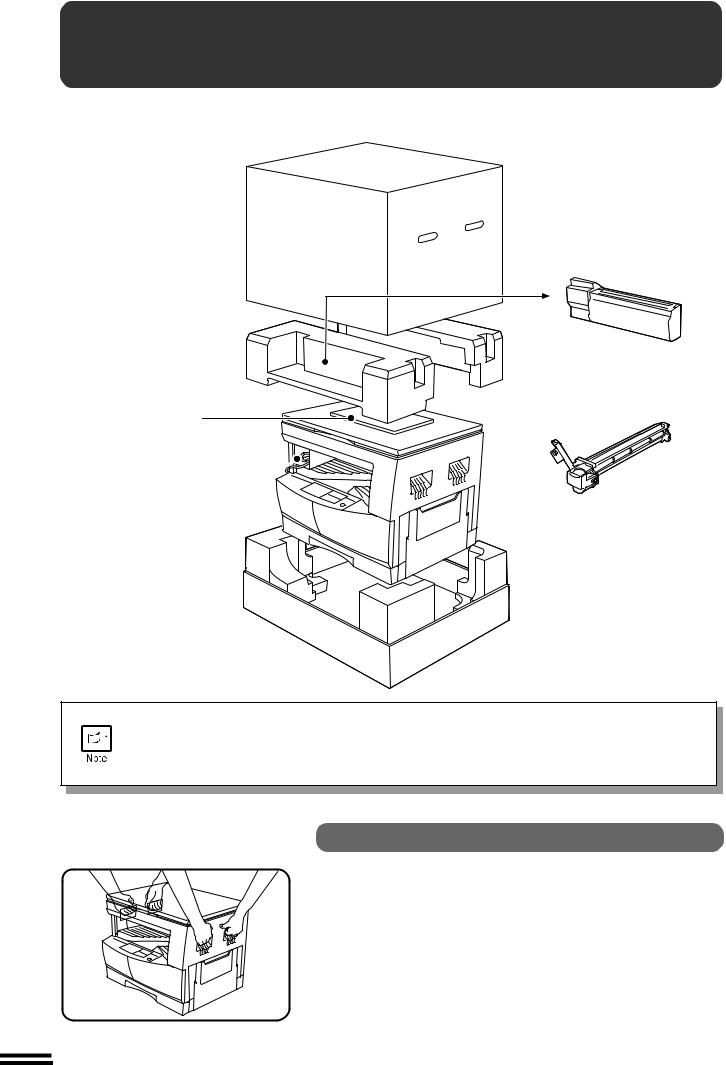
CHECKING PACKED COMPONENTS AND ACCESSORIES
Open the carton and check to ensure that the following components and accessories are included.
TD cartridge
Operation manual
Power cord 
|
Drum cartridge |
Copier |
(installed in copier) |
●If anything is not included or is damaged, contact our Technical Assistance Department at 1- (630)378-3590 in the USA or Toll Free 1-877-SHARP-CC in Canada.
●Save the carton and packing materials.These can be re-used for transporting the machine, should it be necessary.
Unpacking
Be sure to hold the handles on both sides of the copier by two persons to unpack the copier and carry it to the installation location.
10
SET-UP
STARTED GETTING
up-Set
Remove all pieces of tape. Then open the platen 1 cover and remove the protective material.
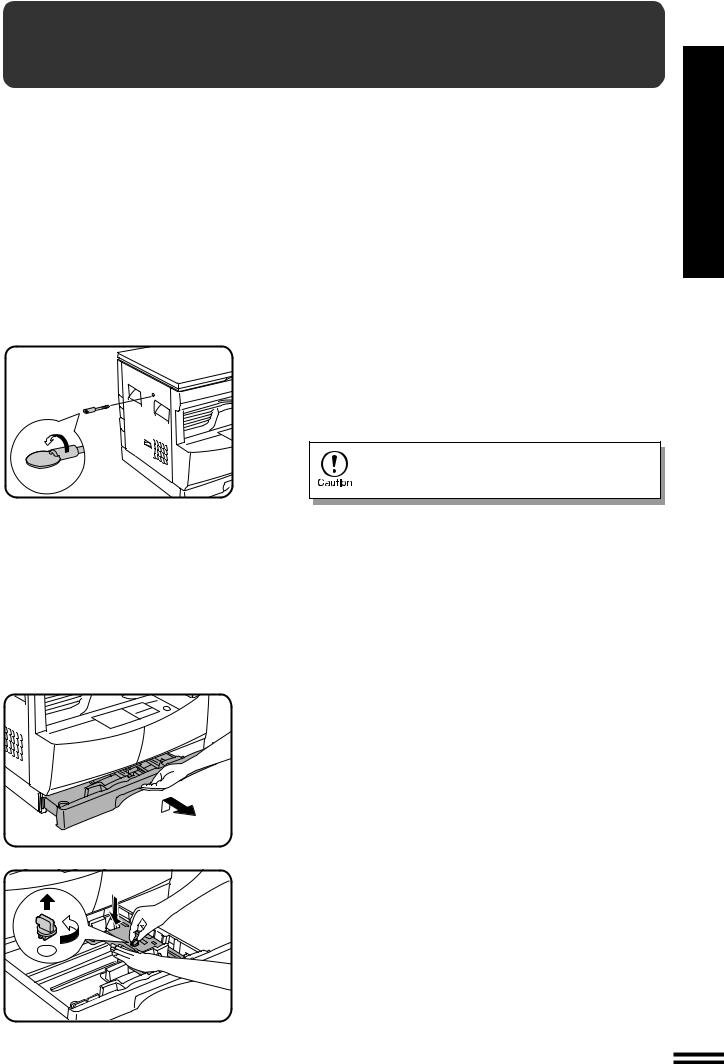
2 Use a coin (or suitable object) to remove the screw.
Store the screw in the paper tray as described in step 6 because it will be used if the copier has to be moved. (p. 42)
3 Install the TD cartridge.
●For installation of the TD cartridge, see steps 1 to 2 and steps 4 to 7 of TD CARTRIDGE REPLACEMENT on pages 24 and 25.
4 Gently lift and pull out the paper tray until it stops.
5 Remove the pressure plate lock. Rotate the pressure plate lock in the direction of the arrow to remove it while pressing down the pressure plate of the paper tray.
11
SET-UP
GETTING |
|
STARTED |
Pressure |
|
|
|
plate lock |
up-Set

 Screw
Screw
Power on
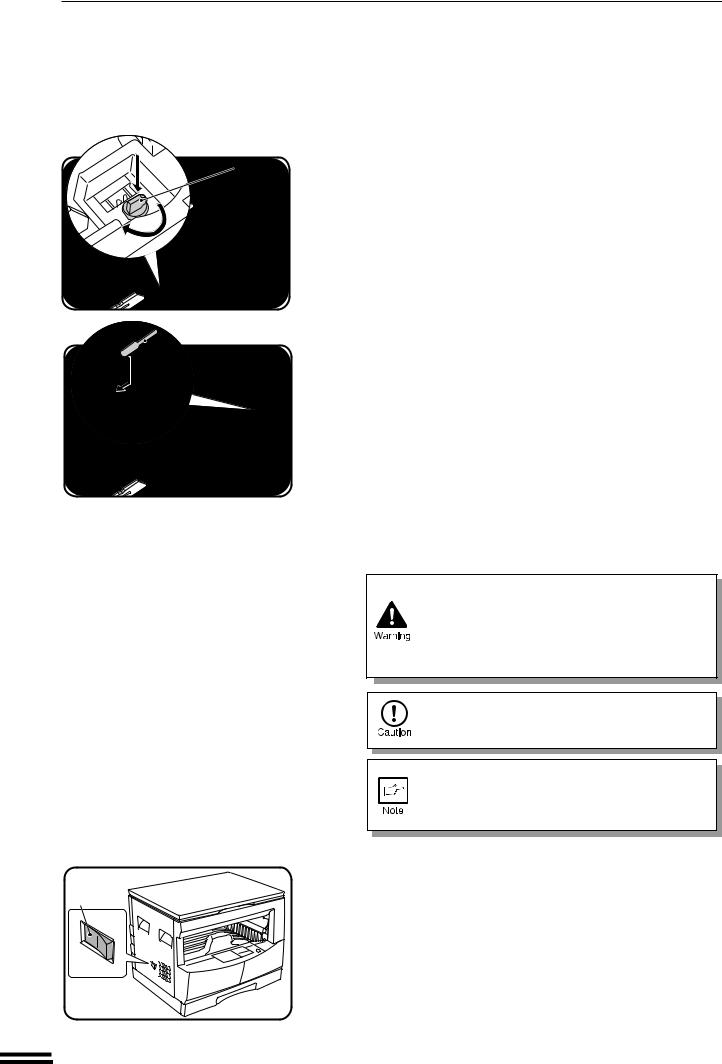
Store the pressure plate lock which has been 6 removed in step 5 and the screw which has been
removed in step 2 in the front of the paper tray.
●To store the pressure plate lock, rotate the lock to fix it on the relevant location.
Ensure that the power switch of the copier is in the 7 OFF position. Plug the power cord into the nearest
outlet.
If you use the copier in a country other than the country where the copier was purchased, you will need to make sure that your local power supply is compatible with your model. If you plug the copier into an incompatible power supply, irreparable damage to the copier will result.
Only insert the power cord into a properly grounded wall socket.
Do not use extension cords or power strips.
Connect the copier to a power outlet which is not used for other electric appliances. If a lighting fixture is connected to the same outlet, the light may flicker.
8 Turn the power switch on.
Load copy paper.
9 ● When loading copy paper for the first time, be sure to turn the power switch on in advance.
If you use copy paper other than 8-1/2" x 11" (default size), use user program No. 21 to set the paper size. See page 32.
●For loading copy paper, see steps 2 to 4 of LOADING COPY PAPER on page 13.
12
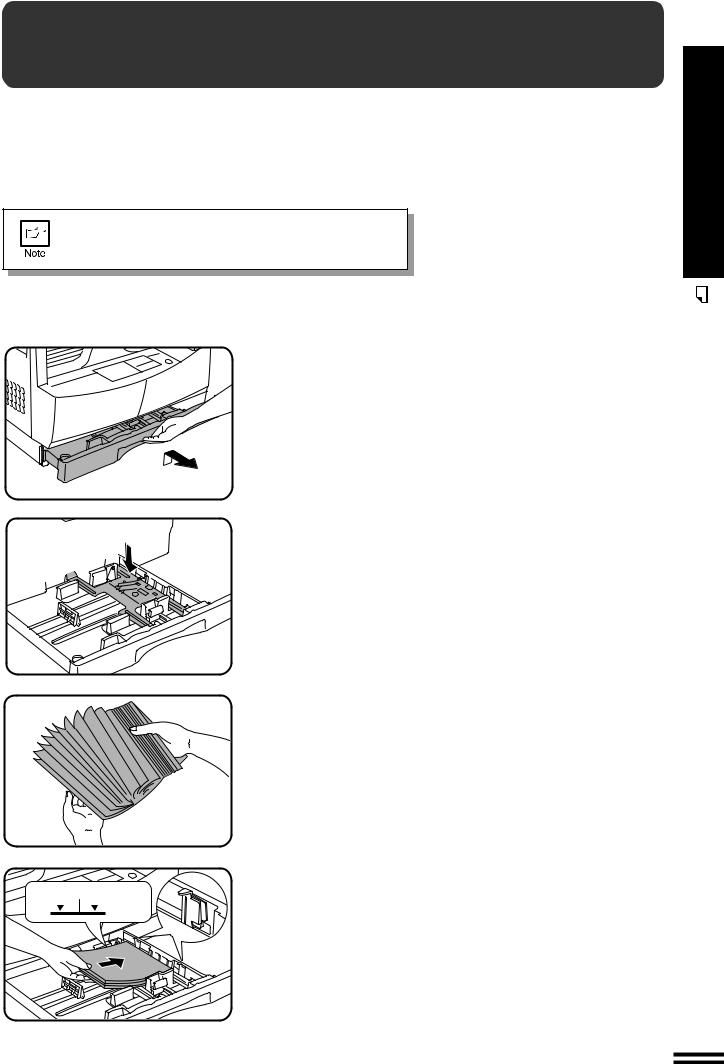
 LOADING COPY PAPER
To save space, this copier has been designed with an adjustable front-loading tray, which is easily opened for paper loading. For best results, use only SHARP recommended paper. (See page 40.)
The paper required ( ) indicator will light up when there is no copy paper in the selected paper feed station, or when the paper tray is not installed or is improperly installed.
If you change the copy paper size in the tray, be sure to set the paper size using user program No. 21. See page 32.
1 Gently lift and pull out the paper tray until it stops.
 2
2
3
Push the pressure plate down until it locks in place.
Fan the copy paper and insert it into the tray. Make sure the edges go under the corner hooks.
●If you change to a different size of copy paper, the tray must be adjusted. See the next page.
|
● |
Set the paper along the guides. |
Maximum height line |
● |
The tray holds up to 250 sheets of 21 lb. bond paper. |
|
|
Do not load paper above the maximum height line. |
4 Push the paper tray firmly back into the copier.
STARTED GETTING
paper copy Loading
13
 Loading...