


Battery
Charger
Model:
™ |
SE-40225 Manual Battery Charger |
|
|
|
2 Amp, 12 Volt |
|
20 Amp, 12 Volt |
|
40 Amp, 6 & 12 Volt |
|
225 Amp, 12 Volt, Engine Start |
|
125 Amp, 6 Volt, Engine Start |
–Save– Important Safety Instructions
Read Rules for Safe Operation and Instructions Carefully
Working in vicinity of a lead-acid battery is dangerous. Batteries generate explosive gases during normal battery operation. For this reason, it is of utmost importance that each time before using your charger, you read this manual and follow the instructions exactly.
WARNING: Handling the cord on this product or cords associated with accessories sold with this product, may expose you to lead, a chemical known to the State of California to cause cancer and birth defects or other reproductive harm. Wash hands after handling.
A. GENERAL BATTERY SAFETY
1.Before you use your battery charger, be sure to read all instructions and cautions printed on:
•Battery Charger
•Battery
•Vehicle or device using battery
2.Use battery charger on LEAD ACID type rechargeable batteries only, such as used in autos, trucks, tractors, airplanes, vans, RVs, trolling motors, etc. Charger is not intended to supply power to low-voltage electrical system other than in an automotive application.
WARNING: Do not use battery charger for charging dry-cell batteries that are commonly used with home appliances. These batteries may burst and cause injury to persons and damage to property.
3.Use only attachments recommended or sold by manufacturer.
Use of non-recommended attachments may result in fire, electric shock, or injury.
4.When disconnecting the battery charger, pull by the plug not by the cord. Pulling on the cord may cause damage to cord or plug.
5.Locate battery power cord so it cannot be stepped on, tripped over, or subjected to damage or stress.
6.Do not operate charger with damaged cord or plug. Have cord replaced immediately.
7.Do not operate charger if it has received a sharp blow, been dropped, or otherwise damaged in any way. Take it to a qualified professional for inspection and repair.
8.Do not disassemble charger. Take it to a qualified professional when service or repair is required. Incorrect reassembly may result in electric shock or fire.
9.To reduce risk of electric shock, unplug charger from outlet before attempting any maintenance or cleaning.
10.Do not use an extension cord unless absolutely necessary.
Useofanimproperextensioncordcouldresultinfireorelectric shock. If an extension cord must be used, make sure that:
•Pins on plug of extension cord are the same number, size, and shape as those of the plug on the charger.
•Extension cord is properly wired and in good electrical condition.
•Wire size is large enough for AC ampere rating of charger, as specified below:
Length of cord (feet): |
25 |
50 |
100 |
150 |
AWG size of cord: |
16 |
14 |
10 |
8 |
(American Wire Gauge)
11.Always charge battery in a well ventilated area.
NEVER operate in a closed-in or restricted area without adequate ventilation because of risk of explosive gases. WARNING: Risk of explosive gas.
12.Locate charger as far away from battery as DC charger cables permit.
13.Do not expose charger to rain or snow.
14.NEVER charge a frozen battery. If battery fluid (electrolyte) is frozen, bring into a warm area to thaw before charging.
15.NEVER allow battery acid to drip on charger when reading specific gravity or filling battery.
16.NEVER set a battery on top of charger.
7. NEVER place charger directly above battery being charged. Gases from battery will corrode and damage charger.
18.NEVER touch the battery clips together when the charger is energized.
SCHUMACHER ELECTRIC CORPORATION
801 BUSINESS CENTER DRIVE • MOUNT PROSPECT, ILLINOIS 60056-2179
In United States: Send Warranty Product Repairs to: 1025 E. Thompson, Hoopeston, IL 60942-0280
Call Customer Service if you have questions: 1-800-621-5485
00-99-000625/1006
B. PERSONAL SAFETY PRECAUTIONS
1.WARNING: Wear complete eye protection and clothing protection, when working with lead-acid batteries.
2.Make sure someone is within range of your voice or close enough to come to your aid when you work with or near a lead-acid battery.
3.Have plenty of fresh water and soap nearby for use if battery acid contacts skin, clothing, or eyes. If battery acid contacts skin or clothing, wash immediately with soap and water.
4.Avoid touching your eyes while working with a battery. Acid particles (corrosion) may get into your eyes! If acid enters your eye, immediately flood eye with running cold water for at least
10 minutes. Get medical attention immediately.
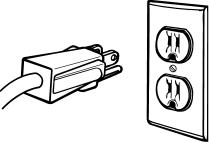
C. Plugging it in
WARNING: Electrical Shock Hazard. Be sure that power cord fits properly into outlet. If not, have a qualified technician install a proper outlet. Never alter the AC cord or plug provided. Improper connection can result in electrical shock.
Your charger should be grounded to reduce the risk of electrical shock.
Your charger is equipped with an electrical cord that has an equipment grounding conductor and a grounding plug designed to be used on a 120 volt circuit. The plug must be plugged into an outlet that has been properly installed and grounded in accordance with all local codes and ordinances.
5.Remove all personal metal items such as rings, bracelets, necklaces, and watches when working with a lead-acid battery. A lead-acid battery can produce a short-circuit current high enough to weld a ring (or the like) to metal, causing a severe burn.
6.Take care not to drop a metal tool or other metal onto the battery. Metal may cause sparking or short circuit the battery or another electrical device. Sparking may cause an explosion.
7.Always operate battery charger in an open well ventilated area.
8.NEVER smoke or allow a spark or flame in the vicinity of the battery or engine. Batteries generate explosive gases!
9.Neutralize any acid spills thoroughly with baking soda before attempting to clean up.
FIGURE 1 – PLUGGING IT IN
DANGER: Never alter the AC cord or plug provided. If it will not fit outlet, have a proper outlet installed by a qualified electrician. Improper connection can result in a risk of an electrical shock. DANGER: Before using an adapter, as illustrated, be certain that the center screw of the outlet plate is grounded. The green-colored rigid ear or lug extending from the adapter must be connected to a properly grounded outlet. Make certain it is grounded. If necessary, replace original outlet cover plate screw with a longer screw that will secure adapter ear or lug to outlet cover plate and make ground connection to grounded outlet.
D. PREPARING TO CHARGE
It is important that you read and follow these guidelines while you are preparing to charge your battery.
•Make sure that you have a 12 volt or 6 volt lead-acid battery.
•Clean the battery terminals. Be careful to keep corrosion from getting in or around your eyes or on your hands.
•If you have a battery with removable cell caps, if required, add distilled water to each cell until the battery acid reaches the level indicated by the manufacturer. This will help purge excessive gases from the cells. Be careful not to overfill. If you have a sealed battery without cell caps, no action is necessary. Continue to the next step listed below.
•Taketimetoreadallbatterymanufacturer’sspecificprecautions, such as removing or not removing cell caps while charging, and recommended rates of charge.
•Wear safety glasses. See additional "Personal Safety Precautions" on page 2.
•Be sure that the area around the battery is well ventilated while it is being charged. If ventilation is poor, any gases emitted from the battery can be manually blown away by using a piece of cardboard or other non-metallic material as a fan.
•If it is necessary to remove the battery from the vehicle to charge it, always remove the grounded terminal from the battery first.
A spark may be caused if all accessories in the vehicle are not completely turned off.

E. OPERATING INSTRUCTIONS: CHARGING BATTERY IN VEHICLE
NOTE: A marine (boat) boat battery must be removed and charged on shore. To charge it on board requires equipment specially designed for marine use.
When charging battery in the vehicle, take care to determine the battery type and which post is grounded. To reduce risk of a spark near battery, follow these steps when battery is installed in vehicle. WARNING: A spark near battery may cause battery explosion.
1.Arrange the power cord and charging cords carefully in order to avoid damage that could be caused by the hood, door, or moving engine parts.
2.Keep hands, hair, clothing and jewelry clear of the fan blades, belts, pulleys, and other parts that can cause injury.
3.Check the polarity of the battery posts using the identification marks on the battery case: POSITIVE (POS,P, +) and NEGATIVE (NEG,N, –).
4.Identify which post of the battery is grounded or connected to the chassis. The negative post is normally the one that is grounded.
5.To charge a negative grounded post system: Connect the red (POSITIVE) battery charger clamp to the ungrounded POSITIVE (POS,P,+) post of the battery. Then connect the black (NEGATIVE) clamp to a heavy metal part of the chassis or engine block, away from the
battery. Do not connect clamp to carburetor, fuel lines, or sheet metal parts.
To charge a positive grounded post system: Connect the black
(NEGATIVE) battery charger clamp to the NEGATIVE
(NEG,N,–) ungrounded post
of the battery. Then connect the red (POSITIVE) clamp to a heavy unpainted metal part of the chassis or engine block, away from the battery. Do not connect clamp to carburetor, fuel lines, or sheet metal parts.
IMPORTANT: Wear safety glasses and face away from the battery while making connections.
6.Twist or rock clamps back and forth to make a solid connection. This will help make better contact and help keep them from slipping off and causing sparks.
7.Plug the power cord into a 3-prong AC electrical wall outlet.
8.Press the SELECT VOLT/CHARGE RATE to the desired charge position.
9.Pressthetimertothedesiredchargetime,from5–135minutes.
If more than 135 minutes of charging time is needed the HOLD position can be used. When using the HOLD feature the battery being charged must be monitored closely to avoid over charging.
10.When the battery is fully charged, unplug the charger power cord from the wall outlet.
11.Facing away from the battery, remove the charger clamps in this order: (1) from the vehicle chassis or engine block (2) from the battery post or terminal.
12.Clean and store the battery charger in a dry location.
F.OPERATING INSTRUCTIONS: CHARGING BATTERY OUT OF VEHICLE
When charging battery out of vehicle, take care to determine the battery type. To reduce risk of a spark near battery, follow these steps when battery is outside vehicle. WARNING: A spark near the battery may cause battery explosion. WARNING: When removing battery from vehicle or boat, disconnect grounded pole first. When disconnecting, make sure all accessories are off, so as not to cause an arc. (NOTE: A marine (boat) battery must be removed and charged on shore. (To charge on board requires special equipment designed for marine use.) WARNING: When reinstalling battery, attach the ground post first.
1.Remove battery from vehicle, making sure to disconnect grounded terminal first with all power turned off to the vehicle.
2.Check the polarity of the battery posts as indicated on the battery case: POSITIVE (POS,P,+) and NEGATIVE (NEG,N,–).
NOTE: On top-post batteries, the positive battery terminal usually has a larger diameter than the negative one.
3.Connect the red (POSITIVE) charger clamp to the POSITIVE post of the battery. Be sure to rock the clamp back and forth to make a solid connection.
4.Attach at least a 6-gauge (AWG) insulated battery cable of at least 24-inches in length to the NEGATIVE battery post. This cable will provide
a safer connection because any arcing and sparking will not occur directly over the battery. (The battery cable is not provided with the charger but may be purchased at most automotive accessory outlets.)
5.Take the other end of the 6-gauge (AWG) insulated battery cable (at least 24-inches in length), and, standing as far away from the battery as possible, connect the black (NEGATIVE) charger clamp to the free end of the cable. Be sure to rock the clamp back and forth to make a solid connection.
IMPORTANT: Wear safety glasses and face away from battery while you are making the final connection.
6.Plug the power cord into a grounded 3-prong AC electrical wall outlet.
7.Press the timer to the desired charge time, from 30-135 minutes. If more than 135 minutes of charging time is needed the hold position can be used. When using the HOLD feature the battery being charged must be monitored closely to avoid over-charging.
8.Press the SELECT VOLT/CHARGE RATE button to the desired charge position. (See “CHARGE RATE” chart on page 5 for correct settings.)
9.When the battery is fully charged, unplug the charger power cord from the wall outlet.
10.Face away from battery and remove the charger clamps from the
NEGATIVE end of the cable first, then from the POSITIVE post.
11.Clean and store the battery charger in a dry location.
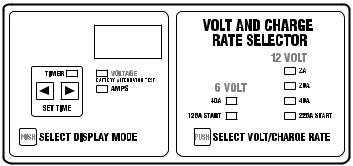
G. OUTPUT SELECTOR CONTROLS
DIGITAL
DISPLAY
TIMER
The timer is designed to allow the battery to be charged for a designated amount of time. To accurately charge your battery, you must know the size of the battery in ampere hours or reserve capacity in units, as well as the state of charge. Since this information is not known by the charger, the timer limit is set at 2.25 hours to prevent the battery from overcharging to a point where it can be severely damaged. If you do not know the charge state of your battery, set the timer at one hour or less.
To set the timer:
1.Press the t symbol for less time and the symbol for more time.
2.The Timer LED will light and digital display will show the time in minutes.
3.To turn the timer off, press the symbol until the digital display reads OFF.
TIMER HOLD
The Timer Hold feature overrides the timer allowing the charger to continue charging for over 2.25 hours. This feature is most often used when the charging rate is 2 or 20 amps. Using this feature requires closely monitoring the charge time and turning off the charger when the battery is fully charged.
Note: When the battery is fully charged, the charger and timer will not automatically turn off. It is important to monitor the charge level. Not doing so may cause damage to your battery.
To activate the hold feature:
1.Press the t symbol until the Digital Display reads HLD.
2.To release the Timer Hold, press the until the digital display reads OFF.
BATTERY TEST
The Battery Test is based on the terminal voltage of the battery. If the battery is installed in the vehicle, make sure the engine and all accessories are turned off before testing.
1.Plug the power cord into a 3-prong electrical wall outlet.
2.Press the SELECT DISPLAY MODE button and select VOLTAGE.
3.Hookthebatteryclampstothebatteryasoutlinedin“Charging Your Battery” on page 3.
4.The digital display will show the voltage of the battery:
|
12V Battery Voltages |
|
12.8 or more volts |
= |
Charged battery |
12.8 – 12.2 volts |
= |
Battery needs charging |
12.2 or less volts |
= Discharged battery, needs charging |
|
|
6V Battery Voltages |
|
6.4 or more volts |
= |
Charged battery |
6.4 – 6.1 volts |
= |
Battery needs charging |
6.1 or less volts |
= Discharged battery, needs charging |
|
Note: If, after charging, the battery does not hold a charge, have the battery tested by a qualified technician.
BATTERY/ALTERNATOR TEST
1.Plug the power cord into a 3-prong electrical wall outlet.
2.Press the SELECT DISPLAY MODE button and select
VOLTAGE. (The digital display will show the voltage of the battery.)
3.Hookthebatteryclampstothebattery,asoutlinedin“Charging Your Battery” on page 3.
4.Start the engine and while it is at a fast idle, read the digital display.
Note: The battery should be in a good state of charge before doing this test.
|
12V Alternator/Generator Display |
||
15 volts or more |
= See vehicle owner’s manual |
||
15 |
– 14 volts |
= |
Good condition |
14 |
- 12.8 volts |
= See vehicle owner’s manual |
|
12.8 or less volts |
= |
Check with qualified technician |
|
Note: If the digital display reads less than 12.8 volts, the charging system may have loose fan belts, a defective voltage regulator or alternator. Additional tests may be required to find the exact cause. Take the vehicle to a qualified service center.
6V Alternator/Generator Display
7.5 volts or more |
= See vehicle owner’s manual |
|
7.5 – 7 volts |
= |
Good condition |
7 - 6.4 volts |
= See vehicle owner’s manual |
|
6.4 or less volts |
= |
Check with qualified technician |
select VOLT/CHARGE RATE
The SELECT VOLT/CHARGE RATE allows you to select the correct battery voltage and amp draw rate to match your charging needs. Read the following operating instructions for making the proper settings for charging a battery.
Whenyoufirststartchargingabattery,theampreadingwillbehigh.
As the battery becomes charged, the reading will decrease. To determine the amount of amps being drawn by the battery:
1.Press the Select Display Mode button until the AMPS LED lights.
a.As the battery charges at 40 amps, the reading will decrease to 15 or 20 amps at full charge. You should stop charging the battery at this time.
b.When charging at 20 amps, the display should show 15 amps for a discharged battery and 7-8 amps for a fully charged battery. You should stop charging the battery at this time.
c.At the 2 amp charge rate, little or no display change will occur.
Note: The digital display will read OL or Overload if more than 40 amps are supplied to the battery. Overload means too high a charging rate. Lower the charging rate to continue.
To determine an accurate reading of your battery’s voltage before you charge:
1.Plug the power cord into a 3-prong electrical wall outlet.
2.Press the select Display Mode button so the VOLTAGE LED lights.
3.Connect the battery charger as outlined in “Charging Your Battery” on page 3. The voltage will be displayed.
Note: If a battery has recently been charged or in a vehicle

that has been run recently, turn on the vehicle’s headlights for a few minutes before reading the meter to avoid getting a false reading from a surface charge.
4.Turn off vehicle’s headlights and read the digital display.
5.To turn OFF the charger, unplug the power cord from the AC wall outlet.
6.Disconnect the battery charging clamps as outlined in
“Charging Your Battery” on page 3.
H. ENGINE START
The Engine Start is a feature to help start the engine of your vehicle.
1.Plug the power cord into a 3-prong electrical wall outlet.
2.Push SELECT VOLT/CHARGE RATE button and choose 125A
START (6 volt) or 225A START (12 volt). The ENGINE START feature will deliver 125 amps to help crank a 6-volt system and 225 amps to help crank a 12-volt system.
3.Push the symbol located in the Timer Set Time section until the number 5 is displayed.
4.Crank the engine for no more than 5 seconds. If it does not start, wait three minutes before cranking again for no more than 5 seconds.
NOTE: During extremely cold weather, or if the battery is severely exhausted, charge the battery for about 5 minutes in the 40 amp setting before cranking the engine.
5.After the engine starts, unplug the charger power cord from the wall outlet.
6.Disconnect the output clamps from the battery.
7.Clean and store the charger in a dry location.
IMPORTANT: Do not try to start the engine without a battery in it. You could cause damage to the electrical system.
If the engine does turn over, but never starts, there is not a problem with the starting system. There is a problem somewhere else with the vehicle. STOP cranking the engine until the other problem has been diagnosed and corrected.
I.CHARGE PERIOD
The Hydrometer or Electronic Method
To find the time needed to fully charge your battery, determine the battery’s charge level with a hydrometer or electronic Percent-of- Charge Tester. The following table will help you convert hydrometer readings to percent of charge values.
SPECIFIC |
PERCENT OF |
PERCENT OF |
GRAVITY |
CHARGE |
CHARGE NEEDED |
1.265 |
100% |
0% |
1.225 |
75% |
25% |
1.155 |
25% |
75% |
1.120 |
0% |
100% |
When you know the percent of charge and the Amp Hour (AH) rating of your battery, you can calculate the approximate time needed to bring your battery to a full charge.
To convert Reserve Capacity to Amp Hours, divide Reserve Capacity by 2, and add 16:
Ampere Hour rating = (Reserve Capacity) + 16
(2)
NOTE: The Reserve Capacity can be obtained from the battery specification sheet or the owner’s manual.
To calculate time needed for a charge:
•Find the percent of charge needed. (A battery at 50 percent charge that will be charged to 100 percent needs another 50 percent (.50).
•Multiply the Amp Hour rating by the charge needed (.50) and divide by the charger setting (2/20/40 amps).
•Multiply the result by 1.25 and you’ll have the time needed, in hours, to bring the battery to full charge.
•Add one additional hour for a deep-cycle battery.
Example:
Amp Hour Rating x % of charge needed x 1.25 |
= |
hours of |
Charger Setting |
|
charge |
100 (AH Rating) x .50 (charge needed) x 1.25 |
= |
4.16666 |
15 (Charger Setting) |
|
hours |
100 x .50 = 3.3333 x 1.25 |
= |
4.16666 |
15 |
|
|
You would need to charge your 100-Ampere Hour Battery for a little more than 4 hours at the 20-Amp charge rate using the above example.
J. BATTERY CHARGING
CHARGER MUST BE ASSEMBLED BEFORE USING.
1.Beforecharginganybattery,makesuretheelectrolyte(battery liquid) in each cell is at correct level.
2.Set all buttons and timers to the OFF position.
3.If the battery is being charged inside the vehicle, use connection procedures outlined in Section E. Should the battery be removed from the vehicle, follow the instruction in Section F. Plug the power cord into the AC outlet.
4.Set the charge rate switch to the desired charge position. See Charge Rate Charts.
5.Set the timer from OFF position to desired timed charge, 30135 minutes.
NOTE: This battery charger is not automatic and can overcharge a battery if permitted to operate for extended periods of time. Monitor the charging often.
Also,yourchargermayexhibitanoise(buzzing)duringcharging. Laminationsofthetransformertendtovibrate.Thisisnormal...
continue to charge the battery. The noise may continue after charger is disconnected from battery.
The Chart Method
Use the following table to more accurately determine the time it will take to bring a battery to full charge. First, identify where your battery fits into the chart.
•Small batteries — motorcycles, garden tractors, etc. — are usually rated in Ampere Hours (AH). For example: 6 to 12 AH, or 12 to 32 AH.
•Batteries in cars and smaller trucks are usually rated in Reserve
Capacity (RC), Cold-Cranking Amps (CCA), or both.
•Marine, or deep-cycle batteries are usually rated in Reserve
Capacity (RC).
•NR means that the charger setting is NOT RECOMMENDED.
Find your battery’s rating on the chart on page 6 and note the charge time given for each charger setting. The times given are for batteries with a 50-percent charge prior to recharging. Add more time for severely discharged batteries.

|
|
|
CHARGE RATE/CHARGING |
||||
|
|
|
|
|
TIME - HOURS |
||
BATTERY SIZE/RATING |
2 AMP |
|
20 AMP |
40 AMP |
|||
SMALL |
Motorcycle, Garden |
6 - 12 AH |
2 |
- 4 |
|
NR |
NR |
BATTERIES |
Tractor, etc. |
12 - 32 AH |
4 - 10 |
|
NR |
NR |
|
CAR/TRUCKS |
200 - 315 CCA |
40 - 60 RC |
11 |
- 14 |
|
90-120 min. |
30-40 min. |
315 - 550 CCA |
60 - 85 RC |
14 |
- 18 |
|
120-150 min. |
40-45 min. |
|
|
|
||||||
|
550 - 875 CCA |
85 - 125 RC |
18 |
- 35 |
|
2.5 - 4.5 hrs. |
45-90 min. |
MARINE/ |
|
80 RC |
18 |
|
130 min. |
NR |
|
|
140 RC |
27 |
|
3.5 |
NR |
||
DEEP CYCLE |
|
|
|||||
|
160 RC |
30 |
|
4.0 |
NR |
||
|
|
|
|||||
|
|
180 RC |
33 |
|
4.5 |
NR |
|
K. ASSEMBLY INSTRUCTIONS
It is important to fully assemble your charger before use. Follow these instructions for easy assembly.
PARTS |
TOOLS NEEDED |
Two, 10 -32 thread cutting |
3/8" wrench (for mounting |
screws |
foot) |
Two, 1/4-20 thread cutting |
5/16" wrench (for wheels) |
screws |
|
Two wheels |
Hammer |
One axle |
Screwdriver (for handle |
|
assembly) |
Two axle caps |
|
Two axle brackets |
|
One handle |
|
One handle clamp rod |
|
One handle grip |
|
One mounting foot |
|
Attach Foot:
Remove charger from packing materials and place charger face down. Attach mounting foot and secure with the two, 1/4-20 thread cutting screws provided.
Axle Assembly:
Hold axle upright on floor or work surface. Then, using a hammer, tap one of the axle caps onto the top end of the axle. Be sure to tap the hub on straight. Slide both wheels onto the axle with the hubs facing inward. Tap the other axle cap onto the opposite end of the axle and place the axle assembly onto the bottom of the charger.
Axle Assembly:
Place the charger on its side. Place one end of each bracket into slot, then place the axle assembly under each bracket. Fasten the other side of each bracket using the two, 10-32 thread cutting screws provided.
Handle:
Turn the charger right side up onto its foot and wheels. Verify grip and handle clamp rod are installed on the handle. Remove the two top screws from each side of the charger. Align the handle so the screw holes are aligned with the screw holes on each side of the wheel charger. Attach handle using the same screws.
L. MAINTENANCE AND CARE
A minimal amount of care can keep your battery charger working properly for years.
1.Clean the clamps each time you are finished charging. Wipe off any battery fluid that may have come in contact with the clamps to prevent corrosion.
2.Coil the input and output cords neatly when storing the charger. The cords can be wrapped around the handle of the charger. This will help prevent accidental damage to the cords and charger.
3.Occasional cleaning of the case of the charger with a soft cloth will keep the finish shiny and help prevent corrosion.

TROUBLESHOOTING
PROBLEM |
POSSIBLECAUSE |
SOLUTION |
|
No Reading on Digital Display. |
Clips are not making a good connection. |
Check for poor connection at battery. |
|
|
2 amp charge rate being used. |
Make sure clamps and posts are clean. |
|
|
Battery may not want to accept a charge |
||
|
|
||
|
|
due to excessive run down state. |
|
|
|
Digital Display may show no activity at |
|
|
|
the 2 amp setting. |
|
No reading on Digital Display and |
AC cord and/or extension is loose. |
Check AC outlet and extension cords for |
|
charger fan is not working. |
|
loose fitting plug. |
|
|
Poor electrical connection. |
Check for open fuse or circuit breaker |
|
|
|
supplying AC outlet. |
|
No reading on Digital Display. |
Battery severely discharged. |
Continue to charge battery for another |
|
or |
SELECT DISPLAY MODE and SELECT |
two hours. If problem continues, call |
|
Customer Service at 1-800-621-5485. |
|||
Digital Display does not change. |
VOLT/CHARGE RATE may have been |
||
|
|||
selected incorrectly. |
Check if SELECT DISPLAY MODE and |
||
|
|||
|
|
SELECT VOLT/CHARGE RATE options |
|
|
|
are selected correctly. |
|
|
|
|
|
Circuit breaker in charger cycles on and |
Shorted battery clamps. |
Circuit breaker cycles when current draw |
|
off with a clicking sound. |
Shorted battery. |
is too high. Separate the clamps. Check |
|
|
for worn cables and replace if needed. |
||
|
Charger leads reversed. |
||
|
Correct connections. |
||
|
SELECT VOLT/CHARGE RATE button |
||
|
Correct Volt/Amp Selector setting. |
||
|
set to an incorrect range. |
||
|
|
||
|
|
|
|
Short start cycle when cranking engine. |
Drawing more than 225 amps for a |
Crank time varies with the amount of |
|
|
period equal to or less than 5 seconds. |
current drawn. If cranking draws more |
|
|
Failure to wait for 3 minutes (180 |
than 225 amps, crank time may be less |
|
|
than 5 seconds. |
||
|
seconds) between cranks. |
||
|
Wait 3 minutes before next crank. |
||
|
|
||
|
|
|
|
Digital Display reads less than selected |
Extension cord too long or wire gauge is |
Use shorter or heavier gauge extension |
|
charge rate when charging a discharged |
too small. |
cord. |
|
battery. |
Weak cell or sulfated plate in battery. |
Sulfated battery will eventually take a |
|
|
|||
|
|
normal charge after a period of time. If |
|
|
|
the battery will not take a charge, have a |
|
|
|
qualified technician test the battery. |
|
|
The battery is only partially discharged. |
Continue to charge battery. |
|
|
|
|
|
Charger makes a loud buzz or hum. |
Transformer laminations vibrate (buzz). |
Continue charging. Buzz is not abnormal. |
|
|
|
|
UNITED STATES LIMITED WARRANTY
SCHUMACHER ELECTRIC CORPORATION, 801 BUSINESS CENTER DRIVE, MOUNT PROSPECT, ILLINOIS, 60056-2179 MAKES THIS LIMITED WARRANTY TO THE ORIGINAL PURCHASER AT RETAIL OF THIS PRODUCT. THIS LIMITED WARRANTY IS NOT TRANSFERABLE.
Schumacher Electric Corporation warrants this battery charger for 3 years from date of purchase at retail against defective material or workmanship. If such should occur, the battery charger will be repaired or replaced at the option of the manufacturer. It is the obligation of the purchaser to forward the battery charger together with proof of purchase, transportation and / or mailing charges prepaid to the manufacturer or its authorized representative. This limited warranty is void if the product is misused, subjected to careless handling, or repaired by anyone other than the factory or other authorized factory representative. The manufacturer makes no warranty other than this limited warranty and expressly excludes any implied warranty including any warranty for consequential damages.
This is the only express limited warranty and the manufacturer neither assumes nor authorizes anyone to assume or make any other obligation towards the product other than this express limited warranty. The manufacturer makes no warranty of merchantability or fitness for purpose of this product and expressly excludes such from this limited warranty. Some states do not allow the exclusion or limitation of incidental or consequential damages or length of implied warranty so the above limitations or exclusions may not apply to you. “This warranty gives you specific legal rights, and you may have other rights which vary from state to state.”

|
™ |
Chargeur de batterie manuel SE-40225 |
|
2 Ampères, 12 Volts |
|
|
Modèle de |
20 Ampères, 12 Volts |
Guide d’utilisation |
chargeur |
40 Ampères, 6 et 12 Volts |
de batterie : |
125 Ampères, 6 Volts, aide-démarrage |
|
|
|
225 Ampères, 12 Volts, aide-démarrage |
– Conservez – Consignes de sécurité importantes
Lisez attentivement les consignes de sécurité et les instructions
Il est dangereux de travailler à proximité d’une batterie au plomb-acide. Les batteries produisent des gaz explosifs dans des conditions normales d’utilisation. Il est donc d’une importance capitale de lire le guide d’utilisation et de suivre les instructions à la lettre toutes les fois qu’on se sert du chargeur.
ATTENTION : La manipulation du cordon de ce produit ou des cordons associés aux accessoires vendus avec ce produit peut vous exposer au plomb, un produit chimique reconnu, par l’État de la Californie, pour causer le cancer ainsi que des anomalies congénitales ou autre dommage génétique. Il faut se laver les mains après la manipulation.
A.CONSIGNES DE SÉCURITÉ GÉNÉRALES SUR LES CHARGEURS
1.Avant d’utiliser votre chargeur de batterie, assurez-vous de lire toutes les instructions et les avis imprimés sur :
•le chargeur de batterie
•la batterie
•le véhicule ou l’appareil alimenté par une batterie
2.Raccordez seulement ce chargeur à des batteries au PLOMBACIDE rechargeables (accumulateurs) telles que celles des autos, camions, tracteurs, avions, fourgonnettes, VR, moteurs électriques pour pêche à la traîne, etc. Ce chargeur n’est pas conçu pour alimenter des circuits électriques à basse tension autres que ceux des véhicules.
ATTENTION : Ne vous servez pas du chargeur de batterie pour recharger des piles sèches couramment utilisées pour alimenter les petits appareils portatifs, car elles risquent d’exploser et de causer des dommages importants et des blessures graves.
3.Servez-vous seulement d’accessoires recommandés par le fabricant ou vendus par ce dernier. L’utilisation d’accessoires non recommandés risque d’occasionner un incendie, un choc électrique ou des blessures.
4.Quand vous débranchez le cordon d’alimentation CA du chargeur, tirez sur la fiche et non pas sur le cordon sinon vous risquez de les endommager.
5.Disposez les fils de sortie pour la batterie de façon à ne pas marcher dessus, trébucher ou les endommager.
6.Ne vous servez pas du chargeur si la fiche ou le cordon est endommagé. Faites remplacer le cordon immédiatement.
7.N’utilisez pas le chargeur s’il a reçu un coup violent, est tombé au sol ou a été endommagé de quelque façon que ce soit. Confiez-le plutôt à un technicien qualifié afin de le faire inspecter et, au besoin, réparer.
8.Ne démontez pas le chargeur. Confiez-le à un technicien qualifié s’il requiert des travaux d’entretien ou de réparation.
Il risque de causer un incendie ou des chocs électriques s’il est remonté d’une façon inadéquate.
9.Pour réduire les risques de choc électrique, débranchez
d’abord le chargeur de la prise de courant avant d’en effectuer l’entretien ou de le nettoyer.
10.Ne vous servez pas d’une rallonge à moins que ce soit absolument nécessaire. L’utilisation d’une rallonge inadéquate risque d’occasionner un incendie ou des chocs électriques. Si vous devez vous servir d’une rallonge, assurez-vous que :
•La fiche de la rallonge est identique (dimension et forme des lames et de la broche) à celle du chargeur.
•La rallonge est bien câblée et en bon état.
•Lecalibredesfilsestsuffisammentélevépourleurpermettre d’acheminer un courant dont l’intensité répond aux exigences du chargeur.
Longueur de la rallonge, |
|
|
|
mètres (pieds) : 7,6 (25) |
15,2 (50) |
30,5(100) |
45,7 (150) |
Calibre des fils : 16 |
14 |
10 |
8 |
(Calibre américain de fils)
11.Chargez toujours la batterie dans un endroit bien aéré. Ne vous en servez JAMAIS dans un espace clos ou un endroit où l’espace est restreint, à moins qu’il soit bien aéré, car il peut y avoir présence de gaz explosifs.
ATTENTION : Risque de gaz explosifs.
12.Placez le chargeur le plus loin possible de la batterie, compte tenu de la longueur des fils de sortie.
13.N’exposez pas le chargeur à la pluie ni à la neige.
14.Ne tentez JAMAIS de recharger une batterie gelée. Si l’acide de batterie (électrolyte) est gelé, transportez la batterie dans un endroit chaud afin de dégeler l’électrolyte avant de recharger la batterie.
15.Ne permettez JAMAIS à l’acide de batterie de couler sur le chargeur quand vous vérifiez la densité de l’acide ou quand vous ajoutez de l’eau distillée.
16.Ne déposez JAMAIS une batterie sur le chargeur.
17.Ne placez JAMAIS le chargeur au-dessus de la batterie que vous allez charger, car les gaz qui s’en dégagent corroderont le chargeur et l’endommageront.
18.Ne placez JAMAIS les pinces du chargeur l’une contre l’autre quand le chargeur est en marche.
SCHUMACHER ELECTRIC CORPORATION
801 BUSINESS CENTER DRIVE • MOUNT PROSPECT, ILLINOIS 60056-2179
Aux États-Unis : Faites parvenir les produits à réparer sous garantie à : 1025 E. Thompson, Hoopeston, IL 60942-0280
Pour toute question, communiquez avec le service à la clientèle au : 1-800-621-5485
00-99-000625/1006
 Loading...