


 Loading...
INSTRUCTION MANUAL
Dual Camera
VPC-PD1EX
VPC-PD2
VPC-PD1GX VPC-PD1PX VPC-PD1TA
Important note
This manual explains how to safely operate the VPC-PD1EX, VPC-PD2, VPC-PD1GX, VPC-PD1PX and VPC-PD1TA.
Any information regarding only one of these products will be labeled as such.
Please read these instructions carefully before using the camera.
Make sure to read and understand the separate booklet “SAFETY MANUAL”. Keep this manual in a safe place for later reference.

Warning
TO PREVENT THE RISK OF FIRE OR ELECTRIC SHOCK, DO NOT EXPOSE THIS APPLIANCE TO RAIN OR MOISTURE
kFOR AMERICAN USERS
The following advisory is included in accordance with the laws of the State of California (USA):
WARNING:
This product contains chemicals, including lead, known to the State of California to cause cancer, birth defects or other reproductive harm. Wash hands after handling.
i This equipment has been tested and found to comply with the limits for a Class B digital device, pursuant to Part 15 of the FCC Rules. These limits are designed to provide reasonable protection against harmful interference in a residential installation. This equipment generates, uses and can radiate radio frequency energy and, if not installed and used in accordance with the instructions, may cause harmful interference to radio communications. However, there is no guarantee that interference will not occur in a particular installation. If this equipment does cause harmful interference to radio or television reception, which can be determined by turning the equipment off and on, the user is encouraged to try to correct the interference by one or more of the following measures:
h Reorient or relocate the receiving antenna.
h Increase the separation between the equipment and receiver.
hConnect the equipment into an outlet on a circuit different from that to which the receiver is connected.
h Consult the dealer or an experienced radio/TV technician for help.
iChanges or modifications not expressly approved by the party responsible for compliance could void the user’s authority to operate the equipment.
Declaration of Conformity
Model number: VPC-PD2 Trade Name: SANYO
Responsible party: SANYO North America Corporation Address: 21605 Plummer Street, Chatsworth, California 91311 Telephone No.: (818) 998-7322
This device complies with Part 15 of the FCC Rules. Operation is subject to the following two conditions:
(1)this device may not cause harmful interference, and
(2)this device must accept any interference received, including interference that may cause undesired operation.
iEnglish

kFOR CANADIAN USERS
i This Class B digital apparatus complies with Canadian ICES-003.
kFOR EU USERS
The symbol mark and recycling systems described below apply to EU countries and do not apply to countries in other areas of the world. Your SANYO product is designed and manufactured with high quality materials and components which can be recycled and/or reused.
The symbol mark means that electrical and electronic equipment, batteries and accumulators, at their end-of-life, should be disposed of separately from your household waste.
Note:
If a chemical symbol is printed beneath the symbol mark, this chemical symbol means that the battery or accumulator contains a heavy metal at a certain concentration. This will be indicated as follows: Hg: mercury, Cd: cadmium, Pb: lead
In the European Union there are separate collection systems for used electrical and electronic equipment, batteries and accumulators.
Please, dispose of them correctly at your local community waste collection/ recycling centre.
Please, help us to conserve the environment we live in!
SANYO Sales & Marketing Europe GmbH
Stahlgruberring 4, D-81829 München, Germany
SANYO Electric Co., Ltd.
1-1, Sanyo-cho, Daito City, Osaka 574-8534, Japan
kFOR RUSSIAN USERS
This product is certified by an official certification company which is authorized by the Russian Federation.
English ii

HOW TO READ THIS MANUAL
Symbols used in this manual
HINT |
Points giving some extended instructions or special points to pay |
CAUTION |
attention to. |
Points that require special attention. |
|
(page xx) |
Refer to the page indicated for detailed information. |
iii English

SHOOT, PLAY BACK AND SAVE
PREPARE THE BATTERY PACK AND CARD
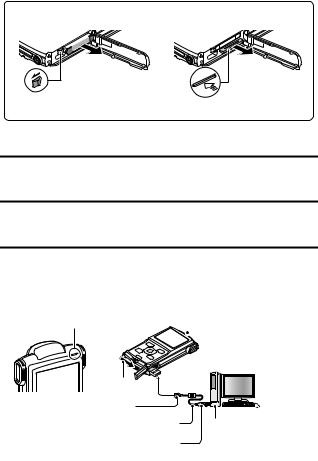
Installing the battery pack and card
Install the card and the supplied battery pack.
i The card is not an included accessory. Please purchase a commercially sold card.
i The camera has an internal memory, which means that you can record and save the recorded data even if no card is installed.
<To close>
English iv
<Remove the battery pack> |
<Remove the card> |
2 Pull out |
2 Pull out |
1 Press |
1 Push in |
|
Charging the battery pack
1 Press the ON/OFF button to turn off the camera.
h It is not possible to charge the battery pack while the camera is on.
2 Use the dedicated USB interface cable (supplied) to connect the camera to a computer.
3 Turn on the computer. h Charging begins.
h During charging, the multi-indicator is lit red.
h When charging is completed, the indicator turns off. h The charging time is approx. 180 minutes.
Multi-indicator
 Camera on/off switch
• OFF
Push
To USB terminal |
Supplied dedicated USB interface cable
To USB connector on the computer
Computer power switch
• ON
v English

CAUTION
During charging...
i Do not turn on the camera while the battery pack is charging. It is not possible to charge the battery pack while the camera is on.
i Do not turn off the computer while the battery pack is charging. It is not possible to charge the battery pack while the computer is off.
i With certain computers, it may be possible to charge the battery pack even when the computer is turned off.
Insert and pull out the cable and USB plug carefully
i When connecting the cables, make sure that the plugs are correctly oriented and that they match the shapes of the terminal sockets on the devices. Push the plugs in straight when connecting them. If undue force is used to connect a cable, it may permanently damage the terminal or the camera.
i If excessive force is used to pull the USB plug, it may damage the cable and/or connector.
English vi
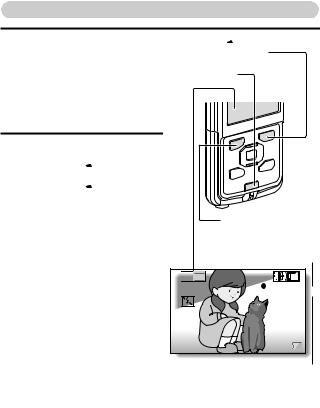
Shooting
1 Press the ON/OFF button for at least 1 second to turn the camera on.
hIf the screen to set the date
and time appears, press the [?] button to cancel it.
For how to set the date and time, see page 14.
2 Record.
To record a video clip:
hPress the [ 
 ] button to begin recording a video clip.
h Press the [ 
 ] button again to end the recording.
To take a photo:
h Press the [  ] button. h A still image is captured.
[ 
 ] button (Video recording button)
ON/OFF button
[  ] button
(Photo shooting button)
Recording time 

 2M
2M
 REC 00:09
 5
5
Available recording time remaining
vii English
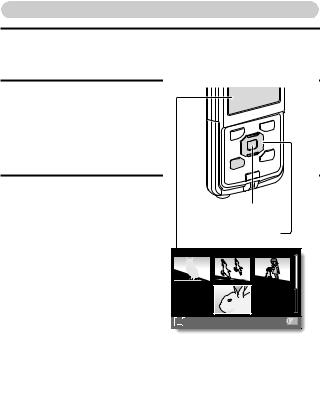
Playback
1 Press the REC/PLAY button.
hThe display changes to the Playback Screen.
2 Select the image to play back.
hUse the arrow keys to move the orange frame to the
image you wish to play back.
hThe image information for the framed image is shown in the bottom part of the monitor.
3 Press the SET button. h The file you selected is
played back.
<To return to the recording mode>
h Press the REC/PLAY button.
REC/PLAY button
SET button
Arrow keys
2010.12.24 |
14:25 |
100-0011 |
Orange frame
Remaining battery power indication
English viii

Deleting files
1 On the screen in step 2, move the orange frame to the file you wish to delete, and press the [?] button.
2 Select “DELETE SINGLE”, and press the SET button.
h If you press [G] or [H], the screen to delete a different file will appear.
3 When you are finished deleting files, press the [?] button.
When you are finished using the camera...
Press the ON/OFF button for at least 1 second to turn the camera off.
ix English
Copy data from your camera to the computer
Connect your camera to a computer, and copy the desired data to the computer.
1 Turn on the computer, and use the supplied dedicated USB interface cable to connect your camera to the computer.
hConnect the cable between the camera’s USB terminal and the computer’s USB connector.
Camera on/off switch
• OFF
Push
To USB terminal |
Supplied dedicated USB interface cable |
Computer power switch |
|
• ON |
To USB connector on the computer |
|
<Insert and pull out the cable and USB plug carefully>
i When connecting the cables, make sure that the plugs are correctly oriented and that they match the shapes of the terminal sockets on the devices. Push the plugs in straight when connecting them. If undue force is used to connect a cable, it may permanently damage the terminal or the camera.
i If excessive force is used to pull the USB plug, it may damage the cable and/or connector.
English x

2 Turn on the camera (page 11).
hThe USB Connection Screen appears on the camera’s monitor.
USB CONNECTION
CARD READER
MTP
CANCEL
 CANCEL
  OK
OK
3 Select “CARD READER”, and press the SET button.
hThe window for automatic playback of XACTI_INT (internal memory) and XACTI (card) opens.
h If the Access Menu appears, click the Access Menu [EXIT] button.
4 In the automatic playback window, click [Open folder and display files].
hTo copy files from the internal memory: Click on the XACTI_INT [Open folder and display files].
hTo copy files from the card: Click on the XACTI [Open folder and display files] .
5 Copy data from your camera to a computer. h Copy files to a computer.
CAUTION
For VPC-PD1EX
i It is not possible to copy files from the computer side (a hard disk, etc.) to the camera’s internal memory or installed card.
xi English

Uploading camera files to a file-sharing website
i Your camera’s internal memory contains the Xacti Simple Uploader application with which you can upload camera files to a file-sharing website.
i For information on how to use Xacti Simple Uploader, please refer to the Xacti Simple Uploader user’s manual, which can be obtained from the SANYO website.
<How to launch Xacti Simple Uploader>
1 Connect your camera to a computer.
2 Turn on the computer and the camera.
3On the USB Connection Screen, select “CARD READER”, and press the
SET button.
i The window for automatic playback of XACTI_INT (internal memory)
and XACTI (card) opens, and the Access Menu appears.
iIf the Access Menu does not appear, double-click "Autorun.Exe" in XACTI_INT.
4In the Access Menu, click on [Install Xacti Simple Uploader]. i The Xacti Simple Uploader installation begins.
iFollow the instructions of the installation wizard to complete the installation.
<How to obtain the manual>
i On the Xacti Simple Uploader screen, click the [?] icon.
English xii

Software operating environment
|
|
|
for Windows® |
for Mac OS |
||
|
|
Video playback *1 |
Xacti Simple |
|
||
|
|
Xacti Simple |
Video playback |
|||
|
|
Uploader *2 |
||||
|
|
Uploader * |
2 |
|||
|
|
|
|
|
||
|
|
Windows®7 |
Windows®7 |
Mac OS X 10.3.9 |
||
Operating |
Windows®Vista |
Windows®Vista |
Mac OS X 10.4.9 or |
|||
Windows®XP |
Windows®XP |
later |
||||
System *3 |
||||||
with standard |
with standard |
with standard USB |
||||
|
|
|||||
|
|
USB port |
|
USB port |
port |
|
|
|
Core 2 Duo |
|
|
||
|
|
E4400 2.0GHz or |
Celeron, |
|
||
|
|
faster |
|
Pentium4 1GHz or |
|
|
CPU |
Core Duo T2600 |
faster |
Core 2 Duo or faster |
|||
|
|
2.16GHz or faster |
Core Duo, Core 2 |
|
||
|
|
Athlon X2 4600+ |
Duo or faster |
|
||
|
|
2.4GHz or faster |
|
|
||
|
|
1GB or greater |
1GB or greater |
1GB or greater |
||
RAM |
(Recommended |
(Recommended |
(Recommended 2GB |
|||
|
|
2GB or greater) |
2GB or greater) |
or greater) |
||
Video |
128MB or greater |
|
|
|||
(Recommended |
— |
256MB or greater |
||||
RAM |
||||||
256MB or greater) |
|
|
||||
|
|
|
|
|||
|
|
|
|
|
|
|
Others |
— |
|
.NET Framework |
— |
||
|
3.5 SP1 or later |
|||||
|
|
|
|
|
||
|
|
|
|
|
||
*1 |
In some cases, images may not show correctly on your computer, |
|||||
*2 |
depending on your computer’s operating environment. |
|||||
It is necessary that your computer be connected to the Internet. To |
||||||
|
upload images, please establish an account with a file-sharing service |
|||||
*3 |
(YouTube, for example). |
|
|
|||
Pre-installed model only. |
|
|
||||
Windows is a registered trademark of Microsoft Corporation.
Mac OS is a trademark of Apple Inc., registered in the U.S. and other countries.
SDXC is a trademark of SD-3C,LLC. All trademarks mentioned are the properties of their respective owners.
xiii English

Dismounting the camera
CAUTION
i To disconnect your camera, be sure to follow the procedure below. Failure to follow this procedure may cause faulty operation of your computer or corrupt the files in your camera.
1 Left-click on the icon for safely removing hardware in the task tray.
hA list appears showing the devices connected to the computer’s USB connector.
2 Left-click on the camera drive.
h The camera can now be disconnected.
English xiv

CONTENTS |
|
HOW TO READ THIS MANUAL ............................................................ |
iii |
CHECKING THE INCLUDED ACCESSORIES ...................................... |
3 |
How to use the accessories ............................................................ |
4 |
ABOUT THE CARD ............................................................................... |
5 |
Media cards that can be used with this camera .............................. |
5 |
What “card” means in this manual .................................................. |
5 |
SETUP |
|
PARTS NAMES ..................................................................................... |
6 |
ABOUT THE BATTERY AND THE CARD ............................................. |
8 |
About recharging ............................................................................ |
8 |
About the temperature alert icon \ ............................................ |
9 |
To format a card ........................................................................... |
10 |
Shooting without a card installed .................................................. |
10 |
TURNING THE CAMERA ON AND OFF ............................................. |
11 |
Turning on the camera .................................................................. |
11 |
Turning off the camera .................................................................. |
11 |
Turning on the camera when the power save (sleep) |
|
mode is active .......................................................................... |
12 |
DATE AND TIME SETTING ................................................................. |
14 |
ACCESSING THE SETUP MENU SCREEN ....................................... |
16 |
SHOOTING |
|
VIDEO CLIP RECORDING .................................................................. |
18 |
SHOOTING SINGLE SHOTS .............................................................. |
20 |
SHOOT A STILL IMAGE WHILE RECORDING A VIDEO CLIP .......... |
23 |
MACRO-PHOTOGRAPHY (ZOOM) .................................................... |
25 |
SHOOTING WITH THE SELF-TIMER ................................................. |
26 |
PLAYING BACK VIDEO CLIPS AND STILL IMAGES ......................... |
27 |
How to save one frame from a video clip as a still image ............. |
29 |
CONNECTING TO A TV |
|
CONNECTING TO A TV ...................................................................... |
31 |
Connecting to the HDMI terminal .................................................. |
32 |
PLAYING BACK ON A TV ................................................................... |
33 |
1 English
APPENDICES |
|
FREQUENTLY ASKED QUESTIONS .................................................. |
34 |
OVERVIEW OF THE SETUP MENU SCREEN .................................... |
39 |
SPECIFICATIONS ................................................................................ |
41 |
Camera .......................................................................................... |
41 |
Camera connectors ....................................................................... |
44 |
Battery life ..................................................................................... |
44 |
Possible No. of Images/Possible Shooting Time/ |
|
Possible Recording Time .......................................................... |
45 |
Concerning the multi-indicator ....................................................... |
46 |
Supplied Li-ion battery pack .......................................................... |
46 |
Others ............................................................................................ |
47 |
Before capturing those important shots, be sure to |
|
first take a test shot to confirm that your camera is |
|
set up and ready to go .............................................................. |
48 |
About the MPEG-4 Standard license ............................................ |
48 |
English 2
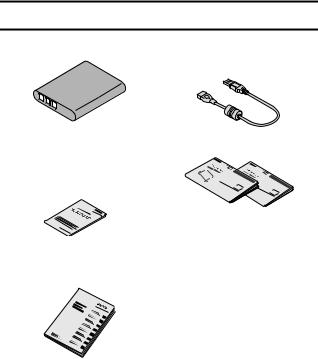
CHECKING THE INCLUDED ACCESSORIES
i Li-ion battery pack: 1 |
i Dedicated USB interface |
|
cable (page v, x): 1 |
i SAFETY MANUAL |
i QUICK GUIDE |
(safety precautions booklet) |
|
Please read this booklet |
|
carefully before using the |
|
camera. |
|
i Obtaining the PDF instruction manual and cautions
3 English
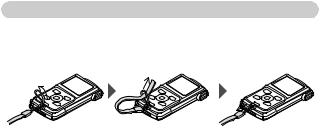
How to use the accessories
kHandstrap (Please purchase a commercially available handstrap.)
iTo avoid dropping the camera, it is recommended that you attach a handstrap.
English 4
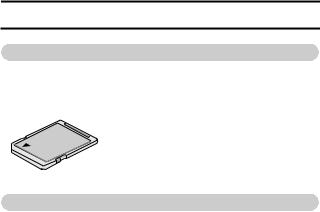
ABOUT THE CARD
Media cards that can be used with this camera
The type of card that can be inserted into and used with this camera is: i SD Memory Card
i SDHC Memory Card
i SDXC Memory Card
What “card” means in this manual
i In this manual, SD Memory Cards, SDHC Memory Cards and SDXC Memory Cards that can be used in this camera are referred to as “card”.
5 English
Loading...