


LCD TV
MODEL LCD-19E30A LCD-26E30A LCD-32E30A LCD-42E30FA
Owner’s Manual
TO THE OWNER
Before operating this LCD TV, read this manual thoroughly and operate the LCD TV properly.
This LCD TV provides many convenient features and functions. Operating the LCD TV properly enables you to manage those features and maintains it in better condition for a considerable time.
Improper operation m ay result in not only shortening the product-life, but also malfunctions, fire hazard, or other accidents.
If your LCD TV seem s to operate improperly, read this manual again, check operations and cable connections and try the solutions in the “Troubleshooting” section on page 40 of this booklet. If the problem still persists, contact the dealer w here you purchased the LCD TV or the service center.
Safety Precaution
WARNING :TO REDUCE THE RISK OF FIRE OR ELECTRIC SHOCK, DO NOT EXPOSE THIS APPLIANCE TO RAIN OR MOISTURE.
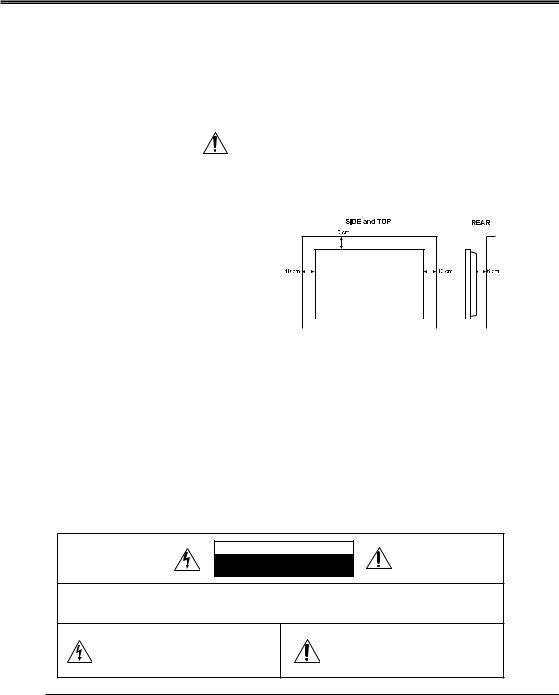
•Install the LCD TV in a proper position. If not, it may result in a fire hazard.
• Provide appropriate space on the top, sides and rear of the LCD TV cabinet for allowing air circulation and cooling the LCD TV.
• Minimum clearance must be maintained. If the |
|
|
|
|
|
|
|
|
! |
|||
LCD TV is to be built into a compartment or |
|
|
|
|
|
|
|
|
|
|||
|
|
|
|
|
|
|||||||
similarly enclosed, the minimum distances must be |
|
|
|
|
|
|
|
|
|
|||
maintained. Do not cover the ventilation slot on the |
|
|
|
|
|
|
|
|
|
|||
LCD TV. Heat build-up can reduce the service life |
|
|
|
|
|
|
|
|
|
|||
of your LCD TV, and can also be dangerous. |
|
|
|
|
|
|
|
|
|
|
||
|
|
|
|
|
|
|
|
|
|
|||
•If the LCD TV is not to be used for an extended time, unplug the LCD TV from the power outlet.
READ AND KEEP THIS OW NER’S MANUAL FOR LATER USE.
Caution In Installing
•Handle the LC D TV carefully w hen installing it and do not drop.
•Locate set aw ay from heat, excessive dust, and direct sunlight.
•For correct installation and mounting it is strongly recommended to use a trained, authorized dealer. Failure to follow correct mounting procedures could result in dam age to the equipment or injury to the installer.
NOTE :
When LCD TV is not used for a long period of time, unlighted dots m ay be observed. This is caused by characteristic of the LCD TV. If this occurs, turn the LCD TV on and leave it on about 1 hour. These dots will gradually disappear.
CAUTION
RISK OF ELECTRIC SHOCK
DO NOT OPEN
CAUTION : TO REDUCE THE RISK OF ELECTRIC SHOCK, DO NOT REMOVE COVER (OR BACK). NO USER-SERVICEABLE PARTS INSIDE. REFER SERVICING TO QUALIFIED SERVICE PERSONNEL.
THIS SYMBOL INDICATES THAT DANGEROUS VOLTAGE CONSTITUTING A RISK OF ELECTRIC SHOCK IS RESENT WITH THIS UNIT.
THIS SYMBOL INDICATES THAT THERE ARE IMPORTANT OPERATING AND MAINTENANCE INSTRUCTIONS IN THE OWNER’S MANUAL WITH THIS UNIT.
2
SAFETY INSTRUCTIONS
All the safety and operating instructions should be read before the product is operated.
Read all of the instructions given here and retain them for later use. Unplug this LC D TV from AC power supply before cleaning. Do not use liquid or aerosol cleaners. Use a damp cloth for cleaning.
Follow all warnings and instructions marked on the LCD TV.
For added protection to the LCD TV during a lightning storm, or when it is left unattended and unused for long periods of time, unplug it from the wall outlet. This will prevent dam age due to lightning and power line surges.
Do not expose this unit to rain or use near water...for example, in a wet basement, near a swimming pool, etc...
Do not use attachments not recommended by the manufacturer as they may cause hazards.
Do not place this LCD TV on an unstable cart,stand, or table. The LCD TV may fall, causing serious injury to a child or adult, and serious damage to the LCD TV. Use only with a cart or stand recommended by the manufacturer, or sold with the LCD TV. Wall or shelf mounting should follow the manufacturer’s instructions, and should use a mounting kit approved by the manufacturers.
An appliance and cart combination should be moved with care. Quick stops, excessive force, and uneven surfaces m ay cause the appliance and cart combination to overturn.
Slots and openings in the back and bottom of the cabinet are provided for ventilation, to insure reliable operation of the equipment and to protect it from overheating.
The openings should never be covered with cloth or other materials, and the bottom opening should not be blocked by placing the LCD TV on a rug, or other similar surface. This LCD TV should never be placed near or over a radiator or heat register.
This LCD TV should not be placed in a builtin installation such as a book case unless proper ventilation is provided.
Never push objects of any kind into this LCD TV through cabinet slots as they may touch dangerous voltage points or short out parts that could result in a fire or electric shock. Never spill liquid of any kind on the LCD TV.
Do not place item s such as vases containing liquid on top of the LCD TV.
Do not install the LCD TV near the ventilation duct of air-conditioning equipment.
This LCD TV should be operated only from the type of power source indicated on the marking label. If you are not sure of the type of power supplied,onsult your authorized dealer or local power company.
Do not overload wall outlets and extension cords as this can result in fire or electric shock. Do not allow anything to rest on the power cord. Do not locate this LCD TV where the cord may be damaged by persons walking on it.
Do not attempt to service this LCD TV yourself as opening or removing covers may expose you to dangerous voltage or other hazards. Refer all servicing to qualified service personnel.
Unplug this LCD TV from wall outlet and refer servicing to qualified service personnel under the following condition:
a.When the power cord or plug is damaged or rayed.
b.If liquid has been spilled into the LCD TV.
c.If the LCD TV has been exposed to rain or water.
d.If the LCD TV does not operate normally byfollowing the operating instructions. Adjust only those controls that are covered by the operating instructions as improper adjustment of other controls may result in damage and will often require extensive work by a qualified technician to restore the LCD TV to normal operation.
e.If the LCD TV has been dropped or the cabinet has been damaged.
f.When the LCD TV exhibits a distinct change in performance-this indicates a need for service.
When replacement parts are required, be sure theservice technician has used replacement parts specified by the manufacturer that have the same characteristics as the original part. Unauthorized substitutions may result in fire, electric shock, or injury to persons.
Upon completion of any service or repairs to this LCD TV, ask the service technician to perform routine safety checks to determine that the LCD TV is in safe operating condition.
3

TABLE
SAFETY INSTRUCTIONS ........................ |
3 |
FEATURE AND DESIGN ........................... |
5 |
PREPARATION.......................................... |
6 |
PARTNAMES AND FUNCTIONS............. |
6 |
PREPARATION.......................................... |
7 |
CONNECTING LCD TV ............................. |
8 |
CONNECTING THE AC POWER CORD.8 |
|
CONNECTING OUTDOOR AERIAL........ |
8 |
CONNECTING A COMPUTER ................ |
9 |
CONNECTING VIDEO EQUIPMENT .... |
10 |
BEFORE OPERATION ............................ |
11 |
OPERATION OF REMOTE CONTROL .11 |
|
TURNING ON/OFF LCD TV .................. |
15 |
SELECTING INPUT SOURCE .............. |
15 |
CHANNEL SELECTION......................... |
15 |
SELECTING CHANNEL SOURCE ........ |
16 |
SOUND SYSTEM .................................. |
16 |
COLOUR SYSTEM................................ |
16 |
DISPLAY ................................................ |
16 |
VOLUME CONTROL ............................. |
17 |
ECO ....................................................... |
17 |
VIRTUAL SURROUND .......................... |
17 |
STILL...................................................... |
17 |
STEREO/MONO .................................... |
17 |
ASPECT RATIO..................................... |
18 |
TIMMER SETTING ................................ |
19 |
SPORTS ................................................ |
19 |
TEXT / TV .............................................. |
19 |
TEXT CANCEL ...................................... |
20 |
TEXT INDEX.......................................... |
20 |
TEXT SUBCODE ................................... |
20 |
TEXT SIZE............................................. |
20 |
TEXT HOLD........................................... |
20 |
TEXT RED ............................................. |
20 |
TEXT GREEN ........................................ |
20 |
TEXT YELLOW...................................... |
20 |
TEXT BLUE ........................................... |
20 |
MENU OPERATION (TV/AV mode) ........ |
21 |
TUNING THE TV FOR THE FIRST TIME 21 |
|
PICTURE ............................................... |
22 |
AUDIO.................................................... |
25 |
SETUP ................................................... |
27 |
TIMER........................................................ |
|
FUNCTION ................................................ |
|
MENU OPERATION (PC/HDMI mode).... |
35 |
PICTURE ............................................... |
35 |
AUDIO.................................................... |
35 |
SETUP ................................................... |
36 |
TIMER.................................................... |
36 |
FUNCTION ............................................ |
36 |
APPENDIX ............................................... |
37 |
CLEANING LCD TV............................... |
37 |
FUNCTION OF PRODUCT SAFETY |
|
FEATURE .............................................. |
37 |
TROUBLESHEETING............................ |
38 |
specifications ......................................... |
39 |
4

FEATURE AND DESIGN
ƇPicture
•LCD Panel
1920 x 1080 pixel Full HD LCD Panel makes perfect reproduction of 1080p/1080i HD contents in pixel-to- pixel. ( for 42” HD panel)
1366 x 768 pixel LCD Panel markes perfect Reproduction of 1080p/1080i HD contents in pixeltransfer to -pixel.
•Video Enhance Engine
Video Enhance Engine, SANYO Hight Quality image Processing Technology rocessing clear. dynamic, natural and realistic Picture along with HD/SD LCD Panel Technology.
•Dynamic AC
The AC (Automatic image Control) circuit compensates picture contrast and brightness level dynamically and reproduces bright and hight-contrast picture. (see page 22,23)
ƇSound
•NICAM/A2 Stereo
It’s the Stereo Sound PAL Color TV Broadcasting System upgrading Mono-sound TV serice to stereo or dual-language sound.(see page 25)
•Bass Boost
Bass Boost providing powerful sound markes viewing experience bass Boost sound. (see page 24)
•Virtural Surround
Virtural Surround providing powerful sound markes viewing experience Virtural Surround.
ƇFeature
•Super Mode
Just by pressing the button, sport mode optimizes picture and audio settings suitable for each sport program.
(see page 19)
ŶColorful World
Dynamic picture and sound performance setting (Default setting).
ŶGreen Field
Suitable setting for Football, Golf program etc.
ŶSnow World
Suitable setting for Skiing, Ice Skating program etc.
ŶWater World
Suitable le setting for Swimming, Diving program etc.
ŶIndoor Sport
Suitable setting for Basketball, Boxing program etc.
ƇFeature
•Auto ECO
Automatically adjust by ECO 1/ECO 2/ECO 3.
•Light Senson formation
Ambient light sensor automatically adjusts picture brightness to provide more relaxing view for your eyes. (see page 16)
ƇCompatibilty
•Full Multy System
PAL, SECAM, NTSC, NTSC 4.43 system can be connected. (see page 16)
•HD-Ready
1080p, 1080i, 720, High Definition signals are receivable.
•HDMI
HDMI provides complete transmission of digital image and sound signals without any quality deterioration. DVI can be connected to HDMI.
•PC Input
Personal Computer/Laptop can be connected with automatic resolution adjustment.
•Terminals
HDMI for BluRay Player etc.
D -SUB 15-pin for PC input etc. Component Video for DVD S-Video/Video for VCR /DVD
ƇOthers
•Wall Mounting
It’s designed for VESA Standard wall hanging bracket.
•Light Commertial Mode
By entering Dealer m ode, Volume Lock, Sart Mode, OSD, RC, Reset, AC Power Mode can be selected. Convenient for placing in Hotel, Hospital, School, S tore, Bank etc.
5
PREPARATION
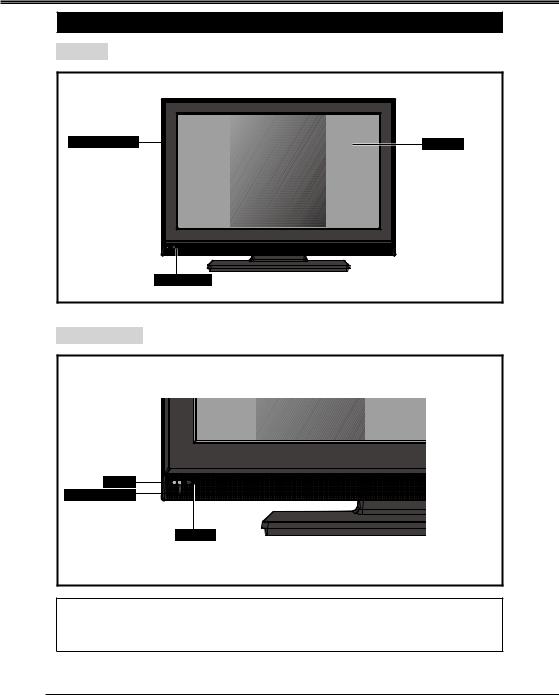
PARTNAMES AND FUNCTIONS
FRONT
For exsample : 26”
Side Controls |
Panel |
Indicator
For exsample : 26”
INDICATORS
For exsample : 26”
IR
Light Sensor
LED
CARE FOR USING LCD TV
•Do not bump or scratch the panel surface as this causes flaws on the surface of the screen.
•There may be some tiny black points and/or blight points on the SCREEN. These points are normal.
6

PREPARATION
SIDE CONTROLS (Each button on the control panel has the same function with its counterpart on the remote control.)
POWER ON/OFF button
Used to turn the LCD TV ON or OFF. CHANNEL UP/DOWN buttons
Used to Change channels. Used to select items.
VOLUME UP/DOWN buttons
Used to adjust the volume. Used to adjust the value of the
selected item on On-Screen Menu. Used to execute the seleted menu on On-Screen menu.
MENU button
Open or Close the On-Screen Menu. INPUT MODE button
>PC<
POWER
CHANNEL
VOLUME
MENU
INPUT
OK 
For exsample : 26”
Used to select input source:DTV, AV1, AV2, AV3, HDMI 1, HDMI 2, HDMI 3, PC, ATV.
BACK TERMINALS
HDMI Input Terminal
Connect all kinds of HDMI output equioment to this terminal.
• HDMI Cable
VIDEO Output Terminal
Connect a television, video recorder or external audio amplifier to these jacks.
•Video (RCA type)
•Audio L and R (RCA type)
Video Input Terminal
Connect video and audio output from video equipment.
•DVD component (RCA type)
•Audio L and R (RCA type)
19”


 DVI
DVI

INPUT1
HDMI Input Terminal
YConnect all kinds of HDMI output equioment
PC INPUT |
RS232 INPUT |
to this terminal. |
Pb |
|
• HDMI Cable |
PC AUDIO DIGITAL AUDIO |
||
S-VIDEO |
|
|
VIDEO Pr |
|
|
INPUT |
OUTPUT |
|
LL VIDEO
R |
R |
L |
|
PC Input Terminal |
|
|
R |
ANT |
|
|
|
|
Connect computer outputs to these terminals |
|
VIDEO |
VIDEO3 |
VIDEO1 INPUT |
|
|
OUTPUT INPUT |
|
|
||
• RGB (D-SUB)
26” |
|
|
|
|
PC Audio Input Terminal |
|
|
|
|
|
|
INPUT1 |
DVI |
INPUT2 |
|
|
Connect computer outputs to these terminals |
|
|
|
|
|
• Audio (L/R) |
|
Y |
|
|
|
RS-232 Input Terminal |
VIDEO |
Pb |
PC INPUT |
RS232 INPUT |
|
DIGITAL AUDIO OUTPUT Terminal |
Pr |
|
||||
|
|
S-VIDEO |
|
|
|
|
|
PC AUDIO DIGITAL AUDIO |
|
|
|
L |
L |
INPUT |
OUTPUT |
|
|
VIDEO |
|
|
|
||
R |
R |
L |
|
|
|
|
|
R |
|
ANT |
Aerial Jack |
|
|
|
|
||
VIDEO |
VIDEO3 |
OUTPUT |
INPUT VIDEO1 INPUT |
32”/42”
 DVI
DVI

INPUT1 |
INPUT2 |
INPUT3 |
Connect the cable with a plug from aerial jack to the aerial socket on the cabinetback.
VIDEO Input Terminal
Connect video and audio output from video equipment.
•Video (RCA type)
•Audio L and R (RCA type)
•S-Video (mini Din 4 type)
Y |
|
Pb |
RS232 INPUT |
PC INPUT |
S-VIDEO
VIDEO Pr
PC AUDIO DIGITAL AUDIO
INPUT OUTPUT
LL VIDEO
RR L
ANT
|
R |
VIDEO |
VIDEO3 |
OUTPUT |
INPUT VIDEO1 INPUT |
HDMI Input Terminal
Connect all kinds of HDMI output equioment to this terminal.
• HDMI Cable
7

CONNECTING LCD TV
CONNECTING THE AC POWER CORD
This LCD TV uses nominal input voltages of 100-240V AC. This LCD TV automatically selects the correct input voltage. It is designed to work with single-phase power systems. To reduce risk of electrical shock, do not plug into any other type of power system . Consult your authorized dealer or service station if you are notsure of the type of power being supplied.
Connect the LCD TV with all peripheral equipment before turning the LCD TV on.
CAUTION
For safety, unplug AC power cord when the LCD TV is not in use.
For exsample : 26”
AC POWER CORD
To the AC Outlet (100-240V AC) Pulls the AC power cord out from the LCD TV. The AC outlet must be near this equipment and must be easily accessible.
CONNECTING OUTDOOR AERIAL
For exsample : 26”
Cable used for connection (This Outdoor Aerial cable is not supplied with this LCD TV.)
• Aerial Cable
NOTE:
For all aerial circuit problems please consult your local dealer.
ANT
8
CONNECTING LCD TV
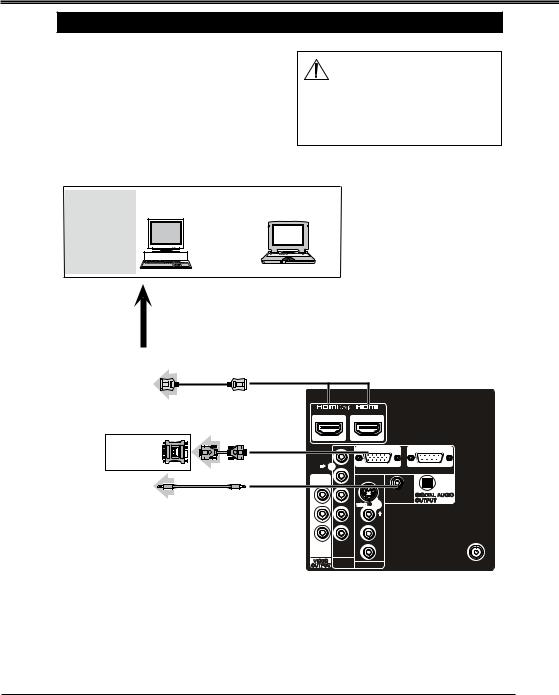
CONNECTING A COMPUTER
Cable used for connection (This cable is not supplied with this LCD TV.)
•PC/VGA Cable (D-SUB 15pin)
•HDMI Cable
•MAC Adapter (in the case of connecting Macintosh computer)
•Audio Cable [Mini Plug (L/R)]
NOTE:
When connecting the cable, AC Power Cords of both LCD TV and external equipment should be disconnected from AC outlet. Turn LCD TV and peripheral equipment on before your computer is switched on.
IBM- |
Desktop Type |
Laptop Type |
compatible |
||
computers |
|
|
or Macintosh |
|
|
computers |
|
|
(VGA/SVGA/ |
|
|
XGA) |
|
|
HDMI Output |
|
|
|
|
For exsample : 26” |
|
HDMI Input |
|
|
|
|
||
|
|
|
|
|
|
|
|
|
|
|
DVI |
|
|
|
|
|
INPUT1 |
INPUT2 |
|
|
Monitor |
MAC |
|
|
Y |
|
|
Output |
Adapter |
PC Input |
|
Pb |
PC INPUT |
RS232 INPUT |
|
|
|
|
|||
|
|
|
|
|
||
Audio Output |
|
VIDEO |
Pr |
S-VIDEO |
|
|
|
|
|
||||
|
(stereo) |
Audio Input |
|
|
INPUT |
OUTPUT |
|
|
|
|
|
PC AUDIO DIGITAL AUDIO |
|
|
|
(stereo) |
L |
L |
VIDEO |
|
|
|
|
|
|
|
|
|
|
|
R |
R |
L |
|
|
|
|
|
|
R |
ANT |
|
|
|
|
|
|
|
|
|
|
VIDEO |
VIDEO3 |
VIDEO1 INPUT |
|
|
|
|
OUTPUT |
INPUT |
|
|
NOTE : You can connect the DVI source to HDMI input terminal by using the DVI to HDM I converter, and you just can watch image, but without sound.
9
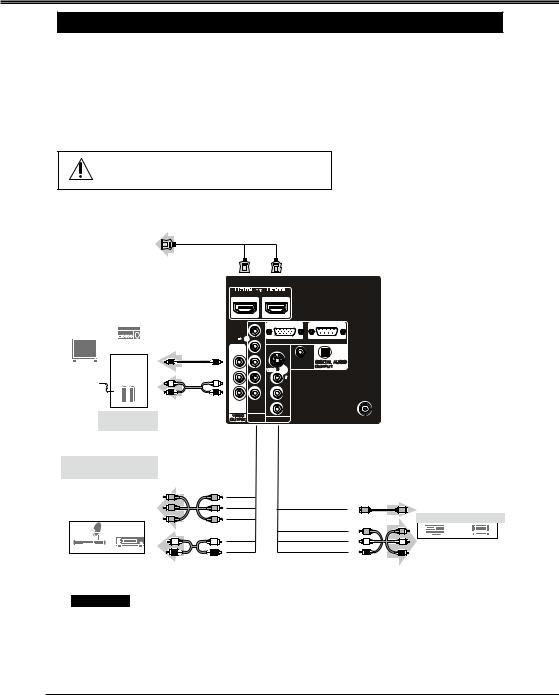
CONNECTING LCD TV
CONNECTING VIDEO EQUIPMENT
Cables used for connection (These cables are not supplied with this LCD TV.)
•Video Cable (RCA X 1), S-Video Cable, Audio Cable (RCA X2) : Video 1 or Video 2
•Video Cable (RCA X3), Audio Cable (RCA X 2) : DVD (Component Video)
•Video Cable (RCA X 1), Audio Cable (RCA X2) : Monitor Outputs
•HDMI Cable: HDMI Input
NOTE : When connecting the cable, AC Power Cords of both LCD TV and external equipment should be disconnected from AC outlet.
HDMI Output |
HDMI cable |
|
|
|
|
|
|
HDMI Input |
|
INPUT1 |
DVI |
|
INPUT2 |
Composite |
|
|
|
Video and |
|
|
|
Audio Output |
|
Video cable |
|
Audio Amplifier |
|||
(RCA x1) |
|||
|
Audio |
|
|
External |
Speaker |
|
|
(stereo) |
|
||
Monitor |
|
||
|
|
||
Audio cable
External Audio (RCA x2)
Equipment
Y |
|
Pb |
RS232 INPUT |
PC INPUT |
S-VIDEO
VIDEO Pr
PC AUDIO DIGITAL AUDIO
INPUT OUTPUT
LL VIDEO
RR L
|
R |
ANT |
|
|
|
VIDEO |
VIDEO3 |
For exsample : 26” |
OUTPUT |
INPUT VIDEO1 INPUT |
Component Video Source
(example) |
DVD |
|
DVD video equipment |
(RCA x3) |
|
(such as DVD player |
Y |
|
or high-definition TV |
Pb, |
|
source) |
||
Pr, |
||
|
L |
R |
Audio cable (RCA x2)
AV OUT
Note:
Video (RCA) output is for TV, AV or S-VIDEO only.
Video |
S-Video output |
|
S-Video cable |
S- |
Video Source (example) |
|
L, V |
Video Cassette |
Video Disc |
|
R, |
|||
Recorder |
Player |
Video and Audio
cable (RCA x3)
10
BEFORE OPERATION
OPERATION OF REMOTE CONTROL
MUTE |
|
POWER |
|
MUTE |
|
|
POWER ON/OFF |
1 |
2 |
3 |
|
4 |
5 |
6 |
NUMBER KEY |
7 |
8 |
9 |
|
TXT REVEAL |
|
|
|
INFO/TXT REVEAL
INFO |
0 |
INPUT |
SPORTS ECO |
|
TXT/TV |
INPUT
SPORTS |
TXT/TV |
|
SUBTITLE |
ECO
VOLUME +/-
POWER OFF
VOL |
WIDE |
|
CH |
POWER OFF POWER ON |
EPG |
FAV/LIST |
|
A/B
CHANNEL +/-
FAV/LIST
POWER ON
OK
MENU/TXT INDEX
OK
TXT |
BACK |
|
INDEX |
||
|
||
MENU |
|
GUIDE
PROGRAM KEY
BACK
TXT SIZE |
TXT HOLD |
TXT SUB TXT SIZE TXT HOLD TXT CNL |
|
P |
P STILL |
TXT SUB |
TXT CNL |
TXT RED |
TXT BLUE |
TST GREEN |
TXT YELLOW |
|
CS-90283U |
Note: In different mode, some buttons have different functions.
11
BEFORE OPERATION
OPERATION RANGE
Point Remote Control toward LCD TV (Infrared |
|
|
Remote Receiver) whenever pressing the buttons. |
|
|
Maxim um operating range for Remote Control is |
|
o |
about 16.4’(5m ) in front, about 30°to the left or the |
51 |
|
right, about 15°for up or down. |
15 |
o |
30o 30o
m5
REMOTE CONTROL BATTERIES INSTALLATION
1 Remove the battery compartment cover . |
2 Insert two size AAA batteries (1.5V ) according |
to “+” and “-” polarity markings inside the battery compartment.
3 Close the battery compartment cover.
To insure safe operation, please observe the following precautions:
•Use (2) AAA, alkaline batteries.
•Replace two batteries at the same time.
•Do not use a new battery with a used battery.
•Avoid contacting with water or liquid.
•Do not expose the Remote Control or Batteries to moisture, or heat such as sunshine,fire or the like.
•Do not drop the Remote Control.
•If a battery has leaked on the Remote Control, carefully wipe case clean and install new batteries.
•Risk of explosion if battery is replaced by an incorrect type.
•Dispose of used batteries according to the instructions.
12
BEFORE OPERATION
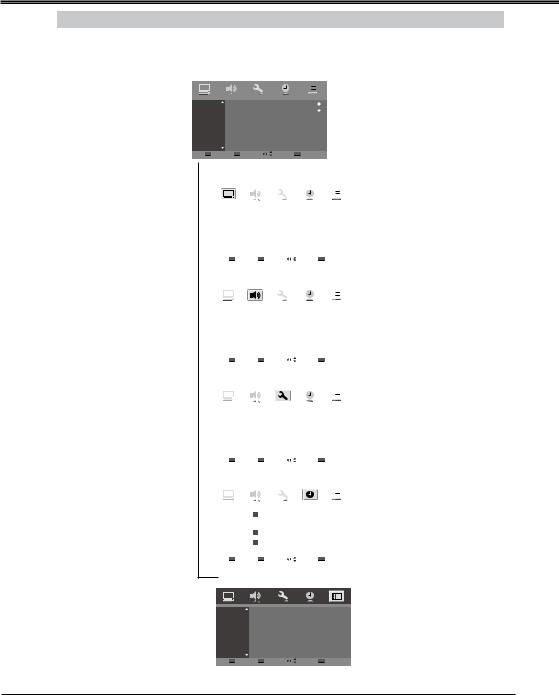
ON-SCREEN MENU
TV/AV MODE MENU LIST
MAIN MENU (CHANNEL MENU) |
Note : “SET UP” menu is only active in TV mode. |
|||||||
|
|
|
|
|
|
|
||
|
|
|
|
|
|
|
|
|
|
|
|
|
|
|
|
|
|
|
|
|
|
|
|
|
|
|
|
DTV Menu... PICTURE |
|
|
|
|
|
||
|
Picture Mode |
Auto Conrrast Enhancement |
|
|
|
|
|
|
On |
||||||||
|
Color Temp |
Picture Mode |
|
|
|
|
|
|
Dynamic |
||||||||
|
Aspect Ratio |
Contrast |
|
|
|
|
|
|
|
|
|
|
50 |
|
|||
|
Backlight |
Brightness |
|
|
|
|
||
|
|
|
|
50 |
|
|||
|
|
Color |
|
|
|
|
||
|
DNR |
|
|
|
50 |
|
||
|
|
Sharpness |
|
|
|
|
||
|
|
|
|
|
0 |
|
||
|
|
Tint |
|
|
|
0 |
|
|
|
OK |
Confirm |
MENU |
Return |
|
|
Navigate |
|
BACK |
Cancel |
|
|
|
|
|
|
||||||
|
|
|
PICTURE MENU |
|
|
|
|
|
|
|
|
|||||||||||
|
|
|
|
|
|
|
|
|
|
|
||||||||||||
|
|
|
|
|
|
|
|
|
|
|
|
|
|
|
|
|
|
|
|
|||
|
|
|
|
|
|
|
|
|
|
|
|
|
|
|
|
|
|
|
|
|
|
|
|
|
|
|
|
|
|
|
|
|
|
|
|
|
|
|
|
|
|
|
|
|
|
|
|
|
DTV Menu... PICTURE |
|
|
|
|
|
|
|
|
|
|
|
|
|
|
|
||||
|
|
|
Picture Mode |
Auto Conrrast Enhancement |
On |
|
|
|
|
|
|
|
||||||||||
|
|
|
Color Temp |
Picture Mode |
|
|
Dynamic |
|
|
|
|
|
|
|||||||||
|
|
|
Aspect Ratio |
Contrast |
|
|
|
|
|
|
|
|
50 |
|||||||||
|
|
|
Backlight |
|
|
Brightness |
|
|
|
|
|
|
|
|
50 |
|||||||
|
|
|
DNR |
|
|
Color |
|
|
|
|
|
|
|
|
|
|
|
|
|
50 |
||
|
|
|
|
|
|
Sharpness |
|
|
|
|
|
|
|
|
0 |
|||||||
|
|
|
|
|
|
Tint |
|
|
|
|
|
|
|
|
|
|
|
|
|
0 |
||
|
|
|
|
|
|
|
|
|
|
|
|
|
|
|
|
|
|
|
|
|
|
|
|
|
|
OK |
Confirm |
MENU |
Return |
|
|
Navigate |
BACK |
Cancel |
|||||||||||
|
|
|
AUDIO MENU |
|
|
|
|
|
|
|
|
|
|
|||||||||
|
|
|
|
|
|
|
|
|
|
|
|
|
||||||||||
|
|
|
|
|
|
|
|
|
|
|
|
|
|
|
|
|
|
|
|
|
|
|
|
|
|
|
|
|
|
|
|
|
|
|
|
|
|
|
|
|
|
|
|
|
|
|
|
|
|
|
|
|
|
|
|
|
|
|
|
|
|
|
|
|
|
|
|
|
|
|
|
DTV Menu... AUDIO |
|
|
|
|
|
|
|
|
|
|
|
|
|
|
|
|
|
||
|
|
|
MTS |
|
|
|
|
|
|
|
|
|
|
|
|
|
|
|
|
|
|
|
|
|
|
Dual |
|
|
|
|
|
|
|
|
|
|
|
|
|
|
|
|
|
|
|
|
|
|
Selectable Sound |
|
|
|
|
|
|
|
|
|
|
|
|
|
|
|
|
|
||
|
|
|
Bass Boost |
|
|
|
|
|
Auto |
|
|
|
|
|
|
|
|
|
|
|||
|
|
|
Virtal Surround |
|
|
|
|
|
|
|
|
|
|
|
|
|
|
|
|
|
||
|
|
|
|
|
|
|
|
|
|
|
|
|
|
|
|
|||||||
|
|
|
OK |
Confirm |
MENU |
Return |
|
|
Navigate |
BACK |
Cancel |
|||||||||||
|
|
|
SETUP MENU |
|
|
|
|
|
|
|
|
|
|
|||||||||
|
|
|
|
|
|
|
|
|
|
|
|
|
||||||||||
|
|
|
|
|
|
|
|
|
|
|
|
|
|
|
|
|
|
|
|
|
||
|
|
|
|
|
|
|
|
|
|
|
|
|
|
|
|
|
|
|
|
|
|
|
|
|
|
|
|
|
|
|
|
|
|
|
|
|
|
|
|
|
|
|
|
|
|
|
|
|
DTV Menu... SETUP |
|
|
|
|
|
|
|
|
|
|
|
|
|
|
|
||||
|
|
|
Language |
|
|
Menu Language |
|
|
English |
|
|
|
|
|
|
|||||||
|
|
|
Country/Region |
|
|
|
|
|
|
|
|
|
|
|
|
|
|
|
|
|
||
|
|
|
Full Search |
|
|
|
|
|
|
|
|
|
|
|
|
|
|
|
|
|
||
|
|
|
Quick Search |
|
|
|
|
|
|
|
|
|
|
|
|
|
|
|
|
|
||
|
|
|
Manual Search |
|
|
|
|
|
|
|
|
|
|
|
|
|
|
|
|
|
||
|
|
|
Channel List |
|
|
|
|
|
|
|
|
|
|
|
|
|
|
|
|
|
||
|
|
|
Fav Group: 1 |
|
|
|
|
|
|
|
|
|
|
|
|
|
|
|
|
|
||
|
|
|
|
|
|
|
|
|
|
|
|
|
|
|
|
|||||||
|
|
|
OK |
Confirm |
MENU |
Return |
|
|
Navigate |
BACK |
Cancel |
|||||||||||
|
|
|
TIMER MENU |
|
|
|
|
|
|
|
|
|
|
|||||||||
|
|
|
|
|
|
|
|
|
|
|
|
|
||||||||||
|
|
|
|
|
|
|
|
|
|
|
|
|
|
|
|
|
|
|
|
|
|
|
|
|
|
|
|
|
|
|
|
|
|
|
|
|
|
|
|
|
|
|
|
|
|
|
|
|
|
|
|
|
|
|
|
|
|
|
|
|
|
|
|
|
|
|
|
|
|
|
|
DTV Menu... TIMER |
|
|
|
|
|
|
|
|
|
|
|
|
|
|
|
|
|
||
|
|
|
Time Setting |
|
Current Time |
|
|
|
|
|
|
|
|
|
|
|||||||
|
|
|
Power Control |
|
|
|
|
|
|
|
|
|
|
|
||||||||
|
|
|
Banner Duration |
|
2008 |
- |
01 |
- |
06 |
|
|
19 |
: |
57 |
|
: |
29 |
|
||||
|
|
|
|
|
|
|
WakeUp Timer |
After |
|
Hours |
|
|
|
Minutes |
||||||||
|
|
|
|
|
|
|
00 |
00 |
|
|||||||||||||
|
|
|
|
|
|
|
Sleep Timer |
After |
|
Hours |
|
|
|
Minutes |
||||||||
|
|
|
|
|
|
|
00 |
00 |
|
|||||||||||||
|
|
|
|
|
|
|
|
|
|
|
|
|
|
|
|
|
|
|
|
|
|
|
|
|
|
OK |
Confirm |
MENU |
Return |
|
|
Navigate |
BACK |
Cancel |
|||||||||||
|
|
|
|
|
|
|
|
|
|
|
|
|
|
|
|
|
|
|
|
|
|
|
FUNCTION MENU
DTV Menu... FUNCTION
Reset to default
AV Connection
Password
Parental Rating
Channel Lock
EPG
OK |
Confirm |
MENU |
Return |
Navigate |
BACK |
Cancel |
13
BEFORE OPERATION
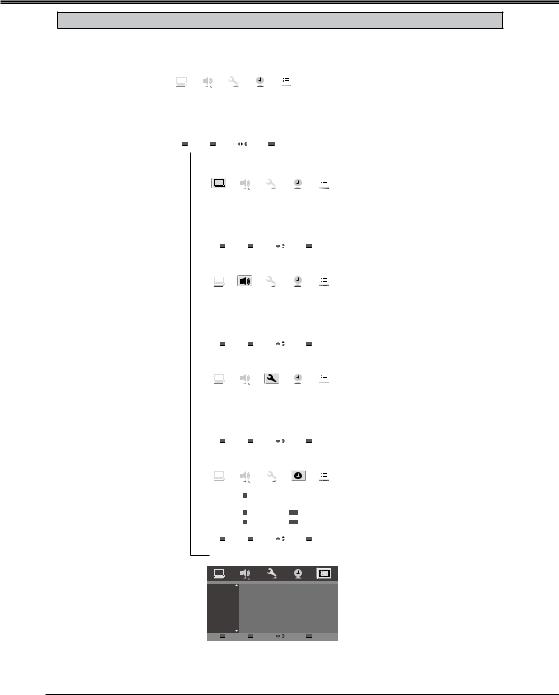
ON-SCREEN MENU
PC/HDMI MODE MENU LIST
MAIN MENU (PICTURE MENU)
|
|
|
|
|
|
|
|
|
|
|
|
|
|
|
|
|
|
|
|
|
|
|
|
|
|
|
|
|
|
|
|
|
|
|
|
|
|
|
|
|
|
|
|
|
|
|
|
DTV Menu... PICTURE |
|
|
|
|
|
|
|
|
|
|
|
|
|
|
|
|
|
|
|
|
|||
Picture Mode |
|
Contrast |
|
|
|
|
|
|
|
|
50 |
|
|
|
|
|
|
|
|
||||
Color Temp |
|
Brightness |
|
|
|
|
|
|
|
|
50 |
|
|
|
|
|
|
|
|
||||
Aspect Ratio |
|
Color |
|
|
|
|
|
|
|
|
50 |
|
|
|
|
|
|
|
|
||||
Backlight |
|
|
|
|
|
|
|
|
|
|
|
|
|
|
|
|
|
|
|
|
|
||
VGA Set |
|
|
|
|
|
|
|
|
|
|
|
|
|
|
|
|
|
|
|
|
|
||
|
|
|
|
|
|
|
|
|
|
|
|
|
|
|
|
|
|
|
|
||||
OK |
Confirm |
MENU |
Return |
|
Navigate |
BACK |
Cancel |
|
|
|
|
|
|
|
|
|
|||||||
|
|
|
|
PICTURE MENU |
|
|
|
|
|
|
|
|
|
||||||||||
|
|
|
|
|
|
|
|
|
|
|
|
|
|||||||||||
|
|
|
|
|
|
|
|
|
|
|
|
|
|
|
|
|
|
|
|
|
|||
|
|
|
|
|
|
|
|
|
|
|
|
|
|
|
|
|
|
|
|
|
|
|
|
|
|
|
|
|
|
|
|
|
|
|
|
|
|
|
|
|
|
|
|
|
|
|
|
|
|
|
|
DTV Menu... PICTURE |
|
|
|
|
|
|
|
|
|
|
|
|
|
|
|
||||
|
|
|
|
Picture Mode |
Contrast |
|
|
|
|
|
|
|
|
50 |
|||||||||
|
|
|
|
Color Temp |
Brightness |
|
|
|
|
|
|
|
|
50 |
|||||||||
|
|
|
|
Aspect Ratio |
Color |
|
|
|
|
|
|
|
|
|
|
|
50 |
||||||
|
|
|
|
Backlight |
|
|
|
|
|
|
|
|
|
|
|
|
|
|
|
|
|
||
|
|
|
|
VGA Set |
|
|
|
|
|
|
|
|
|
|
|
|
|
|
|
|
|
||
|
|
|
|
|
|
|
|
|
|
|
|
|
|
|
|
|
|||||||
|
|
|
|
|
OK |
Confirm |
MENU |
Return |
|
|
|
Navigate |
BACK |
Cancel |
|||||||||
|
|
|
|
AUDIO MENU |
|
|
|
|
|
|
|
|
|
|
|||||||||
|
|
|
|
|
|
|
|
|
|
|
|
|
|
||||||||||
|
|
|
|
|
|
|
|
|
|
|
|
|
|
|
|
|
|
|
|
|
|
|
|
|
|
|
|
|
|
|
|
|
|
|
|
|
|
|
|
|
|
|
|
|
|
|
|
|
|
|
|
|
|
|
|
|
|
|
|
|
|
|
|
|
|
|
|
|
|
|
|
|
|
|
|
DTV Menu... AUDIO |
|
|
|
|
|
|
|
|
|
|
|
|
|
|
|
|
|
||
|
|
|
|
MTS |
|
|
|
|
|
|
|
|
|
|
|
|
|
|
|
|
|
||
|
|
|
|
Dual |
|
|
|
|
|
|
|
|
|
|
|
|
|
|
|
|
|
||
|
|
|
|
Selectab Soun d |
|
|
|
|
|
|
|
|
|
|
|
|
|
|
|
|
|
||
|
|
|
|
Bass Boost |
|
|
|
|
|
Auto |
|
|
|
|
|
|
|
|
|
|
|||
|
|
|
|
Virtal Surround |
|
|
|
|
|
|
|
|
|
|
|
|
|
|
|
|
|
||
|
|
|
|
|
|
|
|
|
|
|
|
|
|
|
|
|
|
|
|||||
|
|
|
|
|
OK |
Confirm |
MENU |
Return |
|
|
|
Navigate |
BACK |
Cancel |
|||||||||
|
|
|
|
SETUP MENU |
|
|
|
|
|
|
|
|
|
|
|||||||||
|
|
|
|
|
|
|
|
|
|
|
|
|
|
||||||||||
|
|
|
|
|
|
|
|
|
|
|
|
|
|
|
|
|
|
|
|
|
|||
|
|
|
|
|
|
|
|
|
|
|
|
|
|
|
|
|
|
|
|
|
|
|
|
|
|
|
|
|
|
|
|
|
|
|
|
|
|
|
|
|
|
|
|
|
|
|
|
|
|
|
|
DTV Menu... SETUP |
|
|
|
|
|
|
|
|
|
|
|
|
|
|
|
||||
|
|
|
|
Language |
Menu Language |
|
|
|
English |
|
|
|
|
|
|
|
|||||||
|
|
|
|
|
|
|
|
|
|
|
|
|
|
|
|
|
|
|
|
|
|
|
|
|
|
|
|
|
OK |
Confirm |
MENU |
Return |
|
|
|
Navigate |
BACK |
Cancel |
|||||||||
|
|
|
|
TIMER MENU |
|
|
|
|
|
|
|
|
|
|
|
|
|||||||
|
|
|
|
|
|
|
|
|
|
|
|
|
|
|
|
||||||||
|
|
|
|
|
|
|
|
|
|
|
|
|
|
|
|
|
|
|
|
|
|
|
|
|
|
|
|
|
|
|
|
|
|
|
|
|
|
|
|
|
|
|
|
|
|
|
|
|
|
|
|
|
|
|
|
|
|
|
|
|
|
|
|
|
|
|
|
|
|
|
|
|
|
|
|
DTV Menu... TIMER |
|
|
|
|
|
|
|
|
|
|
|
|
|
|
|
|
|
||
|
|
|
|
Time Setting |
|
Current Time |
|
|
|
|
|
|
|
|
|
|
|
|
|||||
|
|
|
|
Power Control |
|
|
|
|
|
|
|
|
|
|
|
|
|
||||||
|
|
|
|
|
|
|
|
|
|
|
|
|
|
|
|
|
|
|
|
|
|||
|
|
|
|
Banner Duration |
|
208 |
|
- |
10 |
- |
60 |
|
|
19 |
: |
75 |
|
|
: |
92 |
|
||
|
|
|
|
|
|
|
|
akeUpW Timer |
fterA |
0 oursH |
0 Minutes |
|
|
|
|
||||||||
|
|
|
|
|
|
|
|
SleepTimer |
|
|
fterA |
0 oursH |
|
|
|
|
|
|
|
||||
|
|
|
|
|
|
|
|
|
|
|
|
|
0 |
Minutes |
|||||||||
|
|
|
|
|
|
|
|
|
|
|
|
|
|
|
|
|
|
|
|
|
|
|
|
|
|
|
|
|
OK |
Confirm |
MENU |
Return |
|
|
|
Navigate |
BAC |
K |
Cancel |
||||||||
|
|
|
|
|
|
|
|
|
|
|
|
|
|
|
|
|
|
|
|
|
|
|
|
FUNCTION MENU
DTV Menu... FUNCTION
Reset to default
AV Connection
OK |
Confirm |
MENU |
Return |
Navigate |
BACK |
Cancel |
Note : 1. “PC ADJUST” is only active in PC mode.
2. SOUND/TIMER/OSD menu in PC/HDMI mode is the same as TV/AV mode, please refer to page 13~14.
14
BASIC OPERATION
TURNING ON/OFF LCD TV
1!Complete the peripheral connections before turning on LCD TV. (Please refer to “CONNECTING LCD TV”.)
2!Connect LCD TV ‘s AC Power Cord into an AC outlet.
3!Press POWER ON/OFF button on Side Controls of LCD TV or on Remote Control to turn it ON. The POWER indicator will light up (green). Press POWER ON/OFF button again to shift it to stand-by status, the POWER indicator will become red.
NO SIGNAL SHUT OFF
This TV set incorporates the NO SIGNAL SHUT OFF function. If no signal is input in TV mode, “OFF 00:15” will display for about 15 minutes and TV will be turned off automatically.
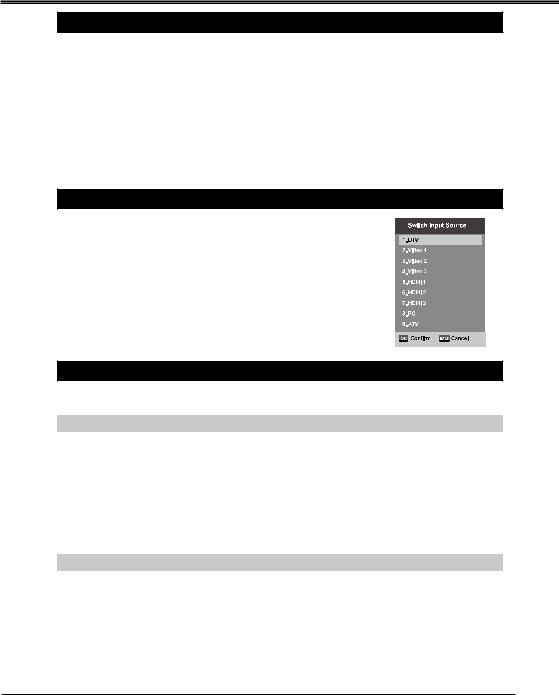
SELECTING INPUT SOURCE
Select mode “DTV”, “VIDEO 1”, “VIDEO 2”, “VIDEO 3”, “HDMI 1”,“HDMI 2”, “HDMI 3”,“PC”,“ATV”, by pressing INPUT button on Remote Control or on Side Controls.
CHANNEL SELECTION
There are 256 channels can be selected on the LCD TV.
DIRECT SELECTION
For direct access to program using the (0-9) numeric button.
1)For selection of channel position 0-9. Example: For channel position 8, press the “8”button.
2)For selection of channel position 10 - 99. For channel position 25, press the DIGIT button to display “- -”, then press “2” and “5” buttons.
3)For selection of channel position 100 - 199. For channel position 125, press the DIGIT button twice to display “1 “, then press “2” and “5” buttons.
4)For selection of channel position 200 - 255. For channel position 235, press the DIGIT button three times to display “2 “, then press “3” and “5” buttons.
CHANNEL UP/DOWN
3UHVV 32,17 Ÿ źEXWWRQV RQ 6LGH &RQWUROV RU RQ 5HPRWH &RQWUROV WR VHOHFW SURJUDPV Ɣ 3UHVV 32,17 Ÿ EXWWRQ WR VHOHFW QH[W FKDQQHO Ɣ 3UHVV 32,17 ź EXWWRQ WR VHOHFW SUHYLRXV FKDQQHO
15
 Loading...