


Sanyo CLT-D6620WH, CLT-D6620, CLT-D6622WH, CLT-D6623WH, CLT-D6623 User Manual
...INSTRUCTION MANUAL |
CLT-D6620 |
||||
|
|
|
CLT-D6620(WH) |
||
|
|
|
Dual Handset Models |
||
Expandable |
CLT-D6622 |
||||
Cordless Telephone |
CLT-D6622(WH) |
||||
Triple Handset Models |
|||||
with Touch Sensitive |
CLT-D6623 |
||||
Keypad |
CLT-D6623(WH) |
||||
|
|
|
|
|
|
|
|
|
|
|
|
The picture depicts dual handset model
Important
Charge the handset battery for 15 continuous hours prior to first use.
SANYO Canada Inc.
www.sanyo.ca

TABLE OF CONTENTS |
|
INTRODUCTION............................................................................................... |
4 |
Main features .............................................................................................. |
4 |
Package contents ........................................................................................ |
5 |
NAMES AND CONTROLS................................................................................ |
6 |
Touch handset.............................................................................................. |
6 |
Base unit(cradle) ......................................................................................... |
7 |
LCD display symbols ................................................................................... |
7 |
TOUCH PHONE USE AND HANDLING........................................................... |
8 |
SAFETY AND CARE......................................................................................... |
8 |
Safety and care............................................................................................ |
8 |
Caring for your product ................................................................................ |
9 |
Caution......................................................................................................... |
9 |
GETTING STARTED....................................................................................... |
10 |
Choose the best location............................................................................ |
10 |
Connecting the base unit............................................................................ |
10 |
Connecting the charger ( For multi-handsets model).................................. |
11 |
Handset battery pack.................................................................................. |
11 |
Activating and charging the handset battery pack....................................... |
11 |
Telephone line connection.......................................................................... |
12 |
Low battery warning................................................................................... |
12 |
Attaching the belt clip ................................................................................ |
13 |
BASIC FUNCTIONS....................................................................................... |
13 |
Standby mode and sleep mode.................................................................. |
13 |
Making and receiving calls......................................................................... |
13 |
PHONEBOOK................................................................................................. |
16 |
Storing numbers......................................................................................... |
16 |
Deleting numbers....................................................................................... |
17 |
Editing numbers......................................................................................... |
18 |
Calling stored numbers.............................................................................. |
19 |
CALLER ID DISPLAY..................................................................................... |
19 |
Caller ID with call waiting........................................................................... |
19 |
Call log....................................................................................................... |
19 |
Viewing / calling Caller ID records.............................................................. |
20 |
Saving Caller ID records in phonebook...................................................... |
20 |
Formatting Caller ID numbers.................................................................... |
21 |
Deleting Caller ID records ......................................................................... |
21 |
TABLE OF CONTENTS |
|
Deleting all Caller ID records...................................................................... |
21 |
Missed calls ............................................................................................... |
22 |
Message waiting......................................................................................... |
22 |
HANDSET SETTINGS.................................................................................... |
23 |
Navigate handset menus ........................................................................... |
23 |
List of submenus........................................................................................ |
24 |
Change display settings ............................................................................ |
25 |
To assign a name to a handset ................................................................. |
25 |
Change ring and key tones ....................................................................... |
26 |
Handset reception...................................................................................... |
26 |
HANDSET SPECIAL FEATURES.................................................................. |
27 |
Phone setup............................................................................................... |
27 |
Smart key lock and manual key lock.......................................................... |
27 |
Area code................................................................................................... |
28 |
Baby call..................................................................................................... |
28 |
Auto answer............................................................................................... |
28 |
Clock and alarm settings............................................................................ |
29 |
MULTI HANDSETS FUNCTIONS................................................................... |
30 |
Registration................................................................................................ |
30 |
RESET............................................................................................................ |
32 |
DEFAULT SETTINGS..................................................................................... |
33 |
TROUBLESHOOTING.................................................................................... |
33 |
CHANGING THE BATTERY........................................................................... |
35 |
POWER FAILURE........................................................................................... |
35 |
RECYCLING NICKELMETAL HYDRIDE BATTERIES ............................... |
36 |
HEADSET JACK ............................................................................................ |
36 |
MAINTENANCE.............................................................................................. |
36 |
MAXIMIZE BATTERY PERFORMANCE........................................................ |
37 |
TECHNICAL INFORMATION.......................................................................... |
38 |
SANYO COMFORT WARRANTY................................................................... |
40 |
SOS HELP LINE............................................................................................. |
42 |
The exclamation point within the triangle is a warning sign alerting you of important instructions accompanying the product.

INTRODUCTION
Congratulations on your purchase of this SANYO Digital cordless telephone with
TOUCH keypad. Your stylish SANYO expandable cordless telephone is a finequality home communications product. It is carefully designed to provide a clear and interference-free calling experience and incorporates features that make phone company services like Caller ID and Call Waiting easier to use. With proper maintenance and care, it will provide you with years of enjoyment and convenience.
Main features
• Touch Keypad with Smart Key Lock |
• |
Handset Speakerphone |
|
• Multiple Base and Handset |
• Intercom / Call Transfer / |
||
Capability |
|
Conference Call Capability(For |
|
• 60 |
Phonebook Records with |
|
multi handset models) |
Search and Edit Function |
• Mute / Redial Functions |
||
• 20 |
Record Last Number Redial |
• Message Waiting / Missed Calls |
|
Records |
|
Notification |
|
• 40 |
Incoming Caller ID Records |
• |
Clock / Alarm Functions |
• 10 |
Polyphonic Melodies and 4 |
• |
Multiple Language Display |
Traditional Ring Tones |
• Standby Time – 120 hours |
||
|
|
• Talk Time – 7 hours |
|

INTRODUCTION
Package contents
Make sure your package includes the following items.
For CLT-D6620/CLT-D6620(WH)
•Base unit (1)
•Handset (1)
•Rechargeable battery pack (pre-installed)(1)
•AC adapter (1)
•Telephone line cord (1)
•Belt clip (1)
•Cleaning cloth (1)
•This user manual
For CLT-D6623/CLT-D6623(WH)
•Base unit (1)
•Handset (3)
•Charging cradle (2)
•Rechargeable battery pack (pre-installed) (3)
•AC adapter (3)
•Telephone line cord (1)
•Belt clip (3)
•Cleaning cloth (1)
•This user manual
For CLT-D6622/CLT-D6622(WH)
•Base unit (1)
•Handset (2)
•Charging cradle (1)
•Rechargeable battery pack (pre-installed) (2)
•AC adapter (2)
•Telephone line cord (1)
•Belt clip (2)
•Cleaning cloth (1)
•This user manual
NOTE: Keep this manual handy as you use your new product. It contains practical step-by-step instructions, as well as technical specifications and warnings.
NAMES AND CONTROLS
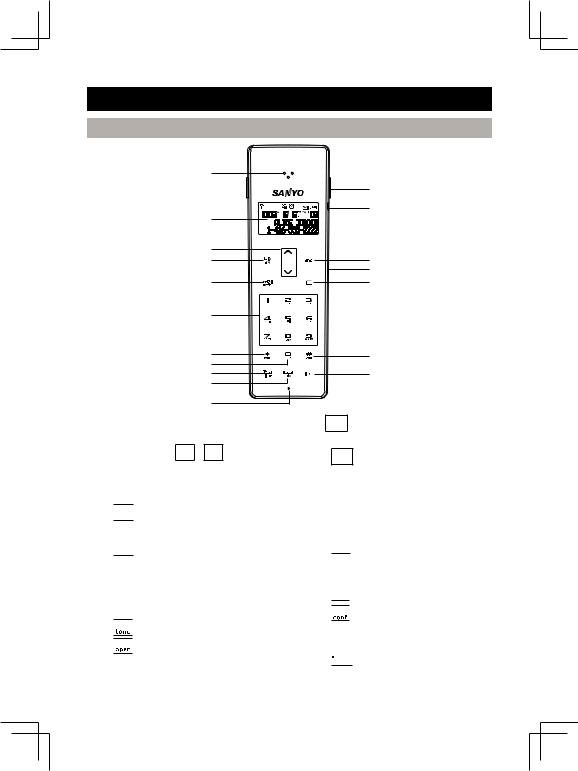
Touch handset
1
2
3
4
5
6
7
8
9
10
11
1.Receiver
2.LCD Display
3.CID / VOL /  /
/  Keys: volume control; view caller ID log; navigate menus and settings
4.

 : answer and dial calls; activate speakerphone
5.

 : view, dial previous calls; format area code/long distance numbers
6.1 - 9: enter numbers and characters
7.

 : enter special characters
8.

 : enter numbers and special characters
12
13
14
15
16
17
18
9. :activate call waiting; delete text; exit submenu
10. : go to menu; enter setting and confirm ok; mute function during a call
11.Microphone
12.Detachable belt clip
13.Headset jack
14. : end calls; exit to standby mode
15.Speaker
16.

 : enter phonebook
17.

 : CONFERENCE / #: toggle capitals and small letters when entering text
18.


 : INTERCOM: dial internal line

NAMES AND CONTROLS
Base Unit (cradle)
1 2
3
1.PAGE: pages handset
2.Charging contacts
3.Charge/In use LED: Line status and voice message indicator
LCD Display symbols
SYMBOL DESCRIPTION
Signal within range
Key lock activated
Ringer silenced
Alarm set
Small letters activated
Message waiting
Battery full
TOUCH PHONE USE AND HANDLING
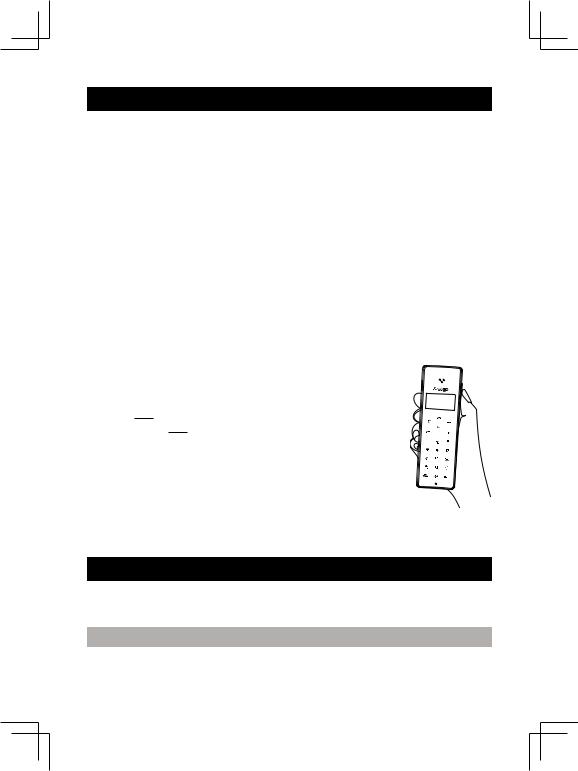
•The touch panel handset offers a new experience in telephone communication. This Touch keypad technology is very sensitive and may take a little time to get used to. To avoid accidental key contact while talking,first lift the handset to touch your ear, pause a brief moment, and then move the lower portion of the phone closer to your mouth.
•The keypad will automatically disable when the receiver first touches your ear. This feature reduces the risk of accidental keypad activation
while the phone is held against the side of your face.
•To properly use your Touch phone, pick it up from the back and sides and cradle it in your hand. While talking, avoid touching the key pad area unnecessarily to prevent accidental triggering of the keypad.
•It is very easy to tell when the keypad is disabled, as the keypad backlight will be off.
•To turn keypad backlight on and activate the keypad, touch any of the number keys, wait for the backlight to come on and then dial normally.
NOTE: If more than one key area is touched,the keypad may not activate.
• During a call, the keypad will automatically disable and
the backlight will turn off. When the backlight turns off and when you want to end the call, the first key-press of the  key will only wake up the keypad, and a second
press of the  key will be required to terminate the call.
• When dialing digits, hold the handset away from the LCD area as shown. Touching the LCD display may trigger the automatic keypad lock sensor and prevent you from dialing. If the keypad lock sensor is triggered, a small key will appear in the top left corner of the display.
•To maximize the touch keypad performance, use the
cleaning cloth that supplied with the phone to keep the keypad clean.
safety and care
Observe the following safety precautions and warnings when setting up and using this product.
Safety and care
•LCD panel – The LCD panel is made of glass, and may break if the unit is dropped. Place the unit securely on a stable surface.

safety and care
•Heat sources – Keep the product away from heat sources, such as radiators, stoves, heaters, and other heat-generating products.
•Water and moisture – Do not use the product in or near water or in high moisture areas, such as a bathroom.
Caring for your product
•Do not clean any part of your phone with benzene, thinner or other solvent chemicals as this may cause permanent damage that is not covered by the warranty. When necessary, clean it with a damp cloth.
•Keep your phone away from hot, humid conditions or strong sunlight.
•Never immerse the unit in water or use your phone outdoors in the rain, or handle it with wet hands.
•Do not subject the base unit to extreme force, shock, or fluctuations in humidity.
•Do not tamper with the internal components or disassemble the unit.
•Every effort has been made to ensure the highest standards of reliability for your phone. However, if something does go wrong, do not try to repair it yourself – consult your supplier.
Caution
•Dispose of old, defective batteries in an environmentally friendly manner in accordance with the relevant legislation.For information, go to www.rbrc.ca
•No exposed flames, such as lighted candles, should not be placed near the apparatus.
•Never use your phone in the open air during a thunderstorm – unplug the base unit from the phone line and the main socket when there are storms in your area.
•Do not install the base unit near a sink, bath or shower, or anywhere else where it could get wet. Electrical equipment can cause serious in jury if used while you are wet or standing in water.
•If the base unit ever falls into water, do not retrieve it until you have unplugged the power lead from the mains and the phone line plug from the phone socket; then pull it out by the unplugged cables.
•When handling batteries exercise care. Contact with conductive materials can short the batteries. To avoid the risk of fire, never use non-rechargeable batteries.
safety and care
•Use only the power source marked on the power supply (adapter). If you are unsure of the power supplied to your home consult your power company. Do not place objects on the power cord.
•Never use this unit near a gas leak as this can cause explosions.
•Occasional loss of synchronization between the handset and base unit is normal if there is significant interference from the surrounding environment.
•Disconnect the telephone line from the wall-outlet before replacing battery.
CAUTION:
You must use a Class 2 power source that supplies 6V DC and delivers at least 300mA. Its plug must fit the phone’s DC IN jack. The supplied adaptor meets these specifications. Using an adaptor that does not meet these specifications could damage the phone or the adaptor.
Always connect the AC adaptor to the phone before you connect it to AC power. When you finish, disconnect the adaptor from AC power before you disconnect from the phone.
GETTING STARTED
Choose the best location
When choosing a location for your new phone, here are some import guidelines you should consider:
1.The location should be close to both a phone jack and a continuous power outlet ( one which is not connected to a switch).
2.The base and handset should be kept away from sources of electrical noise such as motors, microwave ovens, and fluorescent lighting.
3.For better reception, place the base as high as possible.
4.The base should be placed in an open area for optimum range and reception.
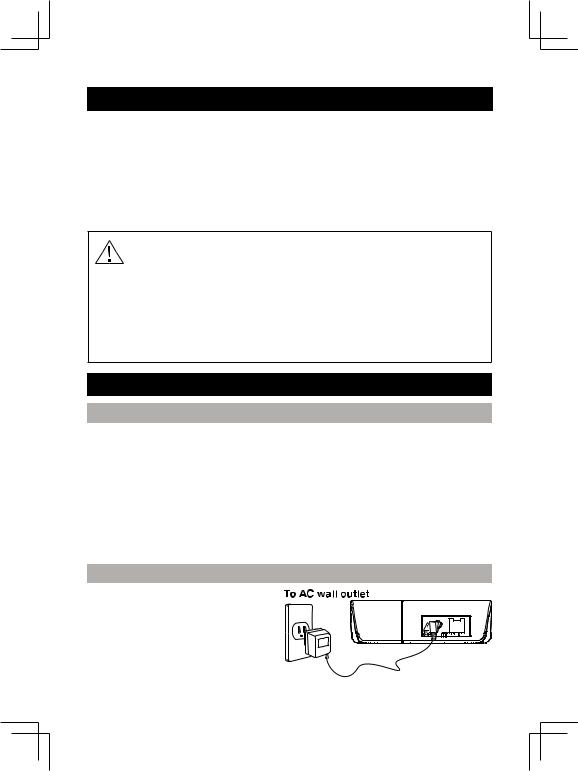
Connecting the base unit
Plug the AC adapter into the POWER
DC 6V jack on the back of the base.
Plug the other end into a standard
120V AC wall outlet.
10
GETTING STARTED
Connecting the charger ( For multi-handset model)
Plug the AC adapter into the POWER
DC 6V jack on the back of the charger.
Plug the other end into a standard
120V AC wall outlet.
CAUTION: Use only the SANYO AC adapter that is supplied with this phone. Using another AC adapter may damage the phone.
Handset battery pack
The handset uses 1 x NiMH 650 mAh 3.6V (AAA) rechargeable battery pack. The removable battery pack is already pre-installed in the handset for you.
NOTE: Before using the handset and to prolong battery life, place the handset in the base handset cradle and charge for at least 15 hours.
WARNING: There is a risk of explosion if battery pack is replaced with the incorrect battery pack type. Dispose of the used battery pack according to the instructions.
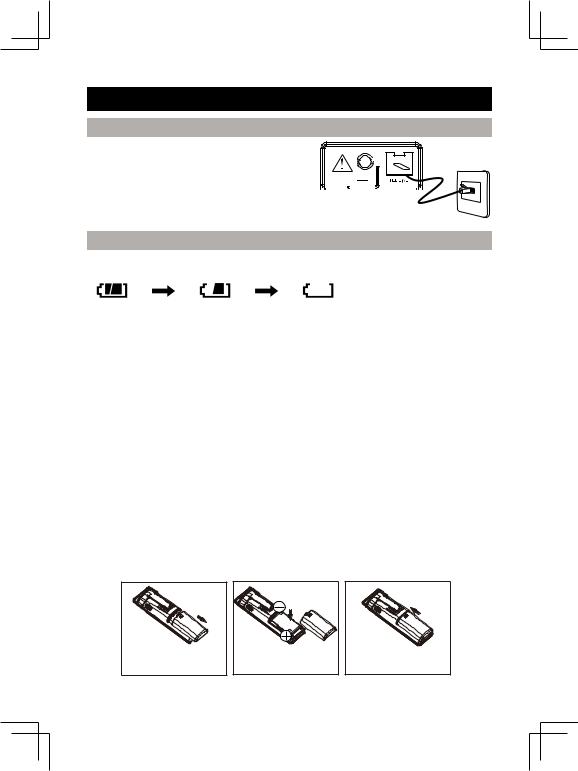
Activating and charging the handset battery pack
To activate and charge the handset battery pack:
1.Pull the battery contact tab out slowly and remove as shown.
2.Place the handset in the cradle of the base unit.
3.  The battery icon on the display will flash and the base indicator light will turn on to indicate the handset is charging.
4. Charge battery pack for at least 15 hours prior to first use.
5.When the battery is fully charged, the battery icon will stop flashing and  will appear.
11
GETTING STARTED
Telephone line connection
Once the handset battery is fully charged, connect the telephone line cord to the
THE LINE jack on the back of the base. Plug 


 the other end into a telephone outlet.


Low battery warning
The battery icon indicates the battery status:
FULL |
EMPTY |
1.If the battery power is low, and the phone is in TALK mode, a warning tone will sound from the handset and ' LOW BATTERY ' will appear on the screen.
2.If the battery is low and the phone is in STANDBY mode, ' LOW BATTERY ' will appear on the screen.
Removing and replacing handset battery pack
After years of use,all NiMH rechargeable batteries loose the ability to hold a full charge and may need to be replaced. The handset uses 1 NiMH 650 mAh 3.6V (AAA) rechargeable battery pack. Only replace with an approved battery pack available through SANYO. Contact the SANYO Customer Service Center at
1-800-263-2244 to order.
WARNING:There is a risk of explosion if battery pack is replaced with an incorrect type. Dispose of used battery pack according to your local waste management guidelines.
To install a replacement handset battery pack:
1.Remove the battery door cover on the telephone handset.
2.Insert the battery pack according to polarity engraved as shown.
3.Slide the cover back on so that it clicks firmly into place.
- |
12 |
GETTING STARTED
NOTE: Before using the handset and to prolong battery life, place the handset in the base handset cradle and charge for at least 15 hours.
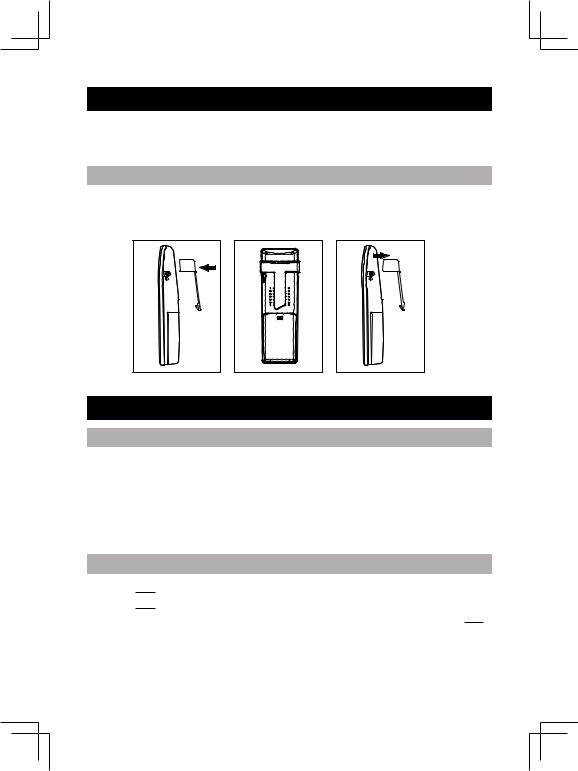
Attaching the belt clip
Belt clip installation
1.Attach the belt clip by inserting the sides of the belt clip into the slots.
2.Snap the ends of the belt clip into place.
BASIC FUNCTIONS
Standby mode and sleep mode
When the handset has been inactive for a while, it will enter sleep mode and the
LCD backlight and key lights will switch off. Touch any key to return to standby mode. The LCD backlight and key lights will activate to indicate standby mode.
To adjust the time from standby to sleep mode, please refer to HANDSET SETTINGS - CHANGE DISPLAY SETTINGS (page 25).
NOTE: If keylock is on you will need to unlock phone to enter standby mode.
Making and receiving calls
To make a call:
•Touch 
 to get a dial tone.
•Enter destination phone number using 0 - 9. If you make an error, touch  to cancel.
13
 Loading...