


 Loading...
Samsung WF-J125NV-C-S, WF-B145NV-C-S, WF-R125NV-C-S, WF-J85NV-C-S, WF-B125NV-C-S User Manual
...Washing Machine
Owner’s Instructions
WF-J145N(V/C/S)
WF-J125N(V/C/S)
WF-J105N(V/C/S)
WF-J85N(V/C/S)
WF-B145N(V/C/S)
WF-B125N(V/C/S)
WF-B105N(V/C/S)
WF-B85N(V/C/S)
WF-R125N(V/C/S)
WF-R105N(V/C/S)
WF-R85N(V/C/S)
WF-F125N(V/C/S)
WF-F105N(V/C/S)
WF-F85N(V/C/S)
Register your product at
www.samsung.com/global/register
Code No.: DC68-02211A_EN
WF-J145NC-02211A-GB.indd |
1 |
2006-03-29 |
10:42:00 |

 Safety Precautions
Congratulations on your purchase of this Samsung washing machine. These Owner's Instructions contain valuable information on the installation, use, and care of this appliance. Please take the time to read these instructions so that you can take full advantage of the washing machine's features and enjoy this appliance for many years to come.
Before using the appliance
•Packing materials can be dangerous to children; keep all packing material (plastic bags, polystyrene, etc.) well out of the reach of children.
•The appliance is designed for home use only.
•Make sure that water and electrical connections are made by qualified technicians, observing the manufacturer's instructions (see "Installing the Washing Machine") and local safety regulations.
•All packaging and shipping bolts must be removed before the appliance is used. Serious damage mayoccuriftheyarenotremoved. See"Removingtheshippingbolts".
•Before washing clothes for the first time, you must run a complete cycle without clothes. See "Washing for the first time".
Safety instructions
•Before cleaning or carrying out maintenance, unplug the appliance from the electrical outlet or set the  (On/Off) button to Off.
•Make sure that the pockets of all clothing to be washed are empty. Hard, sharp objects, such as coins, safety pins, nails, screws, or stones can cause extensive damage to the appliance.
•Always unplug the appliance and turn off the water after use.
•Before you open the door of the appliance, check that the water has drained. Do not open the door if you can still see water.
•Pets and small children may climb into the appliance. Check the appliance before each use.
•The glass door becomes very hot during the washing cycle. Keep children away from the appliance while it is in use.
•Do not attempt to repair the appliance yourself. Repairs made by inexperienced or unqualified persons may cause injury and/or make more serious repairs to the appliance necessary.
•If the plug (power supply cord) is damaged, it must be replaced by the manufacturer or its service agent or a similarly qualified person in order to avoid a hazard.
•This appliance should only be serviced by an authorized service center, and only genuine spare parts should be used.
•This appliance is not intended for use by young children or infirm persons unless they have been adequately supervised by a responsible person to ensure that they can use the
appliance safely. Young children should be supervised to ensure that they do not play with the appliance.
•This appliance has to be connected to the plug endurable to proper power consumption.
•This appliance has to be positioned so that the plug is accessible after installation.
•If this appliance is supplied from a cord extension set or an electrical portable outlet device, the cord extension set or electrical portable outlet device must be positioned so that it is not subject to splashing or ingress of moisture. Additionally, the cord extension set or electrical portable out let device must be of a current rating suitable for the appliance.
•Do not use processed water containing oil, cream or lotion, which is usually found in skin-care shops or massage clinics.
-Otherwise this will cause the packing to be deformed, which causes a malfunction or water leak.
•A stainless washing tube does not usually rust. However if some metal such as a hair pin is left in the tube for an extended time, the tube could rust.
-Do not leave water or bleach containing chlorine in the tube for an extended period of time.
-Do not regularly use or leave water containing iron in the tube for an extended period of time.
If rust starts appearing on the surface of the tube, apply a cleansing agent (neutral) to the surface and use a sponge or soft cloth to clean it. (Under no circumstances use a metal brush)
•For washing machines with ventilation openings in the base, that a carpet must not obstruct the openings.
•Use the new hose-sets and old hose-sets should not be reused.
SAVE THESE INSTRUCTIONS
WF-J145NC-02211A-GB.indd |
2 |
2006-03-29 |
10:42:00 |
Table of Contents 
Safety Precautions . . . . . . . . . . . . . . . . . . . . . inside cover Installing the Washing Machine . . . . . . . . . . . . . . . . . . . .2
Unpacking the Washing Machine . . . . . . . . . . . . . . . . . . . . . . . . . .2 Overview of the washing machine. . . . . . . . . . . . . . . . . . . . . . . . . .2 Selecting a location . . . . . . . . . . . . . . . . . . . . . . . . . . . . . . . . . . . . .3 Adjusting the leveling feet . . . . . . . . . . . . . . . . . . . . . . . . . . . . . . . .3 Removing the shipping bolts . . . . . . . . . . . . . . . . . . . . . . . . . . . . . .3 Connecting the water supply hose(Option) . . . . . . . . . . . . . . . . . . .3 Connecting the water supply hose. . . . . . . . . . . . . . . . . . . . . . . . . .4 Positioning the drain hose . . . . . . . . . . . . . . . . . . . . . . . . . . . . . . . .4 Plugging in the machine . . . . . . . . . . . . . . . . . . . . . . . . . . . . . . . . .5
Washing a Load of Laundry . . . . . . . . . . . . . . . . . . . . . . |
6 |
Overview of the control panel . . . . . . . . . . . . . . . . . . . . . . . . . . . . .6 Washing for the first time. . . . . . . . . . . . . . . . . . . . . . . . . . . . . . . . .8 Putting detergent in the washing machine. . . . . . . . . . . . . . . . . . . .8 Washing clothes using Fuzzy Logic. . . . . . . . . . . . . . . . . . . . . . . . .9 Washing clothes manually. . . . . . . . . . . . . . . . . . . . . . . . . . . . . . .10 Using Delay Start . . . . . . . . . . . . . . . . . . . . . . . . . . . . . . . . . . . . .10 Washing tips and hints. . . . . . . . . . . . . . . . . . . . . . . . . . . . . . . . . .11
Maintaining the Washing Machine . . . . . . . . . . . . . . . . .12
Draining the washing machine in an emergency. . . . . . . . . . . . . .12 Repairing a frozen washing machine. . . . . . . . . . . . . . . . . . . . . . .12 Cleaning the exterior . . . . . . . . . . . . . . . . . . . . . . . . . . . . . . . . . . .12 Cleaning the detergent drawer and recess . . . . . . . . . . . . . . . . . .13 Cleaning the debris filter . . . . . . . . . . . . . . . . . . . . . . . . . . . . . . . .13 Cleaning the water hose mesh filter . . . . . . . . . . . . . . . . . . . . . . .14
Troubleshooting . . . . . . . . . . . . . . . . . . . . . . . . . . . . . . . .15
Problems and solutions . . . . . . . . . . . . . . . . . . . . . . . . . . . . . . . . .15 Understanding error messages . . . . . . . . . . . . . . . . . . . . . . . . . . .15
Programme Chart . . . . . . . . . . . . . . . . . . . . . . . . . . . . . . .16 Appendix . . . . . . . . . . . . . . . . . . . . . . . . . . . . . . . . . . . . . .18
Fabric care chart . . . . . . . . . . . . . . . . . . . . . . . . . . . . . . . . . . . . . .18 Electrical warnings. . . . . . . . . . . . . . . . . . . . . . . . . . . . . . . . . . . . .18 Protecting the environment . . . . . . . . . . . . . . . . . . . . . . . . . . . . . .19 Declaration of conformity. . . . . . . . . . . . . . . . . . . . . . . . . . . . . . . .19 Specification . . . . . . . . . . . . . . . . . . . . . . . . . . . . . . . . . . . . . . . . .19
This marking shown on the product or its literature, indicates that it should not be disposed with other household wastes at the end of its working life. To prevent
possible harm to the environment or human health from uncontrolled waste disposal, please separate this from other types of wastes and recycle it responsibly to promote
 the sustainable reuse of material resources.
Household users should contact either the retailer where they purchased this product, or their local government office, for details of where and how they can take this item for environmentally safe recycling.
Business users should contact their supplier and check the terms and conditions of the purchase contract. This product should not be mixed with other commercial wastes for disposal.
SAMSUNG Washing Machine Owner’s Instructions 1
WF-J145NC-02211A-GB.indd |
1 |
2006-03-29 |
10:42:01 |

Installing the Washing Machine
Unpacking the Washing Machine
Unpack your washing machine and inspect it for shipping damage. Also make sure that you have received all of the items shown below. If the washing machine was damaged during shipping or you do not have all of the items, contact your Samsung dealer immediately.
Overview of the washing machine
|
Worktop |
|
Detergent |
|
|
drawer |
|
|
Control panel |
Drain Hose |
|
|
||
Door |
|
|
|
Plug |
|
Base cover |
|
|
Adjustable feet |
Debris filter |
|
|
Emergency drain |
|
|
tube |
|
|
Filter-cover |
|
|
Cold Water |
|
Wrench |
supply hose |
|
|
||
Drain hose |
|
|
Hose guide |
Bolt hole |
|
covers |
||
|
2 SAMSUNG Washing Machine Owner’s Instructions
WF-J145NC-02211A-GB.indd |
2 |
2006-03-29 |
10:42:02 |
Installing the Washing Machine
Selecting a location
Before you install the washing machine, select a location with the following characteristics:
•A hard, level surface (if the surface is uneven, see "Adjusting the leveling feet," below)
•Away from direct sunlight.
•Adequate ventilation
•Room temperature that will not fall below 0 ˚C
•Away from sources of heat such as coal or gas
Make sure that the washing machine does not stand on its power cord.
Ventilation openings must not be obstructed by carpeting when the washing machine is installed on a carpeted floor.
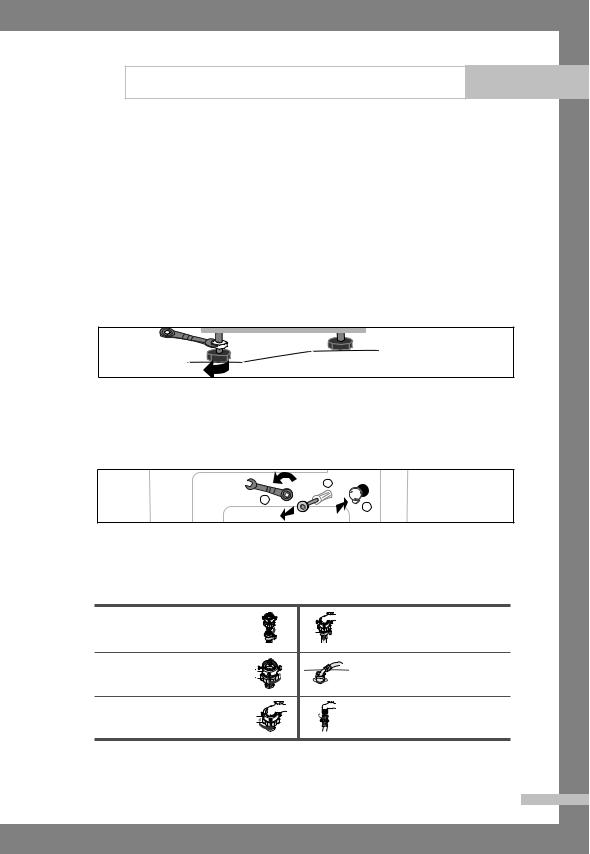
Adjusting the leveling feet
If the floor is uneven, adjust the feet (do not insert pieces of wood or any other objects under the feet):
1. Loosen the leg bolt by turning it with your hand until it is at the desired height. 2. Tighten the locking nut by turning it with the supplied wrench.
•Place the washer on a sturdy, flat surface.
If the washer is placed on an uneven or weak surface, noise or vibration occurs. (Only a l degrees angle is allowed.)
Removing the shipping bolts
Before using the washing machine, you must remove the five shipping bolts from the back of the unit. To remove the bolts:
2
1
3
1. Loosen all bolts with the supplied wrench before removing them.
2. Take each bolt head and pull it through the wide part of the hole. Repeat for each bolt. 3. Fill the holes with the supplied plastic covers.
4. Keep the shipping bolts for future use.
Connecting the water supply hose(Option)
1. Remove the adaptor from the water |
|
4. Connect the water supply hose to the |
supply hose. |
|
adaptor. Pull down part (c) of the water |
|
c |
supply hose. When you release part (c) |
|
|
the hose automatically connects to the |
|
|
adaptor making a ’click’ sound. |
2. First, using a “+” type screw driver, |
|
5. Connect the other end of the water |
loosen the four screws on the |
|
|
|
supply hose to the inlet water valve at |
|
adaptor. Next, take the adaptor and |
|
|
|
the top of the washer. Screw the hose |
|
turn part(b) following the arrow |
|
|
|
clockwise all the way in. |
|
until there is a 5mm gap. |
|
|
|
|
|
3. Connect adaptor to the water tap by |
|
• If the water tap has a screw type faucet, |
tightening the screws firmly. Then, |
a |
connect the water supply hose to the tap as |
turn part (b) following the arrow and |
b |
shown. |
put(a) and (b) together. |
|
|
NOTICE After completing connection, if water leaks from the hose, then repeat the same steps. Use the most conventional type of faucet for water supply. In case the faucet is square or too big, remove the spacing ring before inserting the faucet into the adaptor.
SAMSUNG Washing Machine Owner’s Instructions 3
WF-J145NC-02211A-GB.indd |
3 |
2006-03-29 |
10:42:28 |
Installing the Washing Machine
Connecting the water supply hose
The water supply hose must be connected to the washing machine at one end and to the water faucet at the other. Do not stretch the water supply hose. If the hose is too short and you do not wish to move the water faucet, replace the hose with a longer, high pressure hose.
To connect the water supply hose:
1. Take the L-shaped arm fitting for the cold water supply hose and connect to the cold water supply intake on the back of the machine. Tighten by hand.
2.Connect the other end of the cold water supply hose to your sink's cold water faucet and tighten it by hand. If necessary, you can reposition the water supply hose at the
washing machine end by loosening the fitting, rotating the hose, and retightening the fitting.
Option:
1.Take the red L-shaped arm fitting for the hot water supply hose and connect to the red hot water supply intake on the back of the machine. Tighten by hand.
2.Connect the other end of the hot water supply hose to your sink's hot water faucet and tighten it by hand.
3.Use a Y-piece if you only want to use cold water.
Note: The appliance is to be connected to the water mains using new hose-sets and that old hose-sets should not be used.
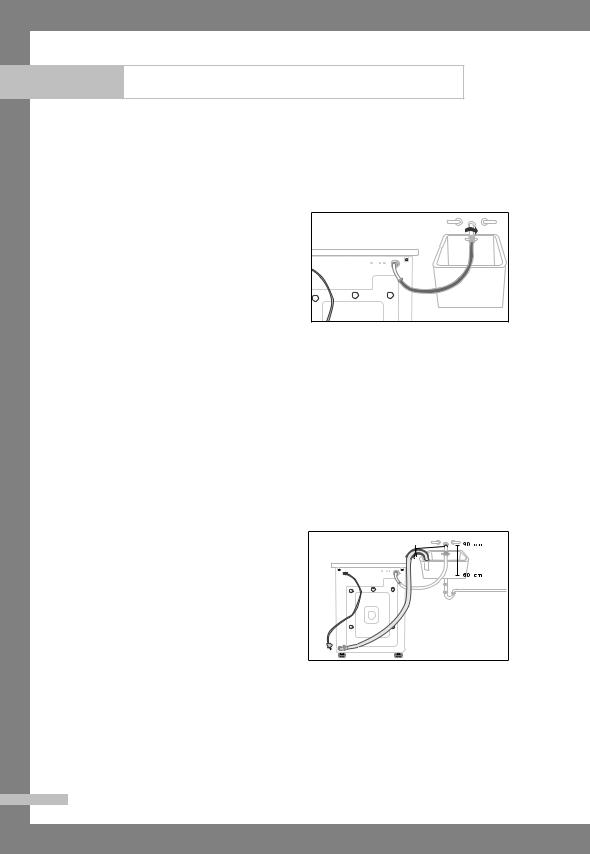
Positioning the drain hose
The end of the drain hose may be positioned in three ways:
Over the edge of a sink
The drain hose must be placed at a height
of between 60 and 90 cm. To keep the drain hose spout bent, use the supplied plastic hose guide. Secure the guide to the wall with a hook or to the faucet with a piece of string to prevent the drain hose from moving.
ln a sink drain pipe branch
The drain pipe branch must be above the sink siphon so that the end of the hose is at least 60 cm above the ground.
ln a drain pipe
Samsung recommends that you use a 65 cm high vertical pipe; it must be no shorter than 60 cm and no longer than 90 cm.
4 SAMSUNG Washing Machine Owner’s Instructions
WF-J145NC-02211A-GB.indd |
4 |
2006-03-29 |
10:42:29 |
Installing the Washing Machine
Plugging in the machine
You MUST ground the plug of the washing machine.
Check with a licensed electrician before using the machine to make sure it is properly grounded.
For U.K. Users.
Wiring lnstructions
WARNING THIS APPLIANCE MUST BE EARTHED.
This appliance must be earthed. In the event of an electrical short circuit, earthing reduces the risk of electric
shock providing an escape wire for the electric current. The appliance is equipped with a mains lead which includes an earth wire for connecting to the earth terminal of your mains plug.
The plug must be plugged into a socket that is properly installed and earthed.
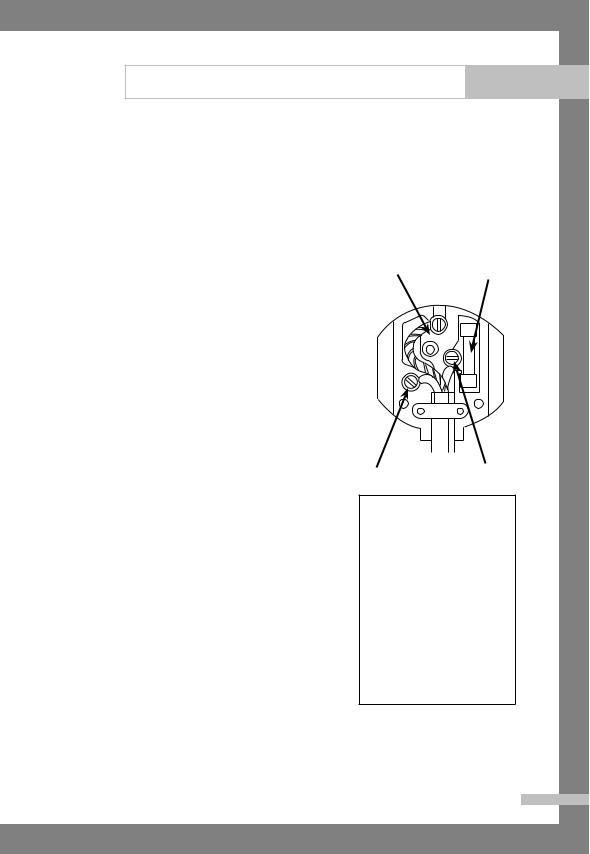
*The wires in this mains lead are coloured in accordance with the following code:
•Green and yellow: Earth
•Blue |
: |
Neutral |
•Brown |
: |
Live |
•AS the colours of the wires in the mains lead of this
appliance may not correspond with the coloured markings indentifying the terminals in your plug, proceed as follows.
•Connect the green and yellow wire to the terminal in the plug marked with the letter E or the earth
symbol (  ) or coloured green or green-and- yellow.
•Connect the blue wire to the terminal marked with the letter N or coloured black.
•Connect the brown wire to the terminal marked with the letter L or coloured red.
* Consult a qualified electrician or service technician if in doubt about any of these instructions.
The manufacturer of this washing machine will not accept any liability for damage to persons or material for non observance of these requirements. There are no user serviceable parts inside the washing machine and if the mains lead of this appliance is damaged, it must only be replaced by qualified service personnel approved by the manufacturer because special tools are required.
GREEN AND |
13 AMP |
YELLOW |
FUSE |
|
|
|
|
|
|
|
|
BLUE BROWN
WARNING
Ensure that the plug and power cord are not damaged before use. If you have any reason to remove the moulded plug from this appliance, immediately remove the fuse and dispose of the plug.
Do not connect the plug to a mains socket under any circumstances as there is a danger of electric shock.
CIRCUITS
Your washing machine should be operated on a separate circuit from other appliances. Failure to do this may cause the circuit breaker to trip or the fuse to blow.
SAMSUNG Washing Machine Owner’s Instructions 5
WF-J145NC-02211A-GB.indd |
5 |
2006-03-29 |
10:42:29 |
Loading...