


Samsung UN75F8000AFXZA, UN60F7500, UN55F9000AF, UN55F7500AF, UN65F9000 User Manual
...
SMART TV
E-Manual
Contents
e-Manual Guide
Viewing the e-Manual
1 Scrolling a Page
1 Using the Top Icons
1Returning to the Home Page
1Searching the Index
2Searching Pages
2 Closing the e-Manual
2 Jumping to a Menu Item
2 Updating the e-Manual
Getting Started
Antenna Connection
3 LED 7400, 7500, 8000, 8200, 8500, 8500 series models 3 UHD F9000 and S9 series models
Video Device Connections
HDMI Connection
5LED 7400, 7500, 8000, 8200, 8500 series models
6UHD F9000 and S9 series models
Component Connection
7LED 7400, 7500 series models
8LED 8000, 8200, 8500 series models
9UHD F9000 and S9 series models
AV Connection
10LED 7400, 7500 series models
11LED 8000, 8200, 8500 series models
12UHD F9000 and S9 series models
Audio Device Connections
Digital Audio (Optical) Connection
14 LED 7400, 7500, 8000, 8200, 8500 series models
14 UHD F9000 and S9 series models
Audio Output Connection
15 LED 7400, 7500, 8000, 8200, 8500 series models
15 UHD F9000 and S9 series models
ARC (Audio Return Channel)
16LED 7400, 7500, 8000, 8200, 8500 series models
17UHD F9000 and S9 series models
Computer Connection
18 HDMI Connection
18LED 7400, 7500, 8000, 8200, 8500 series models
19UHD F9000 and S9 series models
19 HDMI-to-DVI Connection
19LED 7400, 7500, 8000, 8200, 8500 series models
20UHD F9000 and S9 series models
Smartphone Connection
21LED 7400, 7500, 8000, 8200, 8500 series models
22UHD F9000 and S9 series models
Switching Between Video Sources
Programming
23 Auto Program
Channel Management
25 Remove Channels
25 Restore Removed Channels
25 Channel Lock
25 Channel Unlock
25 Rename Analog Channels
Favorite Channels
26 Add Favorite Channels
26Remove Favorite Channels
27Rearrange the Favorite Channels List
27 Rename a Favorite Channel List
27 Copy a Favorite Channels List
Network Configuration
28 Wired Network
28LED 7400, 7500, 8000, 8200, 8500 series models
29UHD F9000 and S9 series models
30 Wireless Network
30Wireless Network Precautions
31Network Security Protocols
Wired Network Setup
31Automatic Wired Network Setup
32Manual Wired Network Setup
33Failed Wired Connection
Wireless Network Setup |
Virtual Remote Control |
|||||
34 |
Automatic Wireless Network Setup |
49 |
Changing the Virtual Remote Control Panel |
|||
35 |
Manual Wireless Network Setup |
49 |
Change a position of the Virtual Remote Panel |
|||
36 |
Using the WPS Button |
49 |
Adjusting the virtual remote panel size |
|||
37 |
Failed Wireless Connection |
50 |
Using the Number Panel |
|||
38 |
Dynamic versus Static IP Addresses |
50 |
Using the Playback Control Panel |
|||
Checking the Network Status |
51 |
Using the Quick Access Panel |
||||
|
|
|
||||
Mobile Device Connection |
Universal Remote Setup |
|||||
|
|
|
||||
39 |
Wi-Fi Direct |
52 |
Connecting the IR EXTENDER CABLE |
|||
|
|
|
||||
|
|
|
|
52 LED 7400, 7500, 8000, 8200, 8500 series models |
||
39 |
AllShare Settings |
|
53 UHD F9000 and S9 series models |
|||
39 |
Rename the TV |
53 |
Add the External Device |
|||
|
|
|
54 |
Using the Universal Remote Control |
||
Controlling the TV |
54 |
Registered External Device Management |
||||
Entering Text using the Onscreen Keypad |
||||||
|
|
|
||||
Smart Touch Control |
54 |
Entering Text using the QWERTY Keypad |
||||
|
54 |
Additional Features |
||||
|
|
|
|
|||
40 |
Inserting the Batteries (AAA X 2) |
|
|
|
||
41 |
Connecting to the TV |
SMART Interaction |
||||
|
|
|
||||
|
41 Reconnecting the Smart Touch Control |
55 |
Precautions |
|||
|
|
|
|
|||
41 |
Battery Low Alarm |
|
55 |
Face Recognition |
||
|
55 |
TV Camera Use |
||||
|
|
|
|
|||
42 |
Buttons and Descriptions |
|
55 |
Motion Control |
||
|
43 |
Special Functions |
|
56 |
Voice Recognition |
|
Using the touch pad |
Voice Recognition |
|||||
44 |
Dragging |
57 |
Operating Environment |
|||
44 |
Press |
|
57 |
Voice Recognition Environment Test |
||
45 |
Flicking |
57 |
Enabling Voice Recognition |
|||
45 |
Pressing and Holding |
58 |
Voice Recognition Tutorial |
|||
45 |
Pressing and Dragging |
58 |
Basic Voice Recognition Use |
|||
46 |
Scrolling Up/Down |
58 |
Voice Recognition Settings |
|||
46 |
Scrolling Left/Right |
59 |
Interactive Voice Recognition Commands |
|||
47 |
Changing Channels by Entering Numbers |
59 |
Deactivating Voice Recognition |
|||
|
47 |
Numerical Input Guide |
|
|
|
|
48 |
Adjusting the Touch pad |
Motion Control |
||||
|
|
|
||||
48 |
Show Status and Notification Banner |
60 |
Operating Environment |
|||
|
|
|
||||
48 |
Recommended |
61 |
Motion Control Environment Test |
|||
|
|
|
||||
48 |
History |
61 |
Motion Control Tutorial |
|||
|
|
|
||||
|
48 |
Deleting History Data |
61 |
Motion Control Activation |
||
|
|
|
|
|||
48 |
Searching |
62 |
Using the Basic Motion Controls |
|||
|
|
|
62 |
Motion Control Options |
||
|
|
|
63 |
Motion Control Screen |
||
|
|
|
|
63 The Screen Composition while Viewing TV |
||
|
|
|
|
64 The Smart Hub Screen Composition |
||
Face Recognition
66Operating Environment
67Face Registration
67Face Registration from the Smart Hub account information screen
68Face Registration for the Smart Hub account using face recognition
68 Face Recognition Login
Using Peripheral Devices
69Keyboard Connection
69 Keyboard Use
70Mouse Connection
70 Mouse Use
TV Viewing
TV Viewing
71 Program Info
71 Change the Broadcast Signal
71 Guide
72 Change Channels
72 Recording the Current Program
72 Change Category
72 Quick Search
72 Schedule Viewing
72 Schedule Recording
72 Checking the Program Info
73 Channel List
74 Change Channels
74 Genre
74 Change the Broadcast Signal
74 Change the Channel List
Schedule Viewing
75 Digital Channel Schedule Viewing
75 Guide
75 Program Info
76 Analog Channel Schedule Viewing
76 Cancel a Schedule Viewing
76 Edit Schedule List
Schedule Recording
77Precautions
78Dedicated Recording Device Setup
78 Initial Setup
78 Dedicated Recording Device Management
79 Program Recording
79 Instant Recording
79 Guide
79 Program Info
79 Specified Time and Date
80 Cancel the Schedule Recording function
80 Edit Schedule List
Recorded Program Playback
80Changing the Viewing Mode
80Filtered View
81Playlist Creation
81 Recording Lock/Unlock
81 Deleting Saved Programs
81 Rename
82 Device Management
82Playing a Different Program
82Program Scan
83Additional Recorded Program Playback Settings
Time Shift
84Precautions
85Activating the Time Shift function
3D TV
86 Precautions
86 Restrictions
86 Tips
87Activating 3D Mode
88Setting 3D Effects
88 3D Channel Viewing
PIP
Analog Screen Calibration
90 Fine Tune
Broadcast Audio Options
91 Digital Broadcast Audio Options
91 Analog Broadcast Audio Options
Subtitles
92Show Subtitles
92Subtitle Options
93Subtitle Display Options
TV Settings
Basic Picture Settings
94Changing the Picture Mode
95Picture Quality
95Applying the Current Picture Quality Setting to Another Input
96Picture Size
97Screen Position
97Picture Off
97 Reset Image Settings
Advanced Settings
Picture Options
Basic Sound Settings
101Changing the Sound Mode
102Adjusting the Sound Settings
102 |
Auto Volume |
102 |
TV Installation Type |
102 |
Resetting the Sound |
Sound Customizer
103Creating a Custom Sound
104Managing Custom Sounds
104Modifying Sound Profiles
3D Audio
External Speaker Settings
105Speaker Select
106Digital Audio Output
106 Samsung Audio Device Connection
Clock and Timer
107 Setting the Time
107 Auto
107 Manual
108 Sleep Timer
108 On Timer
108 Off Timer
Screen Protection and Maintenance
109 Eco Solution
109 Auto Protection Time
Password
110 Change Password
Additional Features
111 Changing the Menu Language
111 Game Mode
111 Precautions and Restrictions
112 BD Wise
112 Menu Transparency
112 Sound Feedback
112Panel Lock
112Boot Logo
113Light Effect
113 DivX® Video On Demand
113 Adjusting the TV Position and Angle
SMART TV Features
Smart Hub
114Agreements Required to Use Smart Hub
115Samsung Account
115 Creating a Samsung Account
115Terms and Conditions, Privacy Policy
116Logging In
116 Linking a Samsung Account to Other Accounts
116 Managing Accounts
117 Resetting Smart Hub
Searching
117 Keyword Search
117 Setting Search Scope
Status and Notification
118 Show Status and Notification Banner
118 Voice Recognition & Motion Control Configuration
118 Samsung Account Configuration
118 Network Configuration
118 Check Notifications
Social
119 Social Settings
119 Checking the Application
119 Connecting a Service to a Samsung Account
120 Watching Videos
120 Friend Profile
120 Video Calling a Friend
120 Filters
Apps
121Precautions
122Installing Standard Applications
122Launching an Application
122 Samsung Apps
122 Searching for Apps
122 Installing Applications
123 Apps Management
123Edit My Apps
124Deleting Applications
124 Managing Application Folders
124 Application Lock/Unlock
124 Application Update
124 Setting up the Application Auto Update
125 Fitness
125 Creating a Profile
125Kids
126WebBrowser
126 Social Networks
126 Linking Service Accounts
113 Wall Mount Adjustment
127 Smart Tips
127 Naver Search
127 Real-Time Hot Issues from me2day
127 Music Search
127 Smart Tips Settings
1273D Explorer
128Apps Settings
128 Auto Ticker
128 Push Notifications
128 Channel-Bound Apps
128 Properties
On TV
129 On TV Settings
129 On TV Setup
129Recommendation Notice
129Auto Start
130Recommendation Method
130Adult Contents Block
130 Watching an On-Air Recommended Program
130 Scheduled Recommended Program Info
130 Activating the Guide
130 Program Recommendations by Time
130 Watching Recorded Programs
Movie & TV Shows
131Custom Recommendations List
132Watching Content
132 Parental Control
132 Miscellaneous
Photos, Videos & Music
133Restrictions
134Supported File Formats
134USB Device Connection
134 USB Device Removal
134 Playing Media Files Stored on USB storage devices
134Clearing the Recent Playlist
135Using Networked External Storage Devices
135 Allowing DLNA Device Connections
135 AllShare
136 Exporting Conents
Videos
136Changing the view mode
136Playlist Creation
137Opening a Different File
137Video Scanning
137Show Subtitles
138Additional Video Playback Settings
Music
138Changing the view mode
138Playlist Creation
139Music Scanning
139 Opening a Different File
139 Additional Music Playback Settings
Photos
140 Changing the view mode
140 Slide Show
140 Slideshow Settings
140Playlist Creation
141Opening a Different File
141Background Music
141 Mini Player
141 Additional Photo Playback Settings
Anynet+ (HDMI-CEC)
142 Precautions
142Anynet+ (HDMI-CEC) Setup
143Using the Anynet+ (HDMI-CEC)
143 Switching between Anynet+ Devices
143 Anynet+ (HDMI-CEC) Device Menu
143 ARC
Sharing Mobile Device Screens on the TV
144 MHL
144 MHL USE
145 Screen Mirroring
145 Mobile Device Connection
Other Information
Support
146 Remote Management
146 e-Manual
146 Self Diagnosis
147 Picture Test
147 Sound Test
147 Voice & Motion Control Environment Check
147 Signal Information
147 Reset
148 Software Update
148 Update now
148 Auto Update
149 Use Mode
149 Support Info
Kensington Security Lock
Display Resolution
150 IBM
150MAC
151VESA DMT
Picture Size and Input Signal
Supported 3D Resolutions
153 |
HDMI |
|
|
|
153 |
3D |
Format: L/R, T/B |
|
153 |
3D |
Format: Frame Packing |
154 |
Component |
||
154 |
Digital Channel |
||
154 |
Videos/Photos |
||
154 |
Computer via HDMI |
||
3D Precautions
Subtitle and Media Contents file formats, and Codec
158 Subtitle
158 External
158 Internal
159 Supported image resolutions
159Supported music file formats
160Video Codec
160Other Restrictions
161Video Decoders
161Audio Decoders
Troubleshooting
Picture
Sound
3D TV
Antenna (Air/Cable) Connection
PC Connection
Networking
Miscellaneous
Schedule Recording/Time Shift
Anynet+ (HDMI-CEC)
Apps
Photos, Videos & Music
Reset the Personal Info and TV settings
Web Browser
Licenses
Viewing the e-Manual
The embedded e-Manual contains information about your TV's key features
Select the e- button on the virtual remote panel or select e-Manual (Troubleshooting) (Support> e-Manual (Troubleshooting)) from the screen menu. Alternatively, you can download a copy of the
e-manual from Samsung's website and read it on your computer or print it out.
111
222
""
Select a category from the left side of the screen.
Select an item. The e-Manual will open on the page containing the selected information.
Words in blue (e.g. Picture Mode) refer to screen menu options and words in light blue (e.g. button) refer to remote control buttons.
"" Arrows are used to indicate the menu path. (e.g. ¤ > Menum > Picture > Picture Mode)
Scrolling a Page
To scroll a page, use of one of the following methods:
●● Press the  or
or  button on the scroll bar at the right edge of the screen.
●● Drag or flick up or down up/down the line on either the left or right edge of the touch pad.
●● Place the focus on the  or
or  button at the right edge of the screen, drag or flick up or down on the touch pad.
Using the Top Icons
Use the Back  , Forward
  , and Opened pages
  icons on the top left of the screen to navigate through pages. These icons are available when two or more pages are passed.
Returning to the Home Page
To return to the home page, press the a button or select  on the top right of the screen.
Searching the Index
Press the b button or select  on the top right of the screen to display the index. Select a term to display the page containing the term.

Searching Pages
Press the { button or select  on the top of the screen to access the search screen. Enter a search phrase and select Done. Select an item from the search results list to navigate to the relevant page.
Closing the e-Manual
To close the e-Manual, select  at the upper-right corner of the screen or press and hold the button.
Jumping to a Menu Item
To directly jump to the menu item that is described in the current section, select Try Now . It is possible to jump from a menu item directly to the related section in the e-Manual. On the screen menu, select e- on the virtual remote's panel that appears on the screen.
"" This feature may not be available, depending on the menu.
Updating the e-Manual
Press the  button and select Apps, and then select More Apps. The e-manual can be updated in the same way with an application update.
On the More Apps screen, select Update Apps, and then select e-Manual from the list. The e-Manual starts updating to the latest version. However, Update Apps appears on the screen only when the
update is required.
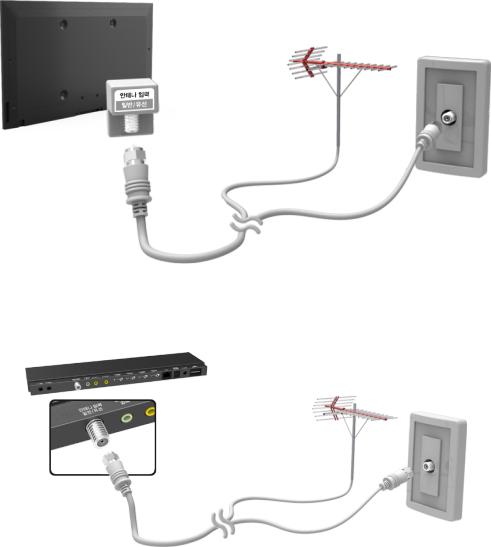
Antenna Connection
Refer to the diagram and connect the antenna cable to the antenna input connector. Make sure that you do not bend the cable. The number of connectors and their names and locations may vary depending on the model.
Connect the correct antenna cable for your viewing environment (over-the-air or cable broadcasting). However, an antenna connection is not necessary if you are using a cable box or satellite receiver.
LED 7400, 7500, 8000, 8200, 8500, 8500 series models
UHD F9000 and S9 series models
Video Device Connections
This TV has a wide range of connectors for video input from video devices such as Blu-ray players, DVD players, camcorders and gaming consoles. Below is a list of featured connectors shown in descending order of picture quality.
●● HDMI
●● Component
●● AV
Connect the video device to the TV via an HDMI connector for the best picture quality. If the device does not have an HDMI connector, try a component connector to get the next best possible picture quality.
The number of connectors and their names and locations may vary depending on the model.
When connecting an external device, refer to the device's operating manual. The number of external device connectors and their names and locations may vary depending on the manufacturer.

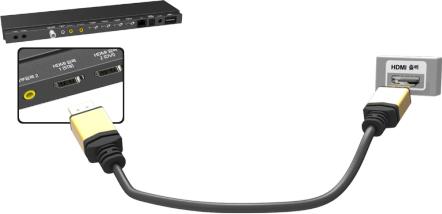
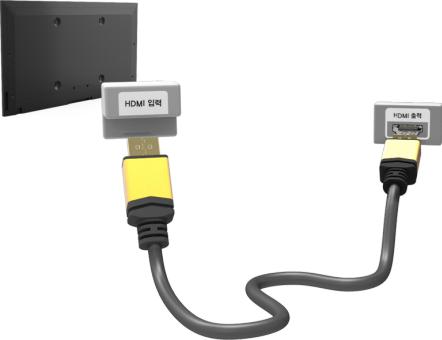
HDMI Connection
LED 7400, 7500, 8000, 8200, 8500 series models
Refer to the diagram and connect the HDMI cable to the video device's HDMI output connector and the TV's HDMI input connector. One of the following HDMI cable types is recommended:
●● High-Speed HDMI Cable
●● High-Speed HDMI Cable with Ethernet
Use an HDMI cable with a thickness of 14 mm or less. Using a non-certified HDMI cable may result in a blank screen or a connection error.
"" Some HDMI cables and devices may not be compatible with the TV due to different HDMI specifications.
"" This TV does not support HDMI Ethernet Channel. Ethernet is a LAN (Local Area Network) built on coaxial cables standardized by the IEEE.
UHD F9000 and S9 series models
Refer to the diagram and connect the HDMI cable to the video device's HDMI output connector and the One Connect HDMI input connector. One of the following HDMI cable types is recommended:
●● High-Speed HDMI Cable
●● High-Speed HDMI Cable with Ethernet
Use an HDMI cable with a thickness of 14 mm or less. Using a non-certified HDMI cable may result in a blank screen or a connection error.
"" Some HDMI cables and devices may not be compatible with the TV due to different HDMI specifications.
"" This TV does not support HDMI Ethernet Channel. Ethernet is a LAN (Local Area Network) built on coaxial cables standardized by the IEEE.
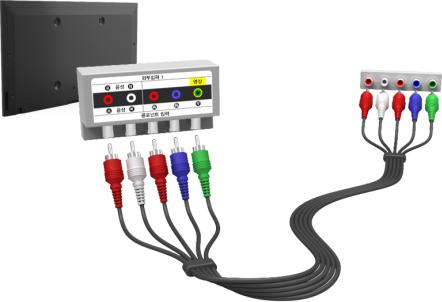
Component Connection
LED 7400, 7500 series models
Refer to the diagram and connect the component cable to the TV's component input connectors and the device's component output connectors. Make sure the cable colors match the connector colors.
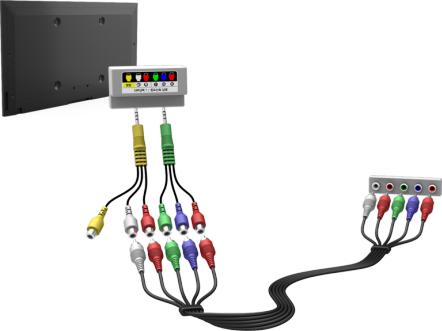
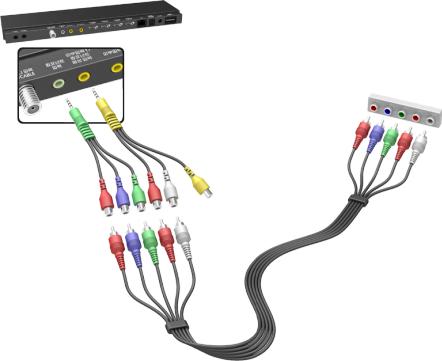
LED 8000, 8200, 8500 series models
Refer to the diagram and connect the component video and audio cables to the component adapter (accessory) and to the TV's component input connectors. Make sure the cable colors match the connector colors.
UHD F9000 and S9 series models
Refer to the diagram and connect the component video and audio cables to the component adapter (accessory) and to the One Connect component input connectors. Make sure the cable colors match the connector colors.
AV Connection
LED 7400, 7500 series models
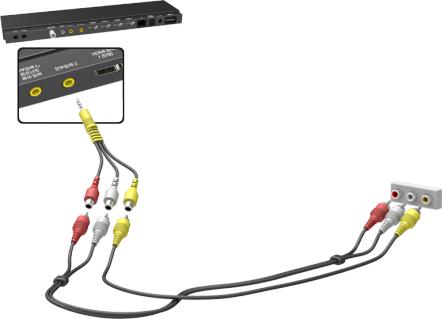
Refer to the diagram and connect the AV cable to the TV's external input connectors and the device's AV output connectors.
If you are using the TV's external input 1 connectors, connect the video cable to the Y connector.
If the TV's external input 2 connectors are being used, use the enclosed AV connection adapter.
LED 8000, 8200, 8500 series models
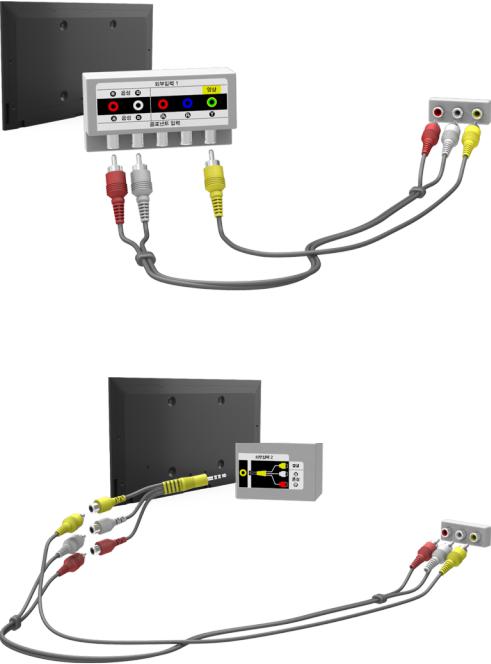
Connect a composite cable to the provided jack-to-RCA extension cable, so that the connectors of the same color connect to each other. Plug the jack into the TV’s composite video and audio input connector, and plug the three connectors on the other end into the external device’s composite video and audio output connectors, as shown in the figure.
UHD F9000 and S9 series models
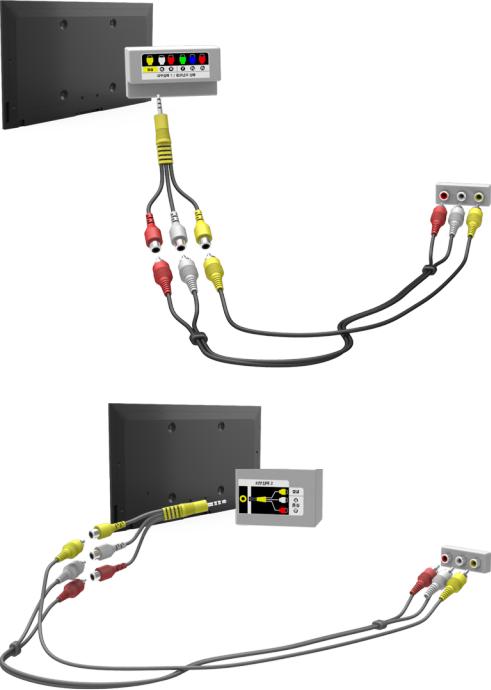
Refer to the diagram and connect the video and audio cables to the A/V adapter (included) and the adapter to One Connect's external input 1 or 2 connector.
Audio Device Connections
This TV has a wide range of connectors for audio input from devices such as amplifiers, Blu-ray players and DVD players. For better audio quality, it is a good idea to use an AV receiver.
●● Digital Audio (Optical)
●● Audio
●● ARC (Audio Return Channel)
The number of connectors and their names and locations may vary depending on the model.
When connecting an external device, refer to the device's operating manual. The number of external device connectors and their names and locations may vary depending on the manufacturer.
Digital Audio (Optical) Connection
Connecting the device using an optical cable does not automatically turn off the TV speakers. To turn off the TV speakers, open the Speaker Select (Sound > Speaker Settings > Speaker Select) menu, then set External Speaker.
Adjust the audio device's volume using its remote control.
An unusual noise coming from the audio device while it is being used may indicate a problem with the audio device itself. If this is the case, ask for assistance from the audio device manufacturer.
5.1-channel audio for digital channels is only available with broadcasts that support 5.1-channel audio.
LED 7400, 7500, 8000, 8200, 8500 series models
Refer to the diagram and connect the optical cable to the TV's digital audio output connector and the device's digital audio input connector.
UHD F9000 and S9 series models
Refer to the diagram and connect the optical cable to the One Connect digital audio output connector and the device's digital audio input connector.
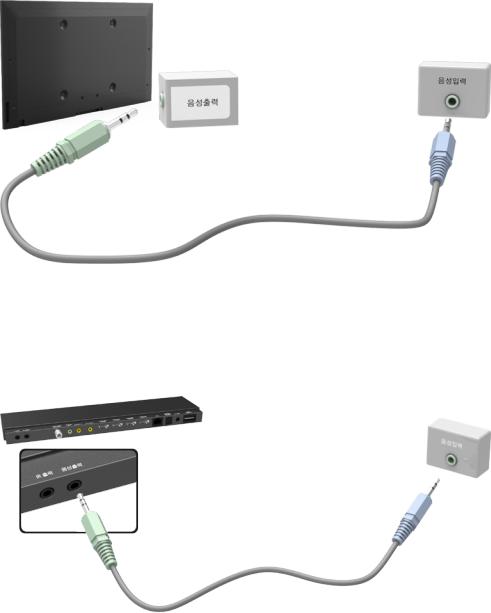
Audio Output Connection
LED 7400, 7500, 8000, 8200, 8500 series models
Refer to the diagram and connect the audio cable to the TV's audio output connector and the device's audio input connector.
UHD F9000 and S9 series models
Refer to the diagram and connect the audio cable to the One Connect audio output connector and the device's audio input connector.
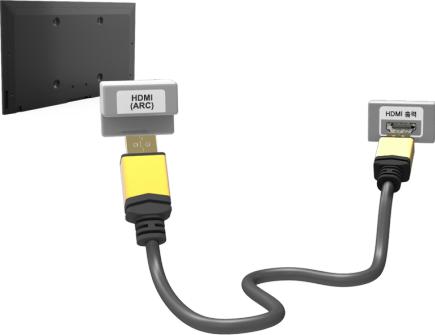
ARC (Audio Return Channel)
LED 7400, 7500, 8000, 8200, 8500 series models
This TV supports 3D and ARC (Audio Return Channel) functions via an HDMI cable. ARC enables digital sound to be output using just an HDMI cable. However, ARC is only available through the HDMI (ARC) port and only when the TV is connected to an ARC-enabled AV receiver. Connect the HDMI cable to the TV's HDMI (ARC) connector and the device's HDMI output connector.
"" Certain functions such as the Smart Hub may not be available if 3D Auto View is set to On while Source is in HDMI mode. In this case, set 3D Auto View or 3D Mode to Off.
UHD F9000 and S9 series models
This TV supports 3D and ARC (Audio Return Channel) functions via an HDMI cable. ARC enables digital sound to be output using just an HDMI cable. However, ARC is only available through the HDMI (ARC) port and only when the One Connect is connected to an ARC-enabled AV receiver. Connect the HDMI cable to the One Connect HDMI (ARC) connector and the device's HDMI output connector.
"" Certain functions such as the Smart Hub may not be available if 3D Auto View is set to On while Source is in HDMI mode. In this case, set 3D Auto View or 3D Mode to Off.
Computer Connection
This TV supports the HDMI/DVI port for connect the computer. Not all computers are HDMI-enabled. In this case, use an HDMI-to-DVI cable to connect the computer to the TV. Refer to the "Display Resolution" for information on the resolution settings supported to the TV.
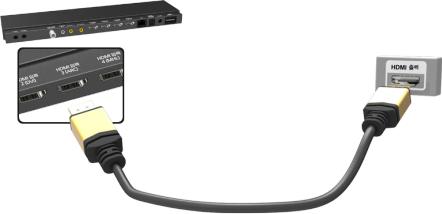
HDMI Connection
LED 7400, 7500, 8000, 8200, 8500 series models
Refer to the diagram and connect the HDMI cable to the TV's HDMI input port and the computer's HDMI output port.
UHD F9000 and S9 series models
Refer to the diagram and connect the HDMI cable to the One Connect HDMI input port and the computer's HDMI output port.
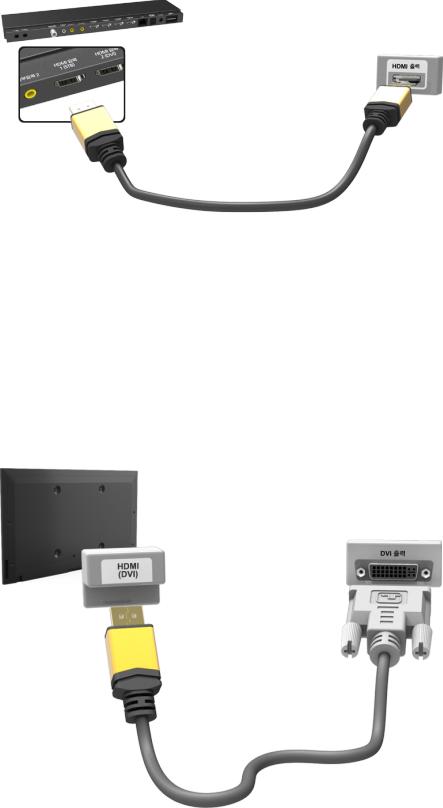
HDMI-to-DVI Connection
LED 7400, 7500, 8000, 8200, 8500 series models
Refer to the diagram and connect the HDMI-to-DVI cable to the TV's HDMI (DVI) port and the computer's DVI output port. The HDMI-to-DVI connection is available through the HDMI (DVI) port only.
DVI cannot carry audio. To listen to the computer sound, connect the external speaker to the computer’s audio output connector.
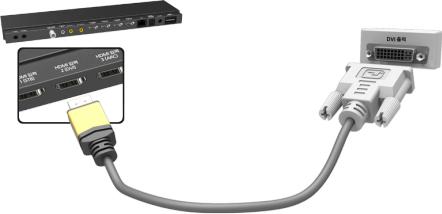
UHD F9000 and S9 series models
Refer to the diagram and connect the HDMI-to-DVI cable to the One Connect HDMI (DVI) port and the computer's DVI output port. The HDMI-to-DVI connection is available through the HDMI (DVI) port only.
DVI cannot carry audio. To listen to the computer sound, connect the external speaker to the computer’s audio output connector.
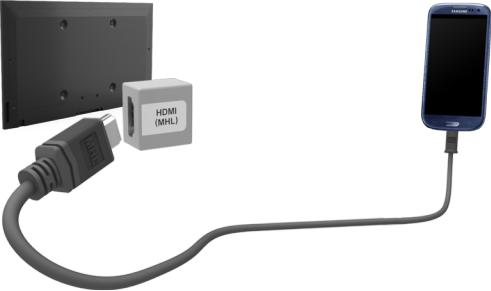
Smartphone Connection
This TV supports MHL (Mobile High-definition Link) via an MHL cable. MHL makes it possible to enjoy video, image, and audio files from mobile devices on your TV. However, MHL is only available through the TV's HDMI (MHL) port and only when used in conjunction with an MHL-enabled mobile device. For information on configuring MHL on your mobile device, refer to the device's User Manual.
"" Connecting the MHL-to-HDMI cable automatically switches Picture Size to Screen Fit. This setting will not change automatically if you are using an HDMI adapter. In this case, change the setting manually in the menu.
"" If you are using an HDMI adapter, the TV recognizes the signal as an HDMI signal and may respond differently than it would to an MHL-to-HDMI cable connection.
LED 7400, 7500, 8000, 8200, 8500 series models
Refer to the diagram and connect the MHL cable to the TV's HDMI (MHL) connector and the mobile device's USB port.
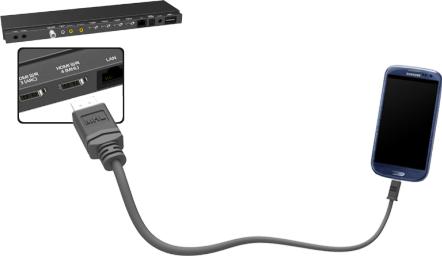
UHD F9000 and S9 series models
Refer to the diagram and connect the MHL cable to One Connect's HDMI (MHL) connector and the mobile device's USB port.
Switching Between Video Sources
Press the button to switch between devices connected to the TV.
For example, to switch to a game console connected to the second HDMI connector, press the button. From the Source list, select HDMI2. The connector names may vary depending on the product.
Select Tools at the upper-right corner of the Source screen to access the following functions.
●● Edit Name: Users can rename devices connected to the TV to more easily identify external sources.
With a computer connected to the TV's HDMI (DVI) port via an HDMI cable, for example, you can change Edit Name to PC.
With a computer connected to the TV's HDMI (DVI) port via an HDMI-to-DVI cable, for example, you can change Edit Name to DVI PC.
With an AV device connected to the TV's HDMI (DVI) port via an HDMI-to-DVI cable, for example, you can change Edit Name to DVI Devices.
●● Information: View detailed information about the connected devices.
●● Refresh: Select this if a connected device does not appear in the list. If the list does not show the device after selecting Refresh, check the status of the TV-to-device connection.
●● Remove USB: Remove the USB device from the list to safely. This function is only available when the USB device selected.
Select  Universal Remote Setup at the top right of the Source screen. Using the universal remote control, users can control external devices connected to the TV, such as a set-top box, Blu-ray player, and AV receiver. For details, see "Universal Remote Control Setup".

Programming
Scan and index available channels.
Broadcasting
Auto Program
Antenna |
Cable |
Channel List
Guide
Schedule Manager
Edit Channel
Edit Favorites
"" The displayed image may differ depending on the model.
Users can also remove channels from the index, restore removed channels and designate favorite channels for a more convenient TV viewing experience. Programming is not necessary if you are connected to a cable or satellite receiver.
Auto Program
¤ > Menum > Broadcasting > Auto Program Try Now
Automatically scans and indexes all channels received through the TV's antenna input connector. 111 To start, navigate to Broadcasting and select Auto Program.
222Select Start when prompted with a message. This initiates the Auto Program function. The process can take up to 30 minutes to complete. If Starting the Auto Program function when there is an existing index of channels overwrites the previous index.
 Loading...