


Samsung RS21HF, RS23HK, RS23HD, RS21HJ, RS23HB User Manual
...Refrigerator
user manual
English
imagine the possibilities
Thank you for purchasing a Samsung product.
To receive a more complete service, please register your product at
www.samsung.com/register
Free Standing Appliance
features of your new refrigerator
Key features of your new refrigerator
Your Samsung Side-By-Side Refrigerator comes equipped with many space-saving, innovative storage and energy-efficient features.
• HIDDEN HINGES & DOOR S/W
Slick-covered hidden hinges & door s/w helps Neat & Stylish square frontal view.
• CoolSelect Zone™ Drawer (Optional)
With this state of the art feature, you can select Quick Cool, Thaw or Select buttons to quickly chill, thaw and cool items just in the CoolSelect drawer. Select Soft Freeze, Cool or 0 Zone to control the temperature of drawer.
• EASY OPENNING (Optional)
Doors can be opened easily and smoothly with this “Easy Handle” for the customer satisfaction.
• BLACK CLEAR LED DISPLAY (Optional)
With luxurious black window, you can look and feel neat & clear design.
• SOFT TOUCH TYPE HOME BAR (Optional)
With soft touch type Home Bar, just push and catch to open or close with latch and damping system.
• EASILY MOVABLE TRAY (Optional)
New concept tray to increase the movability with food simultaneously. Useful for storage of dessert and cake etc.
For easy future reference write the model and serial number down. You will find your model number on the left hand side wall of the refrigerator.
2_ features
Model #
Serial #
safety information
safEty inforMation
• Before operating the appliance, please read this manual thoroughly and retain it for your
WARNING reference.
• Because these following operating instructions cover various models, the characteristics of your
WARNING refrigerator may differ slightly from those described in this manual.
CAUTION/WARNING SYMBOLS USED
Indicates that a danger of death or serious injury exists.
WARNING
Indicates that a risk of personal injury or material damage exists.
CAUTION
OTHER SYMBOLS USED
Represents something you must NOT do.
Represents something you must NOT disassemble.
Represents something you must NOT touch.
Represents something you must follow.
Indicates that you must disconnect the power plug from the socket.
Represents a ground is needed to prevent electric shock.
It is recommended that this symbol be handled by service man.
These warning signs are here to prevent injury to you and others.
Please follow them explicitly.
After reading this section, keep it in a safe place for future reference.
•This refrigerator must be properly installed and located in accordance with the manual before it is used.
•Use this appliance only for its intended purpose as described in this instruction manual.
•We strongly recommend that any servicing be performed by a qualified individual.
•R600a or R134a can be used as a refrigerant. Check the compressor label on the rear of the appliance and the rating label inside the fridge to see which refrigerant is used for the refrigerator.
• In case of R600a refrigerant, this gas is natural gas with high environmental compatibility that is, however, also combustible. When transporting and installing the appliance, care should be taken to ensure that no parts of the refrigerating circuit are damaged.
•Refrigerant squirting out of the pipes could ignite or cause an eye injury. If a leak is detected, avoid any naked flames or potential sources of ignition and air the room in which the appliance is standing for several minutes.
safety information _3

safety information
• In order to avoid the creation of a flammable gas-air mixture if a leak in the refrigerating circuit
WARNING occurs, the size of the room in which the appliance may be sited depends on the amount of refrigerant used.
•Never start up an appliance showing any signs of damage. If in doubt, consult your dealer.
•The room must be 1m3 in size for every 8g of R600a refrigerant inside the appliance.
•The amount of refrigerant in your particular appliance is shown on the identification plate inside the appliance.
•Please dispose of the packaging material for this product in an environmentally friendly manner.
•Pull the power plug out of the socket before changing the interior light of the refrigerator.
-Otherwise, there is a risk of electric shock.
•This appliance is not intended for use by persons (including children) with reduced physical, sensory or mental capabilities, or lack of experience and knowledge, unless they have been given supervision or instruction concerning use of the appliance by a person responsible for their safety.
•Children should be supervised to ensure that they do not play with the appliance.
sEVErE warning signs
• |
Do not install the refrigerator in a damp place or place where it may come in contact with water. |
WARNING • |
- Deteriorated insulation of electrical parts may cause an electric shock or fire. |
Do not place this refrigerator in direct sunlight or expose to the heat from stoves, room heaters or |
|
|
other appliance. |
• |
Allow sufficient space to install the refrigerator on a flat surface. |
|
- If your refrigerator is not level, the internal cooling system may not work correctly. |
• |
Do not plug several appliances into the same multiple power board. The refrigerator should |
|
always be plugged into its own individual electrical which has a voltage rating that matched the |
|
rating plate. |
|
- This provides the best performance and also prevents overloading house wiring circuits, which |
|
could cause a fire hazard from overheated wires. |
• |
Never unplug your refrigerator by pulling on the power cord. Always grip plug firmly and pull |
|
straight out from the outlet. |
|
- Damage to the cord may cause a short-circuit, fire and/or electric shock. |
• |
Make sure that the power plug is not squashed or damaged by the back of the refrigerator. |
• |
Do not bend the power cord excessively or place heavy articles on it. |
|
- This constitutes a fire hazard. |
• |
Have the power cord repaired or replaced immediately by the manufacturer or its service agent if |
|
power cord has become frayed or damaged. |
• |
Do not use a cord that shows cracks or abrasion damage along its length or at either end. |
• |
If the power cord is damaged, have it replaced immediately by the manufacturer or its service |
|
agent. |
• |
When moving the refrigerator, be careful not to roll over or damage the power cord. |
• |
Do not insert the power plug with wet hands. |
• |
Unplug the refrigerator before cleaning and making repairs. |
• |
Do not use a wet or damp cloth when cleaning the plug. |
• |
Remove any foreign matter or dust from the power plug pins. |
|
- Otherwise there is a risk of fire. |
• |
If the refrigerator is disconnected from the power supply, you should wait for at least ten minutes |
|
before plugging it back. |
• |
If the wall socket is loose, do not insert the power plug. |
|
- There is a risk of electric shock or fire. |
• |
The appliance must be positioned so that the plug is accessible after installation. |
4_ safety information
• The refrigerator must be grounded.
- You must ground the refrigerator to prevent any power leakages or electric shocks caused by current leakage from the refrigerator.
• Never use gas pipes, telephone lines or other potential lightening rods as ground.
- Improper use of the ground plug can result in electric shock.
•Do not dissemble or repair the refrigerator by yourself.
-You run risk of causing a fire, malfunction and/or personal injury.
•If you smell pharmaceutical or smoke, pull out power plug immediately and contact your
Samsung electronics service center.
•Keep ventilation opening in the appliance enclosure or mounting structure clear of obstruction.
•Do not use mechanical devices or any other means to accelerate the defrosting process, other than those recommended by the manufacturer.
•Do not damage the refrigerant circuit.
•Do not place or use electrical appliance inside the refrigerator/freezer, unless they are of a type recommended by the manufacturer.
•Before changing the interior light, unplug the appliance from the power supply.
•If you experience difficulty when changing the light, contact your service center.
•The appliance is not intended for use by children or infirm persons without supervision.
•Children should be supervised to ensure that they do not play with the appliance.
•Do not let children hang on the door. If not, a serious injury may occur.
•Do not touch the inside walls of the freezer or products stored in the freezer with wet hands.
-This may cause frostbite.
•If the refrigerator is not to be used for a long period of time, pull out the power plug.
-Deterioration in the insulation may cause fire.
•Do not store articles on the top of the appliance.
-When you open or close the door, the articles may fall and cause personal injury and/or material damage.
Caution signs
• This product is intended only for the storage of food in a domestic environment.
CAUTION • Manufacturer’s recommended storage times should be adhered to.
Refer to relevant instructions
•Bottle should be stored tightly together so that they do not fall out.
•Do not place carbonated or fizzy drinks in the freezer compartment
•Do not overfill the refrigerator with food.
-When you open the door, an item may fall out and cause personal injury or material damage.
•Do not put bottles or glass containers in the freezer.
-When the contents freeze, the glass may break and cause personal injury.
•Do not spray inflammable gas near the refrigerator.
-There is a risk of explosion or fire.
•Do not directly spray water inside or outside the refrigerator.
-There is a risk of fire or electric shock.
•Do not store volatile or flammable substances in the refrigerator.
-The storage of benzene, thinner, alcohol, ether, LP gas and other such products may cause explosions.
•If you have a long vacation planned, you must empty the refrigerator and turn it off.
•Do not re-freeze frozen foods that have thawed completely.
•Do not store pharmaceuticals products, scientific materials or temperature-sensitive products in the refrigerator.
-Products that require strict temperature controls must not be stored in the refrigerator.
•Do not put a container filled with water on the refrigerator.
-If spilled, there is a risk of fire or electric shock.
safety information _5
safety information
Caution signs for CLEaning
•Do not insert your hands into the bottom area under the appliance.
-Any sharp edges may cause personal injury.
•Never put fingers or other objects into the dispenser hole and ice chute.
-It may cause personal injury or material damage.
•Do not use a wet or damp cloth when cleaning the plug, remove any foreign material or dust from the power plug pins.
-Otherwise there is a risk of fire.
•If the refrigerator is disconnected from the power supply, you should wait for at least five minutes before plugging it back.
warning signs for DisPosaL
•When disposing of this or other refrigerator/s, remove the door/door seals, door latch so that small children or animals cannot become trapped inside.
•Leave the shelves in place so that children may not easily climb inside.
•R600a or R134a is used as a refrigerant. Check the compressor label on the rear of the appliance or the rating label inside the fridge to see which refrigerant is used for your refrigerator.
When this product contains flammable gas(Refrigerant R600a) contact your local authority in regard to safe disposal of this product.
•Cyclopentane is used as a insulation blowing gas. The gases in insulation material require special disposal procedure. Please contact your local authorities in regard to the environmentally safe disposal of this product. Ensure that none of the pipes on the back of the appliances are damaged prior to disposal. The pipes shall be broke in the open space.
In the event of a power failure, call the local office of your Electricity Company and ask how long it
CAUTION is going to last.
Most power failures that are corrected in an hour or two will not affect your refrigerator temperatures.
However, you should minimize the number of door openings while the power is off.
But should the power failure last more than 24hours, remove all frozen food.
For doors or lids fitted with locks and keys, the keys be kept out of the reach of children and not in the vicinity of the refrigerating appliance, in order to prevent children from being locked inside.
6_ safety information
safety information
aDDitionaL tiPs for ProPEr usagE
•Allow the appliance to stand for 2hours after installation.
•To get best performance of product,
-Do not place foods too closely in front of the vents at the rear of the appliance as it can obstruct free air circulation in the freezer compartment.
-Wrap the food up properly or place it in airtight containers before put it into the fridge freezer
-Do not put any newly introduced food for freezing near to already frozen food.
•Do not place carbonated or fizzy drinks in the freezer compartment
•Please observe maximum storage times and expiry dates of frozen goods.
•There is no need to disconnect the refrigerator from the power supply if you will be away for less than three weeks. But, remove all the food if you are going away for the three weeks or more. Unplug the refrigerator and clean it, rinse and dry.
•Most power failures that are corrected in an hour or two will not affect your refrigerator temperatures. However, you should minimize the number of door openings while the power is off.
But should the power failure last more than 24hours, remove all frozen food.
•If the key is provided with refrigerator, the keys should be kept out of the reach of children and not in the vicinity of the appliance.
•The appliance might not operate consistently (possibility of defrosting of contents or temperature becoming too warm in the frozen food compartment) when sited for an extended period of
time below the cold end of the range of temperatures for which the refrigerating appliance is designed.
•Do not store food which goes bad easily at low temperature, such as bananas, melons.
•Place the ice tray at the originally provided posistion by manufacturer in order to achieve optimal ice-freezing.
•Your appliance is frost free, which means there is no need to manually defrost your appliance, as this will be carried out automatically.
•Temperature rising during the defrost can comply with ISO requirement. But If you want to prevent an undue rise in the temperature of the frozen food while defrosting the appliance, please wrap the frozen food in several layers of paper such as newspaper.
•Any increase in temperature of frozen food during defrosting can shorten its storage life.
safety information _7

contents
setting up your side-by-side
refrigerator
9
setting up your side-by-side
refrigerator
17
operating the SAMSUNG
side-by-side refrigerator
23
9Getting ready to install the refrigerator
10Removing the refrigerator doors
13 Reattaching the refrigerator doors
16Leveling the refrigerator
17Making minor adjustments to the doors
18Checking the water dispenser line(optional)
19Installing the water dispenser line
23Setting up the refrigerator
24Operating the refrigerator
25Using the digital display
26Controlling the temperature
27Using the ice and cold water dispenser
28Shelves and bins
29Storing food
31 Using the CoolSelect Zone™ Drawer (Optional)
33Removing the freezer accessories
34Removing the refrigerator accessories
35Cleaning the refrigerator
37Changing the interior lights
38Changing the water filter
39Using the doors
troubleshooting
40
8_ contents
setting up your side-by-side refrigerator
gEtting rEaDy to instaLL tHE rEfrigErator
Congratulations on the purchase of your Samsung Side-By-Side Refrigerator. We hope you will enjoy the many state-of-the-art features and efficiencies that this new appliance has to offer.
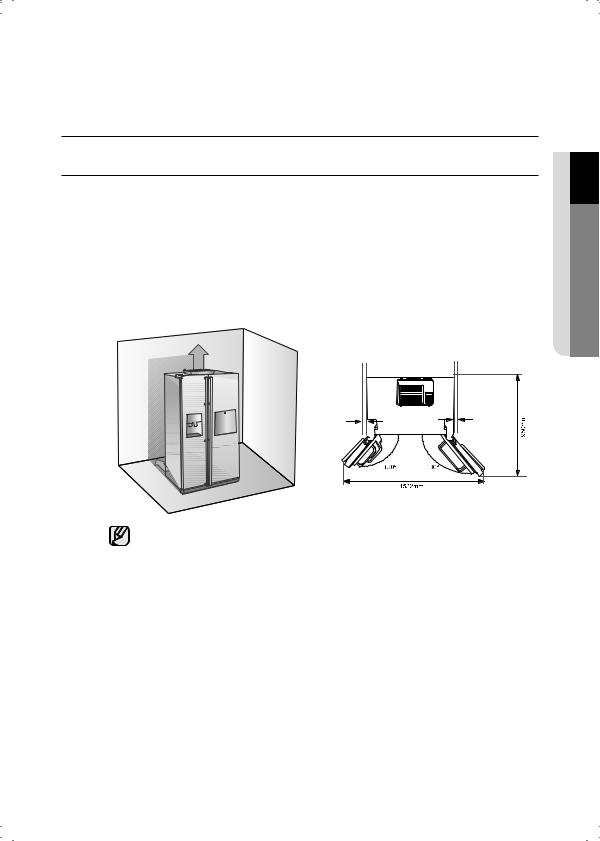
Selecting the best location for the refrigerator
•Select a location with easy access to the water supply.
•Select a location without direct exposure to sunlight.
•Select a location with level (or nearly level) flooring.
•Select a location with enough space for the refrigerator doors to open easily.
•Allow sufficient space to install the refrigerator on a flat surface.
-If your refrigerator is not level, the internal cooling system may not work correctly.
-Overall space required in use. Refer to drawing and dimension as below.
25mm
at least 50mm |
at least 50mm |
25mm
01TTINGSE UP
•Allow clearance to the right, left, back and top when installing. This will help reduce power consumption and keep your energy bills lower.
•Do not install the refrigerator where the temperature will go below 50°F (10°C).
•Make sure you disconnect the water supply line BEFORE removing the freezer door.
See the next section on “Separating the Water Line” to avoid damage.
setting up _9
rEMoVing tHE rEfrigErator Doors
If your entrance won’t allow the refrigerator to pass easily through it, you can remove the doors.
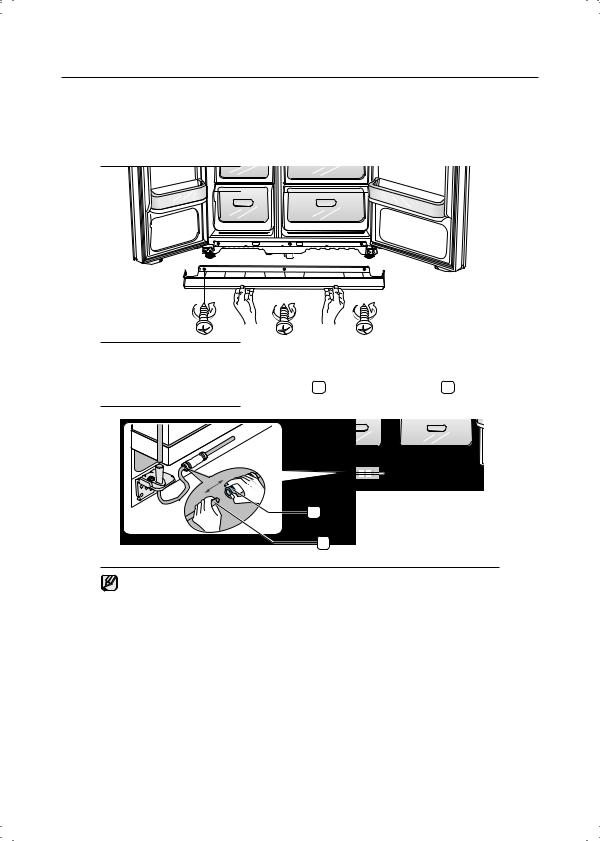
1. Removing the Front Leg Cover
First, open both the freezer and refrigerator doors, and then take off the front leg cover by turning the three screws counter-clockwise.
Separating the Water Supply Line from the Refrigerator
1. Remove the water line by pressing the coupler 1 and pulling the water line 2 away.
1 |
2
Do not cut the water line. Gently separate it from the coupler.
10_ setting up

setting up your side-by-side refrigerator
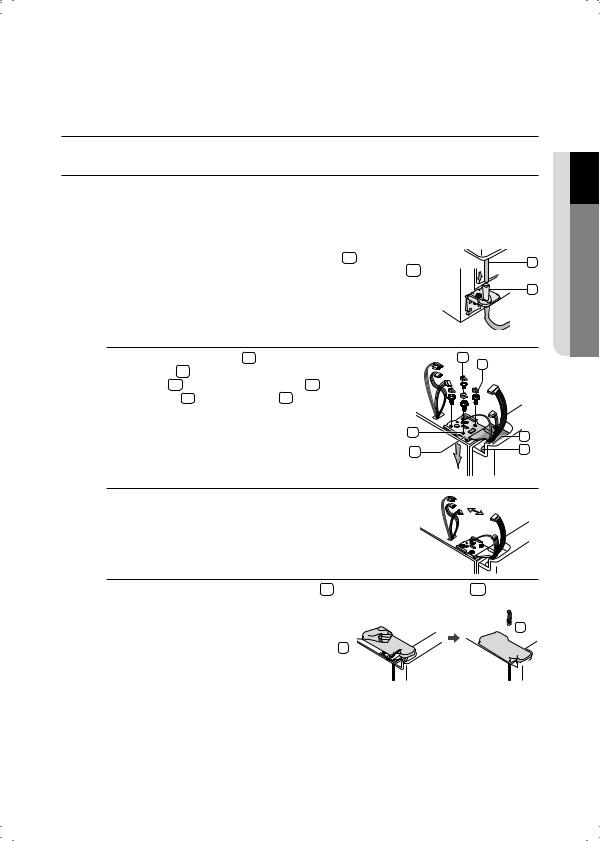
2. Removing the freezer door
A few things to mention first.
•Make sure that you lift the door straight up so the hinges are not bent or broken.
•Be careful not to pinch the water tubing and wire harness on the door.
•Place doors on a protected surface to prevent scratching or damage.
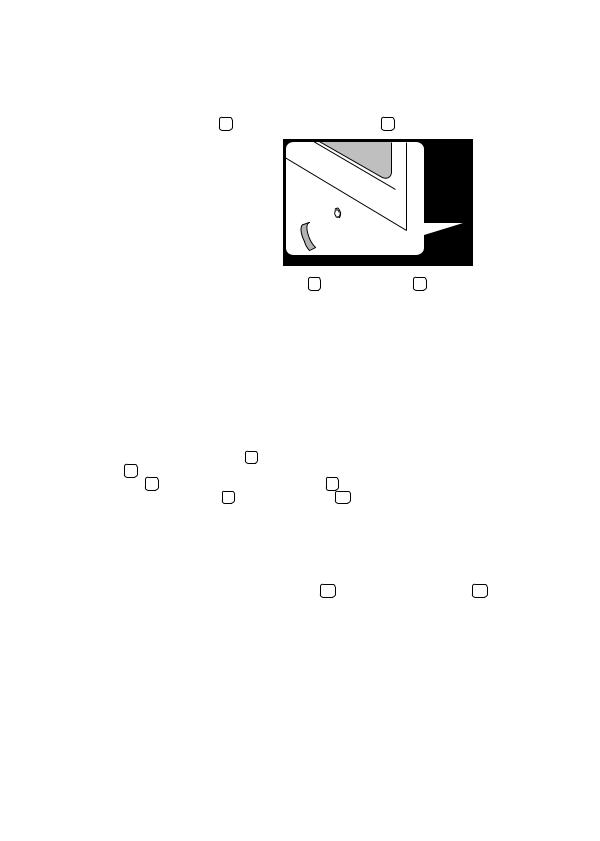
1. With the Freezer door closed, remove the upper hinge cover 1 using a screwdriver, and then disconnect the wires by gently pulling them apart 2 .
1 |
2 |
2. Remove hinge screws 3 and the ground screw 4 by turning counter-clockwise, and take off the upper hinge 5 . Be careful that the door does not fall on you as you are removing it
4
3
5
3. Next, remove the door from the lower hinge 6 by carefully lifting the door straight up 7 .
7 |
6 |
Be careful not to pinch the water tubing and wire harness on the door.
4. Remove the lower hinge 8 using a hex wrench.
01TTINGSE UP
setting up _11

Removing the Fridge Door
1. With the door closed, remove the upper hinge cover 1 using a screwdriver.
1
2. Remove hinge screws 2 and the ground screw 3 by turning counter-clockwise, and take off the upper hinge 4 . Be careful that the door does not fall on you as you are removing it
2
3 |
4
3. Remove the door from the lower hinge 5 by lifting the door straight up 6 .
4. Remove the lower hinge 7 from the bracket 8 by gently lifting the lower hinge upwards.
12_ setting up
setting up your side-by-side refrigerator
rEattaCHing tHE rEfrigErator Doors
Once you have safely placed your refrigerator where you plan for it to stay, it is time to put the doors back on.
Reattaching the Freezer Door
1. Replace the freezer door by inserting the water line 1 back into the |
1 |
lower corner of the door and then into the hole on the lower hinge 2 . |
|
Gently pull the water line back down so that it runs straight, with no kinks |
2 |
or bends. |
|
01TTINGSE UP
2. |
Insert the upper hinge shaft 3 into the hole on the corner of the |
8 |
7 |
||
|
freezer door |
4 |
. Make sure the hinge is level between the upper |
|
|
|
|
|
|||
|
hinge hole 5 |
and the hole of the cabinet 6 and reattach the |
|
|
|
|
hinge screws |
7 |
and ground screw 8 by turning in a clockwise |
|
|
|
direction. |
|
|
|
|
|
|
|
|
5 |
|
|
|
|
|
6 |
|
3. |
Reconnect the wires. |
|
|
||
3
4
4. Place the front part of the upper hinge cover 9 on the front of the upper hinge 10 and reattach with the screw.


 10 9
10 9 


setting up _13
Reattaching the Fridge Door
1. Insert the lower hinge 1 back into the lower hinge bracket 2 .
1
2
2. Fit the hole in the corner of the fridge door 3 over the lower hinge 4 .
3
4
3. Insert the upper hinge shaft 5 into the hole on the hinge
6 . Make sure the hinge is level between the upper hinge hole 7 and the hole on the top of the cabinet 8 . Then, reattach hinge screws 9 and the ground screw 10 by turning it in a clock wise direction.
4. Place the front part of the upper hinge cover 11 on the front of the upper hinge 12 and reattach it with the screw.
12
11
14_ setting up
 Loading...