


LW20M25CP
Table of contents
 Loading...
LCD TV
- AFTER SALES SERVICE
- Do not hesitate to contact your retailer or service agent if a
change in the performance of your product indicates that a faulty
condition may be present.
LW15M2
LW17M2
LW20M2
Owner’s Instructions
Before operating the unit,
please read this manual thoroughly,
and retain it for future reference.
Correct Disposal of This Product
(Waste Electrical & Electronic Equipment)
(Applicable in the European Union and other European countries with
separate collection systems)
This marking shown on the product or its literature, indicates that it
should not be disposed with other household wastes at the end of its working life.
To prevent possible harm to the environment or human health from uncontrolled
waste disposal, please separate this from other types of wastes and recycle
it responsibly to promote the sustainable reuse of material resources.
Household users should contact either the retailer where they purchased this
product, or their local government office, for details of where and how they can take
this item for environmentally safe recycling.
Business users should contact their supplier and check the terms and conditions of
the purchase contract. This product should not be mixed with other commercial
wastes for disposal.
BN68-00939C-00
ON-SCREEN MENUS
PC DISPLAY
TELETEXT
This device is a Class B digital apparatus.
Register your product at www.samsung.com/global/register
Precautions When Displaying a Still Image
Astill image may cause permanent damage to the TV screen.
• Do not display a still image on the LCD panel for more than 2 hours as it can cause screen image retention.
This image retention is also known as "screen burn".
To avoid such image retention, reduce the degree of brightness and contrast of the screen when displaying a still image.
• Watching the LCD TV in 4:3 format for a long period of time may leave traces of borders displayed on the left, right and center
of the screen caused by the difference of light emission on the screen.
Playing a DVD or a game console may cause a similar effect to the screen.
Damages caused by the above effect are not covered by the Warranty.
• Displaying still images from Video games and PC for longer than a certain period of time may produce partial after-images.
To prevent this effect, reduce the ‘brightness’ and ‘contrast’ when displaying still images.
Précautions à prendre lors de l'affichage d'une image fixe
Une image fixe peut causer des dommages irrémédiables à l'écran du téléviseur.
• N'affichez pas une image fixe sur l'écran LCD plus de 2 heures. Cela pourrait provoquer une rémanence de l'image à l'écran.
Cette rémanence de l'image est également appelée "brûlure de l'écran".
Pour éviter une telle rémanence de l'image à l'écran, réduisez la luminosité et le contraste de l'écran lorsque vous laissez une image fixe affichée.
• Regarder l'écran LCD du téléviseur en format 4:3 pendant une longue période peut laisser des traces de bordures à gauche, à
droite et au centre de l'écran, à cause de la différence d'émission de lumière sur l'écran.
La lecture d'un DVD ou l'utilisation d'une console de jeu peut avoir un effet similaire sur l'écran.
Les dommages provoqués par les effets qui précèdent ne sont pas couverts par la garantie.
• L'affichage d'images fixes de jeux vidéo et d'ordinateurs pendant plus longtemps qu'une période spécifique peut provoquer des rémanences.
Pour éviter cela, réduisez la "luminosité" et le "contraste" lors de l'affichage d'images fixes.
Vorsichtsmaßnahmen beim Anzeigen von Standbildern
Ein Standbild kann zu einer dauerhaften Beschädigung des Fernsehbildschirms führen.
• Zeigen Sie kein Standbild länger als 2 Stunden auf dem LCD-Monitor an, da das Bild auf diese Weise einbrennen kann.
Das Einbrennen von Standbildern wird auch als “Bildkonservierung” bezeichnet.
Sie können das Einbrennen vermeiden, indem Sie die Helligkeit und den Kontrast des Monitors beim Anzeigen von Standbildern verringern.
• Bei Wiedergabe im Format 4:3 über einen längeren Zeitraum können bedingt durch die unterschiedliche Lichtemission
Nachbilder der Ränder links, rechts und in der Mitte des Bildschirms auftreten.
DVD- oder Spielekonsole-Wiedergabe können einen ähnlichen Effekt verursachen.
Schäden, die durch die o. g. Effekte verursacht wurden, unterliegen nicht der Garantie.
• Die kontinuierliche Anzeige von Standbildern von Videospielen oder vom PC über einen gewissen Zeitraum hinaus kann partielle Nachbilder
verursachen. Um diesen Effekt zu verhindern, verringern Sie Helligkeit und Kontrast, wenn Sie Standbilder anzeigen möchten.
Voorzorgsmaatregelen bij weergave van stilstaand beeld
Stilstaande beelden kunnen permanente schade aan uw TV-scherm toebrengen.
• Laat niet langer dan 2 uur een stilstaand beeld op het LCD-scherm staan, dat kan namelijk beeldretentie veroorzaken.
Beeldretentie wordt ook wel inbranden genoemd.
Verlaag bij de weergave van een stilstaand beeld de helderheid en het contrast om beeldretentie te voorkomen.
• Als u gedurende langere tijd naar uw LCD-tv kijkt terwijl het beeld in 4:3-formaat wordt weergegeven, kunnen aan de linker- en
rechterkant en in het midden van het scherm randen achterblijven. Dit wordt veroorzaakt door de verschillen in lichtemissie op
het scherm. Het afspelen van een dvd of een computerspel kan hetzelfde effect hebben.
Schade ontstaan door het bovengenoemde effect valt niet onder de garantie.
• Het gedurende langere tijd weergeven van stilstaande beelden van dvd’s of computerspellen kan (gedeeltelijke) scherminbranding tot gevolg
hebben. Om dit te voorkomen kunt u tijdens het weergeven van stilstaande beelden de helderheid en het contrast verminderen.
Precauciones al mostrar en la pantalla una imagen fija
La imagen fija puede causar daños permanentes en la pantalla del televisor.
• No deje una imagen fija en la pantalla LCD durante más de dos horas ya que se podría producir una retención de la imagen en la pantalla.
Este fenómeno de retención de imágenes también se denomina "quemadura de pantalla". Para evitar que se produzca esa persistencia de la
imagen, reduzca el nivel de luminosidad y de contraste de la pantalla cuando muestre imágenes fijas.
• El uso del televisor LCD en formato 4:3 durante un tiempo prolongado puede dejar rastros de bordes en las partes izquierda,
derecha y central de la pantalla debido a las diferencias en la emisión lumínica de la pantalla.
Reproducir un DVD o una videoconsola puede causar un efecto similar en la pantalla.
La garantía no cubre estos daños.
• Ver imágenes fijas de videojuegos y PC durante más tiempo del indicado puede producir imágenes fantasma parciales.
Para evitar este efecto, reduzca el 'brillo' y el 'contraste' cuando vea imágenes fijas.
Precauções a ter quando se vêem imagens fixas
Uma imagem fixa pode danificar permanentemente o ecrã do televisor.
• Uma imagem fixa não deve permanecer no painel LCD durante mais de 2 horas ecrã porque pode provocar o efeito de retenção de
imagem no ecrã. Esta retenção de imagem também é conhecida como "queimadura de ecrã".
Para evitar a retenção de imagem, diminua o grau de luminosidade e de contraste do ecrã quando visualizar uma imagem fixa.
• Utilizar o televisor LCD em formato 4:3 durante um longo período de tempo pode deixar vestígios de margens na parte
esquerda, direita e frontal do televisor devido a diferenças de emissão de luz do ecrã.
Reproduzir um DVD ou ligar uma consola de jogos pode causar efeitos semelhantes no ecrã.
Os danos causados pelo efeito acima mencionado não estão cobertos pela garantia.
• Visualizar imagens fixas de jogos de vídeo ou de PC durante um longo período de tempo pode produzir imagens parciais depois da visualização.
Para evitar este efeito, reduza a "luminosidade" e o "contraste" quando visualizar imagens fixas.
Precauzioni da adottare quando si visualizza un’immagine fissa
Un’immagine fissa può causare danni permanenti allo schermo TV.
• Non visualizzare un’immagine fissa sul pannello LCD per oltre 2 ore poiché può causare la ritenzione dell’immagine sullo schermo.
Il fenomeno di ritenzione dell'immagine è anche noto come "bruciatura dello schermo". Per evitare il fenomeno di ritenzione dell'immagine,
ridurre il grado di luminosità e di contrasto dello schermo quando si visualizza un’immagine fissa.
• Su un TV LCD, l’uso del formato 4:3 per un periodo prolungato può lasciare traccia dei bordi sulla parte sinistra, destra e
centrale del video a causa delle differenti emissioni luminose dello schermo.
La riproduzione di un DVD o l’uso di una console per videogiochi può causare effetti analoghi sullo schermo.
Questo tipo di danni non è coperto dalla Garanzia.
• La visualizzazione prolungata di immagini fisse da videogiochi e PC può causare la visualizzazione di immagini residue parziali.
Per evitare questo problema, ridurre la 'luminosità' e il 'contrasto' mentre si visualizzano immagini fisse.
English-1
English
Contents
CONNECTING AND PREPARING YOUR TV
List of Parts .............................................................. 2
How to Adjust the Stand .......................................... 2
How to Adjust the Angle of the TV ...................... 2
Installing the Wall Mount Kit .................................... 3
Installing VESA compliant mounting devices .......... 3
Viewing the Control Panel ........................................ 3
Viewing the Connection Panel.................................. 4
Viewing the Remote Control .................................... 5
Installing Batteries in the Remote Control................ 6
Switching On and Off................................................ 6
Placing Your Television in Standby Mode ................ 6
Plug & Play .............................................................. 6
SETTING THE CHANNELS
Storing Channels Automatically................................ 7
Storing Channels Manually ...................................... 8
Editing the Channels ................................................ 9
Sorting the Stored Channels .................................... 9
Assigning Channels Names .................................... 10
Fine Tuning Channel Reception .............................. 10
SETTING THE PICTURE
Changing the Picture Standard ................................ 11
Adjusting the Custom Picture .................................. 11
Changing the Colour Tone ........................................ 12
SETTING THE SOUND
Changing the Sound Standard ............................ 12
Adjusting the Volume Automatically .................... 12
SETTING THE TIME
Setting and Displaying the Current Time..............13
Setting the Sleep Timer........................................ 13
Switching the Television
On and Off Automatically......................................14
SETTING THE OTHERS
Choosing Your Language .................................... 14
Setting the Blue Screen Mode..............................15
Selecting the Source ............................................15
Editing the Input Source Names ..........................15
USING THE TELETEXT FEATURE
Teletext Decoder ..................................................16
Displaying the Teletext Information ......................16
Selecting a Specific Teletext Page ......................17
Using Fastext to Select a Teletext Page ..............17
Storing Teletext Pages..........................................17
SETTING THE PC
Setting up Your PC Software
(Based on Windows XP) ......................................18
Display Modes ......................................................18
Setting the PC ......................................................19
RECOMMENDATIONS FOR USE
Troubleshooting:
Before Contacting Service Personnel ..................20
Technical and Environmental Specifications ......20
Symbol Press Important Note One-Touch
Button

English-2
CONNECTING AND PREPARING YOUR TV
List of Parts
Please make sure the following items are included with your LCD TV.
If any items are missing, contact your dealer.
Remote Control
& Batteries (AAA x 2)
Power Cord Wall Mount kit Owner’s Instructions
Warranty card Service Network Card Safety Guide Registration Cards
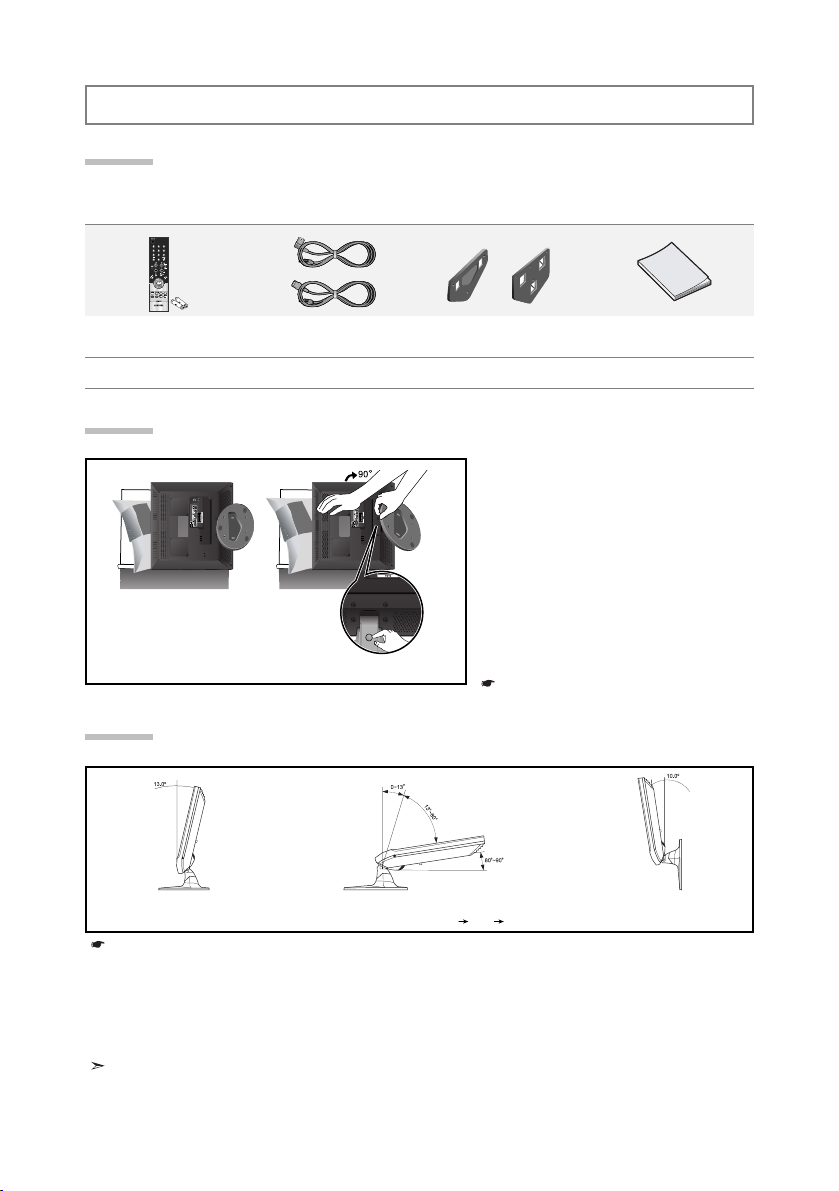
How to Adjust the Stand
(1)
(2)
1. Place the front of the TV onto a soft cloth
or cushion on a table as in Figure (1).
- Align the TV bottom along the table
edge.
2. Press on the center of the TV back.
Adjust the stand as in Figure (2) while
pressing the “PUSH” button on the back of
the stand.
3. Place the TV on the table so that the TV
sits safely.
When you adjust the stand, press the “PUSH"
button on the back of the stand.
How to Adjust the Angle of the TV
1. Figure (1) shows the adjustment angle (0°~13°) when you use the LCD on its stand .
Excessive tilting can turn the LCD TV over which may cause damage.
2. Figure (2) shows the adjustment angle (13°~80°) when you convert the LCD from stand-based use
to wall-mount.
3. Figure (3) shows the adjustment angle (0°~10°) when you mount the LCD TV to a wall.
You will hear a “Click ” sound when changing the angle from 1 to 2 or 3 to 2.
(1) Angle adjustment when using the
TV on its stand.
(2) Angle adjustment when converting
from Stand to Wall mount (1 3, 3 1)
(3) Angle adjustment when LCD TV
is wall-mounted
When you adjust the stand, press the “PUSH" button on the back of the stand.
PUSH button
17”
15”, 20”
20”15”, 17”

English-3
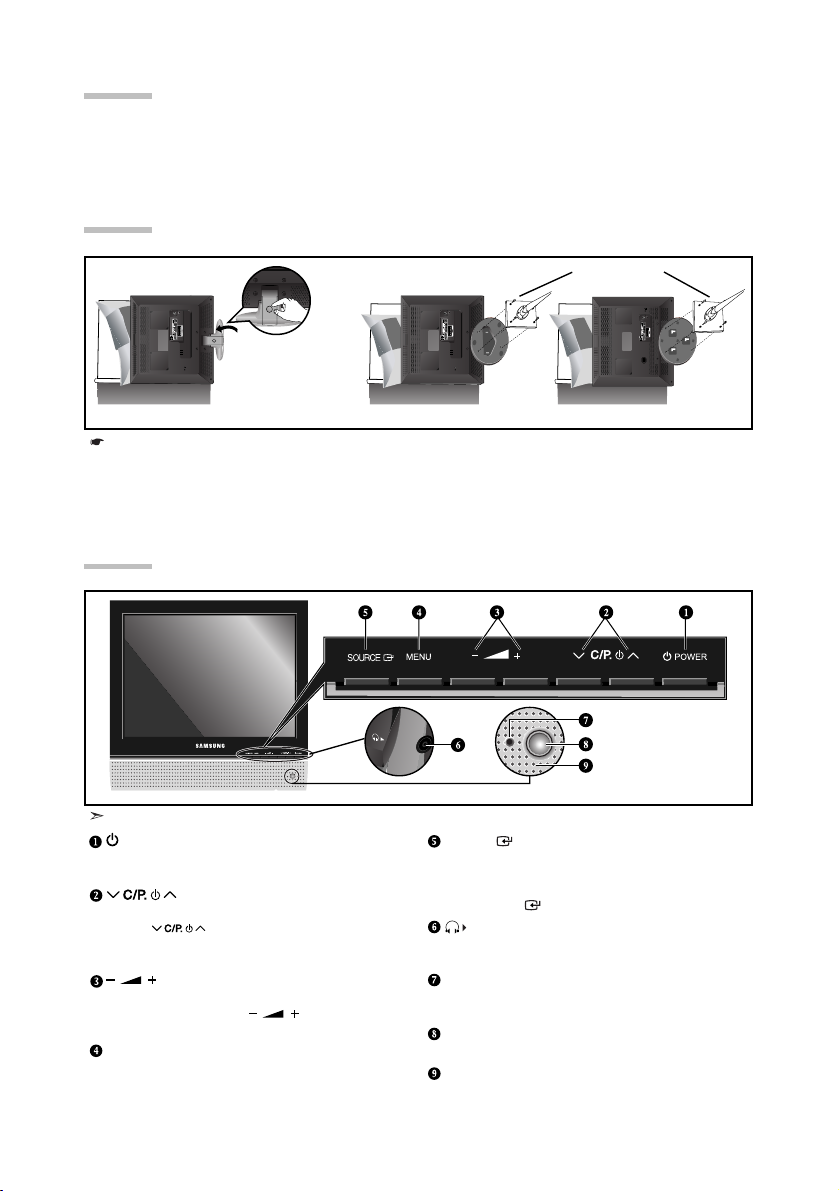
Viewing the Control Panel
POWER
Press to turn the TV on and off.
Press to change channels.
In the on-screen menu, use the buttons as you
use the
and buttons on the remote control.
(Without the Remote Control, You can turn on TV by using
the Channel buttons.)
Press to decrease or increase the volume.
In the on-screen menu, use the buttons
as you use the
and buttons on the remote control.
MENU
Press to see an on-screen menu of your TV’s features.
SOURCE
Toggles between all the available input sources
(TV - Ext. - AV - S-Video - PC).
In the on-screen menu, use this button as you use the
ENTER button on the remote control.
(Headphone Jack)
Connect a set of external headphones to this jack for private
listening.
Power Indicator
Blinks and turns off when the power is on and lights up in
stand-by mode.
Remote Control Sensor
Aim the remote control towards this spot on the TV.
Speakers
The product colour and shape may vary depending on the model.
Wall mount items (sold separately) allow you to mount the TV on the wall. For detailed information on
installing the wall mount, see the instructions provided with the Wall Mount items. Contact a technician for
assistance when installing the wall mounted bracket. Samsung Electronics is not responsible for any
damage to the product or injury to yourself or others if you elect to install the TV on your own.
Installing the Wall Mount Kit
Installing VESA compliant mounting devices
(2) (3)
When you adjust the stand, press the “PUSH" button on the back of the stand.
1. Place the TV faced down on a soft cloth or cushion on a table.
2. Adjust the stand, pressing the "PUSH" button on the back of the stand.
3. Align the mounting interface pad (not supplied) with the holes in the stand bottom and secure it with the four
screws that come with the arm-type base, wall mount hanger or other bases (not supplied).
LW15M2/LW17M2
LW20M2
Mounting pad
(sold separately)
PUSH button
English-4
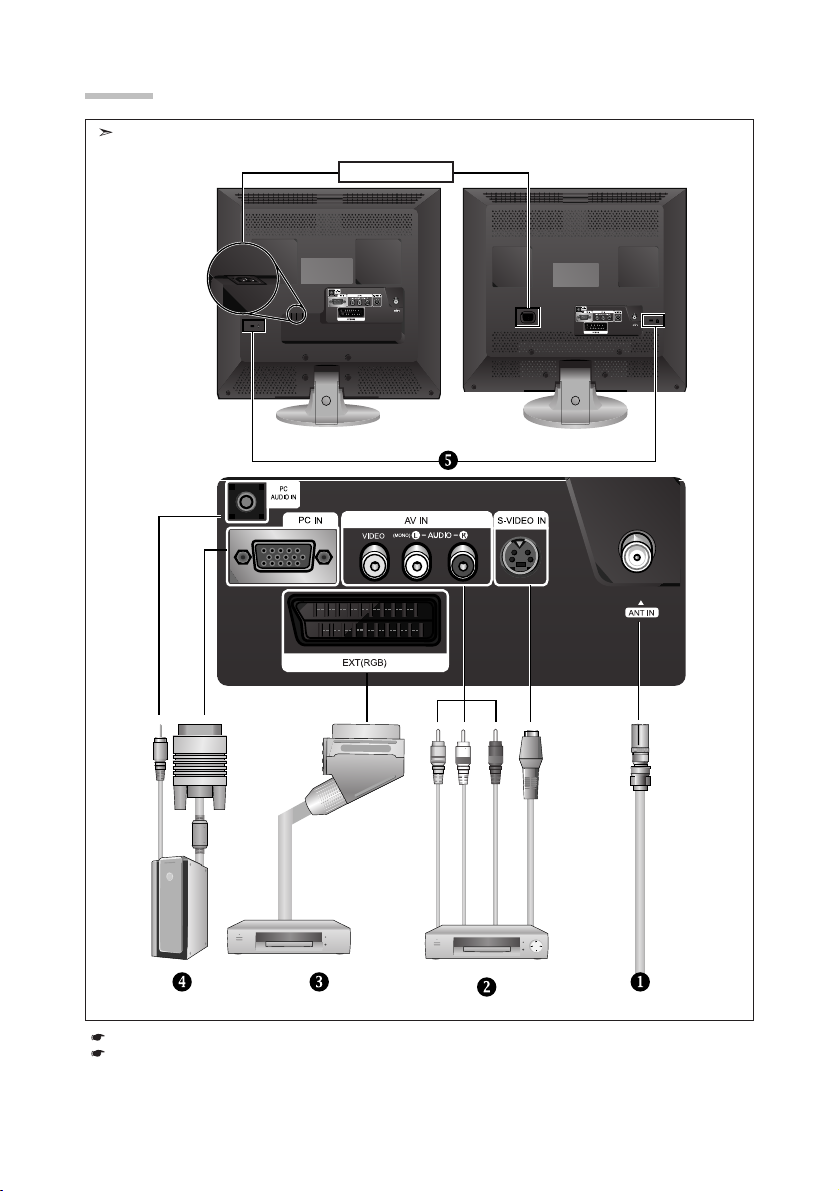
Viewing the Connection Panel
Power Input
Whenever you connect an external device to your TV, make sure that power on the unit is turned off.
When connecting an external device, match the colour of the connection terminal to the cable.
The product colour and shape may vary depending on the model.
English-5
Connecting an Aerial or Cable Television Network
To view television channels correctly, a signal must be received by the set from one of the following sources:
- An outdoor aerial / A cable television network / A satellite network
Connecting External A/V Devices
-
Connect RCA (optional) or S-VIDEO cable (optional) to an appropriate external A/V device such as VCR, DVD or Camcorder.
- Connect RCA audio cables (optional) to “L - AUDIO - R” on the rear of your set and the other ends to corresponding audio
out connectors on the A/V device.
Connecting Set-Top Box, VCR or DVD
- Connect the VCR or DVD SCART cable (optional) to the SCART connector of the VCR or DVD.
- If you wish to connect both the Set-Top Box and VCR (or DVD), you should connect the Set-Top Box to the VCR (or DVD)
and connect the VCR (or DVD) to your set.
Connecting Computer
-Connect the D- Sub cable (optional) to “PC IN” on the rear of your set and the other end to the
Video Card of your computer.
-Connect the stereo audio cable (optional) to “PC AUDIO IN” on the rear of your set and the other end to “Audio Out” of the
sound card on your computer.
Kensington Lock
- The Kensington lock (optional) is a device used to physically fix the system when used in a public place.
- If you want to use a locking device, contact the dealer where you purchased the TV.
- The place of the Kensington Lock may be different depending on its model.
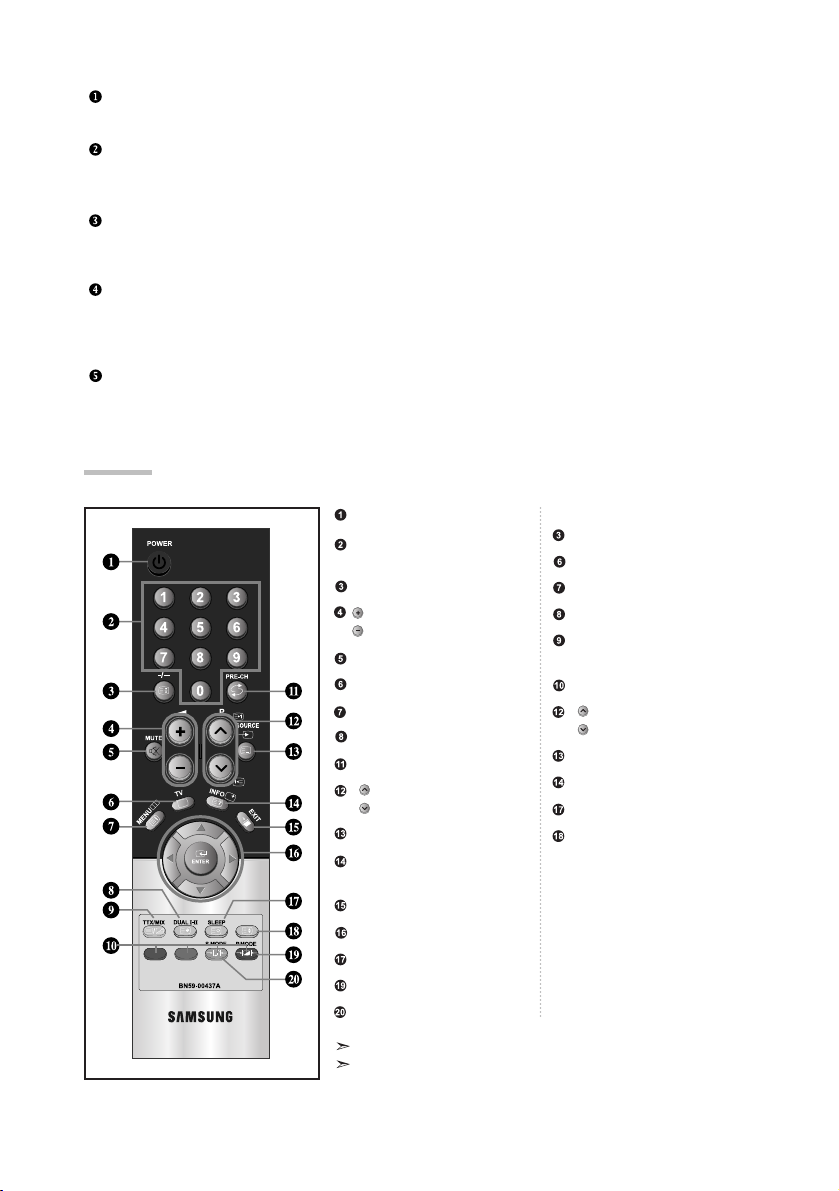
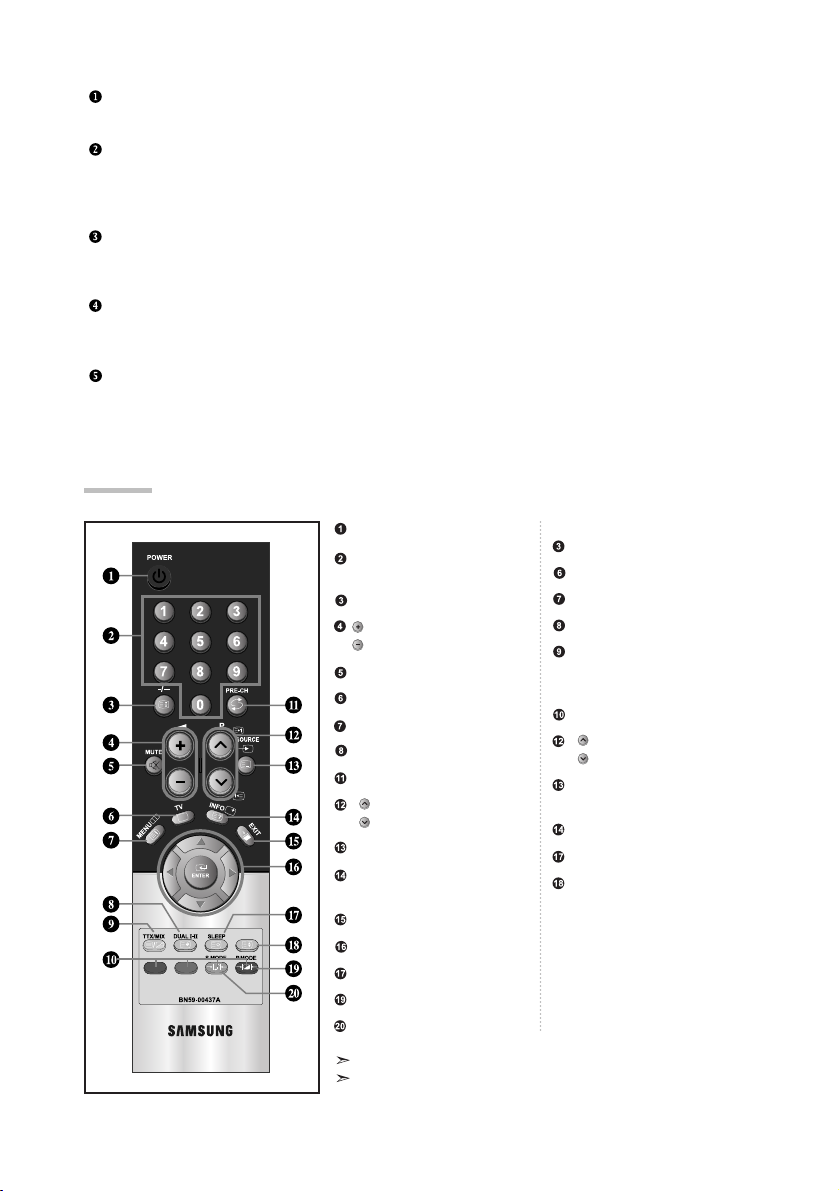
Television Standby button
Number buttons for direct
channel access
One/Two-digit channel selection
: Volume increase
: Volume decrease
Temporary sound switch-off
Selects the TV mode directly
Displays the main on-screen menu
Sound effect selection
Previous channel
P: Next channel
P: Previous channel
Available source selection
Use to see information on the
current broadcast
Exit the on-screen menu
Control the cursor in the menu
Automatic Power-off
Picture effect selection
Sound mode selection
Teletext Functions
Teletext hold
Exit from the teletext display
Teletext index
Teletext sub page
Teletext display/mix both teletext
information and the normal broadcast
Fastext topic selection
P: Teletext next page
P: Teletext previous page
Teletext mode selection (LIST/FLOF)
Teletext reveal
Teletext store
Teletext size selection
The performance of the remote control may be affected by bright light.
For details, refer to further instructions.
Viewing the Remote Control
The mains lead is attached to the rear of your set.
1. Plug the mains lead into an appropriate socket.
The standby indicator lights up on the lower-right panel.
2. Press the POWER button on the lower-right panel.
The programme that you were watching last is reselected automatically.
3. Press the numeric button (0~9) or channel up/down ( / ) button on the remote control or
button on the lower-right panel.
When you switch the set on for the very first time, you will be asked to choose language in which the menus
are to be displayed.
4. To switch your set off, press the POWER button again.
Your set can be placed in standby mode in order to reduce the power consumption. The standby mode
can be useful when you wish to interrupt viewing temporarily (during a meal, for example).
1. Press the POWER button on the remote control.
The screen is turned off and a standby indicator appears on the lower-right panel.
2. To switch your set back on, simply press the POWER , numeric buttons (0~9) or channel
up/down ( / ) button again.
Do not leave your set in standby mode for long periods of time (when you are away on holiday, for example).
It is best to unplug the set from the mains and aerial.
Switching On and Off
Placing Your Television in Standby Mode
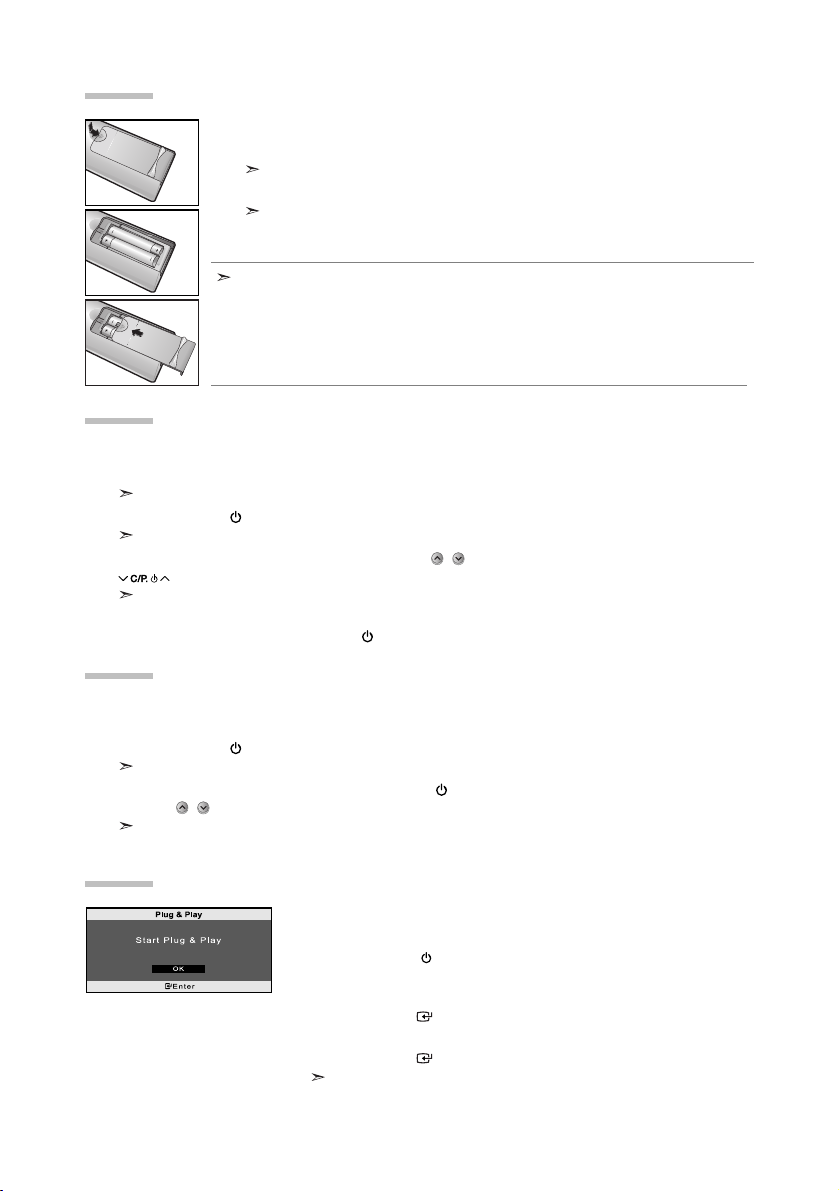
When the TV is initially powered on, several basic settings proceed
automatically and subsequently. The following settings are available.
1. Press the POWER button on the remote control.
The message “Start Plug & Play” is displayed with “OK” selected.
2. Select the appropriate language by pressing the or button.
Press the
ENTER button to confirm your choice.
3. The message “Check antenna input.” is displayed with “OK” selected.
Press the
ENTER button.
Please check that the antenna cable is connected correctly.
Plug & Play
English-6
1. Slide the cover out completely.
2. Install two AAA size batteries.
Make sure to match the “+” and “–” ends of the batteries with the diagram inside the compartment.
3. Replace the cover.
Remove the batteries and store them in a cool, dry place if you won’t be using the
remote control for a long time. The remote control can be used up to about 23 feet from
the TV. (Assuming typical TV usage, the batteries last for about one year.)
If the remote control doesn’t work, check the following:
1. Is the TV power on?
2. Are the plus and minus ends of the batteries reversed?
3. Are the batteries drained?
4. Is there a power outage, or is the power cord unplugged?
5. Is there a special fluorescent light or neon sign nearby?
Installing Batteries in the Remote Control
English-7
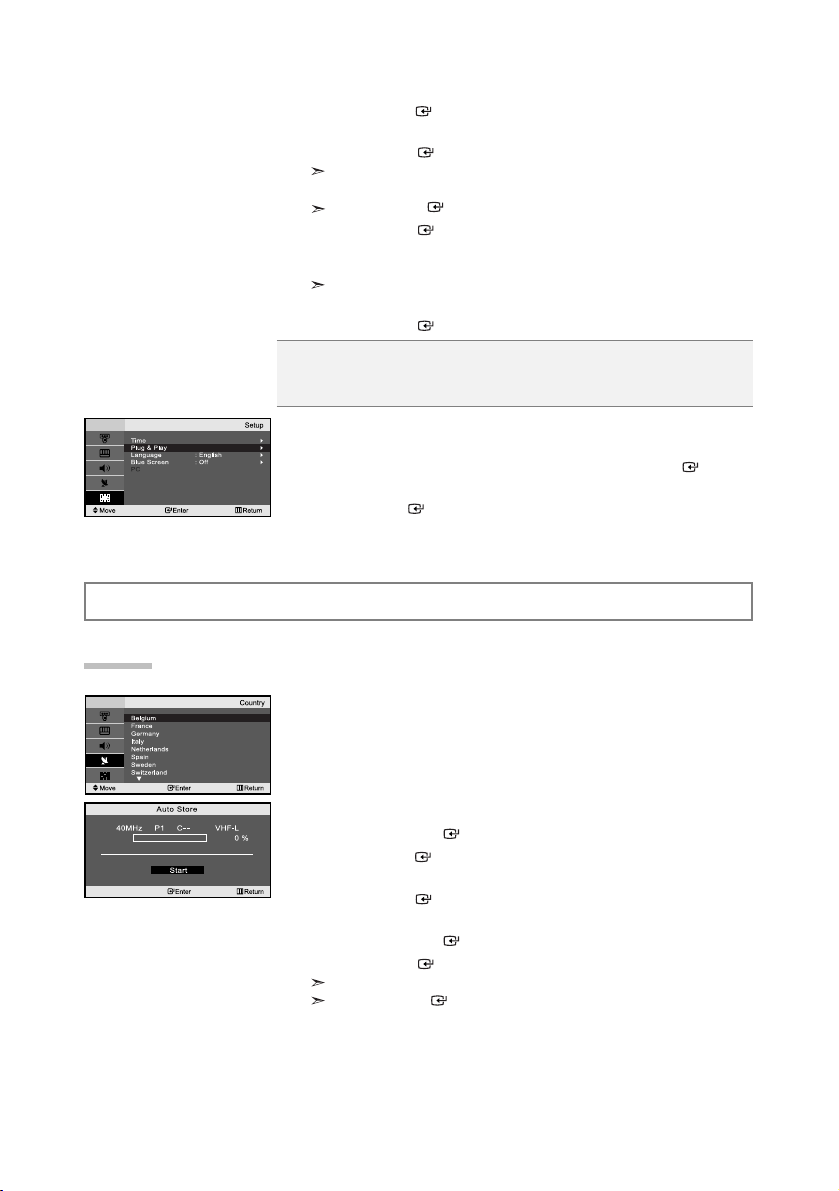
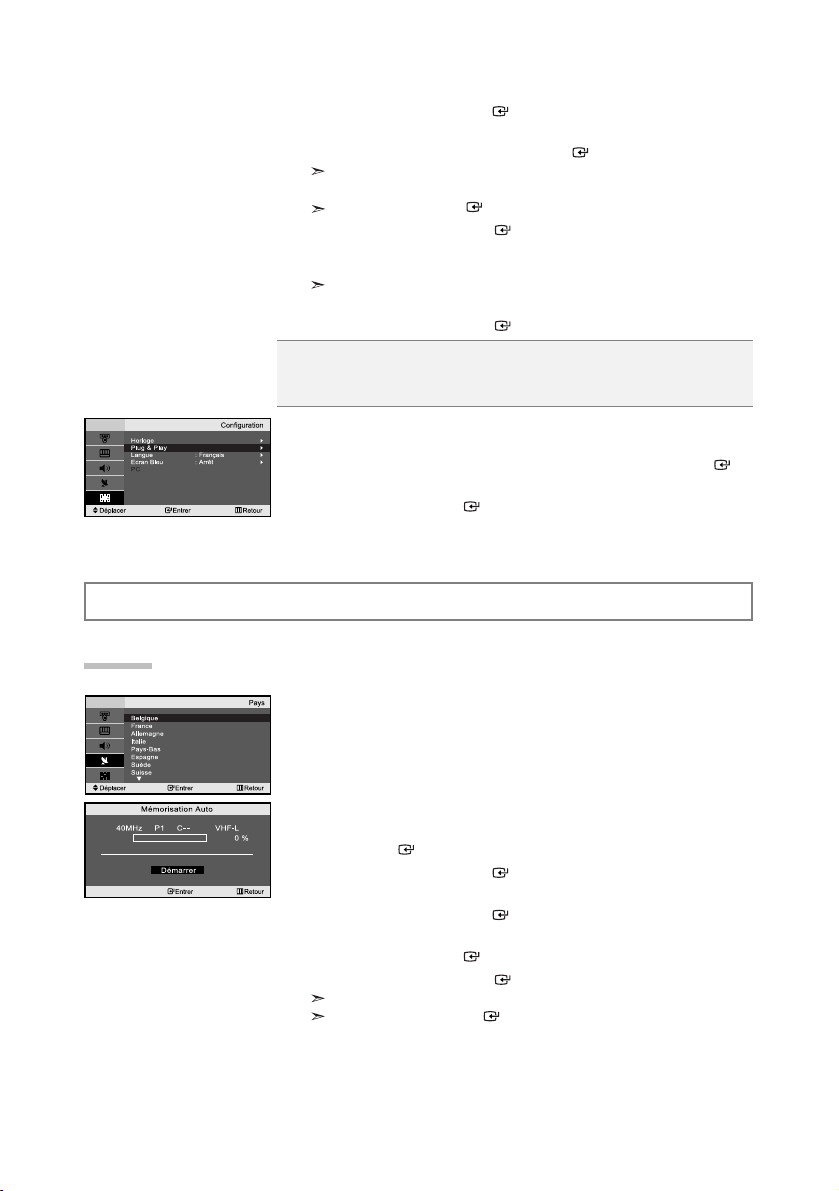
Language: Select your language.
Country: Select your country.
Auto Store: Automatically scans for and stores channels available in the local area.
Clock Set: Sets the current time for the TV clock.
If you want to reset this feature...
1. Press the MENU button to display the menu.
Press the or
button
to select “Setup”, then press the ENTER button.
2.
Press the or
button
to select
“Plug & Play”
, then
press the
ENTER button.
3. This will change or reset the settings.
4. Select the appropriate country by pressing the or button.
Press the
ENTER button to confirm your choice.
5. The “Auto Store” menu is displayed with the “Start” selected.
Press the
ENTER button.
The channel search will start and end automatically.
After all the available channels are stored, the “Clock Set” menu appears.
Press the ENTER button at any time to interrupt the memorization process.
6. Press the ENTER button.
Select the “Hour” or “Minute” by pressing the
or
button.
Set the “Hour” or “Minute” by pressing the
or
button.
You can also set the hour and minute by pressing the number buttons on the
remote control.
7. Press the ENTER button to confirm your setting.
SETTING THE CHANNELS
You can scan for the frequency ranges available to you (and availability
depends on your country). Automatically allocated programme numbers
may not correspond to actual or desired programme numbers.
However, you can sort numbers manually and clear any channels you do
not wish to watch.
1. Press the MENU button to display the menu.
Press the
or button to select “Channel”,
then press the
ENTER button.
2. Press the ENTER button to select “Country”.
3. Select the appropriate country by pressing the or button.
Press the
ENTER button to confirm your choice.
4. Press the or button to select “Auto Store”,
then press the
ENTER button.
5. Press the ENTER button.
The TV will begin memorizing all of the available channels.
Press the ENTER button at any time to interrupt the memorization process
and return to the “Channel” menu.
6. After all the available channels are stored, the “Sort” menu appears.
Storing Channels Automatically
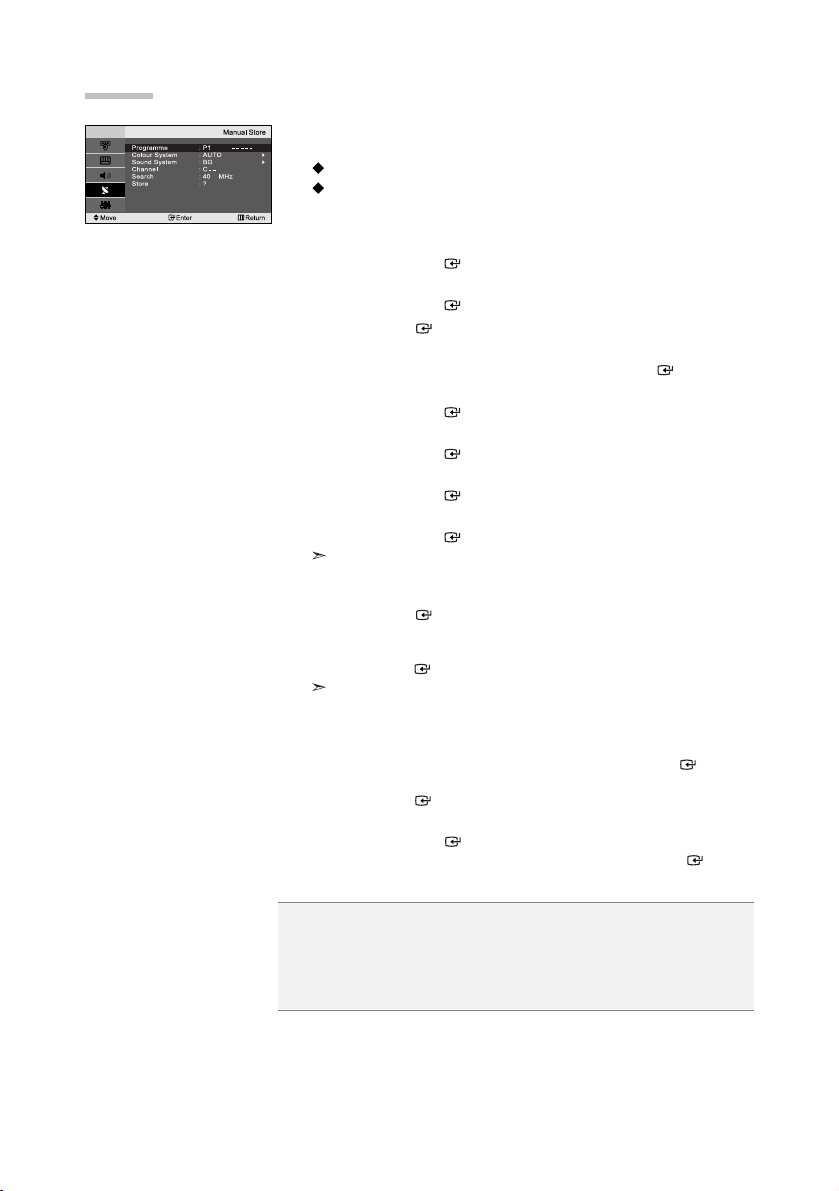
English-8
You can store up to 100 channels, including those received via cable
networks. When storing channels manually, you can choose:
Whether or not to store each of the channels found.
The programme number of each stored channel which you wish
to identify.
1. Press the MENU button to display the menu.
Press the
or button to select “Channel”,
then press the
ENTER button.
2. Press the or button to select “Manual Store”,
then press the
ENTER button.
3. Press the ENTER button to select “Programme”.
4. To assign a programme number to a channel, find the correct number
by pressing the
or button and then press the ENTER button.
5. Press the or button to select “Colour System”,
then press the
ENTER button.
6. Select the colour standard required by pressing the or button,
then press the
ENTER button.
7. Press the or button to select “Sound System”,
then press the
ENTER button.
8. Select the sound standard required by pressing the or button,
then press the
ENTER button.
If there is an abnormal sound or no sound, re-select the sound system required.
9. If you know the number of the channel to be stored,
press the
or button to select “Channel”.
Press the
ENTER button. Select C (Air channel) or S (Cable channel)
by pressing the
or button. Press the button to select channel.
Select the required number by pressing the
or button and then
press the
ENTER button.
Channel mode: P (Programme mode)
C (Air channel mode)
S (Cable channel mode)
10. If you do not know the channel numbers,
press the
or button to select “Search”. Press the ENTER button.
Search by pressing the
or button and then
press the
ENTER button.
11. Press the or button to select “Store”,
then press the
ENTER button.
Press the
or button to select “OK”, then press the ENTER button.
12. Repeat steps 3 to 11 for each channel to be stored.
Programme: Selects a program number for the channel.
Colour System: Sets the colour supporting system.
Sound System: Sets the sound supporting system.
Channel: Selects a channel.
Search: Scans for the frequency value for the channel.
Store: Saves your settings.
Storing Channels Manually
English-9
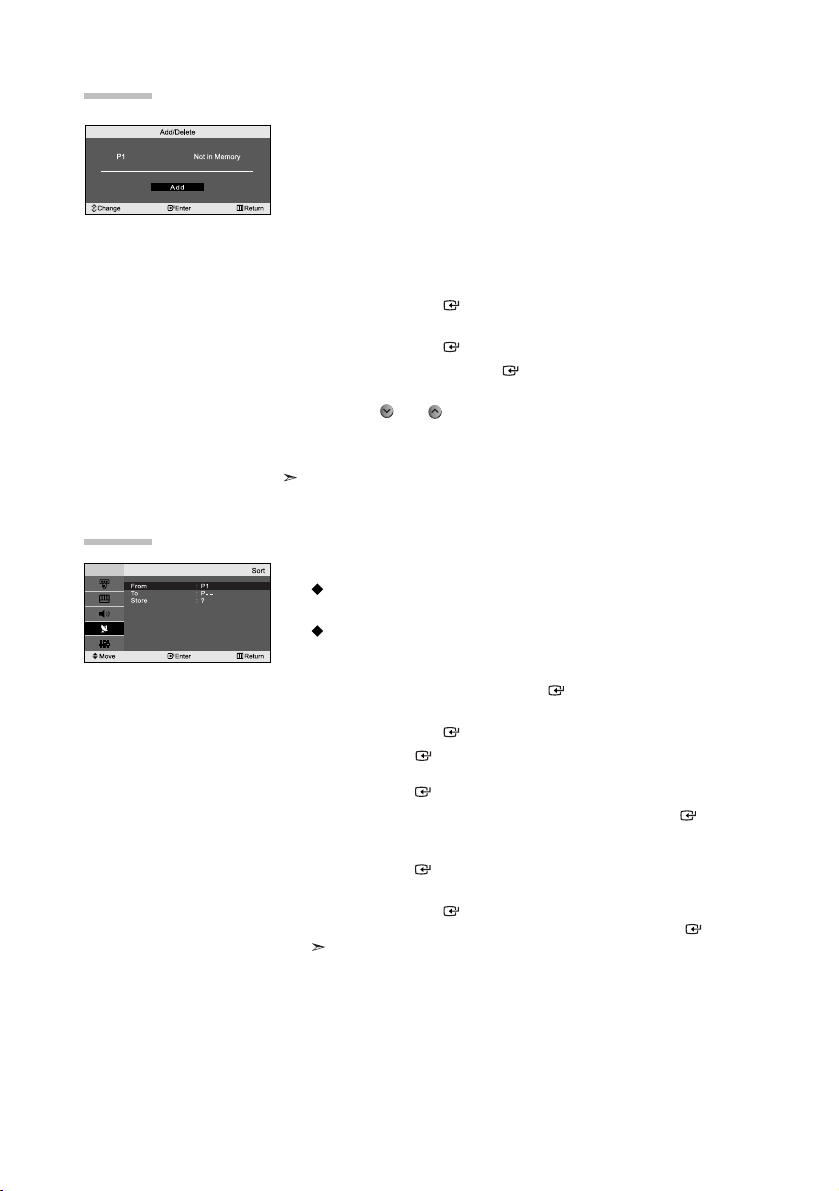
You can exclude the channels you chose from the channels you
scanned. When you scan through the stored channels, those you
have chosen to skip are not displayed.
All channels that you do not specifically choose to skip are displayed
during scanning.
1. Use the number buttons to directly select the channel that
will be added or deleted.
2. Press the MENU button to display the menu.
Press the
or button to select “Channel”,
then press the
ENTER button.
3. Press the or button to select “Add/Delete”,
then press the
ENTER button.
4. Repeatedly pressing the ENTER button will alternate between add
channel and delete channel.
5. Press the P or P buttons to switch to the appropriate channel,
then repeat above.
6. Press the EXIT button to exit.
You can view any channel (including an erased channel) by using the number buttons
on the remote control.
Editing the Channels
You can exchange the numbers of two channels, in order to:
Modify the numeric order in which the channels have been
automatically stored.
Give easily remembered numbers to the channels that you watch
most often.
1. Press the MENU button to display the menu. Press the or button to
select “Channel”, then press the
ENTER button.
2.
Press the or button to select “Sort”,
then press the
ENTER button.
3.
Press the ENTER button to select “From”. Press the or button
until the channel number that you wish to change is displayed.
Press the
ENTER button.
4.
Press the or button to select “To”, then press the ENTER button.
Press the
or button until the new number by which you wish to
identify the channel is displayed.
Press the
ENTER button.
5.
Press the or button to select “Store”,
then press the
ENTER button.
Press the
or button to select “OK”, then press the ENTER button.
The selected channel is exchanged with the one previously stored to the chosen
number.
6.
Repeat steps 3 to 5 for another channel to be sorted.
7.
Press the EXIT button to exit.
Sorting the Stored Channels
English-10
Channel names will be assigned automatically when channel information
is broadcast.
These names can be changed, allowing you to assign new names.
1. Press the MENU button to display the menu. Press the or button to
select “Channel”, then press the
ENTER button.
2.
Press the or button to select “Name”,
then press the
ENTER button.
3.
If necessary, select the channel to be assigned to a new name by
pressing the
or
button. Press the
ENTER
button.
4.
The characters available are :
Letters of the alphabet (A~Z)
Numbers (0~9)
Special characters (
-
, space)
5.
Repeat steps 3 to 4 for each channel to be assigned to a new name.
6.
Press the EXIT button to exit.
Assigning Channels Names
To...
Select a letter, number or symbol
Move on the next letter
Move back the previous letter
Confirm the name
Then...
Press the
or
button
Press the
button
Press the
button
Press the ENTER button
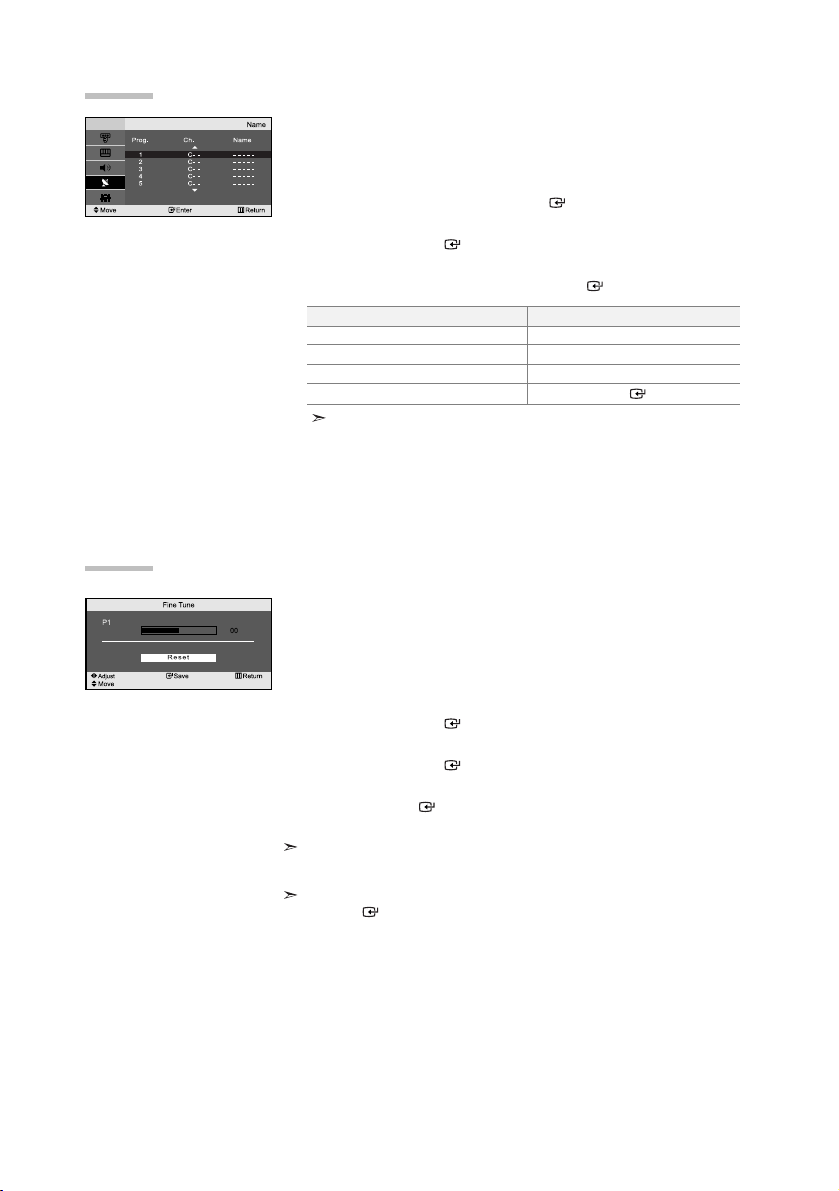
Fine tuned channels that have been saved are marked with an asterisk “*” on the
right-hand side of the channel number in the channel banner. And the channel number
turns red.
To reset the fine-tuning, select “Reset” by pressing the
or button and then press
the
ENTER
button.
Use fine tuning to manually adjust a particular channel for optimal
reception.
1. Use the number buttons to directly select the channel that
you want to fine tune.
2. Press the MENU button to display the menu.
Press the
or button to select “Channel”,
then press the
ENTER button.
3. Press the or button to select “Fine Tune”,
then press the
ENTER button.
4. Press the or button to adjust the fine tuning.
Press the
ENTER
button.
5. Press the EXIT button to exit.
Fine Tuning Channel Reception
English-11
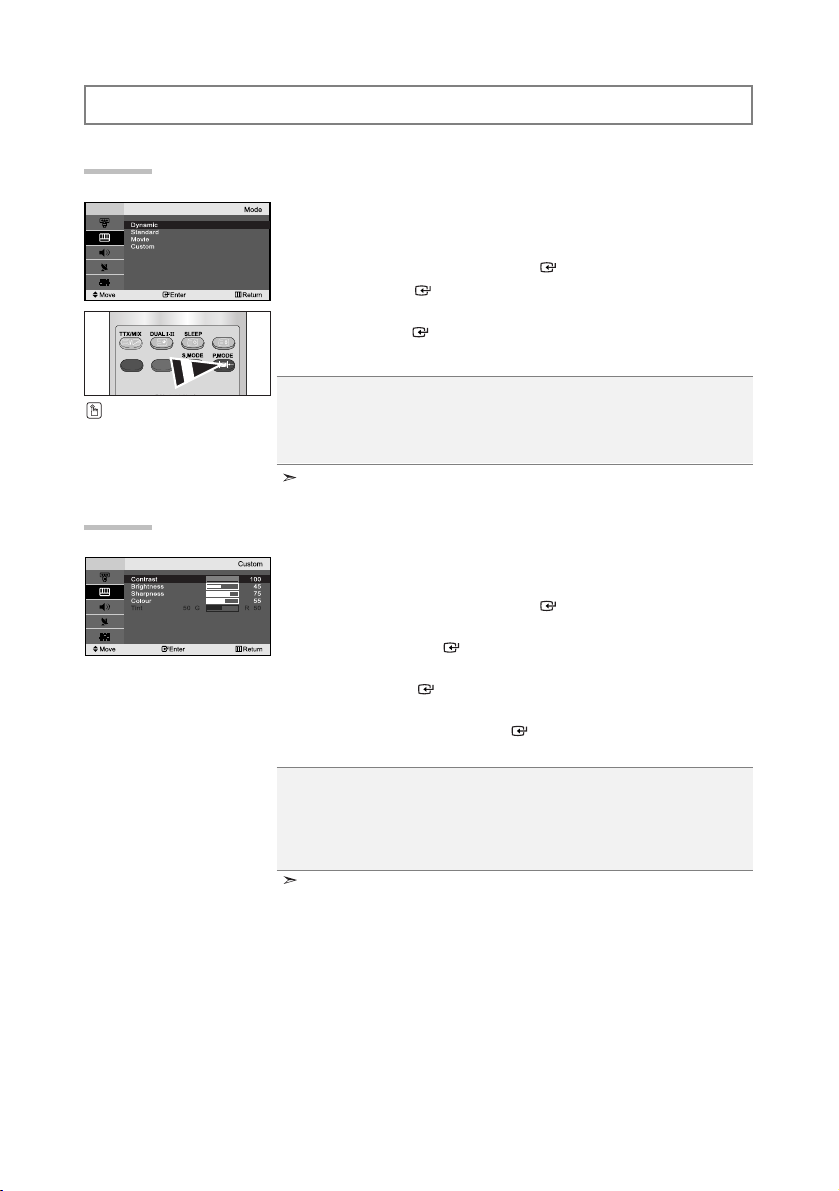
SETTING THE PICTURE
You can select the type of picture which best corresponds to your
viewing requirements.
1. Press the MENU button to display the menu. Press the or button to
select “Picture”, then press the
ENTER button.
2.
Press the ENTER button to select “Mode”.
3.
Press the
or
button to select the desired picture effect.
Press the
ENTER
button.
4.
Press the EXIT button to exit.
Dynamic: Selects the picture for high-definition in a bright room.
Standard: Selects the picture for optimum display in a normal environment.
Movie: Selects the picture for comfortable display in a dark room.
Custom: Select to view your favorite display settings.
(Refer to “Adjusting the Custom Picture” on page 11)
You can also press the
P. MODE button on the remote
control to select one of the
picture settings.
The Picture mode must be adjusted separately for each input source.
If you make any changes to these settings, the picture mode is automatically switched
to “Custom”.
Changing the Picture Standard
Contrast: Adjusts the lightness and darkness between objects and the background.
Brightness: Adjusts the brightness of the whole screen.
Sharpness: Adjusts the outline of objects to either sharpen them or make them more dull.
Colour: Adjusts the colours, making them lighter or darker.
Tint (NTSC only): Adjusts the colour of objects, making them more red or green for a more
natural look.
Your set has several settings which allow you to control picture quality.
1. Press the MENU button to display the menu. Press the or button to
select “Picture”, then press the
ENTER button.
2.
Press the or button to select “Custom”,
then press the
ENTER button.
3.
Press the
or button
to select a particular item.
Press the
ENTER
button.
4.
Press the
or button
to decrease or increase the value of a
particular item.
Press the ENTER button.
5.
Press the EXIT button to exit.
Adjusting the Custom Picture
English-12
Each broadcasting station has its own signal conditions, and so it is not
easy for you to adjust the volume every time the channel is changed.
This feature let you automatically adjust the volume of the desired
channel by lowering the sound output when the modulation signal is
high or by raising the sound output when the modulation signal is low.
1. Press the MENU button to display the menu. Press the or button to
select “Sound”, then press the
ENTER button.
2. Press the or button to select “Auto Volume”, then press the
ENTER button.
3.
Press the or button to select “On” or “Off”. Press the ENTER button.
4. Press the EXIT button to exit.
Adjusting the Volume Automatically
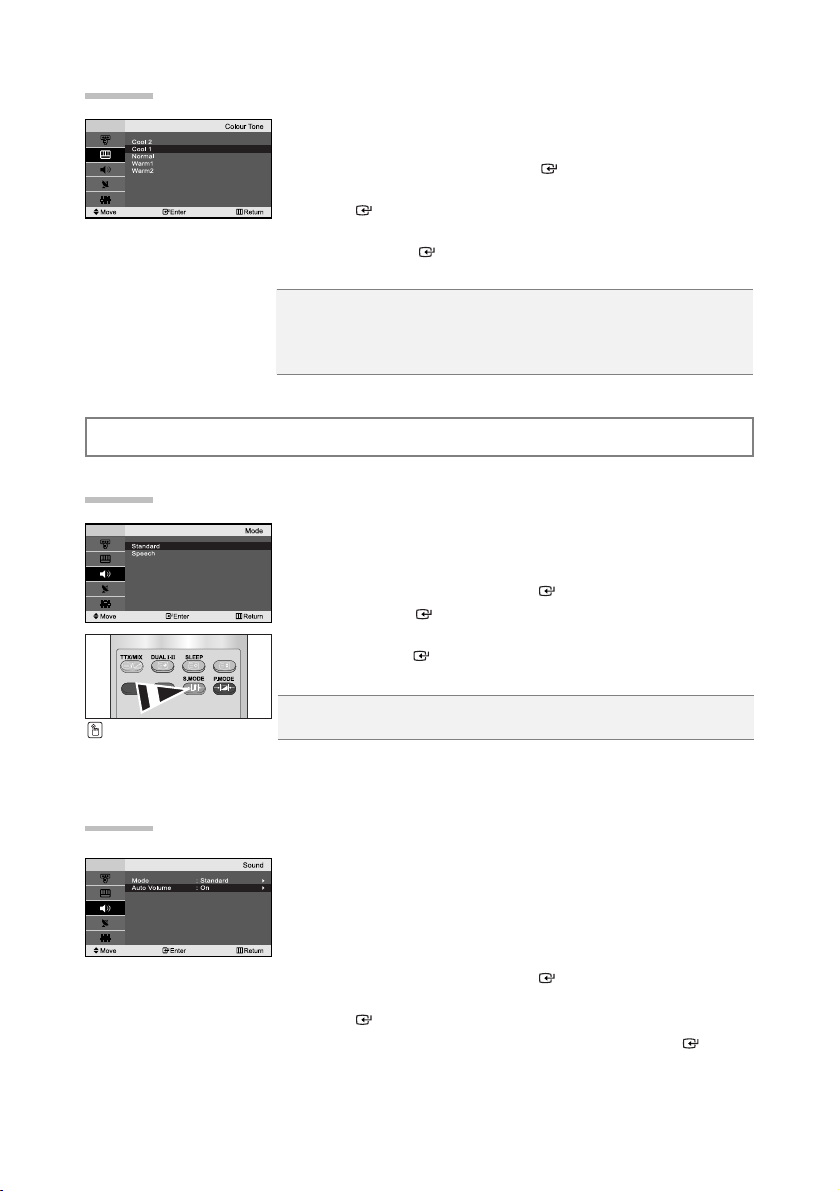
SETTING THE SOUND
You can select the type of the special sound effect to be used when
watching a given broadcast.
1. Press the MENU button to display the menu. Press the or button to
select “Sound”, then press the
ENTER button.
2. Press the ENTER button to select “Mode”.
3.
Press the
or
button to select the desired sound effect.
Press the
ENTER
button.
4. Press the EXIT button to exit.
Standard: Selects the normal sound mode.
Speech: Emphasizes voices over other sounds.
Changing the Sound Standard
You can also select these
options by simply pressing the
S.MODE button on the remote
control.
You can select the most comfortable colour tone to your eyes.
1. Press the MENU button to display the menu. Press the or button to
select “Picture”, then press the
ENTER button.
2. Press the or button to select “Colour Tone”, then press the
ENTER button.
3.
Press the
or button
to select the desired colour tone setting.
Press the
ENTER
button.
4.
Press the EXIT button to exit.
Changing the Colour Tone
Cool 2: Makes the colour temperature bluer than “Cool 1” menu.
Cool 1: Makes whites bluish.
Normal: Keeps whites white.
Warm1: Makes whites reddish.
Warm2: Makes the colour temperature redder than “Warm1” menu.
English-13
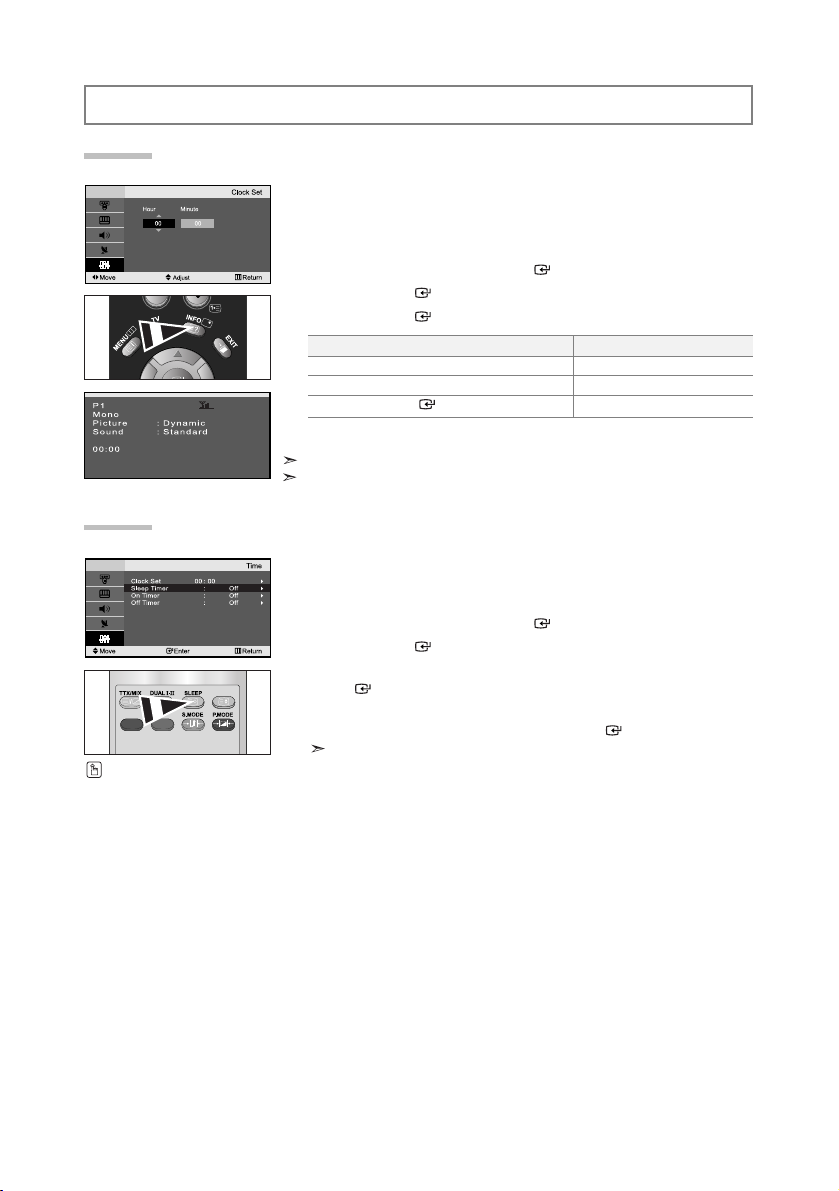
SETTING THE TIME
You can set the TV’s clock so that the current time is displayed when
you press the INFO button. You must also set the time if you wish to
use the automatic On/Off timers.
1. Press the MENU button to display the menu. Press the or button to
select “Setup”, then press the
ENTER button.
2. Press the ENTER button to select
“Time”.
3. Press the ENTER button to select “Clock Set”.
4.
5.
Press the EXIT button to exit.
If you disconnect the power cord, you have to set the clock again.
You can also set hour and minute by pressing the number buttons on the remote control.
To...
Move to “Hour” or “Minute”
Set the “Hour” or “Minute”
Press the
ENTER button.
Press the...
or button.
or button.
Setting and Displaying the Current Time
You can select a time period of between 30 and 180 minutes after which
the television automatically switches to standby mode.
1. Press the MENU button to display the menu. Press the or button to
select “Setup”, then press the
ENTER button.
2. Press the ENTER button to select
“Time”.
3. Press the or button to select “Sleep Timer”, then press the
ENTER button.
4. Press the or button repeatedly until the desired time appears
(Off, 30, 60, 90, 120, 150, 180). Press the
ENTER
button.
The TV automatically switches to standby mode when the timer reaches 0.
5. Press the EXIT button to exit.
Setting the Sleep Timer
Press the SLEEP button on
the remote control repeatedly
until the appropriate time
interval appears.
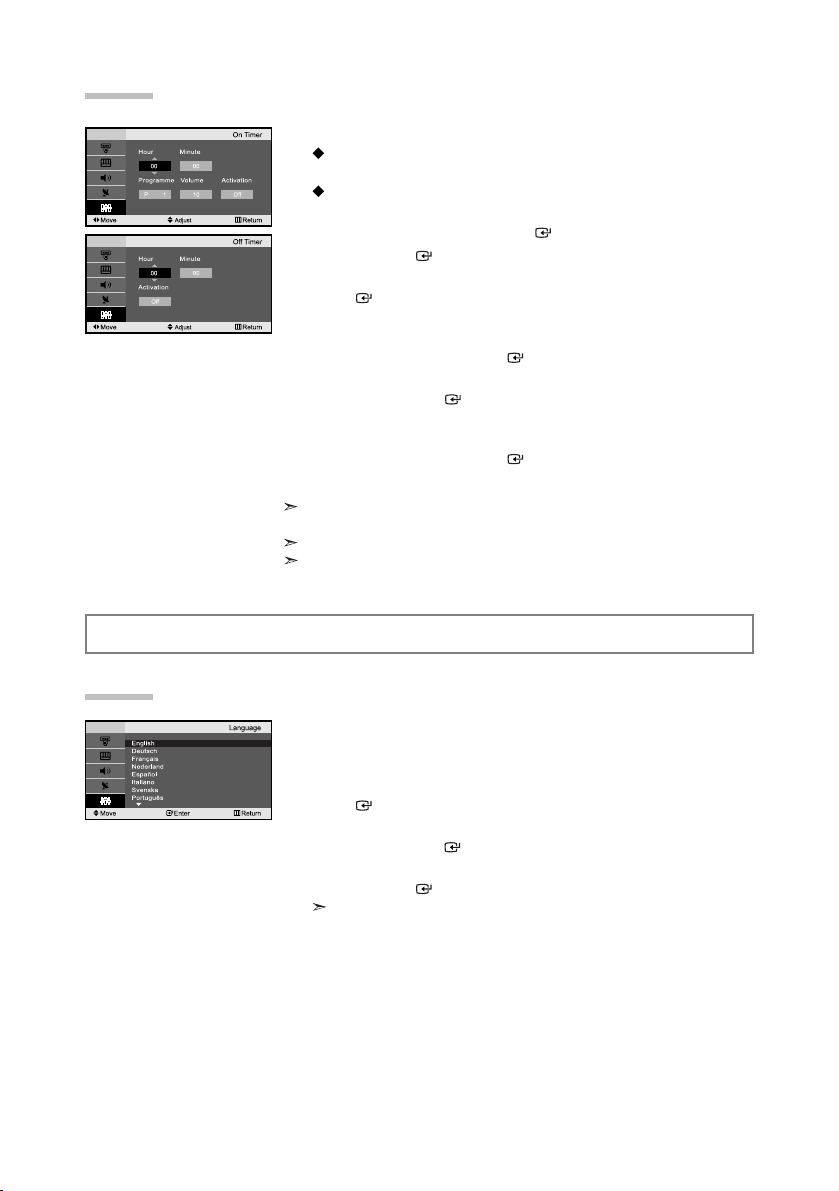
English-14
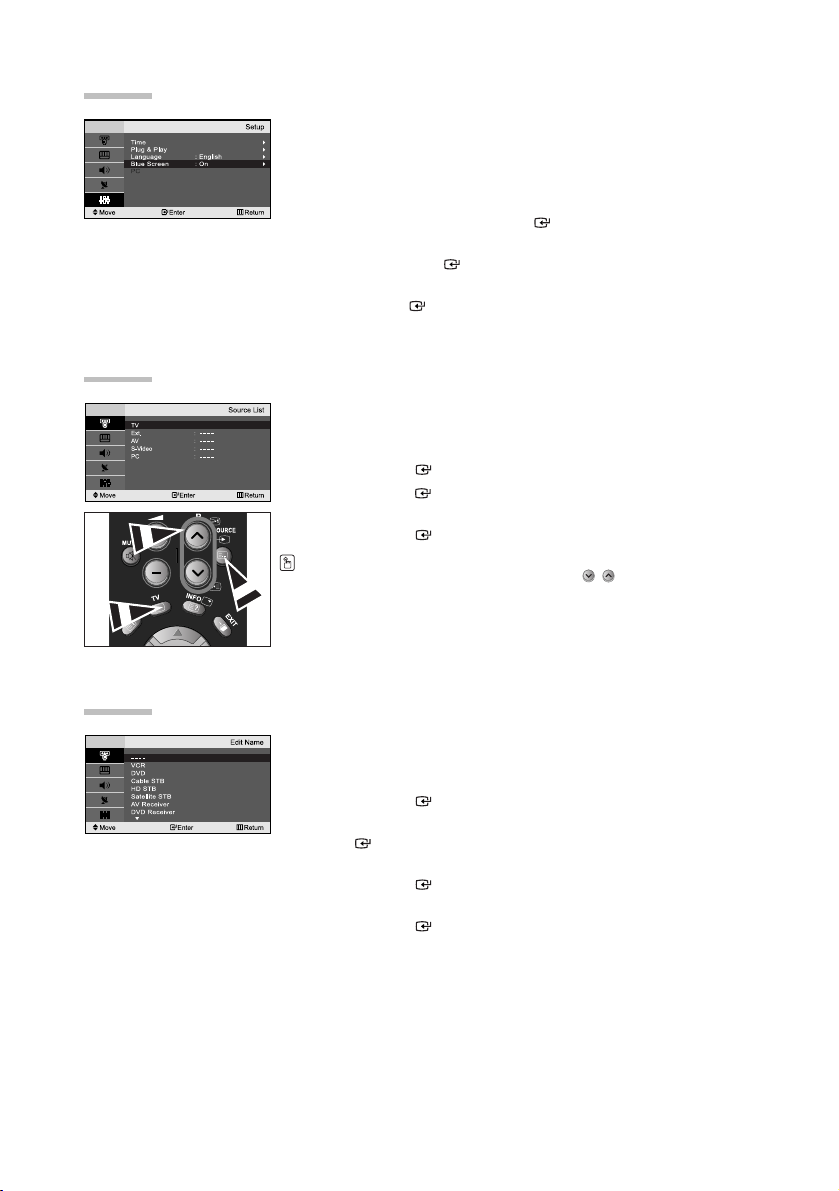
You can set the On/Off timers so that the set will:
Switch on automatically and tune to the channel of your choice at
the time you select.
Switch off automatically at the time you select.
1. Press the MENU button to display the menu. Press the or button to
select “Setup”, then press the
ENTER button.
2. Press the ENTER button to select
“Time”.
3. Press the or button to select “On Timer”, then press the
ENTER button.
4. Press the or button to adjust “Hour”, then press the button to
move to the next step. Set other items using the same method as above.
When finished, press the
ENTER button to return.
5. Press the or button to select “Off Timer”,
then press the
ENTER button.
6. Press the or button to adjust “Hour”, then press the button to
move to the next step. Set other items using the same method as above.
When finished, press the
ENTER button to return.
7. Press the EXIT button to exit.
The first step is to set the television’s clock.
(refer to “Setting and Displaying the Current Time” on page 13)
You can also set hour and minute by pressing the number buttons on the remote control.
The "Activation" setting must be set to "On" in order for the timers to work.
Switching the Television On and Off Automatically
SETTING THE OTHERS
When you start using your set for the first time, you must select the
language which will be used for displaying menus and indications.
1. Press the MENU button to display the on-screen menu.
Press the
or button to select “Setup”, then press the
ENTER button.
2. Press the or button to select “Language”,
then press the
ENTER button.
3. Select a particular language by pressing the or button repeatedly.
Press the
ENTER button.
You can choose one of 12 languages.
4. Press the EXIT button to exit.
Choosing Your Language
English-15
If no signal is being received or the signal is very weak, a blue screen
automatically replaces the noisy picture background. If you wish to
continue viewing the poor picture, you must set the "Blue Screen"
mode to "Off".
1. Press the MENU button to display the menu. Press the or button to
select “Setup”, then press the
ENTER button.
2. Press the or button to select “Blue Screen”
then press the
ENTER button.
3.
Press the or button to select “On” or “Off”.
Press the
ENTER button.
4. Press the EXIT button to exit.
Setting the Blue Screen Mode
You can select among external sources connected to
your TV’s input jacks.
1. Press the MENU button to display the menu.
Press the
ENTER button to select “Input”.
2. Press the ENTER button to select “Source List”.
3. Select the required device by pressing the or button.
Press the
ENTER button.
Selecting the Source
Press the SOURCE button on the remote control to toggel between all the available
source. TV mode can be selected by pressing the
TV or P / button on the
remote control but you cannot select it by pressing the
SOURCE button.
Name the device connected to the input jacks to make your input
source selection easier.
1. Press the MENU button to display the menu.
Press the
ENTER button, to select “Input”.
2. Press the or button to select “Edit Name”, then press the
ENTER button.
3. Press the or button to input select input source that you wish to edit.
Press the
ENTER button.
4. Press the or button to select the required device.
Press the
ENTER button.
5. Press the EXIT button to exit.
Editing the Input Source Names

English-16
USING THE TELETEXT FEATURE
Most set channels carry “ teletext ”, pages of written
information that provide information such as:
Television programme times.
News bulletins and Weather forecasts.
Sports results.
Subtitles for the hard of hearing.
The teletext pages are organized according to six categories:
Part
A
B
C
D
E
F
Contents
Selected page number.
Broadcasting station identity.
Current page number or search status.
Date and time.
Text.
Status information.
Teletext Decoder
You can display teletext information at any time, but signal reception
must be good. Otherwise:
Information may be missing.
Some pages may not be displayed.
To activate the teletext mode and display the contents page:
1.
Using the P () or P () button, select the channel providing the
teletext service.
2.
Press the TTX/MIX () button to activate the teletext mode.
The contents page is displayed. It can be redisplayed at any time by pressing
the MENU () button.
3. Press the TTX/MIX () button again.
The actual broadcast will be displayed simultaneously with the teletext page
on the screen.
4. Press the TV() button again to exit from the Text display.
If any broken character appears while Text is being viewed, make sure that the
Text language is identical with the language in the “Setup” menu mode. If both languages
are different, select the same language with the Text language on the “Setup” menu.
Displaying the Teletext Information
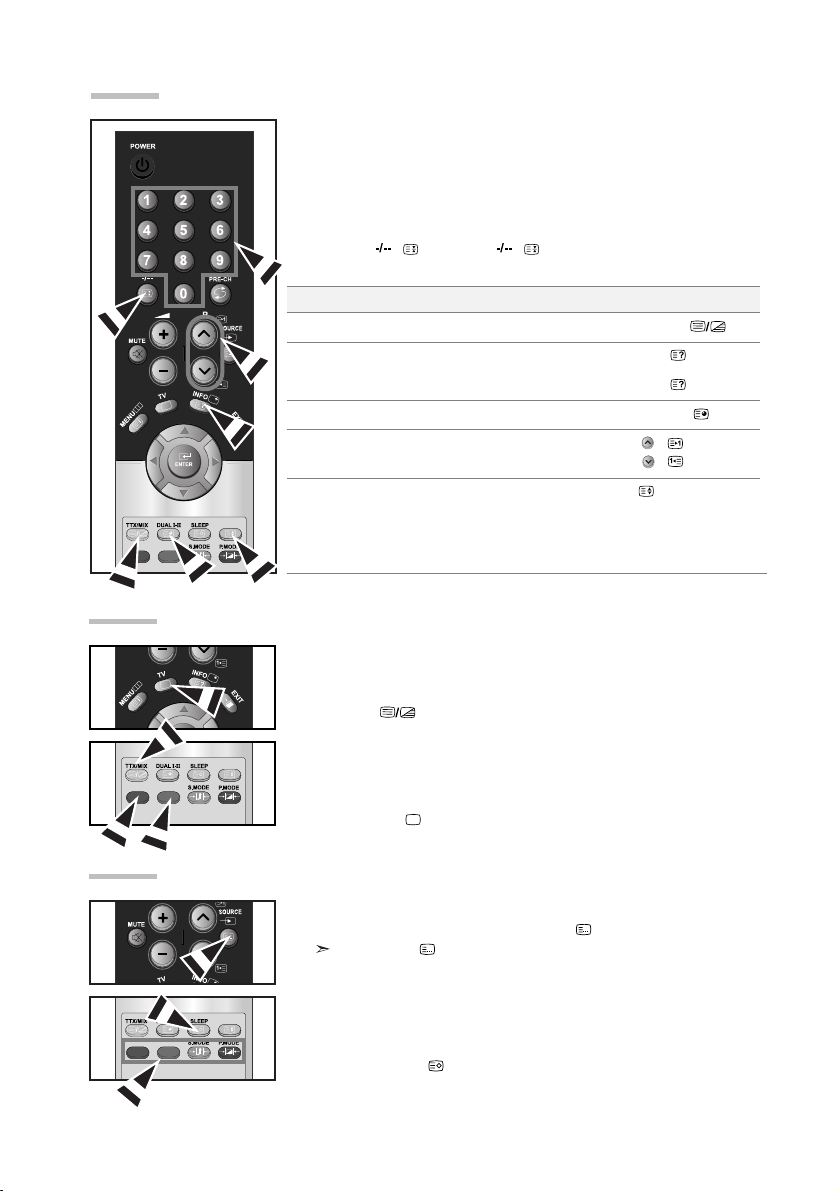
English-17
Press the number buttons on the remote control to enter the page
number directly:
1.
Enter the three-digit page number listed in the contents by pressing the
corresponding numeric buttons.
2.
If the selected page is linked with several secondary pages, the secondary
pages are displayed in sequence. To freeze the display on a given page,
press the
()
. Press the
()
button again to resume.
3. Using the various display options:
To d isplay...
Both teletext information and the normal broadcast
Hidden text (answers to quiz games, for example)
The normal screen
A secondary page, by entering its 4-digit number
The next page
The previous page
Double-size letters in the:
Upper half of the screen
Lower half of the screen
Normal screen
Press the...
TTX/MIX ( )
INFO ( )
INFO ( )
DUAL I-II ( )
P
()
P
()
()
Once
Twic e
Three times
Selecting a Specific Teletext Page
The various topics included in the teletext pages are colour-coded, and can
be selected by pressing the coloured buttons on the remote control.
1.
Display the teletext contents page by pressing the
TTX/MIX ()
button.
2. Press the coloured button corresponding to the topic that you wish to
select (The available topics are listed on the status information line).
3. Press the Red button to display the previous page.
Press the Green button to display the next page.
4. Press the TV () button again to exit from the Text display.
Using Fastext to Select a Teletext Page
You can store up to four teletext pages to display them later at leisure.
1. Select the LIST mode using the
SOURCE
()
button.
The
SOURCE
()
button is used to switch between the LIST and FLOF modes.
2. Press the coloured button corresponding to the page that will be replaced.
3. Enter the new page number using the numeric buttons.
4. Repeat steps 2 and 3 for each page to be stored, using a different
coloured button each time.
5. Press the SLEEP
()
button until the corresponding blocks blink.
Storing Teletext Pages
English-18
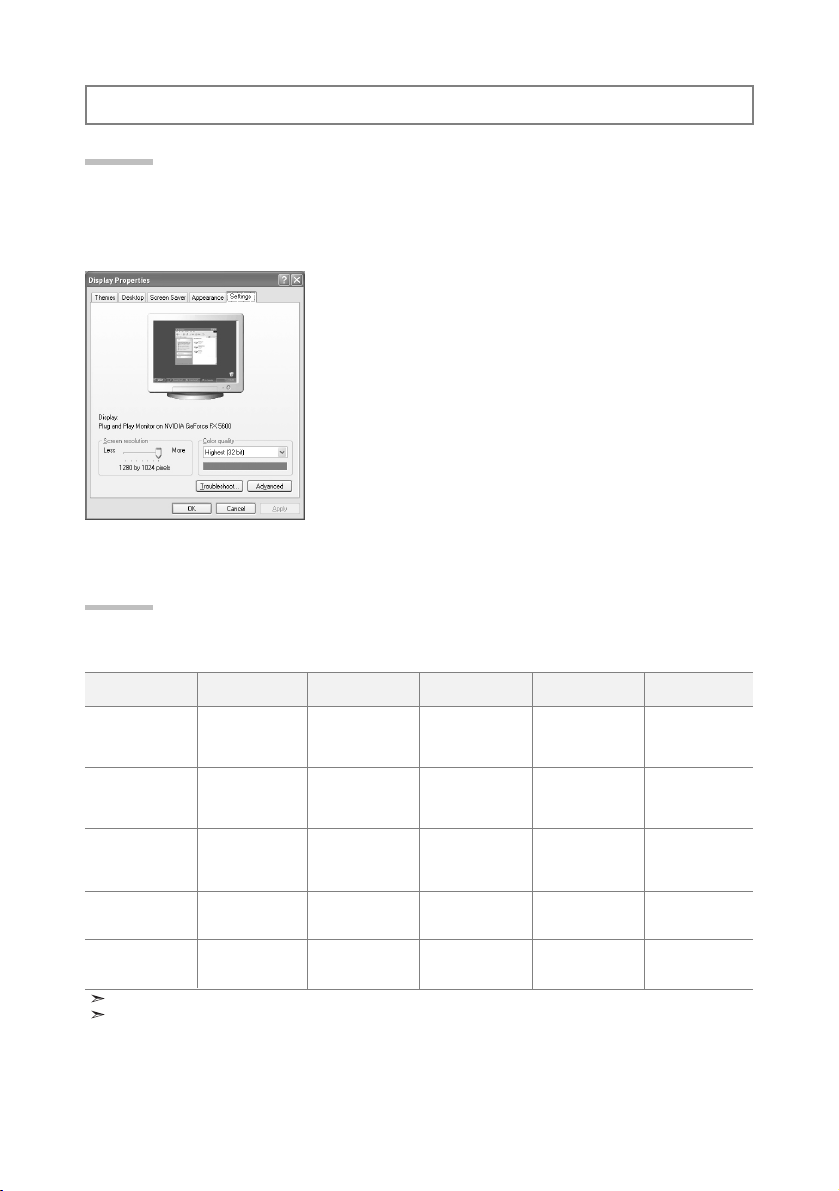
SETTING THE PC
The Windows display-settings for a typical computer are shown below. The actual screens on your PC
may be different depending upon your particular version of Windows and your particular video card.
Even if your actual screens look different, the same, basic set-up information will apply in almost all
cases. (If not, contact your computer manufacturer or Samsung Dealer.)
1. First, click on “Control Panel” on the Windows start menu.
2. When the control panel window appears, click on “Appearance and
Themes” and a display dialog-box will appear.
3. When the control panel window appears, click on “Display” and
a display dialog-box will appear.
4. Navigate to the “Settings” tab on the display dialog-box.
The correct size setting (resolution):
Optimum
LW15M2: 1024 X 768
LW17M2: 1280 X 1024
LW20M2: 800 X 600
If a vertical-frequency option exists on your display settings dialog
box, the correct value is “60” or “60 Hz”. Otherwise, just click “OK”
and exit the dialog box.
Setting up Your PC Software (Based on Windows XP)
The interlace mode is not supported.
The set might operate abnormally if a non-standard video format is selected.
Display Modes
Both screen position and size will vary depending on the type of PC monitor and its resolution.
The resolutions in the table are recommended. (All resolutions between the supported limits are supported)
Mode
VGA
LW15M2/
LW17M2/
LW20M2
VGA
LW15M2/
LW17M2/
LW20M2
SVGA
LW15M2/
LW17M2/
LW20M2
XGA
LW15M2/
LW17M2
SXGA
LW17M2
Resolution
720X400
640X480
640X480
800X600
800X600
1024X768
1024X768
1280X1024
1280X1024
Horizontal
Frequency (kHz)
31.469
31.469
37.500
46.875
37.879
48.363
60.023
63.981
79.976
Vertical
Frequency (Hz)
70.087
59.940
75.000
75.000
60.317
60.004
75.029
60.020
75.025
Pixel Clock
Frequency (MHz)
28.322
25.175
31.500
49.500
40.000
65.000
78.750
108.000
135.000
Sync Polarity
(H/V)
- / +
- / -
- / -
+ / +
+ / +
- / -
+ / +
+,- / -,+
+ / +
English-19
Setting the PC
Coarse and Fine Tuning of the Image (Image Lock):
The purpose of picture quality adjustment is to remove or reduce picture
noise. If the noise is not removed by Fine-tuning alone, then adjust the frequency as best as possible (coarse) and Fine-tune again. After the noise has
been reduced, re-adjust the picture so that it is aligned on the center of
screen.
1. Preset: Press the SOURCE button to select PC mode.
2. Press the MENU button to display the menu.
Press the
or button to select “Setup”,
then press the
ENTER button.
3. Press the or button to select “PC”, then
press the
ENTER button.
4. Press the ENTER button to select “Image Lock”.
5. Press the or button to select “Coarse” or “Fine”,
then press the
ENTER button.
6. Press the or button to adjust the screen quality.
Press the
ENTER button.
7. Press the EXIT button to exit.
Changing the Image Position (Position):
Adjust the PC’s screen positioning if it does not fit the TV screen.
1. Follow the “Coarse and Fine Tuning of the Image (Image Lock)”
instructions number 1 to 3.
2. Press the or button to select “Position”,
then press the
ENTER button.
3. Press the or button to adjusting the Vertical-Position.
Press the
or button to adjust the Horizontal-Position.
Press the
ENTER button.
4. Press the EXIT button to exit.
Initializing the Image Settings (Image Reset):
You can replace all image settings with the factory default values.
1. Follow the “Coarse and Fine Tuning of the Image (Image Lock)”
instructions number 1 to 3.
2. Press the or button to select “Image Reset”,
then press the
ENTER button.
3. Press the EXIT button to exit.
Adjusting the PC Screen Automatically (Auto Adjustment):
Auto adjustment allows the PC screen of set to self-adjust to the
incoming PC video signal. The values of fine, coarse and position are
adjusted automatically.
1. Follow the “Coarse and Fine Tuning of the Image (Image Lock)”
instructions number 1 to 3.
2. Press the or button to select “Auto Adjustment”,
then press the
ENTER button.
3. Press the EXIT button to exit.
English-20
Technical and Environmental Specifications
RECOMMENDATIONS FOR USE
No sound or picture
Normal picture but no sound
No picture or black and white picture
Sound and picture interference
Blurred or snowy picture,
distorted sound
Remote control malfunctions
“Check signal cable.”
message is displayed.
On PC mode, “Not Supported Mode.”
message is displayed.
The TFT LCD panel uses a panel consisting of sub pixels (LW15M2 - 2,359,296, LW17M2 - 3,932,160, LW20M2 - 1,440,000)
which require sophisticated technology to produce. However, there may be few bright or dark pixels on the screen. These pixels will
have no impact on the performance of the product.
Check that the mains lead has been connected to a wall socket.
Check that you have pressed the POWER buttons on the lower-right panel.
Check the picture contrast and brightness settings.
Check the volume.
Check the volume.
Check whether the MUTE button has been pressed on the remote control.
Adjust the colour settings.
Check that the broadcast system selected is correct.
Try to identify the electrical appliance that is affecting the set and move it further away.
Plug your set into a different mains socket.
Check the direction, location and connections of your aerial.
This interference is often due to the use of an indoor aerial.
Replace the remote control batteries.
Clean the upper edge of the remote control (transmission window).
Check the battery terminals.
Check that the signal cable is firmly connected to the PC or video sources.
Check that the PC or video sources are turned on.
Check the maximum resolution and the frequency of the video adaptor.
Compare these values with the data in the Display Modes.
Troubleshooting: Before Contacting Service Personnel
Model Name
Panel
Size
Display Size
Pixel Pitch
Frequency
Horizontal / Vertical
PC Resolution (Optimum)
Power Supply (Input)
Power Consumption
Normal / Power Saving
Dimension (WxDxH)
Body
With stand
Weight
With stand
Environmental
Considerations
Operating Temperature
Operating Humidity
Storage Temperature
Storage Humidity
LW15M2
15” Diagonal (4:3)
304.1 (H) x 228.1 (V) mm
0.297 (H) x 0.297 (V) mm
30 ~ 69 kHz / 50 ~ 75 Hz
1024 x 768 @ 60 Hz
AC 100 ~ 240 V, 60/50 Hz ± 3 Hz
40 W / < 3 W
360.2 x 64.2 x 338.6 mm
360.2 x 192.9 x 396.5 mm
3.6 kg (7.94 lbs)
10 °C to 40 °C (50 °F to 104 °F)
10 % to 80 %, non-condensing
-20 °C to 45 °C (-4 °F to 113 °F)
5 % to 95 %, non-condensing
LW17M2
17” Diagonal (4:3)
337.9 (H) x 270.3 (V) mm
0.264 (H) x 0.264 (V) mm
30 ~ 80 kHz / 50 ~ 75 Hz
1280 x 1024 @ 60 Hz
AC 100 ~ 240 V, 60/50 Hz ± 3 Hz
45 W / < 3 W
416.7x 71.8 x 392.9 mm
416.7 x 192.9 x 423.8 mm
4.95 kg (10.91 lbs)
10 °C to 40 °C (50 °F to 104 °F)
10 % to 80 %, non-condensing
-20 °C to 45 °C (-4 °F to 113 °F)
5 % to 95 %, non-condensing
LW20M2
20” Diagonal (4:3)
408.0 (H) x 306.0 (V) mm
0.51 (H) x 0.51 (V) mm
28 ~ 47 kHz / 50 ~ 75 Hz
800 x 600 @ 60 Hz
AC 100 ~ 240 V, 60/50 Hz ± 3 Hz
55 W / < 3 W
479.0 x 74.7 x 436.4 mm
479.0 x 226.0 x 463.0 mm
7.45 kg (16.42 lbs)
10 °C to 40 °C (50 °F to 104 °F)
10 % to 80 %, non-condensing
-20 °C to 45 °C (-4 °F to 113 °F)
5 % to 95 %, non-condensing
Français-1
Français
Table des matières
CONNEXION ET PREPARATION DE VOTRE TELEVISEUR
Liste de pièces.......................................................... 2
Réglage du socle...................................................... 2
Réglage de l'angle du téléviseur .......................... 2
Installation du kit de montage mural ........................ 3
Installation de dispositifs de montage
conformes VESA ...................................................... 3
Présentation du panneau de commande ................ 3
Présentation du panneau de branchement .............. 4
Présentation de la télécommande............................ 5
Installation des piles dans la télécommande............ 6
Mise en marche et arrêt .......................................... 6
Mode de mise en veille de votre télévision .............. 6
Plug & Play .............................................................. 6
REGLAGE DES CANAUX
Mémorisation automatique des chaînes .................. 7
Mémorisation manuelle des chaînes........................ 8
Édition des chaînes .................................................. 9
Organisation des canaux mémorisés ...................... 9
Attribution de noms aux canaux .............................. 10
Réception nette des chaînes grâce au réglage fin .. 10
REGLAGE DE L'IMAGE
Changement du mode image ..................................11
Réglage de l'image personnalisée .......................... 11
Changement de la nuance couleur ..........................12
REGLAGE DU SON
Changement de la norme Son ............................12
Réglage automatique du volume..........................12
REGLAGE DE L'HEURE
Réglage et affichage de l'heure............................13
Réglage de la minuterie de mise en veille ..........13
Marche et arrêt automatique du téléviseur ..........14
REGLAGE DES AUTRES OPTIONS
Choix de la langue................................................14
Réglage du mode d’écran bleu ............................15
Sélection de la source ..........................................15
Modification du nom d'une source d'entrée..........15
UTILISATION DE LA FONCTION TELETEXTE
Décodeur télétexte ..............................................16
Affichage des informations Télétexte ..................16
Sélection d’une page télétexte spécifique............ 17
Utilisation du système
Fastext pour sélectionner une page télétexte ...... 17
Mémorisation de pages télétexte ........................17
REGLAGE DU PC
Paramétrage du logiciel PC
(Basé sur Windows XP) ......................................18
Modes d’affichage ................................................18
Sélection du PC....................................................19
RECOMMANDATIONS D’UTILISATION
Résolution des problèmes avant de contacter
le personnel qualifié pour le dépannage .............. 20
Spécifications techniques et
environnementales ..............................................20
Symboles Appuyer Important Remarque
Bouton
d'accès rapide
Français-2
CONNEXION ET PREPARATION DE VOTRE TELEVISEUR
Liste de pièces
Veuillez vous assurer que les composants suivants sont bien inclus avec votre téléviseur LCD.
Le cas échéant, contactez votre revendeur.
Télécommande et
batteries (AAA x 2)
Cordon d'alimentation Kit de fixation murale Instructions d'utilisation
Carte de garantie Carte réseau de service Guide de sécurité Cartes d'enregistrement
Réglage du socle
(1)
(2)
1.
Placez la partie avant du téléviseur sur une
table, en posant l'écran sur un chiffon doux
ou un coussin, comme illustré à la figure (1).
- Alignez le bas du téléviseur le long du
bord de la table.
2.
Appuyez sur l'arrière du téléviseur, au centre.
Réglez le socle comme illustré à la figure (2)
tout en appuyant sur le bouton “Pousser” à
l'arrière du socle.
3. Placez le téléviseur sur la table, de
manière stable.
Lorsque vous réglez le socle, appuyez sur le
bouton “Pousser” situé à l'arrière.
Réglage de l'angle du téléviseur
1. La figure (1) illustre l'angle de réglage (0°~13°) lorsque vous utilisez le téléviseur LCD sur son socle.
Un angle trop important peut faire basculer le téléviseur LCD et l'endommager.
2. La figure (2) illustre l'angle de réglage (13°~80°) lorsque vous faites passer le téléviseur LCD du socle au
montage mural.
3. La figure (3) illustre l'angle de réglage (0°~10°) lorsque vous utilisez le téléviseur LCD en montage mural.
Vous entendrez un "clic" lors du passage de l'angle de 1 à 2 ou de 3 à 2.
(1) Réglage de l'angle lors de l'utilisation
du téléviseur sur son socle.
(2) Réglage de l'angle lors du passage du
socle au montage mural (1 3, 3 1)
(3) Réglage de l'angle lors du montage
mural du téléviseur LCD
Lorsque vous réglez le socle, appuyez sur le bouton “Pousser” situé à l'arrière.
Bouton Pousser
17”
15”, 20”
20”15”, 17”
Français-3
Présentation du panneau de commande
POWER
Appuyez sur ce bouton pour allumer ou éteindre le
téléviseur.
Pour changer de canal. Dans le menu à l'écran, utilisez les
boutons de la même manière que les boutons
et de la télécommande. (Vous pouvez allumer votre
téléviseur sans votre télécommande à l'aide de ces boutons.)
Appuyez pour diminuer ou augmenter le volume. Dans le menu
à l'écran, utilisez les boutons de la même manière
que les boutons et de la télécommande.
MENU
Appuyez sur ce bouton pour afficher le menu des fonctions
de votre téléviseur.
SOURCE
Bascule entre toutes les sources d'entrée disponibles.
(TV - Ext. - AV - S-Vidéo - PC). Dans le menu à l'écran,
utilisez ce bouton de la même manière que le
bouton ENTER de la télécommande.
(PRISE CASQUE)
Connectez un casque externe à cette prise pour
une écoute privée.
Voyant d'alimentation
Clignote puis s'arrête lorsque le téléviseur est allumé.
S'allume en mode Veille.
Capteur de la télécommande
Dirigez la télécommande vers ce point du téléviseur.
Enceintes
La couleur et la forme du produit peuvent varier en fonction du modèle.
Les accessoires de montage mural (vendus séparément) vous permettent de fixer votre téléviseur au mur.
Pour plus d'informations sur l'installation du kit de montage mural, reportez-vous aux instructions fournies
avec les composants du kit. Faites appel à un technicien pour obtenir de l'assistance lors de l'installation du
support mural. Samsung Electronics n'est pas responsable de tout dommage au produit ou toute blessure
sur vous-même ou une autre personne si vous choisissez d'installer le téléviseur vous-même.
Installation du kit de montage mural
Installation de dispositifs de montage conformes VESA
(2) (3)
Lorsque vous réglez le socle, appuyez sur le bouton “Pousser” situé à l'arrière.
1. Placez le téléviseur sur la table, écran vers le bas, sur un chiffon doux ou un coussin.
2. Réglez le socle en appuyant sur le bouton “Pousser” situé à l'arrière.
3. Alignez le patin de montage (non fourni) sur les trous situés au bas du socle et fixez le patin à l'aide des
quatre vis fournies avec la base de type bras articulé, le support mural ou autre (non fournis).
LW15M2/LW17M2
LW20M2
Plaque de fixation
(vendus séparément)
Bouton Pousser

Français-4
Présentation du panneau de branchement
Entrée del’alimentation
Lorsque vous raccordez un appareil externe au téléviseur, assurez-vous que l'appareil est arrêté.
Lorsque vous connectez un périphérique externe, faites correspondre les couleurs du terminal de connexion et du câble.
La couleur et la forme du produit peuvent varier en fonction du modèle.
Français-5
Branchement à un réseau de télévision câblé ou hertzien (en fonction du modèle)
Afin d’afficher correctement les canaux de télévision, un signal doit être reçu par le téléviseur/moniteur depuis l’une des sources suivantes :
-Une antenne extérieure / Un réseau de télévision câblée / Un réseau satellite
Branchement de périphériques audio/vidéo externes
-
Connectez le câble RCA (en option) ou S-VIDEO (en option) à un périphérique A/V externe approprié tel qu'un magnétoscope,
un lecteur DVD ou un caméscope.
- Connectez les câbles audio RCA (en option) au connecteur “L - AUDIO – R” situé à l'arrière de votre poste et aux connecteurs
de sortie audio correspondants sur le périphérique A/V.
Branchement d'un boîtier décodeur, d'un magnétoscope ou d'un lecteur DVD
-Connectez le câble SCART (en option) du magnétoscope ou du lecteur DVD au connecteur SCART de ces appareils.
-Si vous souhaitez brancher en même temps le boîtier décodeur et le magnétoscope (ou lecteur DVD), branchez ces
appareils ensemble puis connectez le magnétoscope (ou le lecteur DVD) à votre poste.
Branchement Ordinateur
-
Connectez le câble D-Sub (en option) au connecteur “PC IN” situé à l'arrière de votre poste et à la carte vidéo de votre ordinateur.
-Connectez le câble audio stéréo (en option) au connecteur “PC AUDIO IN” situé à l'arrière de votre poste et au connecteur
“Audio Out” de la carte son de votre ordinateur.
Verrou Kensington
- Le verrou Kensington (en option) est un dispositif utilisé pour fixer physiquement le système dans le cas d'une utilisation
dans un endroit public.
-Pour utiliser un dispositif de verrouillage, contactez le revendeur de votre téléviseur.
- L'emplacement du verrou Kensington peut varier en fonction du modèle.
Bouton veille du téléviseur
Boutons numériques d’accès direct
aux chaînes
Sélection de canaux à 1 ou 2 chiffres
: Augmenter le volume
: Réduire le volume
Arrêt temporaire du son
Permet d'accéder directement au mode TV
Affiche le menu principal à l'écran
Sélection des effets sonores
Canal précédent
P: Chaîne suivante
P: Chaîne précédente
Sélection de la source d'entrée
Afficher les informations relatives au
programme en cours
Permet de quitter le menu à l'écran
Déplacement du curseur dans le menu
Arrêt automatique
Sélection des effets visuels
Sélection du mode audio
Fonctions télétexte
Pause Télétexte
Sortir du Télétexte
Index Télétexte
Page secondaire Télétexte
Affichage Télétexte / Afficher à la
fois informations Télétexte et le
programme normal
Sélection de sujets Fastext
P: Page Télétexte suivante
P: Page Télétexte précédente
Sélection du mode Télétexte
(LIST/FLOF)
Affichage du Télétexte
Mémorisation Télétexte
Sélection de la taille du Télétexte
Une lumière intense peut affecter le bon fonctionnement de la télécommande.
Pour plus d'informations, reportez-vous aux instructions supplémentaires.
Présentation de la télécommande

Le câble relié au secteur est fixé à l'arrière du téléviseur/moniteur.
1. Relier le câble principal à la prise appropriée.
Le voyant de veille s'allume sur le panneau inférieur droit.
2. Appuyez sur le bouton POWER situé en bas à droite de votre unité.
Le dernier programme que vous avez regardé est automatiquement re-sélectionné.
3. Appuyez sur les boutons numériques (0~9) ou sur les boutons de chaîne ( / ) de la télécommande, ou
sur le bouton situé sur le panneau inférieur droit du téléviseur.
Lorsque vous allumez le téléviseur pour la première fois, vous devrez choisir la langue dans laquelle vous souhaitez que les menus s'affichent.
4. Pour éteindre votre téléviseur, appuyez de nouveau sur le bouton POWER .
Ce mode permet de réduire la consommation électrique. Le mode veille peut être utile lorsque vous
souhaitez éteindre temporairement (pendant un repas par exemple).
1. Appuyez sur le bouton POWER de la télécommande.
L'écran est éteint et le voyant de veille apparaît sur le panneau inférieur droit.
2. Pour mettre votre téléviseur sous tension, appuyez simplement sur le bouton POWER , les boutons
numériques (0~9) ou le bouton channel up/down ( / ).
Ne laissez pas le téléviseur/moniteur en mode attente pendant de longues périodes (lorsque vous êtes en vacances
par exemple). Il est conseillé de débrancher le téléviseur du secteur et de l'antenne.
Mise en marche et arrêt
Mode de mise en veille de votre télévision
Lorsque le téléviseur est allumé pour la première fois, plusieurs réglages de
base sont à faire l'un après l'autre. Ils vous sont automatiquement présentés.
Les réglages suivants sont disponibles.
1. Appuyez sur le bouton POWER de la télécommande.
Le message “Start Plug & Play” s'affiche lorsque “OK” est sélectionné.
2. Sélectionnez la langue appropriée à l'aide de la touche ou .
Appuyez sur le bouton ENTER pour confirmer votre choix.
3. Le message “Vérifier I'entrée de I'antenne.”, la touche “OK” est alors
sélectionnée. Appuyez sur le bouton ENTER .
Vérifiez que le câble de l'antenne est correctement branché.
Plug & Play
Français-6
1. Faites coulisser le couvercle complètement.
2. Placez deux piles AAA.
Assurez-vous de faire correspon dre les pôles “+” et “-” des piles avec le schéma situé à l'intérieur du compartiment.
3. Replacez le couvercle.
Retirez les piles et stockez-les dans un endroit frais et sec si vous n'utilisez pas la télécommande pendant
longtemps. La télécommande peut être util isée jusqu'à environ 7 mètres de la télévision.
(Pour une utilisation type de la télévision, les piles durent environ un an.)
Si la télécommande ne fonctionne pas, vérifiez ce qui suit :
1. La télévision est-elle allumée?
2. Les pôles (+ / -) des piles sont-ils inversés?
3. Les piles sont-elles usagées?
4. Y a-t-il une coupure d'alimentation ou le cordon d'alimentation est-il débranché ?
5. Y a-t-il une lampe fluorescente ou un néon à proximité?
Installation des piles dans la télécommande
Français-7
Langue : Sélectionnez votre langue.
Pays : Sélectionnez votre pays.
Mémorisation Auto : Recherche et mémorise automatiquement les chaînes disponibles dans la zone locale.
Régl. horl. : Règle l'heure de l'horloge du téléviseur selon l'heure actuelle.
Pour réinitialiser cette fonction…
1. Appuyez sur le bouton MENU pour afficher le menu.
Appuyez sur la touche
ou
pour sélectionner “Configuration”, puis sur la touche
ENTER .
2. Appuyez sur la touche ou pour sélectionner “Plug & Play”,
puis sur la touche ENTER .
3. Les paramètres sont modifiés ou réinitialisés.
4. Sélectionnez la pays appropriée à l'aide de la touche ou .
Appuyez sur le bouton ENTER pour confirmer votre choix.
5. Le menu “Mémorisation Auto” s'affiche. La commande “Démarrer” est
sélectionnée. Appuyez sur le bouton ENTER .
La recherche des chaînes débute et s'arrête automatiquement.
Lorsque toutes les chaînes disponibles ont été enregistrées, le menu “Régl. horl.” s'affiche.
Appuyez sur le bouton ENTER à tout moment pour interrompre le processus de mémorisation.
6. Appuyez sur le bouton ENTER .
Sélectionnez l' “Heure” ou les “Minute” à l'aide de la touche
ou
.
Validez l' “Heure” ou les “Minute” à l'aide de la touche
ou
.
Vous pouvez également régler les heures et les minutes en appuyant sur les
touches numériques de la télécommande.
7. Appuyez sur le bouton ENTER pour confirmer votre choix.
REGLAGE DES CANAUX
Vous pouvez chercher les plages de fréquences disponibles par balayage
(leur disponibilité dépend de votre pays). Il est possible que les numéros
de programmes alloués automatiquement ne correspondent pas aux
numéros de programmes souhaités ou actuels. Vous pouvez toutefois
organiser les numéros manuellement et effacer les chaînes que vous ne
souhaitez pas regarder.
1. Appuyez sur le bouton MENU pour afficher le menu.
Appuyez sur le bouton ou pour sélectionner “Canal”, puis sur la
touche ENTER .
2. Appuyez sur le bouton ENTER pour sélectionner “Pays”.
3. Sélectionnez la pays appropriée à l'aide de la touche ou .
Appuyez sur le bouton ENTER pour confirmer votre choix.
4. Appuyez sur le bouton ou pour sélectionner “Mémorisation Auto”,
puis sur la touche ENTER .
5. Appuyez sur le bouton ENTER .
Le téléviseur commence la mémorisation de toutes les chaînes disponibles.
Appuyez sur le bouton ENTER à tout moment pour interrompre le processus de
mémorisation et retourner au menu “Canal”.
6. Lorsque toutes les chaînes disponibles ont été enregistrées, le menu
“Tri des canaux” s'affiche.
Mémorisation automatique des chaînes
Français-8
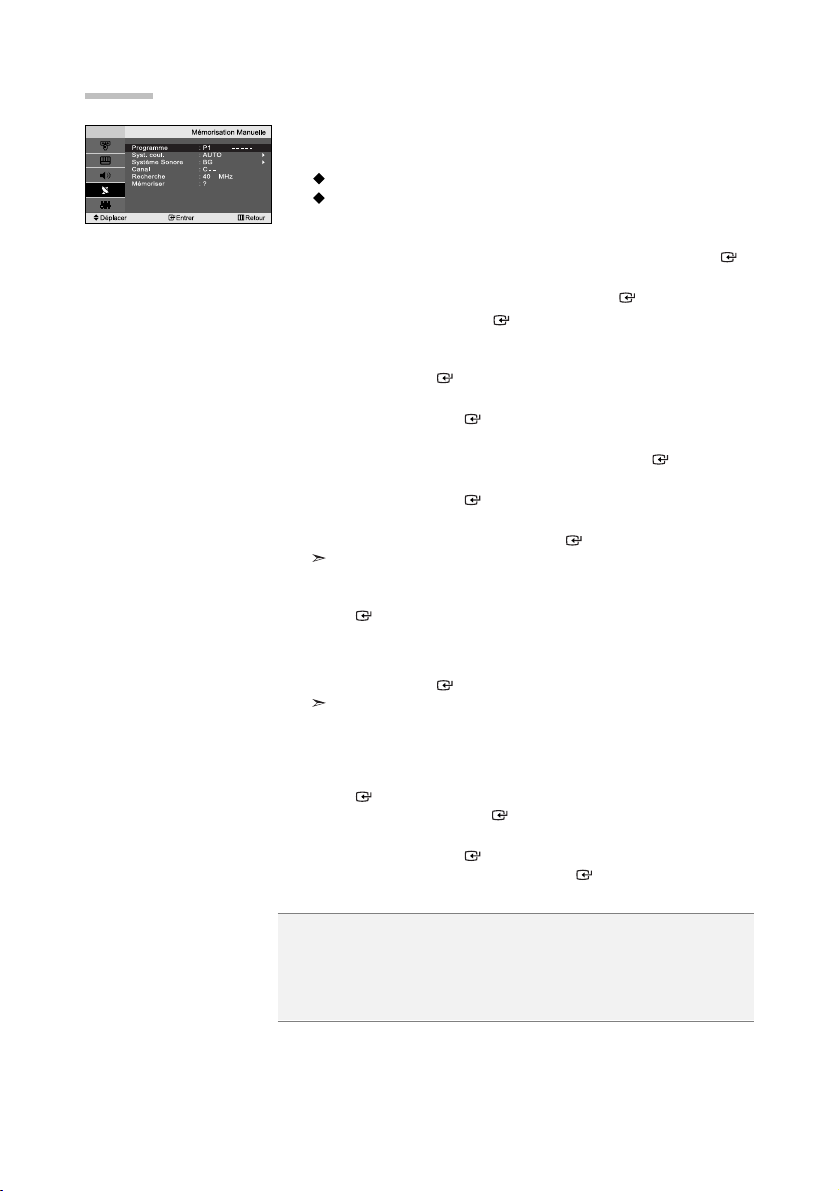
Vous pouvez mémoriser jusqu’à 100 chaînes, y compris celles reçus via
les réseaux câblés.
Lors de la mémorisation manuelle des chaînes, vous pouvez choisir :
De mémoriser ou non chaque chaîne trouvée.
Le numéro du programme qui vous servira à identifierchaque
chaîne mémorisée.
1. Appuyez sur le bouton MENU pour afficher le menu. Appuyez sur le
bouton ou pour sélectionner “Canal”, puis sur la touche ENTER .
2. Appuyez sur le bouton ou pour sélectionner
“Mémorisation Manuelle”, puis sur la touche ENTER .
3. Appuyez sur le bouton ENTER pour sélectionner “Programme”.
4. Pour attribuer un numéro de programme à un canal, vous pouvez trouver
le chiffre correspondant en appuyant sur le bouton ou puis appuyez
sur le bouton ENTER .
5. Appuyez sur le bouton ou pour sélectionner “Syst. coul.”,
puis sur la touche ENTER .
6. Sélectionnez les couleurs normalisées voulues en appuyant de façon
répétée sur la touche ou , puis sur la touche ENTER .
7. Appuyez sur le bouton ou pour sélectionner “Système Sonore”,
puis sur la touche ENTER .
8. Sélectionnez la norme audio voulue en appuyant de façon répétée sur la
touche ou , puis sur la touche ENTER .
S'il n'y a aucun son ou si le son est anormal, re-sélectionnez la norme Son requise.
9. Si vous connaissez le numéro de la chaîne à enregistrer, appuyez sur le
bouton ou pour sélectionner “Canal”. Appuyez sur le bouton
ENTER . Sélectionnez C (Chaîne par voie hertzienne) ou
S (Chaîne câblée) en appuyant sur le bouton ou .
Appuyez sur la touche pour sélectionner la chaîne. Sélectionnez le
numéro de votre choix en appuyant sur le bouton ou puis appuyez
sur le bouton ENTER .
Channel mode : P (Mode Programme),
C (Mode chaîne par voie hertzienne),
S (Mode chaîne câblée)
10. Si vous ne connaissez pas les numéros des chaînes, appuyez sur le
bouton ou pour sélectionner “Recherche”. Appuyez sur le bouton
ENTER . Effectuez la recherche à l'aide des boutons ou , puis
appuyez sur le bouton ENTER .
11. Appuyez sur le bouton ou pour sélectionner “Mémoriser”,
puis sur la touche ENTER . Appuyez sur le bouton ou pour
sélectionner “OK”, puis sur la touche ENTER .
12. Répétez les étapes 3 à 11 pour chaque canal à mémoriser.
Programme : Sélectionne un numéro de programme pour la chaîne.
Syst. coul. : Définit la norme de couleur.
Système Sonore : Définit la norme audio.
Canal : Sélectionne une chaîne.
Recherche : Recherche la valeur de fréquence de la chaîne.
Mémoriser : Enregistre vos réglages.
Mémorisation manuelle des chaînes
Loading...