


OWNER’S MANUAL
ARP-1000ES PORTABLE AIR CONDITIONER
ARP1000ES
PORTABLE AIR CONDITIONER ACONDICIONADOR DE AIRE PORTÁTIL
Read and retain these instructions for future reference
For any Customer Support needs, please choose the Support tab on www.royalsovereign.com
Royal Centurian Inc.

PORTABLE AIR CONDITIONER
Model ARP-1000ES
INTRODUCTION
Thank you for choosing this air conditioner to provide you and your family with all of the "Home Comfort" requirements for your home, apartment, or office. This appliance can be moved from room to room and set-up in just minutes.
It is multi-functional room air conditioner that offers you Conditioning, Dehumidify, and Independent Fan modes.
This manual will provide you with valuable information necessary for the proper care and maintenance for your new appliance. Please take a few moments and read the instructions thoroughly. If properly maintained, your appliance will give your many years of trouble free operation.
Electrical Specifications
1.All wiring must comply with local and national electrical codes and be installed by a qualified electrician. If you have any questions regarding the following instructions, contact a qualified electrician.
2.Check available power supply and resolve any wiring problems before installation and operation of this unit.
3.For your safety and protection, this unit is grounded through the power cord plug when plugged into a matching wall outlet. If you are not sure whether the wall outlets in your home are properly grounded, please consult an electrician. Do not use plug adapters or extension cords with this unit.
ARP-1000ES
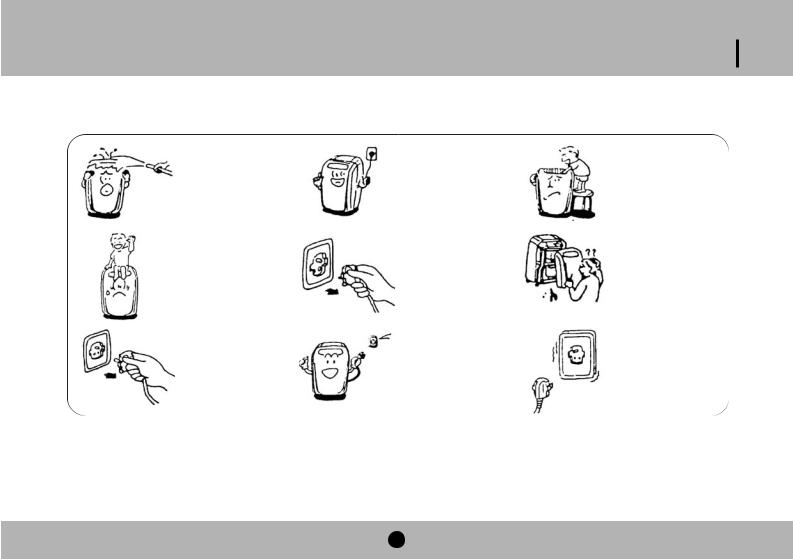
WARNING - Make sure rubber plug is installed in drain port on bottom of the machine.
Improper handling can cause serious damage to the appliance. Read this manual carefully before operating the unit.
Do not wet the |
Do not cover the |
Do not allow |
housing or control |
air outlet while in |
children to play |
panel. |
use. |
with the controls or |
|
|
drop any objects |
|
|
into the outlet. |
Do not place |
Always turn the |
Do not attempt to |
objects or let any |
unit off and remove |
remove any part of |
person sit on top of |
the power plug |
the casing unless |
the unit. |
from the socket |
by an authorized |
|
when cleaning. |
technician. |
Remove the plug |
Use only the |
Do not operate the |
from the socket if |
correct power |
unit with damaged |
the unit is not |
supply AC |
plug or loose |
being used for long |
115V/60Hz. |
socket point. |
period. |
|
|
Make sure that the back of the unit is at least 4" or more from a wall. Do not place the unit in front of curtains or drapes.
WARNING
-If the power cord on this unit is damaged, it must be replaced by the manufacturer service agent or qualified electrician.
-This appliance is not intended for use by children.
3
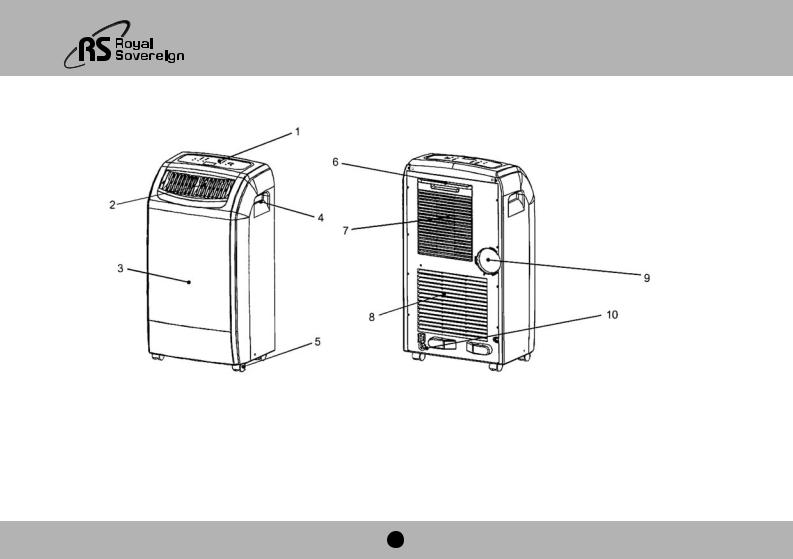
DESCRIPTION OF COMPONENTS
|
|
|
|
1. |
Control panel |
6. |
Screen filter |
2. |
Air outlet (Up-Down and Left-Right) |
7. |
Air intake (Evaporator) |
3. |
Front panel |
8. |
Air intake (Condenser) |
4. |
Handle hole |
9. |
Air outlet (Heat exchange) |
5. |
Casters |
10. Water drain with rubber plug |
|
4

ARP-1000ES
INSTALLATION INSTRUCTIONS
Connect exhaust hose assembly to the back of the unit. Extend hose to desired length and locate the exhaust nozzle through a window or
wall for ventilation.
DO NOT add additional hose length. This will diminish the efficiency of the unit. Window spacer only comes in one size. Good for double
hung or slider window only.
Exhaust nozzle connection
EXHAUST ASSEMBLY AND INSTALLATION
Exhaust nozzle |
Exhaust nozzle connector |
Exhaust hose Exhaust |
Insert exhaust nozzle from rear.
Attach screws from front.
1.Insert ends of exhaust hose into exhaust nozzle connector and exhaust until it stops.
2.Attach the exhaust hose connector onto the rear outlet of the unit and turn
3.Attach the exhaust nozzle to the window spacer with the 4 screws provided
4.Connect the exhaust nozzle connector to the exhaust nozzle.
5. |
Extend the exhaust hose and close the window as far as possible trapping |
. |
6. |
Install rubber plug as shown below. |
|
rubber plug
5
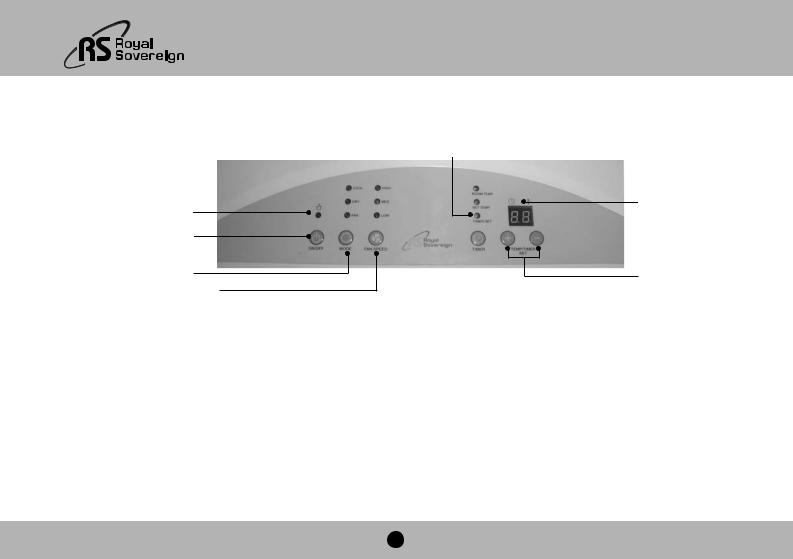
OPERATION
When running unit for the first time, make sure the LCD light on the GFI plug is green. If not press and the reset button on the plug.
Timer On / Off
Control panel
Warning Light
Power Control
Mode Control
Fan Speed Control
POWER CONTROL
The power control turns the unit on and off.
WARNING CONTROL
Display
Timer / Temp
Set Control
Condensed water may accumulate in the unit. If the internal tank becomes full, the Warning Light will shine and the unit will not operate until the unit has been drained.
FAN MODE
When fan mode is selected the indicator light will shine yellow. Air is circulated throughout the room with no cooling.
NOTE: Unit does not need to be vented in fan mode.
MODE CONTROL
The Mode Control has three settings:
Cool Dehumidify Fan
The settings are adjusted with the Mode Control button. A light will indicate which setting is currently being used.
FAN SPEED CONTROL
The Fan Speed Control has 3 setting: High, Medium, and Low.
6

ARP1000ES
DEHUMIDIFY MODE
When dehumidify mode is selected, the indicator light will shine orange. Air is dehumidified as it passes through the unit, without being in full cooling mode. The fan will operate in low or medium speed. Fan speed is not adjustable in dehumidify mode.
NOTE: The air exchange hose must vent outside the room thru a window as usual.
COOLING MODE
When cool mode is selected, the indicator light will shine green. During the cooling mode the air is cooled and hot air is exhausted to the outside air through the exhaust hose.
NOTE: The air exchange hoses must vent outside the room when using cooling mode.
TIMER / TEMP SET CONTROLS
Used for adjusting the timer and thermostat.
The default display is room temperature.
In cooling mode, when "+" or "-" button is pressed, the set temperature is displayed and may be adjusted. After 15 seconds the display will revert back to room temperature. Temperature is only adjustable in cool mode. The time is adjustable between 1~12 hours.
NOTE: By pressing both Timer / Temp set buttons at the same time, the display will toggle between Celsius and Fahrenheit.
TIMER
Auto turn off:
With machine in fan mode, press timer button to select number of hours you would like the unit to run in air conditioning mode until it automatically shuts off.
Auto turn on:
With machine powered off, press timer button to select number of hours until you would like the unit to automatically start running in air conditioning mode.
After switching the air conditioner off, you must wait 3 minutes before switching it back on again.
7
OPERATION
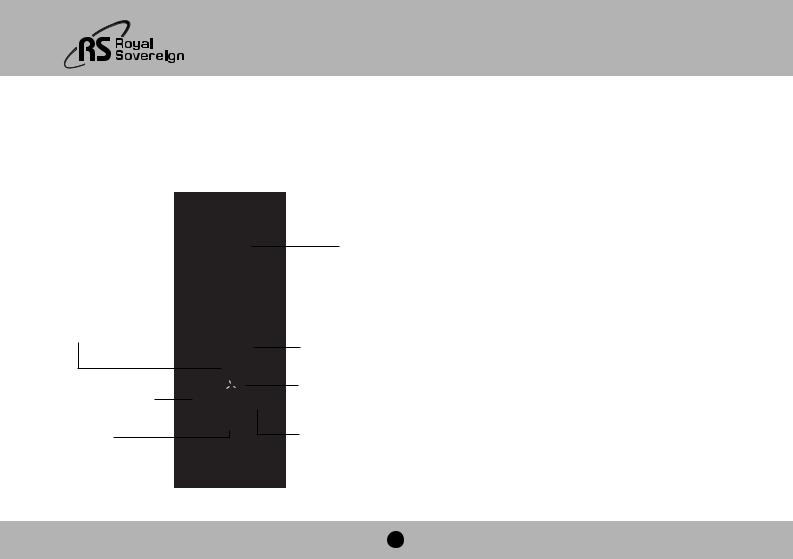
Air Conditioner Remote Control
The functions work the same as your air conditioner's touch controls.
LCD Screen
Timer and thermostat
Setting Buttons
|
Power ON / OFF Button |
|
Mode Button |
A/C Fan Speed Button |
(Select A/C, Fan or Dehumidify) |
|
|
(High, Medium or Low) |
|
Fahrenheit / |
Timer ON/OFF Button |
Celsius Selector |
|
TIMER PROGRAMMING
1.Press the  button on the remote or the "Timer Setting" button on the control panel to turn on the Timer Function.
2.Press the  or
or buttons on the remote or the + or - buttons on the control panel to set the desired shut-off period.
3.The unit will shut off when the set time elapses.
DEHUMIDIFICATION OPERATION
Press the  button on the remote or the "MODE" button on the control panel to select the dehumidify mode. When the dehumidify mode is on, the temperature buttons and the fan speed buttons do not function and the fan will operate on low or medium speed. The dehumidify indicator light will illuminate and stay solid while the unit is dehumidifying. When the humidity in the room is 50% or lower, the compressor will not run, the unit will not dehumidify, and the dehumidify light will blink. Remember, the exhaust hose does not need to be used in dehumidify mode.
8
 Loading...