


0102 095 50931
683(5 6,;7((1 19
USERS INSTRUCTIONS
THIS CAT I2H APPLIANCE IS FOR USE ON NATURAL GAS G20 AT A SUPPLY PRESSURE OF 20 mbar IN GB & IE
HAND THESE INSTRUCTIONS TO THE USER
Description
The Super Sixteen NG inset is a decorative gas fire designed to fit a traditional fire surround and fireplace, with a chimney that conforms to a conventional Class I flue. i.e. Brick built of 227 x227mm (9 x 9ins) or 175mm (7ins) diameter lined or stone chimney with the fireback and fireplace components complying with BS 1251.
This appliance is intended for decorative purposes, the fuel bed have a realistic coal effect utilizing ‘ceramic coals’ and coal bed that allows secondary air to be entrained into the bed for clean combustion. The burner is an aerated twin ported steel burner producing two parallel ribbons of flame, which run across the front of the firebed. The rear ribbon of flame is ignited first and the front ribbon cross lights from it instantaneously. A single gas control selects ignition (pilot only) and can be turned anti-clockwise to select a high rate and then reduced input at the maximum rotation. For extra safety the tap is designed so that gas cannot be allowed to reach the burner before the pilot is proven. A separate push button piezo igniter is used to ignite an oxy-pilot device that will cause the appliance to ‘shut-off’ and prevent continued spillage occurring under hazardous flue conditions.
A Flame Supervision Device is fitted; this ensures that if the pilot goes out for any reason (including turning off) that then the gas flow to the burner is cut off until the full lighting sequence is repeated.
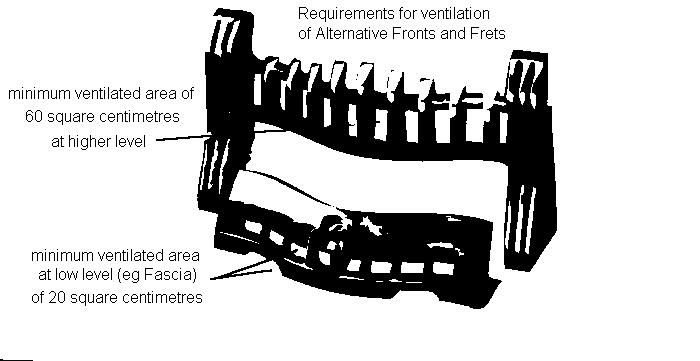
Two types of fire fronts are recommended as shown on page 7, these have perforated frets to allow air to be drawn into the coal bed for combustion and over the controls for cooling purposes. If other types of fire fronts are to be used they must have a minimum open area in the fret of 20 square centimeters and 60 square centimeters in the front.
A decorative brass trim is available as an optional extra to locate on the inner edges of the fireplace/surround opening, the trim has 50mm deep flanges to assist with fixing the trim in position.
Important Notes
The Flicker Flame 16” is a decorative fuel effect appliance designed and manufactured to the requirements of the British Standards Institution BS 5258 Part 12: 1990 and EN 509, it is for use on Natural Gas Only.
All gas appliance installations must be carried out by a competent person in accordance with the Gas Safety (Installation & Use) Regulations 1994 (as amended) or the rules in force and in accordance with the manufacturers instructions, failure to do so could lead to prosecution.
The chimney or flue (unless new) must be swept before installation. It should be checked annually for spillage (smoke test) and that there is no excessive build up of soot when the appliance is serviced.
Additional permanent ventilation is not required for this appliance in GB only, for Ireland (IE) ventilation is required with a minimum cross sectional area of 100 square centimeters and should be checked periodically to ensure freedom from obstruction.
This product uses fuel effect pieces, gaskets and insulation material containing Refractory Ceramic Fibre (RCF), which are man-made vitreous silicate fibres. Excessive exposure to these materials may cause temporary irritation to eyes, skin and respiratory tract, consequently, it makes sense to take care when handling these articles to ensure that the release of dust is kept to a minimum.
The appliance has a naked flame, a fireguard to British standard BS 6539 or BS 6778 should be used for the protection of young children, the elderly and the infirm. Combustible materials should not be put or left in the hearth, nor should the coal bed be used to burn rubbish or other materials.
Care must be taken on the selection of wall coverings within the close proximity of the fire as some vinyls and embossed materials may become discoloured by convected heat. Soft furnishings must be kept clear from the radiant heat of the fire and from impinging the hearth area. The hearth must not be covered by any combustible materials such as carpet etc.
The appliance is fitted with an oxy-pilot which in the event of the flue being blocked or hazardous conditions causing the appliance to spill products of combustion; will shut off the gas supply to the appliance. If the sequence is repeated the appliance must be turned off and not used until expert advice has been obtained.
Page 2
It is recommended that the appliance is serviced annually by a competent person and that the flue is checked for satisfactory clearance of products and that there is no excessive build up of soot.
The curing effect of heating the coals will cause an initial odour which, although not harmful, may require additional ventilation until the odour has disappeared.
This appliance will run on Full for approximately 4.4 hours on one therm of gas.
Clearance to Shelves
Minimum clearances to underside of a 150mm (6ins) combustible shelf from the top of the fire opening must be 228mm (9ins). Add 12.5mm (1/2in) to this clearance for every 25mm (1in) increased depth of shelf.
Clearance to Side
Minimum clearance required to any combustible material to the side of the appliance must be 150mm (6ins).
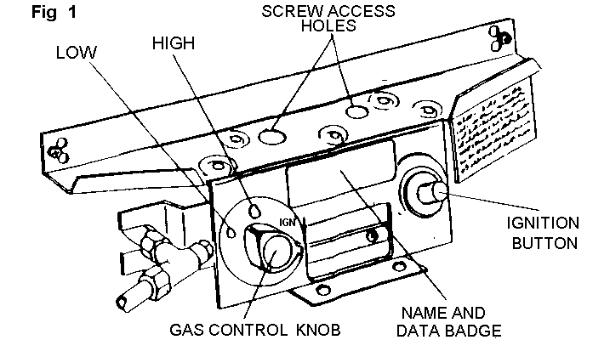
TO LIGHT THE APPLIANCE
1.Remove the fret from the fire front to gain access to the gas control and igniter.
2.Press and turn the gas control knob anti-clockwise until the indicator is opposite the IGN. Keep the gas control fully depressed.
3.Press and release the ignition button and check that the pilot flame situated on the right hand side of the burner has lit at both ports. Keep the gas control depressed for a further 20 seconds.
4.Release the gas control and check the pilot flame remains lit.
5.Push in the gas control slightly and turn anti-clockwise so that the indicator dot is at the required setting. Replace the fret.
6.To turn off the appliance and pilot: Push in slightly, turn the gas control knob clockwise from any position - until the indicator dot is opposite OFF.
IMPORTANT: After turning OFF, or if the pilot and appliance go out for any other reason, wait for 3 minutes before attempting to relight.
If required the pilot may be lit by a long taper or spill placed down the left-hand side of the front bottom coal.
Page 3
CLEANING
Any debris or soot from the chimney or flue or, any soot that is formed during operation should be removed.
Should any soot accumulation become excessive, the appliance should be allowed to cool completely before removing the fuel effect pieces from the fire for cleaning. Cleaning should be carried out in a well-ventilated area or in the open air, by gently brushing with the pieces held away from your face so that you avoid inhaling the dust. We do not recommend the use of a normal domestic vacuum cleaner, which may blow dust back into the air. If debris has located in the burner slots (both front and rear) it may be easily removed by using a small piece of thin cardboard to ease out any foreign matter. Be sure to remove the cardboard after use.
NOTE: Should any ‘coals’ or the coal bed become damaged, lost or broken, only the correct replacements must be obtained and fitted before the appliance is used. Extra coals etc. must not be added to the coal bed and the coal must always be assembled as detailed.
The front & fret can be cleaned with a hand brush or, washed with soapy water. The brass front & fret can be polished with an ordinary brass cleaner.
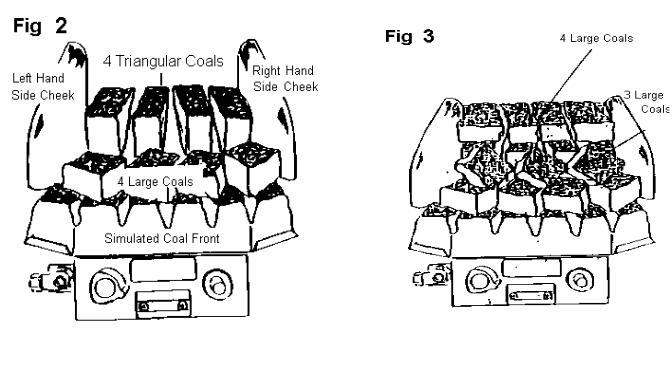
TO RE-LAY THE COAL BED (e.g. after cleaning) See figs 2,3,4 & 5.
Replace the two Tee shaped burner inserts ensuring that the base of the insert sits between the two parallel burner ports. Stand the left and right hand side cheeks against the sides of the chairbrick and into the retaining flanges of the appliance, then replace right and left hand rear coal supports ensuring that the rebate is facing downwards and located over the fibre support channel flange. The correct location of the coal supports will be verified by the presence of a gap approximately 6mm between the front edge of the coal support and the rear edge of the burner.
Note that there are two additional stops provided for the front edge of the coal supports. The front simulated coal can now be positioned on the support platform immediately above the control panel. (Figs 2 & 3). Note that the two front tapered edges of the simulated coal locate between the two raised flanges.
Coal Layout
Lay the four triangular coals with the square corner facing upwards and the longest edge laid on the coal support shelf. Position 4 large rectangular coals with the rear edge on the burner insert and rotate slightly as shown in fig. 2.
ADDITIONAL COALS MUST NOT BE USED
Page 4

Lay 3 large coals in the gaps between the triangular coals and the row of 4 coals and place 4 large coals on the triangular coals behind the second row of coals as shown in Fig. 3 & 4.
Place the 8 small coals randomly and in a stable position between the peaks of the larger coals.
To obtain the best visual appearance it may be necessary to make slight adjustments to the positions of the coals.
Page 5
SPARES AND SERVICE
For spares and service, apply to your local Supplier, Installer or direct to the address overleaf, stating that the appliance is a Flicker Flame 16” Inset and quoting the Serial Number from the Data Badge located on the front control panel behind the front cover.
Advantage should be taken of regular servicing and inspection for gas appliances to ensure their continued safe operation.
SHORT PARTS LIST
Description |
|
Qty |
Part No |
GC No |
Coal Support L.& RH. |
1 |
41094 |
|
|
Burner Inserts |
|
2 |
41345 |
|
Simulated Coal Front |
1 |
40481 |
170 248 |
|
LH & RH Side Cheeks |
1 |
41981 |
170 289 |
|
Set of Coals |
|
|
41980 |
|
FRONTS AND FRETS |
|
|
|
|
Make |
Colour |
G.C.No |
|
|
MACH II |
Black |
170 141 |
|
|
“ |
Brass |
170 142 |
|
|
JB |
Black |
170 144 |
|
|
Page 6
 Loading...