


Cord Reel
C D E F G H I
J
B
A
|
N |
M |
L |
|
K |
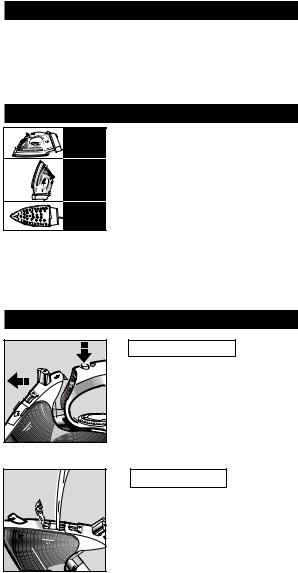
■ Description: |
|
|
|
|
|
A |
Spray nozzle |
|
|
J |
Cord reel |
B |
Water filling inlet with |
|
K |
Pilot light |
|
|
cover |
|
|
L |
Stainless steel soleplate |
C |
Variable steam control/ |
|
M Transparent, removable |
||
|
Self Clean |
|
|
|
water tank |
D |
Spray button |
|
|
N |
Maximum water level |
E |
Burst of steam button |
|
|
indicator |
|
F |
Tank release button |
|
|
|
|
G |
Auto-off indicator light |
|
Features vary by model. |
||
H |
Temperature control dial |
|
Check packaging or markings |
||
I |
Cord reel button |
|
|
on iron for exact features. |
|
■ Descripción :
A Pulverizador
BOrificio de llenado con tapa
C Control de vapor ajustable /Sistema de autolimpieza
D Pulsador pulverizador
EPulsador de golpe de vapor normal
F Botón para retirar el depósito
GIndicador luminoso de desconexión automática
H Regulador de temperatura
IRecoge de cable
Rowenta Werke GmbH 63016 Offenbach am Main
J Protector de cable flexible K Luz piloto
L Suela de acero inoxidable
M Depósito de agua transparente
N Indicador del nivel de agua
Las características varían según el modelo.
Para conocer las características exactas, mire el embalaje o las marcas de la plancha."


IMPORTANT SAFETY
INSTRUCTIONS
When using your iron, basic safety precautions should always be followed, including the following:
Read all instructions before using the iron.
1.Use iron only for its intended use.
2.To protect against a risk of electric shock, do not immerse the iron in water or other liquids.
3.The iron should always be turned to Minimum (Min) before plugging or unplugging from outlet. Never yank cord to disconnect from outlet; instead, grasp plug and pull to disconnect.
4.Do not allow cord to touch hot surfaces. Let iron cool completely before putting away. Loop cord loosely around iron when storing.
5.Always disconnect iron from electrical outlet when filling iron with water or emptying and when not in use.
6.Do not operate iron with a damaged cord or if the iron has been dropped or damaged. To avoid the risk of electric shock, do not disassemble the iron, take it to the nearest authorized Rowenta Appliance Service Center for examination and repair. Incorrect reassembly can cause a risk of electric shock when the iron is used.
7.Close supervision is necessary for any appliance being used by or near children. Do not leave iron unattended while connected or on an ironing board.
8.Burns can occur from touching hot metal parts, hot water or steam. Use caution when you turn a steam iron upside down – there may be hot water in the reservoir.
9.The use of accessory attachments is not recommended by Rowenta Appliance Company and may result in fire, electric shock or personal injury.
SPECIAL INSTRUCTIONS
1.This is a 1400 watt appliance (check rating on iron heel). To avoid a circuit overload, do not operate another high wattage appliance on the same circuit.
2.If an extension cord is absolutely necessary, a 12ampere cord should be used. Cords rated for less amperage may overheat. Care should be taken to arrange the cord so that it cannot be pulled or tripped over.
3.Your Rowenta appliance is intended for household use only.
SAVE THESE INSTRUCTIONS
BEFORE USE
MPlease read the instructions for use and the Important Safeguards carefully.
MRemove the soleplate sticker or transparent soleplate protector.
MIt is normal for a small amount of smoke to be produced the first time the iron is used. This will quickly disappear.
3-WAY AUTO-OFF |
|
30 sec. |
M If the iron is not moved while it |
is switched on, an internal safety |
|
|
switch will turn it off. It will turn |
8 min. |
off in 8 minutes if left vertically |
or in 30 seconds if left on its sole- |
|
|
plate or tipped over. A red flash- |
|
ing light indicates that the auto- |
30 sec. |
off has been activated. To switch |
|
the iron on again, move the iron |
|
or gently shake it. |
MWait until iron is fully reheated before use.
Auto-off is not an on/off switch. Always unplug the iron when not in use.
STEAM IRONING
1 |
2 |
Removing the tank
MEnsure the iron is unplugged, and allow it to cool down.
MPush steam control fully to the left (to the min position).
MPress tank release button and remove tank.
Filling with water
MOpen the water tank inlet lid.
MHold tank at an angle so that the filler opening is horizontal. Add tap water (containing no additives) through the filler opening until it reaches the max. mark.
MAfter filling, close the lid and replace the tank until it clicks firmly into place.
SELECTING THE TEMPERATURE
m |
i |
n |
To avoid damage to clothes from dust or dirt that may collect in the iron, we recommend that for the first use or after the iron has been stored for some time that you first iron an old cloth, testing both the steam and burst of steam feature.
Set the temperature control dial according to the type of fabric you are ironing. Check the fabric's label for appropriate setting.
● synthetics (low temperature) ●● silk, wool (medium temperature)
●●●cotton, linen (high temperature)
To avoid an automatic switch off while the iron is heating up, always keep the iron on its heel. Start at low temperature and graduate to high temperature. For delicate fabrics we recommend carrying out a test on an unobstrusive part of the garment (inner seam).
MSlowly pull cord out of reel by plug. Pull cord until it is fully extended being sure not to yank cord.
MPlug into outlet. The pilot light will turn on to indicate the iron is heating. When the pilot light goes out the iron is ready to use.
Warning:
Never iron clothes while they are being worn.
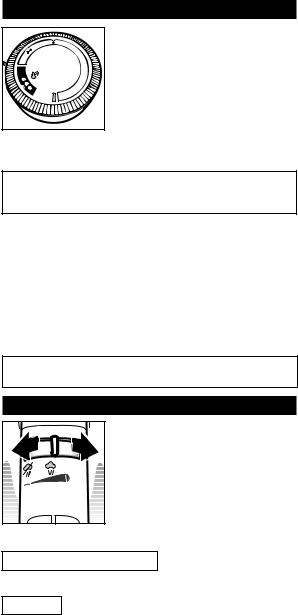
VARIABLE STEAM FUNCTION
min |
max |
|
S |
|
elf |
|
Cl |
|
ean |
Set the variable steam control to required steam volume. Steam can only be produced when the thermostat is in the red cotton/linen zone. Allow iron to heat up (light goes out) before activating the variable steam control. Reduce or set variable steam to min. when ironing at low temperatures to avoid water leakage or spitting.
Iron ready for steam ironing
Steam is produced as soon as the iron is held horizontally.
Steam off
Steam generation can be interrupted:
Mby standing the iron on its heel or
Mby sliding the variable steam control fully to the left
(min setting)

SPRAY SETTING
M Ensure there is water in the tank. M Moistening the fabric with the spray will make wrinkle removal
easier.
M Press the spray button down slowly for a jet or quickly and strongly for a mist.
M Do not spray silk, etc.
BURST OF STEAM
Vertical steam
MTo remove stubborn wrinkles or press in a sharp crease, use the burst of steam button.
MPress the button firmly, a strong burst of steam penetrates deep into the fabric.
MLeave an interval of at least four seconds between pressing the burst of steam button.
MWith water in the tank, the burst of steam button can be used as soon as the steam ironing temperature has been reached (●●●).
MThe iron can also be used vertically. This is especially useful for getting creases out of hanging clothes, curtains, tapestries, etc.
MTo use – hold iron vertically and press the burst of steam button.
DRY IRONING |
|
||
|
|
M Slide the variable steam control |
|
|
|
fully to the left for dry ironing. |
|
|
|
Dry ironing can be performed |
|
min |
max |
either with or preferably without |
|
water in the tank. |
|||
|
Self |
||
|
Clea |
|
|
|
n |
|
|
 Loading...