


DOMESTIC ROTARY LAWNMOWER
OWNER’S MANUAL

SAFETY INSTRUCTIONS
•Never mow while barefoot or wearing open sandals or thongs. Wear long trousers and heavy shoes
•Know your controls. Read the owner’s manual carefully. Learn how to stop the engine quickly in any emergency
•Make sure the lawn is clear of sticks, stones, bones, wire and debris. They could be thrown by the blade
•Stop the engine and disconnect the spark plug wire before clearing blockages, checking, or working on the mower.
•Before using, always visually inspect to see that blades, blade bolts and cutter assembly are not worn or damaged. Replace worn or damaged blades in sets to preserve balance.
DAMAGED BLADES AND WORN BOLTS ARE MAJOR HAZARDS.
•Check all nuts, bolts and screws often; always be sure the mower is in a safe operating condition. Use only genuine replacement parts.
•Refuel outdoors only. Do not smoke while fuelling engine. Add fuel before starting the engine. Never remove the cap off the fuel tank or add petrol while the engine is running or the engine is hot. If petrol is spilled, do not attempt to start the engine but move the machine away from the area of the spill and avoid creating any source of ignition until petrol vapours have dissipated.
•Do not mow whilst people, especially children or pets are in the mowing area.
•Replace worn or faulty silencers (muffler)
•Mow only in good daylight.
•Never use the mower unless the grass catcher or guards (rear flap) provided by the manufacturer are in position.
•Start the engine carefully with feet well away from the blade.
•Do not operate the engine in a confined space where exhaust fumes (carbon monoxide) can collect.
•Stop the engine whenever you leave the mower, even for a moment.
•Do not allow children or people unfamiliar with these instructions to use the mower.
•Store the mower in a well-ventilated room away from naked flames such as may be found in hot water heaters.
•Do not over-speed the engine or alter governor settings. Excessive speed is dangerous and shortens the mower life.
•It is advisable to wear suitable eye protection when operating a mower.
•Turn the fuel off at the conclusion of mowing and reduce the throttle setting during engine run-out.
•Store fuel in a cool place in a container specifically designed for the purpose. In general, plastic containers are unsuitable.
•Stop the engine, disconnect the spark plug wire and inspect the mower if :
a)the mower begins to vibrate abnormally; or
b)after striking a foreign object.
•Never cut grass while walking backwards.
•Stop the engine before pushing the mower across gravel drives, walks or roads.
•Walk, never run.
•Mow across the face of slopes, never up and down. Exercise extreme caution when changing direction on slopes. Do not mow excessively steep slopes.
•Never pick up or carry a mower when it is operating.
CAUTION
To avoid engine damage drain the oil and fuel from the engine before turning the lawnmower over in any direction.
1

INTRODUCTION
Congratulations on your purchase of a Rover Mowers domestic rotary lawnmower.
This manual covers the setting up, operation and maintenance of the Rover domestic rotary lawnmower. Please read and understand this owner’s manual before using the mower. If any point is unclear, contact Rover Mowers or any Rover Mowers authorized service dealer or agent.
To emphasise special information the following WARNING and CAUTION highlights are used.
WARNING
The safety of the user and others involved. Personal injury may result should this information be disregarded.
CAUTION
Follow these instructions to avoid mower damage and possible loss of warranty.
MANUAL CONTENTS |
Page |
|||
|
Safety instructions |
1 |
||
|
Introduction |
2 |
||
|
Setting up |
|
3 |
|
|
Operation |
|
3 |
|
|
|
- |
All Models |
3, 4, 7 |
|
|
- |
Mulch Models (only) |
5, 6 |
|
|
- Self Propelled Models (only) |
11, 12 |
|
|
Maintenance |
8 |
||
|
- |
All Models |
8, 9, 10 |
|
|
- Self Propelled Models (only) |
11, 12 |
||
|
- |
Mulch Models (only) |
13 |
|
|
Mulch Mowing Information |
13, 14 |
||
|
Warranty conditions |
15 |
||
CARTON CONTENTS: |
Quantity |
|||
Rover domestic rotary lawnmower |
1 |
|||
|
Rover owner’s manual |
1 |
||
Engine manufacturer owner’s manual |
1 |
|||
Plastic grass catcher left hand side |
1 |
|||
Plastic grass catcher right hand side |
1 |
|||
Plastic grass catcher mesh insert |
1 |
|||
NB. Mowers which have the Mulch option will have the mulch plug fitted into the rear chute of the mower.
If when unpacking your new lawnmower it is found that there are items missing contact your nearest authorized Rover Mowers service dealer or agent.
2
SETTING UP
Preliminary
Open the lawn mower cardboard carton carefully folding back the carton top flaps.
Lift out the plastic grass catcher components.
With the aid of a second person carefully lift the lawn mower out of the cardboard carton and place on a level surface.
Loosen the two handle bar pivot bolt knobs (A) (where fitted).
Fold the handle bars out straight, inline with the lower handle bars. Tighten the two handle bar pivot bolt knobs (A) or the camlocks (B) to secure the handle bars in position. Refer to figure 1.
Remove and discard the white protective packing sheet from the mower.
Plastic grass catcher assembly - refer figures 2 and 3
Figure 1. Handle bar pivot Bolt knobs and camlocks
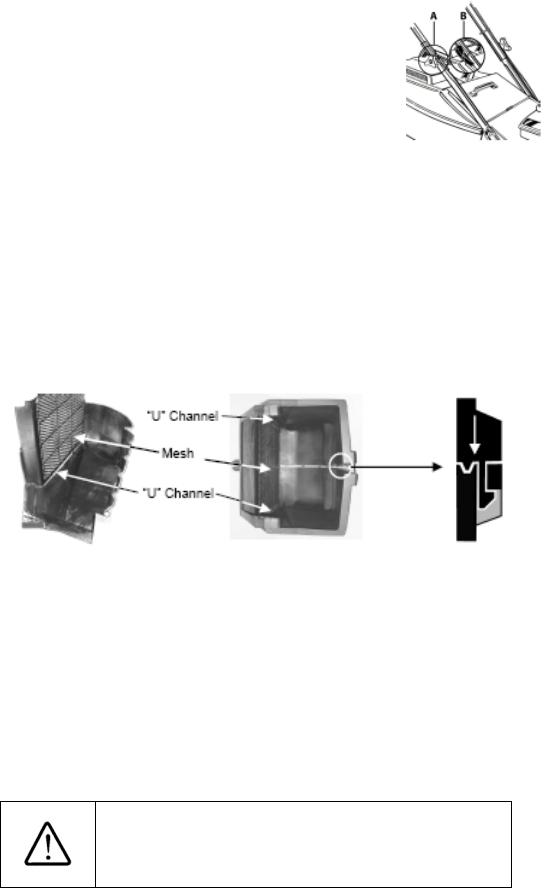
Position one side of the grass catcher on a clean flat bench. Refer to figure 2.
Orient the mesh so it aligns with the “U” channel (on the inside of the grass catcher side) and slide it fully into the channel. Refer to figure 2.
Position the other grass catcher side over the assembly. Align the mesh into the “U” channel and the barbs into the slots on the grass catcher sides. Refer to figures 2 and 3.
Press firmly down on the catcher assembly to lock the barbs fully into the slots.
Check that all catcher barbs are clipped into place. Refer to figure 3.
Figure 2. Grass catcher assembly |
Figure 3. Grass catcher barbs |
Engine oil
Oil must be added before attempting to start the engine otherwise damage to the engine
will occur.
Refer to the engine manufacturer owner’s manual.
The 4 stroke engine fitted to the Rover lawnmower is shipped with no oil in the sump.
Engine fuel
Refer to the engine manufacturer owner’s manual.
Use only fresh unleaded petrol in the lawnmower engine.
OPERATION - All mowers
Adjusting the cut height– refer figure 4.
Figure 2. Grass catcher assembly
WARNING
When selecting the cut height stand to the rear of the machine with your feet well clear of the cutting blades.
3

OPERATION - All mowers
Adjusting the cut height (Continued)
The Rover lawnmower has ten height settings controlled by the height adjustment lever located at the rear right hand wheel.
Grasp the height adjustment lever (1) and pull the lever away from the base to disengage the lever from the height adjustment rack (2).
Move the lever either forwards or backwards to the desired position and release the lever so as to engage in the height adjustment rack
Installing the grass catcher– refer figures 5 and 6.
Figure 4. Height adjustment
WARNING
The grass catcher should only be fitted or removed when the engine is stopped. Never raise the rear flap when the engine is running.
Raise the rear flap of the mower.
Grasp the grass catcher by the top handle and position the grass catcher against the rear of the mower. Refer to Figure 5.
Locate the grass catcher above the grass catcher support bracket. Align the catcher lugs with the hooks each side and lower the catcher into place. Refer to Figure 6.
Lower the rear flap so that the back edge of the rear flap hooks over the matching lip on the grass catcher.
Figure 5. Grass catcher fitment |
Figure 6. Support bracket detail |
Removing the grass catcher– refer figure 7.
Raise the rear flap of the mower to release the grass catcher.
Lift the grass catcher clear of the mower and lower the rear flap.
Emptying the grass catcher - refer figure 7
Remove the grass catcher (as per the instructions above).
Tilt the grass catcher with the opening downwards.
Grip the large channel in the rear bottom of the grass catcher with the other hand and shake the clippings out. Refer to figure 7.
Figure 7. Emptying grass catcher
4
 Loading...