


21-1574.fm Page 1 Thursday, May 13, 1999 4:03 PM
Cat. No. 21-1574
OWNER’S MANUAL
Please read before using this equipment.
TRC-446
Deluxe 4 Watt 40-Channel Mobile CB Radio
with Weather Alert and ACE
21-1574.fm Page 2 Thursday, May 13, 1999 4:03 PM
FEATURES
Your RadioShack TRC-446 Deluxe 40Channel Mobile CB Radio with Weather Alert is a high performance CB that also lets you tune to local and national weather service broadcasts. This CB is perfect for recreational, business, or emergency use. You can call other people who have CBs at home, in their vehicles, or at camp sites. You can also connect optional equipment to your CB, such as an external speaker which creates a PA system; or a DC power supply and base station antenna to use it as a base station in your home.
Your CB has these features:
ACE (Audio Clarity Enhancer) — suppresses noise levels while leaving the signal intact during reception. During transmitting, it enhances the signal, providing you with a significant reduction in reception and transmission noise.
NOAA 7-Channel WX Band Receiver
— lets you tune to seven national weather service frequencies which provide local weather conditions and forecasts.
WX/Alert Indicator — shows the CB is ready to receive and indicates the reception of a weather alert
Built-In SWR Meter — helps you tune your antenna system to optimize your CB's performance.
RF Gain Control — lets you adjust reception to match the strength of the received signal.
Convenient On-Microphone Channel Up/Down Controls — let you quickly scan the band for communications.
CH-9/NOR/CH-19 Switch — lets you quickly tune to emergency Channel 9 or Channel 19 without using the rotary tuning control.
Screw-On Microphone Connector — ensures rugged operation and long life.
PLL (Phase-Locked Loop) Frequency Synthesizer — uses a precise frequency reference crystal to provide reliable and exact tuning.
Two Ceramic Filters — provide superior channel selectivity and prevent adja- cent-channel interference.
Specialized Squelch Circuit — compensates for fading signals and eliminates signal chopping during reception.
Last-Channel Memory — tunes to the last selected channel each time you turn on the radio.
Lighted SWR/RF/Signal Meter — displays the signal strength and the standing wave ratio (SWR).
Digital Channel Display — makes the selected channel easy to see.
© 1999 Tandy Corporation.
All Rights Reserved.
RadioShack is a registered trademark used by Tandy Corporation.
2
21-1574.fm Page 3 Thursday, May 13, 1999 4:03 PM
Noise Blanking — reduces the noise occasionally generated by nearby electrical motors or automotive ignition systems.
CB/WX/PA Switch — lets you quickly select among normal CB operation, weather mode, or public address mode.
RX/TX Indicator — shows whether the CB is transmitting or receiving.
S/RF/SWR/CAL Switch — lets you quickly change the display of the RF/ Signal Meter to show radio input/output signal strength, the standing wave ratio of the antenna, or SWR calibration data.
Universal Mounting Bracket — lets you mount your CB securely in your vehicle.
Note: To use this CB, you need a mobile or base station antenna (not supplied). Your local RadioShack store has a wide variety of antennas. For more information, see “Installing an Antenna” on Page 7.
We recommend you record your CB's serial number here. The number is on the CB's back panel.
Serial Number__________________
FCC INFORMATION
The Federal Communications Commission (FCC) does not require you to have a license to operate this CB. However, the FCC does require that you read and know Part 95 of FCC Rules. These rules apply to the operation of a Class D CB. We have provided a copy of these regulations with your CB.
Warning: Do not open your CB to make any internal adjustments. Any internal adjustments can be made only by an authorized service technician.
Unauthorized internal adjustments and/ or modifications can lead to illegal operation as defined by Part 95 of FCC Rules. Such illegal operation can lead to very serious consequences. To be safe and sure:
•Never open your CB's case.
•Never modify your CB.
Your CB might cause TV or radio interference even when it is operating properly. To determine whether your CB is causing the interference, turn off your CB. If the interference goes away, your CB is causing it. Try to eliminate the interference by either moving your CB away from the receiver or contacting your local RadioShack store for help. If you cannot eliminate the interference, the FCC requires that you stop using your CB.
3

21-1574.fm Page 4 Thursday, May 13, 1999 4:03 PM
CONTENTS |
|
Installation ............................................................................................................... |
5 |
Mounting the TRC-446 ....................................................................................... |
5 |
Connecting the Microphone ................................................................................ |
6 |
Installing an Antenna .......................................................................................... |
7 |
Selecting an Antenna ................................................................................... |
7 |
Connecting an Antenna ............................................................................... |
7 |
Using Vehicle Battery Power .............................................................................. |
7 |
Using the CB as a Base Station ......................................................................... |
8 |
Connecting Optional External Speakers ............................................................. |
8 |
External CB Speaker ................................................................................... |
8 |
Public Address Speaker ............................................................................... |
9 |
Adjusting the Standing Wave Ratio .................................................................... |
9 |
Standing Wave Ratio Guidelines ...................................................................... |
10 |
Standing Wave Ratio Performance ............................................................ |
10 |
A Quick Look at the Controls ............................................................................... |
11 |
Operation ............................................................................................................... |
12 |
Changing Channels Using the Controls on the Microphone ............................. |
13 |
Listening to Weather Broadcasts ...................................................................... |
13 |
Weather Alert .................................................................................................... |
14 |
Using the Public Address Function ................................................................... |
14 |
CB Operation Tips ................................................................................................ |
15 |
Business Uses .................................................................................................. |
15 |
Personal Uses .................................................................................................. |
15 |
CB Courtesy ..................................................................................................... |
15 |
Using Common 10-Codes .................................................................................... |
16 |
Maximum Range .............................................................................................. |
17 |
Troubleshooting .................................................................................................... |
18 |
Care and Maintenance .......................................................................................... |
19 |
Specifications ........................................................................................................ |
21 |
4
21-1574.fm Page 5 Thursday, May 13, 1999 4:03 PM
INSTALLATION
MIC
VOLUME
CH-9 |
|
|
S/RF |
|
|
CH-19 |
CB |
|
|
NB |
|
CAL |
|
|
SQUELCH |
PA |
|
|
SWR |
OFF |
|
CAL |
|
ACE |
|
OFF |
TRC- |
446 |
|
TX/RX |
|
RFG |
WX/ALERT |
AIN |
|
|
WEATHER |
MIC
VOLUME
CH-9 |
|
S/RF |
|
CH-19 |
CB |
|
|
CAL |
|
SQUELCH |
PA |
SWR
NB
OFF CAL
ACE
OFF RF
TX/RX
GAIN
TRC-446
WX/ALERT WEATHER
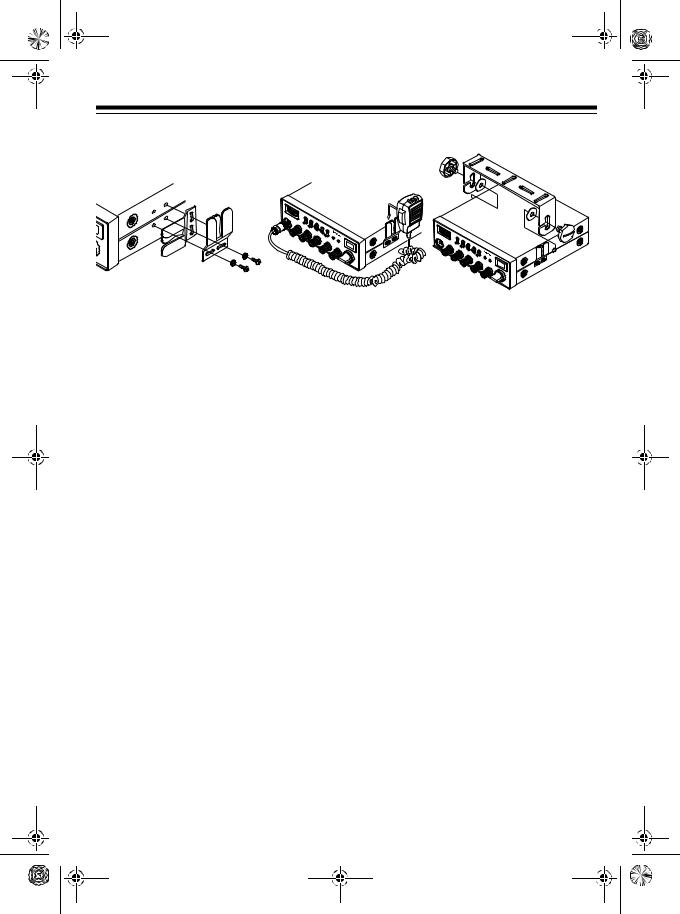
MOUNTING THE MICROPHONE HOLDER
Using a Philips screwdriver and the supplied screw and washers, attach the supplied microphone holder to the CB's left or right side, either horizontally or vertically (depending on how you plan to use it).
MOUNTING THE TRC-446
The most common mounting location for this CB is under a vehicle’s dashboard. If you use the TRC-446 as a base station, you can place it on a desk, shelf, or table (See “Using the CB as a Base Station” on Page 8).
When mounting the CB in a vehicle, choose a location where:
•you can easily reach the CB
•wires and cables are routed away from the vehicle's pedals or other moving parts
•all wires and cables can reach their connection points
•the CB is not directly in front of heating vents
Cautions:
•If you use the TRC-446 in a vehicle, mount it securely to avoid damage to the CB or vehicle or injury to anyone in the vehicle during sudden starts or stops.
•Do not mount the CB where it could damage or interfere with the proper operation of any passive restraint safety device (an air bag or seat belt).
Follow these steps to mount the CB using the supplied hardware.
1.Select a location that provides secure mounting.
Caution: Be careful not to drill into anything behind the mounting surface.
2.Using the slots in the mounting bracket as a template, mark the positions for the screw holes.
3.In each marked location, drill a hole slightly smaller than the supplied mounting screws.
5

21-1574.fm Page 6 Thursday, May 13, 1999 4:03 PM
4.Using a Phillips screwdriver, attach the mounting bracket to the mounting surface with the supplied large mounting screw and star lock washers.
5.Attach the CB to the mounting bracket using the supplied rubber washers and mounting knobs.
CONNECTING THE
MICROPHONE
1.Align the slot on the top of the microphone plug with the ridge
inside the MIC jack, then fully insert the plug into the jack.
2.Secure the plug by turning the plug's locking nut clockwise.
3.Slide the microphone onto the microphone holder.
To disconnect the microphone, unscrew the locking nut and gently pull out the microphone plug.
Caution: Always grasp the connector body when you are disconnecting the microphone. Never pull on the microphone cable.
|
SP |
|
EXT |
PA |
SP |
|
|
|
- |
|
POWERDC |
|
.8V |
+ |
13 |
ANTENNA
ANTENNA
+
R
CAT NO.: 21-1574 TRC-446 FCC ID: AAO21-1574
CUSTOM MANUFACTURED IN THAILAND FOR RADIOSHACK,
A DIVISION OF TANDY CORPORATION
FORT WORTH, TEXAS 76102
SERIAL NO.: |
0000001 |
PA SP EXT SP
13.8 DC Power Supply
POWER |
|
13.8V DC |
- |
Base Station Power Setup
6

21-1574.fm Page 7 Thursday, May 13, 1999 4:03 PM
INSTALLING AN
ANTENNA
Caution: To prevent damage to your CB, do not attempt to transmit without an antenna attached.
Selecting an Antenna
When you decide on an antenna and its location, consider these points:
•The antenna should be positioned as high as possible.
•The antenna and the antenna cable should be routed as far as possible from any source of electrical noise such as ignition systems, electric gauges, and motors.
Your local RadioShack store sells a variety of CB antennas for both mobile and base-station use. Choose the one that best meets your needs.
Connecting an Antenna
Follow the mounting instructions supplied with the antenna you choose. Route the antenna cable to the CB, then thread the PL-259 antenna cable plug into ANTENNA on the back of the CB.
Cautions:
•Do not run the cable over sharp edges or moving parts that might damage it.
•Do not run the cable next to power cables or other CB antenna cables.
•Do not run the cable through a vehicle's engine compartment or other areas that produce extreme heat.
USING VEHICLE
BATTERY POWER
You can power this CB from your vehicle's battery or from standard AC power with an optional DC power supply. For information on using AC power, see “Using the CB as a Base Station” on Page 8.
Follow these steps to power the CB from your vehicle's battery.
1.Plug the single-connector end of the power cord into POWER 13.8V DC on the CB's back panel.
2.Connect the black wire to your vehicle’s negative (–) battery terminal or to a metal part of the vehicle's frame that is not insulated from the frame by a plastic part.
3.Connect the red wire, with its in-line fuse, to a source of voltage that turns on and off with the ignition switch, such as a spare accessory terminal in your vehicle's fuse box. This assures you that power to the CB is turned off when you turn off the ignition.
4.Connect the orange wire, with its inline fuse, to a source of voltage that supplies constant positive (+) power (regardless of the ignition switches position) or directly to your vehicle's positive (+) battery terminal. This enables the radio to “remember” the last channel you tuned to when you turn the radio back on.
7

21-1574.fm Page 8 Thursday, May 13, 1999 4:03 PM
USING THE CB AS A BASE STATION
Although this CB is designed for mobile use, you can also use it as a base station. For base-station installation, you need a regulated 12-volt DC power supply, such as Cat. No. 22-504 available at your local RadioShack store.
Caution: Most 12-volt DC power supplies plug into a standard AC outlet to produce DC power. Before connecting your CB to a 12-volt DC power supply, read and follow the instructions included with the power supply.
You also need a base station antenna and coaxial antenna cable and connectors. Your local RadioShack store also carries a wide selection of suitable antennas, cables, and connectors.
Follow these steps to install the CB as a base station.
1.Mount the base station antenna as described in its owner's manual.
Warning: Use extreme caution when you install or remove a base station CB antenna. If the antenna starts to fall, let it go! It could contact overhead power lines. If the antenna touches the power line, contact with the antenna, mast, cable, or guy wires can cause electrocution and death. Call the power company to remove the antenna. DO NOT attempt to do so yourself.
2.Route the antenna cable to the CB, then connect the cable to ANTENNA on the back of the CB.
8
3.Plug the single connector end of the power cord into POWER 13.8V DC on the CB's back panel.
4.Connect the black wire to the DC power supply's negative (–) terminal.
5.Connect the red wire and orange wires, with in-line fuses, to the DC power supply's positive (+) terminal.
Note: Due to the lack of a constant 12VDC, as in an automotive installation, if you turn off the DC power supply, the CB “remembers” the last channel you tuned for only a few minutes. When you turn on the CB and the DC power supply again, the radio automatically tunes to Channel 9.
CONNECTING OPTIONAL EXTERNAL SPEAKERS
You can connect an external CB or PA speaker to your CB. The larger, external speaker provides greater clarity. A PA speaker lets you take advantage of the amplifier and mic to use the CB as a public-address system.
External CB Speaker
To connect an external CB speaker, use a speaker rated at 8-ohms and capable of handling 3–10 watts of power (such as Cat. No. 21-549). Simply plug the speaker cable's 1/8-inch plug into EXT SP. Connecting the external speaker automatically disconnects the internal speaker.
 Loading...