


 Loading...
8VHU¶V *XLGH 8VHU¶V *XLGH 8VHU¶V *XLGH8VHU¶V *XLGH8VHU¶V *XLGH 8VHU¶V *XLGH
/72 7DSH 'ULYH
/72
%
Quantum LTO-3 Tape Drive User’s Guide, P/N 50002764, B01, July 2005
Made in USA.
Quantum Corporation provides this publication “as is” without warranty of any kind, either express or implied, including but not limited to the implied warranties of merchantability or fitness for a particular purpose. Quantum Corporation may revise this publication from time to time without notice.
COPYRIGHT STATEMENT
Copyright 2005 by Quantum Corporation. All rights reserved.
Your right to copy this manual is limited by copyright law. Making copies or adaptations without prior written authorization of Quantum Corporation is prohibited by law and constitutes a punishable violation of the law.
TRADEMARK STATEMENT
Quantum and the Quantum logo are all registered trademarks of Quantum Corporation.
Other trademarks may be mentioned herein which belong to other companies.

Contents
Preface |
|
xi |
Chapter 1 |
Overview, Unpacking Instructions and Quick Start |
1 |
|
Overview............................................................................................................. |
1 |
|
Drive Configurations.................................................................................. |
2 |
|
Features ........................................................................................................ |
2 |
|
Unpacking and Inspection................................................................................ |
3 |
|
Quick Start Guide ............................................................................................. |
4 |
|
Internal LTO-3 Tape Drive Quick Start ................................................... |
4 |
|
Desktop LTO-3 Tape Drive Quick Start .................................................. |
5 |
|
Internal Tape Drive Guidelines and Cautions............................................... |
5 |
Chapter 2 |
Installation |
7 |
|
Drive Installation Instructions ......................................................................... |
7 |
|
Installing an Internal LTO-3 Tape Drive ........................................................ |
8 |
|
Configuring an LVD Drive........................................................................ |
8 |
|
Mounting the Internal LTO-3 Tape Drive............................................. |
11 |
|
Connector Detail ....................................................................................... |
12 |
|
ADI Free Cable Connector....................................................................... |
13 |
LTO-3 Tape Drive User’s Guide |
iii |

Contents |
|
|
|
Connecting a SCSI Cable.......................................................................... |
14 |
|
Checking the SCSI Termination.............................................................. |
15 |
|
Connecting a Serial Cable for Tape Libraries........................................ |
16 |
|
Bus Composition ....................................................................................... |
17 |
|
Connecting a Power Cable....................................................................... |
18 |
|
Installing the LTO Driver......................................................................... |
18 |
|
Registering Your Tape Drive................................................................... |
18 |
|
Installing a Desktop LTO-3 Tape Drive ........................................................ |
18 |
|
Setting the SCSI ID.................................................................................... |
19 |
|
Connecting a SCSI Cable.......................................................................... |
19 |
|
Checking the SCSI Termination.............................................................. |
20 |
|
Connecting a Power Cord........................................................................ |
21 |
|
Installing the LTO Driver......................................................................... |
21 |
|
Registering Your Tape Drive................................................................... |
21 |
Chapter 3 |
Operation |
23 |
|
Understanding the Front Panel Display ....................................................... |
24 |
|
Blink Codes ....................................................................................................... |
25 |
|
Using LTO Cartridges...................................................................................... |
26 |
|
Loading a Cartridge.................................................................................. |
26 |
|
Unloading a Cartridge.............................................................................. |
26 |
|
Write-protecting a Cartridge ................................................................... |
27 |
|
Cartridge Care and Maintenance............................................................ |
28 |
|
Drive Maintenance ........................................................................................... |
28 |
|
Cleaning the Tape Drive .......................................................................... |
29 |
|
Parking the Drive for Shipping ...................................................................... |
30 |
|
Using the Load/Unload Button to Park the Drive............................... |
30 |
|
Using Software to Park the Drive ........................................................... |
30 |
Chapter 4 |
Theory |
31 |
|
Track Layout ..................................................................................................... |
31 |
|
Recording Method............................................................................................ |
33 |
|
Data Buffer ........................................................................................................ |
33 |
|
Data Integrity .................................................................................................... |
33 |
|
Error-correction Code (ECC) ................................................................... |
34 |
|
Servo-tracking Faults................................................................................ |
35 |
iv |
LTO-3 Tape Drive User’s Guide |

|
Contents |
|
|
Data Compression............................................................................................ |
35 |
|
Data Compression Considerations......................................................... |
36 |
|
Intelligent Data Compression ................................................................. |
37 |
Chapter 5 |
Specifications |
39 |
|
Physical Specifications .................................................................................... |
40 |
|
Power Specifications........................................................................................ |
42 |
|
Drive Performance Specifications.................................................................. |
43 |
|
Environmental Requirements ........................................................................ |
44 |
|
Injected Noise ............................................................................................ |
45 |
|
Reliability .......................................................................................................... |
45 |
|
Mean Time Between Failures ......................................................................... |
46 |
|
Mean Time to Replace.............................................................................. |
47 |
|
LTO Cartridge Specifications ......................................................................... |
47 |
|
Environmental Considerations............................................................... |
47 |
|
Cartridge Memory .................................................................................... |
48 |
|
Cartridge Reliability ................................................................................. |
48 |
|
Regulatory Compliance .................................................................................. |
48 |
|
Safety Compliance .................................................................................... |
48 |
|
Electromagnetic Compatibility (EMC) .................................................. |
50 |
|
Disposal of Electrical and Electronic Equipment ....................................... |
51 |
Chapter 6 |
UNIX Settings |
53 |
|
A Word About SCSI Controllers.................................................................... |
54 |
|
Configuring for the DEC/Compaq UNIX Environment ........................... |
54 |
|
Finding Existing SCSI Controllers and Devices ................................... |
54 |
|
Configuring Digital UNIX Version 4.0 and later/Compaq |
|
|
Tru64 Unix 5.x.................................................................................... |
54 |
|
Configuring for the Sun Environment (Solaris 2.4, 2.5, 2.6, 7, 8, and 9)... |
55 |
|
Finding Current SCSI Controllers and Targets .................................... |
55 |
|
Types of Controllers ................................................................................. |
56 |
|
Configuring the Device File st.conf........................................................ |
56 |
|
Configuring for the IBM AIX Environment (AIX Version 4.1.x |
|
|
and later) .................................................................................................... |
58 |
|
Finding Existing SCSI Controllers and Devices ................................... |
58 |
|
Configuring the LTO-3 Tape Drives using SMIT................................. |
58 |
|
Configuring for SCO Open Server 5.0.x ...................................................... |
59 |
LTO-3 Tape Drive User’s Guide |
v |

Contents |
|
|
|
Finding Existing SCSI Controllers and Devices ................................... |
59 |
|
Configuring the LTO-3 Tape Drive with mkdev.................................. |
60 |
|
Configuring for Linux...................................................................................... |
61 |
|
Finding Existing SCSI Controllers and Devices ................................... |
61 |
|
Using the LTO-3 Tape Drive ................................................................... |
62 |
|
Configuring for SGI Irix .................................................................................. |
63 |
|
Finding Current SCSI Controllers and Targets..................................... |
63 |
|
Modifying the IRIX Configuration File.................................................. |
63 |
|
Configuring for HP-UX 11.0 ........................................................................... |
64 |
|
Finding Current Hardware/Driver Configuration.............................. |
64 |
|
Attaching the LTO-3 Tape Drive ............................................................ |
64 |
Chapter 7 |
Troubleshooting Guide |
67 |
|
Installation Best Practices................................................................................ |
67 |
|
Follow SCSI Best Practices ....................................................................... |
67 |
|
SCSI Host Bus Adapters (HBA) .............................................................. |
67 |
|
Adding the Tape Drive............................................................................. |
68 |
|
Troubleshooting Suggestions ......................................................................... |
69 |
|
Computer will not Boot............................................................................ |
69 |
|
Computer Boots but Does Not Recognize the Tape Drive.................. |
69 |
|
Tape Drive Recognized During System Boot But Not by |
|
|
Operating System or Application.................................................... |
71 |
|
Problems with Tape Drive and Cartridge ............................................. |
72 |
|
Emergency Reset and Emergency Cartridge Eject ............................... |
75 |
|
Problems During Backup/Restore Operations .................................... |
75 |
Index |
|
81 |
vi |
LTO-3 Tape Drive User’s Guide |

Figures
Figure 1 |
Typical Internal and Desktop Configurations ......................... |
2 |
Figure 2 |
Internal LTO-3 Tape Drive Jumper Settings............................. |
9 |
Figure 3 |
Acceptable Mounting Orientations ......................................... |
11 |
Figure 4 |
Internal LTO-3 Tape Drive Mounting Dimensions ............ |
12 |
Figure 5 |
ADI Fixed Board Connector ..................................................... |
13 |
Figure 6 |
ADI Free Cable Connector ........................................................ |
14 |
Figure 7 |
Rear View of the Internal LTO-3 Tape drive ....................... |
15 |
Figure 8 |
Two SCSI Termination Examples for the Internal LTO-3 |
|
|
Tape Drive .................................................................................. |
16 |
Figure 9 |
Switches and Connectors on the Back of the Desktop |
|
|
LTO-3 Tape Drive....................................................................... |
19 |
Figure 10 |
SCSI Termination Examples for the Desktop LTO-3 |
|
|
Tape Drive .................................................................................. |
20 |
Figure 11 |
Generic Front Panel Display .................................................... |
24 |
Figure 12 |
Ultrium Cartridge Showing Write-Protect Switch ................ |
27 |
Figure 13 |
Layout of the Tracks on LTO Ultrium Tapes ........................ |
32 |
Figure 14 |
Internal LTO-3 Tape Drive Dimensions.................................. |
41 |
LTO-3 Tape Drive User’s Guide |
vii |
Figures
viii |
LTO-3 Tape Drive User’s Guide |

Tables
Table 1 |
ISCSI IDs and Jumper Settings for an Internal LTO-3 |
|
|
Tape Drive ..................................................................................... |
9 |
Table 2 |
Serial Interface Connector Pin Assignments (LTO-3) ........... |
16 |
Table 3 |
ADT Bus Connections................................................................ |
17 |
Table 4 |
LTO-3 Tape Drive Blink Codes ................................................ |
25 |
Table 5 |
Physical Specifications............................................................... |
40 |
Table 6 |
Voltage and Current .................................................................. |
42 |
Table 7 |
Power Dissipation ...................................................................... |
42 |
Table 8 |
Drive Performance Specifications............................................ |
43 |
Table 9 |
Environmental Requirements................................................... |
44 |
Table 10 |
Reliability..................................................................................... |
46 |
Table 11 |
Environmental Tolerances ........................................................ |
47 |
LTO-3 Tape Drive User’s Guide |
ix |
Tables
x |
LTO-3 Tape Drive User’s Guide |
Preface
The LTO-3 Tape Drive is a high-performance 16-channel tape drive that complies with the LTO interchange specifications. The drive is suited for mid-range to high-end servers, mainframe systems, and tape library automation systems.
Audience |
This document was written for users of the LTO-3 Tape Drive. |
|
|
This document provides information about the LTO-3 Tape Drive |
|
Purpose |
||
|
including: |
|
|
• |
Installation |
|
• |
Unpacking |
|
• |
Basic library operations |
|
• |
Specifications |
|
• |
UNIX Settings |
|
• |
Troubleshooting |
LTO-3 Tape Drive User’s Guide |
xi |
Preface
Document |
|
This User’s Guide describes how to install, configure, and care for the |
||
Organization |
|
LTO-3 desktop and internal tape drives. Please read the appropriate |
||
|
|
|
chapters and appendixes carefully, and keep this Guide handy for future |
|
|
|
|
reference. |
|
|
|
|
• Chapter 1, Overview, Unpacking Instructions and Quick Start |
|
|
|
|
provides on overview of LTO-3 Tape Drive and its features as well as |
|
|
|
|
handling precautions and unpacking tips. It provides quick-start |
|
|
|
|
instructions for getting the drives up and running in the shortest |
|
|
|
|
possible time. |
|
|
|
|
• Chapter 2, Installation provides installation instructions for the |
|
|
|
|
internal and desktop drives. It provides a summary of cabling and |
|
|
|
|
connector specifications. |
|
|
|
|
• Chapter 3, Operation explains the use and operation of the drive and |
|
|
|
|
describes maintenance procedures, including drive “parking.” |
|
|
|
|
• Chapter 4, Theory describes the theory of operation behind the |
|
|
|
|
drives, including the technology used in various drive components. |
|
|
|
|
• Chapter 5, Specifications contains detailed drive and cartridge |
|
|
|
|
specifications, as well as a summary of regulatory approvals and |
|
|
|
|
WEEE Compliance statement. |
|
|
|
|
• Chapter 6, UNIX Settings describes the settings for Unix systems. |
|
|
|
|
• Chapter 7, Troubleshooting Guide provides troubleshooting |
|
|
|
|
procedures you can follow in the unlikely event you encounter a |
|
|
|
|
problem with your drive. |
|
|
|
|
This document concludes with a detailed index. |
|
|
|
This manual uses the following conventions: |
||
|
Notational |
|
||
Conventions |
|
|
|
|
|
|
|
Note: Notes emphasize important information related to the main |
|
|
|
|
topic. |
|
|
|
|
|
|
|
|
|
|
|
|
|
|
Tech Tip: Tech Tips provide technical information which may be |
|
|
|
|
helpful in performing the procedure. |
|
|
|
|
|
|
|
|
|
|
|
xii |
LTO-3 Tape Drive User’s Guide |

Preface
Caution: Cautions indicate potential hazards to equipment and are included to prevent damage to equipment.
Warning: Warnings indicate potential hazards to personal safety and are included to prevent injury.
Related |
Refer to the appropriate product manuals for information about your |
Documents |
tape drive and cartridges. |
SCSI-2 Specification
The SCSI-2 communications specification is the proposed American National Standard for information systems, dated March 9, 1990. Copies may be obtained from:
Global Engineering Documents 15 Inverness Way, East Englewood, CO 80112
(800) 854-7179 or (303) 397-2740
Contacts |
Quantum company contacts are listed below. |
Quantum Corporate Headquarters
To order documentation on the LTO-3 Tape Drive or other products contact:
Quantum Corporation P.O. Box 57100 Irvine, CA 92619-7100 (949) 856-7800 (800) 284-5101
LTO-3 Tape Drive User’s Guide |
xiii |
Preface
Technical Publications
To comment on existing documentation send e-mail to:
doc-comments@quantum.com
Quantum Home Page
Visit the Quantum home page at:
www.quantum.com
Customer Support
The Quantum Customer Support Department provides a 24-hour help desk that can be reached at:
North/South America: |
(949) 725-2100 or (800) |
284-5101 |
|
Asia/Pacific Rim: |
(International Code) + 61 |
7 3839 0988 |
|
Europe/Middle East/Africa: |
(International Code) + |
44 |
(0) 1256 848748 |
Send faxes for the Customer Support Department to:
North/South America: |
(949) 725-2176 |
Asia/Pacific Rim: |
(International Code) + 61 7 3839 0955 |
Europe/Middle East/Africa: |
(International Code) + 44 (0) 1256 848777 |
Send e-mail for the Customer Support Department to: |
|
Asia/Pacific Rim: |
apachelp@quantum.com |
Europe/Middle East/Africa: |
eurohelp@quantum.com |
Visit our web site: |
|
www.quantum.com/support |
|
xiv |
LTO-3 Tape Drive User’s Guide |

Chapter 1
1Overview, Unpacking
Instructions and Quick Start
This chapter provides an overview of this product and a quick start guide. It also discusses unpacking and inspection considerations.
Topics covered in this chapter are:
•Overview
•Internal Tape Drive Guidelines and Cautions
•Quick Start Guide
•Internal Tape Drive Guidelines and Cautions
Overview
The LTO-3 is a high-performance 16-channel tape drive that complies with the LTO interchange specifications. The drive is suited for midrange to high-end servers, mainframe systems, and tape library automation systems.
The LTO-3 Tape Drive uses Ultrium data cartridges. Its capacity is maximized using intelligent data compression. The drive has a native capacity of 400 Gbytes (800 Gbytes assuming 2:1 data compression).
LTO-3 Tape Drive User’s Guide |
1 |
Chapter 1 Overview, Unpacking Instructions and Quick Start
Overview
Drive
Configurations
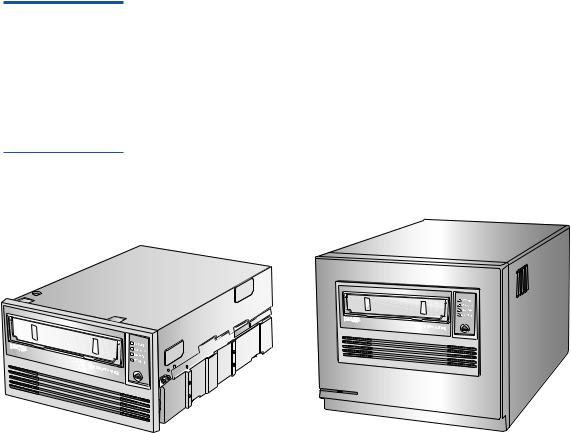
Figure 1 Typical
Internal and Desktop
Configurations
The LTO-3 Tape Drive has a 5¼-inch, full-height form factor, with automatic electromechanical cartridge soft load. The drive is available as an internal and a desktop drive.
•Internal LTO-3 Tape Drive fits in a 5¼-inch full-height drive bay.
•Desktop LTO-3 Tape Drive is a stand-alone unit with a built-in power supply.
Features |
The following list summarizes the key features of the LTO-3 Tape Drive. |
|
• Performance |
|
• Up to 68 Mbytes-per-second native transfer. |
|
• 13-Speed Transfer matches tape drive speed to that of the host — |
|
optimizes data transfers, resulting in shorter backup times and |
|
increased reliability. |
|
• Two convenient form-factors: |
|
• 5¼-inch internal form-factor for installation in a 5¼-inch half- |
|
height space. |
|
• External desktop form-factor. |
2 |
LTO-3 Tape Drive User’s Guide |

Chapter 1 Overview, Unpacking Instructions and Quick Start
Unpacking and Inspection
•Intelligent data compression maximizes performance and capacity by analyzing compressibility prior to recording.
•Cartridge memory enables fast loading of cartridges and stores pertinent information about the media.
•128-Mbyte data buffer for high-performance.
•Tape Alert drive performance monitoring and reporting.
•Third generation read channel for increased maturity and data integrity.
•Patented head positioner for increased data integrity.
•Shock damped isolated chassis.
•MediaShield increases media life through managed airflow dynamics with isolated HTI chamber.
•SmartVerify includes two levels of ECC for extra data safety and protection from errors.
•Reliable tape picking implementation for increased reliability.
•Custom-designed LSI circuitry for fast, efficient data processing.
•RISC processors for fast, efficient data processing.
•Supports a wide variety of UNIX platforms
Unpacking and Inspection
Although drives are inspected and carefully packaged at the factory, damage may occur during shipping. Follow these steps for unpacking the drive.
1Visually inspect the shipping containers and notify your carrier immediately of any damage.
2Place shipping containers on a flat, clean, stable surface; then carefully remove the contents. If the equipment is damaged, notify your Quantum representative.
3Always save the containers and packing materials for any future reshipment.
LTO-3 Tape Drive User’s Guide |
3 |

Chapter 1 Overview, Unpacking Instructions and Quick Start
Quick Start Guide
Quick Start Guide
|
|
Use the following quick-start instructions to get your tape drive up and |
|
|
running as quickly as possible. |
|
Use the following procedure to install the internal LTO-3 Tape Drive. |
|
|
Internal LTO-3 |
|
Tape Drive Quick |
Print the page and check each step as you complete it. If you need more |
|
Start |
information about a step, turn to the section referenced in the step. |
|
1 Unpack the contents of your drive package, and check for damaged items. See Internal Tape Drive Guidelines and Cautions on page 5.
2 Review the drive’s default settings and change them if necessary:
•SCSI ID: 6
•Terminator Power: Disabled
See Configuring an LVD Drive on page 8.
3 Turn off your computer, remove its covers and power cable, and select a mounting bay for the drive.
See Mounting the Internal LTO-3 Tape Drive on page 11.
4 Connect a SCSI interface cable to the drive.
See Connecting a SCSI Cable on page 14.
5 Terminate the SCSI bus if the internal tape drive is the last device on the SCSI bus. See Checking the SCSI Termination on page 15.
6 Connect a serial cable, if connecting the tape drive to a tape library.
See Connecting a Serial Cable for Tape Libraries on page 16.
7 Connect a power cable to the drive. See Bus Composition on page 17.
8 Replace the computer covers and power cable, turn on the computer, and verify that the internal tape drive is operating properly.
9 Register your tape drive.
See Registering Your Tape Drive on page 18.
4 |
LTO-3 Tape Drive User’s Guide |

|
|
Chapter 1 Overview, Unpacking Instructions and Quick Start |
|
|
Internal Tape Drive Guidelines and Cautions |
|
Use the following procedure to install the desktop LTO-3 Tape Drive. |
|
|
Desktop LTO-3 |
|
Tape Drive Quick |
Print the page and check each step as you complete it. If you need more |
|
Start |
information about a step, turn to the section referenced in the step. |
|
1 Unpack the contents of your drive package, and check for damaged items. See Internal Tape Drive Guidelines and Cautions on page 5.
2 Review the drive’s default settings and change them if necessary:
•SCSI ID: 6
See Setting the SCSI ID on page 19.
3 Connect a SCSI interface cable to the drive. See Connecting a SCSI Cable on page 19.
4 Check the SCSI termination.
See Checking the SCSI Termination on page 20.
5 Connect a power cable to the drive.
See Connecting a Power Cord on page 21.
6 Turn on the computer, turn on the desktop tape drive, and verify that the desktop tape drive is operating properly.
7 Register your tape drive.
See Registering Your Tape Drive on page 21.
Internal Tape Drive Guidelines and Cautions
The following guidelines and cautions apply to handling and installing internal tape drives. Keep them in mind as you install the drive.
•Handle the drive by the sides rather than by the top cover to reduce the risk of dropping the drive or damaging it during installation.
•Internal drives contain some exposed components that are sensitive to static electricity. To reduce possible damage from static discharge, the drives are shipped in a protective antistatic bag. Do not remove the drive from the antistatic bag until you are ready to install it.
LTO-3 Tape Drive User’s Guide |
5 |
Chapter 1 Overview, Unpacking Instructions and Quick Start
Internal Tape Drive Guidelines and Cautions
•Before you remove the drive from the antistatic bag, touch a metal or grounded surface to discharge any static electricity buildup from your body.
•Always lay the drive either on top of the antistatic bag or place it inside of the bag to reduce possible damage from static discharge.
•Install LVD drives only in an LVD environment. Do not mix HVD and LVD devices on the same SCSI bus.
•Due to the speed of the LTO-3 Tape Drive, it is recommended that a maximum of one LTO-3 Tape Drive be connected to one host SCSI adapter.
6 |
LTO-3 Tape Drive User’s Guide |
Chapter 2
2Installation
This chapter explains how to install the internal and desktop LTO-3 Tape
Drives.
Topics covered in this chapter are:
•Installing an Internal LTO-3 Tape Drive
•Installing a Desktop LTO-3 Tape Drive
Drive Installation Instructions
After unpacking and inspecting your shipping containers and reviewing the installation guidelines and cautions, proceed to the appropriate section in this chapter for instructions on installing your LTO-3 Tape Drive.
•Installing an Internal LTO-3 Tape Drive.
•Installing a Desktop LTO-3 Tape Drive on page 18.
LTO-3 Tape Drive User’s Guide |
7 |

Chapter 2 Installation
Installing an Internal LTO-3 Tape Drive
Installing an Internal LTO-3 Tape Drive
Installing an internal LTO-3 Tape Drive with an Ultra 160 SCSI LVD interface involves the following steps:
1 Configuring an LVD Drive
2 Mounting the Internal LTO-3 Tape Drive on page 11 3 Connecting a SCSI Cable on page 14
4 Checking the SCSI Termination on page 15
5 Connecting a Serial Cable for Tape Libraries on page 16 6 Bus Composition on page 17
7 Registering Your Tape Drive on page 18
Configuring an |
Before you install the LVD tape drive in your computer, you may need to |
|
LVD Drive |
configure the drive’s SCSI ID and terminator power features. The default |
|
|
configuration settings for the LTO-3 Tape Drive is: |
|
|
• |
SCSI ID: 6 |
|
• |
Terminator power: disabled |
If you need to change these settings, refer to the following sections.
Otherwise, proceed to Mounting the Internal LTO-3 Tape Drive.
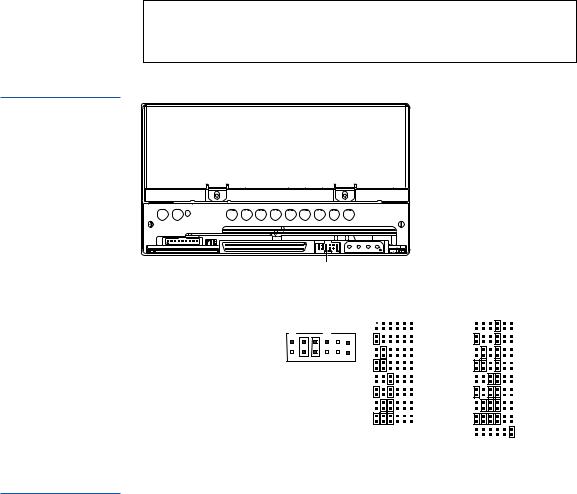
SCSI ID
Jumper Pins: 1–2, 3–4, 5–6, 7–8
Default Setting: SCSI ID 6
Each SCSI device on the bus must have its own unique SCSI ID. The internal tape drive is shipped with a default SCSI ID of 6. If another SCSI device in the SCSI chain is using this ID, use jumper pins 1–2, 3–4, 5–6,
8 |
LTO-3 Tape Drive User’s Guide |
Chapter 2 Installation
Installing an Internal LTO-3 Tape Drive
and 7–8 to change the SCSI ID of the LTO-3 Tape Drive (see table 1 and table 2), or assign a unique SCSI ID to the other SCSI device.
Note: The SCSI controller or host adapter generally uses ID 7. In some systems, the boot drive uses ID 0 or ID 1. Avoid setting your drive’s SCSI ID to these settings.
Figure 2 Internal
LTO-3 Tape Drive
Jumper Settings
Drive Configuration Jumpers Pins
|
Drive Configuration |
|
Jumper Settings |
|
|||||||||||||||
|
|
Jumpers Pins |
|
|
|||||||||||||||
|
|
|
|
|
|
|
|||||||||||||
|
|
|
|
|
|
|
|
|
|
|
|
|
|
|
|
|
|
|
|
|
Default |
|
|
|
|
|
|
|
|
|
|
|
|
|
SCSI ID=0 |
|
|
SCSI ID=8 |
|
|
|
|
|
|
|
|
|
|
|
|
|
|
|
SCSI ID=1 |
|
|
SCSI ID=9 |
||
|
Settings: |
|
|
|
|
|
|
|
|
|
|
|
|
|
|
|
|||
|
|
|
|
|
|
|
|
|
|
|
|
|
|
SCSI ID=2 |
|
|
SCSI ID=10 |
||
|
|
|
|
|
|
|
|
|
|
|
|
|
|
|
|
|
|
||
|
|
|
|
|
|
|
|
|
|
|
|
|
|
|
|
SCSI ID=3 |
|
|
|
Pins: |
Function: |
|
|
|
|
|
|
|
|
|
|
|
SCSI ID=11 |
||||||
|
|
|
|
|
|
|
|
|
|
||||||||||
|
SCSI ID=4 |
|
|
SCSI ID=12 |
|||||||||||||||
1-2 |
SCSI ID bit 0 |
|
|
|
|
|
|
|
|
|
|
|
|
||||||
|
|
|
|
|
|
|
|
|
|
|
|
|
|
||||||
3-4 |
SCSI ID bit 1 |
|
|
|
|
|
|
|
|
SCSI ID=5 |
|
|
SCSI ID=13 |
||||||
|
|
|
|
|
|
|
|
|
|
|
|
||||||||
5-6 |
SCSI ID bit 2 |
|
|
|
|
|
|
|
SCSI ID=6 |
|
|
SCSI ID=14 |
|||||||
|
|
|
|
|
|
|
|
|
|
||||||||||
7-8 |
SCSI ID bit 3 |
|
|
|
|
|
|
SCSI ID=7 |
|
|
SCSI ID=15 |
||||||||
|
|
|
|
|
|
|
|
||||||||||||
9-10 |
Reserved |
|
|
|
|
|
|
|
|
|
|
|
|
|
|
|
|
||
|
|
|
|
|
|
|
|
Term. power |
|||||||||||
|
|
|
|
|
|
|
|
||||||||||||
11-12 Termination Power |
|
|
|
|
|
|
|
|
|
|
|
|
|
|
|
|
|
||
|
|
|
|
|
|
|
|
||||||||||||
Table 1 ISCSI IDs and Jumper Settings for an Internal LTO-3 Tape Drive
|
Jumpers |
|
|
|
|
|
|
|
|
SCSI ID |
1–2 |
3–4 |
5–6 |
7–8 |
|
|
|
|
|
0 |
Open |
Open |
Open |
Open |
|
|
|
|
|
1 |
Shunted |
Open |
Open |
Open |
|
|
|
|
|
LTO-3 Tape Drive User’s Guide |
9 |

Chapter 2 Installation
Installing an Internal LTO-3 Tape Drive
|
Jumpers |
|
|
|
|
|
|
|
|
SCSI ID |
1–2 |
3–4 |
5–6 |
7–8 |
|
|
|
|
|
2 |
Open |
Shunted |
Open |
Open |
|
|
|
|
|
3 |
Shunted |
Shunted |
Open |
Open |
|
|
|
|
|
4 |
Open |
Open |
Shunted |
Open |
|
|
|
|
|
5 |
Shunted |
Open |
Shunted |
Open |
|
|
|
|
|
6 (default) |
Open |
Shunted |
Shunted |
Open |
|
|
|
|
|
8 |
Open |
Open |
Open |
Shunted |
|
|
|
|
|
9 |
Shunted |
Open |
Open |
Shunted |
|
|
|
|
|
10 |
Open |
Shunted |
Open |
Shunted |
|
|
|
|
|
11 |
Shunted |
Shunted |
Open |
Shunted |
|
|
|
|
|
12 |
Open |
Open |
Shunted |
Shunted |
|
|
|
|
|
13 |
Shunted |
Open |
Shunted |
Shunted |
|
|
|
|
|
14 |
Open |
Shunted |
Shunted |
Shunted |
|
|
|
|
|
15 |
Shunted |
Shunted |
Shunted |
Shunted |
|
|
|
|
|
Terminator Power
By default, terminator power is disabled on the internal LTO-3 Tape
Drive. To enable terminator power, place a jumper across pins 11 and 12.
Note: The internal LTO-3 Tape Drive does not provide SCSI termination. Thus, a terminator must be installed on the drive if it is the last device in a SCSI chain.
10 |
LTO-3 Tape Drive User’s Guide |
Mounting the
Internal LTO-3
Tape Drive
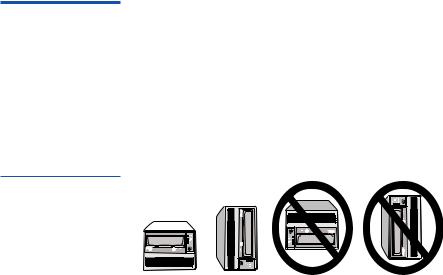
Figure 3 Acceptable
Mounting Orientations
Chapter 2 Installation
Installing an Internal LTO-3 Tape Drive
You can mount the internal LTO-3 Tape Drive either horizontally or vertically, with the drive’s left side facing up (see figure 3).
If you mount the drive:
•Vertically the left side of the drive must face up and the side of the drive should be within 5 degrees of horizontal.
•Horizontally, the base of the drive must be within 15 degrees of horizontal and the drive must not be upside down.
Yes |
Yes |
No |
No |
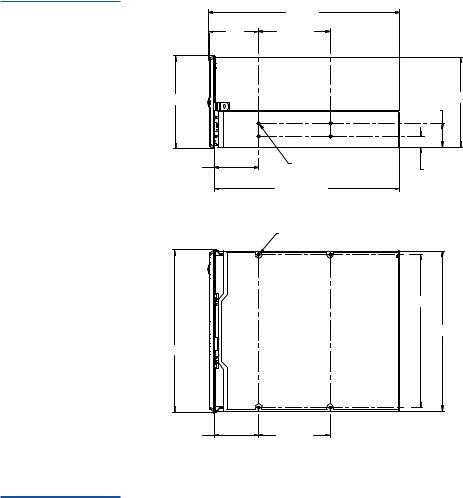
Mount the drive in a 5.25-inch, full-height drive bay and secure it using two M3.0 X 5 metric screws on each side of the drive. Do not use screws longer than 5 mm or you may damage the drive. Figure 4 shows the locations of the mounting-screw holes on the side and bottom of the drive, respectively.
LTO-3 Tape Drive User’s Guide |
11 |
Chapter 2 Installation
Installing an Internal LTO-3 Tape Drive
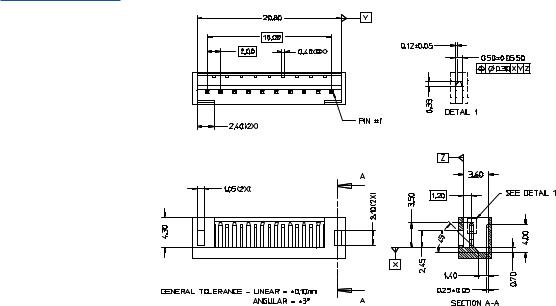
Figure 4 Internal |
|
212.0 Max. |
|
LTO-3 Tape Drive |
|
(Less connectors) |
|
55.9 |
79.24 ± 0.20 |
|
|
Mounting Dimensions |
|
||
|
|
|
|
|
84.3 |
|
82.6 Max |
|
|
|
|
|
|
|
21.80 ± 0.20 |
|
48.90 ± 0.60 |
4 x M3.0 Nearside |
9.90 ± 0.20 |
|
4 x M3.0 Farside |
||
|
From Upper Bezel |
||
|
|
|
|
|
Mounting Tabs |
|
|
|
|
205.0 Max. |
|
|
|
Length of Drive |
|
|
|
without Bezel |
|
|
|
(Less connectors) |
|
147.8
48.90 ± 0.60 From Upper Bezel Mounting Tabs
4 x M3.0 x 5.0 Deep
189.70 ± 0.20
146.05 ± 0.25
79.24 ± 0.20
Connector Detail Two connectors are specified, a fixed board connector and a free cable connector.
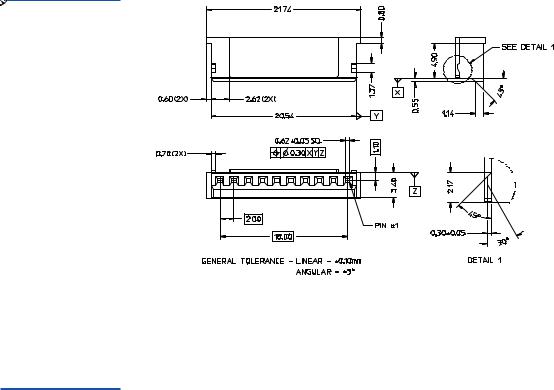
ADI Fixed Board Connector
The fixed board connector (see figure 5) is intended to be attached to a circuit board in a removable medium device. It may also be used in the automation device containing the removable medium device. The attachment of the connector to the circuit board that is, surface mount or through-hole) is beyond the scope of this standard. The location of the
12 |
LTO-3 Tape Drive User’s Guide |
Chapter 2 Installation
Installing an Internal LTO-3 Tape Drive
connector in a removable medium or automation device is beyond the scope of this standard.
Figure 5 ADI Fixed
Board Connector
ADI Free Cable |
The free cable connector is intended to mate with the fixed board |
Connector |
connector (see figure 6). |
LTO-3 Tape Drive User’s Guide |
13 |
Chapter 2 Installation
Installing an Internal LTO-3 Tape Drive
Figure 6 ADI Free
Cable Connector
When the ADI free cable connector is used on both ends of a cable, likenumbered pins shall be connected together, that is, pin 1 on end A is wired to pin 1 on end B, pin 2 on end A to pin 2 on end B, and so forth.
Connecting a SCSI The internal LTO-3 Tape Drive has an Ultra 160 SCSI interface,
Cable terminated by a 68-pin LVD SCSI connector. Use the following procedure to connect a SCSI cable to this connector.
1Turn off all power to the drive and the computer.
2Attach the SCSI interface cable to the 68-pin SCSI interface connector on the back of the drive (see figure 7).
14 |
LTO-3 Tape Drive User’s Guide |
Chapter 2 Installation
Installing an Internal LTO-3 Tape Drive
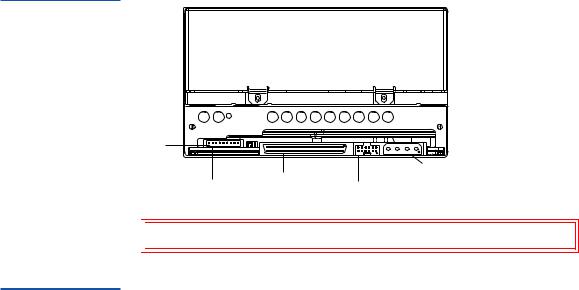
Figure 7 Rear View of the Internal LTO-3 Tape drive
Pin 1 |
|
|
|
|
Power |
|
68-pin SCSI |
connector |
Serial Library |
connector |
Drive configuration |
Port |
|
jumper pins |

 Caution: Install an LVD drive only in an LVD environment.
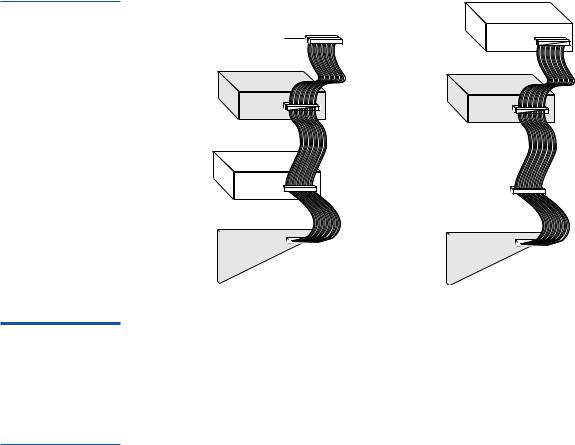
Checking the SCSI The Internal LTO-3 Tape Drive does not provide SCSI termination. You Termination must place a SCSI bus terminator or a SCSI device with termination
enabled at the end of the SCSI chain. Two examples of SCSI termination are shown in figure 8.
The Internal LTO-3 Tape Drive provides terminator power if a jumper is placed on the termination power jumper pins (see Terminator Power).
LTO-3 Tape Drive User’s Guide |
15 |
Chapter 2 Installation
Installing an Internal LTO-3 Tape Drive
Figure 8 Two SCSI |
|
SCSI device |
Termination Examples |
|
(termination |
for the Internal LTO-3 |
SCSI Terminator |
enabled) |
Tape Drive |
|
|
|
Tape drive |
|
|
(no |
Tape drive |
|
termination) |
|
|
|
(no |
|
|
termination) |
|
SCSI device |
|
|
(termination |
|
|
disabled) |
|
SCSI Controller |
|
|
|
|
|
SCSI Controller |
|
|
|
|
|
|
|
|
|
|
|
|
|
|
|
||
(termination enabled) |
|
|
|
|
|
(termination enabled) |
|
|
|
|
|
|
|
|
|
|
|
|
|
|
|
|
|
Connecting a Serial Cable for Tape Libraries
Table 2 Serial Interface Connector Pin Assignments (LTO-3)
The internal LTO-3 Tape Drive includes an RS-422 serial interface for tape libraries. This connector is an in-line shrouded and keyed 10-pin 2 mm connector. It is located on the lower left side of the back of the drive (see figure 7). Table 2 shows the pin descriptions for the serial interface connector.
Pin Number |
Description |
|
Pin Number |
Description |
|
|
|
|
|
1 |
+Txa - Rxd |
|
6 |
Sensed |
2 |
-Txa - Rxd |
|
7 |
Sensea |
3 |
Ground |
|
8 |
Reseta |
4 |
-Txd - Rxa |
|
9 |
Signalaux |
5 |
+Txd - Rxa |
|
10 |
Senseaux |
16 |
LTO-3 Tape Drive User’s Guide |
Loading...