


P10
Table of contents
 Loading...
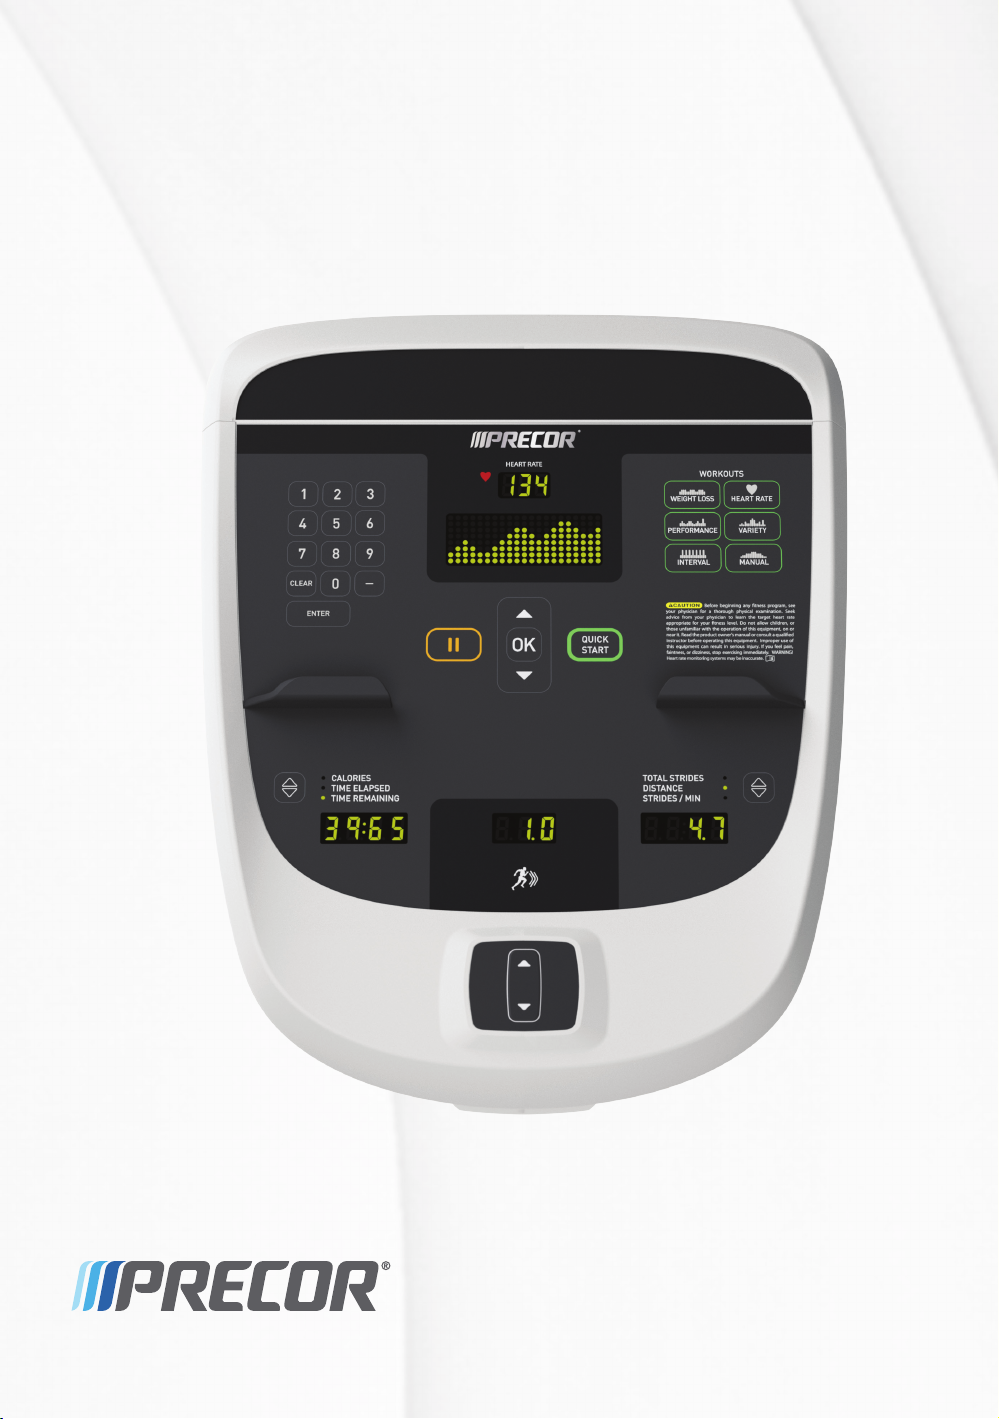
Operating and Maintaining the P10 Console


Edition Information
OPERATING AND MAINTAINING THE P10 CONSOLE
P/N 302291-101 rev A
Copyright © January 2013 Precor Incorporated. All rights
reserved. Specifications subject to change without notice.
Trademark Note
Precor, AMT, EFX, and Preva are registered trademarks of
Precor Incorporated. Other names in this document may be
the trademarks or registered trademarks of their respective
owners.
Intellectual Property Notice
All rights, title, and interests in and to the software of the
Preva Business Suite, the accompanying printed materials,
any copies of such software, and all data collected via the
Preva Business Suite, are exclusively owned by Precor or its
suppliers, as the case may be.
Precor is widely recognized for its innovative, award-winning
designs of exercise equipment. Precor aggressively seeks U.S.
and foreign patents for both the mechanical construction and
the visual aspects of its product design. Any party
contemplating the use of Precor product designs is hereby
forewarned that Precor considers the unauthorized
appropriation of its proprietary rights to be a very serious
matter. Precor will vigorously pursue all unauthorized
appropriation of its proprietary rights.
Precor Incorporated
20031 142nd Ave NE, P.O. Box 7202
Woodinville, WA 98072-4002
1-800-347-4404
http://www.precor.com

WARNING
Important Safety Instructions
Important: Save these instructions for future reference.
Read all instructions in the documentation provided with your
exercise equipment, including all assembly guides, user
guides, and owner’s manuals, before installation of this
device.
Note: This product is intended for commercial use.
The display apparatus (hereinafter referred to as the console)
is intended to be shipped with new Precor exercise equipment
(hereinafter referred to as the base unit). It is not packaged for
individual sale.
To prevent injury, the console must be
attached securely to the base unit following all
assembly and installation instructions shipped
with the base unit. The console is intended to
be connected to AC mains power through the
furnished power supply ONLY. It should be
powered on only when installed as described
in the assembly and installation instructions
shipped with the base unit. The console is
intended for use only with Precor fitness
equipment, not as a standalone device.
Safety Precautions
Always follow basic safety precautions when using this
equipment to reduce the chance of injury, fire, or damage.
Other sections in this manual provide more details of safety
features. Be sure to read these sections and observe all safety
notices. These precautions include the following:
Read all instructions in this guide before installing and
using the equipment and follow any labels on the
equipment.

4 Operating and Maintaining the P10 Console
Make sure all users see a physician for a complete
physical examination before they begin any fitness
program, particularly if they have high blood pressure,
high cholesterol or heart disease; have a family history of
any of the preceding conditions; are over the age of 45;
smoke; are obese; have not exercised regularly in the past
year; or are taking any medication.
French equivalent of the above notice, for Canadian
markets: Il est conseillé aux utilisateurs de subir un examen
médical complet avant d’entreprendre tout programme
d’exercice, en particulier s’ils souffrent d’hypertension
artérielle, ou de cardiopathie ou ont un taux de cholestérol
élevé, s’ils ont des antécédents familiaux des précédentes
maladies, s’ils ont plus de 45 ans, s’ils fument, s’ils sont
obèses, s’ils n’ont pas fait d’exercices réguliers au cours de
l’année précédente ou s’ils prennent des médicaments. Si vous
avez des étourdissements ou des faiblesses, arrêtez les
exercices immédiatement.
Do not allow children, or people unfamiliar with the
operation of this equipment, on or near it. Do not leave
children unsupervised around the equipment.
Make sure all users wear proper exercise clothing and
shoes for their workouts and avoid loose or dangling
clothing. Users should not wear shoes with heels or
leather soles, and they should check the soles of their
shoes to remove any dirt and embedded stones. They
should also tie long hair back.
Never leave the equipment unattended when it is plugged
in. Unplug the equipment from its power source when it is
not in use, before cleaning it, and before providing
authorized service.
Note: The optional power adapter is considered a power
source for self-powered equipment.
Use the power adapter provided with the equipment. Plug
the power adapter into an appropriate, grounded power
outlet as marked on the equipment.
Care should be taken when mounting or dismounting the
equipment.
For Treadmills: Do not use typing or web surfing features
while walking at speeds that exceed a slow and relaxed
leisurely pace. Always stabilize yourself by holding a
stationary handle bar while using typing or web surfing
features.
For AMT and EFX: Always stabilize yourself by holding a
stationary handle bar while using typing or web surfing
features.

Important Safety Instructions 5
Read, understand, and test the emergency stop
procedures before use.
Keep the power cord or optional power adapter and plug
away from heated surfaces.
Route power cables so that they are not walked on,
pinched, or damaged by items placed upon or against
them, including the equipment itself.
Ensure the equipment has adequate ventilation. Do not
place anything on top of or over the equipment. Do not
use on a cushioned surface that could block the
ventilation opening.
Assemble and operate the equipment on a solid, level
surface.
SPACING—The below minimum spacing
recommendations are based on a combination of the
ASTM (U.S.) voluntary standards and EN (European)
regulations as of October 1, 2012, for access, passage
around, and emergency dismount:
Treadmills—a minimum of 0.5 m (19.7 in.) on each
side of the treadmill and 2 m (78 in.) behind the
machine.
Cardio equipment other than treadmills—a
minimum of 0.5 m (19.7 in.) on at least one side, and
0.5 m (19.7 in.) behind or in front the machine.
Careful consideration should be given to the
requirements of the Americans with Disabilities Act
(ADA), US Code 28 CFR (see Section 305). ASTM
standards are voluntary and may not reflect current
industry standards. The actual area for access, passage
around, and emergency dismount is the responsibility of
the facility. The facility should consider the total space
requirements for training on each unit, voluntary and
industry standards, and any local, state, and federal
regulations. Standards and regulations are subject to
change at any time.
Important: These spacing recommendations should be used
when positioning equipment away from sources of heat, such
as radiators, heat registers, and stoves. Avoid temperature
extremes.
Keep equipment away from water and moisture. Avoid
dropping anything on or spilling anything inside the
equipment to prevent electric shock or damage to the
electronics.

6 Operating and Maintaining the P10 Console
When using the treadmill, always attach the safety clip to
your clothing before beginning your workout. Failure to
use the safety clip may pose a greater risk of injury in the
event of a fall.
Keep in mind that heart rate monitors are not medical
devices. Various factors, including the user’s movement,
may affect the accuracy of the heart rate readings. The
heart rate monitors are intended only as exercise aids in
determining heart rate trends in general.
Do not operate electrically powered equipment in damp
or wet locations.
Never operate this equipment if it has a damaged cord or
plug, if it is not working properly, or if it has been dropped,
damaged, or exposed to water. Call for service
immediately if any of these conditions exist.
Maintain the equipment to keep it in good working
condition, as described in the Maintenance section of the
owner’s manual. Inspect the equipment for incorrect,
worn, or loose components, and then correct, replace or
tighten prior to use.
If you plan to move the equipment, obtain help and use
proper lifting techniques.
Equipment Weight Restrictions: Do not use the treadmill
if you weigh more than 500 pounds (225 kg). If you weigh
more than 350 pounds (160 kg), do not run on the
treadmill. For all other fitness equipment, the weight limit
is 350 pounds (160 kg).
Use the equipment only for its intended purpose as
described in this manual. Do not use accessory
attachments that are not recommended by Precor. Such
attachments may cause injuries.
Do not operate the equipment where aerosol (spray)
products are being used or where oxygen is being
administered.
Do not use outdoors.
Do not attempt to service the equipment yourself, except
to follow the maintenance instructions in the owner’s
manual.
Never drop or insert objects into any opening. Keep hands
away from moving parts.
Important Safety Instructions 7
Do not set anything on the stationary handrails,
handlebars, control console, or covers. Place liquids,
magazines, and books in the appropriate receptacles.
Do not lean on or pull on the console at any time.
CAUTION: DO NOT remove the cover, or you may risk injury due
to electric shock. Read the assembly and maintenance guide
before operating. There are no user-serviceable parts inside.
Contact Customer Support if the equipment needs servicing. For
use with single phase AC power only.
Hazardous Materials and Proper Disposal
The batteries within self-powered equipment contain
materials that are considered hazardous to the environment.
Federal law requires proper disposal of these batteries.
If you plan to dispose of your equipment, contact Precor
Commercial Products Customer Support for information
regarding battery removal. Refer to Obtaining Service.
Product Recycling and Disposal
This equipment must be recycled or discarded according to
applicable local and national regulations.
Product labels, in accordance with European Directive
2002/96/EC concerning waste electrical and electronic
equipment (WEEE), determine the framework for the return
and recycling of used equipment as applicable throughout the
European Union. The WEEE label indicates that the product is
not to be thrown away, but rather reclaimed upon end of life
per this Directive.
In accordance with the European WEEE Directive, electrical
and electronic equipment (EEE) is to be collected separately
and to be reused, recycled, or recovered at end of life. Users
of EEE with the WEEE label per Annex IV of the WEEE
Directive must not dispose of end of life EEE as unsorted
municipal waste, but use the collection framework available
to customers for the return, recycling, and recovery of WEEE.
Customer participation is important to minimize any potential
effects of EEE on the environment and human health due to
the potential presence of hazardous substances in EEE. For
proper collection and treatment, refer to Obtaining Service.

8 Operating and Maintaining the P10 Console
WARNING
Regulatory Notices for Cardiovascular Exercise Equipment
The regulatory information in this section applies to the
Safety Approvals for Cardiovascular Equipment
Radio Frequency Interference (RFI)
exercise equipment and its control console.
Precor equipment has been tested and found to comply with
the following applicable safety standards.
Cardiovascular Type Equipment:
CAN/CSA, IEC, EN 60335-1 (Household and similar
electrical appliances - Safety)
EN 957 (Stationary training equipment, class S/B
compliant equipment)
This Precor exercise equipment conforms to the following
national standards defining acceptable limits for radio
frequency interference (RFI).
Federal Communications Commission, Part 15
This equipment has been tested and found to comply with the
limits for a Class A digital device, pursuant to Part 15 of the
FCC Rules. These limits are designed to provide reasonable
protection against harmful interference in a commercial
installation. The equipment generates, uses, and can radiate
radio frequency energy and, if not installed and used in
accordance with the owner’s manual instructions, can cause
harmful interference to radio communications.
Operation is subject to the following two conditions: (1) this
device may not cause harmful interference, and (2) this
device must accept any interference received, including
interference that may cause undesired operation.
Per FCC rules, changes or modifications not
expressly approved by the manufacturer could
void the user’s authority to operate the
equipment.

Important Safety Instructions 9
Industry Canada
This device complies with RSS-210:2007 of the Spectrum
Management & Telecommunications Radio Standards
Specification. Operation is subject to the following two
conditions: (1) this device may not cause harmful
interference, and (2) this device must accept any interference
received, including interference that may cause undesired
operation.
This Class A digital apparatus complies with Canadian
ICES-003.
Cet appareil numérique de la classe A est conforme à la norme
NMB-003 du Canada.
ATTENTION: Haute Tension
Débranchez avant de réparer
European Applications
CE compliance is claimed to the following directives:
2004/108/EC EMC Directive
2006/95/EC LVD Directive
2002/95/EC RoHS Directive
Directive compliance has been verified to the following
standards:
EN 55022
EN 55024
EN 60335-1
EN 60065 (P80 and PVS)
10 Operating and Maintaining the P10 Console
Electrical Recommendations: 120 V and 240 V Treadmills
Note: This is a recommendation only. NEC (National Electric
Code) guidelines or local region electric codes must be
followed.
You should have received a power cable that meets your local
electrical code requirements along with the equipment.
Precor treadmills must be connected to a 20 amp individual
branch circuit that can be shared only with one PVS. If you
need additional help with the power connections contact your
Precor authorized dealer.
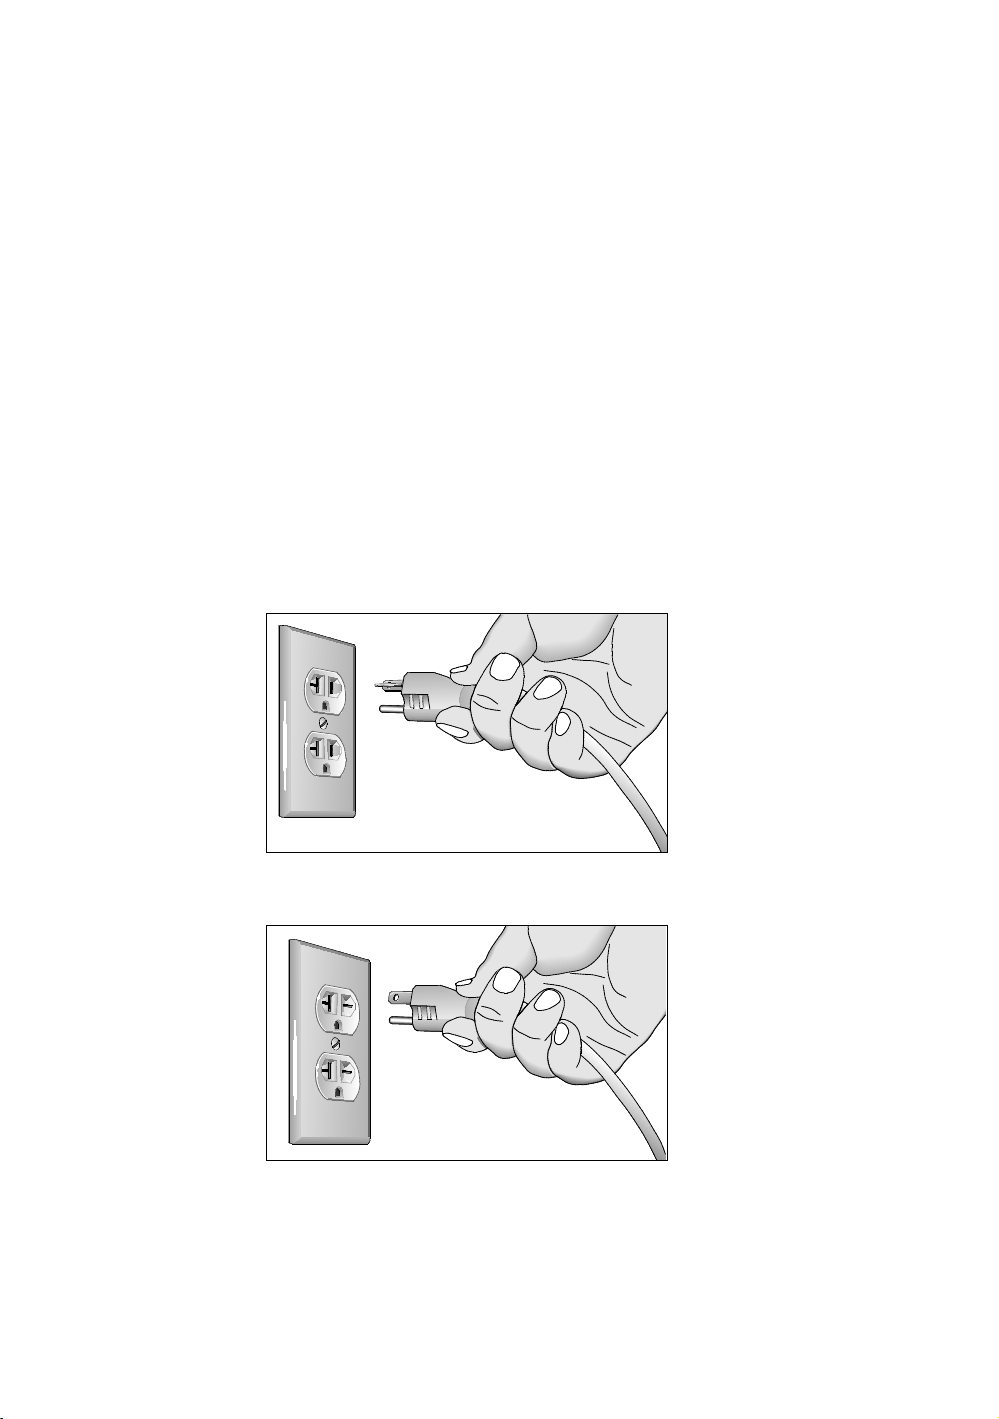
Important: An individual branch circuit provides a hot conductor
and neutral conductor to a receptacle. The conductors must not be
looped, "daisy-chained", or connected to any other conductors.
The circuit must be grounded according to NEC guidelines or local
region electric codes.
Figure 1: North American 120-volt, 20-amp power receptacle
Figure 2: North American 240-volt, 20-amp power receptacle
Important Safety Instructions 11
Electrical Recommendations: All Equipment Excluding Treadmills
Note: This is a recommendation only. NEC (National Electric
Code) guidelines or local region electric codes must be
followed.
For equipment fitted with a P80 console or Personal Viewing
System (PVS) screen a separate power connection is
required. For a 20 amp branch circuit up to 10 screens can be
connected. If the branch circuit has any other devices plugged
into the circuit, then the number of screens must be reduced
by the wattage of the other devices.
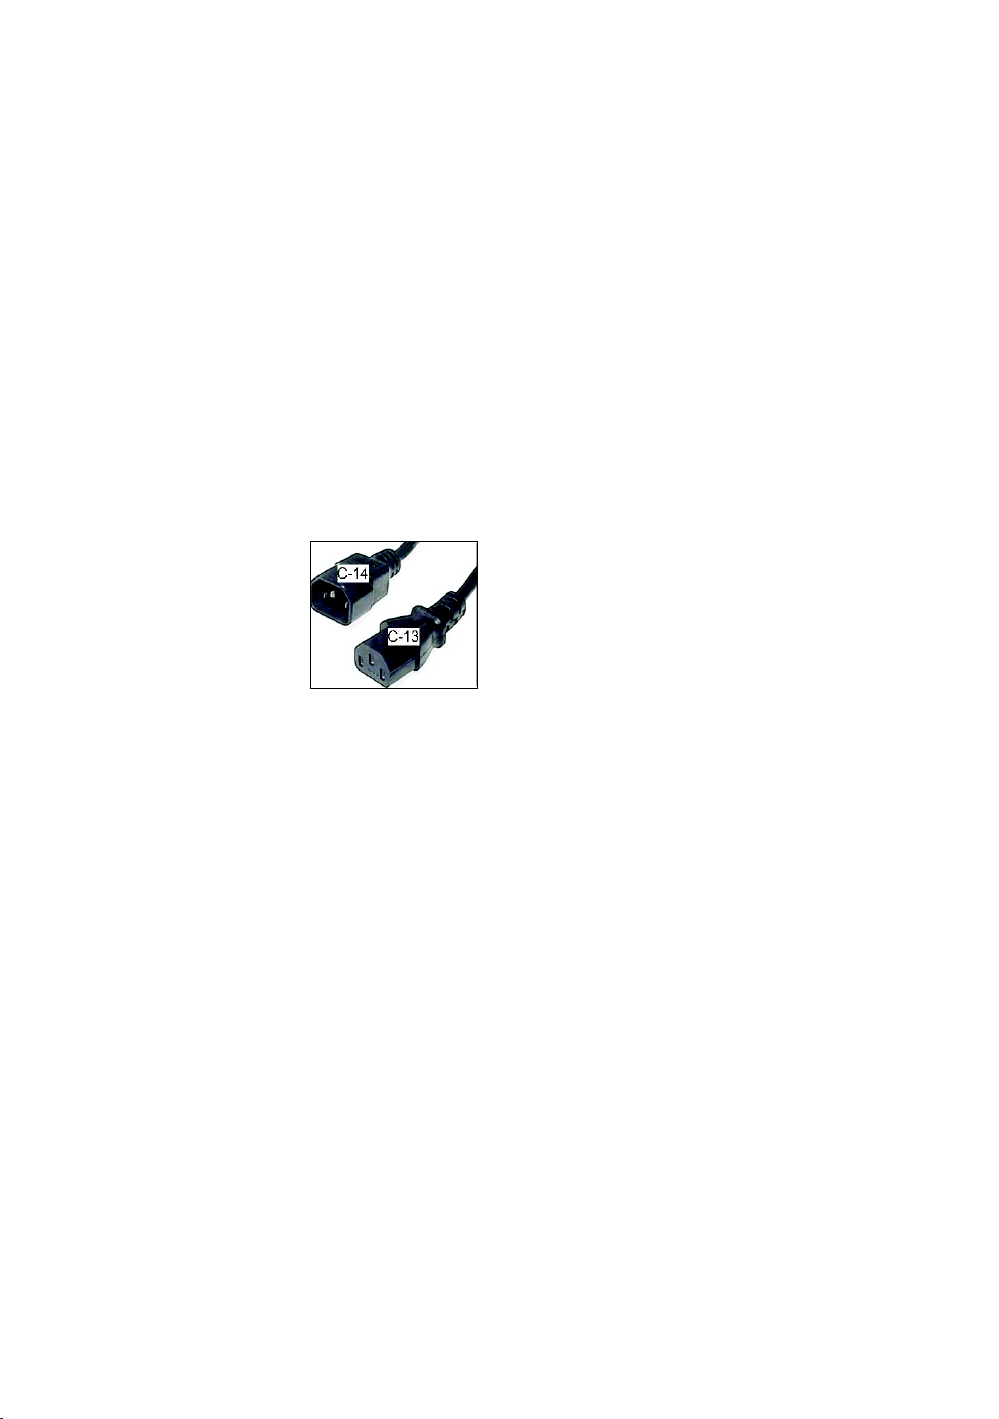
Note: The typical splitter power cords that have IEC-320 C13
and C14 plugs have a recommended maximum capacity of
five screens.
Figure 3: IEC-320 C13 and C14 plugs
Obtaining Service
Do not attempt to service the equipment except for
maintenance tasks. If any items are missing, contact your
dealer. For more information regarding customer support
numbers or a list of Precor authorized service centers, visit
the Precor web site at http://www.precor.com.

12 Operating and Maintaining the P10 Console

Table of Contents
Important Safety Instructions ................................................... 3
Safety Precautions .................................................................................3
Hazardous Materials and Proper Disposal .................................... 7
Product Recycling and Disposal ....................................................... 7
Regulatory Notices for Cardiovascular
Exercise Equipment ...................................................................... 8
Electrical Recommendations: 120 V and
240 V Treadmills ........................................................................ 10
Electrical Recommendations: All Equipment
Excluding Treadmills .................................................................... 11
Obtaining Service .................................................................................. 11
Getting Started ........................................................................ 15
Activating the Console for Self-Powered Equipment ................ 15
Identifying Parts of the Console ....................................................... 17
Setting Up the Console ............................................................ 19
System Settings .................................................................................... 19
Club Parameters .................................................................................. 20
Viewing the Informational Displays .............................................. 24
User ID Entry with CSAFE Equipment ........................................... 28
Introducing Users to the P10 Console ..................................... 29
Using the Touch Heart Rate Feature ............................................. 29
Using a Chest Strap Transmitter ..................................................... 31
Using the Treadmill Safety Clip ...................................................... 32
Treadmill Auto Stop™ (Automatic Stop) Function ................... 34
Starting a Workout .................................................................. 35
Starting a Preset Programmed Workout ...................................... 36
Pausing and Resuming an Exercise Session ................................ 36
Ending a Session.................................................................................. 38
Maintenance ............................................................................ 39
Cleaning the Console and Display ................................................. 39
Changing the Belt (Newer Model AMT Only) ........................... 40

14 Operating and Maintaining the P10 Console

Chapter 1
Getting Started
The P10 console offers administrators the ability to set default
values that meet their specific needs. These values include
items like language, units of measure, and setting a maximum
Activating the Console for Self-Powered Equipment
allowed workout time for each piece of equipment.
Precor equipment is either self-powered or externally
powered using an optional power adapter. Self-powered
equipment requires the user exercise to initialize the console.
This section provides more detail about powering equipment.
Activating the Console for Self-Powered Equipment
On self-powered equipment, when a user starts exercising,
the console initializes and displays the Welcome banner. A
minimum rate of motion must be maintained for the
Welcome banner to appear. The words PEDAL FASTER (or
the equivalent message depending on the equipment type)
appear in the display when the rate of motion drops below the
minimum requirements.
The equipment saves its battery charge by moving into a
shutdown mode. If the user does not maintain the minimum
rate of motion, a 30-second shutdown process begins.
In this mode, the console displays a countdown indicator and
ignores all keypresses. If no movement is detected or the rate
of motion remains below the minimum, the indicator changes
as the countdown continues.
Note: The user can resume exercising before the countdown
period elapses and the workout will continue from the point at
which it was paused.

16 Operating and Maintaining the P10 Console
Optional Use of the Power Adapter
An optional AC power adapter provides sustained power to
the equipment. This adapter allows you to change settings
without having to pedal the equipment. To purchase the
power adapter, contact your dealer.
If you purchase the optional power adapter, you must also
purchase the internal cable kit. The kit supplies the cable,
bracket, and fasteners that connect the power adapter to the
lower electronics board.
CAUTION: The internal cable kit must be installed by authorized
service personnel. Do not attempt installation on your own as you
could void the Precor Limited Warranty. For more information,
refer to Obtaining Service.
Important: If this equipment includes a P80 console, the optional
power adapter and the internal cable kit must still be installed to
provide continuous power to the base unit and support its internal
battery.
Once the internal cable kit is installed, you can plug the
optional power adapter into the equipment. Plug the opposite
end into the appropriate power source for your equipment
(120 V or 240 V). Review the safety instructions found at the
beginning of this manual before using the power adapter.
CAUTION: When the optional power adapter is in use, make sure
that the power supply cord does not create a safety hazard. Keep
it out of the way of traffic and moving parts. If the power supply
cord or power conversion module is damaged, it must be replaced.
The control console functions differently when the power
adapter is connected. Because the power adapter provides a
constant source of power, a user can pause for brief periods
without initiating shutdown procedures. When the pause time
limit expires and the user has not resumed exercising, the
console returns to the Welcome screen. The default pause
time is 30 seconds for all fitness equipment. Refer to the
manual for your control console for instructions on setting or
changing the pause time limit.
Getting Started 17
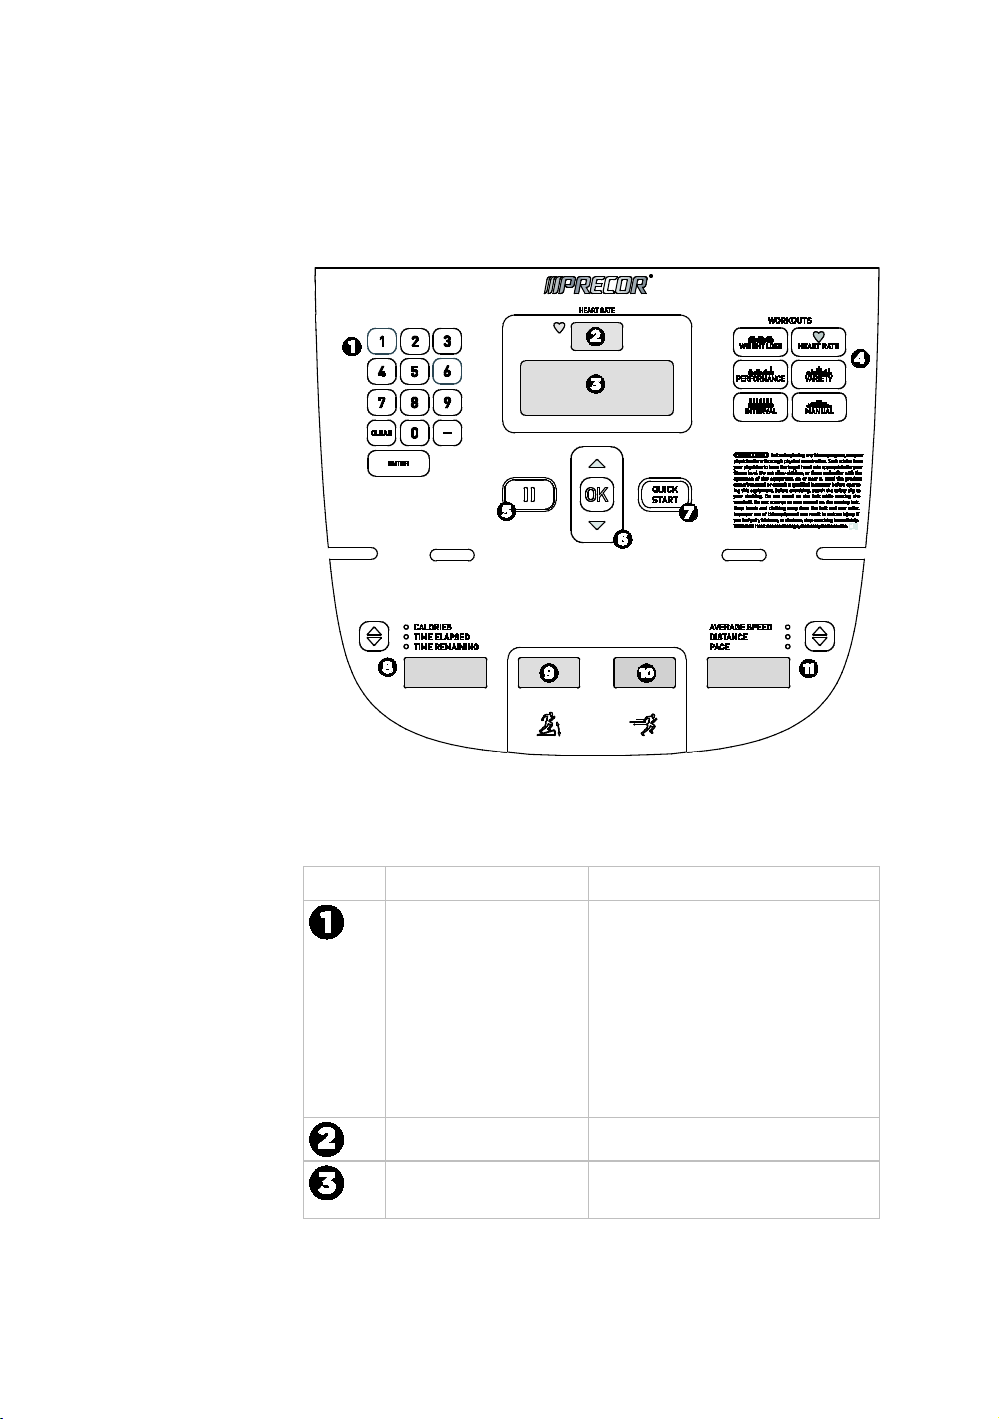
Identifying Parts of the Console
The following figure provides information about the console
keys. The number and actions of the console keys may differ
slightly depending on the type of equipment.
Figure 4: P10 console keys
Table 1. Parts of the console
Number Name Details
Number pad Enter numerical information such
Heart Rate Displays your current heart rate.
Lower Display Displays graphical information
as age, weight, and passwords.
You can also enter and change
channels using the number pad.
• Press Clear to delete the
numbers you entered.
• Press Enter to confirm your
selection.
about your workout progress.
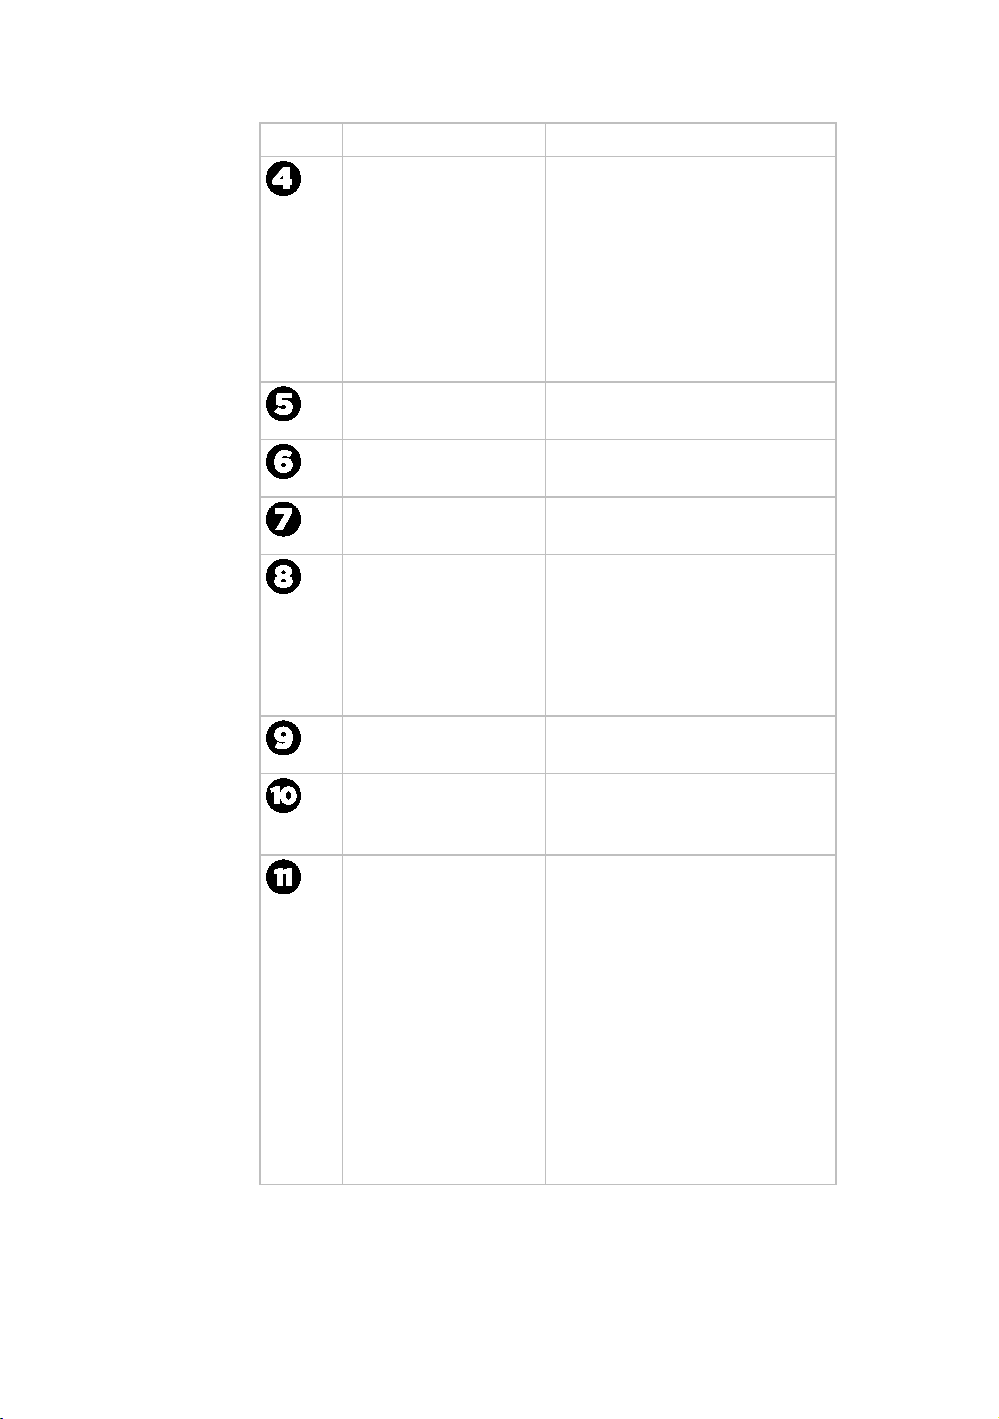
18 Operating and Maintaining the P10 Console
Number Name Details
Workouts Examples of workouts:
Pause Use to pause or end a workout
OK and Up/Down
arrows
Quick Start Press Quick Start to begin
• Calories
• Time Elapsed
• Manual
• Heart Rate
• Interval
• Weight Loss
• Variety
• Performance
session.
Use to navigate options and
settings.
exercising.
Use the ▲ or ▼ arrows to
change what information is
displayed.
• Time Remaining
• Watts (bike)
• Time (bike)
Incline or Crossramp Available on treadmill and EFX
Speed or Resistance Available on AMT, bike,
(dual).
treadmill, EFX (single), and EFX
(dual).
• Average Speed
(treadmill)
• Speed (bike)
• Pace (treadmill)
• Distance (all
Use the ▲ or ▼ arrows to
change what information is
displayed.
equipment)
• RPM (bike)
• Cals/Min (AMT)
• Strides/Min
(AMT, EFX)
• Total Strides (EFX)

Chapter 2
Setting Up the Console
Use the System mode to configure settings in ways that
benefit your users and your facility. The System menu is
visible only to administrators and registered service
technicians. Changes made to these settings are saved to the
fitness equipment.
The System Settings categories are:
Club Parameters
Informational Display
System Settings
System Setting features remain hidden from club patrons and
can only be accessed using special keypresses. To view the
System Settings, the equipment must be in the Welcome
state. The equipment is in the Welcome state when it is on,
but not actually in use. This means that there is no exercise
session, data entry, or diagnostic operation in progress.
When the equipment is in the Welcome state:
SELECT A WORKOUT OR PRESS QUICKSTART TO
BEGIN scrolls in the text display.
On the treadmill, the belt is not moving and the lift motor
is off.
Note: On self-powered equipment, the console initializes
when you begin working out. You must maintain a minimum
rate of motion for the Welcome banner to appear.
The changes made in System Setting modes become the
default settings when the display resets to the Welcome
banner.
CAUTION: If you change the Unit of Measure display on the
treadmill, check the speed setting to verify that it is correct.

20 Operating and Maintaining the P10 Console
To view the Club Settings:
1. At the Welcome banner, press Pause.
2. Press the following number keys in sequence to enter the
password:
5 6 5 1 5 6 5
3. Press OK.
The Set Club Parameters banner appears.
Table 2. Navigational keys for the system setting modes
Key Function
▲ or ▼ Navigates the settings menu
OK Selects a menu setting and confirms the changes made to
the value setting
CLEAR Returns to the previous menu level without saving changes
PAUSE Exits the System Settings mode and returns to the
Welcome banner
Club Parameters
Use the following information to customize the equipment for
your setting.
Note: When you make changes to the club parameters, the
new settings replace the factory default settings.
Safety Code (Treadmill only)
Value: Enabled or Disabled
(Default: Disabled)
When the equipment is shipped from the factory, the safety
code protection feature is disabled. If you enable the safety
code, your users will need to enter a four digit number to
begin their exercise session and start the running belt. The
code is 1 2 3 4.

Setting Up the Console 21
Select Language (All Equipment)
Value: English, Deutsch, Espanol, Francais, Netherlands,
Portugues, Rucckijj, and Italiano
(Default: English)
Select your preferred language for the console display.
Note: Programming prompts are not affected by language
selection. The prompts in this section continue to appear in
English.
Set Units (All Equipment)
Value: U.S. or Metric
(Default: U.S.)
The equipment can display measurements in either Metric or
U.S. Standard.
Important: If you change the Unit of Measure on a treadmill, be
sure to check the speed setting to verify that it is correct.
Set Max Workout Time (All Equipment)
Value Range: 1 to 240 minutes
(Default: 60 minutes)
You can set a maximum workout time per session. Choose a
time limit between 1 and 240 minutes, or select No Limit if
you do not want to set a time limit. For example, if you set the
time limit to 20 minutes, users can only enter a workout time
between 1 and 20 minutes.
Set Max Pause Time (All Equipment)
Value Range: 1 to 120 seconds
(Default: 120 seconds)
This setting limits how long equipment remains in a paused
banner during a workout before it resets.
Note: The optional power adapter must be connected on
self-powered equipment to establish a definitive pause time
limit. If the optional power adapter is not attached and the
rate of motion drops below the minimum requirements, the
equipment begins its shutdown, effectively eliminating pause
mode.

22 Operating and Maintaining the P10 Console
Set Cool Down Time (All Equipment)
Value Range: 0 to 5 minutes
(Default: 5 minutes)
Select the maximum amount of time the equipment remains
in the cool down mode. The cool down time is the period of
time following the completion of a program when the user
exercises at a reduced work rate.
Set Speed Limit (Treadmill only)
Value Range: Full speed range of equipment
(Default: Maximum speed)
This setting limits how fast the running belt moves and,
consequently, the number of speed settings that are available
to the user. Use it to set the maximum speed that a user can
enter when using the equipment.
The speed is displayed in miles per hour (mph) or kilometers
per hour (kph) depending upon the units of measure (U.S.
Standard or Metric) selected earlier. The values range from
0.5 to 12 mph (0.8 to 20 kph).
Set Incline Limit (Treadmill only)
Value Range: Full grade range of equipment
(Default: Maximum grade possible)
Select the maximum percent incline that a user can enter
when using the equipment. Values range from 0.0 to 15.0.
Hidden Programs (Treadmill only)
Value: Show Programs or Hide Programs
(Default: Hide Programs)
When set to Show Programs the Fitness Test is available.
If set to HIDE PROGRAMS, when the user presses
PERFORMANCE, the message WORKOUT NOT AVAILABLE
will scroll in the text display.

Setting Up the Console 23
Remote Speed Control (Treadmill only)
Value: Enable or Disable
(Default: Disable)
When this feature is enabled, the CSAFE SetSpeed command
and the CSAFE SetGrade command are available if:
The treadmill is in the CSAFE "InUse" state.
The speed or grade values sent are within range.
Set Auto Stop (Treadmill only)
Value: On or Off
(Default: On)
Set to On to bring the treadmill to a gradual stop when no
user is on the equipment. This can occur if a user steps off the
equipment during a workout and does not turn it off.
Set Crossramp Auto-level (EFX only)
Value Range: 0 to 20
(Default: 10)
Use this setting to choose a specific ramp incline so that the
EFX automatically returns to that incline at the end of a
workout session.
Set Resistance Range (Bike only)
Value Range: High, Medium, or Low
(Default: High)
You can set a low, medium, or high base resistance on the
recumbent or upright bikes. There are 25 levels of resistance
within each base setting, but the base setting affects the
overall resistance range. The following ranges are available:
High: Provides full resistance range.
Medium: Provides approximately two thirds of the
resistance that is available within the high group setting.
Low: Provides approximately one third of the resistance
that is available within the high group setting.

24 Operating and Maintaining the P10 Console
Viewing the Informational Displays
Informational Display settings are values that provide you
with information about the equipment. Types of information
contained in this setting group include, an event log, software
and equipment serial numbers, and usage information.
To view the System settings:
1. At the Welcome banner, press Pause.
2. Press the following number keys in sequence to enter the
password:
6 5
3. Press Enter.
Use the following table to set up customized Informational
Display values.
Table 3. Informational Displays values
Product Value Information provided
All ODOMETER Correlates to the type of equipment and
the standard of units, U.S. or Metric,
selected in the programs.
• Treadmill and AMT: Displays the
number of cumulative miles or
kilometers logged to date. In
addition, the AMT displays the
number of vertical strides.
• EFX: Displays the number of total
strides logged to date.
• Bike: Displays the number of total
revolutions logged to date.
AMT BELT USAGE • Belt Stride Count: Tracks the
number of strides on equipment.
• Stride Count Reset: Reset increases
by one each time a reset is
performed.
• Odometer at Last Reset: Records
the odometer reading at the time
the belt was changed. The
equipment odometer continues to
count forward after the belt change.

Setting Up the Console 25
Product Value Information provided
All HOUR METER Displays the number of hours that the
equipment has been in use.
Note: The equipment tracks the elapsed
minutes, but the value that appears is
truncated to the nearest full hour.
All UPPER BOOT
SW PART
Upper board application software part
number and version.
NUMBER
All UPPER BASE
SW PART
Displays the upper base application
software version.
NUMBER
All LOWER BASE
SW PART
Displays the lower application software
version.
NUMBER
All METRICS
BOARD
All SERIAL
NUMBER
Displays the software number on the
Metrics Board.
Displays the model and type of
equipment.
All USAGE LOG • Displays the number of times each
workout has been used and displays
the associated cumulative minutes.
• Displays the user preferences in
workout selection.
All ERROR LOG Displays any event codes that may have
been detected by the software. For
more information, refer to Event Log.

26 Operating and Maintaining the P10 Console
Event (Error) Log
The event log (sometimes referred to as an error log)
contains the following information:
Event number
Odometer value when the event occurred
Hour meter value at the time the event occurred
Current drawn by the motor when the event occurred
(treadmill only)
The following table contains a list of events detectable by the
software.
Table 4. Event log numbers and descriptions
Event
Number
00 Upper PCA memory location event
02 RAM location event
03 EEPROM checksum event
05 Depressed key at power up
09 Lower PCA memory test event
10 Line Frequency out of acceptable range
11 Watchdog (Upper PCA) low voltage power
12 Watchdog (Lower PCA) low voltage power
13 Fan at incorrect speed (version 1 treadmills)
14 Fan fail (Lower PCA)
15 AC input voltage too high
16 AC input voltage too low
20 Too many maximum power requests in one second
21 Too many maximum consecutive power requests
22 No motor pulses at start up
23 Motor pulses missing after start up
24 Reduce speed requested, speed is not reducing
26 Motor pulse width incorrect
27 Too much drive motor current
28 Temperature too high
29 Excessive AC input current
30 Communications event lower board to upper board
Description of Event

Setting Up the Console 27
Event
Description of Event
Number
31 Incorrect Communications event upper board to lower
board
32 Communication event upper board to lower board
33 Incorrect communications event lower board to upper
board
37 E-STOP error (treadmill only)
40 Lift motion detected
42 Lift position value out of range
43 Zero switch not found
44 Un-commanded lift motion
45 Lift going in the wrong direction
50 Too much brake (magnet) current
53 Cannot read target, cannot find home switch
54 Target pulses lost during operation
55 Brake home switch activated unexpectedly
60 Auto Stop sensor failure (treadmill only)
61 Auto Stop not present (treadmill only)
62 Vertical sensor failure (AMT only)
70 Belt replacement, lower control board not read (AMT
only)
71 Belt replacement, new lower control board (AMT only)
72 Belt replacement, lower control board version unknown
(AMT only)
73 Belt replacement, lower control board record bad (AMT
only)
74 Belt replacement, lower control board refurbished
console (AMT only)
75 Belt replacement, refurbished lower control board
(AMT only)
76 Belt replacement, console stride count is less than lower
control board (AMT only)
77 Belt replacement, console stride count is greater than
lower control board (AMT only)
78 Belt replacement warning (AMT only)
79 Belt replacement required (AMT only)

28 Operating and Maintaining the P10 Console
User ID Entry with CSAFE Equipment
This equipment is fully compatible with CSAFE protocols.
When the equipment is connected to a CSAFE master device,
the user is prompted to press ENTER and begin an
identification process. The user ID is displayed as five zeros
and indicates the starting point. The following table describes
key functions while in CSAFE mode.
Table 5. CSAFE access keys
Keys Function
Number
Keypad
CLEAR Erases individual numbers in the user ID from right to
OK Submits the user ID.
PAUSE Resets to the Welcome banner.
Use the number keys to enter a user ID. Once you
have entered the user ID number, press OK to submit
the user ID.
left.
Note: User ID entry is bypassed when the user enters
five zeros. No workout statistics are recorded.
A message appears on the display and indicates when the
user ID is accepted by the CSAFE master device. Once
program selection is complete, the user can begin exercising.
Loading...