


 Loading...
Product Owner's Manual
C952i C954i
C956i C966i
Commercial Treadmills
C966i

Important Safety Instructions
When using the treadmill, always take basic precautions, including the following:
•Read all instructions before using the treadmill. These instructions are written to protect the unit and ensure the safety of those using the treadmill.
•Before beginning any fitness program, make sure all users see a physician for a complete physical examination.
Il est conseillé de subir un examen médical complet avant d’entreprendre tout programme d’exercise. Si vous avez des étourdissements ou des faiblesses, arrêtez les exercices immédiatement.
DANGER To reduce the risk of electrical shock always unplug the treadmill from its power source
before cleaning the unit.
WARNING To reduce the risk of burns, fire, electric shock, or injury, take the following precautions:
•Do not allow children or those unfamiliar with its operation on or near the treadmill. Do not leave children unsupervised around the unit.
•Never leave the treadmill unattended when it is plugged in. Unplug the treadmill from the power source when it is not in use, before cleaning it, and before putting on or taking off parts.
•Assemble and operate the treadmill on a solid, level surface. Locate the treadmill a few feet from walls or furniture.
•Maintain the treadmill in good working condition. Refer to the Maintenance section. Make sure that all fasteners are secure and the running belt is clean and running smoothly.
•Use the treadmill only for its intended purpose as described in this manual. Do not use accessory attachments that are not recommended by the manufacturer, as such attachments may cause injuries.
•Never operate the unit if it is damaged, not working properly, when it has been dropped, or has been dropped in water. Return the treadmill to a service center for examination and repair.
•Keep the power cord and plug away from heated surfaces.
•Do not operate the treadmill where aerosol (spray) products are being used or where oxygen is being administered.
•Do not use outdoors.
NSTRUCTIONSI AFETYS MPORTANTI
Product Owner’s Manual: Important Safety Instructions |
1 |

•Never block the air vents while operating the treadmill. Keep the air vents clean and free of lint, hair, or anything that might impede the free flow of air.
•Do not attempt to service the treadmill yourself except to follow the maintenance instructions found in this manual.
•Never drop or insert objects into any opening. Keep hands away from moving parts.
•Keep all electrical components, such as the power cord and I/O switch away from liquids to prevent shock. Do not set anything on the handrails, display console, or covers. Place liquids, magazines, and books in the appropriate receptacles.
Treadmill Weight Limit
You should not allow runners over 350 lb (160 kg) or walkers heavier than 500 lb (225 kg) on the treadmill.
Treadmill Location
It is important to keep the area around the treadmill open and free from encumbrances such as other equipment. The minimum space requirement needed for user safety and proper maintenance is three feet by six feet (one meter by two meters) square, directly behind the running belt.
Safety Approval
When identified with the ETL-c logo, the unit has been tested and conforms to the requirements of CAN/CSA-E-335-1/3-94, Safety of Household and Similar Electrical Appliances. The treadmill is a Class S/B certified machine according to EN957 - 1,6 standards.
Radio Frequency Interference (RFI)
Federal Communications Commission, Part 15
The treadmill has been tested and found to comply with
•the IEC EMC Directive (international electromagnetic compatibility certification)
•the limits for a Class A digital device, pursuant to Part 15 of the FCC Rules. These limits are designed to provide reasonable protection against harmful interference in a residential installation. The treadmill generates, uses, and can radiate radio frequency energy and, if not installed and used in accordance with the owner’s manual instructions, may cause harmful interference to radio communications.
WARNING Per FCC rules, changes or modifications not expressly approved by Precor could void the
user’s authority to operate the equipment.
NSTRUCTIONSI AFETYS MPORTANTI
Product Owner’s Manual: Important Safety Instructions |
2 |

Canadian Department of
Communications
This digital apparatus does not exceed the Class A limits for radio noise emissions from digital apparatus set out in the Radio Interference Regulations of the Canadian Department of Communications.
Le présent appareil numérique n’émet pas de bruits radioéélectriques dépassant les limites applicables aux appareils numériques de la class A prescrites dans le Règlement sur le brouillage radioélectrique édicté par le ministére des Communications du Canada.
ATTENTION: Haute Tension
Débranchez avant de réparer
European Applications
This product conforms to the requirements of the European Council Directive 89/336/EEC, Electromagnetic Compatibility and has been tested to the following standards:
EN55022, Limits & Methods of Measurement of Radio Interference, Information Technology Equipment.
EN50082-1, Generic Immunity Standard for Residential, Commercial and Light Industrial Products.
This product also conforms to the requirements of the European Council Directive 73/23/EEC, Low Voltage Directive and has been tested to the following standard:
IEC 335-1, Safety of Household and similar Electrical Appliances.
NSTRUCTIONSI AFETYS MPORTANTI
Product Owner’s Manual: Important Safety Instructions |
3 |
Grounding Instructions
The treadmill must be grounded. If the unit malfunctions or breaks down, grounding provides a path of least resistance for electric current, which reduces the risk of electrical shock. The unit is equipped with a power cord having an equipment-grounding conductor and a grounding plug. The plug must be inserted into an outlet that is properly installed and grounded in accordance with all local codes and ordinances. Failure to properly ground the treadmill could void the Precor Limited Warranty.
DANGER Improper connection of the equipmentgrounding conductor can result in a risk of electric shock. Check with a qualified electrician or service person if you are in doubt as to whether the unit is properly grounded. Do not modify the plug provided with the treadmill. If it does not fit the outlet, get a proper outlet installed by a qualified electrician.
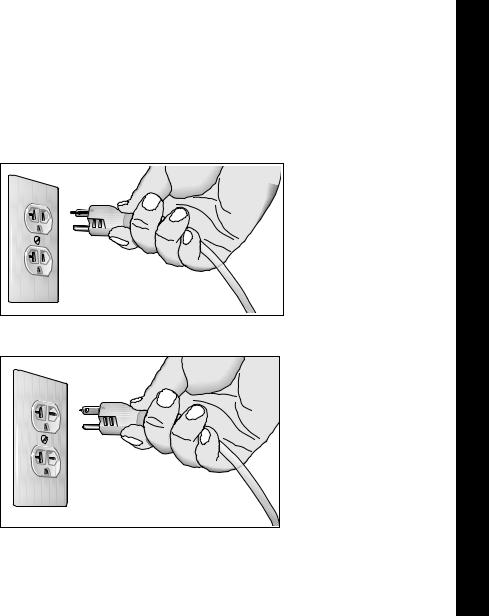
120 V Units and 240 V Units Designated for U.S. Markets
The treadmill must be connected to a dedicated, grounded circuit. A 20 amp dedicated circuit is recommended. The unit’s grounding plug looks like the plug shown in Diagram 1 and Diagram 2. The power outlet must have the same configuration as the plug. No adapter should be used with this product.
Diagram 1: 120-volt power plug
Diagram 2: 240-volt power plug
NSTRUCTIONSI AFETYS MPORTANTI
Product Owner’s Manual: Important Safety Instructions |
4 |
Password Security
To help prevent unauthorized use, the treadmill is equipped with password protection. The password involves entering three keys in sequence. If the correct keys are not pressed within two minutes, further access is denied and the running belt will not move. For more information, refer to Club Features.
Security Clip
The security clip must be attached at waist level before a user begins exercising on the treadmill. A lanyard connects the security clip to the red STOP button on the display console. If a user encounters difficulties, a strong tug on the lanyard stops the running belt.
Obtaining Service
You should not attempt to service the treadmill except for maintenance tasks described in this manual. For information about product operation or service, see the Precor website at www.precor.com. Should you need more information regarding customer support numbers or a list of Precor authorized service centers, visit the Precor website at www.precor.com/contact.
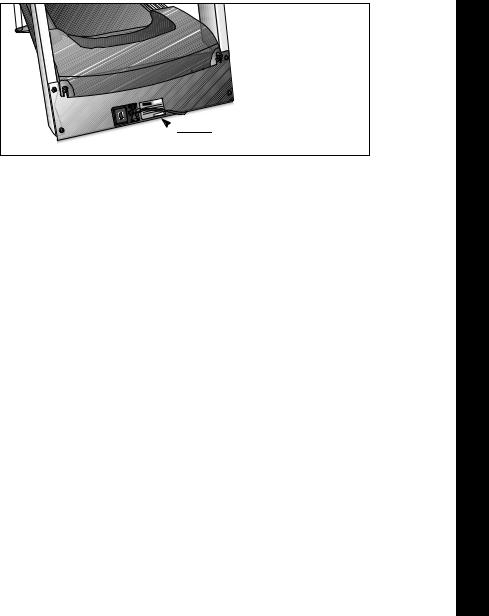
For future reference, write the model, serial number, and date of purchase for all your units in the space provided. The serial number is printed on a label located on the front panel (Diagram 3).
Serial number label |
Diagram 3: Location of serial number
Model #: _______ Serial #: _______________________
Date purchased: _________________________
Model #: _______ Serial #: _______________________
Date purchased: _________________________
Model #: _______ Serial #: _______________________
Date purchased: _________________________
Model #: _______ Serial #: _______________________
Date purchased: _________________________
NSTRUCTIONSI AFETYS MPORTANTI
Product Owner’s Manual: Important Safety Instructions |
5 |

Table of Contents
Important Safety Instructions ............................................... |
1 |
Treadmill Weight Limit ................................................................... |
2 |
Treadmill Location .......................................................................... |
2 |
Safety Approval ............................................................................... |
2 |
Radio Frequency Interference (RFI) ........................................... |
2 |
Canadian Department of Communications .............................. |
3 |
European Applications .................................................................. |
3 |
Grounding Instructions .................................................................. |
4 |
Password Security ......................................................................... |
5 |
Security Clip .................................................................................... |
5 |
Obtaining Service ........................................................................... |
5 |
Treadmill Safety Features ...................................................... |
7 |
Using the Security Clip ................................................................. |
7 |
Entering the Password .................................................................. |
7 |
Using the Handrails ........................................................................ |
8 |
Turning the Unit ON and OFF ..................................................... |
8 |
Educating Users ............................................................................. |
8 |
Club Features ............................................................................ |
9 |
Club Programming Tips ................................................................ |
9 |
Choosing a Language (C952i) ................................................. |
10 |
Choosing a Language (C954i, C956i, C966i) ..................... |
10 |
Selecting a U.S. Standard or Metric Display ......................... |
11 |
Selecting Password Protection ................................................. |
11 |
Determining the Club Speed Limit ........................................... |
12 |
Setting a Workout Time Limit .................................................... |
12 |
Setting a Pause Time Limit ......................................................... |
13 |
Setting a Cool-Down Time Limit ............................................... |
13 |
Enabling or Disabling the Fitness Test .................................... |
14 |
Informational Displays (C952i) .................................................. |
14 |
C952i Entertainment Power Connection ................................ |
16 |
Informational Displays (C954i, C956i, C966i) ...................... |
16 |
User ID Entry with CSAFE Equipment |
|
(C954i, C956i, C966i) ................................................................ |
18 |
Maintenance ............................................................................ |
19 |
Inspection ....................................................................................... |
19 |
Cleaning the Equipment ............................................................. |
19 |
Storing the Chest Strap .............................................................. |
20 |
Checking the Alignment of the Running Belt ......................... |
20 |
Adjusting the Running Belt ........................................................ |
21 |
Servicing the Treadmill ................................................................ |
21 |
Long-Term Storage ...................................................................... |
21 |
Troubleshooting Error Codes .................................................... |
22 |
Troubleshooting Heart Rate ....................................................... |
22 |
Precor Commercial Equipment |
|
Limited Warranty.................................................................... |
23 |
Product Owner’s Manual: Table of Contents |
6 |

Treadmill Safety Features
The treadmill is equipped with certain items that, when used properly, help sustain an enjoyable workout. These items include:
•Security clip
•Password protection
•Handrails
•I/O power switch
Important: Before allowing users on the treadmill, review the Important Safety Instructions found at the beginning of this manual. You should also teach users how to safely use the treadmill following the guidelines in Educating Users.
Using the Security Clip
Remind users how important it is to use the security clip while exercising on the treadmill. Instruct them on how to attach it to their clothing near their waistline. If any complications occur, a strong tug on the security cord will stop the running belt.
If the security switch trips while users are exercising, have them reattach the security clip, reenter the password (if necessary), and press SPEED ▲.
Note: The treadmill retains users’ workout statistics if they resume their workout within the limit set for pause mode.
Security clip |
Lanyard |
Diagram 4: Attaching the security clip
Entering the Password
If you wish to enable the password, refer to Club Features. Inform users that the treadmill provides password protection to help prevent unauthorized use. When users press SELECT (C952i), ENTER, or QUICKSTART at the PRECOR banner, a password prompt appears. Users have two minutes to press the following key sequence and continue their workout:
INCLINE ▼, SPEED ▼, SPEED ▲.
An asterisk appears on the display with each key press. If the correct keys are pressed, a program prompt appears on the display. Users can press SELECT (C952i) or ENTER and proceed to select workout session information or press QUICKSTART to begin their workout immediately using club default settings. Refer to Workout Options in the User’s Reference Manual.
Product Owner’s Manual: Treadmill Safety Features |
7 |

Important: If QUICKSTART is pressed, the running belt begins moving after a 3-second countdown. Tell users to hold onto the handrail with one hand before pressing the QUICKSTART key with the other hand.
CAUTION: Do not assume the treadmill is safe because of password protection. Never leave children unsupervised around the treadmill.
Using the Handrails
Educate users on the importance of holding onto a handrail when they step on or off the treadmill, and when they use the keypad.
Note: Information about the heart rate touch-sensitive grips on the the C954i, C956i, and C966i is found in the User’s Reference Manuals.
Turning the Unit ON and OFF
To turn the unit ON and OFF, use the I/O power switch located at the front of the unit, near the power cord. Refer to Diagram 5.
Important: When it is not being used, turn the unit OFF.
 I/O power switch
Diagram 5: I/O power switch
Educating Users
Take time to educate users on safety issues. Explain to your club or facility patrons that they should:
•Hold onto a handrail while stepping onto the treadmill.
•Face the display and then straddle the running belt by placing their feet on the trim strips provided.
•Attach the security clip to their clothing before touching the keypad or entering the password.
•Step onto the running belt while it is moving at or below 1 mile per hour (1 kilometer per hour).
Product Owner’s Manual: Treadmill Safety Features |
8 |
Club Features
These next few pages explain how to customize the treadmill for your club. All these features remain hidden to the club patrons and can only be accessed using special key presses. Read this section if you want to:
•Change the display to a different language
•Change the display to U.S. standard or metric
•Enable or disable password protection
•Set the maximum speed
•Set the maximum workout and pause times
•Set a cool-down time limit
•Provide a Fitness Test or remove it
•View the odometer
•Display the number of hours you have used your treadmill
•View the software versions and part numbers
•Check the error log
•Display the serial number (C954i, C956i, C966i only)
Club Programming Tips
•Always start at the Precor banner.
•The club programming mode is accessed by pressing the RESET key while the Precor banner is being displayed. The remaining key presses must occur quickly and without pause.
•The function of the QUICKSTART key is disabled while in club programming mode.
•The club programs appear sequentially. Pressing SELECT (C952i) or ENTER (C954i, C956i, C966i) moves you through the programs. To quickly advance through programs without affecting the current settings, press the red STOP button. To exit, press the RESET key at any time.
Note: The functionality of the RESET and red STOP button on the C952i is different than the C954i, C956i, and C966i. While in programming mode, pressing the C952i RESET key or red STOP button lets you progress through each program without affecting the current settings.
Product Owner’s Manual: Club Features |
9 |
Choosing a Language (C952i)
The treadmill can display user prompts, text, and user entries in six different languages. When the treadmill is shipped from the factory it is set to display English.
Note: Programming prompts are not affected by language selection. The prompts in this section continue to appear in English.
To change the language setting, perform the following steps:
1.At the scrolling Precor banner, press the following keys in sequence and without pause:
RESET, SELECT, SPEED ▼, SELECT, INCLINE ▲, SELECT, SPEED ▼, SELECT
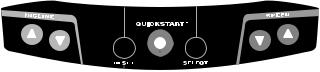
As shown in Diagram 6, numbers are associated with the keypad. The numbers appear on the display as you press the associated key.
1 |
|
6 |
7 |
2 |
4 |
|
|
3 |
5 |
|
|
|
|
Diagram 6: C952i Keypad programming numbers
2.At the SELECT LANGUAGE prompt, use the arrow keys to choose between ENGLISH, DEUTSCH, ESPANOL, FRANCAIS, NEDERLANDS, and PORTUGUES.
3.When you are ready, press SELECT to move to the next program.
Choosing a Language
(C954i, C956i, C966i)
The treadmill can display user prompts, text, and user entries in six different languages. When the treadmill is shipped from the factory it is set to display English.
Note: Programming prompts are not affected by language selection. The prompts in this section continue to appear in English.
To change the language setting, perform the following steps:
1.At the Precor banner, press the following in sequence and without pause:
RESET, 5, 6, 5, 1, 5, 6, 5
2.At the SELECT LANGUAGE prompt, use the arrow keys to choose between ENGLISH, DEUTSCH, ESPANOL, FRANCAIS, NEDERLANDS, and PORTUGUES.
3.When you are ready, press ENTER to move to the next program or press RESET to return to the Precor banner.
Product Owner’s Manual: Club Features |
10 |
Selecting a U.S. Standard or Metric Display
The treadmill can display measurements in either METRIC or U.S. STANDARD. The default factory setting is set to display U.S. STANDARD. To change this setting, perform the following steps:
4.At the SELECT UNITS prompt, use an arrow key to select a unit of measure (U.S. STANDARD or METRIC).
CAUTION: If you change the Unit of Measure display, be sure to check the speed setting to verify that it is correct.
5.When you are ready, press SELECT (C952i) or ENTER to move to the next program or press RESET to return to the Precor banner.
Note: Refer to Club Programming Tips for clarification on the C952i keys.
Selecting Password Protection
When the unit is shipped from the factory, the password protection feature is disabled. If you enable password protection, your patrons will need to enter three keys in sequence to start the running belt. If the correct keys are not pressed within two minutes, further access is denied and the running belt will not move. For more information, refer to Entering the Password.
6.Review the current PASSWORD: selection, ENABLE or DISABLE in the display. Use any arrow key to alternate between the two selections.
Setting |
Description |
|
|
Password Enable |
Causes the password prompt to appear prior |
|
to a workout and when returning from pause |
|
mode. |
|
|
Password Disable |
Lets you turn off the password prompt. Use |
|
this option with caution. |
|
|
CAUTION: Do not assume the treadmill is safe because of password protection. Never leave children unsupervised around the treadmill.
7.When you are ready, press SELECT (C952i) or ENTER to move to the next program or press RESET to return to the Precor banner.
Product Owner’s Manual: Club Features |
11 |
Determining the Club Speed Limit
You can set a maximum speed for the treadmill. This limits how fast the running belt moves and, consequently, how many adjustments a user can make to the treadmill’s speed. The speed is displayed in miles per hour (mph) or kilometers per hour (kph) depending upon the units of measure (U.S. standard or Metric) selected earlier. The range of speeds available are:
Treadmill |
Speed Settings |
|
|
C952i |
0.5 to 12 mph (1 to 20 kph) |
|
|
C954i |
0.5 to 12 mph (1.5 to 20 kph) |
C956i |
|
|
|
C966i |
0.5 to 16 mph (1.5 to 25 kph) |
|
|
Important: If you select a number that limits the miles per hour, your change will not affect the kilometers per hour (and vice versa). The treadmill does not convert the speed entered in miles per hour (U.S. standard) to kilometers per hour (Metric). It stores separate numbers for the different units of measure.
8.At the SET MAX SPEED prompt, use the arrow keys to display the desired running belt speed limit.
9.When you are ready, press SELECT (C952i) or ENTER to move to the next program or press RESET to return to the Precor banner.
Setting a Workout Time Limit
You can limit how long a user can exercise on the treadmill. For example, if you set the time limit to 20 minutes, users can only enter a workout time between 1 and 20 minutes.
Note: The automatic cool-down period is appended to the end of any time-based program, so adjust the time limit accordingly.
You can also let a user exercise indefinitely by selecting NO LIMIT. You will need to instruct users to select NO LIMIT (C952i) or press the number 0 (C954i, C956i, C966i) when they are prompted for a workout time.
The range of workout times available are:
Treadmill |
Workout Time |
|
|
C952i |
1 to 99 minutes |
|
|
C954i |
|
C956i |
1 to 240 minutes |
C966i |
|
|
|
10.At the SET MAX WORKOUT TIME prompt, use the arrow keys to display the desired time limit. Or, choose NO LIMIT.
Note: When you press and hold an arrow key, the number increments by five, for example, 1, 5, 10, 15, 20. When you tap an arrow key, the number increments by one.
11.When you are ready, press SELECT (C952i) or ENTER to move to the next program or press RESET to return to the Precor banner.
Product Owner’s Manual: Club Features |
12 |
Setting a Pause Time Limit
You can limit how long a user can pause while exercising on the treadmill by entering a time between 1 and 120 seconds (two minutes). For example, if you set the pause time limit to 60 seconds, the display automatically resets to the Precor banner if no key press occurs within one minute.
12.At the SET MAX PAUSE TIME prompt, use the arrow keys to cycle through the available time limits. Choose between 1 and 120 seconds (two minutes).
13.When you are ready, press SELECT (C952i) or ENTER to move to the next program or press RESET to return to the Precor banner.
Setting a Cool-Down Time Limit
You can limit how long a user cools down after exercising on the treadmill by entering a time between 1 and 5 minutes.
Important: It is highly recommended that you set the cool-down period at or above three minutes. It takes time for a user’s heart rate to return to a resting state after vigorous exercise. An effective cooldown period also reduces the amount of lactic acid in muscle tissue.
14.At the SET COOL DOWN TIME prompt, use an arrow key to cycle through the available time limits. Choose between 1 and 5 minutes. The default setting is 5 minutes.
15.When you are ready, press SELECT (C952i) or ENTER to move to the next program or press RESET to return to the Precor banner.
Product Owner’s Manual: Club Features |
13 |
Enabling or Disabling the Fitness Test
The Fitness Test is disabled at the factory. When the Fitness Test is disabled, it is not available in the list of programs. If you wish to add the option to the user’s choice of programs on the treadmill, you need to enable the Fitness Test.
Note: If you enable the Fitness Test on either the C956i or C966i, it replaces Custom 2 (program number 16).
16.At the FITNESS TEST prompt, use an arrow key to display ENABLE or DISABLE, depending on whether or not you want to allow access to the Fitness Test.
17.When you are ready, press SELECT (C952i) or ENTER to save the selection and return to the Precor banner.
Note: If you prefer to exit the program without changing the selection, press RESET or the red STOP button.
Informational Displays (C952i)
The treadmill provides information about its use (odometer and hour meter), as well as software version, and error log. In general, you would only access this information if directed to do so by Precor Customer Support.
These instructions guide you through all four informational displays.
Viewing the Odometer
1.At the Precor banner, press the following keys in sequence and without pause:
RESET, SPEED ▼, SELECT
Numbers appear on the display as you press the associated key.
MILES (KILOMETERS) appears on the display followed by the odometer value (the number of cumulative miles or kilometers users have taken).
2.When you are ready, press SELECT to move to the next display (hour meter).
Product Owner’s Manual: Club Features |
14 |
Viewing the Hour Meter
HOURS appears on the display followed by the number of hours that the unit has been in use. The treadmill tracks the elapsed minutes, but the value that appears is truncated to the nearest full hour.
3.When you are ready, press SELECT to move to the next display (software version).
Viewing the Software Version and Part Numbers
UPPER SW scrolls across the display followed by the upper board application software part number and version (for example, 48181-350).
4.To see the upper boot and lower board application software version, press the SELECT key. If needed, you can move through all three—upper board, upper boot, and lower board—using the SELECT key.
5.Write the numbers below. You will need these numbers when you call Customer Support with display-related questions. This information will help rule out any software-related problems:
Upper Software P/N: _____________
Lower Software P/N: ___________________
Upper Boot Application P/N: ___________________
6.When you are ready, press the red STOP button or RESET to move to the next display (error log).
Viewing the Error Log
The first error log entry scrolls across the display. Up to ten error codes can be retrieved. If there are no errors in the log, you will see NO ERRORS displayed.
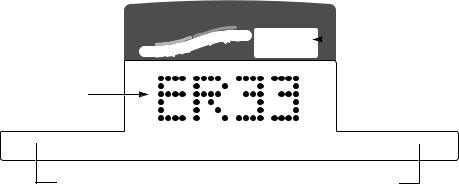
7.To view any additional error codes in the error log, use the arrow keys. Each error code specifies when it occurred, listing the odometer and hour meter values. Refer to Diagram 7.
Most recent error |
The hour meter at the time the error |
|
was detected. |
1: ER33 AT |
12,345,678 MILES 1,714 HOURS |
Error code |
Odometer reading at the |
|
time the error occurred. |
Diagram 7: Error log
8.Copy the error code information to paper so you can provide it to Customer Support if needed. Be sure to copy it exactly as shown.
9.When you no longer need the information in the error log, press QUICKSTART for at least four seconds to erase the error log. Continue to maintain light pressure on the key until the message OK appears. When the key is released, NO ERRORS appears on the display, which indicates the error log has been deleted.
Important: You cannot retrieve the error log once you have deleted it. You may want to resolve any issues you are experiencing with the treadmill before clearing the error log.
10.When you are ready, press SELECT, RESET, or the STOP button to return to the Precor banner.
Product Owner’s Manual: Club Features |
15 |
C952i Entertainment Power Connection
The entertainment power port on the C952i treadmill provides a power-only connection. It cannot handle CSAFE protocols. You may use the port to connect to entertainment products. Contact Precor Customer Support for compatibility information. Refer to Obtaining Service.
Informational Displays
(C954i, C956i, C966i)
The treadmill provides information about its use (odometer and hour meter), as well as software version, error log, and serial number. In general, you would only access this information if directed to do so by Precor Customer Support.
These instructions guide you through all the informational displays. Pressing the ENTER key moves you through the displays. To exit, press the RESET key at any time.
Viewing the Odometer
1.At the Precor banner, press the following keys in sequence and without pause:
RESET, 6, 5
ODOMETER appears on the display followed by the odometer value (the number of cumulative miles or kilometers users have taken).
2.When you are ready, press ENTER to move to the next display (hour meter).
Viewing the Hour Meter
HOUR METER appears on the display followed by the number of hours that the unit has been in use. The treadmill tracks the elapsed minutes, but the value that appears is truncated to the nearest full hour.
3.When you are ready, press ENTER to move to the next display (software version).
Viewing the Software Version and Part Numbers
SW VERSION (C954i) or SOFTWARE VERSION (C956i and C966i) appears on the display followed by the upper board application software part number and version (for example, 48181-350).
4.To see the upper boot and lower board application software version, use the CHANGE key (C954i) or arrow keys (C956i and C966i). If needed, you can move through all three—upper board, upper boot, and lower board—using the appropriate keys.
Note: If a part number does not exist, 00000-000 appears.
5.Write the numbers below. You will need these numbers when you call Customer Support with display-related questions. This information will help rule out any software-related problems:
Upper Software P/N: _____________
Lower Software P/N: ___________________
Upper Boot Application P/N: ___________________
6.When you are ready, press ENTER to move to the next display
(error log).
Product Owner’s Manual: Club Features |
16 |
Viewing the Error Log
ERROR LOG appears on the display followed by the first entry in the error log if there are any errors. Up to ten error codes can be retrieved.
If there are no errors in the log, you will see NO MORE ERRORS displayed.
7.To view any additional error codes in the error log, use the arrow keys. Each error code specifies when it occurred, listing the odometer and hour meter values. Refer to Diagram 8.
SmartRate
|
|
Cardiovascular |
Above |
Heart Rate |
|
|
|
|
Weight Loss |
1 |
|
Most recent error |
|
Below |
|
|
||||
|
|
|||||
|
|
|
|
(Error code index) |
||
Error code
 12000 MI 1714 HrS
Odometer reading at the |
The hour meter at the time the error |
time the error occurred. |
was detected. |
Diagram 8: Error log
Note: The C954i display is different. The error code index appears on the center display followed by the error code. Press the CHANGE keys to toggle between the error code and error description, odometer reading and hours of use at the time the error occurred.
8.Copy the error code information to paper so you can provide it to Customer Support if needed. Be sure to copy it exactly as shown.
9.When you no longer need the information in the error log, press QUICKSTART for at least four seconds to erase the error log. Continue to maintain light pressure on the key until the message OK (C954i) or CLEARED (C956i and C966i) appears. When the key is released, 1: ---- (C954i) or NO MORE ERRORS (C956i and C966i) appears on the display, which indicates the error log has been deleted.
Important: You cannot retrieve the error log once you have deleted it. You may want to resolve any issues you are experiencing with the treadmill before clearing the error log.
10.When you are ready, press ENTER to move to the next display (serial number).
Product Owner’s Manual: Club Features |
17 |
Displaying the Serial Number
SER NUMB (C954i) or SERIAL NUMBER (C956i and C966i) appears on the display followed by the 13-digit serial number. The serial number is helpful when you contact Customer Support.
Note: If no serial number has been entered, then NONE appears. Use the serial number found on a label on the front panel (Diagram 3).
11.If you have not already done so, write the serial number onto the Warranty Registration card. You can also register online at www.precor.com.
12.When you are ready, press ENTER to return to the Precor banner.
User ID Entry with CSAFE Equipment (C954i, C956i, C966i)
The treadmill is fully compatible with CSAFE protocols. When the unit is connected to a CSAFE master device, the user is prompted for a user ID.
Note: The C952i port does not provide a connection to CSAFE protocol devices.
The user ID is displayed as five zeros. The left most zero blinks indicating your starting point. The following table describes key functions while in CSAFE mode.
Keypad |
Description |
|
|
SPEED ▼ or ▲ |
moves the blinking LED from field to field |
|
|
INCLINE ▲ or ▼ |
changes the number value in the selected field |
|
|
Number keypad |
use the number keys to enter a user ID. The number |
|
that is pressed appears in the display and the next |
|
field begins to blink. When all five numbers are in |
|
place, the user must press ENTER to submit the user |
|
ID. |
|
|
ENTER |
submits the user ID. |
|
Note: User ID entry is bypassed when the user |
|
enters five zeros. No workout statistics are recorded. |
|
|
RESET |
resets the display to the Precor banner. |
|
|
A message appears on the display and indicates when the user ID is accepted by the CSAFE master device. Then, the program prompt appears. The user has the option to choose QUICKSTART or select a program and begin exercising.
To review information about CSAFE specifications, visit the web site at: www.fitlinxx.com/csafe
If you have questions or need technical support, refer to Obtaining Service.
Product Owner’s Manual: Club Features |
18 |
Maintenance
It is important to perform the minor maintenance tasks described below. Failure to maintain the treadmill as described in this section could void the Precor Limited Warranty.
DANGER To reduce the risk of electrical shock, always unplug the unit from its power source before cleaning it or performing any maintenance tasks.
Inspection
Inspect the treadmill daily.
1.Look and listen for slipping belts, loose fasteners, unusual noises, worn or frayed power cords, and any other indications that the equipment may be in need of service. If you notice any of these, obtain service.
Important: If you determine that the treadmill needs service, ensure that the treadmill cannot be used inadvertently. Turn the unit OFF, and then unplug the power cord from its power source. Make sure users know that the treadmill needs service.
2.Check for worn, frayed or missing security lanyards. Replace missing or worn security lanyards immediately. Make sure users attach the security clip to their clothing before exercising on the treadmill.
To order parts or to contact a Precor authorized service provider in your area, refer to Obtaining Service.
Cleaning the Equipment
Most of the working mechanisms are protected inside the hood and base of the treadmill. However, for efficient operation, the treadmill relies on low friction. To keep the friction low, the unit’s running belt, staging platforms, and internal mechanisms must be as clean as possible.
Precor recommends the treadmill be cleaned before and after each workout. Use mild soap and water to dampen a soft cloth and wipe all exposed surfaces. This helps remove any dust or dirt.
CAUTION: Do not use any acidic cleaners. Doing so will void the Precor Limited Warranty. Never pour water or spray liquids on any part of the treadmill. Allow the treadmill to dry completely before using.
Periodically, clean the running belt using a soft nylon scrub brush. Frequently vacuum the floor underneath the unit to prevent the accumulation of dust and dirt, which can affect the smooth operation of the unit.
Product Owner’s Manual: Maintenance |
19 |
Loading...