


 Loading...
Product Owner's Manual
Commercial Products
Treadmills:
•932i
•954i
Ellipticals:
•EFX534i
•EFX532i
Cycle:
• 842i
Before beginning any fitness program,see
your physician for a thorough physical examination.Seek advice from your physician to learn the target heart rate appropriate for your fitness level.Do not allow children or those unfamiliar with its operation on or near this equipment. Read the product owner's manual or consult a qualified instructor before operating this equipment. Improper use of this equipment can result in serious injury. If you feel pain,faintness,or dizziness,stop exercising immediately.
PROGRAMS |
|
|
HEART |
MANUAL |
RATE |
INTERVAL |
WEIGHTLOSS |
VARIETY |
PERFORMANCE |
HEART RATE
SmartRate
|
1 |
2 |
3 |
|
4 |
5 |
6 |
OK |
7 |
8 |
9 |
|
|||
|
CLEAR |
0 |
ENTER |
PAUSE/
RESET
QUICK
START

Important Safety Instructions
When using Precor equipment, always take basic precautions, including the following:
yRead all instructions before using the equipment. These instructions are written to educate patrons and other users in the proper use of the equipment.
yOther sections in this manual provide more details of safety features. Be sure to read these sections and observe all safety notices.
yBefore beginning any fitness program, make sure all users see a physician for a complete physical examination.
Il est conseillé de subir un examen médical complet avant d’entreprendre tout programme d’exercise. Si vous avez des étourdissements ou des faiblesses, arrêtez les exercices immédiatement.
DANGER Before cleaning it, always unplug the equipment from its power source to reduce the risk of electric shock. Before cleaning self-powered equipment, disconnect the optional power adapter.
WARNING To reduce the risk of burns, fire, electric shock, or injury, take the following precautions:
yDo not allow children or people unfamiliar with its operation on or near the equipment. Do not leave children unsupervised around the equipment.
yNever leave the equipment unattended when it is plugged in. Unplug the equipment from the power source when it is not in use, before cleaning it, and before providing authorized service.
Note: The optional power adapter is considered an electrical power source for self-powered equipment.
yKeep all electrical components away from liquids to prevent shock.
yAssemble and operate the equipment on a solid, level surface. Locate the equipment a few feet from walls or furniture.
yMaintain the equipment in good working condition. Refer to
Maintenance.
yIf you plan to move the equipment, obtain help and use proper lifting techniques. For more information, refer to Moving the Equipment.
yUse the equipment only for its intended purpose as described in this manual. Do not use accessory attachments that are not recommended by the manufacturer, as such attachments may cause injuries.
Product Owner's Manual: Important Safety Instructions |
1 |
yNever operate the equipment if it is damaged, not working properly, when it has been dropped, or has been immersed in water. Return the equipment to a service center for examination and repair.
yKeep the power cord or optional power adapter and plug away from heated surfaces.
yDo not operate the equipment where aerosol (spray) products are being used or where oxygen is being administered.
yDo not use outdoors.
yDo not attempt to service the equipment yourself except to follow the maintenance instructions found in this manual.
yNever drop or insert objects into any opening. Keep hands away from moving parts.
yDo not set anything on the stationary handrails or handlebars, display console, or covers. Place liquids, magazines, and books in the appropriate receptacles.
Safety Code
The club owner or manager has the option to enable the safety code. The code involves entering four number keys in sequence. If the correct keys are not pressed within two minutes, further user access is denied. For more information, refer to Treadmill Safety Features and Club Features.
Safety Approval
When identified with the ETL-c logo, the equipment has been tested and conforms to the requirements of CAN/CSA-E-335-1/3-04, EN 60335-1: 2002 Safety of Household and Similar Electrical Appliances. This equipment is a Class S/B or C certified machine according to applicable EN957 standards.
Product Owner's Manual: Important Safety Instructions |
2 |
Educating Users
Take time to educate users on the safety instructions found in both the User’s Reference Manual and Product Owner’s Manual. Explain to your club or facility patrons that they should:
yHold onto a stationary handrail or handlebar while stepping onto the equipment or when getting comfortably seated on the cycle.
yFace the display at all times.
yHold on to a stationary handrail or handlebar with one hand whenever reaching with the other hand to touch the display keys.
yOn treadmills: straddle the running belt and attach the safety clip to clothing at waist level before touching the display.
Important: For safety, make sure users step onto the running belt while it is moving at or below 1 mile per hour (1 kilometer per hour).
Hazardous Materials and Proper
Disposal
The self-powered equipment has an internal battery which contains materials that are considered hazardous to the environment. Proper disposal of the battery is required by federal law.
If you plan to dispose of your equipment, contact Precor Commercial Products Customer Support for information regarding battery removal. Refer to Obtaining Service.
Product Recycling and Disposal
This equipment must be recycled or discarded according to applicable local and national regulations.
Product labels, in accordance with European Directive 2002/96/EC concerning waste electrical and electronic equipment (WEEE), determine the framework for the return and recycling of used equipment as applicable throughout the European Union. The WEEE label indicates that the product is not to be thrown away, but rather reclaimed upon end of life per this Directive.
In accordance with the European WEEE Directive, electrical and electronic equipment (EEE) is to be collected separately and to be reused, recycled, or recovered at end of life. Users of EEE with the WEEE label per Annex IV of the WEEE Directive must not dispose of end of life EEE as unsorted municipal waste, but use the collection framework available to customers for the return, recycling, and recovery of WEEE. Customer participation is important to minimize any potential effects of EEE on the environment and human health due to the potential presence of hazardous substances in EEE. For proper collection and treatment, refer to Obtaining Service.
Product Owner's Manual: Important Safety Instructions |
3 |
Radio Frequency Interference (RFI)
Federal Communications Commission, Part 15
This equipment has been tested and found to comply with the limits for a Class A digital device, pursuant to Part 15 of the FCC Rules. These limits are designed to provide reasonable protection against harmful interference in a commercial installation. The equipment generates, uses, and can radiate radio frequency energy and, if not installed and used in accordance with the owner’s manual instructions, may cause harmful interference to radio communications.
WARNING Per FCC rules, changes or modifications not expressly approved by Precor could void the user’s authority to operate the equipment.
Industry Canada
This Class A digital apparatus complies with Canadian ICES-003.
Cet appareil numérique de la classe A est conforme à la norme NMB-003 du Canada.
ATTENTION: Haute Tension
Débranchez avant de réparer
Product Owner's Manual: Important Safety Instructions
European Applications
This product is compliant to:
y2004/108/EC Electromagnetic Compatibility Directive.
y2006/95/EC Low Voltage Directive.
y2002/95/EC Restriction of Hazardous Substances Directive.
This product conforms to the requirements of the European Council Directive 89/336/EEC, 2004/108/EC Electromagnetic Compatibility and has been tested to the following standards:
yEN55022, Limits & Methods of Measurement of Radio Interference, Information Technology Equipment.
yEN55024, Immunity of Information Technology Equipment.
This product also conforms to the requirements of the European Council Directive 73/23/EEC, 2006/95/EC Low Voltage Directive and has been tested to the following standard:
yIEC 335-1, EN60335-1 Safety of Household and similar Electrical Appliances.
4
Treadmill Grounding Instructions
The treadmill must be grounded. If the equipment malfunctions or breaks down, grounding provides a path of least resistance for electric current, which reduces the risk of electrical shock. The treadmill has a power cord having an equipment-grounding conductor and a grounding plug. The plug must be inserted into an outlet that is properly installed and grounded in accordance with all local codes and ordinances. Failure to properly ground the treadmill could void the Precor Limited Warranty.
DANGER Improper connection of the equipment-grounding conductor can result in a risk of electric shock. Check with a qualified electrician or service person if you are in doubt as to whether the equipment is properly grounded. Do not modify the plug provided with the treadmill. If it does not fit the outlet, get a proper outlet installed by a qualified electrician.
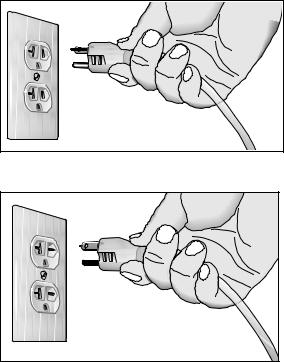
120 V and 240 V Equipment Designated for U.S. Markets
The treadmill must be connected to a dedicated, grounded circuit. A 20-amp dedicated circuit is recommended. The equipment’s grounding plug looks like the plug shown in one of the following figures. The power outlet must have the same configuration as the plug. No adapter should be used with this product.
Figure 1: 120-volt power plug
Figure 2: 240-volt power plug
Product Owner's Manual: Important Safety Instructions |
5 |
Obtaining Service
You should not attempt to service the equipment except for maintenance tasks described in this manual. For information about product operation or service, see the Precor web site at www.precor.com. Should you need more information regarding customer support numbers or a list of Precor authorized service centers, visit the Precor web site at www.precor.com/corp/contact.
For future reference, write the model, serial number, and date of purchase for all your equipment in the space provided. The serial number is printed on a label located near the power cord connection (treadmills) or receptacle (self-powered equipment).
Model #: _______ Base Serial #: _______________________
Display Serial #: _______________________
Date purchased: _______________________
Model #: _______ Base Serial #: _______________________
Display Serial #: _______________________
Date purchased: _______________________
Model #: _______ Base Serial #: _______________________
Display Serial #: _______________________
Date purchased: _______________________
Model #: _______ Base Serial #: _______________________
Display Serial #: _______________________
Date purchased: _______________________
Product Owner's Manual: Important Safety Instructions |
6 |

Table of Contents
Important Safety Instructions............................................ |
1 |
Safety Code..................................................................................... |
2 |
Safety Approval .............................................................................. |
2 |
Educating Users ............................................................................. |
3 |
Hazardous Materials and Proper Disposal............................... |
3 |
Product Recycling and Disposal ................................................ |
3 |
Radio Frequency Interference (RFI)........................................... |
4 |
European Applications.................................................................. |
4 |
Treadmill Grounding Instructions ............................................... |
5 |
Obtaining Service .......................................................................... |
6 |
Treadmill Safety Features .................................................. |
8 |
Entering the Safety Code............................................................. |
8 |
Using the Safety Clip..................................................................... |
8 |
Turning the Treadmill On and Off............................................... |
9 |
Weight Limit .................................................................................... |
9 |
Location............................................................................................ |
9 |
Self-Powered Features...................................................... |
10 |
Informational Displays Prior to Shutdown............................... |
10 |
Symptoms of a Low Battery....................................................... |
11 |
Using the Optional Power Adapter.......................................... |
11 |
The Optional Power Adapter Kit............................................... |
12 |
Replacing the Battery.................................................................. |
12 |
Club Features....................................................................... |
13 |
Club Programming Tips.............................................................. |
14 |
Accessing Club Programming Mode and |
|
Changing the Settings ................................................................ |
16 |
Treadmill: Selecting Safety Code Protection......................... |
19 |
Product Owner's Manual: Table of Contents |
|
Choosing a Language................................................................. |
19 |
Selecting a U.S. Standard or Metric Display......................... |
20 |
Setting an Exercise Session Time Limit.................................. |
20 |
Setting a Pause Time Limit........................................................ |
21 |
Setting a Cool-Down Time Limit .............................................. |
21 |
Treadmill: Determining the Club Speed Limit ....................... |
22 |
Treadmill: Setting an Incline Limit ............................................ |
22 |
Treadmill: Accessing Performance Programs ....................... |
23 |
Treadmill: Changing Remote Control Access....................... |
23 |
EFX: Changing the Auto-Level Setting................................... |
24 |
Cycle: Setting a Resistance Range......................................... |
24 |
Informational Displays................................................................. |
26 |
User ID Entry with CSAFE Equipment.................................... |
29 |
Maintenance......................................................................... |
30 |
Daily Inspection ............................................................................ |
30 |
Daily Cleaning............................................................................... |
30 |
EFX: Cleaning the Ramp............................................................ |
31 |
Storing the Chest Strap ............................................................. |
31 |
Treadmill: Checking the Alignment of the |
|
Running Belt ................................................................................. |
32 |
Treadmill: Adjusting the Running Belt..................................... |
33 |
Upright Cycle: Adjusting the Seat Tilt..................................... |
34 |
Recumbent Cycle: Realigning the Seat.................................. |
35 |
Moving the Equipment................................................................ |
36 |
Long-Term Storage ..................................................................... |
36 |
Precor Commercial Equipment |
|
Limited Warranty................................................................. |
37 |
7
Treadmill Safety Features
Before allowing users on Precor equipment, review the Important Safety Instructions found at the beginning of this manual. You should also teach your patrons how to safely use the equipment following the guidelines in Educating Users.
Entering the Safety Code
When the equipment is shipped from the factory, the safety code protection feature is disabled. If you wish to enable the safety code, refer to Club Features. Inform users that the equipment requests a safety code to help prevent unauthorized use. When users select a program or press QUICKSTART at the PRECOR banner, the following prompt appears:
E N T E R S A F E T Y C O D E
Users have two minutes to press the following number key sequence and continue their workout: 1, 2, 3, 4.
Important: Tell users to hold onto the handrail with one hand before entering the safety code with the other hand.
If the correct keys are pressed, the program selection process begins. If the code is incorrect, the display prompts the user to reenter the code after a 2-minute time out.
Note: On the treadmill, a 3-second countdown appears on the display, and then the running belt starts moving. Refer to Workout Options in the User’s Reference Manual.
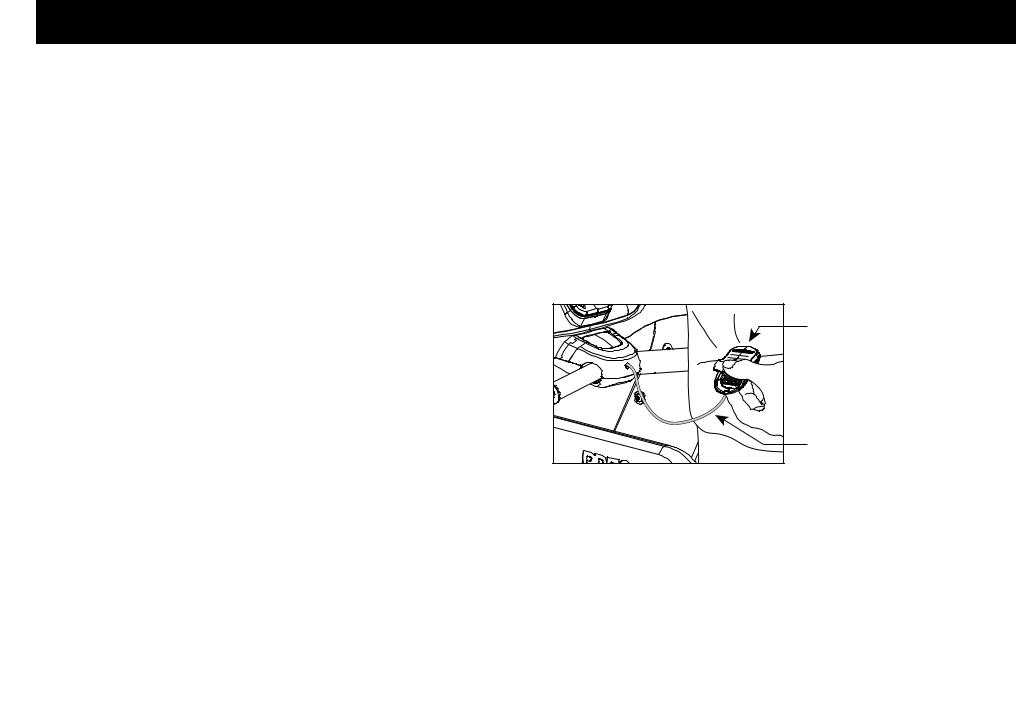
Using the Safety Clip
Instruct users how important it is to use the safety clip while exercising on the treadmill. Instruct them on how to attach it to their clothing near their waistline. If any complications occur, a strong tug on the safety lanyard will stop the running belt.
If the safety switch trips while users are exercising, have them reattach the safety clip, press the SPEED up key or QUICKSTART and reenter the safety code, if necessary.
Note: The treadmill retains users’ workout statistics if they resume their workout within the limit set for pause mode.
Safety Clip |
Lanyard |
Figure 3: Attaching the safety clip
Product Owner's Manual: Treadmill Safety Features |
8 |
Turning the Treadmill On and Off
To turn the treadmill On and Off, use the power switch located beneath the hood, near the power cord receptacle.
Important: When it is not being used, turn the treadmill Off.
Weight Limit
You should not allow runners over 350 lb. (160 kg) or walkers heavier than 500 lb. (225 kg) on the treadmill.
Location
It is important to keep the area around the treadmill open and free from encumbrances such as other equipment. The minimum space requirement needed for user safety and proper maintenance is three feet wide by six feet deep (one meter wide by two meters deep), directly behind the running belt.
Product Owner's Manual: Treadmill Safety Features |
9 |

Self-Powered Features
On self-powered equipment, the battery initializes and displays the Precor banner when a user starts exercising. A minimum rate of motion must be maintained for the banner to appear, as shown in the following table. When a person meets the requirements, the power that is generated allows the equipment to function properly.
Table 1. Minimum requirements for operation
Equipment |
Rate of Motion |
|
|
EFX |
40 strides per minute (SPM) |
|
|
Cycle |
20 revolutions per minute (RPM) |
|
|
Informational displays appear when the battery is low or when the rate of motion drops below the minimum requirements. The display explains what to do to retain power. If the messages are ignored, the equipment begins shutdown procedures to maintain the charge of the battery. Refer to Informational Displays Prior to Shutdown.
An optional power adapter can be purchased and provides sustained power to the equipment. If you plan to change the club settings, the power adapter is highly recommended. To purchase the optional power adapter, check with your dealer. Refer to
Obtaining Service.
Informational Displays Prior to Shutdown
The equipment saves its battery charge by moving into a shutdown mode. If the user does not maintain the minimum rate of motion, a 30-second shutdown process begins.
Dots appear in the display and all key presses are ignored. If no movement is detected or the rate of motion remains below the minimum, the dots steadily disappear as the countdown continues.
Note: The user can resume exercising if he or she begins before the countdown period elapses.
Important: If the equipment is connected to a CSAFE master device, a slightly different scenario occurs. When ten seconds remain before the equipment shuts off, the exercise session ends. R E S E T T IN G appears in the display while the equipment disconnects from the CSAFE master device. All key presses are ignored.
Product Owner's Manual: Self-Powered Features |
10 |
Symptoms of a Low Battery
If no one has used the equipment for an extended period of time, the battery may need recharging.
Symptoms of a low battery include:
yA flickering or erratic display
yUser and program information is lost once the user stops exercising. No workout summary or notification of pending shutdown occurs.
Important: To maintain a constant power source, use the optional power adapter.
Using the Optional Power Adapter
After connecting the power adapter to the equipment, plug the opposite end into the appropriate power source 120 V or 240 V.
CAUTION: When the optional power adapter is in use, make sure that the power supply cord does not create a safety hazard. Keep it out of the way of traffic and moving parts. If the power supply cord or power conversion module is damaged, it must be replaced.
The display functions differently when the power adapter is connected. Because the power adapter provides a constant source of power, a user can pause for brief periods without initiating shutdown procedures. When the pause time limit expires and the user has not resumed exercising, the display returns to the Precor banner. Refer to Setting a Pause Time Limit. To learn how to install the power adapter, refer to The Optional Power Adapter Kit.
Product Owner's Manual: Self-Powered Features |
11 |
The Optional Power Adapter Kit
If you purchase the optional power adapter, you must also purchase the internal cable kit. The kit supplies the cable, bracket, and fasteners that connect the power adapter to the lower electronics board.
CAUTION: The internal cable kit must be installed by authorized service personnel. Do not attempt installation on your own as you could void the Precor Limited Warranty. For more information, refer to Obtaining Service.
Once the internal cable kit is installed, you can plug the optional power adapter into the equipment. Plug the opposite end into the appropriate power source for your equipment 120 V or 240 V. Review the safety instructions found at the beginning of this manual before using the power adapter.
Product Owner's Manual: Self-Powered Features
Replacing the Battery
The equipment’s battery is built to last for a long time. However, if you feel that the battery may need replacing, check with an authorized service technician. Refer to Obtaining Service.
CAUTION: The battery stored inside the equipment contains hazardous materials and must be disposed of according to Hazardous Waste Regulations. Refer to Hazardous Materials and Proper Disposal.
12

Club Features
These next few pages explain how to customize the equipment for your club or facility and view useful product information. All these features remain hidden to the patrons and can only be accessed using special key presses. Read this section if you want to:
yEnable or disable the safety code (treadmill)
yChange the display to a different language
yChange the display to show U.S. standard or metric measurements
ySet the maximum exercise and pause times
ySet a cool-down time limit
ySet the maximum speed and incline (treadmill)
yEnable or disable hidden programs or remote access (treadmill)
yChange the auto-level setting (EFX)
ySet the resistance range (cycle)
yView the odometer
yDisplay the number of hours the equipment has been in use
yView the software versions and part numbers
yDisplay the serial number
yCheck the program usage and error logs
Note: To review the club programming prompts and factory default settings that can be changed through club programming mode, refer to the following table.
Product Owner's Manual: Club Features |
13 |
Club Programming Tips
yAlways start at the Precor banner.
yElectrical power must be supplied. For self-powered equipment, a constant power source is available if you use the optional power adapter, otherwise you will have to maintain the minimum rate of motion. Refer to Self-Powered Features. If you plan to program self-powered equipment, purchasing the optional power adapter is highly recommended.
Note: If you do not use the optional power adapter during club programming mode, and the rate of motion falls below the minimum requirements, no warning is given when the equipment moves into its 30-second shutdown procedure.
yThe club programming mode is accessed by pressing the RESET key at the Precor banner. The remaining key presses must occur quickly and without pause.
Note: Treadmill keys that can be used interchangeably in club programming mode are: PAUSE/RESET and the red STOP button. On the EFX, the CLEAR and ENTER keys perform specific functions, but the number keypad is disabled once you enter club programming mode.
yThe changes made in club programming mode become the default settings whenever the display resets to the Precor banner.
Product Owner's Manual: Club Features |
14 |
Table 2. Club custom features and settings
Equipment |
Club Programming Prompt |
Factory Default |
Changes you can make |
||||
|
|
|
|
|
|
Setting |
|
|
|
|
|
|
|
||
Treadmill |
S A F E T Y |
C O D E |
|
Disabled |
An enabled safety code requires a 4-digit entry code before users can access any |
||
|
|
|
|
|
|
|
exercise programs. |
|
|
|
|
||||
All * |
S E L E C T L A N G U A G E |
English |
Several languages affect the display prompts. Choose one. |
||||
|
|
|
|
|
|
||
All * |
S E L E C T |
U N I T S |
|
U.S. |
Two standard units of measure affect the display prompts. Choose between U.S. or |
||
|
|
|
|
|
|
|
Metric. |
|
|
|
|
|
|
||
All * |
S E T |
M A X |
W O R K O U T T I M E |
60 minutes |
Exercise session time limits range from 1 to 240 minutes. N O L I M I T is accessible |
||
|
|
|
|
|
|
|
beyond 240 minutes. |
|
|
|
|
|
|
|
|
All * |
S E T |
M A X |
P A U S E |
T I M E |
120 seconds |
Pause time limits range from 1 to 120 seconds (2 minutes). Restrictions exist for |
|
|
|
|
|
|
|
|
self-powered equipment. |
|
|
|
|
|
|
||
All * |
S E T |
C O O L D O W N |
T I M E |
5 minutes |
Cool-down time limits range from 1 to 5 minutes. |
||
|
|
|
|
|
|
|
|
Treadmill |
S E T |
S P E E D |
L I M I T |
|
Maximum speed |
Refer to Treadmill: Determining the Club Speed Limit. |
|
|
|
|
|
|
|
available. |
|
|
|
|
|
|
|
||
Treadmill |
S E T |
I N C L I N E |
L I M I T |
Maximum grade |
Refer to Treadmill: Setting an Incline Limit. |
||
|
|
|
|
|
|
possible. |
|
|
|
|
|
||||
Treadmill |
H I D D E N P R O G R A M S |
Hide programs |
Two options are available: Show Programs or Hide Programs. Choose one. |
||||
|
|
|
|
|
|||
Treadmill |
R E M O T E |
S P E E D C O N T R O L |
Disabled |
A computer must be connected through the CSAFE port to enable this feature and |
|||
|
|
|
|
|
|
|
change the speed or incline for a specific user. |
|
|
|
|
|
|
||
EFX |
S E T |
C R O S S R A M P |
A U T O - L E V E L |
Mid-level of ramp |
This prompt appears on equipment with adjustable ramps. Settings range from 1 to |
||
|
|
|
|
|
|
incline range |
20. Refer to EFX: Changing the Auto-Level Setting. |
|
|
|
|
|
|
||
Cycle |
S E T |
R E S I S T A N C E |
R A N G E |
High |
Settings range from High, Medium, and Low. Refer to Cycle: Setting a Resistance |
||
|
|
|
|
|
|
|
Range. |
|
|
|
|
||||
* This feature is available in all Precor club equipment. |
|
|
|||||
Note: When you make changes in club programming mode, the new settings replace the factory defaults. |
|||||||
Product Owner's Manual: Club Features |
15 |
Accessing Club Programming Mode
and Changing the Settings
Read the Club Programming Tips to identify useful information about customizing your Precor equipment.
To access the available menus and change the program settings, perform the following steps:
1.At the Precor banner, press the following keys in sequence without pausing between selections:
RESET, 5, 6, 5, 1, 5, 6, 5
Note: A PAUSE/REST key appears on some products and functions the same as the RESET key.
The club programming prompts appear sequentially and in a menu format. The following table describes which keys to use in club programming mode.
Product Owner's Manual: Club Features
Table 3. Club Programming Mode keys
Key |
Description |
Function |
|
|
|
▲ or ▼ |
Navigational arrow keys |
Moves you through the |
|
|
programs and selections. |
|
|
|
OK |
OK key |
Lets you choose or accept the |
|
|
displayed selection. |
|
|
|
CLEAR |
Number keypad CLEAR |
Returns to the previous menu |
|
key |
level without saving any |
|
|
changes. |
|
|
|
RESET |
RESET key or |
Exits Club Programming Mode |
|
PAUSE/RESET key |
and returns to the Precor |
|
|
banner. |
|
|
|
Note: The number keypad is disabled once you enter club programming mode.
16
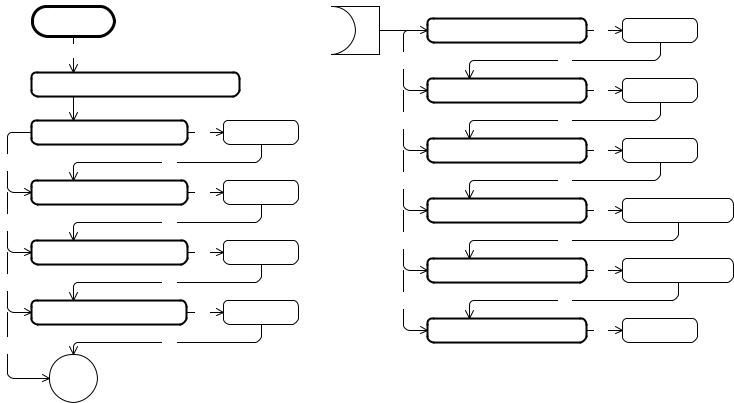
Use the following flowchart to navigate through the menu settings on treadmills.
PRECOR |
|
|
|
SET MAX PAUSE TIME |
OK |
[ 120 SEC . ] |
|||
|
|
|
|
||||||
PAUSE/RESET, 5, 6, 5, 1, 5, 6, 5 |
|
|
▼ |
|
|
OK |
|
|
|
|
|
|
|
|
|
|
|
||
DIAGS – SET CLUB PARAMETERS |
SET COOL DOWN TIME |
OK |
[ 5 MIN . ] |
||||||
|
|
|
|
||||||
SAFETY CODE |
|
OK |
[ DISABLED ] |
▼ |
|
|
OK |
|
|
|
|
|
|
|
|
|
|||
▼ |
OK |
|
|
SET |
SPEED |
LIMIT |
|
OK |
[ 16 . 0 MPH ] |
|
|
|
|
|
|
|
|
||
SELECT LANGUAGE |
OK |
[ ENGLISH] |
▼ |
|
|
OK |
|
|
|
|
|
|
|
|
|
||||
▼ |
OK |
|
|
SET |
INCLINE |
LIMIT |
|
OK |
[ INCLINE 15. 0 ] |
|
|
|
|
|
|
|
|
||
SELECT UNITS |
|
OK |
[ U . S . ] |
▼ |
|
|
OK |
|
|
|
|
|
|
|
|
|
|||
▼ |
OK |
|
|
HIDDEN PROGRAMS |
OK |
[ HIDE PROGRAMS ] |
|||
|
|
|
|
|
|
|
|
||
SET MAX WORKOUT TIME |
OK |
[ 60 MIN ] |
▼ |
|
|
OK |
|
|
|
|
|
|
|
|
|
||||
▼ |
OK |
|
|
REMOTE SPEED CONTROL |
OK |
[ DISABLED ] |
|||
|
|
|
|
|
|
|
|
||
|
|
|
|
|
|
|
|
|
|
Product Owner's Manual: Club Features |
17 |
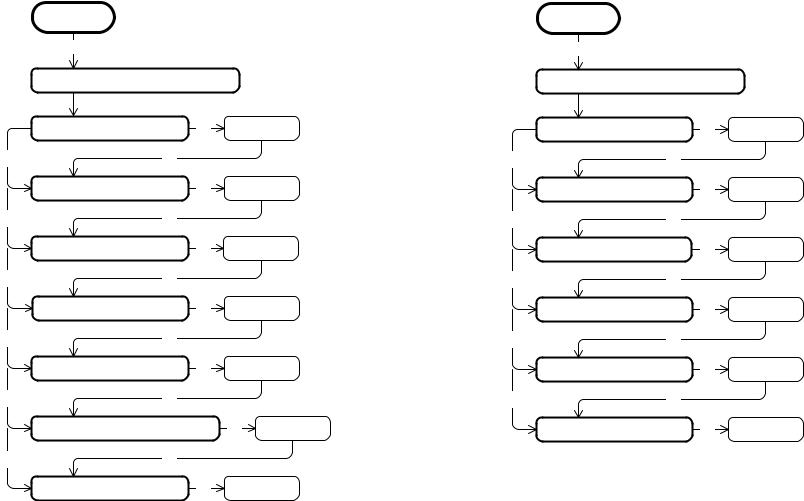
Use the following flowchart to navigate through the menu settings on ellipticals.
PRECOR
RESET, 5, 6, 5, 1, 5, 6, 5
DIAGS – SET CLUB PARAMETERS
SELECT LANGUAGE |
OK |
[ ENGLISH ] |
|
▼ |
OK |
|
|
SELECT UNITS |
|
OK |
[ U. S . ] |
▼ |
OK |
|
|
SET MAX WORKOUT TIME |
OK |
[ 60 MIN ] |
|
▼ |
OK |
|
|
SET MAX PAUSE TIME |
OK |
[ 120 SEC . ] |
|
▼ |
OK |
|
|
SET COOL DOWN TIME |
OK |
[ 5 MIN . ] |
|
▼ |
OK |
|
|
SET CROSSRAMP AUTO - LEVEL |
OK [ XRAMP 10 ] |
||
▼ |
OK |
|
|
SET CUSTOM PROGRAM 1 * |
OK |
[ RANDOM] |
|
Product Owner's Manual: Club Features
Use the following flowchart to navigate through the menu settings on cycles.
PRECOR
RESET, 5, 6, 5, 1, 5, 6, 5
DIAGS – SET CLUB PARAMETERS
SELECT LANGUAGE |
OK |
[ ENGLISH] |
|
▼ |
OK |
|
|
SELECT |
UNITS |
OK |
[ U . S . ] |
▼ |
OK |
|
|
SET MAX WORKOUT TIME |
OK |
[ 60 MIN ] |
|
▼ |
OK |
|
|
SET MAX PAUSE TIME |
OK |
[ 120 SEC . ] |
|
▼ |
OK |
|
|
SET COOL DOWN TIME |
OK |
[ 5 MIN . ] |
|
▼ |
OK |
|
|
SET RESISTANCE RANGE |
OK |
[ HIGH ] |
|
18
Treadmill: Selecting Safety Code
Protection
When the equipment is shipped from the factory, the safety code protection feature is disabled. If you enable the safety code, your patrons will need to enter four number keys in sequence to begin their exercise session and, on the treadmill, start the running belt. If the correct keys are not pressed within two minutes, further access is denied. For more information, refer to Entering the Safety Code.
1.At the S A F E T Y C O D E prompt, press OK. Use the navigational arrow keys to alternate between the two selections.
Setting |
Description |
|
|
E N A B L E D |
Causes the safety code prompt to appear prior to |
|
a workout and when returning from pause mode. |
|
|
D I S A B L E D |
Does not require a safety code to operate. |
|
|
CAUTION: Do not assume the equipment is safe because of safety code protection. Never leave children unsupervised around the equipment.
2.When you are ready, press OK to accept the displayed setting and move to the next feature. For further options, refer to the table in Accessing Club Programming Mode and Changing the Settings.
Choosing a Language
The equipment can display user prompts, text, and user entries in several different languages. When the equipment is shipped from the factory, it is set to display English.
Note: Programming prompts are not affected by language selection. The prompts in this section continue to appear in English.
1.At the S E L E C T L A N G U A G E prompt, press OK. Use the navigational arrow keys to choose a language.
2.When you are ready, press OK to accept the displayed setting and move to the next feature. For other options, refer to the table in Accessing Club Programming Mode and Changing the Settings.
Product Owner's Manual: Club Features |
19 |
Selecting a U.S. Standard or Metric Display
The equipment can display measurements in either Metric or U.S. Standard. The default factory setting is to display U.S. Standard. To change this setting, perform the following steps:
1.At the S E L E C T U N I T S prompt, press OK. Use the navigational arrow keys to select a unit of measure (U S or M E T R I C ).
CAUTION: If you change the Unit of Measure display on a treadmill, be sure to check the speed setting to verify that it is correct. Refer to Treadmill: Determining the Club Speed Limit.
2.When you are ready, press OK to accept the displayed setting and move to the next feature. For other options, refer to the table in Accessing Club Programming Mode and Changing the Settings.
Setting an Exercise Session Time Limit
You can limit how long a user can exercise on the equipment. For example, if you set the time limit to 20 minutes, users can only enter a session time between 1 and 20 minutes.
Note: The automatic cool-down period is appended to the end of any time-based program, so adjust the time limit accordingly.
You can also let a user exercise indefinitely by selecting N O L I M I T . However, you will need to instruct the users that once they select a program and the workout time appears in the display, they need to use the Number Keypad to type in 240. They must then press the up arrow key to display N O L I M I T , and press OK.
The exercise session times available are between 1 and 240 minutes.
1.At the S E T M A X W O R K O U T T I M E prompt, press OK. Use the navigational arrow keys to change the displayed time limit.
Note: When you press and hold a navigational arrow key, the number increments by five, for example, 1, 5, 10, 15, 20. When you tap an arrow key, the number increments by one.
2.When you are ready, press OK to accept the displayed setting and move to the next feature. For other options, refer to the table in Accessing Club Programming Mode and Changing the Settings.
Product Owner's Manual: Club Features |
20 |
Setting a Pause Time Limit
You can limit how long a user can pause while exercising on the equipment by entering a time between 1 and 120 seconds (two minutes). For example, if you set a pause time limit of 60 seconds, the display automatically resets to the Precor banner if no movement is detected and no key press occurs for one minute.
Important: The optional power adapter must be connected on self-powered equipment to establish a definitive pause time limit. If the optional power adapter is not attached and the rate of motion drops below the minimum requirements, the equipment begins its 30-second shutdown, effectively eliminating pause mode. Refer to the table in Self-Powered Features.
1. At the S E T M A X P A U S E T I M E prompt, press OK. Use the navigational arrow keys to change the time limit. Choose between 1 and 120 seconds (two minutes).
2.When you are ready, press OK to accept the displayed setting and move to the next feature. For other options, refer to the table in Accessing Club Programming Mode and Changing the Settings.
Setting a Cool-Down Time Limit
You can limit how long a user cools down after exercising on the equipment by entering a time between 0 and 5 minutes.
Important: It is highly recommended that you set the cool-down period at or above three minutes. It takes time for a user’s heart rate to return to a resting state after vigorous exercise. An effective cool-down period also reduces the amount of lactic acid in muscle tissue.
1. At the S E T C O O L D O W N T I M E prompt, press OK. Use the navigational arrow keys to display the available time limits. Choose between 0 and 5 minutes. The default setting is 5 minutes.
2.When you are ready, press OK to accept the displayed setting and move to the next feature. For other options, refer to the table in Accessing Club Programming Mode and Changing the Settings.
Product Owner's Manual: Club Features |
21 |
Treadmill: Determining the Club Speed
Limit
You can set a maximum speed for the treadmill. This limits how fast the running belt moves and, consequently, the number of speed settings that are available to the user. The speed is displayed in miles per hour (mph) or kilometers per hour (kph) depending upon the units of measure (U.S. standard or Metric) selected earlier. The speed ranges from 0.5 to 12 mph (0.8 to 20kph).
Important: If you select a number that limits the miles per hour, your change will not affect the kilometers per hour (and vice versa). The treadmill does not convert the speed entered in mph (U.S. standard) to kph (Metric). It stores separate numbers for the different units of measure. To enter both values, you must first reset the display to the appropriate unit of measure, and then change the speed limit in this program. Refer to Selecting a U.S. Standard or Metric Display.
1. At the S E T S P E E D L I M I T prompt, press OK. Use the navigational arrow keys to select the desired running belt speed limit.
2.When you are ready, press OK to accept the displayed setting and move to the next feature. For other options, refer to the table in Accessing Club Programming Mode and Changing the Settings.
Treadmill: Setting an Incline Limit
You can set the maximum grade (percent of incline) for the treadmill. This limits the degree of incline and, consequently, the number of incline settings that are available to the user. The available range is 0% to 15% grade.
1. At the S E T I N C L I N E L I M I T prompt, press OK. Use the navigational arrow keys to select the desired grade.
2.When you are ready, press OK to accept the displayed setting and move to the next program. For other options, refer to the table in Accessing Club Programming Mode and Changing the Settings.
Product Owner's Manual: Club Features |
22 |
Loading...