


5.37

Important Safety Instructions
When using the EFX, always take basic precautions, including the following:
•Read all instructions before using the EFX. These instructions are written for your safety and to protect the unit.
•Before beginning any fitness program, see your physician for a complete physical examination.
Il est conseillé de subir un examen médical complet avant d’entreprendre tout programme d’exercise. Si vous avez des étourdissements ou des faiblesses, arrêtez les exercices immédiatement.
DANGER |
To reduce the risk of electrical shock |
|
always unplug the EFX from the |
||
|
||
|
electrical outlet immediately after |
|
|
using and before cleaning. |
|
WARNING |
To reduce the risk of burns, fire, |
|
|
electric shock, or injury, take the |
|
|
following precautions: |
•Do not allow children or those unfamiliar with its operation on or near the EFX. Do not leave children unsupervised around the unit.
•Never leave the EFX unattended when it is plugged in. Unplug the EFX from the power source when it is not in use, before cleaning it, and before providing authorized service.
•Assemble and operate the EFX on a solid, level surface. Locate the EFX a few feet from walls or furniture. Keep the area around the EFX clear.
•Maintain the EFX in good working condition. Refer to the Maintenance section. Routinely check and make sure that all fasteners are secure.
•Use the EFX only for its intended purpose as described in this manual. Do not use accessory attachments that are not recommended by the manufacturer, as such attachments may cause injuries.
•Never operate the unit if it is damaged, not working properly, when it has been dropped, or has been immersed in water. Return the EFX to a service center for examination and repair.
•Keep the power cord and plug away from heated surfaces.
•Do not operate the EFX where aerosol (spray) products are being used or where oxygen is being administered.
NSTRUCTIONSI AFETYS MPORTANTI
Owner’s Manual: Important Safety Instructions |
1 |

•Do not use outdoors.
•Do not attempt to service the EFX yourself except to follow the maintenance instructions found in this manual.
•Never drop or insert objects into any opening. Keep hands away from moving parts.
•Keep all electrical components, such as the power cord and power switch, away from liquids to prevent shock.
•Do not hang anything on the handrails, moving handlebars, or covers. Place liquids, magazines, and books in the appropriate receptacles.
DANGER |
The EFX must be connected to a |
|
properly grounded outlet. See |
|
Grounding Instructions. |
•Wear proper exercise clothing and shoes for your workout and avoid loose clothing. Do not wear shoes with heels or leather soles. Check the soles of your shoes and remove any dirt and embedded stones. Tie long hair back.
•Use care when getting on or off the EFX. Use the stationary handrail for stability.
•For safety, hold onto a stationary handrail while using the EFX.
•Keep your body and head facing forward. Never attempt to turn around on the EFX.
•Never place your hands or feet in the path of the roller arm because injury may occur to you or damage may occur to the equipment.
•Always use the locking pin to secure the foot pedals when the EFX is not in use.
•Do not rock the unit. Do not stand on the handrail(s), display console, or covers.
•Do not overexert yourself or work to exhaustion. If you feel any pain or abnormal symptoms, stop your workout immediately and consult your physician.
•When the EFX is not in use, disconnect the unit by turning the power switch to the Off position, and then remove the power plug from the wall outlet.
Safety Approval
When identified with the ETL-c logo, the unit has been tested and conforms to the requirements of
CAN/CSA-E-335-1/3-04, EN 60335-1: 2002 Safety of Household and Similar Electrical Appliances.
NSTRUCTIONSI AFETYS MPORTANTI
Owner’s Manual: Important Safety Instructions |
2 |

Grounding Instructions
The EFX must be grounded. If the unit malfunctions or breaks down, grounding provides a path of least resistance for electric current, which reduces the risk of electrical shock. The unit is equipped with a power cord having an equipment-grounding conductor and a grounding plug. The plug must be inserted into an outlet that is properly installed and grounded in accordance with all local codes and ordinances. Failure to properly ground the EFX could void the Precor Limited Warranty.
DANGER |
Improper connection of the |
|
equipment-grounding conductor can |
|
result in a risk of electric shock. Check |
|
with a qualified electrician or service |
|
person if you are in doubt as to |
|
whether the unit is properly |
|
grounded. Do not modify the plug |
|
provided with the EFX. If it does not |
|
fit the outlet, get a proper outlet |
|
installed by a qualified electrician. |
120 V Units Designated for U.S. Markets
The grounding plug on the EFX looks like the plug shown in Diagram 1. The power outlet must have the same configuration as the plug. No adapter should be used with this product.
Diagram 1: 120-volt power plug
NSTRUCTIONSI AFETYS MPORTANTI
Owner’s Manual: Important Safety Instructions |
3 |

Radio Frequency Interference (RFI)
Federal Communications Commission, Part 15
The EFX has been tested and found to comply with the limits for a Class B digital device, pursuant to Part 15 of the FCC Rules. These limits are designed to provide reasonable protection against harmful interference in a residential installation. The EFX generates, uses, and can radiate radio frequency energy and, if not installed and used in accordance with the owner’s manual instructions, may cause harmful interference to radio communications.
WARNING |
Per FCC rules, changes or |
|
modifications not expressly |
|
approved by Precor could void the |
|
user’s authority to operate the |
|
equipment. |
Canadian Department of Communications
This digital apparatus does not exceed the Class B limits for radio noise emissions from digital apparatus set out in the Radio Interference Regulations of the Canadian Department of Communications.
Le présent appareil numérique n’émet pas de bruits radioéélectriques dépassant les limites applicables aux appareils numériques de la class B prescrites dans le Règlement sur le brouillage radioélectrique édicté par le ministére des Communications du Canada.
ATTENTION: Haute Tension
Débranchez avant de réparer
NSTRUCTIONSI AFETYS MPORTANTI
Owner’s Manual: Important Safety Instructions |
4 |
European Applications
This product conforms to the requirements of the European Council Directive 2004/108/EC, Electromagnetic Compatibility and has been tested to the following standards:
•EN55022, Limits & Methods of Measurement of Radio Interference, Information Technology Equipment.
•EN50024, Immunity of Information Technology Equipment
This product is compliant to 2002/95/EC, Restriction of Hazardous Substances Directive.
This product also conforms to the requirements of the European Council Directive 2006/95/EC, Low Voltage Directive and has been tested to the following standard:
•IEC 335-1, Safety of Household and similar Electrical Appliances.
Obtaining Service
You should not attempt to service the EFX except for maintenance tasks as described in this manual. The EFX does not contain any user-serviceable parts that require lubrication. For information about product operation or service, see the Precor web site at www.precor.com.
Should you need more information regarding customer support numbers or a list of Precor authorized service centers, visit the Precor web site at www.precor.com/corp/contact.
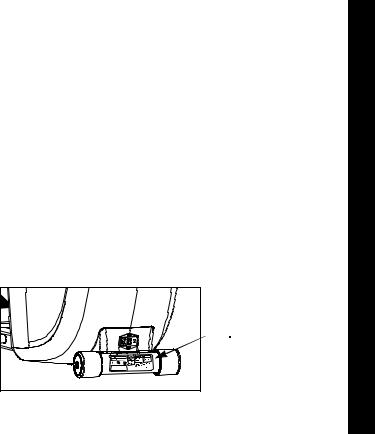
For future reference, write the model, serial number, and date of purchase for your unit in the space provided. The serial number is printed on a label located beneath the power receptacle (Diagram 2).
Model #: _______ |
Serial #: _______________________ |
Date purchased: _________________________
 Serial number label
Diagram 2: Location of serial number
NSTRUCTIONSI AFETYS MPORTANTI
Owner’s Manual: Important Safety Instructions |
5 |

Table of Contents
Important Safety Instructions ............................. |
1 |
Safety Approval ..................................................................... |
2 |
Grounding Instructions ........................................................ |
3 |
Radio Frequency Interference (RFI) ................................. |
4 |
European Applications ........................................................ |
5 |
Obtaining Service ................................................................. |
5 |
EFX Features ..................................................................... |
9 |
The Locking Pin ..................................................................... |
9 |
Converting Handlebar Positions .................................... |
10 |
Using the Stationary Handrail ......................................... |
11 |
Moving Handlebars Support the |
|
Total Body Workout .......................................................... |
11 |
Turning the Unit On and Off ............................................ |
11 |
Weight Limit ........................................................................ |
11 |
Location ............................................................................... |
12 |
Heart Rate Features ...................................................... |
13 |
Important Use and Safety Information .......................... |
13 |
Using the Heart Rate |
|
Touch-Sensitive Handrail Grips ..................................... |
16 |
Using SmartRate ................................................................ |
16 |
Exercise to Your Target Heart Rate ............................... |
18 |
Heart Rate Analysis ........................................................... |
18 |
Display Console .............................................................. |
19 |
More Information about the Upper Display .................. |
20 |
More Information about the Center Display ................. |
21 |
More Information about the Lower Display .................. |
21 |
................................................................................................ |
21 |
Keypads ............................................................................... |
24 |
User Identification .......................................................... |
30 |
Adding a User ..................................................................... |
31 |
Updating User Information ............................................... |
32 |
Changing the User Name and |
|
Clearing Workout Statistics ............................................ |
33 |
Workout Options ............................................................ |
34 |
Choosing QUICKSTART ................................................. |
35 |
Selecting a Program .......................................................... |
36 |
Selecting a USER Key ...................................................... |
37 |
Setting Display Preferences Before Exercising .......... |
38 |
Cooling Down After a Workout ...................................... |
38 |
Pausing During a Workout or the |
|
Cool-Down Period ............................................................. |
39 |
Ending a Workout .............................................................. |
40 |
Owner’s Manual: Table of Contents |
6 |
Programs .......................................................................... |
41 |
Choosing a Program ......................................................... |
41 |
Program Tips ...................................................................... |
42 |
Manual Program ................................................................. |
43 |
Interval Programs ............................................................... |
43 |
Aerobic Endurance Program ........................................... |
44 |
Hill Climb Program ............................................................ |
45 |
Custom Programs .............................................................. |
45 |
Heart Rate Programs ........................................................ |
47 |
Fitness Test Program ........................................................ |
49 |
Weight Loss Programs ..................................................... |
51 |
Gluteal Program ................................................................. |
52 |
CrossTrainer Program ...................................................... |
52 |
Exercise Session ............................................................ |
53 |
Exercise Session Tips ....................................................... |
53 |
Changing Programs in Mid-session .............................. |
53 |
Changing the Workout Time ........................................... |
54 |
Adjusting Program Goals ................................................. |
55 |
Changing Your Workout Display Options ................... |
55 |
Changing the Units of Measure Display ....................... |
57 |
Adjusting Your Target Heart Rate .................................. |
57 |
Advanced Programming and Troubleshooting |
......58 |
Advanced Programming Tips .......................................... |
58 |
Changing EFX Settings .................................................... |
59 |
Informational Displays ....................................................... |
61 |
Troubleshooting Error Codes .......................................... |
64 |
Troubleshooting Heart Rate ............................................ |
65 |
Maintenance .................................................................... |
66 |
Inspection ............................................................................ |
66 |
Cleaning the Equipment ................................................... |
66 |
Storing the Chest Strap ................................................... |
67 |
Long-Term Storage ............................................................ |
67 |
Precor Residential Equipment |
|
Limited Warranty.................................................. |
68 |
Owner’s Manual: Table of Contents |
7 |
Notes:
Owner’s Manual: Table of Contents |
8 |
EFX Features
The EFX is equipped with certain items that, when used properly, help sustain a safe and enjoyable workout. These items include:
•Locking pin location
•Convertible handlebars
•Stationary handrails with heart rate feature
•Moving handlebars
•Power switch location
Important: Before exercising, review the Important Safety Instructions found at the beginning of this manual.
The Locking Pin
CAUTION: Always use the locking pin to secure the foot pedals when the EFX is not in use.
The locking pin secures the foot pedals to keep them from traveling up or down the ramp. Before beginning your workout, pull firmly on the pin to slide it out of the roller arm. Refer to Diagram 3. A lanyard attaches the locking pin to the ramp.
Store the locking pin underneath the ramp once it is removed from the roller arm. Refer to Diagram 4.
After exercising, use the locking pin to secure the foot pedals.
Roller arm |
Locking |
pin |
Diagram 3: Remove locking pin before exercising
Storage location |
Ramp |
Lanyard |
|
Diagram 4: Store the locking pin under the ramp
Owner’s Manual: EFX Features |
9 |
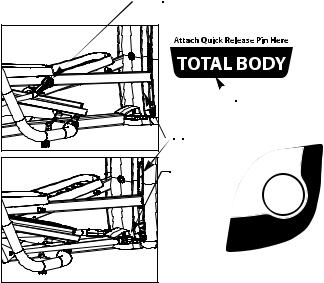
Converting Handlebar Positions
The EFX5.37 handlebars can be locked in either a stationary (Lower Body) or moving arm (Total Body) position depending on your exercise preference. Refer to Diagram 5.
CAUTION: Never attempt to change the handlebar connection when the EFX is in use.
 Receiver for Total Body is located on the foot pedal.
 Receiver label
 Rear covers
|
|
|
|
|
e |
|
|
|
|
|
r |
|
|
|
|
|
e |
Receiver for |
|
|
|
|
H |
|
|
|
|
n |
|
|
|
|
|
i |
|
Lower Body is |
|
|
|
|
P |
|
|
|
|
e |
|
|
|
|
|
s |
|
located on the |
|
|
|
|
a |
|
|
|
|
e |
|
|
|
|
|
l |
|
|
|
|
|
e |
|
base |
|
|
|
|
R |
|
|
|
|
ck |
|
frame. |
|
|
Q |
u |
i |
|
|
|
|||
|
|
|
|
||
LOWER |
|
ch |
|
|
|
a |
|
|
|
||
|
tt |
|
|
|
|
BODY |
A |
|
|
|
|
|
|
|
|
|
|
Receiver label |
|||||
Diagram 5: Converting the handlebars
The following steps explain how to convert the handlebars from a Lower Body to a Total Body position or vice versa.
1.Hold the link arm securely with one hand as you press the button on the quick release pin with your thumb. Pull the quick release pin out of its receiver.
2.Rotate the link arm 90° so the quick release pin is aligned with the other receiver. For example, the locking receiver for the Total Body handlebars is beneath the foot pedal. If you wish to lock the handlebars in the Lower Body position the locking receiver is on the base frame just in front of the rear cover.
CAUTION: Be aware of handlebar movement. If you move the link arm, it also causes the handlebar to move. Do not drop the link arm. Dropping the link arm may chip the paint on the EFX. To avoid injury to you or your assistants, be aware of the location of the handlebars during the conversion process.
3.Press the button on the quick release pin and slide the pin into the appropriate receiver.
4.Let go of the button and make sure the link arm is securely locked into position by pushing and pulling it firmly.
5.Perform the same steps for the opposite handlebar.
CAUTION: Make sure the quick release pin is fully engaged in the receiver and locked in position before using the EFX.
Owner’s Manual: EFX Features |
10 |
Using the Stationary Handrail
To maintain your balance, always grasp a stationary handrail when you step on or off the foot pedals, and when you use the keypad.
To learn more about the touch-sensitive handrail grips, refer to Heart Rate Features.
Moving Handlebars Support the Total
Body Workout
The handlebars on the EFX5.37 provide an upper-body workout which helps increase cardiovascular fitness. By adding the total body movement to your cross training workout, you are actually increasing your work effort and enhancing your overall fitness level.
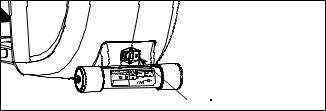
Turning the Unit On and Off
To turn the unit On and Off, use the power switch located at the rear of the unit, near the power cord receptacle. Refer to Diagram 6.
Important: When it is not being used, turn the unit Off.
 Power switch
Diagram 6: Power switch
Weight Limit
The equipment has been durability tested to 350 lb. (160 kg).
Owner’s Manual: EFX Features |
11 |
Location
It is important to keep a minimum of one foot (30 cm) around the EFX open and free from encumbrances such as other equipment.
CAUTION: If you plan to move the EFX, obtain help and use proper lifting techniques.
To move the EFX, the two of you need to stand on opposite sides and face the rear of the EFX. Follow the appropriate steps for the EFX you own.
1.Lock the handlebars in the Lower Body position. Refer to the labels on the base of the EFX and to the instructions found in Converting Handlebar Positions.
2.Determine a comfortable height for lifting and have your assistant grasp one handlebar while you grasp the opposite one.
3.Lift the EFX and roll it on the rear rollers to the desired location.
Owner’s Manual: EFX Features |
12 |

Heart Rate Features
CALORIES |
|
HEART RATE |
|
5.37 |
109 |
|
|
|
|
SmartRate |
|
WARMUP |
FATBURN CARDIO PEAK HIGH |
|
Heart rate and SmartRate® features are available when you wear the chest strap or grasp both touch-sensitive handrail grips. When a heartbeat is detected, the HEART RATE display shows your heart rate and, if your age has
been entered, the SmartRate LED pulses and indicates your target zone.
Important Use and Safety Information
Read the following before using the heart rate or SmartRate features.
•Consult your physician before engaging in any vigorous exercise. Do not use the heart rate programs until authorized by your physician.
•Know your heart rate and your physician-recommended heart rate target zone. Individual heart rates vary according to several physiological factors and may not correspond directly with Diagram 7.
Owner’s Manual: Heart Rate Features |
13 |

•The calculation used for the heart rate target zone is: (220 minus your age) multiplied by a percent.
For example:
Low range: (220 minus your age) multiplied by 55% High range: (220 minus your age) multiplied by 85% Refer to Table 1 in Using SmartRate.
Heart Rate Target Zones
Your Heart Rate
200
190
180
170
160
150
140
130
120
110
100
90
80
70
20 25
Recom mended C ardiovascular Z one Recommended W eight Loss Zo ne
30 35 40 45 50 55 60 65 70 75
Your Age
High
Peak
Cardio
Fat Burn
Warmup
Diagram 7: Heart rate target zones
•After you put on the chest strap, face the display console for a few seconds. This allows the receiver in the console to recognize the signal from the chest strap.
•If Hr appears in the display, the EFX is detecting a signal, but has not yet determined your heart rate. Make sure the chest strap is positioned properly around your chest and against your skin.
•If you prefer to use the touch-sensitive handrail grips, grasp both grips and wait five to ten seconds. Make sure both hands are moist.
Note: When a signal is detected, the heart rate icon flashes and a number appears in the HEART RATE display and indicates your heart rate.
•Always face forward on the EFX and use the stationary handrail for balance. Keep upper body movement to a minimum.
Owner’s Manual: Heart Rate Features |
14 |

Wearing a Chest Strap
During a workout, the heart rate features appear on the display when you wear a chest strap. To receive an accurate reading, the chest strap needs to be in direct contact with your skin.
1.Carefully dampen the back of the strap with tap water Refer to Diagram 8.
Note: Do not use deionized water. It does not have the proper minerals and salts to conduct electrical impulses.
Diagram 8: Moisten chest strap
2.Adjust the strap and fasten it around your chest. The strap should feel snug, not restrictive. Refer to Diagram 9.
Diagram 9: Adjust chest strap
3.Make sure that the chest strap is right side up, lies horizontally across your chest, and is centered in the middle of your chest. Refer to Diagram 10.
Diagram 10: Fasten chest strap
After you put on the chest strap, face the display console for a few seconds. This allows the receiver in the console to recognize the signal from the chest strap.
Owner’s Manual: Heart Rate Features |
15 |

Using the Heart Rate
Touch-Sensitive Handrail Grips
While exercising, you must grasp both touch-sensitive handrail grips for a minimum of five to ten seconds to transmit your heart rate to the display. Refer to Diagram 11.
 Touch-sensitive
handrail grips
Diagram 11: Touch-sensitive handrail grips
Usually, the concentration of salts in a person’s perspiration provides enough conductivity to transmit a signal to the receiver inside the display console. However, some people, because of body chemistry or erratic heart beats cannot use the touch-sensitive heart rate feature on the EFX. A chest strap may provide better results.
Important: While exercising, do not grasp the touchsensitive handrail grips and wear the chest strap at the same time. The touch-sensitive handrail grips override the signals from the chest strap transmitter. If used together, inconsistent readings may occur.
Using SmartRate
The SmartRate feature helps you monitor and maintain your heart rate in the target zone best suited to your specific needs. All 10 LEDs may light during a workout. When the EFX detects a heart rate, a single LED blinks and indicates the zone that your heart rate is in.
Important: To use the SmartRate feature, you must enter your age during the setup phase of your exercise session.
The 10 LEDs in the SmartRate display are color-coded. A pulsating orange LED indicates you are outside the recommended heart rate target zone. Green LEDs indicate when you are exercising within the recommended fat burn or cardio fitness zones.
Owner’s Manual: Heart Rate Features |
16 |
Table 1 shows the percents used in calculating the heart rate target zones. While your heart rate remains within these zones, the corresponding lights blink and provide a visual cue.
The calculation used to determine your maximum aerobic heart rate is (220 minus your age). When you multiply it by the percent indicated in Table 1, you can understand the relationship between the pulsating LED and your target heart rate.
CAUTION: Your heart rate should never exceed 85% of your maximum aerobic heart rate or go above PEAK. If it does, immediately reduce your strides per minute, adjust the CrossRamp, or resistance to return your heart rate to your physician-recommended target zone.
Table 1. Heart rate target zones and SmartRate LEDs
Heart Rate Zone |
|
|
|
Percent |
LED Lit |
LED Blinking |
Label |
|
|
|
|
Below 50 |
First |
Orange |
WARMUP |
|
|
|
|
50 to 54 |
Second |
Orange |
WARMUP |
|
|
|
|
55 to 59 |
Third |
Green |
FATBURN |
60 to 64 |
Fourth |
Green |
FATBURN |
65 to 69 |
Fifth |
Green |
FATBURN |
70 to 74 |
Sixth |
Green |
CARDIO |
75 to 79 |
Seventh |
Green |
CARDIO |
80 to 84 |
Eighth |
Green |
CARDIO |
85 to 87 |
Ninth |
Orange |
PEAK |
|
|
|
|
Above 87 |
Tenth |
Orange |
HIGH |
|
|
|
|
The SmartRate indicator lights do not appear when:
•You press QUICKSTART at the banner.
•You do not enter your age before starting a program.
•You do not wear or improperly position the chest strap.
•You fail to grasp both touch-sensitive handrail grips for five to ten seconds.
Owner’s Manual: Heart Rate Features |
17 |
Exercise to Your Target Heart Rate
A dedicated window displays your heart rate while exercising. To view your heart rate (beats per minute) on the display, either wear a chest strap or grasp both touchsensitive handrail grips.
The Precor web site (www.precor.com) has several suggestions for workouts with varying levels of intensity. It provides many workout details that include the appropriate target heart rate.
The EFX includes a program that lets you exercise based on a specified target heart rate. As you exercise, the Basic HRC Program monitors your heart rate and automatically maintains it within a few beats per minute (bpm) of your selected target.
To use this program, press the PROGRAMS - HEART RATE key. For more information, refer to Programs.
Heart Rate Analysis
Every time you complete a program using the chest strap or touch-sensitive handrail grips, the EFX provides a heart rate analysis after the workout summary.
Your average heart rate appears followed by the maximum heart rate achieved during your workout. A third display appears, if you entered your age, and indicates the amount of time your heart rate remained between the target zones shown.
The heart rate analysis is based on how often your heart rate signal is received while exercising. If you use the chest strap, the average heart rate will be more accurate than if you occasionally grasp the touch-sensitive handrail grips.
Owner’s Manual: Heart Rate Features |
18 |
Display Console
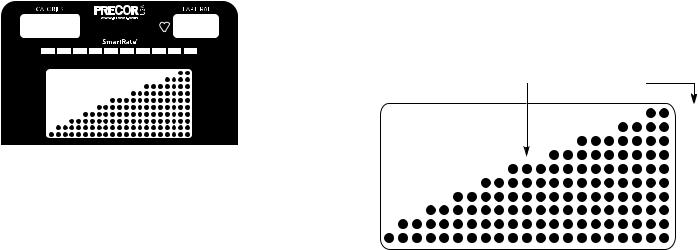
Upper display: Initially shows the Precor banner. It changes to the program profile when you select a program or press QUICKSTART. A blinking column in the profile indicates your position. The smaller CALORIES and HEART RATE displays show your calorie expenditure and pulse.
 SmartRate display: LEDs light in this column when the SmartRate feature is activated. Follow the LEDs to monitor your heart rate and maintain it in your target zone.
PROGRAMS keypad: To begin an exercise session, press a PROGRAMS key to view a menu of programs within each category. For program descriptions, refer to Programs.
MANUAL |
HEART |
|
.37 |
RATE |
|
||
INTERVAL |
WEIGHT LOSS |
WARMUP |
CARDIO PEAK HIGH |
VARIETY |
PERFORMANCE |
|
|
USER 1—4: Press a USER key at the

 Precor banner to personalize your
exercise experience. The information is stored for future exercise sessions.
Selection key: Press the key to move  through the information in the column, so
you can choose what you want to display during your session. Indicator lights appear next to the item that is displayed. You can perform the same function with the right selection key.
 TIME ELAPSED TIME REMAINING
SSRAMP |
RESISTA |
NC |
O |
|
QUICK
START
DATA |
|
|
Number keys: During an exercise |
|
|
|
|
|
session, use the number keys to answer |
|
|
|
|
prompts and update information. |
|
|
|
|
|
|
|
|
|
|

 Before beginning any fitness program, see your physician for a thorough physical examination. Seek advice from your physician to learn the target heart rate appropriate for your fitness level. Do not allow children or those unfamiliar with its operation on or near this equipment. Read the product owner's manual or consult a qualified instructor before operating this equipment. Improper use of this equipment can result in serious injury. If you feel pain, faintness, or dizziness, stop exercising immediately.
RESET
Copyright 2007 Precor Incorporated en
 TOTAL STRIDES
STRIDES/min
 VERTICAL GAIN
Center display
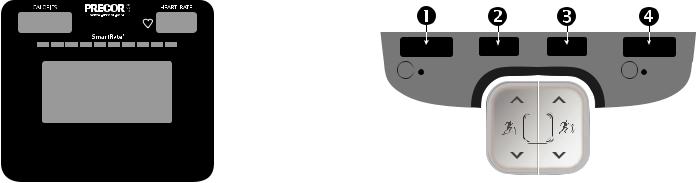
OK and Navigational arrow keys: Use the OK key to confirm responses to specific prompts. The up and down arrow keys present the available selections and affect what appears on the display. Refer to the Navigational Keypad.
Lower display: While you exercise, six sets of numbers show information about your session. Refer to More Information about the Lower Display
CROSSRAMP arrow keys: Use the  arrow keys to adjust the ramp incline.
 RESISTANCE arrow keys: Use the arrow keys to adjust the resistance.
Owner’s Manual: Display Console |
19 |
More Information about the Upper Display
5.37
WARMUP |
FATBURN |
CARDIO PEAK HIGH |
CALORIES—displays the estimated cumulative number of calories burned. The calorie calculation is derived from the pedaling speed, resistance, and your weight. An accurate weight entry results in a more accurate calorie count. When using QUICKSTART and a weight has not been specified, the default weight is 150 pounds (68 kilograms).
SmartRate—displays your heart rate as a blinking bar which indicates the zone you are in when you wear a chest strap or grasp both touch-sensitive grips. Refer to Using SmartRate.
HEART RATE—displays your heart rate when you wear a chest strap or grasp both touch-sensitive grips. Refer to
Heart Rate Features.
PROGRAM PROFILE—In most programs, the CrossRamp setting affects the column height in the program profile as shown in Diagram 12. The profile raises or lowers according to which arrow key is pressed.
Column height |
|
CrossRamp settings |
|
19 — 20
17 — 18
15 — 16
13 — 14
11 — 12
9 — 10
7 — 8
5 — 6
3 — 4
1 — 2
Diagram 12: Column height in the program profile
Owner’s Manual: Display Console |
20 |
More Information about the
Center Display
5.37
WARMUP |
FATBURN |
CARDIO PEAK HIGH |
|
|
|
|
|
|
The center display presents the program name when you select a program. During an exercise session, the center display becomes a message bar showing additional information depending on user selections and program interludes. For more information about the selections that can appear in the center display, refer to Changing Your Workout Display Options.
More Information about the Lower Display
 TIME ELAPSED TIME REMAINING
|
SRAMP |
RESIST |
|
OS |
AN |
C |
|
R |
|
|
|
C |
|
|
E |
QUICK
START
 TOTAL STRIDES
STRIDES/min
 VERTICAL GAIN
The lower display provides information about your exercise session. The two center windows automatically provide information about your CrossRamp and resistance settings. To choose the type of information displayed in the left and right windows, press the adjacent Selection key. The numbers that appear relate to your workout statistics and are described below.
Note: If you choose to rest a book or magazine on the display, you can still view these workout statistics.
Owner’s Manual: Display Console |
21 |
 Loading...