


SURROUNDBAR 500
Technical Assistance or Service
If anything is missing or damaged, or if your speaker fails to
operate, notify Polk Audio Customer Service immediately at
800-377-7655. If, after following the hookup directions, you
experience difficulty, please double-check all wire connections.
Should you isolate the problem to the speaker, contact the author-
ized Polk Audio dealer where you made your purchase, or contact
Polk Audio Customer Service 800-377-7655 (M-F, 9-5:30 EST
,
US & Canada only) or via email polkcs@polkaudio.com. Outside
the US & Canada, call +1 410-358-3600.
WARNING: Listen Carefully
Polk Audio loudspeakers and subwoofers are capable of playing
at extremely high volume levels, which could cause serious or
permanent hearing damage. Polk Audio, Inc. accepts no liability
for hearing loss, bodily injury or property damage resulting from
the misuse of its products.
Keep these guidelines in mind and always use your own good
judgm
ent when controlling volume:
• You should limit prolonged exposure to volumes that exceed
85 decibels (dB). For more about safe volume levels, go to
the Occupational Health and Safety Administration (OSHA)
guidelines at www.osha.gov.
Product Disposal
Certain international, national and/or local laws and/or
regulations may apply regarding the disposal of this
product. For further detailed information, please
contact the retailer where you purchased this product
o
r the Polk Audio Importer/Distributor in your country.
A listing of Polk Audio Importer/Distributors can be found
on the Polk Audio website www.polkaudio.com or by
contacting Polk Audio at 5601 Metro Drive, Baltimore,
Maryland 21215, USA—Phone: +1 410-358-3600.
ENG LISH
Service ou assistance technique
S’il manque des pièces, si vous découvrez des avaries ou si votre
enceinte ne fonctionne pas, contactez immédiatement le Service
à la clientèle de Polk Audio au 1-800-377-7655. Si vous éprouvez
des difficultés après avoir suivi toutes les instructions, vérifiez
toutes les connexions. Si vous en concluez que le problème
est relié à l’enceinte, communiquez avec votre revendeur
Polk Audio ou contactez le Service à la clientèle de Polk Audio
au 1-800-377-7655 (lundi au vendredi, 9h à 17:30h, HE, Canada
et É.-U. seul.) ou par courriel à polkcs@polkaudio.com. À l’extér-
ieur des É.U. et du Canada, composez le: +1 410-358-3600.
AVERTISSEMENT: écoutez bien!
Les enceintes et subwoofers Polk Audio sont capables de générer
des niveaux sonores extrêmement élevés pouvant causer des
dommages auditifs graves ou permanents. Polk Audio Inc. ne peut
être tenue responsable de perte d’ouïe, blessures corporelles ou
dom
mages matériaux résultant de l’usage abusif de ses produits.
Faites preuve de discernement lorsque vous contrôlez
le volume et tenez compte du conseil suivant:
• Limitez l’exposition prolongée à des niveaux sonores excédant
85 décibels (dB). Pour plus d’information sur les niveaux sonores
sécuritaires, visitez le site de l’OSHA (Occupational Health and
Safety Administration): www.osha.gov
Product Disposal
La récupération de ce produit pourrait être sujette
à cer
taines lois ou à certains règlements inter-
nationaux, nationaux ou régionaux. Pour plus
d’information, communiquez avec votre revendeur
ou avec l’importateur/distributeur Polk Audio dans
votre pays. Vous trouverez la liste des importateurs/
distributeurs des produits Polk Audio sur le site web
de Polk Audio www.polkaudio.com ou en communiquant
avec Polk Audio: 5601 Metro Drive, Baltimore, Maryland 21215,
USA—Tél.: +1 410 358-3600.
FRA NÇAIS
Servicio y Asistencia Técnica
Si algo falta o se ha dañado, o si el altavoz no funciona, avise
inmediatamente al Servicio al Cliente de Polk Audio llamando
al 1-800-377-7655. Si tiene problemas después de seguir las
instrucciones de cableado, revise bien todas las conexiones
de cables. Si determina que el problema está en el altavoz,
póngase en contacto con el distribuidor de Polk Audio al que
le compró el altavoz o comuníquese con el Servicio al Cliente
de Polk Audio llamand
o al 1-800-377-7655 (de lunes a viernes,
de 9 a.m. a 5:30 p.m., hora del Este, sólo EE.UU. y Canadá)
o escribiendo a polkcs@polkaudio.com. Fuera de EE.UU.
y Canadá, llame al +1 410-358-3600.
ADVERTENCIA: Escuche Cuidadosamente
Los altavoces de Polk Audio son capaces de reproducir sonido
a volúmenes extremadamente altos, lo cual puede causar daños
graves o permanentes al oído. Polk Audio, Inc. no acepta ninguna
responsabilidad por pérdida de oído, lesiones corporales o d
años
a la propiedad producidos por el uso inadecuado de sus productos.
Tenga en mente estas recomendaciones y ponga siempre
en práctica su sentido común al controlar el volumen:
• Limite la exposición prolongada a volúmenes de más de
85 decibles (dB). Para obtener más información sobre niveles
seguros de volumen, consulte a la Administración de Seguri-
dad y Salud Ocupacional (Occupational Health and Safety
Administration, OSHA) en www.osha.gov.
Desecho del Producto
E
s posible que haya leyes y/o reglamentos inter-
nacionales, nacionales y/o locales sobre el desecho
de este producto. Para obtener información más
detallada, comuníquese con el distribuidor a quien
le compró este producto de Polk Audio o al importador
o distribuidor de su país. Hay una lista de importadores
y distribuidores de Polk Audio en www.polkaudio.com.
También puede comunicarse con Polk Audio por correo:
5601 Metro Drive, Baltimore, Maryland 21215, USA;
o por te
léfono: +1 410 358-3600.
ESPAÑOL
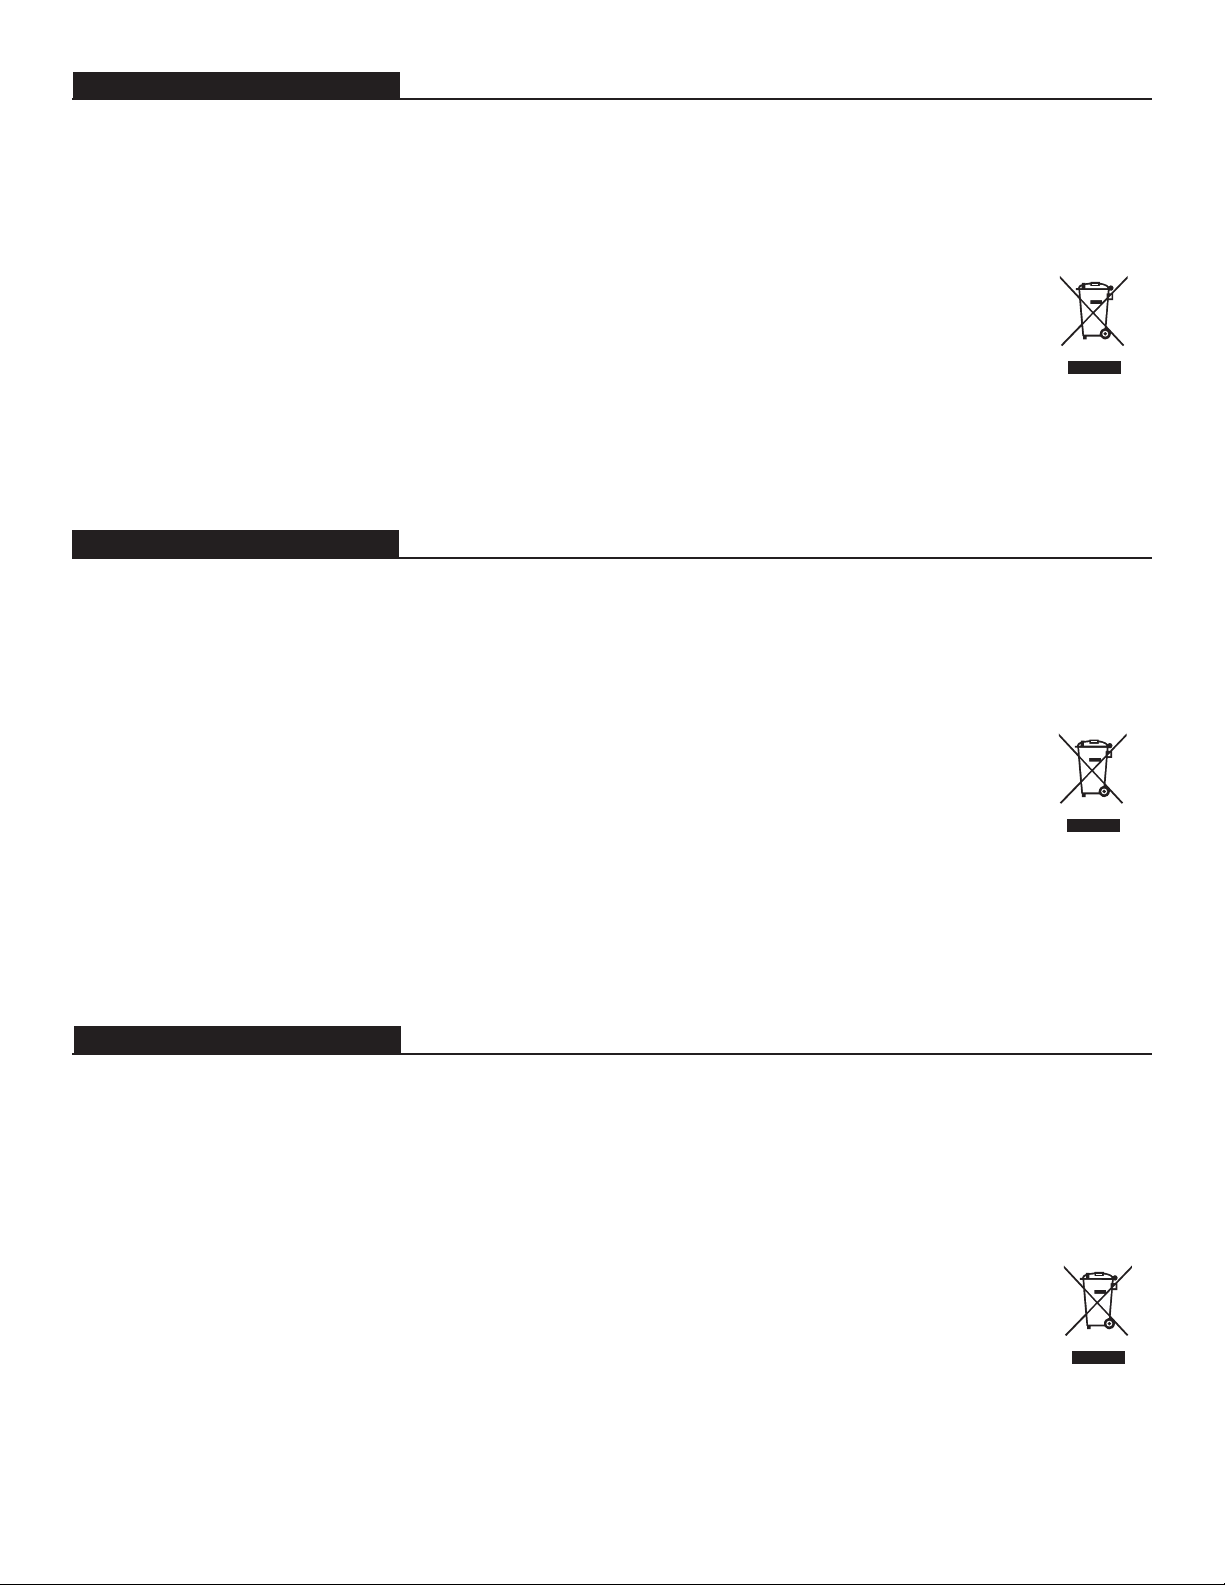
PLEASE TAKE INVENTORY
Please check to ensure you have everything in your Polk Audio
®
SurroundBar
®
400 Component Home Theater (CHT) or your
SurroundBar 500 CHT carton. Inside, you should find:
SURROUNDBAR 400 CHT:
SurroundBar 400 loudspeaker
Wall mount bracket
15' (4.6m) color-coded cable
2 rubber feet
Owner’s manual
Online registration card
SURROUNDBAR 500 CHT:
SurroundBar 500 loudspeaker
SDA control module
SDA control module wall mount template
Rack mount ears wit
h screws
Wall mount bracket
15' (4.6m) cable
2 rubber feet
Owner’s manual
Online registration card
Important Note: If anything is missing or damaged, or if your
Polk Audio SurroundBar CHT system fails to operate, please
notify your dealer immediately. We recommend keeping your
original carton and packing materials in case you need to ship
the unit in the future.
ABOUT YOUR SURROUNDBAR CHT
Thank you for choosing the SurroundBar CHT from Polk Audio.
You’re about to discover how the legendary Polk Audio sound
makes watching TV and movies so much more exciting. The
SurroundBar CHT produces a wide soundstage and rich, full
sound without the need for rear speakers and the clutter
of rear speaker wires.
INSIDE YOUR SURROUNDBAR CHT CARTONS:
Wall Mount Bracket 15' (4.6m) Color-Coded Cable
SurroundBar 400 Loudspeaker
Wall Mount Bracket
15' (4.6m) Cable
SurroundBar 500 Loudspeaker
SDA Control Module
Rack Mount Ears
(Hardware Included)
SDA Control Module
Wall Mount Template
Rubber Feet
Rubber Feet
SURROUNDBAR 500 CHT:
SURROUNDBAR 400 CHT:
Crossover Module Wall Mount Template
1.Determinecrossovermodulelocation.
2.Holdortapethetemplate to the mounting location,
eitherinaverticalorhorizontal position.
3.Marktheholesforthe keyhole mounting screws
4.Attachthemountingscrewsinto the wall stud or,
ifdirectlyintodrywall,byusing wall anchors. Leave
enoughofthescrewexposedso that the keyhole
slotswillrestsecurelyonthe screws.
5.Attachthewirestothe terminals on the back
ofthecrossovermodule(seemanual).
6.Mountt
hem
oduleonthewall.
See manualfordifferentmountingoptions
Gabarit pour montage mural
dela Crossover Module
1.Déterminezlelieudemontage de crossover module.
2.Tenezoufixezlegabarit à l’endroit choisi—
enpositionverticaleouhorizontale.
3.Marquezlestrouspourles vis de montage
dessupportsentroudeserrure.
4.Visezlesvisdemontage au montant du mur—
utilisezdesancressivousvisez dans le placoplâtre.
Laissezdépasserlesvisassezpour que les supports
entroudeserrures’enclenchentsolidemen
ts
urlesvis.
5.Connectezlesfilsdeh.p. aux bornes situées à l’arrière
decrossovermodule(consultezlemanuel).
6.Montezmoduleaumur.
Consultezlemanuelpourdiversesoptions de montage.
Screw locationforhorizontalmounting
Positiondelavispourmontage horizontal
Screw locationforverticalmounting
Positiondelavispourmontage vertical
Center Point
PointCentral
Screw locationforhorizontalmounting
Positiondelavispourmontage horizontal
Screw locationforverticalmounting
Positiondelavispourmontage vertical
Customer Service Hours of Operation: Monday-Friday, 9AM-5:30PM EST polkcs@polkaudio.com 3
ENG LISH
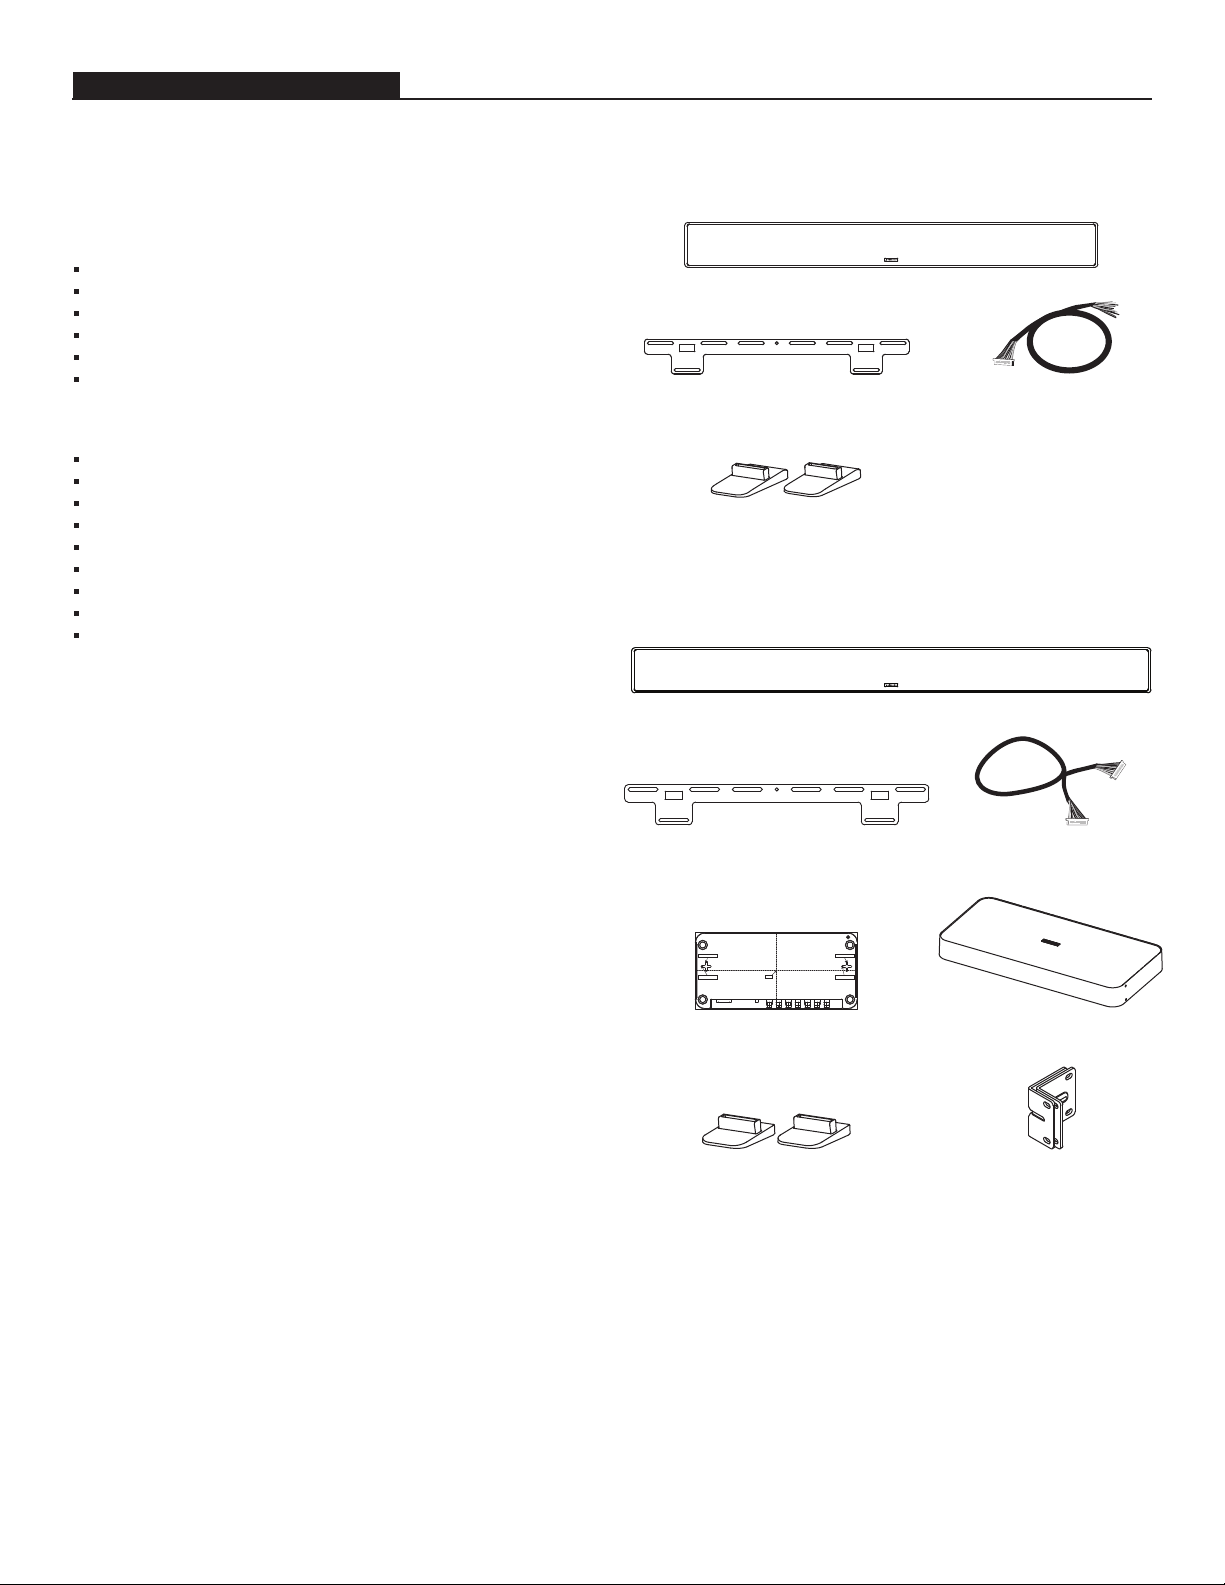
RESTING THE SURROUNDBAR ON A SHELF
The SurroundBar’s detachable feet can be reversed
and, depending on their orientation, will make the bar sit
flat or tilt up at 10°. Without the feet, the SurroundBar tilts
up 5°. Press the detachable rubber feet into the groove on
the bottom of the SurroundBar, plug in the speaker cable
and set the mode switch to either 7CH, 5CH or LCR,
depending upon your intended setup (see pages 6 - 10).
Place the speaker on a flat surface below or above your
TV
and aimed directly toward your seating position.
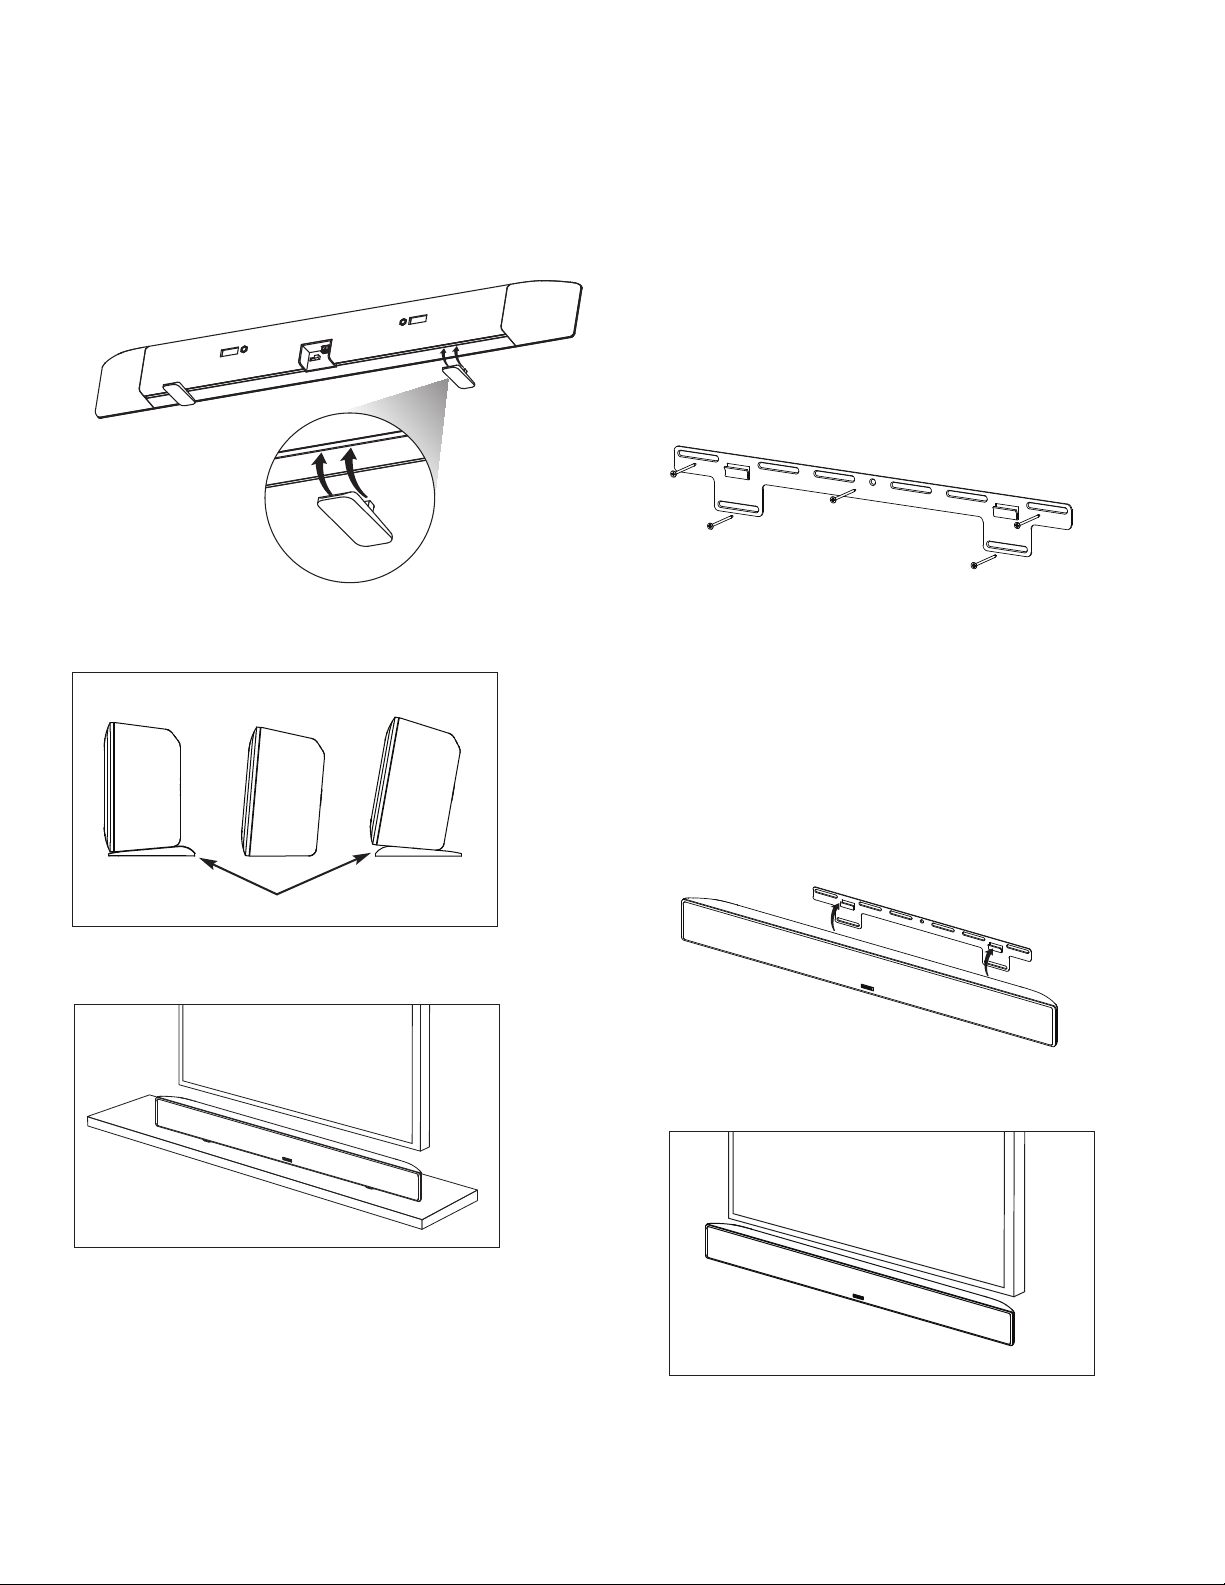
MOUNTING THE SURROUNDBAR ON A WALL
Note: Before you install your SurroundBar on its wall
mount bracket, make sure the mode switch is on
the correct setting (see pages 6 - 10).
1. Hold the speaker in your intended location to be
sure there are no obstructions.
2. Attach the wall mount bracket to the wall, ensuring
it’s level and positioned exactly in the middle of the TV.
Mounting Screws For SurroundBar Bracket (not included)
The S
urroundBar mounting bracket should be attached
to the wall using a minimum of five (5) #6 or #8 drywall
or wood screws, either bugle head or flat head, 1 1/2"
long or longer. The five recommended mounting points
are indicated in the illustration below.
3. The wall mount bracket has enough holes so that you
can always make the attachment to at least one wall stud,
which is important for a secure installation. Use a molly
bolt or wall anchor if a second stud is not available.
4. Plug th
e SurroundBar cable into the back of the bar,
ensure the mode switch is on the correct setting
(either 7CH, 5CH or LCR), then slide the SurroundBar
down onto the bracket’s mounting tabs, making sure
the SurroundBar sits securely on the wall mount bracket.
5. Tug gently on the SurroundBar while holding it from below
to ensure it is secure on its bracket.
4 Polk Audio Customer Service 800-377-7655 (Outside USA & Canada: 410-358-3600)
Wall mounted bar.
Shelf mounted bar sits in front of TV.
Flat, 5° angle or 10° angle depending on orientation
of detachable feet.
0°
5° 10°
Rubber Feet
Five recommended mounting points
for the CHT wall mount bracket.
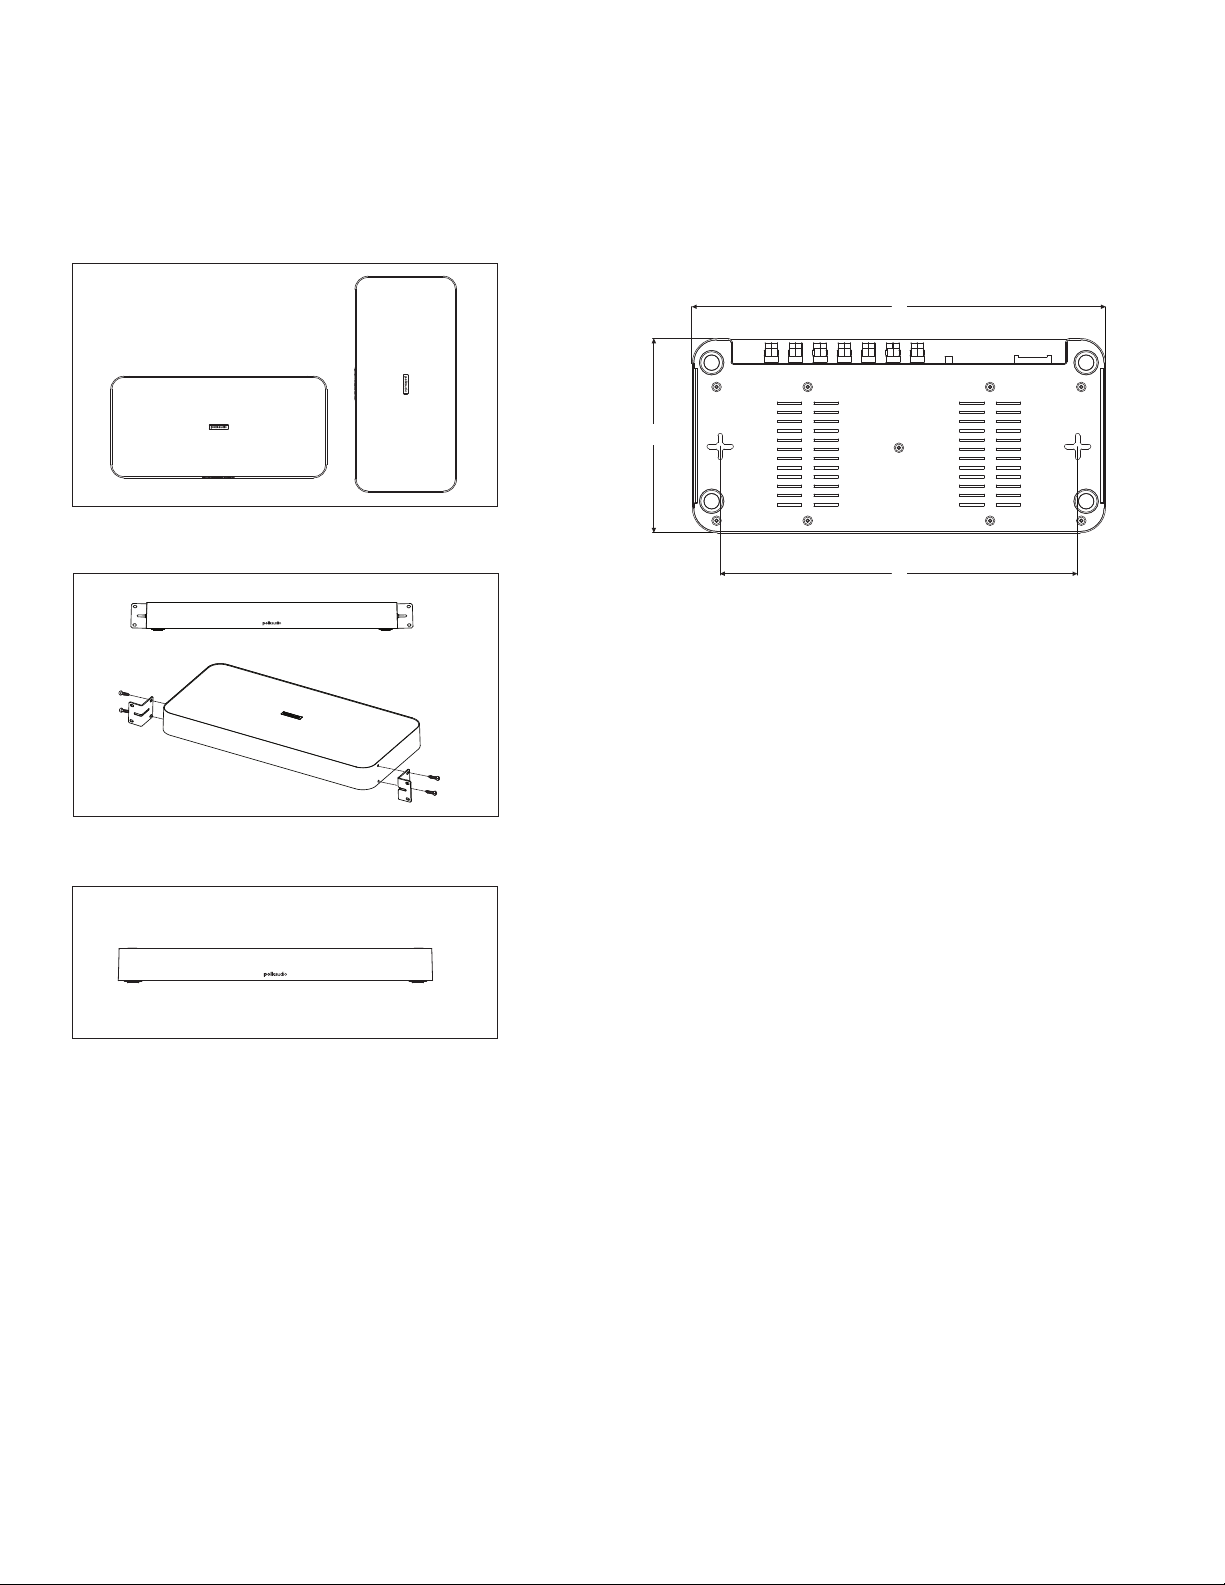
MOUNTING THE SURROUNDBAR 500 CHT
SDA CONTROL MODULE
The SurroundBar 500 CHT SDA Control Module can be mounted
on a wall, either vertically or horizontally, into a rack using the
supplied rack mount ears, or it may be placed on a flat surface.
The location of your other electronic components will determine
which location will work best for you.
WALL MOUNTING THE SDA CONTROL MODULE
Overall Dimensions
1. 8" H (20.32cm)
2. 17" W (43.18cm)
Keyhole Slots
3. 14 3/4" W (37.47cm)
1. Determine if you want to mount the SDA Control Module
vertically or horizontally. Then hold it in your intended
location to be sure there are no obstructions to the
SurroundBar and to your receiver, and to determine
the length of the speaker wires you will run for each
channel from your receiver to the SDA Control Module.
2. Using the SDA Control Module Wall Mount Template,
mark and drill the holes for the mounting screws
or wall anchors as appropriate. Use a molly bolt
or wall anchor i
f a second stud is not available.
3. The SurroundBar cable plugs into the SDA Control Module
and the SurroundBar. Run speaker wire (not included) from
your receiver to the SDA Control Module. Make the appro-
priate connections based on whether you are using the
500 CHT in 7CH, 5CH or LCR mode (see pages 8 - 10).
4. With the SDA Control Module wired and the SurroundBar
cable plugged in, set the 7CH, 5CH or LCR switch to the
appropriate setting and hang the module on the wall.
5. Tug gent
ly on the module while holding it from below
to ensure it has seated properly on its keyhole slots.
Customer Service Hours of Operation: Monday-Friday, 9AM-5:30PM EST polkcs@polkaudio.com 5
3
1
2
Wall mounted vertically or horizontally.
Rack mounted using supplied rack mount ears.
Placed on a flat surface.
6 Polk Audio Customer Service 800-377-7655 (Outside USA & Canada: 410-358-3600)
SURROUNDBAR 400 CHT HOOKUP DIAGRAMS
SBL
FR
C
FLSL SR SBR
SURROUND
SPEAKERS
FRONT
SPEAKERA
CENTER
SPEAKER
SURROUNDBACK
SPEAKERS
R
L
LCR / 5CH / 7CH
SPEAKER IN
RECEIVER
The SurroundBar 400 CHT can operate in one of three
channel modes: 7CH, 5CH or LCR. If you choose to
operate your SurroundBar 400 CHT in the 5CH or LCR
configuration, “tie off” the unused channel wires
with wire nuts.
Note: Remember to set the mode switch, located on
the back of the SurroundBar, to either 7CH, 5CH or LCR,
depending on your system configuration (see page
12 for details).
The colors for the inputs & wires are as follows:
Surround Back Left (SBL): Brown
Surround Left (
SL): Blue
Front Left (FL): White
Center (C): Green
Front Right (FR): Red
Surround Right (SR): Grey
Surround Back Right (SBR): Tan
7CH HOOKUP

Customer Service Hours of Operation: Monday-Friday, 9AM-5:30PM EST polkcs@polkaudio.com 7
FR
C
FLSL SR
SBL
SBR
SURROUND
SPEAKERS
FRONT
SPEAKERA
CENTER
SPEAKER
SURROUNDBACK
SPEAKERS
R
L
RECEIVER
LCR / 5CH / 7CH
SPEAKER IN
FR
C
FL
SBL
SL
SR
SBR
SURROUND
SPEAKERS
FRONT
SPEAKERA
CENTER
SPEAKER
SURROUNDBACK
SPEAKERS
R
L
RECEIVER
LCR / 5CH / 7CH
SPEAKER IN
Note: Remember to “tie off”
the unused channel wires
with wire nuts.
Note: Remember to “tie off”
the unused channel wires
with wire nuts.
5CH HOOKUP
Note: Only use this hookup if you are using dedicated
satellite loudspeakers for the Surround Back channels.
LCR HOOKUP
Note: Only use this hookup if you are using dedicated satellite
loudspeakers for the Surround and Surround Back channels.
SURROUNDBAR 400 CHT HOOKUP DIAGRAMS
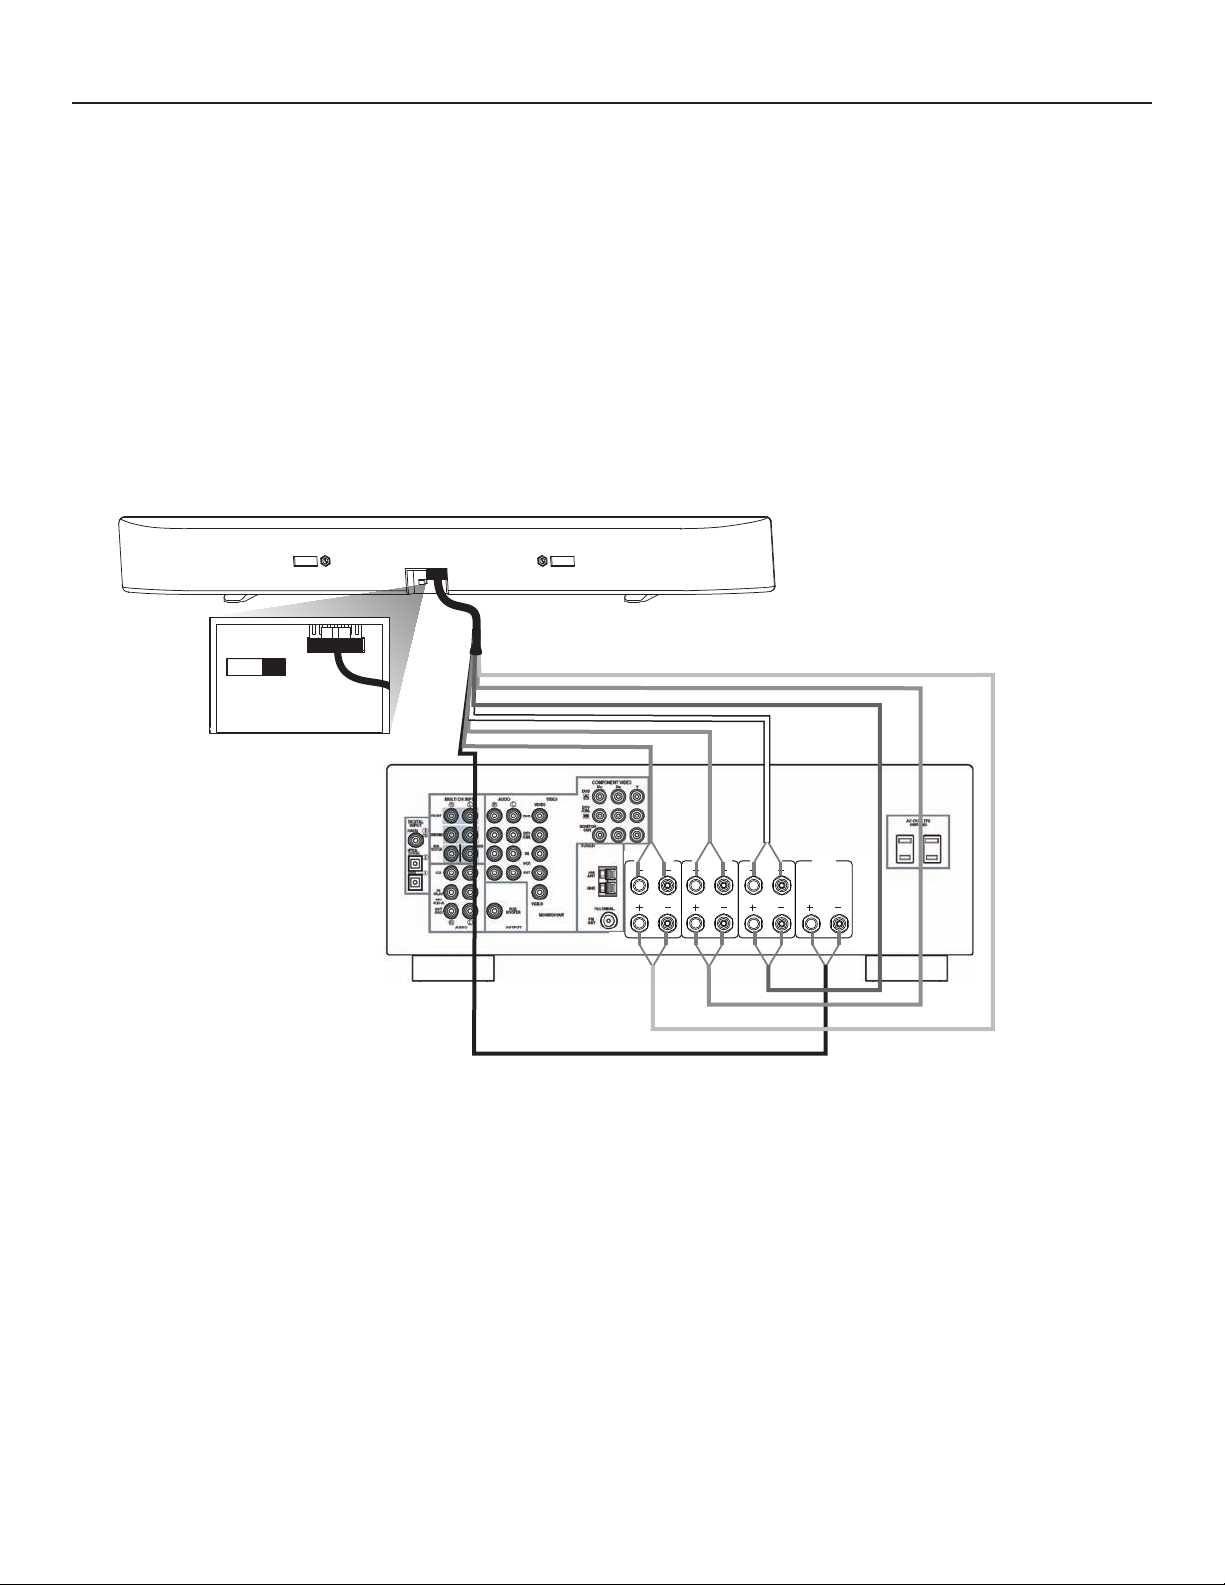
SURROUNDBAR 500 CHT HOOKUP DIAGRAMS
The SurroundBar 500 CHT can operate in one
of three channel modes: 7CH, 5CH or LCR.
Note: Remember to set the mode switch, located
on the back of the SDA Control Module, to either
7CH, 5CH or LCR, depending on your system
configuration (see page 12 for details).
SBL
SBRFRCFLSL SR
SBL
FRCFLSL SR SBR
LCR / 5CH / 7CH
SURROUND
SPEAKERS
FRONT
SPEAKERA
CENTER
SPEAKER
SURROUNDBACK
SPEAKERS
R
L
SDA CONTROL MODULE
RECEIVER
7CH HOOKUP
8 Polk Audio Customer Service 800-377-7655 (Outside USA & Canada: 410-358-3600)
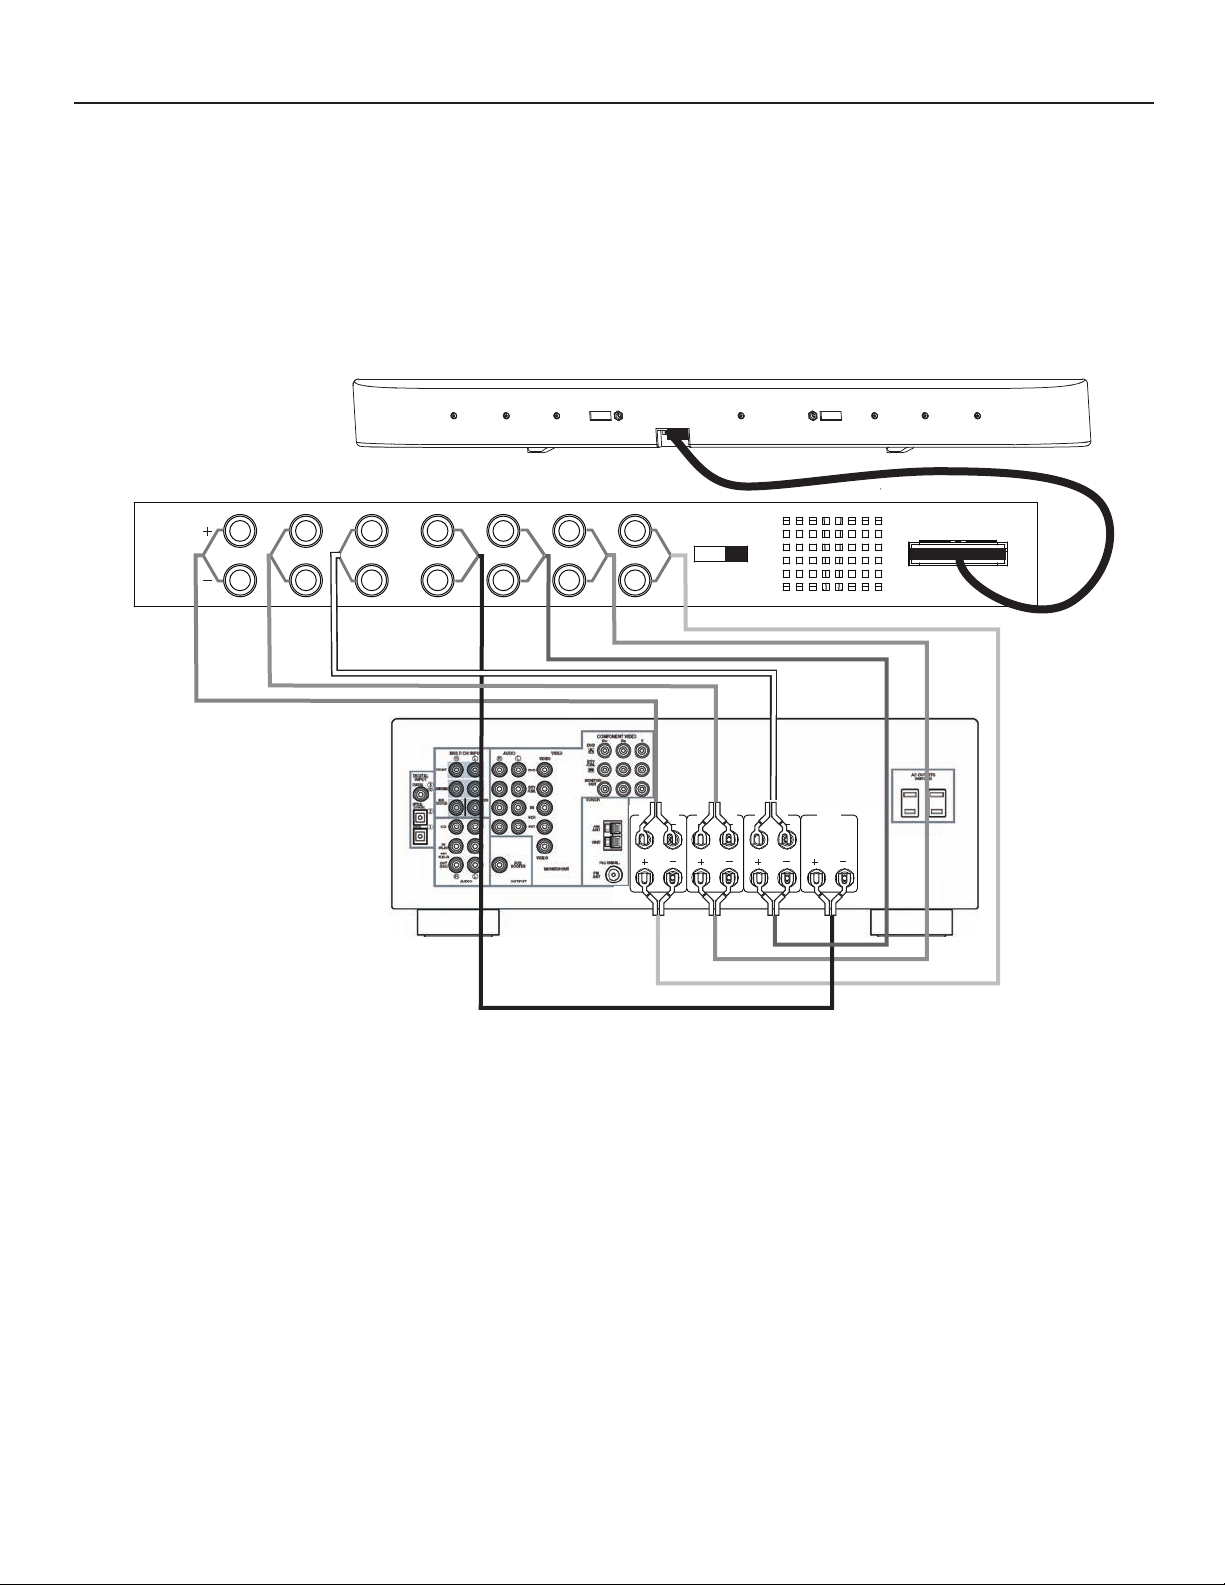
FRCFLSL SR
SBL
FRCFLSL SR SBR
LCR / 5CH / 7CH
SPEAKER OUT
SURROUND
SPEAKERS
FRONT
SPEAKERA
CENTER
SPEAKER
SURROUNDBACK
SPEAKERS
R
L
SDA CONTROL MODULE
RECEIVER
5CH HOOKUP
Note: Only use this hookup if you are using dedicated
satellite loudspeakers for the Surround Back channels.
SURROUNDBAR 500 CHT HOOKUP DIAGRAMS
Customer Service Hours of Operation: Monday-Friday, 9AM-5:30PM EST polkcs@polkaudio.com 9
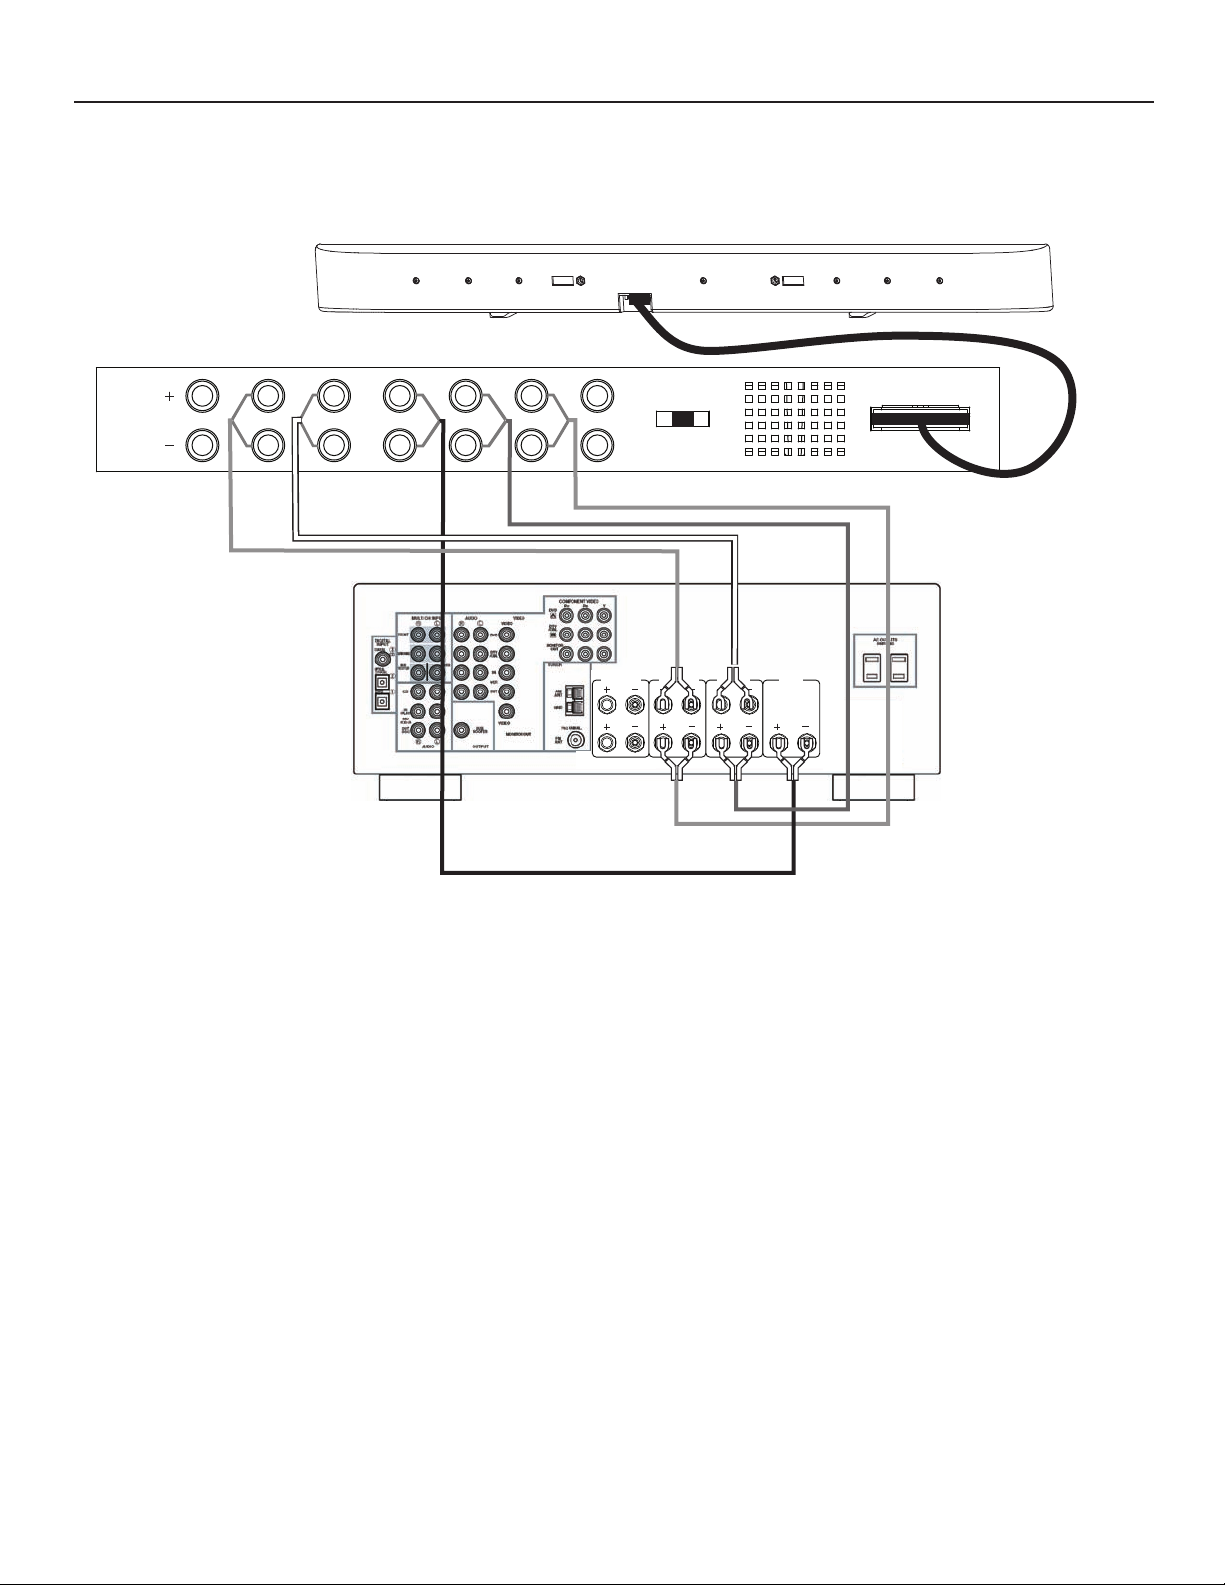
FRCFL
SBL
FRCFLSL SR SBR
LCR / 5CH / 7CH
SPEAKER OUT
SURROUND
SPEAKERS
FRONT
SPEAKERA
CENTER
SPEAKER
SURROUNDBACK
SPEAKERS
R
L
SDA CONTROL MODULE
RECEIVER
SURROUNDBAR 500 CHT HOOKUP DIAGRAMS
LCR HOOKUP
Note: Only use this hookup if you are using dedicated satellite
loudspeakers for the Surround and Surround Back channels.
10 Polk Audio Customer Service 800-377-7655 (Outside USA & Canada: 410-358-3600)
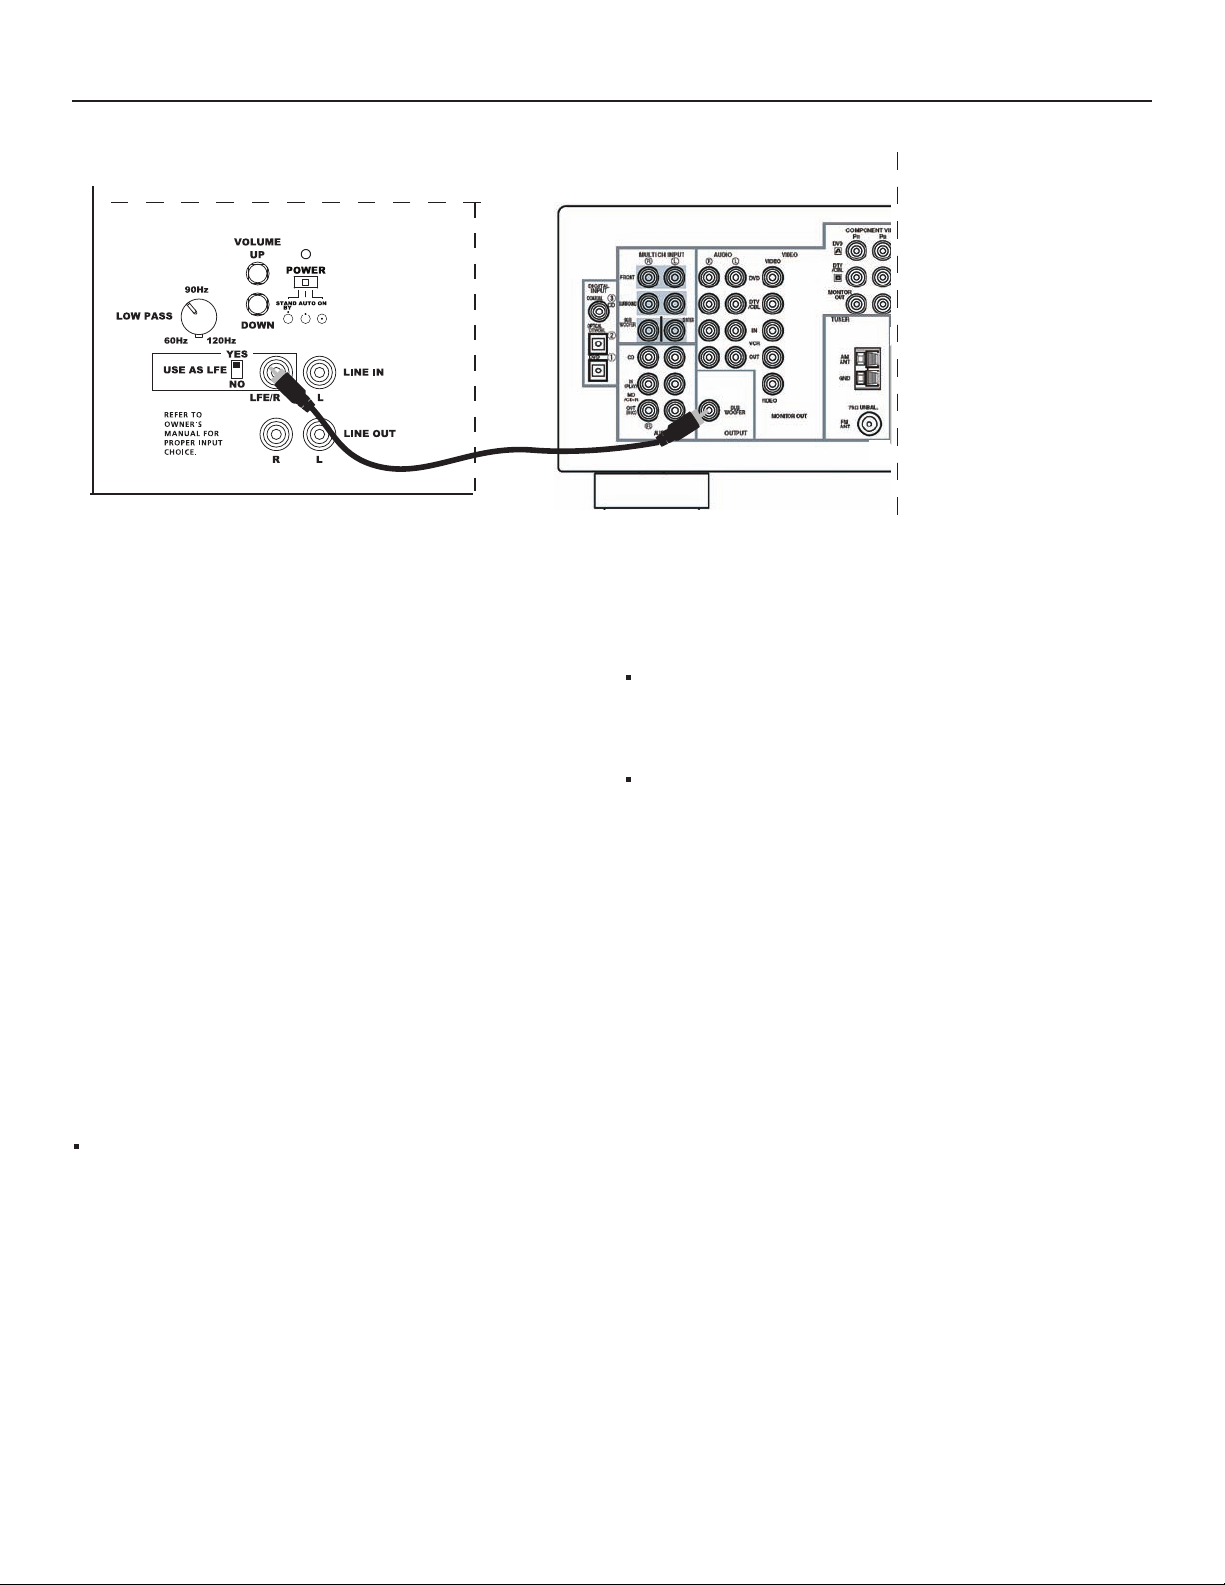
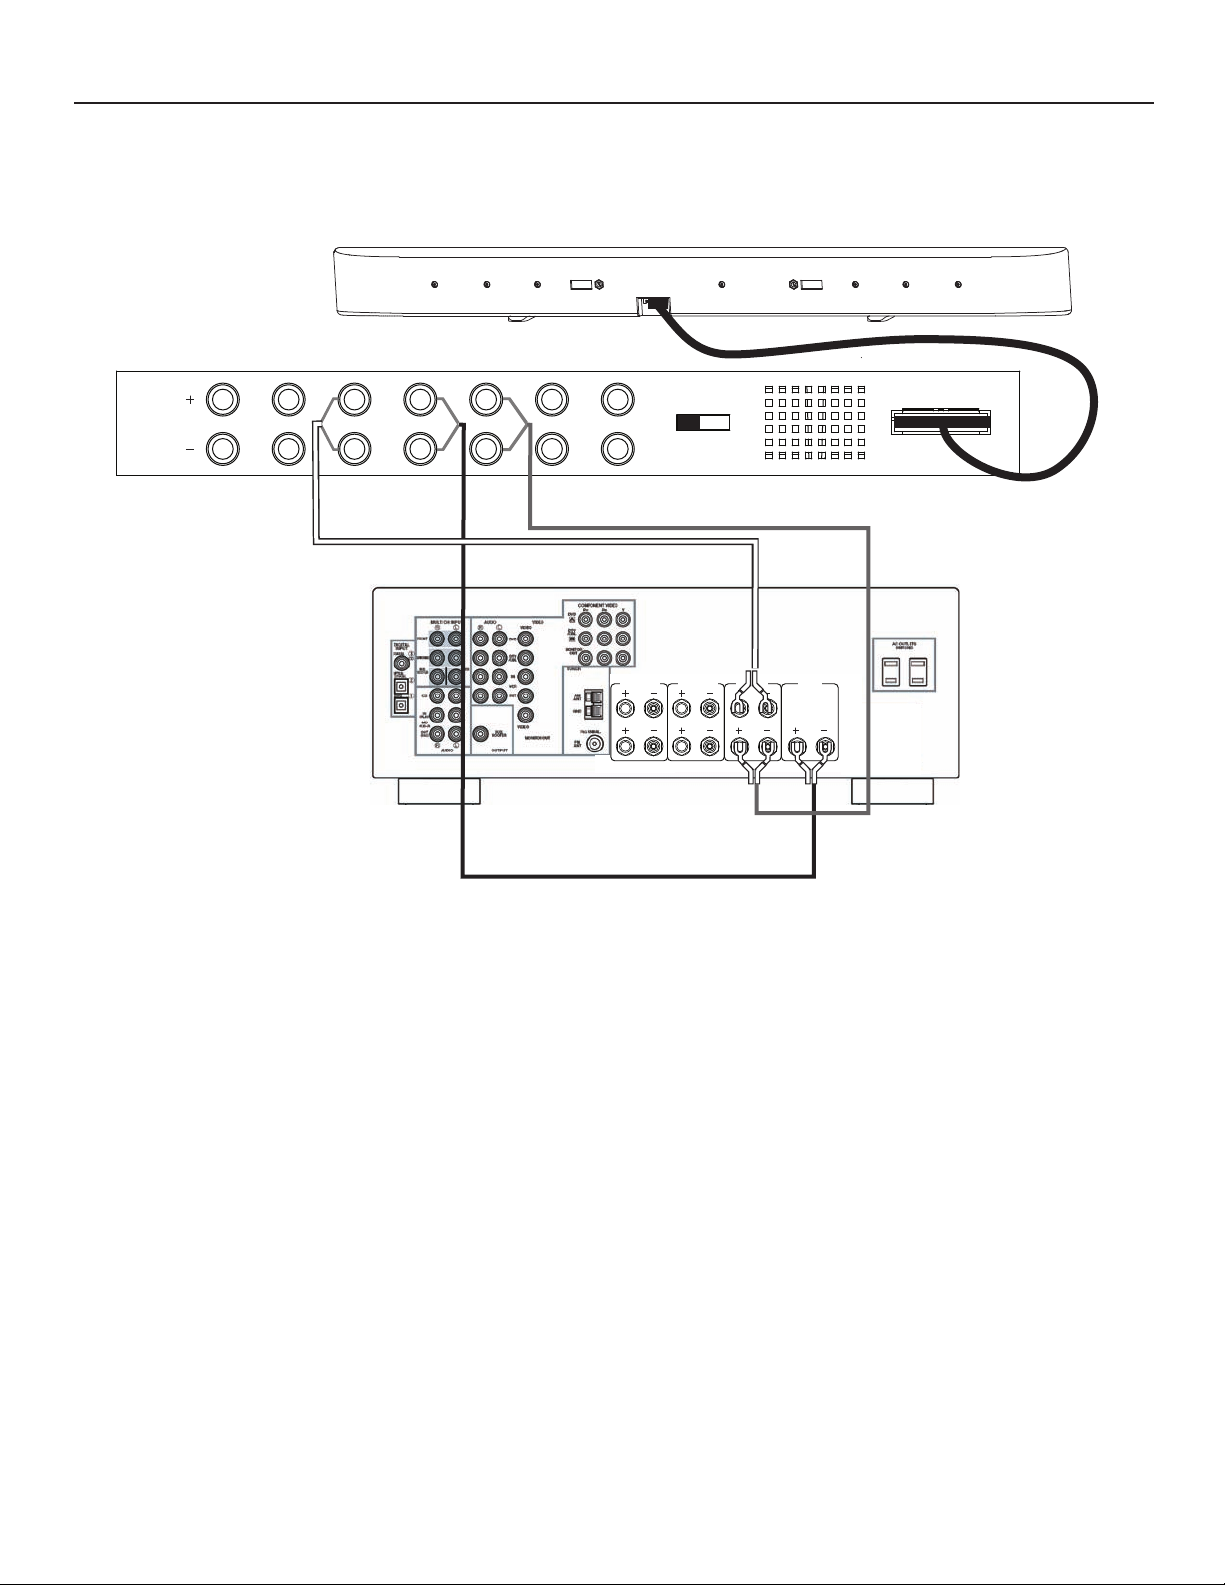
SUBWOOFER HOOKUP
To hook up a subwoofer, use a single RCA cable and
make the connection from the SUB OUT connection
on your receiver to the LFE input on your subwoofer.
(See wire hookup diagram above.) If no LFE input
is available, use LINE R or L and turn “Low Pass”
fully clockwise.
Recommended Polk Audio Subwoofers: PSW111,
DSW
PRO440wi, DSWPRO550wi & DSWPRO660wi.
OPTIONAL SATELLITE LOUDSPEAKER HOOKUP
Dedicated satellite/surround loudspeakers may be employed
to create an even more enveloping surround experience.
SURROUNDBAR 400 CHT:
Do not connect the provided loudspeaker cable’s Surround and
Surround Back conductors to your receiver. Instead, connect your
dedicated surround speakers to these amplifier outputs. Be sure
to “tie off” the unused Surround and Surround Back wires.
For LCR Mode: Connect the Surround Left (SL), Surround
Right (SR), Surround Back Left (SBL) and Surround Back
Right (SBR) channels from the outputs of your re
ceiver to
the corresponding inputs on the four satellite loudspeakers.
For 5CH Mode:
Connect the Surround Back Left (SBL) and Surround Back
Right (SBR) channels from the outputs of your receiver to
the corresponding inputs on the two satellite loudspeakers.
For 7CH Mode: Do not connect any satellite loudspeakers
to your receiver. The SurroundBar reproduces all 7 channels.
Note: Be sure to “tie off” the unused channels
on the provided cable.
F/X
®
WIRELESS SURROUND
Polk Audio offers a unique, wireless single-enclosure surround
sound loudspeaker. The F/X Wireless Surround sits behind
your listening area on the floor, a table or shelf. A 2.4 GHz
transmitter connects to your receiver and communicates
with the F/X loudspeaker, which will reproduce both
Surround and Surround Back channels when properly
configured and the SurroundBar CHT set in LCR mode.
For more, go to www.polkaudio.com/homeaudio/fx/.
SPEAKER AND SUBWOOFER HOOKUPS FOR CHT SURROUNDBARS
HOME THEATER
RECEIVER/PROCESSOR
SUBWOOFER
Customer Service Hours of Operation: Monday-Friday, 9AM-5:30PM EST polkcs@polkaudio.com 11
SURROUNDBAR (7CH)
TV
SURROUNDBAR CHANNEL MODE OPTIONS
While the SurroundBar CHT was designed to reproduce
an enveloping surround experience in the 7CH mode,
we have given you the option of adding satellite loud-
speakers to create even more precise surround effects.
Connect additional satellite speakers and set the
SurroundBar’s channel mode switch to either LCR
or 5CH. (See optional settings below)
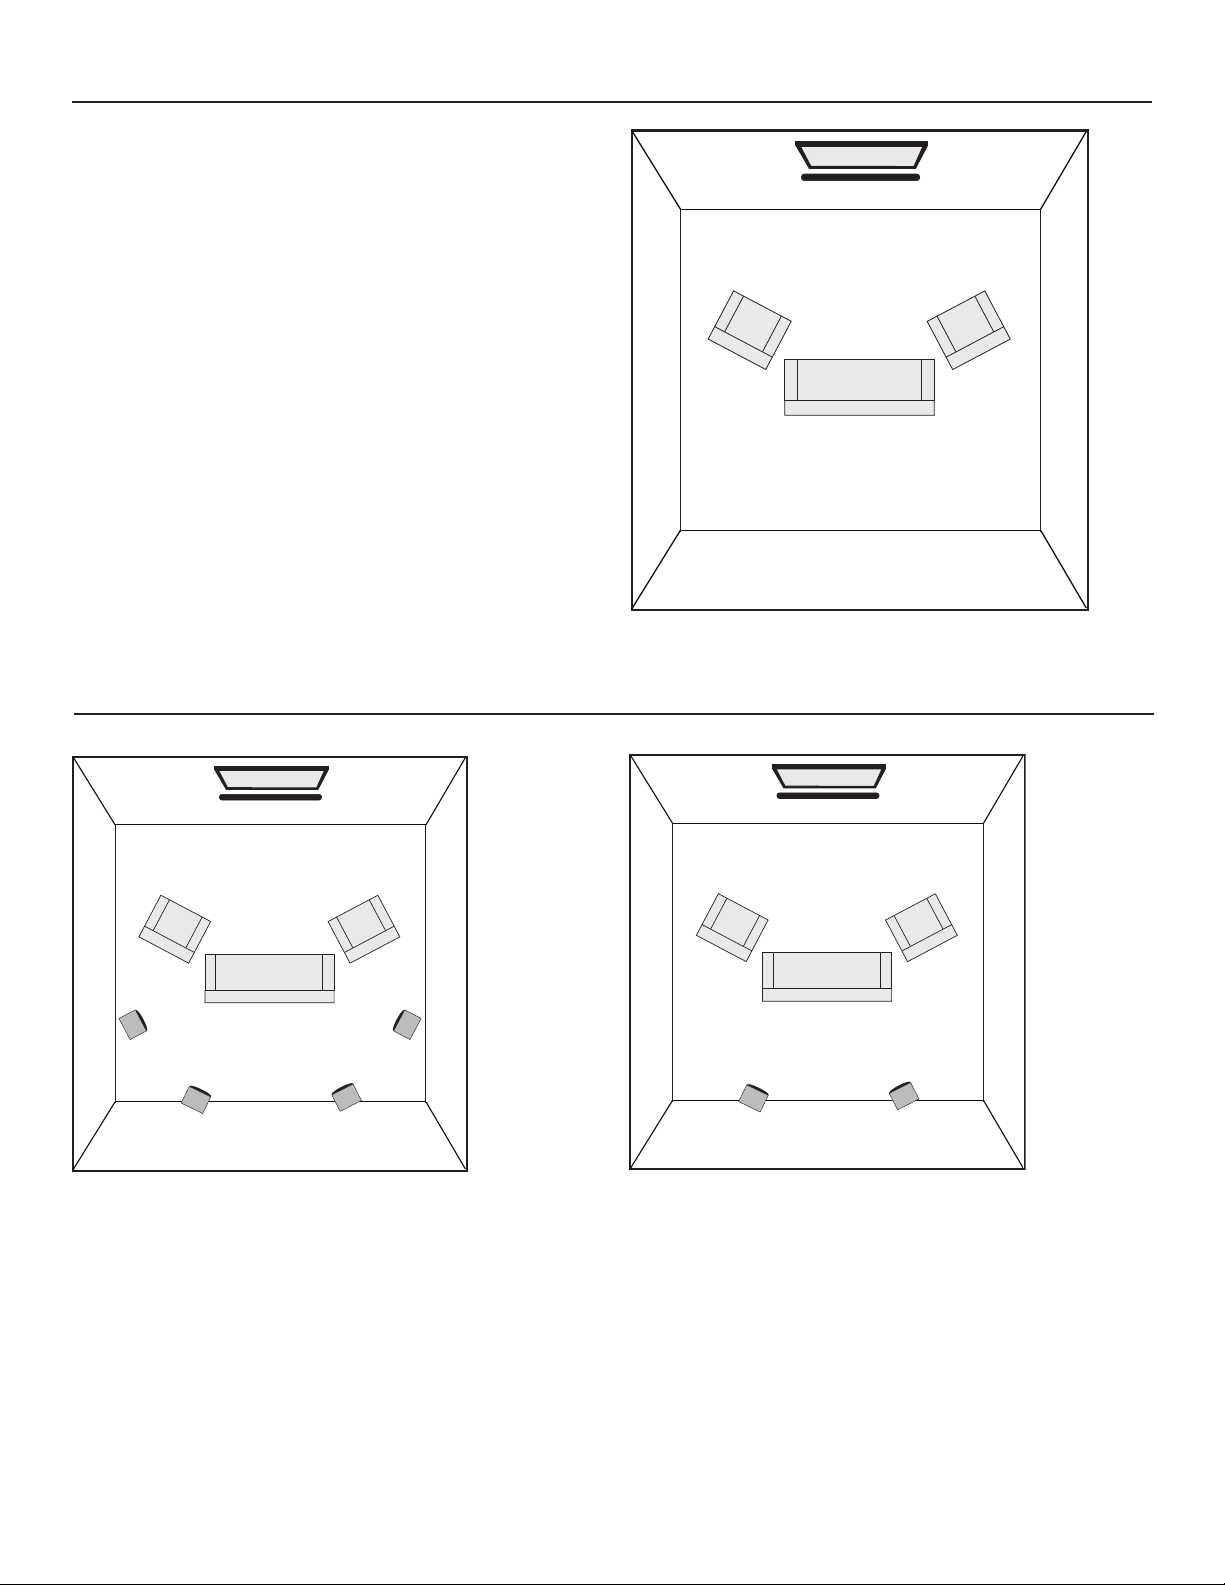
SURROUNDBAR ONLY IN 7CH MODE
No satellites are hooked up. SurroundBar reproduces LCR,
Surround Left (SL), Surround Right (SR), Surround Back
Left (SBL) and Surround Back Right (SBR) channels.
SURROUNDBAR IN LCR MODE
WITH FOUR SATELLITES
SurroundBar reproduces LCR channels. Connect Surround
Left (SL), Surround Right (SR), Surround Back Left (SBL)
and Surround Back Right (SBR) satellites directly to your
receiver with speaker wire. The four unused channels
of the SurroundBar 400 CHT cable should be “tied off”
with wire nuts (not required for the SurroundBar
500 CHT).
SURROUNDBAR IN 5CH MODE
WITH TWO SATELLITES
SurroundBar reproduces LCR, Surround Left (SL) and
Surround Right (SR) channels. Connect Surround Back
Left (SBL) and Surround Back Right (SBR) satellites
directly to your receiver with speaker wire. The two
unused channels of the SurroundBar 400 CHT cable
should be “tied off” with wire nuts (not required
for the SurroundBar 500 CHT).
SURROUNDBAR (LCR)
SL
SBL SBR
SR
TV
SURROUNDBAR (5CH)
SBL SBR
TV
ADDITIONAL CHANNEL MODE OPTIONS
12 Polk Audio Customer Service 800-377-7655 (Outside USA & Canada: 410-358-3600)
 Loading...