


ATRIUM6

ENGLISH
FRANÇAIS
ESPAÑOL
PORTUGUESE

English
2 Polk Audio Customer Service 800-377-7655 (Outside USA & Canada: 410-358-3600)
IMPORTANT SAFETY INSTRUCTIONS
This product was designed and manufactured to meet strict
quality and safety standards. There are, however, some
installation and operation precautions which you
should be particularly aware of.
1. Read Instructions. All the safety and operating instruc-
tions should be read before the system is operated.
2. Retain Instructions. The safety and operating instructions
should be retained for future reference.
3. Heed Warnings. All warnings on the appliances and
in the operating instructions should be adhered to.
4. Follow Instructions. All operating and use instructions
should be followed.
5. Attachments. Do not use attachments not recommended
by the product manufacturer as they may cause hazards.
6. Accessories. Do not place these appliances on an
unstable cart, stand, tripod, bracket, or table. The
audio/video products may fall, causing serious injury
to a child or adult, and serious damage to the products.
Use only with a cart, stand, tripod, bracket, or table
recommended by the manufacturer, or sold with the
appliances. Any mounting of the appliances should
follow the manufacturer’s instructions, and should use
mounting accessories recommended by the manufacturer.
7. Object and Liquid Entry. Never push objects of any kind
into this product through openings, as they may touch
dangerous voltage points or short out parts that could
result in a fire or electric shock. Never spill liquid of
any kind on this audio/video product.
8. Servicing. Do not attempt to service this product
yourself, as opening or removing covers may expose
you to dangerous voltage or other hazards. Refer
all servicing to qualified service personnel.
9. Damage Requiring Service. Unplug this product from
wall outlets and refer servicing to qualified service
personnel under the following conditions:
a. If liquid has been spilled, or objects have fallen
into the product.
b. If the product does not operate normally by following
the operating instructions. Adjust only those controls
that are covered by the operating instructions, as
an improper adjustment of other controls may result
in damage and will often require extensive work by
a qualified technician to restore the product to its
normal operation.
c. If the product has been dropped or the cabinet
has been damaged.
d. When the product exhibits a distinct change in
performance—this indicates a need for service.
10. Replacement Parts. When replacement parts are
required, be sure the service technician has used
replacement parts specified by the manufacturer
or that the parts have the same characteristics
as the original part. Unauthorized substitutions
may result in fire, electric shock or other hazards.
11. Safety Check. Upon completion of any service or repairs
to this product, ask the service technician to perform
safety checks to determine that the products are in
proper operating condition.
Customer Service Hours of Operation: Monday-Friday, 9AM-6PM EST polkcs@polkaudio.com 3
SAFE LIMITS OF OPERATION
Polk Audio specifies the recommended amplification range
for each of its passive (non-amplified) loudspeakers. Typically
that specification will be expressed as a range of power such
as 20-200 Watts (per channel). It is important to understand
what those numbers mean when choosing a receiver or am-
plifier for your Polk Audio loudspeakers. The lower number
indicates the lowest continuous rated power that will yield
acceptable performance in a typical listening environment.
The higher number indicates the highest per channel power
that should be used with your Polk Audio speakers. That
number should not be confused with a “Power Handling”
specification and it does not imply that the speaker will
safely handle that full amount of power on a long-term
basis. We specify a wide range of power ratings because
not all electronics manufacturers use the same method
for rating power. In fact, high quality lower-rated amplifiers
sound better and play louder than low quality units with
higher power rating.
Automobile horsepower is a good analogy. Your car
probably has far more horsepower than it needs for your
daily commute and is likely capable of going well over
120mph (190km/hr). Having that extra power is good
for on-ramp acceleration and danger avoidance (like
getting away from brain-eating zombies) but that doesn’t
mean that it is advisable to operate your car on North
American highways at full power and maximum speed
for an extended period of time. Just ask your local state
trooper if you are in doubt. Similarly, we recommend
using amplifiers and receivers with rated power above
the power handling limits of our speakers because
having extra power available for short term peaks
is conducive to better sound quality, maximum dynamic
range and effortless high volume output. But we strongly
urge you not to use the full power of your amplifier
or receiver for daily listening.
Loudspeakers can be damaged when an amplifier, regardless
of its wattage, is made to play at higher listening levels than
its power can clearly produce. Operation at this level can
result in very high levels of audible distortion originating
in the amplifier, which can add a harsh, gritty sound to your
listening material. If you hear distortion—turn the volume
down or risk damaging your speakers. You can damage just
about any speaker, regardless of power rating, if you drive
an amplifier to or beyond the point of distortion.
PRODUCT DISPOSAL
Certain international, national and/or local
laws and/or regulations may apply regarding
the disposal of this product. For further
detailed information, please contact the
retailer where you purchased this product
or the Polk Audio Importer/ Distributor in
your country. A listing of Polk Audio Importer/
Distributors can be found on the Polk Audio
website www.polkaudio.com or by contacting
Polk Audio at: 5601 Metro Drive, Baltimore,
Maryland 21215, USA Phone: +1 410 358-3600.
TECHNICAL ASSISTANCE OR SERVICE
If, after following the hookup directions, you experience
difficulty, please double-check all wire connections.
Should you isolate the problem to the speaker, contact
the authorized Polk Audio dealer where you made your
purchase, or contact Polk Audio Customer Service
800-377-7655 (M-F, 9am-6pm
EST, US & Canada only)
or via email polkcs@polkaudio.com. Outside the US
& Canada, call 410-358-3600. More detailed information
including audio how-to articles, FAQs and online
manuals are available on our award-winning website:
www.polkaudio.com.

PREPARING TO PAINT
Before you paint, you will need:
• A spray can of primer paint (Krylon
Sandable Spray Primer #1318).
• A spray can of the paint of your choice.
Choose exterior grade paint if you plan
to use the speakers outdoors.
• A paperclip or corkscrew (for removing
the paintable grille).
• Masking tape.
• Paint mask to cover unpaintable parts
(not included). To make an easy paint
mask, use the grille as a template
and cut a mask from heavy, nonporous
Kraft paper.
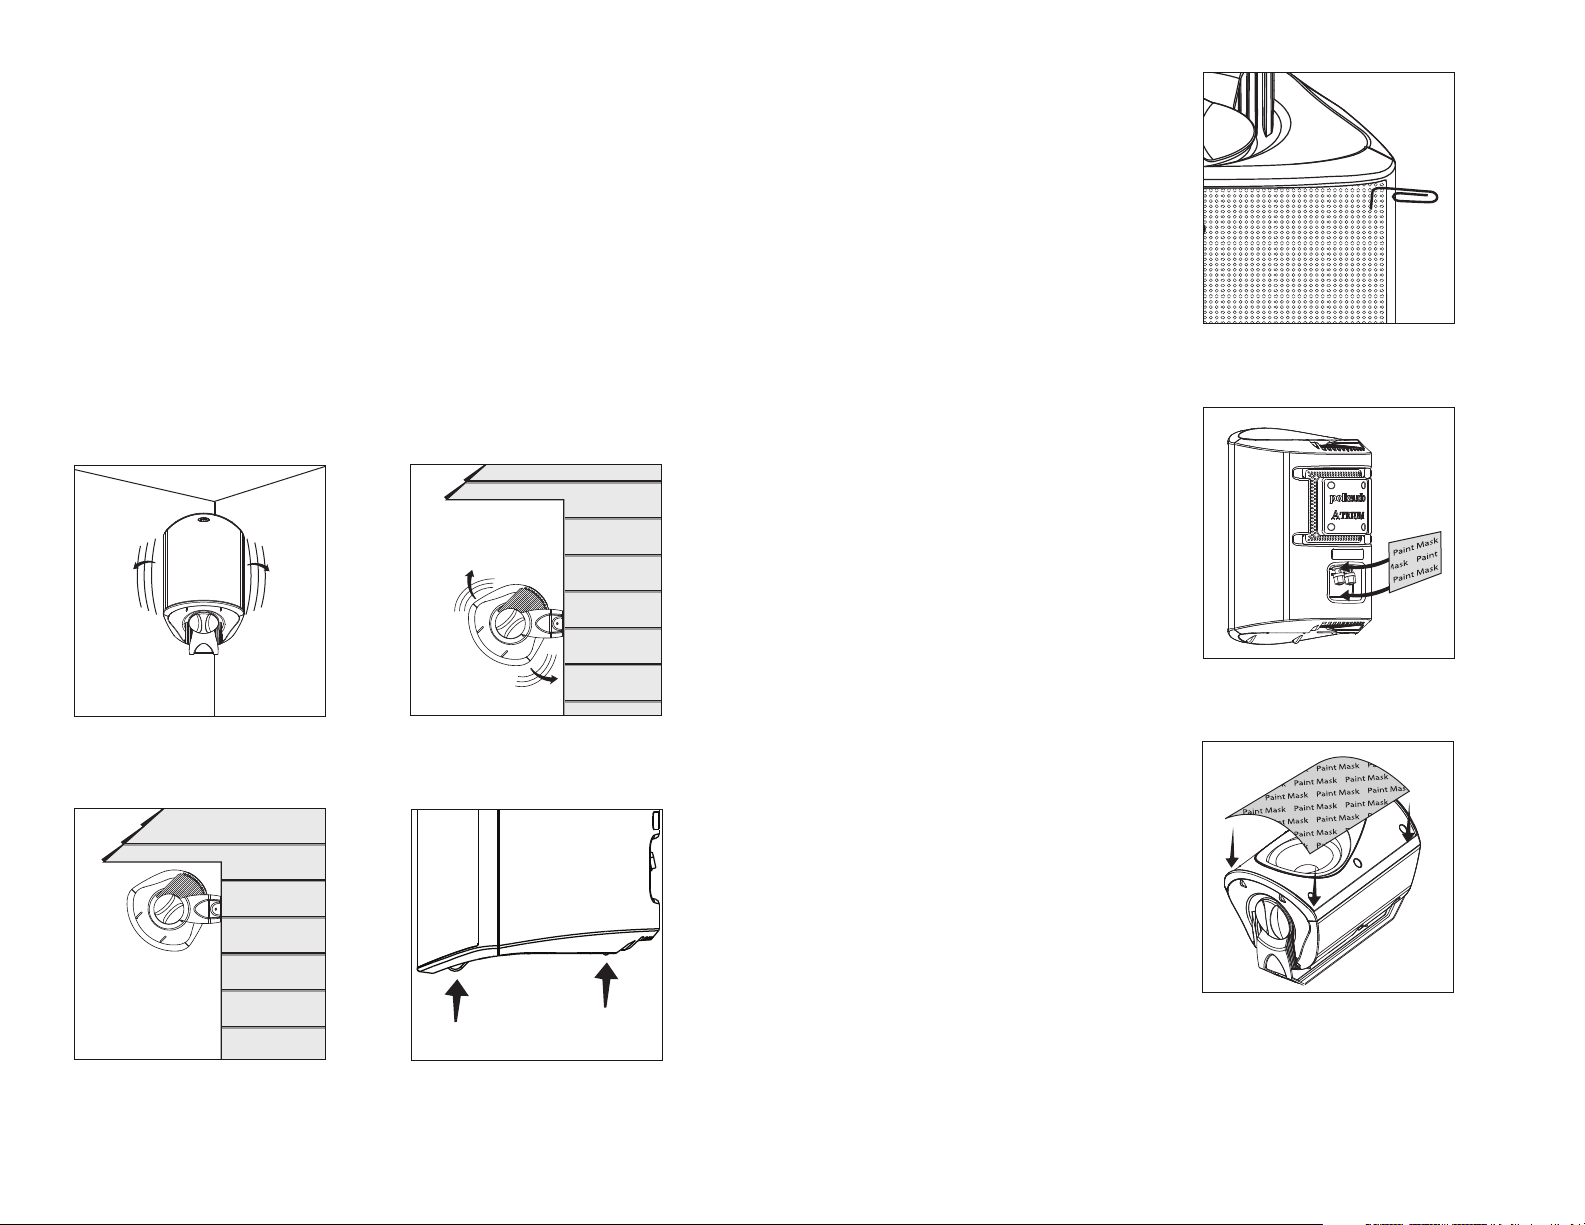
1. Separate the parts of the speaker: Remove
the brackets and bracket knobs. Remove
the grille by carefully hooking it with a bent
paper clip and pulling it gently away from
the cabinet [figure 5].
2. Mask off the binding posts on the back
of the speaker [figure 6], the end panels
and bracket knobs, and carefully mask
off the front of the speakers to protect
the drivers and baffles while painting
[figure 7]. The grille has a logo on it,
which you may mask off should you
choose not to paint over it.
Customer Service Hours of Operation: Monday-Friday, 9AM-6PM EST polkcs@polkaudio.com 5
PLACEMENT OPTIONS
Atrium Series loudspeakers were created
to live and play outdoors. Atriums have a wide
dispersion pattern, and are also very efficient.
This means your Atrium Series loudspeakers
will deliver exceptional sound quality throughout
a large listening area. However, if you want high
sound levels in an outdoor setting with acoustic
characteristics that differ from those of indoor
conditions, we recommend multiple-pair setups.
In addition to the placement locations typically
used for outdoor loudspeakers, all Atrium Series
loudspeakers have built-in stability feet, which
allows the loudspeakers to be placed securely
on a shelf or other flat horizontal surface.
Please keep in mind that you’ll maximize
the useful life of your Atrium loudspeakers
by locating them where they’ll receive less
exposure to the elements, under eaves for
example. When locating your Atrium loud-
speakers outdoors, take into account three
factors: sound quality, convenience and
exposure to the elements.
4 Polk Audio Customer Service 800-377-7655 (Outside USA & Canada: 410-358-3600)
FIGURE 5: Remove the grille using a paper clip.
FIGURE 6: Mask the binding posts
on the rear of the speaker.
FIGURE 7: Mask the drivers and baffles.
FIGURE 1: Place the speaker in a corner for more
bass output. Bracket attached to side wall.
FIGURE 2: Place the speaker away from eaves and
corners for less bass output.
FIGURE 3: Place the speaker close
under an eave for more bass output.
FIGURE 4: The Atrium’s built-in stability feet
ensure safe, secure placement on a shelf
of other flat surface.

MOUNTING OPTIONS (SAFETY FIRST)
When installing Atrium loudspeakers note
the weight of your particular model and the
weight bearing tolerance of the material to
which you’re mounting the speaker. If you’re
not sure of a safe way of mounting your
speakers, please consult a professional
installer, your authorized Polk Audio dealer
or a building contractor.
You’ll maximize the useful life of your Atrium
loudspeakers by placing them where they’ll
receive less exposure to the elements. If
extreme weather conditions are expected,
we recommend storing your speakers indoors.
Look for the best overall compromise between
sound quality, convenience and exposure.
Never compromise safety.
The Atrium’s Speed-Lock
™
mounting bracket
enables you to mount the speaker either horizon-
tally or vertically. The Speed-Lock bracket holds
the speaker in place so you can easily aim the
speaker to deliver the best possible sound in
a variety of situations. Follow the steps below
to safely secure the brackets and speakers.
Installing Atrium Series loudspeakers requires
basic skills in using tools such as a drill and
screwdriver. If you are in doubt that you possess
the necessary skills or tools, consult your
Polk Audio dealer, or a professional installer.
Horizontal & Vertical Mounting
1. Verify the material on which you plan
to mount the speakers (plaster, drywall,
paneling, stone, etc.) can support the
weight of the speakers:
Speaker Weights
Atrium4 3.6lbs / 1.63kg each
Atrium5 4.6lbs / 2.09kg each
Atrium6 5.4lbs / 2.45kg each
Atrium7 8lbs / 3.63kg each
Atrium8SDI 9.7lbs / 4.4kg each
2. Ensure the locations you select do not
conceal electrical wiring or plumbing.
3. Before you install the speaker, hold it in
the chosen location to make sure it safely
clears obstacles such as ceiling, adjacent
walls, corners, beams, lighting fixtures
and door/window frames.
4. Using the keyhole slots in the bracket as
a template, mark the installation location
of the two keyhole slots with a pencil. You
can do this by removing the bracket knobs
on the top and bottom of the speaker and
removing the bracket [figure 10].
5. Position the bracket so that the small ends
of the keyhole slots are facing “up” according
to the direction of installation.
Customer Service Hours of Operation: Monday-Friday, 9AM-6PM EST polkcs@polkaudio.com 7
PAINTING THE CABINET,
BRACKET KNOBS & BRACKET
1. Apply two thin coats of primer to the cabinet
and knobs. The bracket does not require
a primer.
2. Only after the primer is completely dry should
you apply the finish color [figure 8].
3. Do not remove the masking material (not
included) until the paint is completely dry.
4. Do not reattach the speaker to the bracket
until the bracket is mounted. Try to handle
any freshly painted parts as little as possible.
PAINTING THE GRILLE
1. Atrium loudspeaker grilles have an even,
protective powder coating. This powder
coating is an ideal primer. The grille has
a logo pod, which you may mask off
or paint right over.
2. Using spray paint, spray two thin coats
of finish color [figure 9]. If you’re using
a compressor and spray gun, use the finest,
most diffuse setting. Be careful not to fill
the holes in the grille with paint.
3. When the paint is completely dry, carefully
fit the grille into its recess so that it just rests
on the cabinet. Starting with one corner, work
around the speaker and push the grille into
the grille notch a little at a time.
Be gentle; the grille may be easily bent
by rough handling.
6 Polk Audio Customer Service 800-377-7655 (Outside USA & Canada: 410-358-3600)
FIGURE 10: Turn the bracket knobs to remove
the bracket assembly.
FIGURE 8: After priming, apply thin coats
of finish color.
FIGURE 9: Paint the grille. Use thin coats of
spray paint. Do not block grille holes with paint.

14. Tug gently on the speaker to make certain
that the screws and bracket are properly
aligned and that the wall anchors are secure.
15. If the bracket is not held snug against the
wall by the screw heads, remove the speaker
from the wall, drive the screws in a little
further and then remount the speaker.
16. Once the speaker is mounted, the bracket
knobs can be loosened to “aim” the speaker,
and then hand tightened to keep the speaker
angled correctly.
VERTICAL MOUNT AIMED 45° DOWN
The Atrium Series mounting bracket is designed
so the speakers may be mounted in a vertical
45° downward firing position [Figure 15].
Use an anchoring device that can support the
weight of your Atrium model and be sure the
material you are mounting the loudspeaker
to can support its weight.
RECEIVER HOOKUP
Follow the hookup directions included with
your receiver. Strip 1/2" of insulation from each
of the two conductors of the wire to expose
the bare metal and twist each of the conductors
into a single un-frayed strand (so you have
two unfrayed strands).
Note that one of the terminals on the rear of
each speaker is red (+) and the other is black (–).
Make certain that you connect the wire from
the red terminal of your amplifier or receiver
to the red terminal on your speaker; and the
wire from the black terminal of your amplifier
or receiver to the black terminal on your speaker
[figure 16]. Most wire has some indicator (such
as color-coding, ribbing or writing) on one of the
two conductors to help you maintain consistency.
Customer Service Hours of Operation: Monday-Friday, 9AM-6PM EST polkcs@polkaudio.com 9
6. If you are certain there is a stud behind
the wall surface, drive #10 screws (not
included) through the wall and into the
stud [figure 11a].
7. If there is no stud behind the wall at the
chosen location, install #10 wall anchors
(not supplied) into the wall by following
the wall-anchor-manufacturer’s instruc-
tions. Always use two wall anchors and
two screws per speaker [figure 11b].
8. Drive the screws into the stud or wall
anchors, leaving screw heads protruding
1/8"~1/4" (3mm~6mm).
9. If you’re feeding speaker wire through a
hole in the wall behind the bracket, pull this
speaker wire through the hole in the bracket
before mounting the bracket [figure 12].
10. Screw the bracket directly into a weight-
bearing stud on the mounting surface.
Place the screws securely in the smaller
end of the keyhole slot. Do not leave
screw heads protruding.
Note: All Atrium loudspeaker cabinets have
molded ramps, which guide the speaker bracket
onto threaded protrusions to which the bracket
knobs attach.
11. Screw the bracket knobs into the protru-
sions but do not tighten them securely.
12. Secure the speaker to the bracket by sliding
the speaker between the bracket arms. The
built-in ramps will spread the bracket slightly
and guide the ends of the bracket onto the
threaded protrusions. A ratcheting system
holds the speaker in place and helps you fine
tune how you want to aim it. [figure 14].
13. Secure the loudspeaker to the bracket
by tightening the adjusting bracket knobs.
8 Polk Audio Customer Service 800-377-7655 (Outside USA & Canada: 410-358-3600)
FIGURE 11a & 11b: Use #10 screw for wall stud,
use #10 wall anchors and screw for no wall stud.
FIGURE 13: Slide the bracket down on
the screw heads to catch the keyhole slots.
11a Wall Stud
11b No Wall Stud
FIGURE 12: Feed speaker wire from wall
through bracket wire hole for easy mounting.
FIGURE 14: Turn the bracket knobs
to remove the bracket assembly.
FIGURE 15: Installation of the 45° bracket.
FIGURE 16: Make speaker connection
using binding posts.
Customer Service Hours of Operation: Monday-Friday, 9AM-6PM EST polkcs@polkaudio.com 11
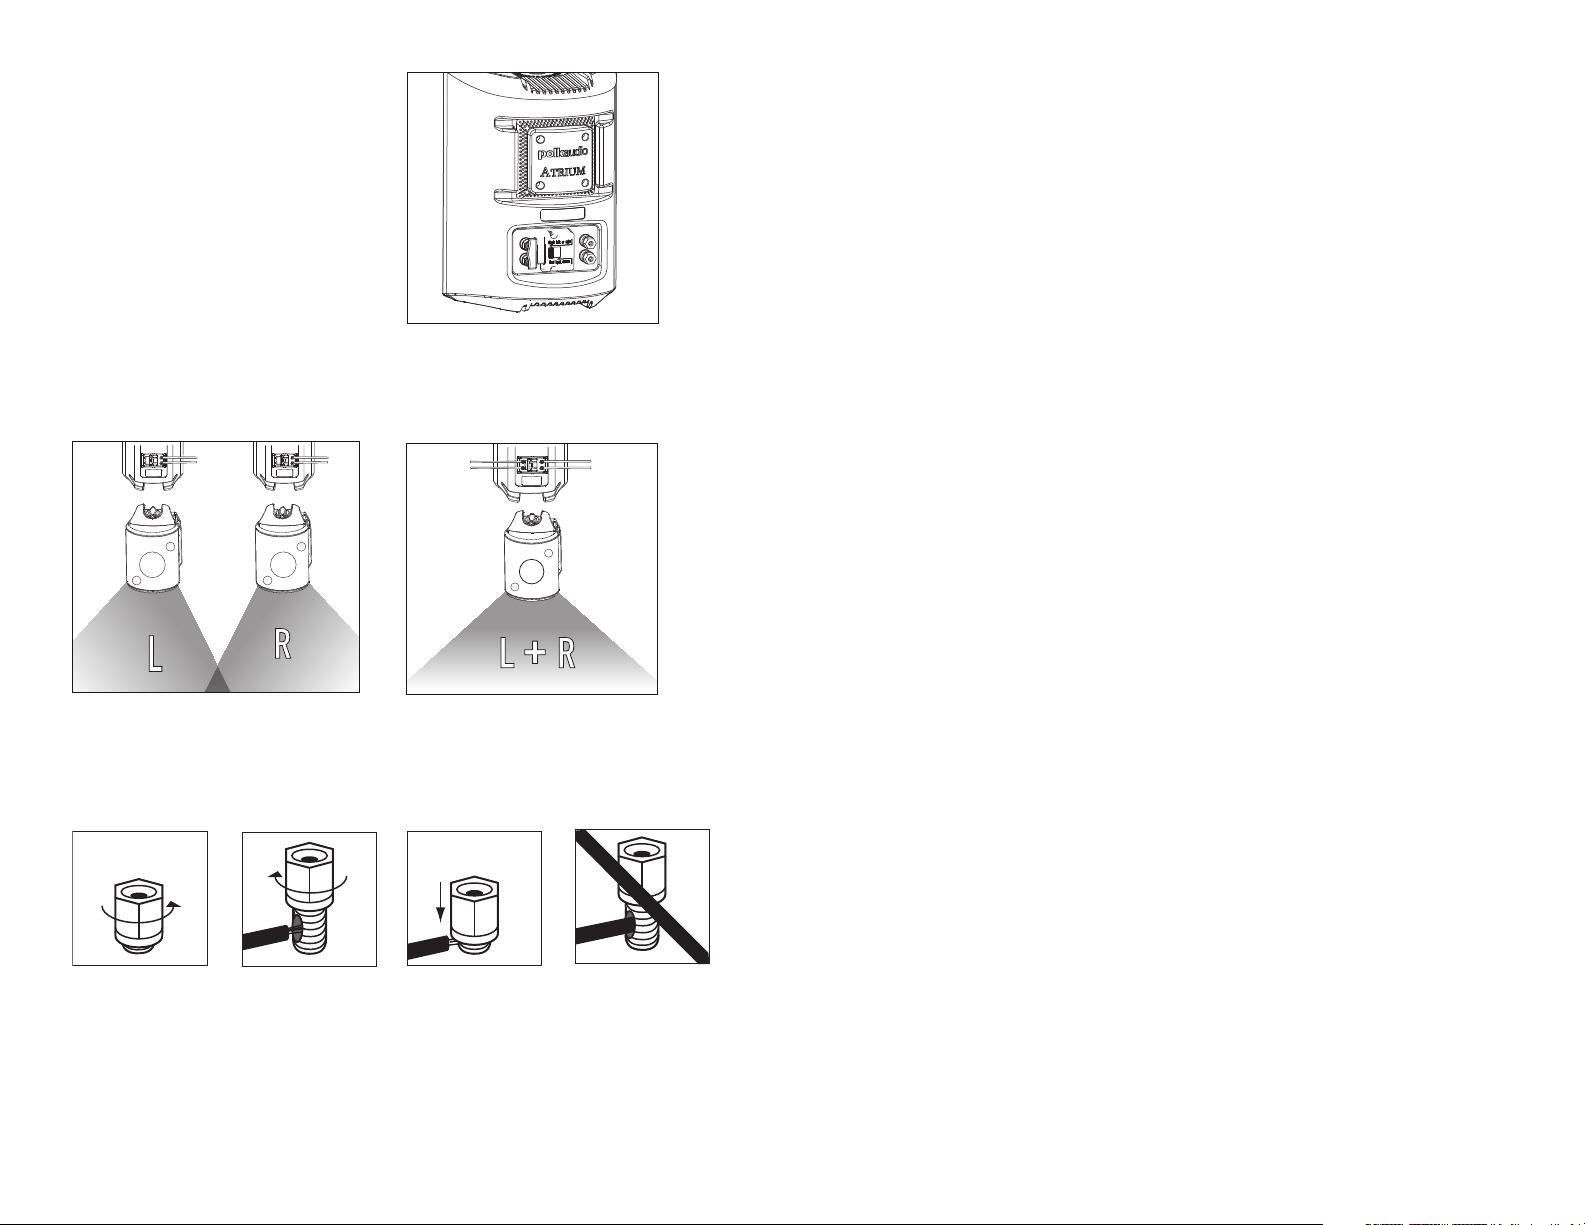
ATRIUM8SDI DUAL INPUT/SINGLE
INPUT SWITCH
The Atrium8SDI has a patented dual input/single
input switch. this switch enables the Atrium8
SDI
to be used either as a single high-performance
stereo loudspeaker, or the left-or-right speaker
in a high performance stereo pair [Figure 17].
10 Polk Audio Customer Service 800-377-7655 (Outside USA & Canada: 410-358-3600)
Insert speaker wire
through hole.
Loosen hex nut.
Tighten hex nut.
Do not insert insulated
section of speaker wire.
USING 5-WAY BINDING POSTS
FIGURE 17: Rear view of the Atrium8SDI.
TO RECEIVER
LEFT CHANNEL
TO RECEIVER
RIGHT CHANNEL
TO RECEIVER
LEFT CHANNEL
TO RECEIVER
RIGHT CHANNEL
STEREO PAIR
SINGLE HOOKUP

Customer Service Hours of Operation: Monday-Friday, 9AM-6PM EST polkcs@polkaudio.com 1312 Polk Audio Customer Service 800-377-7655 (Outside USA & Canada: 410-358-3600)
Français
IMPORTANTES CONSIGNES DE SÉCURITÉ
Ce produit a été conçu et fabriqué pour répondre à de strictes
normes de qualité et de sécurité. Veuillez cependant porter
attention aux consignes de sécurité suivantes se rapportant
à son installation et à son utilisation.
1. Lisez toutes les consignes de sécurité et d’utilisation
avant d’utiliser cet appareil.
2. Conservez les consignes de sécurité et d’opération
pour référence future.
3. Observez les consignes contenues dans ce manuel
et affichées sur l’appareil.
4. Suivez toutes les instructions d’opération et d’utilisation.
5. Accessoires: n’utilisez jamais d’accessoires qui ne
sont pas recommandés par le fabricant. Ils pourraient
provoquer un danger.
6. Ne placez jamais cet appareil sur un charriot, socle,
meuble ou support instable. L’appareil pourrait tomber,
s’endommager et/ou blesser grièvement un enfant ou
un adulte. N’utilisez qu’un charriot, socle, meuble ou
support spécifié par le fabricant ou vendu avec l’appareil.
Toute installation de l’appareil doit se faire selon les
directives du fabricant et en utilisant des accessoires
recommandés par le fabricant.
7. Objets et liquides: n’insérez jamais d’objets dans
les ouvertures de cet appareil. Ils pourraient entrer
en contact avec des points de voltage dangereux
et provoquer des courts-circuits et entrainer un risque
d’incendie ou de choc électrique. Prenez garde de
ne jamais renverser de liquides sur l’appareil.
8. Entretien et réparation: ne tentez jamais de réparer
cet appareil vous-même car ouvrir son boîtier ou en
retirer le couvercle pourrait vous exposer à des voltages
dangereux ou à d’autres dangers. Confiez tout entretien
ou réparation à un technicien qualifié.
9. Dommages requérant la réparation: Débranchez
l’appareil de la prise CA et contactez un réparateur
qualifié lorsque:
a. un objet ou du liquide s’est introduit dans l’appareil;
b. l’appareil ne fonctionne pas normalement selon
les instructions du fabricant. Réglez uniquement
les contrôles spécifiés dans le manuel d’utilisation
car le réglage inapproprié de certains autres contrôles
pourrait endommager l’appareil et requérir l’intervention
d’un réparateur qualifié pour le remettre en ordre.
c. l’appareil a subi une chute ou son boîtier
a été endommagé;
d. l’appareil ne semble pas fonctionner normalement —
ce qui indique la nécessité de réparation ou d’entretien.
10. Pièces de rechange: lorsque des pièces de rechange sont
requises, assurez-vous que le technicien en réparation
utilise des pièces de rechange spécifiées par le fabricant
ou des pièces ayant les mêmes caractéristiques que
les pièces d’origine. Des substitutions non autorisées
risquent de provoquer un incendie, un choc électrique
ou d’autres dangers.
11. Contrôle de sécurité: après chaque entretien ou réparation
de cet appareil, demandez au technicien d'effectuer
un contrôle pour confirmer que l’appareil est en bon
état de fonctionnement.
LIMITES D’OPÉRATION
Polk Audio spécifie la gamme de puissance d’amplification
recommandée pour chacun de ses haut-parleurs non amplifiés.
Cette spécification est typiquement exprimée en watts par
canal (par ex. 20-200 W/canal). Il est important de bien com-
prendre la signification de ces chiffres avant de choisir un am-
plificateur ou un récepteur pour vos haut-parleurs. Le premier
chiffre indique la puissance nominale minimum requise pour
assurer une performance convenable dans une pièce normale.
Le deuxième chiffre indique la puissance nominale maximum
admissible par vos haut-parleurs—ce chiffre ne doit pas être
confondu avec la spécification de «capacité de puissance»
et n’implique pas que le haut-parleur peut soutenir cette
puissance de façon continue sans risque d’endommagement.
Nous spécifions une gamme de puissance d’amplification
étendue parce que les fabricants de composants électroniques
n’utilisent pas toujours la même méthode pour déterminer
la puissance admissible. En fait, les amplificateurs moins
puissants de qualité supérieure donnent un meilleur
rendement que les amplificateurs plus puissants
de qualité inférieure.
L’automobile et les chevaux-vapeur sont une bonne analogie.
Votre automobile a beaucoup plus de chevaux-vapeur que
ceux requis par son utilisation quotidienne, vous permettant
probablement d’atteindre les 190 km/h ou plus! Vous ne roulez
pas pour autant à fond la caisse en tout temps (du moins nous
l’espérons). Cependant, cette réserve de puissance vous per-
met de bien accélérer sur les rampes d’accès, d’éviter les
accidents et de doubler sécuritairement. C’est pour cette
même raison que nous vous recommandons d’utiliser un
amplificateur ou un récepteur d’une puissance nominale
plus élevée que la capacité de puissance spécifiée pour
vos haut-parleurs. En effet, cette réserve de puissance
leur permettra de reproduire les crêtes sonores momen-
tanées sans effort et sans distorsion, assurant une gamme
dynamique maximale et une performance optimale, même
à très haut volume. Il est quand même fortement déconseillé
d’écouter votre chaîne audio «à fond la caisse» en tout temps.
Un haut-parleur peut être endommagé lorsqu’un amplifica-
teur, quelle que soit sa puissance, est poussé au delà de
ses limites. L’amplificateur surchargé génère alors un niveau
élevé de distorsion audible, le son devenant rauque et éraillé.
Si vous entendez de la distorsion, baissez le volume
sinon vous risquez d’endommager vos haut-parleurs.
Un haut-parleur, quelle que soit sa capacité de puissance,
risque d’être endommagé lorsque l’amplificateur
est poussé au delà de ses limites de distorsion.
RÉCUPÉRATION DU PRODUIT
Certaines lois ou certains règlements
internationaux, nationaux et/ou région-
aux pourraient s’appliquer à la récupération
de ce produit. Pour plus d’information,
communiquez avec le revendeur de ce
produit ou avec l’impor-tateur/distributeur
de ce produit dans votre pays. Vous
trouverez la liste des importateurs/
distributeurs des produits Polk Audio
sur le site www.polkaudio.com ou en
communiquant avec Polk Audio:
5610 Metro Drive, Baltimore, Maryland
21215, USA—Tél.: +1 410 358-3600.
SERVICE OU ASSISTANCE TECHNIQUE
Si, après avoir suivi toutes les instructions, vous éprouvez
des difficultés, vérifiez toutes vos connexions. Si vous en
concluez que le problème est relié au haut-parleur, commu-
niquez avec votre revendeur Polk Audio ou contactez le
Service à la Clientèle de Polk Audio au 1-800-377-7655
(L-V, 9-18, HNE, Canada et É.-U. seulement). À l’extérieur
des É.-U. et du Canada, composez le 410-358-3600. Vous
pouvez aussi nous contacter par courriel à l’adresse:
polkcs@polkaudio.com
. Pour plus d’information—
incluant des chroniques pratiques, des FAQ et des
manuels d’utilisation en ligne, visitez notre site
web primé: www.polkaudio.com.
PEINTURE DE VOS
ENCEINTES ATRIUM
Pour peindre vos enceintes,
vous aurez besoin de:
• Peinture d’apprêt en aérosol (peinture
de fond en aérosol Krylon #1318).
• Peinture de finition de votre choix
(en aérosol). Utilisez une peinture
d’extérieur si vous comptez installer
vos enceintes à l’extérieur.
• Un trombone ou un tire-bouchon.
• Du ruban-cache.
• Un cache-peinture (non-compris) pour
couvrir les pièces non-peinturables
de l’écran acoustique. Pour fabriquer
facilement ce cache-peinture, découpez
du papier kraft en utilisant la grille
comme gabarit.
1. Retirez d’abord les boutons des supports
et les supports. Retirez ensuite la grille
en l’accrochant délicatement avec un
trombone replié et le retirant doucement
de l’enceinte [figure 5].
2. Masquez le panneau et les bornes situés
à l’arrière de l’enceinte [figure 6], puis
masquez la surface avant des enceintes
pour protéger les transducteurs et l’écran
acoustique lors de l’application de la
peinture [figure 7]. Masquez le logo Polk
situé sur la grille. Masquez également
la portion vissable des boutons et les
douilles filetées situées aux extrémités
des enceintes.
Customer Service Hours of Operation: Monday-Friday, 9AM-6PM EST polkcs@polkaudio.com 15
OPTIONS D’INSTALLATION
Les enceintes Atrium ont été conçues pour
usage extérieur ou intérieur. Elles sont très
efficaces et grâce à leur vaste dispersion
acoustique elles vous assurent une excellente
reproduction sonore même dans de grands
espaces; mais si vous désirez un volume très
élevé à l’extérieur, il est recommandé d’en
installer plusieurs paires car les propriétés
acoustiques extérieures diffèrent des
propriétés acoustiques intérieures.
Les enceintes de la Série Atrium peuvent être
installées de façon conventionnelle, mais elles
sont toutes dotées de pieds intégrés, leur
assurant une grande stabilité sur une étagère
ou autre surface plate.
Vous prolongerez la vie utile de vos enceintes
Atrium en les installant autant que possible
à l’abri des intempéries. Tentez de trouver un
compromis entre la fonction, la qualité sonore
et l’exposition aux intempéries.
14 Polk Audio Customer Service 800-377-7655 (Outside USA & Canada: 410-358-3600)
FIGURE 5: Retirez la grille
en utilisant un trombone.
FIGURE 6: Masquez les bornes
situées à l’arrière de l’enceinte.
FIGURE 7: Masquez l’écran acoustique
et les transducteurs.
FIGURE 1: Installez l’enceinte à proximité
d’un coin pour augmenter les graves.
Support fixé à un mur latéral.
FIGURE 2: Installez l’enceinte à distance de
l'avant-toit et des coins pour réduire les graves.
FIGURE 3: Installez l’enceinte à proximité
de l’avant-toit pour augmenter les graves.
FIGURE 4: Les pieds intégrés assurent la stabilité
de l’enceinte sur une étagère ou surface plate.
INSTALLATION
(SÉCURITÉ AVANT TOUT)
Lorsque vous installez des enceintes Atrium,
soyez conscient du poids du modèle que vous
installez et des tolérances de charge portante
du matériau sur lequel vous les installez. Si
vous avez des doutes sur la méthode d’installa-
tion sécuritaire de vos enceintes, consultez
votre revendeur Polk, un installateur profession-
nel ou un spécialiste en bâtiment. Ne faites
jamais de compromis en matière de sécurité.
Vous prolongerez la vie utile de vos Atrium
en les installant autant que possible à l’abri
des intempéries. En cas de conditions atmo
sphériques extrêmes, il est recommandé de
les remiser à l’intérieur. Tentez de trouver
un compromis entre la fonction, la qualité
sonore et l’exposition aux intempéries.
Ne faites jamais de compromis en matière
de sécurité.
Le support Speed-Lock
™
de l’enceinte Atrium
permet une installation verticale ou horizontale;
il permet également d’orienter l’enceinte pour
obtenir la propagation sonore optimale. Suivez
les étapes suivantes pour installer le support
et l’enceinte de façon sécuritaire.
L’installation des enceintes de la Série Atrium
requiert une compétence technique rudimentaire
et des outils ordinaires (tournevis et perceuse).
Si vous ne croyez pas être assez habile
ou ne possédez pas les outils nécessaires,
consultez votre revendeur Polk ou un
installateur professionnel.
Installation en position
horizontale ou verticale
1. Assurez-vous que le matériau sur lequel
vous comptez installer vos enceintes (plâtre,
placoplâtre, lambris, pierre, etc.) peut
supporter le poids des enceintes.
L’enceinte pèse:
Atrium4 3.6lbs / 1.63kg ch.
Atrium5 4.6lbs / 2.09kg ch.
Atrium6 5.4lbs / 2.45kg ch.
Atrium7 8lbs / 3.63kg ch.
Atrium8SDI 9.7lbs / 4.4kg ch.
2. Assurez-vous que l’endroit choisi ne dissimule
pas de fils électriques ou de plomberie.
3. Avant d’installer l’enceinte, tenez-la à
l’endroit choisi pour vous assurer qu’elle
sera suffisamment dégagée du plafond,
des murs adjacents, des coins, des poutres,
des luminaires et des cadres de portes
et de fenêtres.
4. Utilisant le support comme gabarit, marquez
la position des deux fentes en trou de serrure
à l’aide d’un crayon. Vous pouvez le faire en
retirant les boutons du support de l’enceinte
et en la dégageant du support [figure 10].
5. Placez le support (position verticale ou
horizontale au choix) de façon à ce que
la partie rétrécie des fentes en trou
de serrure soit située en haut.
Customer Service Hours of Operation: Monday-Friday, 9AM-6PM EST polkcs@polkaudio.com 17
PEINTURE DES CAISSONS, DES
SUPPORTS ET DES BOUTONS
1. Appliquez deux minces couches de peinture
d’apprêt aux caissons et aux boutons.
Les supports ne requièrent pas d’apprêt.
2. Lorsque la peinture d’apprêt est complète-
ment sèche, appliquez la peinture de finition
[figure 8].
3. Ne retirez pas les cache-peinture avant
que la peinture de finition ne soit complète-
ment sèche.
4. Ne réinstallez pas l’enceinte dans son
support avant que la peinture ne soit
complètement sèche. Évitez autant
que possible de manipuler les pièces
fraîchement peintes.
PEINTURE DE LA GRILLE
1. La grille des enceintes Atrium est enduite
d’un revêtement de poudre protectrice.
Ce revêtement constitue un apprêt idéal.
Masquez le logo Polk si vous désirez
le garder apparent.
2. Appliquez deux minces couches de peinture
de finition en aérosol [figure 9]. Si vous
utilisez un pistolet pulvérisateur, choisissez
le réglage le plus fin, le plus diffus. Assurez-
vous de ne pas obstruer les trous de la grille
avec la peinture.
3. Lorsque la peinture est complètement
sèche, posez délicatement la grille sur
l’écran acoustique de l’enceinte. En
commençant par un coin, poussez petit
à petit la grille dans son encoche tout
autour de l’écran.
Soyez délicat, la grille peut être
facilement déformée.
16 Polk Audio Customer Service 800-377-7655 (Outside USA & Canada: 410-358-3600)
FIGURE 10: Dévissez les boutons
pour retirer le support.
FIGURE 8: Après la couche d’apprêt,
appliquer de minces couches de finition.
FIGURE 9: Peinture de la grille. Appliquer
de minces couches de peinture en aérosol.
N’obstruez pas les trous avec la peinture.
 Loading...