


 Loading...
Warnings about Copyrights
zCopying of copyrighted materials such as music is unlawful unless permitted by a legal exception or consented to by the rightowners.
*Music recorded from CDs, etc. is protected by the copyright laws of each country, as well as by international agreements. The person who makes such a recording, himself, bears full responsibility for legal compliance in the use thereof.
zThis software restricts the playback and reproduction of music content subject to copyright protection.
*When encoded data is included in order to protect the copyrights of music content, the program may not operate correctly.
*When encoded data included in order to protect the copyrights of music content is detected, it may cancel the ripping, playback and/or other processes.
*In oder to protect the copyrights of music content, transferring (checking out) music to SD memory cards is limited to a maximum of 3 per music content.
*A reader compatible with the copyright protection function of SD memory cards is needed in order to transfer (check out) music content to an SD memory card. For more detailed information, refer to the user’s manual of the various readers/writers.
*Music transferred (checked out) to an SD memory card can only be played back on SD Audio Compatible players. For more detailed information, refer to the user’s manual of the various players.
Disclaimers
zThe DJS music CD ripping function is only compatible with music CDs that have one of the following symbols on the disc label.
zThe DJS SD memory card transfer function (checking out/ checking in) is not compatible with Windows Vista®.
zPlease make a note of your registration information and keep it in a safe location.
*Please be advised that in the unlikely event that the information created/registered with this software is lost, Pioneer shall bear no responsibility for it.
*Pioneer and DJS are trademarks or registered trademarks of the Pioneer Corporation.
*Microsoft and Windows are registered trademarks of the Microsoft Corporation of the United States and other countries. The formal name of Windows is the Microsoft Windows Operating System.
*MPEG Layer-3 audio coding technology licensed from Fraunhofer IIS and Thomson multimedia.
Supply of this product only conveys a license for private, non-commercial use and does not convey a license nor imply any right to use this product in any commercial (i.e. revenue-generating) real time broadcasting (terrestrial, satellite, cable and/or any other media), broadcasting/streaming via internet, intranets and/or other networks or in other electronic content distribution systems, such as pay-audio or audio-on-demand applications. An independent license for such use is required. For details, please visit http://www.mp3licensing.com.
*Pentium is a registered trademark of the Intel Corporation of the United States.
*Adobe and Reader are either registered trademarks or trademarks of Adobe Systems Incorporated in the United States and/or other countries.
*All other company names and names of products are either the trademarks or registered trademarks of their respective company(ies).
2 |
DJS Ver. 1.600 |
Index |
Contents |
|
|
|
|
|
|
|
|
|
|
|
Reading this Manual
Reading this Manual
This User’s Manual uses the following writing conventions in its explanations. You can get the most out of this manual with a full understanding of each.
•The names of pop-up screens and function screens (DJ Play, Music Management, Ripping, Create and Transfer) are enclosed in bold brackets, [ ]. (Ex. [DJ Play] screen)
•Menus and icons that are displayed on the screens are enclosed in brackets, [ ]. (For example: [A/4] button)
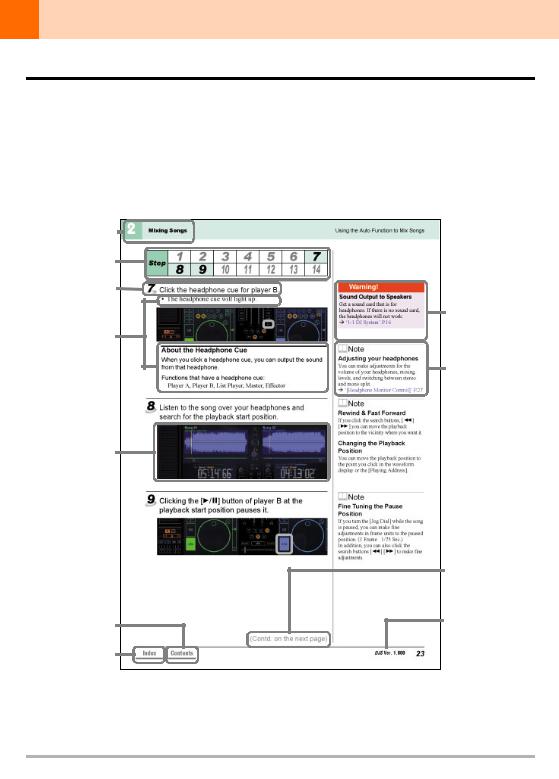
Chapter number and title
Steps on the page
Basic Description
of an Operation
A fuller explanation of the operation
The DJS screen that is displayed while performing a step
Goes to the Table of Contents
Goes to the Index

 Section title
Things to be careful of while performing a step
Helpful information and where to find related information
Indicates the content continues on the next page
Software name and its version number


 Page number
*The sample screen shots were taken with Windows XP as the OS and the screen settings set to the XGA (1024 × 768 Pixels) size.
*For information about SXGA (1280 × 1024 Pixels) images, refer to ‘Starting Up DJS’ P.12.
Index |
Contents |
DJS Ver. 1.600 |
3 |
|
|
|
|
|
|
|
|
|
|
|

Table of Contents
Table of Contents
About DJS |
................................................................................................................................ |
|
6 |
|
Getting Ready .......................................................................................................................... |
|
6 |
||
1. |
Checking the Packaging ................................................................................................................................. |
6 |
||
2. |
Installing DJS ................................................................................................................................................... |
7 |
||
3. |
Starting .............................................................................................................................................Up DJS |
12 |
||
Names of Each ..........................................................................................................Screen |
14 |
|||
Chapter 1 Getting the Most out of DJS............................................................................. |
16 |
|||
1-1 ..........................................................................................When Using the DJS Mixer Functions |
16 |
|||
1-2 ..................................................................................................When Using a Different DJ Mixer |
17 |
|||
.....................................................................................................Chapter 2 |
Mixing Songs |
18 |
||
2-1 ..........................................................................................Using the Auto Function to Mix Songs |
18 |
|||
2-2 ................................................................................................................. |
Mixing Songs Manually |
29 |
||
...................................................................................................Chapter 3 |
Playing Sound |
34 |
||
3-1 ..........................................................................................................Adjusting the Sound Quality |
34 |
|||
|
|
3 - 1 - 1 |
Making Changes |
|
|
|
3 - 1 - 2 Cutting a Specific Range |
|
|
3-2 ............................................................................................................................... |
Adding Effects |
37 |
||
|
|
3 - 2 - 1 Effector Types and their Features |
|
|
|
|
3 - 2 - 2 |
Adding Effects |
|
|
|
3 - 2 - 3 |
Adjusting Effects |
|
|
|
3 - 2 - 4 |
Turning Effects ON/OFF |
|
3-3 ............................................................................................Playing a Part of a Song Repeatedly |
44 |
|||
|
|
3 - 3 - 1 Setting up Loops (Play) |
|
|
|
|
3 - 3 - 2 Getting out of a Loop |
|
|
|
|
3 - 3 - 3 Playing a Loop you Set up Previously |
|
|
3-4 ...................................................................Setting up to 8 Points to Start Playing (List Hot Cue) |
47 |
|||
|
|
3 - 4 - 1 Determining List Hot Cue Points |
|
|
|
|
3 - 4 - 2 Playing from a List Hot Cue Point |
|
|
3-5 .............................................................................................................Arranging Mixes of Songs |
51 |
|||
|
|
3 - 5 - 1 Types of Mix Modes & Fader Curves and their Features |
|
|
|
|
3 - 5 - 2 Selecting a Mix Mode or Fader Curve |
|
|
|
|
3 - 5 - 3 Setting the Mixing Time (Beat) |
|
|
|
|
3 - 5 - 4 |
Mixing Songs |
|
3-6 ...................................................................................................Using the Fader Start Functions |
54 |
|||
|
|
3 - 6 - 1 |
Channel Fader Start |
|
|
|
3 - 6 - 2 |
Cross Fader Start |
|
...............................................................................................Chapter 4 |
Useful Functions |
57 |
||
4-1 ................................................................Setting up to 4 Points to Start Playing (Track Hot Cue) |
57 |
|||
|
|
4 - 1 - 1 Determining Track Hot Cue Points |
|
|
|
|
4 - 1 - 2 Calling Out Track Hot Cues |
|
|
|
|
4 - 1 - 3 Changing a Track Hot Cue into an Auto Setup Cue |
|
|
4-2 ............................................................................................................................. |
Using Play Lists |
61 |
||
|
|
4 - 2 - 1 Auto - Playing a Play List |
|
|
|
|
4 - 2 - 2 Changing the Order of Songs During Auto - Play |
|
|
4-3 ............................................................................................................................ |
Checking Songs |
63 |
||
4-4 .............................................................................Using the Auto Mix Function for Mixing Songs |
65 |
|||
4-5 ............................................................................................................................. |
Key Operations |
67 |
||
4-6 ....................................................................................................Operations used with DMP-555 |
68 |
|||
|
|
4 - 6 - 1 |
Connecting |
|
|
|
4 - 6 - 2 Allocating the DMP - 555 to a Player |
|
|
4 |
DJS Ver. 1.600 |
Index |
Contents |
|
|
|
|
|
|
|
|
|
|
|
Table of Contents
Chapter 5 Creating Loops Made Easy .............................................................................. |
70 |
|
5-1 |
Making a Loop............................................................................................................................... |
70 |
5-2 |
Adjusting the Loop Range............................................................................................................. |
72 |
5-3 |
Saving the Length of a Loop as a Track ....................................................................................... |
73 |
5-4 |
Other Useful Functions (Create) ................................................................................................... |
74 |
Chapter 6 Play Lists & Classifying Songs ....................................................................... |
76 |
|
6-1 |
Editing Song Information............................................................................................................... |
76 |
6-2 |
Classifying Songs into Categories ................................................................................................ |
78 |
6-3 |
Creating a New Play List............................................................................................................... |
79 |
6-4 |
Editing a Playlist............................................................................................................................ |
80 |
Chapter 7 |
Importing Songs ............................................................................................... |
82 |
7-1 |
Importing an MP3.......................................................................................................................... |
82 |
7-2 Importing Songs from Music CDs ................................................................................................. |
83 |
|
7-3 |
Importing WAV Files ..................................................................................................................... |
86 |
7-4 |
Recording Sound from Microphone or Line Input ......................................................................... |
89 |
.................................................................................................Chapter 8 Using SD Cards |
91 |
||
8-1 Transferring DJS Music to SD Cards ............................................................................................ |
91 |
||
8-2 Returning Music from an SD Card to DJS .................................................................................... |
93 |
||
.................................Chapter 9 Changing the Settings to Make DJS More Convenient |
95 |
||
9-1 Opening and Closing Preferences ................................................................................................ |
95 |
||
|
9-1-1 |
Opening Preferences |
|
|
9-1-2 |
Closing Preferences |
|
9-2 Setting the Size of Text Displayed in Lists .................................................................................... |
97 |
||
9-3 Setting the Layout of DJ Play Functions ....................................................................................... |
98 |
||
9-4 Mixer and Sound Card Settings .................................................................................................. |
100 |
||
|
9-4-1 |
Switching between Internal & External Mixers |
|
|
9-4-2 Selecting a Sound Card |
|
|
|
9-4-3 |
Adjusting Delay Time |
|
|
9-4-4 |
Adjusting the Size of Buffers |
|
9-5 |
Key Assignment Settings ............................................................................................................ |
104 |
|
9-6 |
Ripping Settings.......................................................................................................................... |
105 |
|
|
9-6-1 Setting the Bit Rate |
|
|
|
9-6-2 |
ID3 Tag Settings |
|
|
9-6-3 |
Dead Air Cut Settings |
|
|
9-6-4 |
Settings for Selecting the DVD/CD Drive & Acquiring Song Information |
|
|
9-6-5 |
Line In Settings |
|
9-7 |
Category Settings........................................................................................................................ |
108 |
|
|
9-7-1 |
Selecting Categories for Top & Other |
|
|
9-7-2 |
Creating Categories & Play Lists, Changing their Names and Deleting them |
|
..............................................................................................Chapter 10 Other Functions |
111 |
||
10-1 Connecting to the Internet........................................................................................................... |
111 |
||
10-2 |
Table of Functions....................................................................................................................... |
112 |
|
10-3 |
Tables of Menus.......................................................................................................................... |
123 |
|
|
10-3-1 Names of Each Function & What they Do |
|
|
|
10-3-2 Menus Displayed in DJ Play Functions |
|
|
|
10-3-3 Menus Displayed in Track List/Play List |
|
|
............................................................................................Chapter 11 User Registration |
131 |
||
11-1 |
Registering Online....................................................................................................................... |
131 |
|
11-2 |
Registering Offline....................................................................................................................... |
136 |
|
Chapter 12 Uninstalling DJS ............................................................................................. |
140 |
||
..............................................................................................Chapter 13 Version Updates |
143 |
||
Troubleshooting |
.................................................................................................................. |
145 |
|
Index ..................................................................................................................................... |
|
|
151 |
Index |
Contents |
DJS Ver. 1.600 |
5 |
|
|
|
|
|
|
|
|
|
|
|
About DJS
About this Manual
If this is your first time using DJ equipment or DJS, please read the Quick Start Guide and then start enjoying DJS.
Quick Start Guide:
Written to make it easy to start using DJS right away.
User’s Manual:
Written so you can use the full complement of DJS functions.
About DJS
Thank you very much for your purchase of DJS.
DJS is a software that allows you to enjoy DJing with MP3 files. You can enjoy all the things involved in being the DJ with just DJS, as it incorporates the functions of MP3 players and those of a DJ’s mixer.
Not only can you achieve a high level of DJ play with its rich variety of functions, like its equalizer, effector and hot cueing, but even a beginner to DJ mixers has easy access to the pleasure of DJing via its auto tempo synching function, beat display function, etc.
First off, in order to get to know DJS’s functions, please read the Quick Start Guide and the User’s Manual, and then get right to using DJS for real.
Getting Ready
1. Checking the Packaging
Check that the following attachments are enclosed with DJS.
Installation Key × 1
Read Before Use × 1
Keyboard Stickers × 4
Software CD-ROM × 1
•Some models may include additional accessories (printed matter, etc.) that are not listed here.
•Please take good care of your installation key even after completing installation because you will need it if you have occasion to contact us.
•The keyboard sticker is a consumable item. To order additional items, please visit our internet home page (http://www.prodjnet.com/djs/support/).
•If in the unlikely event that something is missing and/or damaged, please contact the store where you purchased this product.
6 |
DJS Ver. 1.600 |
Index |
Contents |
|
|
|
|
|
|
|
|
|
|
|

Getting Ready
2. Installing DJS
Before you install DJS, please read the Software End User License Agreement thoroughly. DJS is compatible with the following Microsoft® Windows® operating systems.
•Windows Vista® Home Basic / Home Premium / Ultimate / Business
•Windows® XP Home Edition / Professional
•Windows® 2000 Professional (SP4)
*DJS is not compatible with the Microsoft’s 64-bit operating systems (Windows XP® Professional X64 Edition and Windows Vista® 64-bit Editions).
Please check and make sure your computer meets the following operating environment conditions and then start the installation.
System Requirements (Minimum Operating Environment)
DJS can be used with a PC/AT compatible computer that meets the following minimum conditions.
CPU: |
1.5 GHz or faster Intel ® Pentium® M (or compatible processor) |
|
Please note that if you are using Windows Vista®, a 1.5GHz or faster Intel® Core™ 2 |
|
Duo (or an equivalent processor) |
|
|
Required Memory: |
512 MB of RAM |
|
With Windows Vista®, 1GB or more of RAM |
Hard Disk: |
250 MB of available disk space |
|
(Not including the space required for saving files, such as MP3, etc.) |
Optical Disk Drive: |
A drive capable of reading CD-ROMs and playing music CDs (CD-DA). |
Display: |
XGA (1024 × 768 Pixels) and High Color (16 bit) |
|
or higher-resolution video adaptor and monitor |
Sound: |
2 or more audio output systems |
|
(An internal or external sound card or an audio unit) |
Input Devices: |
Keyboard, Mouse (or equivalent pointing device) |
Internet Connection: |
Connection speed of 56 kbps or faster. To be used with Microsoft® Internet Explorer |
|
5.5 or higher, or a 128-bit SSL enabled Web browser. |
USB Port: |
If you wish to use Pioneer hardware, such as the CDJ-400 or MEP-7000 in |
|
conjunction with DJS, you will need a USB port that is version 1.1 or faster. For more |
|
detailed information, refer to the user’s manual of the relevant hardware. |
|
|
Warning:
•Before you start installing the DJS software, use the Windows update function to install the latest Windows Service Pack on your computer.
•Even if the required amount of memory as indicated in the operating environment above is installed on your computer, you may still not have enough memory for the functions of the software to work and/or to achieve normal performance; this will depend on the number of resident programs and/or services. If this should be the case, we recommend that you either stop the resident programs and/or services to ensure you have enough free memory or that you increase the amount of memory so your computer will operate in a stable manner.
•A software conflict may also occur between DJS and some combinations of software when you try to use this software, even in the operating environment above.
(Contd. on the next page)
Index |
Contents |
DJS Ver. 1.600 |
7 |
|
|
|
|
|
|
|
|
|
|
|

Getting Ready
Step 1 2 3 4 5 6 7 8 9
1 Place the DJS CD-ROM in the DVD/CD drive.
•After a few moments, the [DJS Installation] screen will open.
2 Click the [Install DJS] button.
•Once you click on the [Install DJS] button, the screen for selecting the language is displayed.
3 Select [English] and click the [OK] button.
•Depending on the user’s Windows environment, you may be able to select from a number of languages.
•The [Preparing to install DJS.] screen opens.
•Once the preparation is complete, the [Commencing installation of DJS...] screen opens.
(Contd. on the next page)
Warning!
Installing and uninstalling DJS requires administrator authority for the computer. Log on as a user who has been set up as a computer administrator and then install the software.
If the [Install DJS] screen fails to open after you place the CD-ROM in the drive, open the DVD/CD Drive from My Computer (or Computer) on the [Start] menu and double-click the [Install] icon.
Warning!
When the trial version of DJS has been installed
The [Uninstall the trial version of DJS] button is displayed, not the [Install DJS] button. Click the [Uninstall the trial version of DJS] button and then after the trial version of DJS is uninstalled, click the [Install DJS] button again.
To cancel the installation…
Click the [Cancel] button.
If you are using Adobe Reader Version 5.0 or earlier...
After uninstalling the old version of the Adobe Reader®, click the [Install Adobe Reader] button once again.
8 |
DJS Ver. 1.600 |
Index |
Contents |
|
|
|
|
|
|
|
|
|
|
|

Getting Ready
|
|
|
|
|
|
|
|
|
|
Step |
1 |
2 |
3 |
4 |
5 |
6 |
7 |
8 |
9 |
4 Click the [Next] button.
• The [Usage Agreement] screen opens.
5 After reading the End User License Agreement, select [Agree] and then click the [Next] button.
• The [Inputting the Installation Key] screen opens.
(Contd. on the next page)
If you do not agree…
Click the [Cancel] button.
•The installation will be terminated.
•In such case, you will not be able to use DJS.
Index |
Contents |
DJS Ver. 1.600 |
9 |
|
|
|
|
|
|
|
|
|
|
|

Getting Ready
Step 1 2 3 4 5 6 7 8 9
6 Enter the installation key and then click the [Next] button.
•The installation key is printed on the Installation Key Sticker that comes in the package.
•The installation key will be printed in green. Be careful to input all numerals and letters correctly.
• The [Installation Destination Folder] screen opens.
7 Click the [Next] button after you check the destination folder for the installation.
•The [Confirming Installation Information] screen opens.
(Contd. on the next page)
Warning!
You will need your installation key when making inquiries, so please write it down and keep it in a safe place after finishing all installation procedures.
If the [Insufficient Disk Capacity] screen opens...
There isn’t enough free space on the hard disk to which it will be installed. Perform either operation (a) or (b).
(a)Click the [OK] button and specify a different drive.
(b)Click the [Cancel] button and suspend installation. Delete unneeded files and programs to ensure there is enough hard disk capacity and then restart the installation.
10 |
DJS Ver. 1.600 |
Index |
Contents |
|
|
|
|
|
|
|
|
|
|
|
Getting Ready
Step 1 2 3 4 5 6 7 8 9
8 Click the [Next] button after checking the [Installation Information].
•The installation begins and the [DJS is being installed.] screen opens.
•Once the installation is complete, the [Installation of DJS is now complete.] screen opens.
9 After clicking the [Yes, I want to restart my computer now.] button, read the message that is displayed and click the [Finish] button.
•The [Installation of DJS is now complete.] closes and your computer restarts.
Changing the [Installation Information]
You can go back to the previous settings screen by clicking the [Back] button.
After making changes...
Check the places that you have changed then click the [Next] button and continue with the installation process.
Warning!
If you select [No, I will restart my computer later.]…
It is necessary to restart your computer. If you select [No, I will restart my computer later.] and finish the installation, be absolutely sure that you do restart your computer before you start up DJS.
If you can’t successfully install DJS...
Inquiries Regarding Installation and User Registration (URL)
‘Troubleshooting’ P.145
Index |
Contents |
DJS Ver. 1.600 |
11 |
|
|
|
|
|
|
|
|
|
|
|

Getting Ready
3. Starting Up DJS
There are two ways to start up DJS, (a) and (b).
1 Start up DJS with either method (a) or (b).
(a) Double-click the [DJS] shortcut icon on the desktop.
(b)Click the [Start] button, then select [All Programs], [DJS] and [DJS] in that order.
•For Windows 2000, click the [Start] button, then select [Programs], [DJS] and [DJS] in that order.
In Windows XP/Windows Vista
In Windows 2000
(Contd. on the next page)
When you start up DJS after registering as a user, the [Update Available] screen may appear. Download the update package and use it to conduct a version update.
Æ ‘Chapter 13 Version Updates’ P.143
•If you don't want to download the update the package right away, click on the [No] button.
Warning!
Administrator’s Authority for the Computer
For some DJS functions, Windows requires that the function be authorized by the administrator of the computer. So when you wish to do things like registering a DJS user, updating the version of DJS, ripping music from a CD and so forth, first log on as a user with administrator authority for the computer and then start up DJS.
Windows Vista Administrator Authority
Follow the steps below to set up administrator authority.
1.Log on as a user who has been established as the administrator for the computer.
2.Right click the [DJS] shortcut icon on the desktop and then click on [Properties].
3.Click the Compatibility tab in the [DJS Properties].
4.Click on [Run this program as the administrator.] and then click the check box so it is on.
5.Click [OK] and then close the [DJS Properties] window.
Connecting with Peripheral Devices
Always close DJS before connecting, disconnecting or turning ON/OFF peripheral devices, such as sound devices, CD drives, SD readers/writers or other hardware.
12 |
DJS Ver. 1.600 |
Index |
|
Contents |

Getting Ready
2 If you haven’t completed the user registration, a dialog box prompting user registration will appear when you start DJS. Please register as indicated.
‘Chapter 11 User Registration’ P.131
•If you do not wish to register right away, click [No] button in the dialog box.
3 Follow the instructions in the [Folder Settings] screen, selecting destination folders for music library creation, and then click the [OK] button. (Only the 1st time it is started)
• The following screen is displayed.
[DJ Play] Screen
XGA |
SXGA |
About registration
If you do not register the software, the DJS software will operate with the following conditions:
(a)You can use DJS for a period of 60 days without registering the user.
(b)A dialog box prompting you to register a user will be displayed every time you launch the program.
‘Chapter 11 User Registration’ P.131
DJS Screen Size
The screen is displayed in line with the computer’s screen settings (SXGA 1280 × 1024 or XGA 1024 × 768).
The Music Library Creation Folder
Music files created by ripping are saved in this folder.
The folder specified here for saving files can be changed using [Change Music Library Folder] on the [Help] menu.
‘[Help] Menu’ P.126
Index |
Contents |
DJS Ver. 1.600 |
13 |
|
|
|
|
|
|
|
|
|
|
|
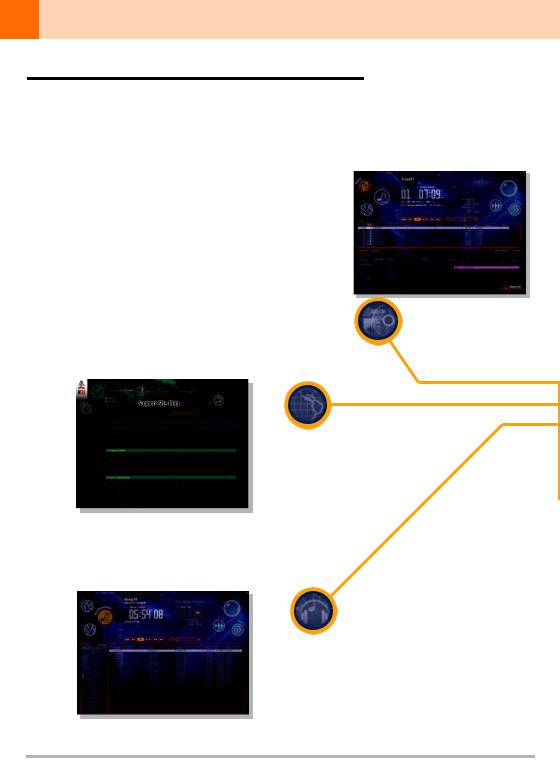
Names of Each Screen
Names of Each Screen
DJS has 5 functions in addition to the DJ Play function that opens when DJS starts up. To switch between functions, click the [Function] icon at the top of the screen.
*Click the [Close] button at the upper right corner of each screen to close the DJS.
Ripping Function
Converts music CDs, WAV files and the sound from line inputs into MP3 files and then imports them.
Internet Function
Gives you access to our user support pages and to a web page that introduces web sites that distribute music.
Music Management Functions
Allows you to edit the information on songs in a track list. Allows you to classify each of your songs into their respective categories.
(Contd. on the next page)
14 |
DJS Ver. 1.600 |
Index |
Contents |
|
|
|
|
|
|
|
|
|
|
|

Names of Each Screen
Create Function
Allows you to create loops and save them as separate tracks.
Transfer Function
MP3 files can be moved to an SD memory card using a reader/writer that supports the copyright protection function.
The transfer function is not available with Windows Vista.
DJ Play Function
[Function] Icon
|
|
|
|
|
|
|
|
|
|
|
|
|
|
|
|
|
|
|
|
|
|
|
|
|
|
|
|
Index |
Contents |
|
|
|
DJS Ver. 1.600 |
15 |
|
|
|
|
|
|
|
|
|
|
|
|
|
|
|
|
|
|
|
1 |
Getting the Most out of DJS |
When Using the DJS Mixer Functions |
Chapter 1
Getting the Most out of
DJS
Explains the system structure that needs to be in place to DJ with DJS.
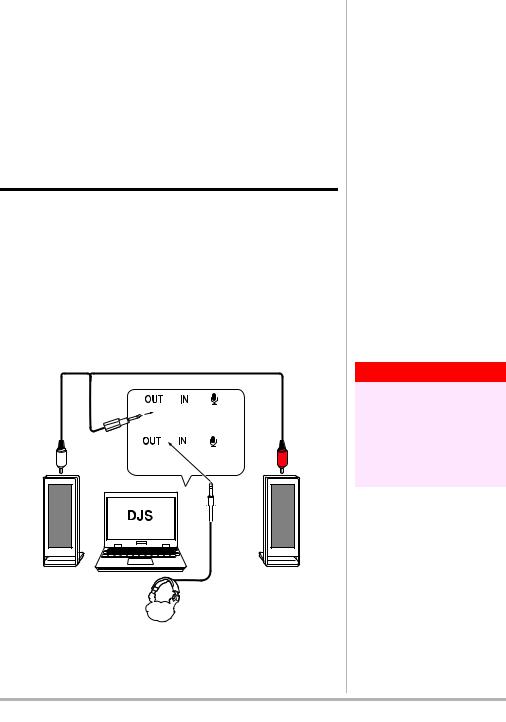
1-1 When Using the DJS Mixer Functions
The DJS mixer outputs audio separately for the master (amp/ speakers) and the monitor (headphones).
Consequently, your computer needs to have 2 audio output systems, whether internal or external. If your computer only has one audio output system, please add another audio device, such as a sound card or an audio unit.
Connect your equipment, amp/speaker or headphones to each audio output (for the master or the monitor).
Configuration when using the DJS Mixer Functions (Example of Connections)
Sound Card
Speaker (Left) |
Computer |
Speaker (Right) |
Headphones 

(Contd. on the next page)
Warning!
If you increase the number of sound cards or audio units
Make the setting on the [Preferences] Screen for the device, whether a sound card or an audio unit, for the type of sound it will output.
‘9-4-2 Selecting a Sound Card’ P.101
16 |
DJS Ver. 1.600 |
Index |
Contents |
|
|
|
|
|
|
|
|
|
|
|
1 |
Getting the Most out of DJS |
When Using a Different DJ Mixer |
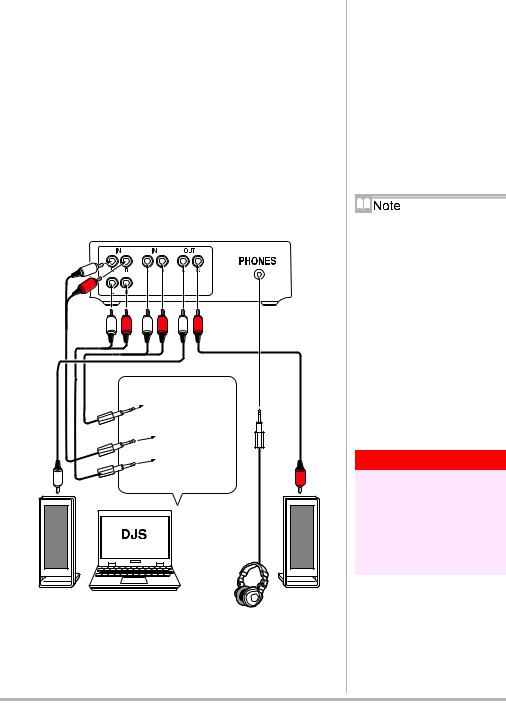
1-2 When Using a Different DJ Mixer
You may use just the DJS player functions (player A and player B) without using the DJS mixer functions. If you do so, you can output the audio of each player to the external DJ mixer.
Consequently, your computer needs to have 2 audio output systems, whether internal or external. If your computer only has one audio output system, please add another audio device, such as a sound card or an audio unit.
Connect each of your computer’s audio outputs (for player A and for player B) to the external DJ mixer and connect your equipment, amp/ speaker and headphones, to the external DJ mixer.
Configuration when using an External DJ Mixer (Example of Connections)
External Mixer
Sound Card
Speaker (Left) |
Computer |
Headphones |
Speaker |
|
|||
|
|
(Right) |
|
|
|
|
Switching to an External Mixer
When DJS is initially installed, it is set up for using the DJS mixer functions. Consequently, if you do not wish to use DJS’s mixer functions, use the [Preference] screen to switch the settings to using an external DJS mixer.
‘9-4-1 Switching between Internal & External Mixers’ P.100
List Player
If you have three or more audio output systems, it is possible to output audio not only for players A and B, but also for a list player.
‘9-4-2 Selecting a Sound Card’ P.101
Warning!
If you increase the number of sound cards or audio units
Make the setting on the [Preferences] Screen for the device, whether a sound card or an audio unit, for the type of sound it will output.
‘9-4-2 Selecting a Sound Card’ P.101
Index |
Contents |
DJS Ver. 1.600 |
17 |
|
|
|
|
|
|
|
|
|
|
|
2 |
Mixing Songs |
Using the Auto Function to Mix Songs |
Chapter 2
Mixing Songs
When you use the Quick Start Guide, everything is done automatically, except for selecting songs. Follow the below explanation on how to mix songs in a semi-automatic way (auto functions) and how to do everything yourself (manual).
2-1 Using the Auto Function to Mix Songs
Auto function automate parts of the operation involved with mixing songs. If you use the convenient functions explained here, you can make light work of DJing.
The actual work flow is as follows.
Select an MP3 Song |
Steps 1–3 |
*Get two MP3 songs ready. |
|
|
Steps 4–6 |
Assign songs to players A and B |
|
|
Steps 7–10 |
Decide on the play start position for |
|
player B |
|
|
Step 11 |
Automatically synchronize the Tempo |
|
(speed) |
|
|
Step 12 |
Decide the Timing for Mixing the Songs |
|
|
Step 13 |
Play Player B |
|
|
Step 14 |
Switch the Song to Play |
|
|
|
•Start up DJS before doing any of the operations.
•Switch the [AUTO MIX] button on the Mixer to the [MIX] button.
(Contd. on the next page)
Warning!
Sound Output to Headphones
Get a sound card that is for headphones. If there is no sound card, the headphones will not work.
‘1-1 When Using the DJS Mixer Functions’ P.16
Changing the [AUTO MIX] button to the [MIX] button
1.Right click the [AUTO MIX] button.
2.Click [MIX].
18 |
DJS Ver. 1.600 |
Index |
Contents |
|
|
|
|
|
|
|
|
|
|
|
2 |
Mixing Songs |
Using the Auto Function to Mix Songs |
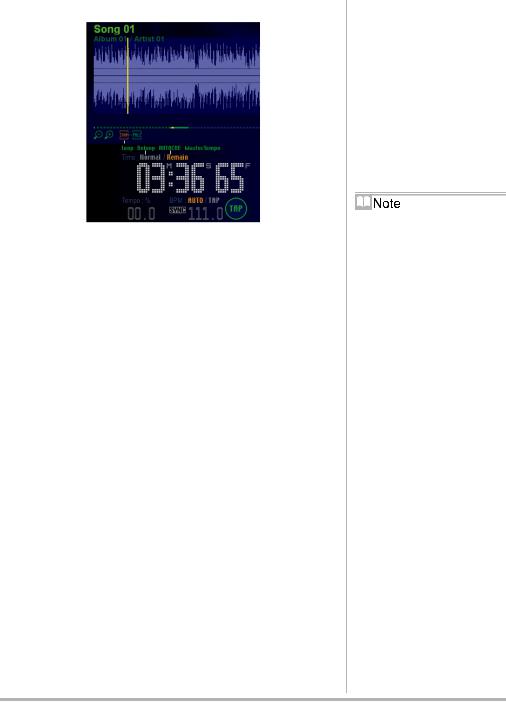
Layout of the Information Display
1 |
|
|
|
|
|
|
|
|
|
|
|
|
|
|
|
|
|
|
|
|
|
|
|
|
|
|
|
|
|
|
|
|
|
|
|
|
|
|
|
|
|
|
|
|
|
|
|
|
|
|
|
|
|
|
|
|
|
|
|
|
|
|
|
|
|
|
|
|
|
|
|
|
|
|
|
2 |
|
|
|
|
|
|
|
|
|
|
|
|
|
|
|
|
|
|
|
|
|
|
|
|
|
|
|
|
|
|
|
|
|
|
|
|
|
3 |
|
|
|
|
|
|
|
|
|
|
|
|
|
|
|
|
|
|
|
|
|
|
|
|
|
|
|
|
|
|
|
|
|
|
|
|
! |
|
|
|
|
|
|
|
|
|
|
|
|
|
|
|
|
|
|
|
|
|
|
|
|
|
|
|
|
|
|
|
|
|
|
|
|
||
4 |
|
|
|
|
|
|
|
|
|
|
|
|
|
|
|
|
|
|
|
|
|
|
|
|
|
|
|
|
|
|
|
|
|
|
|
||
|
|
||||||||||||||||||||||||||||||||||||
|
|
|
|
|
|
|
|
|
|
|
|
|
|
|
|
|
|
|
|
|
|
|
|
|
|
|
|
|
|
|
|
|
|
|
|
8 |
|
|
|
|
|
|
|
|
|
|
|
|
|
|
|
|
|
|
|
|
|
|
|
|
|
|
|
|
|
|
|
|
|
|
|
|
|
||
5 |
|
|
|
|
|
|
|
|
|
|
|
|
|
|
|
|
|
|
|
|
|
|
|
|
|
|
|
|
|
|
|
||||||
|
|
|
|
|
|
|
|
|
|
|
|
|
|
|
|
|
|
|
|
|
|
|
|
|
|
|
|
|
|
|
|||||||
|
|
|
|
|
|
|
|
|
|
|
|
|
|
|
|
|
|
|
|
|
|
|
|||||||||||||||
6 |
|
|
|
|
|
|
|
|
|
|
|
|
|
|
|
|
|
|
|
|
|
|
|
|
|
|
|
|
7 |
||||||||
A |
|
|
|
|
|
|
|
|
|
|
|
|
|
|
|
|
|
|
|
|
|
|
|
|
|
|
|
|
|
|
|
|
|
|
|
|
9 |
B |
|
|
|
|
|
|
|
|
|
|
|
|
|
|
|
|
|
|
|
|
|
|
|
|
|
|
|
|
|
|
|
|
|
|
|
|
C |
|
|
|
|
|
|
|
|
|
|
|
|
|
|
|
|
|
|
|
|
|
|
|
|
|
|
|
|
|
|
|
|
|
|
|
|
||
0 |
|
|
|
|
|
|
|
|
|
|
|
|
|
|
|
|
|
|
|
|
|
|
|
|
|
|
|
|
|
|
|
|
|
|
|
|
|
|
|
|
|
|
|
|
|
|
|
|
|
|
|
|
|
|
|
|
|
|
|
|
|
|
|
|
|
|
|
|
|
|
|
|
|
|
|
- |
|
|
|
|
|
|
|
|
|
|
|
|
|
|
|
|
|
|
|
|
|
|
|
|
|
|
|
|
|
|
|
|
|
|
|
|
|
|
|
|
|
|
|
|
|
|
|
|
|
|
|
|
|
|
|
|
|
|
|
|
|
|
|
|
|
|
|
|
|
|
|
|
|
|
|
= |
|
|
|
|
|
|
|
|
|
|
|
|
|
|
|
|
|
|
|
|
|
|
|
|
|
|
|
|
|
|
|
|
|
|
|
|
E |
|
|
|
|
|
|
|
|
|
|
|
|
|
|
|
|
|
|
|
|
|
|
|
|
|
|
|
|
|
|
|
|
|
|
|
|
||
|
|
|
|
|
|
|
|
|
|
|
|
|
|
|
|
|
|
|
|
|
|
|
|
|
|
|
|
|
|
|
|
|
|
|
|
||
D |
|
|
|
|
|
|
|
|
|
|
|
|
|
|
|
|
|
|
|
|
|||||||||||||||||
|
|
|
|
|
|
|
|
|
|
|
|
|
|
|
|
|
|
|
|
|
|
|
|
|
|
|
|
|
|
|
|
|
~ |
||||
1Title Display
Displays song titles.
2Album Display
Displays the name of the album.
3Artist Display
Displays the name of the artist.
4Playing Address
The width indicates the length of the whole song. The yellow indicates the playback position. The solid line in the color of the player indicates the range that is being displayed in the waveform display. If you drag the solid line, you can move the range of the waveform display. (After it has been displayed for about 2seconds, it returns to the playback position.)
5Zoom Out Button
Shrinks the range of the waveform that is displayed.
6Zoom In Button
Expands the range of the waveform that is displayed.
7Zoom Button
Expands the display of the area around the playback position in the waveform display.
8FULL Button
The entire song is displayed in the waveform display.
9Master Tempo Display
Lights up when the Master Tempo function is ON.
0Time Display Setting
Displays the settings for the time display (Elapsed time display: Normal; Time remaining display: Remain). If you click the display, it toggles to the other setting.
-Time Display
Displays the time (time remaining or elapsed time).
=Tempo Display
Displays the tempo setting.
~BPM Display
Displays the BPM, which is automatically detected during playback. It updates itself every time it is detected.
!Waveform Display
The dynamics of the music are displayed as a waveform.
(Contd. on the next page)
ALoop Display
‘3-3-1 Setting up Loops (Play)’ P.44
BReloop Display
‘3-3-3 Playing a Loop you Set up
Previously’ P.46
CAUTO CUE Display
‘When the Auto Cue function is ON’ P.22
DBPM SYNC Button
‘2-1 Using the Auto Function to Mix
Songs’ P.18
ETAP Button
‘Using the [TAP] button to Re-detect
the BPM’ P.33
Master Tempo Function
When the master tempo is OFF, changing the tempo causes the key to be altered (faster: higher pitch, slower: lower pitch), but if you turn the master tempo ON, it prevents changes to the tempo from resulting in changes to the key.
Expanding the Waveform Display
Can be expanded to a maximum of 4 beats.
Meaning of Colors in the Waveform Display
While a Loop is Playing
Light Blue: In the range of the loop being played
Indigo: |
Outside the range of the |
|
loop being played |
Index |
Contents |
DJS Ver. 1.600 |
19 |
|
|
|
|
|
|
|
|
|
|
|

2 |
Mixing Songs |
Using the Auto Function to Mix Songs |
Layout of the Mixer
1 |
|
|
|
|
|
|
|
|
|
|
|
|
|
|
|
|
|
|
|
|
|
|
|
|
|
|
|
|
|
|
|
|
|
|
|
|
|
|
|
|
|
|
|
|
|
|
|
|
|
|
|
|
|
|
|
|
|
|
|
|
|
2 |
|
|
|
|
|
|
|
|
|
|
|
|
7 |
@ # @ |
||||||||||||||||
|
|
|
|
|
|
|
|
|
|
|
|
|||||||||||||||||||
|
|
|
|
|
|
|
|
|
|
|||||||||||||||||||||
5 |
|
|
|
|
|
|
|
|
|
|
|
|
|
|
|
|
|
|
|
|
|
|
|
0 |
|
|
|
|
||
A |
|
|
|
|
|
|
|
|
|
|
|
|
|
|
|
|
|
|
|
|
|
|
|
|
|
J |
|
|
|
|
B |
|
|
|
|
|
|
|
|
|
|
|
|
|
|
|
|
|
|
|
|
|
|
|
|
|
K |
|
|
|
|
|
|
|
|
|
|
|
|
|
|
|
|
|
|
|
|
|
|
|
|
|
|
|
|
|
|
|
|
|
||
|
|
|
|
|
|
|
|
|
|
|
|
|
|
|
|
|
|
|
|
|
|
|
|
|
|
|
|
|
||
|
|
|
|
|
|
|
|
|
|
|
|
|
|
|
||||||||||||||||
C |
|
|
|
|
|
|
|
|
|
|
|
|
|
|
|
|
|
|
|
|
|
|
|
|
|
I |
|
|
|
|
|
|
|
|
|
|
|
|
|
|
|
|
|
|
|
|
|
|
|
|
|
|
|
|
|
|
|
|
|
||
|
|
|
|
|
|
|
|
|
|
|
|
|
|
|
|
|
|
|
|
|
|
|
|
|
|
|
|
|
||
|
|
|
|
|
|
|
|
|
|
|
|
|
|
|
|
|
|
|
|
|
|
|
|
|
|
|
|
|
||
|
|
|
|
|
|
|
|
|
|
|
|
|
|
|
|
|
|
|
|
|
|
|
|
|
! |
|
||||
|
|
|
|
|
|
|
|
|
|
|
|
|
|
|
|
|
|
|
|
|
|
|
|
|
|
|
|
|||
6 |
|
|
|
|
|
|
|
|
|
|
|
|
|
|
|
|
|
|
|
|
|
|
|
|
|
= |
|
|
|
|
|
|
|
|
|
|
|
|
|
|
|
|
|
|
|
|
|
|
|
|
|
|
|
|
|
|
|
|
|
||
|
|
|
|
|
|
|
||||||||||||||||||||||||
3 |
|
|
|
|
|
|
|
|
|
|
|
|
|
|
|
|
|
|
|
|
|
|
|
|
~ |
|
|
|
|
|
|
|
|
|
|
|
|
|
|
|
|
|
|
|
|
|
|
||||||||||||||
4 |
|
|
|
|
|
|
|
|
|
|
|
|
|
|
|
|
|
|
|
|
|
|
|
|
|
- |
|
|
|
|
|
|
|
|
|
|
|
||||||||||||||||||||||||
|
|
|
|
|
|
|
|
|
|
|
|
|
|
|
|
|
|
|
|
|
|
|
|
|
|
E |
|
|
|
|
|
|
|
|
|
|
|
|
|
|
|
|
|
|
|
|
|
|
|
|
|
|
|
|
|
|
|
|
|
|
|
|
|
|
|
|
|
|
|
|
|
|
|
|
|
|
|
|
|
|
|
|
|
|
|
|
|
|
|
|
|
|
9 |
|
|
|
|
|
|
|
|
|
|
|
|
|
|
|
|
|
|
|
|
|
|
|
|
|
F |
|
|
|
|
|
|
|
|
|
|
|
|
|
|
|
|
|
|
|
|
|
|
|
|
|
|
|
|
|
|
|
|
|
||
|
|
|
|
|
|
|
|
|
|
|
|
|
|
|
|
|
|
|
|
|
|
|
|
|
|
|
|
|
|
|
D |
|
|
|
|
|
|
|
|
|
|
|
|
|
|
|
|
|
|
|
|
|
|
|
|
|
H |
|
|
|
|
|
|
|
|
|
|
|
|
|
|
|
|
|
|
|||||||||||||||||
8 |
|
|
|
|
|
|
|
|
|
|
|
|
|
|
|
|
|
|
|
|
|
|
|
|
|
|
|
|
|
|
|
|
|
|
|
|
|
|
|
|
|
|
|
|
|
|
|
|
|
|
|
|
|
|
|
|
|
|
|
|
|
|
|
|
|
|
|
|
|
|
|
|
|
|
|
|
|
|
|
|
|
|
|
|
|
|
|
|
|
|
|
|
1Headphone Monitor Control
Displays the [HEADPHONES] screen. ‘[Headphone Monitor Control]’ P.27
2Headphone Volume Level
Adjusts the volume for the headphones.
3~ Peak Level Meter (for both Players A & B)
Displays the volume of each player.
4- Channel Fader (for both Players A & B)
Adjusts the volume of each player.
50 Auto Fader (for both Players A & B)
Adjusts the volume of each player.
6= Headphone Cue (for both Players A & B)
Select the source to monitor on your headphones.
7Beat Indicator
Displays the beat of each player.
8Cross Fader
Switches the sound that is output from the speakers.
9AUTO MIX/MIX Button
Moves the position of the Cross Fader to the opposite side.
!Headphone Cue (Master)
Switches the sound output from the headphones to that of the master.
@Peak Level Meter (Master)
Displays the volume of the master sound.
#Master Fader
Adjusts the volume of the master.
(Contd. on the next page)
A J AUTO Button
‘Adjusting all of the Sound’ P.36
B K Trim
‘Adjusting all of the Sound’ P.36
C I Equalizer
‘3-1 Adjusting the Sound Quality’
P.34
D H Fader Start Button
‘3-6 Using the Fader Start Functions’
P.54
E Mix Mode Button
‘3-5-1 Types of Mix Modes & Fader Curves and their Features’ P.51
F Fader Curve Button
‘3-5-1 Types of Mix Modes & Fader Curves and their Features’ P.51
G Effector
‘3-2 Adding Effects’ P.37
[Beat Adjust] Button
The circle on the left side of the [Beat Indicator] serves as the [Beat Adjust] buttons as well.)
‘Operating the [Beat Adjust] Button’ P.27
20 |
DJS Ver. 1.600 |
Index |
Contents |
|
|
|
|
|
|
|
|
|
|
|
2 |
Mixing Songs |
Using the Auto Function to Mix Songs |
|
|
|
|
|
|
|
|
Step |
1 |
2 |
3 |
4 |
5 |
6 |
7 |
8 |
9 |
10 |
11 |
12 |
13 |
14 |
1 Click [File] and select [Import] then [MP3 Audio File] in order.
• The [Importing MP3 Audio Files] screen opens.
2 Click the first song you want to play and then click the [Open] button.
•When you start importing, the [Import] screen opens up so you can check the status of progress.
•Once you have finished importing, click the [OK] button to close the [Import] screen. The songs you imported will be displayed in the track list.
(Contd. on the next page)
If you want to change the folder...
Click the name of the folder displayed in the [Location of File(s)] and click the folder you wish to change to.
When opening folders
Double click on the folder name or folder icon to open the folder to reference the sub-folders and MP3 files contained within.
Warning!
If you click on the [Open] button after clicking on and selecting a folder, all of the MP3 files contained within the folder and sub-folder will be imported.
‘7-1 Importing an MP3’ P.82
Meanings of Colors for Categories/Tracks/Play List
DJ Play Function:
Slate Blue: |
While Not Playing |
Green: |
During Playback on |
|
Player A |
Blue: |
During Playback on |
|
Player B |
Orange: |
During Playback of the |
|
List Player |
Gray: |
Cannot be Played |
Functions other than DJ Play: |
|
Slate Blue: |
While Not Playing |
Orange: |
During Playback |
Gray: |
Cannot be Played |
Unable to import
The file name and number of MP3 files that could not be imported are displayed on the lower part of the
[Import] screen.
‘Troubleshooting’ P.145
Index |
Contents |
DJS Ver. 1.600 |
21 |
|
|
|
|
|
|
|
|
|
|
|

2 |
Mixing Songs |
Using the Auto Function to Mix Songs |
|
|
|
|
|
|
|
|
Step |
1 |
2 |
3 |
4 |
5 |
6 |
7 |
8 |
9 |
10 |
11 |
12 |
13 |
14 |
3 After doing step 1, click the song that will be mixed next and click the [Open] button.
•The [Import] screen closes and the selected song(s) are added to the track list.
4 Drag the slider of the [Cross Fader] to the player A side (left edge).
• Music will be output only from player A.
5 Select the first song to play and drag & drop it from the track list to player A.
• The song will start to play on player A.
6 Select the next song to play and drag & drop it from the track list to player B.
• The song will start to play on player B.
(Contd. on the next page)
Before mixing…
This chapter explains how to mix songs while 2 songs are playing at the same time, so conduct the operations with the mix mode at [Cross Fader] as is.
‘3-5-1 Types of Mix Modes & Fader Curves and their Features’ P.51
When the Auto Cue function is ON
When the Auto Cue is working, it automatically detects where the music starts (starting point of the song), cues it up and stands by.
Status Display
When a song is put on Player A, B or a list player, a musical note symbol will be displayed on the left side of the title display.
Play/Pause Button [A/4]
In DJS a song starts to play as soon as you put it on a player.
In addition, if you press the [A/4] button during playback, it pauses with the sound being output. (Sound ON Pause)
When a song finishes playing
Track List:
Returns to the beginning of the song and continues to play.
Play List:
The next song is put on.
Track Search Buttons on the Track List
Regardless of which track search button you click [6] [7], it jumps to the beginning of the song.
Title Display of a List
If the latter part of a title is hidden because the list is too narrow, put the cursor on it and the entire title will be displayed as a pop-up.
22 |
DJS Ver. 1.600 |
Index |
Contents |
|
|
|
|
|
|
|
|
|
|
|

2 |
Mixing Songs |
Using the Auto Function to Mix Songs |
|
|
|
|
|
|
|
|
Step |
1 |
2 |
3 |
4 |
5 |
6 |
7 |
8 |
9 |
10 |
11 |
12 |
13 |
14 |
7 Click the headphone cue for player B.
• The headphone cue will light up.
About the Headphone Cue
When you click a headphone cue, you can output the sound from that headphone.
Functions that have a headphone cue:
Player A, Player B, List Player, Master, Effector
8 Listen to the song over your headphones and search for the playback start position.
9 Clicking the [A/F] button of player B at the playback start position pauses it.
(Contd. on the next page)
Warning!
Sound Output to Headphones
Get a sound card that is for headphones. If there is no sound card, the headphones will not work.
‘1-1 When Using the DJS Mixer Functions’ P.16
Adjusting your headphones
You can make adjustments for the volume of your headphones, mixing levels, and switching between stereo and mono split.
‘[Headphone Monitor Control]’ P.27
Rewind & Fast Forward
If you click the search buttons, [8] [9] you can move the playback position to the vicinity where you want it.
Changing the Playback Position
You can move the playback position to the point you click in the waveform display or the [Playing Address].
Fine Tuning the Pause Position
If you turn the [Jog Dial] while the song is paused, you can make fine adjustments in frame units to the paused position. (1 Frame 1/75 Sec.)
In addition, you can also click the search buttons [8] [9] to make fine adjustments.
Index |
Contents |
DJS Ver. 1.600 |
23 |
|
|
|
|
|
|
|
|
|
|
|

2 |
Mixing Songs |
Using the Auto Function to Mix Songs |
|
|
|
|
|
|
|
|
Step |
1 |
2 |
3 |
4 |
5 |
6 |
7 |
8 |
9 |
10 |
11 |
12 |
13 |
14 |
10 Click player B’s [CUE] button and to set up the place where playback is to start.
11 Click player B’s [BPM SYNC] button and it will match the speed of player A’s song.
12 Using the [Beat Indicator] of Player A as a guide, gauge when playback is to start for Player B.
About the Beat Indicators
The [Beat Indicator] is composed of one large, circular indicator on the left and 3 smaller circular indicators to its right. Usually, the largest waveform is shown in the large, round indicator as the beginning of the beat.
(Contd. on the next page)
Using the [CUE] button
‘Using the [CUE] button’ P.28
Recording Cues
(Track Hot Cues / List Hot Cues)
‘4-1 Setting up to 4 Points to Start Playing (Track Hot Cue)’ P.57
‘3-4 Setting up to 8 Points to Start Playing (List Hot Cue)’ P.47
[BPM SYNC] Button
This button automatically adjusts the speed of the next song to synchronize with the speed of the song being played. The speed of a song is called its BPM (Beats Per Minute). The button is called [BPM SYNC] as it automatically synchronizes the BPM of the two songs.
[Beat Indicators]
The indicators display the beats of players A & B. In order to mix the songs cleanly, it is essential to synchronize the 2 beats perfectly.
Adjusting Disparities in the
Beat Displays
‘Adjusting discrepancies in the [Beat
Indicator]’ P.27
24 |
DJS Ver. 1.600 |
Index |
Contents |
|
|
|
|
|
|
|
|
|
|
|

2 |
Mixing Songs |
Using the Auto Function to Mix Songs |
|
|
|
|
|
|
|
|
Step |
1 |
2 |
3 |
4 |
5 |
6 |
7 |
8 |
9 |
10 |
11 |
12 |
13 |
14 |
13 Click on the [A/4] button of Player B to initiate playback for player B.
•This enables you to monitor the sound from player B on your headphones.
14 Click the [MIX] button to move the slider of the [Cross Fader] to player B.
•As the [Cross Fader] moves, the volume from player A gets quieter while that of player B gets louder.
•When the [Cross Fader] reaches the right side and stops, the volume from player A goes completely off.
When the Beat is not Synchronized…
If the beat is not synchronized, the drums make an out of sync “bam-bam” sound and it all sounds fast and garbled. The timing of the mixing of the songs is either too slow or too fast. Conduct one of the following, ‘Adjusting with the [Jog Dial] before Mixing’ P.26 or ‘Adjusting discrepancies in the [Beat Indicator]’ P.27.
(Contd. on the next page)
[MIX] Button
This button automatically moves the cross fader position from the song being played to the next song to be played.
Setting the Timing (beats) of
the [Cross Fader]
‘3-5-3 Setting the Mixing Time
(Beat)’ P.53
Direction the [Cross Fader] Moves
The [Cross Fader] moves to the opposite side. If you press the [MIX] button again while it is moving, the [Cross Fader] will stop moving.
If the BPM Isn’t Detected
Songs are mixed at 120 BPM.
Index |
Contents |
DJS Ver. 1.600 |
25 |
|
|
|
|
|
|
|
|
|
|
|
2 |
Mixing Songs |
Using the Auto Function to Mix Songs |
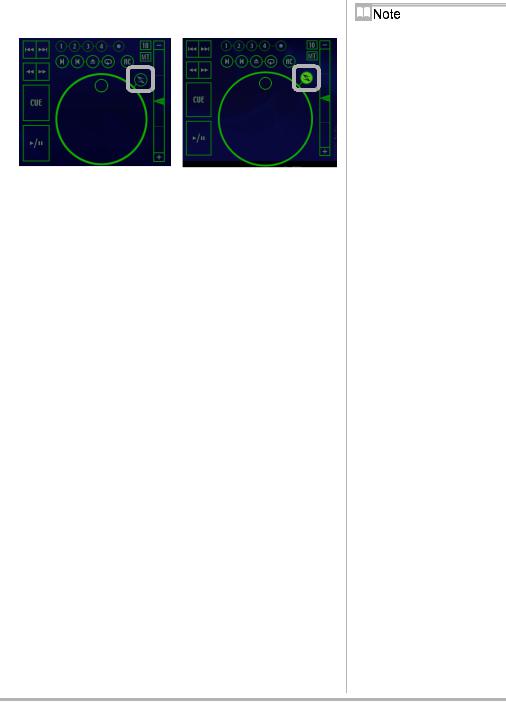
Adjusting with the [Jog Dial] before Mixing
Normal Mode |
Scratch Mode |
If you check your headphones before mixing the songs, you will notice if the beats are not aligned. If you use the jog dial, you can make adjustments, like speeding the beat up or altering the playback position.
Switching Jog Dial Modes
Click the [Scratch] button above and to the right of the Jog Dial to switch between the Normal and Scratch modes.
When Off: Normal Mode
When Lit: Scratch Mode
Using the Jog Dial in the Normal Mode
Clockwise: If you click down on the jog dial and rotate it clockwise, it accelerates the playback speed. When you stop rotating the dial, playback returns to the previous speed.
Counter Clockwise: If you click down on the jog dial and rotate it counterclockwise, it slows down the playback speed. When you stop rotating the dial, playback returns to the previous speed.
Using the Jog Dial in the Scratch Mode
Stop: If you click down on the jog dial, it stops playback; releasing the dial returns it to its previous playback state.
Rotate: If you click down on the jog dial and drag it to the left or right, it slows down or speeds up playback, depending on which way you rotate the jog dial.
(Contd. on the next page)
Making adjustments with Pitch Bend.
You can use the keyboard to use Pitch Bend.
‘4-5 Key Operations’ P.67
While holding down Pitch Bend+, the playback speeds up.
While holding down Pitch Bend-, the playback speed slows down.
26 |
DJS Ver. 1.600 |
Index |
Contents |
|
|
|
|
|
|
|
|
|
|
|
2 |
Mixing Songs |
Using the Auto Function to Mix Songs |
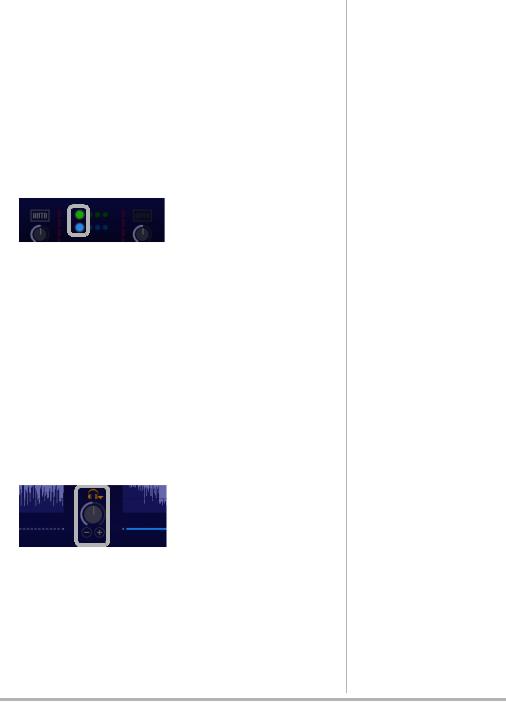
When the BPM (speed) is not Synchronized…
‘Using the [TAP] button to Re-detect the BPM’ P.33
Adjusting discrepancies in the [Beat Indicator]
If the display of the [Beat Indicator] gets out of sync with the actual beat, use the [Beat Adjust] button to redisplay it.
The circle on the left side of the [Beat Indicator] has the function of displaying the starting beat and acts as the [Beat Adjust] button.
Operating the [Beat Adjust] Button
If you click the [Beat Adjust] button, the timing with which you click it is re-displayed in the [Beat Indicator] as the starting beat.
[Headphone Monitor Control]
Make headphone settings on the Mixer and [HEADPHONES] screens.
The [HEADPHONES] screen is displayed by right clicking the [Headphone Monitor Control] on the upper edge of the Mixer.
The Mixer
Selecting the Source to Monitor on your Headphones:
Click the headphone cue on each of the sources, players, master, or effector and it will light up.
Adjusting the Volume:
Drag the slider of the [Headphone Volume Level] to adjust the volume. Turn the dial to the left [-] to decrease the volume and turn it to the right [+] to increase the volume.
(Contd. on the next page)
Index |
Contents |
DJS Ver. 1.600 |
27 |
|
|
|
|
|
|
|
|
|
|
|

2 |
Mixing Songs |
Using the Auto Function to Mix Songs |
[HEADPHONES] Screen
Switching between Stereo & Mono Split:
Click either the [STEREO] or [MONO SPLIT] button and select the ‘monitoring by headphones’ method.
Mixing Adjustment:
If you turn the dial to the left to [CUE], the volume of sources selected with headphone cue, other than master, increases, whereas if you turn it to the right to [MASTER], the volume of the Master output increases.
If you right click on the dial, it returns to the middle position between [CUE] and [MASTER].
Using the [CUE] button
If you click the [CUE] button, it will work as follows, depending on the circumstances when you clicked it.
When Paused:
That position is registered for the [CUE] button and it changes to Cue Standby.
When in Cue Standby:
As long as you push and hold the button, it continues to play from the cue position. Once you release the button, it returns to the cue position and goes to cue standby.
During Playback:
It returns to the cue position and stands by.
*Registered cue position information is retained until either a new cue position is set, or the [DJ Play] screen is closed.
With [STEREO] Selected
If you click [STEREO], the source selected with [Headphone Cue] can be monitored in stereo.
With [MONO SPLIT] Selected
If you click [MONO SPLIT], the output to the headphones becomes monaural and you can monitor the audio of the source selected with [Headphone Cue] (not master) on the left and the master audio on the right.
When Cues have been Set
The Loop In button blinks 3 times and then stays lit. (A cue point and a loop in point are the same)
A Cue is overwritten when…
(a)When a new cue is set
(b)When Auto Cue is ON and you put on another song
(c)When Auto Cue is on and you return to the beginning of a song with track search
(d)When a new loop is set up
(e)When a One Track Loop is set up
(f)When you move to any function other than DJ Play
(g)When a track is put on that has an Auto Setup Cue set to it or when it jumps to the beginning of the song via track searching of a track that has an Auto Setup Cue set
Saving Set Cues
The Track Hot Cue function allows you to register up to 4 cues per song.
‘4-1 Setting up to 4 Points to Start Playing (Track Hot Cue)’ P.57
28 |
DJS Ver. 1.600 |
Index |
Contents |
|
|
|
|
|
|
|
|
|
|
|

2 |
Mixing Songs |
Mixing Songs Manually |
2-2 Mixing Songs Manually
The procedures explained here are aimed at users who are already accustomed to using DJ equipment. For beginners these methods call for a great deal of practice, but this is the only way to develop so you can use the methods freely.
The actual work flow is as follows. |
|
|
|
||
( |
|
) |
|
||
Select an MP3 Song |
|
||||
*Get two MP3 songs ready. |
|
||||
|
|
|
|
|
Steps 1–3 |
|
Assign songs to players A and B |
|
|
||
|
|
|
|
|
Steps 4–6 |
|
Synchronize the tempo (speed) while |
|
|
||
|
listening to the music |
|
|
|
|
|
|
|
|
|
Steps 7–9 |
|
Decide on the play start position for player B |
|
|||
|
|
|
|
|
Step 10 |
|
Decide the Timing for Mixing the Songs |
|
|
||
|
|
|
|
|
Step 11 |
|
Play Player B |
|
|
||
|
|
|
|
|
Step 12 |
|
Switch the Song to Play |
|
|
||
|
|
|
|
|
|
• Start up DJS before doing any of the operations. |
|
|
|
||
(Contd. on the next page)
Index |
Contents |
DJS Ver. 1.600 |
29 |
|
|
|
|
|
|
|
|
|
|
|

2 |
Mixing Songs |
Mixing Songs Manually |
|
|
|
|
|
|
|
Step |
1 |
2 |
3 |
4 |
5 |
6 |
7 |
8 |
9 |
10 |
11 |
12 |
1 Drag the slider of the [Cross Fader] to the player A side (left edge).
2 Select the first song to play and drag & drop it from the track list to player A.
• The song starts to play.
3 Select the next song to play and drag & drop it from the track list to player B.
• The song starts to play.
4 Click the headphone cue for player B.
• The headphone cue will light up.
5 Listen to the music on player B over the headphones and gauge the difference in tempos.
(Contd. on the next page)
Warning!
Sound Output to Headphones
Get a sound card that is for headphones. If there is no sound card, the headphones will not work.
‘1-1 When Using the DJS Mixer Functions’ P.16
Before Mixing Songs
Import 2 or more songs into the track list.
BPM Display
The automatically detected BPM is displayed in the information display for each player.
30 |
DJS Ver. 1.600 |
Index |
Contents |
|
|
|
|
|
|
|
|
|
|
|
Loading...