


Multi-CD control High power cassette player with FM/AM tuner
Operation Manual
KEH-P4025
English
Español
(B) Português
«dFWOÐ

Contents
Before You Start
About this manual 2 Precautions 2 What’s what 3
Optional remote control 4 Protecting your unit from theft 5
•Removing the front panel 5
•Attaching the front panel 5
Power ON/OFF
Turning the unit on 6
Selecting a source 6
Turning the unit off 6
Tuner
Listening to the radio 7 Storing and recalling broadcast
frequencies 8
Tuning in strong signals 8 Storing the strongest broadcast
frequencies 8
Cassette Player
Playing a tape 9 Repeating play 10
Skipping blank tape sections 10 Radio intercept 10
1 En
Pioneer product.
instructions so you will know how to oper- finished reading the instructions, put them
Multi-CD Player
Playing a CD 10
50-disc multi-CD player 11 Repeating play 11
Playing tracks in a random order 12 Scanning CDs and tracks 12 Pausing CD playback 12
Audio Adjustments
Introduction of audio adjustments 13
Using balance adjustment 13
Using the equalizer 14
•Recalling equalizer curves 14
•Adjusting equalizer curves 14 Adjusting loudness 14
Front image enhancer (FIE) 15 Adjusting source levels 15
Initial Settings
Adjusting initial settings 16
Setting the time 16
Setting the FM tuning step 16
Setting the AM tuning step 17
Switching the auxiliary setting 17
Additional Information
Setting the time display on or off 17 Using the AUX source 17
• Selecting AUX as the source 17 Cassette tapes 18
Cleaning the playback head 18 Music search and repeat functions 18 Specifications 19

Before You Start
About this manual
This unit features a number of sophisticated functions ensuring superior reception and operation. All the functions have been designed for the easiest possible use, but many are not selfexplanatory. This operation manual will help you benefit fully from this product’s potential and to maximize your listening enjoyment.
We recommend that you familiarize yourself with the functions and their operation by reading through the manual before you begin using this unit. It is especially important that you read and observe precautions on this page and in other sections.
This manual explains head unit operation. You can perform the same operations with the remote control (CD-R30). 
Precautions
•Keep this manual handy as a reference for operating procedures and precautions.
•Always keep the volume low enough so you can hear sounds outside of the car.
•Protect this product from moisture.
•If the battery is disconnected or discharged, the preset memory will be erased and must be reprogrammed.
•Should this product fail to operate properly, contact your dealer or nearest authorized Pioneer Service Station. 
En
English
Español
Italiano Français Deutsch
Nederlands
2

Before You Start
1 |
2 |
|
3 |
4 5 |
= |
|
|
|
|
|
|
|
|
6 |
- |
|
|
|
|
|
0 |
9 |
8 |
7 |
What’s what |
6 |
5/∞/2/3 buttons |
|
|
|
|
Press to do manual seek tuning, fast for- |
|
|
|
ward, reverse and track search controls. Also |
1 |
VOLUME button |
|
used for controlling functions. |
|
Press to increase or decrease the volume. |
|
|
|
|
7 |
LOUDNESS button |
2 |
LOCAL button (tuner) |
|
Press to switch loudness function on or off. |
|
Press to switch local function on or off. |
|
|
|
PAUSE/SCAN button |
8 |
BAND button |
Press to switch pause function on or off. Press and hold for two seconds to switch scan function on or off.
3BSM button (tuner)
Press and hold for two seconds to switch BSM function on or off.
REPEAT/RANDOM button
Press to switch repeat function on or off. Press and hold for two seconds to switch random function on or off.
4OPEN button
Press to open the front panel.
5AUDIO button
Press to select various sound quality controls.
Press to select among three FM and one AM band and cancel the control mode of functions.
91–6 (PRESET TUNING) buttons
Press for preset tuning and disc number search when using a multi-CD player.
0SOURCE button
This unit is switched on by selecting a source. Press to cycle through all of the available sources.
-EQ button
Press to select various equalizer curves.
=CLOCK button
Press to switch clock display on or off. 
3 En
Before You Start
 ~
~
8

 %
%
 6 !
6 !


 5
5
@

 $
$
#
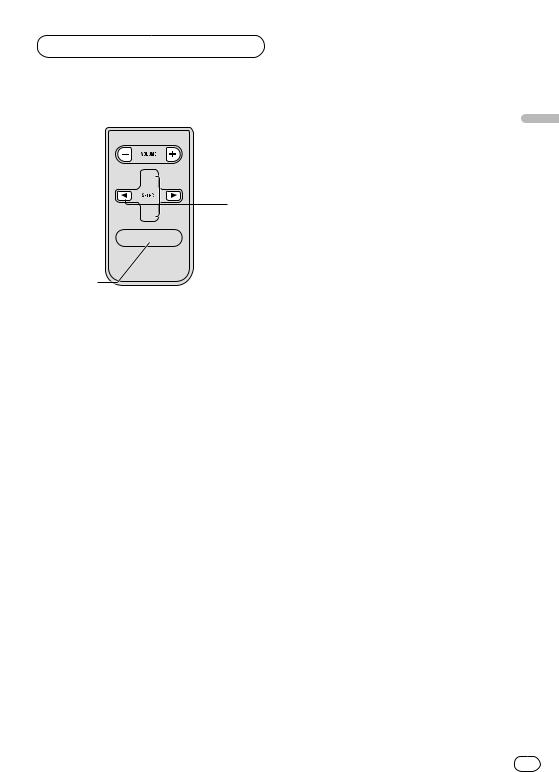
Optional remote control
The remote control CD-R30 is sold separately. Operation is the same as when using the button on the head unit. See the explanation of the head unit about the operation of each button with the exception of ATT, which is explained below.
~+/– button
Press to increase or decrease the volume.
!FUNCTION button
Not used.
@CD button
Press once to select a CD.
#Cassette button
Press once to select a cassette.
$TUNER button
Press once to select a tuner.
%ATT button
Press to quickly lower the volume level, by about 90%. Press once more to return to the original volume level. 
English
Español
Italiano Français Deutsch
Nederlands
En 4
Before You Start
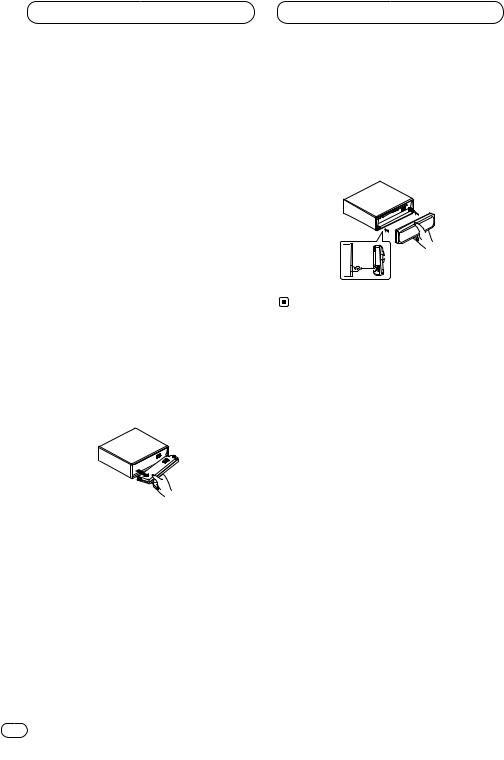
Protecting your unit from theft
The front panel can be detached from the head unit and stored in the protective case provided to discourage theft.
• Keep the front panel closed while driving.
 Important
•Never use force or grip the display and the buttons tightly when removing or attaching.
•Avoid subjecting the front panel to excessive shocks.
•Keep the front panel out of direct sunlight and high temperatures.
Removing the front panel
1Press OPEN to open the front panel.
2Grip the left side of the front panel and pull it gently outward.
Take care not to grip it tightly or drop it.
3 Put the front panel into the protective case provided for safe keeping.
Attaching the front panel
Replace the front panel by holding it upright to this unit and clipping it securely into the mounting hooks.
5 En
Power ON/OFF
Turning the unit on
Press SOURCE to turn the unit on.
When you select a source the unit is turned on.
Selecting a source
You can select a source you want to listen to. To switch to the cassette player, load a cassette tape in this unit (refer to page 9).
Press SOURCE to select a source.
Press SOURCE repeatedly to switch between the following sources:
Tuner—Cassette player—Multi-CD player
—External unit—AUX
|
|
Notes |
English |
|
|
|
|
||
• In the following cases, the sound source will |
||||
|
||||
|
not change: |
|
||
|
— When a product corresponding to each |
|
||
|
|
source is not connected to this unit. |
|
|
|
— When no cassette is set in this unit. |
|
||
|
— When no magazine is set in the multi-CD |
|
||
|
|
player. |
Español |
|
|
— When the AUX (external input) is set to off |
|||
|
|
|||
|
|
(refer to page 17). |
|
|
• External Unit refers to a Pioneer product |
|
|||
|
(such as one available in the future) that, |
|
||
|
although incompatible as a source, enables |
|
||
|
control of basic functions by this product. |
|
||
|
Only one External Unit can be controlled by |
Deutsch |
||
|
this product. |
|||
|
|
|||
• When this unit’s blue/white lead is connected |
|
|||
|
to the car’s auto-antenna relay control termi- |
|
||
|
nal, the car’s antenna extends when this |
|
||
|
unit’s source is switched on. To retract the |
|
||
|
antenna, switch the source off. |
|
||
Turning the unit off |
Français |
|||
|
||||
Press SOURCE and hold for at least one sec- |
|
|||
ond to turn the unit off. |
|
|||
|
|
|
Italiano |
|
Nederlands
En 6
Tuner
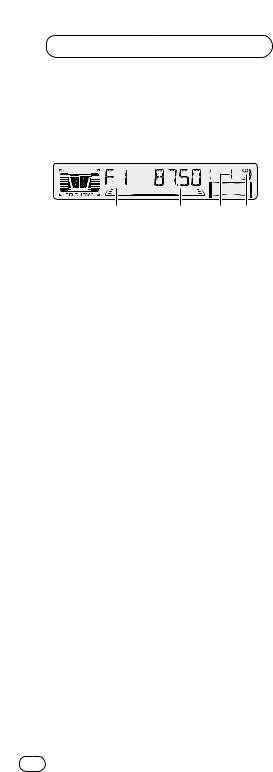
Listening to the radio
1 2 3 4
If you are using this unit in North, Central or South America, reset the AM tuning step (see
Setting the AM tuning step on page 17).
1BAND indicator
Shows which band the radio is tuned to, AM or FM.
2FREQUENCY indicator
Shows to which frequency the tuner is tuned.
3PRESET NUMBER indicator
Shows what preset has been selected.
4STEREO ( ) indicator
Shows that the frequency selected is being broadcast in stereo.
7 En
1Press SOURCE to select the tuner.
2Use VOLUME to adjust the sound level.
When you press VOLUME up/+, the volume is raised and when pressed down/–, the volume is lowered.
3Press BAND to select a band.
Press BAND until the desired band is displayed, F1, F2, F3 for FM or AM.
4To perform manual tuning, press 2 or 3 with quick presses.
The frequencies move up or down step by step.
5To perform seek tuning, press and hold 2 or 3 for about one second and release.
The tuner will scan the frequencies until a broadcast strong enough for good reception is found.
• You can cancel seek tuning by pressing either 2 or 3 with a quick press.
• If you press and hold 2 or 3 you can skip broadcasting stations. Seek tuning starts as soon as you release the buttons.
 Note
Note
•When the frequency selected is being broadcast in stereo the STEREO ( ) indicator will light. 

Tuner
Storing and recalling broadcast frequencies
If you press any of the PRESET TUNING buttons you can easily store up to six broadcast frequencies for later recall with the touch of a button.
When you find a frequency that you want to store in memory press a PRESET TUNING button and hold until the preset number stops flashing.
The number you have pressed will flash in the PRESET NUMBER indicator and then remain lit. The selected radio station frequency has been stored in memory.
The next time you press the same PRESET TUNING button the radio station frequency is recalled from memory.
 Notes
Notes
•Up to 18 FM stations, 6 for each of the three FM bands, and 6 AM stations can be stored in memory.
•You can also use 5 and ∞ to recall radio station frequencies assigned to PRESET TUNING buttons. 
Tuning in strong signals
Local seek tuning lets you tune in only those radio stations with sufficiently strong signals for good reception.
1Press LOCAL to turn local seek tuning on.
Local seek sensitivity (LOC) appears in the display.
2When you want to return to normal seek tuning, press LOCAL to turn local seek tuning off. 
Storing the strongest broadcast frequencies
BSM (best stations memory) lets you automatically store the six strongest broadcast frequencies under PRESET TUNING buttons 1–6 and once stored there you can tune in to those frequencies with the touch of a button.
Press and hold BSM for about two seconds to turn BSM on.
BSM begins to flash. While BSM is flashing the six strongest broadcast frequencies will be stored under PRESET TUNING buttons in order of their signal strength. When finished, BSM stops flashing.
• To cancel the storage process, press BSM.
 Note
Note
•Storing broadcast frequencies with BSM may replace broadcast frequencies you have saved using PRESET TUNING. 
En
English
Español
Italiano Français Deutsch
Nederlands
8

Cassette Player
Playing a tape
12
1 TAPE DIRECTION indicator
Shows the direction of the tape transport.
2PLAY TIME indicator
Shows the elapsed playing time of the current side of the tape.
1Press OPEN to open the front panel.
Cassette loading slot appears.
2Insert a cassette tape into the cassette loading slot.
Playback will automatically start.
Cassette loading slot
TAPE EJECT button
• You can eject a cassette tape by pressing
TAPE EJECT.
3 Close the front panel.
• After a cassette tape has been inserted, press SOURCE to select the Cassette player.
4Use VOLUME to adjust the sound level.
When you press VOLUME up/+, the volume is raised and when pressed down/–, the volume is lowered.
5To perform fast forward or rewind, press 2 or 3.
FF or REW appears in the display.
• To cancel fast forward or rewind and return to playback, press BAND.
• You can cancel fast forward or rewind by pressing 2 or 3 in the same direction twice.
6To perform forward or rewind music search, press 2 or 3 twice.
F-MS (forward music search) or R-MS (rewind music search) appears in the display. The cassette player will fast forward or rewind to the next or previous blank spot on the tape and begin to play.
• To cancel music search and return to playback, press BAND.
• You can cancel music search by pressing 2 or 3 in the same direction again.
7To change the direction of the tape transport, press BAND.
 Notes
Notes
•Do not insert anything other than a cassette tape into the cassette loading slot.
•PLAY TIME indicator starts from 00’00” in the following cases:
—When a tape is inserted
—When the tape direction is changed
—When you rewind the tape to the beginning
•PLAY TIME indicator is halted when fast forward, rewind or music search is operating. 
9 En
Cassette Player |
Multi-CD Player |
Repeating play
Repeat play lets you hear the same track over again.
1Press REPEAT/RANDOM to turn repeat play on.
RPT appears in the display. The track presently playing will play and then repeat.
2Press REPEAT/RANDOM to turn repeat play off.
The track presently playing will continue to play and then play the next track. 
Skipping blank tape sections
Blank skip automatically fast forwards to the next song if there is a long period of silence (12 seconds or longer) between songs.
1 Press 5 to turn blank skip on.
BS ON appears in the display. Long periods of silence between songs will be skipped.
2 Press 5 to turn blank skip off.
BS OFF appears in the display. The complete cassette tape will play. 
Radio intercept
This function allows you to listen to the radio during tape fast-forwarding/rewinding.
1Press 6 to turn radio intercept on.
RI ON appears in the display.
2Press 6 to turn radio intercept off.
RI OFF appears in the display. 
Playing a CD
English
1 |
2 |
3 |
Español |
|
You can use this unit to control a multi-CD player, |
||||
|
||||
which is sold separately.
1TRACK NUMBER indicator
Shows the track currently playing.
2 |
PLAY TIME indicator |
Deutsch |
|
Shows the elapsed playing time of the current track.
3DISC NUMBER indicator
Shows the disc currently playing.
Italiano Français
Nederlands
En 10

Multi-CD Player
1Press SOURCE to select the multi-CD player.
2Use VOLUME to adjust the sound level.
When you press VOLUME up/+, the volume is raised and when pressed down/–, the volume is lowered.
3Select a disc you want to listen to with the
1to 6 buttons.
For discs located at 1 to 6, press the corresponding number button.
If you want to select a disc located at 7 to 12, press and hold the corresponding numbers such as 1 for disc 7, until the disc number appears in the display.
• You can also sequentially select a disc by pressing 5/∞.
4To perform fast forward or reverse, press and hold 2 or 3.
5To skip back or forward to another track, press 2 or 3.
Pressing 3 skips to the start of the next track. Pressing 2 once skips to the start of the current track. Pressing again will skip to the previous track.
 Notes
Notes
•When the multi-CD player performs the preparatory operations, READY is displayed.
•If the multi-CD player does not operate properly, an error message such as ERROR-14 may be displayed. Refer to the multi-CD player owner’s manual.
•If there are no discs in the multi-CD player magazine, NO DISC is displayed. 
50-disc multi-CD player
Only those functions described in this manual are supported for 50-disc multi-CD players. 
Repeating play
There are three repeat play ranges for the multiCD player: Multi-CD player repeat, one-track repeat, and disc repeat.
Press REPEAT/RANDOM to select the repeat range.
Press REPEAT/RANDOM until the desired repeat range appears in the display.
•Nothing’s displayed — Repeat all discs in the multi-CD player
•RPT — Repeat just the current track
•DISC — Repeat the current disc
 Notes
Notes
•If you select other discs during repeat play, the repeat play range changes to multi-CD player repeat.
•If you perform track search or fast forward/reverse during RPT (one-track repeat), the repeat play range changes to DISC (disc repeat). 
11 En
Multi-CD Player
Playing tracks in a random order
Random play lets you play back tracks in a random order within the repeat range, multi-CD player repeat and disc repeat.
1 Select the repeat range.
Refer to Repeating play on page 11.
2Press and hold REPEAT/RANDOM for about two seconds to turn random play on.
DRDM (random playing in a disc) or RDM (random playing in a magazine) appears in the display. Tracks will play in a random order within the previously selected multi-CD player repeat or disc repeat ranges.
3Press and hold REPEAT/RANDOM for about two seconds to turn random play off.
Tracks will continue to play in order. 
Scanning CDs and tracks
While you are using DISC (disc repeat), the beginning of each track on the selected disc plays for about 10 seconds. When you are using multi-CD player repeat, the beginning of the first track of each disc is played for about 10 seconds.
1 Select the repeat range.
Refer to Repeating play on page 11.
2 Press and hold PAUSE/SCAN for about two seconds to turn scan play on.
DSCN (scanning tracks) or SCAN (scanning discs) appears in the display. The first 10 seconds of each track of the present disc (or the first track of each disc) is played.
3 When you find the desired track (or disc) |
|
|
press and hold PAUSE/SCAN for about two |
English |
|
seconds to turn scan play off. |
||
|
||
The track (or disc) will continue to play. |
|
 Note
Note
•After track or disc scanning is finished, normal playback of the tracks will begin again.
|
Español |
|
Pausing CD playback |
|
|
Pause lets you temporarily stop playback of the |
Deutsch |
|
CD. |
||
|
||
1 Press PAUSE/SCAN to turn pause on. |
|
|
PAUSE appears in the display. Play of the cur- |
|
|
rent track pauses. |
|
|
2 Press PAUSE/SCAN to turn pause off. |
|
|
Play will resume at the same point that you |
Français |
|
turned pause on. |
||
|
||
|
Italiano |
|
|
Nederlands |
En |
12 |
 Loading...