


IMPORTANT
The lightning flash with arrowhead symbol, within an equilateral triangle, is intended to alert the user to the presence of uninsulated "dangerous voltage" within the product's enclosure that may be of sufficient magnitude to constitute a risk of electric shock to persons.
CAUTION
RISK OF ELECTRIC SHOCK
DO NOT OPEN
CAUTION:
TO PREVENT THE RISK OF ELECTRIC SHOCK, DO NOT REMOVE COVER (OR BACK). NO USERSERVICEABLE PARTS INSIDE. REFER SERVICING TO QUALIFIED SERVICE PERSONNEL.
The exclamation point within an equilateral triangle is intended to alert the user to the presence of important operating and maintenance (servicing) instructions in the literature accompanying the appliance.
D3-4-2-1-1_En-A
1)Read these instructions.
2)Keep these instructions.
3)Heed all warnings.
4)Follow all instructions.
5)Do not use this apparatus near water.
6)Clean only with dry cloth.
7)Do not block any ventilation openings. Install in accordance with the manufacturer’s instructions.
8)Do not install near any heat sources such as radiators, heat registers, stoves, or other apparatus (including amplifiers) that produce heat.
9)Do not defeat the safety purpose of the polarized or grounding-type plug. A polarized plug has two blades with one wider than the other. A grounding type plug has two blades and a third grounding prong. The wide blade or the third prong are provided for your safety. If the provided plug does not fit into your outlet, consult an electrician for replacement of the obsolete outlet.
10)Protect the power cord from being walked on or pinched particularly at plugs, convenience receptacles, and the point where they exit from the apparatus.
11)Only use attachments/accessories specified by the manufacturer.
12)Use only with the cart, stand, tripod, bracket, or table specified by the manufacturer, or sold with the apparatus. When a cart is used, use caution when moving the cart/apparatus combination to avoid injury from tip-over.
13)Unplug this apparatus during lightning storms or when unused for long periods of time.
14)Refer all servicing to qualified service personnel.
Servicing is required when the apparatus has been damaged in any way, such as power-supply cord or plug is damaged, liquid has been spilled or objects have fallen into the apparatus, the apparatus has been exposed to rain or moisture, does not operate normally, or has been dropped.
IMPORTANT NOTICE – THE SERIAL NUMBER FOR THIS EQUIPMENT IS LOCATED IN THE REAR. PLEASE WRITE THIS SERIAL NUMBER ON YOUR ENCLOSED WARRANTY CARD AND KEEP IN A SECURE AREA. THIS IS FOR YOUR SECURITY.
WARNING: Handling the cord on this product or cords associated with accessories sold with the product will expose you to chemicals listed on proposition 65 known to the State of California and other governmental entities to cause cancer and birth defect or other
reproductive harm.
Wash hands after handling
D36-P4-A_En

TABLE OF CONTENTS
Congratulations on your purchase of a Pioneer KURO flat panel television.
KURO is the future of Pioneer flat-panel displays. It’s a world without boundaries. A place where the senses evolve, colors are felt and sounds can be tasted. An experience that changes not only the way you look at television, but the way you look at the world.
We are proud to incorporate this philosophy of exceptional quality, state-of-the-art design and meticulous engineering to make the KURO undeniably unique and bring you one of the best entertainment experiences possible.
Please take some time to read through this owner’s guide and manual to learn about the many features and benefits that set the KURO apart. We hope you enjoy the experience of owning the KURO and invite you to enter a new world of seeing and hearing like never before.
TABLE OF CONTENTS
1 Introduction to the ELITE Series Flat Panel TVs ..................................................................................... |
6 |
|
1.1 |
Flat Panel TV Shipment Checklist ................................................................................................................................... |
6 |
1.2 |
Control Options: Get to Know Your Flat Panel TV .......................................................................................................... |
8 |
|
1.2.1 Control Buttons and More on the Flat Panel TV .................................................................................................... |
8 |
|
1.2.2 Operating the Remote Control .............................................................................................................................. |
10 |
|
1.2.3 Buttons on the Remote Control ............................................................................................................................ |
12 |
2 Install Your Flat Panel TV ...................................................................................................................... |
14 |
|
2.1 |
Choose a Location and the Mounting Method............................................................................................................. |
14 |
|
2.1.1 Check the Location for Suitability ......................................................................................................................... |
15 |
|
2.1.2 Lift and/or Move Your Panel (the How To’s)......................................................................................................... |
15 |
2.2 |
Install the Panel Using a Stand ..................................................................................................................................... |
16 |
|
2.2.1 Use or Remove the Included Stand ...................................................................................................................... |
16 |
|
2.2.2 Connect the Speaker Cables ................................................................................................................................. |
22 |
2.3 |
Wall/Ceiling Mounting.................................................................................................................................................... |
23 |
2.4 |
Mount the Flat Panel TV ................................................................................................................................................. |
24 |
2.5 |
Attach the Color Sensor ................................................................................................................................................. |
26 |
2.6 |
Connect to Broadcast TV & Other Devices (DVR, Receiver, BDR, etc.) ..................................................................... |
29 |
|
2.6.1 Add Analog (conventional) and Digital TV Channels .......................................................................................... |
29 |
|
2.6.2 Connect Your Other Pioneer Equipment.............................................................................................................. |
29 |
|
2.6.3 Connect the Power Cord to the Panel .................................................................................................................. |
32 |
2.7 |
Route then Bundle the Power Cord and Cables .......................................................................................................... |
32 |
3 Basic Operations For Television Viewing ............................................................................................. |
34 |
||
3.1 |
Turn the Flat Panel TV ON/OFF...................................................................................................................................... |
34 |
|
3.2 |
Program the Flat Panel TV for Television Viewing........................................................................................................ |
35 |
|
|
3.2.1 Choose Analog or Digital TV Channels ................................................................................................................ |
35 |
|
|
3.2.2 Explore the Home Menu ........................................................................................................................................ |
35 |
|
|
3.2.3 Assign a Language................................................................................................................................................. |
37 |
|
|
3.2.4 |
Set the Clock........................................................................................................................................................... |
38 |
|
3.2.5 |
Create the List of Channels ................................................................................................................................... |
38 |
|
3.2.6 Skip or Delete Unwanted Channels...................................................................................................................... |
41 |
|
|
3.2.7 |
Channel List ............................................................................................................................................................ |
42 |
3.3 |
Quick Start for Watching Television.............................................................................................................................. |
44 |
|
|
3.3.1 Change the Channel/Sub-Channel....................................................................................................................... |
44 |
|
|
3.3.2 Adjust the Volume/Sound...................................................................................................................................... |
44 |
|
|
3.3.3 Turn On the Sleep Timer........................................................................................................................................ |
44 |
|
3.4 |
Adjust the Picture and Sound Quality .......................................................................................................................... |
45 |
|
|
3.4.1 |
Adjust the Picture for Your Room Lighting .......................................................................................................... |
45 |
|
3.4.2 General Picture (Video) Adjustment for an AV Source ....................................................................................... |
46 |
|
|
3.4.3 Compare Images When Adjusting the Picture.................................................................................................... |
47 |
|
|
3.4.4 Display a Graphical Picture/Sound Adjustment Screen..................................................................................... |
48 |
|
|
3.4.5 Sound Control......................................................................................................................................................... |
49 |
|
|
3.4.6 General Sound (Audio) Adjustment...................................................................................................................... |
49 |
|
3.5 |
Block Programs, Channels, or Content ........................................................................................................................ |
50 |
|
|
3.5.1 Assign a Parental Control (Block) Password....................................................................................................... |
50 |
|
3
En

TABLE OF CONTENTS
|
3.5.2 |
Activate Parental Control ....................................................................................................................................... |
51 |
|
3.5.3 Assign a Rating System to Create Blocks ............................................................................................................ |
51 |
|
|
3.5.4 Temporarily Remove a Block ................................................................................................................................. |
54 |
|
3.6 |
Smart Starts for New Owners ........................................................................................................................................ |
55 |
|
|
3.6.1 Use the TOOLS Menu............................................................................................................................................. |
55 |
|
|
3.6.2 |
Extend Your Panel Life............................................................................................................................................ |
55 |
|
3.6.3 Turn On the Image Orbiter..................................................................................................................................... |
56 |
|
|
3.6.4 |
Trigger the Screen-Saving Video Pattern Periodically......................................................................................... |
56 |
|
3.6.5 Activate Energy Save to Reduce Power Usage .................................................................................................... |
56 |
|
4 Additional Picture and Sound Adjustment Options ........................................................................... |
57 |
||
4.1 |
Choose an AV Option (Video, Game, etc.)..................................................................................................................... |
57 |
|
|
4.1.1 AV Source through the Remote Control............................................................................................................... |
57 |
|
|
4.1.2 Choose an AV Source through the Home Menu ................................................................................................. |
58 |
|
|
4.1.3 Choose a PC Source............................................................................................................................................... |
58 |
|
|
4.1.4 Set the Panel to Recognize a Game Console....................................................................................................... |
59 |
|
4.2 |
Adjust Specific Picture Elements .................................................................................................................................. |
59 |
|
|
4.2.1 Choose a Screen Size (Automatically or Manually)............................................................................................. |
59 |
|
|
4.2.2 Correct the Picture for an AV or PC Source ......................................................................................................... |
61 |
|
4.3 |
Assign Advanced Picture Functions ............................................................................................................................. |
62 |
|
|
4.3.1 Adjust for Screen Masking (black bars on sides) ................................................................................................ |
62 |
|
|
4.3.2 Select a PureCinema Level for High Quality Image............................................................................................. |
63 |
|
|
4.3.3 |
Select an Intelligent Mode Option......................................................................................................................... |
64 |
|
4.3.4 |
Select the Picture Detail Options.......................................................................................................................... |
64 |
|
4.3.5 Adjust the Color Temperature ............................................................................................................................... |
65 |
|
|
4.3.6 Use CTI and Color Space ....................................................................................................................................... |
66 |
|
|
4.3.7 Use the Color Management................................................................................................................................... |
66 |
|
|
4.3.8 Reduce Noise from the Image............................................................................................................................... |
67 |
|
|
4.3.9 |
Adjust Color Signals............................................................................................................................................... |
68 |
4.4 |
View in Multi-Screen ....................................................................................................................................................... |
69 |
|
|
4.4.1 |
Split/Swap/Shift the Screen................................................................................................................................... |
69 |
4.5 |
Freeze the Picture ........................................................................................................................................................... |
70 |
|
4.6 |
Use the Banner Feature.................................................................................................................................................. |
71 |
|
4.7 |
Select Alternatives for/to Sound .................................................................................................................................... |
72 |
|
|
4.7.1 |
Activate Closed Captioning (CC) ........................................................................................................................... |
72 |
|
4.7.2 Switch Languages Using MTS............................................................................................................................... |
74 |
|
|
4.7.3 Select SAP............................................................................................................................................................... |
74 |
|
|
4.7.4 Apply Sound Effect Settings .................................................................................................................................. |
75 |
|
|
4.7.5 Use Auto Volume Control (AVC)............................................................................................................................ |
75 |
|
4.8 |
Manage the Power .......................................................................................................................................................... |
76 |
|
5 Use Other Equipment With Your Flat Panel TV ................................................................................... |
78 |
||
5.1 |
Program the Remote Control to Operate Other Equipment........................................................................................ |
78 |
|
|
5.1.1 Use the Learning Feature....................................................................................................................................... |
78 |
|
|
5.1.2 Assign a Manufacturing Code to the Remote Control ........................................................................................ |
79 |
|
|
5.1.3 Issue a Library Search for a Manufacturer Code ................................................................................................. |
79 |
|
|
5.1.4 Clear Added Manufacturer Codes from the Remote Control ............................................................................. |
80 |
|
|
5.1.5 |
Control a Pioneer Receiver .................................................................................................................................... |
80 |
|
5.1.6 |
Control a Cable (CBL) or Satellite (SAT) System.................................................................................................. |
81 |
|
5.1.7 Control a Video Cassette Recorder (VCR) ............................................................................................................ |
82 |
|
|
5.1.8 Control a DVD Player/DVR Recorder/BD Player.................................................................................................. |
83 |
|
5.2 |
Use HDMI Inputs............................................................................................................................................................. |
84 |
|
|
5.2.1 Specify the HDMI Input Type ................................................................................................................................. |
84 |
|
|
5.2.2 Specify a Digital HDMI Signal Type ...................................................................................................................... |
85 |
|
|
5.2.3 Specify an Audio HDMI Signal Type ..................................................................................................................... |
85 |
|
5.3 |
Control Equipment with the Panel’s Remote Through HDMI ..................................................................................... |
86 |
|
|
5.3.1 Control an AV System............................................................................................................................................. |
88 |
|
|
5.3.2 Control a Recorder ................................................................................................................................................. |
89 |
|
|
5.3.3 |
Control a Player....................................................................................................................................................... |
89 |
|
5.3.4 Add an AV Amp or a BD Player............................................................................................................................. |
90 |
|
5.4 |
Specific HDMI Control Commands ............................................................................................................................... |
91 |
|
|
5.4.1 Play Source Sound Using an HDMI Command................................................................................................... |
91 |
|
4
En

TABLE OF CONTENTS
|
5.4.2 Turn OFF the Power With an HDMI Command ................................................................................................... |
91 |
|
|
5.4.3 Turn ON the Power With an HDMI Command .................................................................................................... |
91 |
|
|
5.4.4 |
Test the Power Control (On/Off)............................................................................................................................ |
92 |
5.5 |
Connect a Game Console or Camcorder ...................................................................................................................... |
92 |
|
5.6 |
Use the IR REPEATER OUT............................................................................................................................................ |
92 |
|
5.7 |
Operate the Home Media Gallery .................................................................................................................................. |
93 |
|
|
5.7.1 Network Connections............................................................................................................................................. |
94 |
|
|
5.7.2 Connect a USB Device........................................................................................................................................... |
96 |
|
5.8 |
Run the Home Media Gallery......................................................................................................................................... |
98 |
|
|
5.8.1 Show Your Movie Files on the Flat Panel TV ...................................................................................................... |
101 |
|
|
5.8.2 |
Play Your Music Files on the Flat Panel TV ........................................................................................................ |
103 |
|
5.8.3 Show Your Photo File on the Flat Panel TV ........................................................................................................ |
104 |
|
5.9 |
Use the TOOLS Menu ................................................................................................................................................... |
106 |
|
5.10 HMG Setup .................................................................................................................................................................. |
118 |
||
5.11 Other useful functions................................................................................................................................................ |
119 |
||
5.12 Add Other Audio Equipment...................................................................................................................................... |
121 |
||
5.13 Add a Computer (PC) ................................................................................................................................................. |
122 |
||
|
5.13.1 Automatic Image Position and Clock Adjustments ........................................................................................ |
122 |
|
|
5.13.2 Manual Image Position and Clock Adjustments............................................................................................. |
122 |
|
6 Helpful Information ............................................................................................................................. |
123 |
||
6.1 |
Frequently Asked Questions (FAQs) ........................................................................................................................... |
123 |
|
6.2 |
Check Your Software/Hardware Version..................................................................................................................... |
124 |
|
6.3 |
Cleaning Methods......................................................................................................................................................... |
124 |
|
6.4 |
Troubleshooting & Service Information....................................................................................................................... |
125 |
|
|
6.4.1 Check the Signal Strength................................................................................................................................... |
130 |
|
7 Cautions and Warnings........................................................................................................................ |
131 |
||
7.1 |
Installation Details ........................................................................................................................................................ |
131 |
|
7.2 |
Physical Location & Temperature Considerations ..................................................................................................... |
131 |
|
7.3 |
Usage Guidelines .......................................................................................................................................................... |
131 |
|
7.4 |
Signal Interference or Noise ........................................................................................................................................ |
132 |
|
7.5 |
Phosphor Properties..................................................................................................................................................... |
132 |
|
7.6 |
Image Information Including Retention & After-Image Lag ...................................................................................... |
132 |
|
7.7 |
Safety Precautions........................................................................................................................................................ |
134 |
|
7.8 |
Legal Notices................................................................................................................................................................. |
134 |
|
|
7.8.1 |
Safety..................................................................................................................................................................... |
134 |
|
7.8.2 |
Radio Interference................................................................................................................................................ |
135 |
8 Appendix .............................................................................................................................................. |
136 |
||
8.1 |
Ratings Charts (for Various Audience Classifications) ............................................................................................. |
136 |
|
|
8.1.1 |
TV Ratings (age-based) ........................................................................................................................................ |
136 |
|
8.1.2 |
U.S. TV Parental Guideline Ratings (age/category-based)................................................................................ |
136 |
|
8.1.3 MPAA Movie Ratings (age-based) ...................................................................................................................... |
136 |
|
|
8.1.4 Canadian - English Ratings (age-based) ............................................................................................................ |
137 |
|
|
8.1.5 Canadian - French Ratings (age-based)............................................................................................................. |
137 |
|
8.2 |
Manufacturer Codes to Program into the Remote Control....................................................................................... |
138 |
|
|
8.2.1 |
Cable...................................................................................................................................................................... |
138 |
|
8.2.2 |
Satellite.................................................................................................................................................................. |
138 |
|
8.2.3 VCR (Brands A - F)................................................................................................................................................ |
139 |
|
|
8.2.4 VCR (Brands G - O)............................................................................................................................................... |
140 |
|
|
8.2.5 VCR (Brands P - V) ............................................................................................................................................... |
141 |
|
|
8.2.6 VCR (Brands W - Z) .............................................................................................................................................. |
141 |
|
|
8.2.7 PVR ........................................................................................................................................................................ |
142 |
|
|
8.2.8 BD (HD-DVD)........................................................................................................................................................ |
142 |
|
|
8.2.9 DVD-R.................................................................................................................................................................... |
142 |
|
|
8.2.10 DVD (Brands A - N) ............................................................................................................................................ |
143 |
|
|
8.2.11 DVD (Brands O - Z)............................................................................................................................................. |
144 |
|
|
8.2.12 LD......................................................................................................................................................................... |
144 |
|
8.3 |
Specifications................................................................................................................................................................ |
145 |
|
8.4 |
Glossary ......................................................................................................................................................................... |
162 |
|
8.5 |
Index............................................................................................................................................................................... |
164 |
|
8.6 |
Trademarks, Licenses, & Patent Information ............................................................................................................. |
165 |
|
5
En
01 |
Introduction to the ELITE Series Flat Panel TVs |
1 Introduction to the ELITE Series Flat Panel TVs
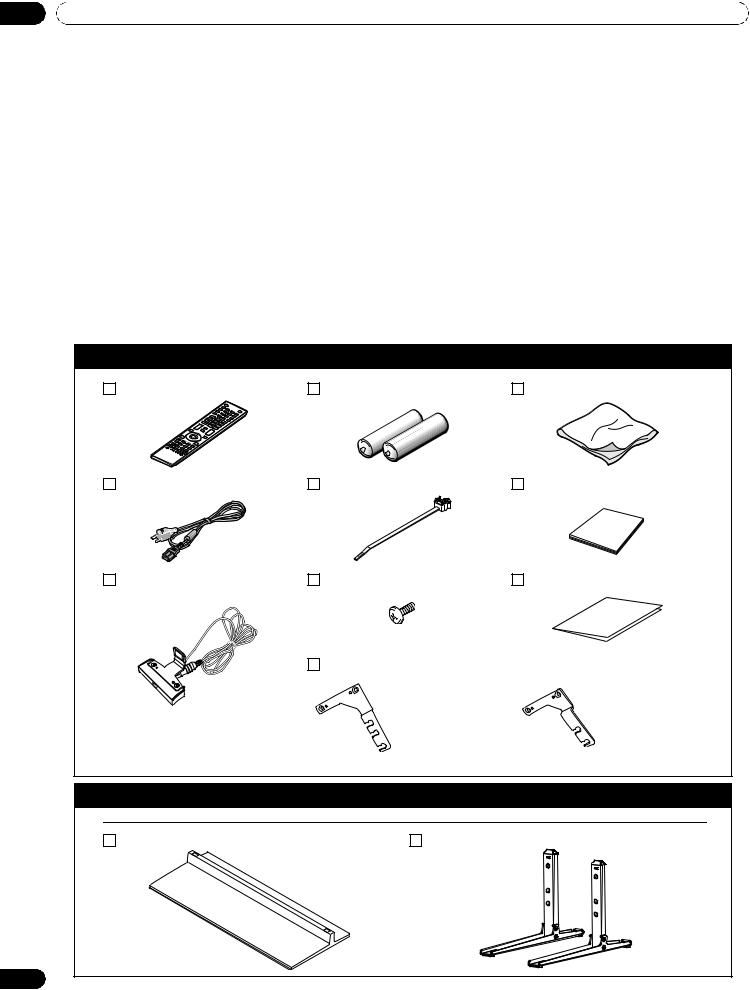
The Pioneer ELITE Series Flat Panel TV models include the 60-inch PRO-151FD and the 50-inch PRO-111FD (screen sizes measured diagonally). Below is a list of all accessories shipped with your panel. If an item is missing, please contact your dealer or our Service organization immediately. Service contact information is listed on the back of this manual.
1.1 Flat Panel TV Shipment Checklist
In addition to the flat panel TV, there are several accessories included to make installation quick and easy. Please check for contents before discarding or allowing your installer to discard any packing material.
The PRO-151FD and PRO-111FD shipments have slightly different pieces. Identify the accessories from the appropriate list below.
You will need a Philips screwdriver when mounting the speaker and attaching the stand.
Shipped with both models
Remote Control
Power Cord (2 m/6.6 feet)
Color Sensor
Batteries for Remote (2) |
Cleaning Cloth |
Cable Clamps (4) |
Operating Instructions |
Screws (x 2) (M5 x 8 mm) |
Warranty Card |
Color Sensor Bracket (when attached to the top right of the rear panel)
Bracket (for 60”) Bracket (for 50”)
Also shipped with the PRO-151FD (60” panel)
Stand kit
Base Cover |
Stand Pipes (2) |
6
En

Introduction to the ELITE Series Flat Panel TVs |
01 |
Also shipped with the PRO-151FD (60” panel)
Silver Screws (4) (4×10 mm) |
Falling Prevention Metal Fittings (2) |
Black Screws (4) (M6×20 mm) |
|
Light-Blocking Shield |
Screws to Metal Fittings (4) (M4×35 mm) |
Speaker accessories
Speaker Cables (2) |
Speaker Brackets |
for TOP-Right
for BOTTOM-Right
Speaker Mounting Screws (16) (M5×10 mm)
for TOP-Left
Speaker
for BOTTOM-Left
Also shipped with the PRO-111FD (50” panel)
Stand kit
Falling Prevention Metal Fittings (2) Screws to Metal Fittings(2) (M4×35 mm)
Speaker accessories
Speaker Cables (2) |
Speaker Brackets |
Speaker |
|
for TOP-Right |
|
for BOTTOM-Right
for TOP-Left
Speaker Mounting Screws (16) (M5×10 mm)
for BOTTOM-Left
7
En
01 |
Introduction to the ELITE Series Flat Panel TVs |
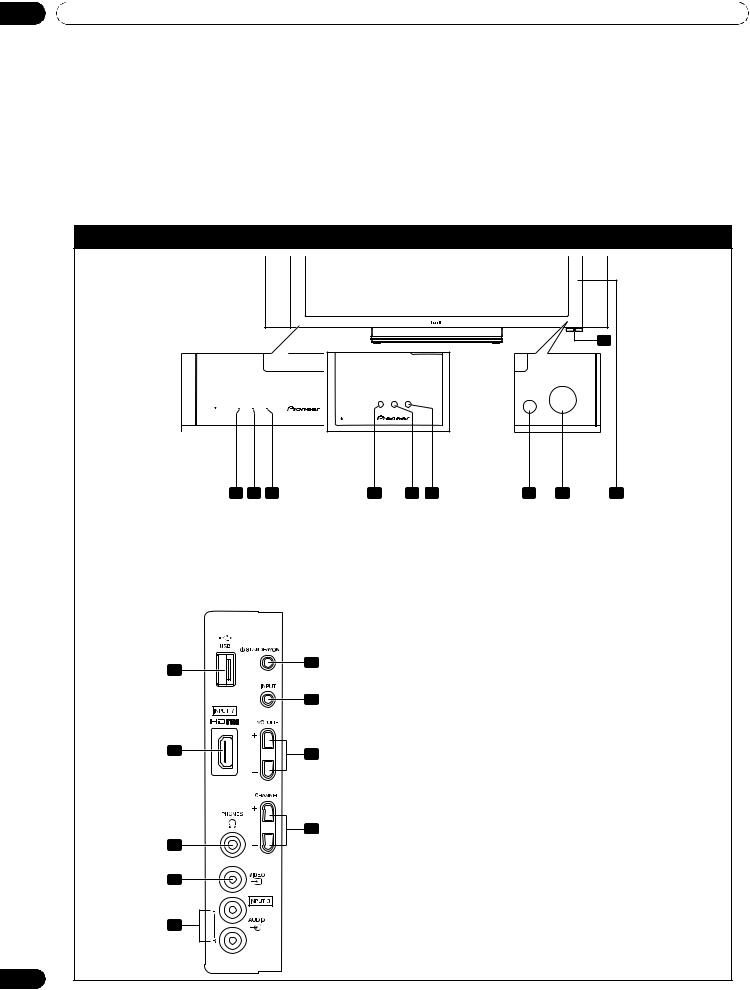
1.2 Control Options: Get to Know Your Flat Panel TV
You can operate your flat panel TV from the panel buttons or with the remote control. The following sections provide button locations/operations for the panel and the remote control.
1.2.1 Control Buttons and More on the Flat Panel TV
Your flat panel TV has buttons, indicators, and sensors on the lower front bezel with more buttons, toggles, and ports on the panel sides. Refer to the drawings below for specific locations and functions. Or, for the back ports and terminals only, check the terminal position sheet located near the panel’s terminal compartment to identify the various options.
ELITE Series Models: Face of Panel
6 |
(PRO-111FD) (PRO-151FD)
|
1 |
2 |
3 |
1 |
2 |
3 |
4 |
5 |
7 |
1 |
- Power ON indicator |
|
|
|
4 |
-Room Light sensor |
|
|
|
2 |
- STANDBY indicator |
|
|
|
5 |
-Remote Control sensor |
|
|
|
3 |
- SLEEP indicator |
|
|
|
6 |
-Color Sensor |
|
|
|
|
|
|
|
|
7 |
-Bezel (some call it the front frame) |
|||
Command Side of the Panel (left side)
13
8
14
9 |
15 |
16
10
11
8-USB terminal
9-INPUT 7 terminal (HDMI) 10 -PHONES terminal
11 -INPUT 3 terminal (Video)
12 -INPUT 3 terminals (Audio)
13 -STANDBY/ON button
14 -INPUT button
15 -VOLUME Up/Down buttons
16 -CHANNEL Up/Down buttons
12
8
En
Introduction to the ELITE Series Flat Panel TVs |
01 |
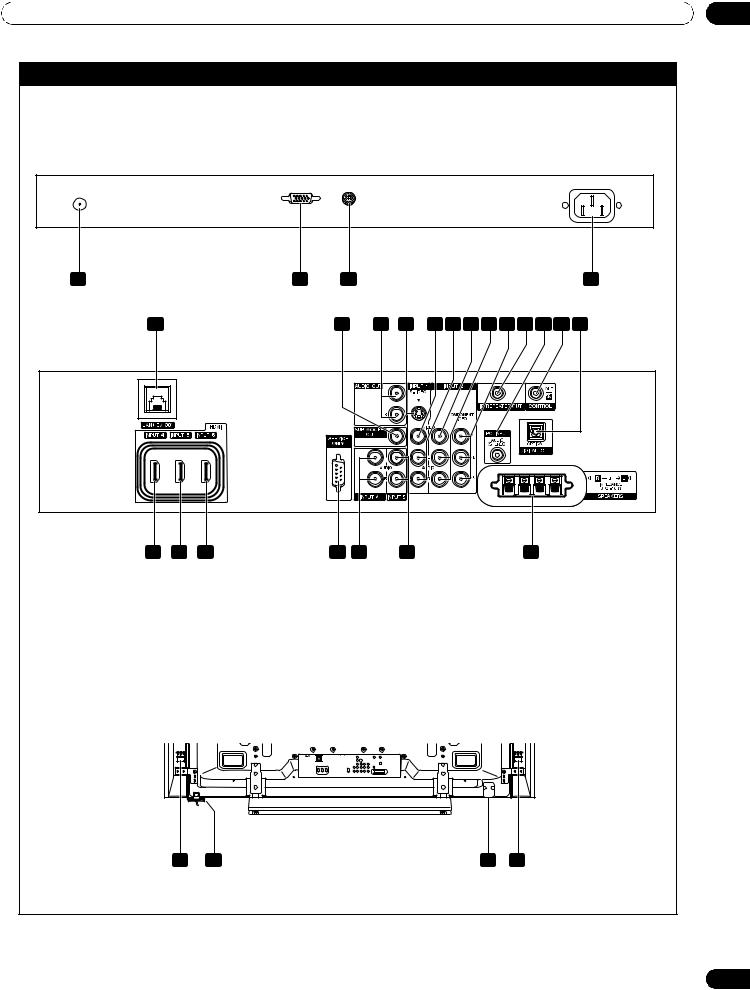
Back of the Panel
1- ANT terminal
2- PC Input terminal (Analog RGB)
3- Color sensor terminal
4- AC In terminal
(upper bank)
1 |
2 |
3 |
|
4 |
5 |
|
12 |
13 14 |
151617181920212223 |
(middle bank)
|
6 |
7 |
8 |
9 |
10 |
11 |
24 |
5 |
- Ethernet cable port |
|
|
|
15 |
-INPUT 1 terminal (Video) |
|
6 |
- INPUT 4 terminal (HDMI) |
|
|
16 |
-INPUT 1 terminals (Audio) |
||
7 |
- INPUT 5 terminal (HDMI) |
|
|
17 |
-INPUT 2 terminal (Video) |
||
8 |
- INPUT 6 terminal (HDMI) |
|
|
18 |
-INPUT 2 terminals (Audio) |
||
9 |
- RC-232C terminal (for factory use) |
|
19 |
-INPUT 2 terminals (Component, Y, PB, PR) |
|||
10 |
- INPUT 4 terminals (Audio) |
|
20 |
-IR REPEATER OUT terminal |
|||
11 |
-INPUT 5 terminals (Audio) |
|
21 |
-PC INPUT terminal (Audio) |
|||
12 |
-SUB WOOFER OUT terminal |
|
22 |
-CONTROL OUT terminal |
|
||
13 |
-AUDIO OUT terminals (Audio) |
|
23 |
-DIGITAL OUT terminal (Optical) |
|||
14 |
-INPUT 1 terminal (S-Video) |
|
24 |
-SPEAKERS (right/left) terminal |
|||
|
|
|
|
|
|
|
(PRO-151FD) |
(lower bank) |
25 26 |
|
27 28 |
|
25 |
-Speakers (R) terminal (speaker side) |
27 |
-Power On button |
|
26 |
-Color Sensor |
|
28 |
-Speakers (L) terminal (speaker side) |
Terminals on side and rear panels are common to both ELITE models.
9
En
01 Introduction to the ELITE Series Flat Panel TVs
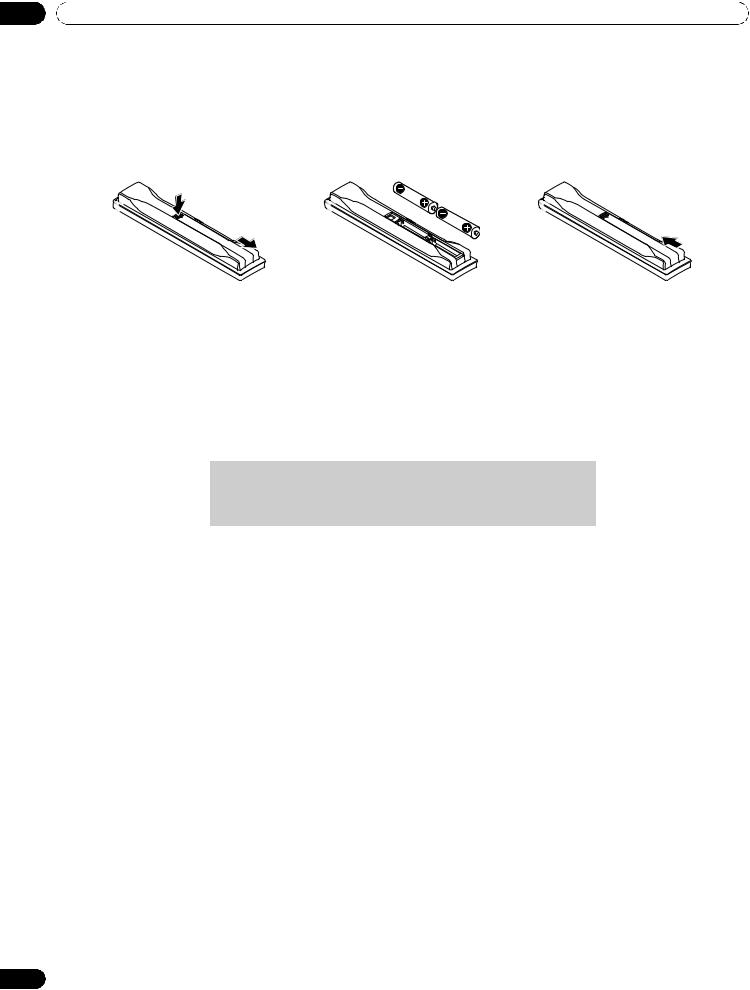
1.2.2 Operating the Remote Control
The remote control for the ELITE Series panels is a powerful tool. This section provides a brief introduction to your remote control while later sections explore more advanced operations.
Insert the Batteries into the Remote Control
To open push and slide the battery cover in the direction of the arrows.
Load the supplied two AA size batteries by the negative polarity (–) ends first.
The batteries supplied with this product may have a shorter life expectancy due to storage conditions. If the remote control seems to be failing or is weak, replace the provided batteries with new alkaline batteries. Never mix old and new batteries. Mixing old and new batteries can shorten the life of new batteries or cause
chemical leaks in old batteries. Also, mixing different types or brands of batteries can cause issues as batteries brands have slightly different characteristics.
Note: If the flat panel TV’s remote control is not needed for an extended length of time, remove the batteries.
When disposing of used batteries, please comply with governmental regulations or environmental public institution’s rules that apply in your country/area.
Remote Control Issues
There are several issues that can affect your remote control but the most common problem is weak batteries. Weak batteries in the remote control can cause communication to fail or only operate sporadically. In this situation, try moving closer to the panel and attempt to control the panel with the remote. If the panel responds then change the batteries. If moving closer has no effect on the panel, check the surroundings for objects that might be blocking the signal. Also consider other equipment with remote controls that are in the area around the panel. Objects and other IR signals can disrupt the remote. For more help with your remote control, refer to “6.1 Frequently Asked Questions (FAQs).”
10
En
Introduction to the ELITE Series Flat Panel TVs |
01 |
Operating Range for the Remote Control
To control the flat panel TV, point the remote towards the sensor on the panel’s bottom right corner. For easy operation, keep the distance between the remote control and the sensor less than 7 m (23 feet) and at an angle of less than 30 degrees.
30º |
7 m |
(23 feet) |
|
|
30º |
Sensor
The remote control may not work properly if the sensor is in direct sunlight or very bright lighting. If your viewing room is naturally bright, change the position of the panel or physically use the remote control closer to the panel’s sensor.
Note: If the remote control is left sitting in direct sunlight or under a very strong light, the case could warp or deform.
11
En
01 Introduction to the ELITE Series Flat Panel TVs
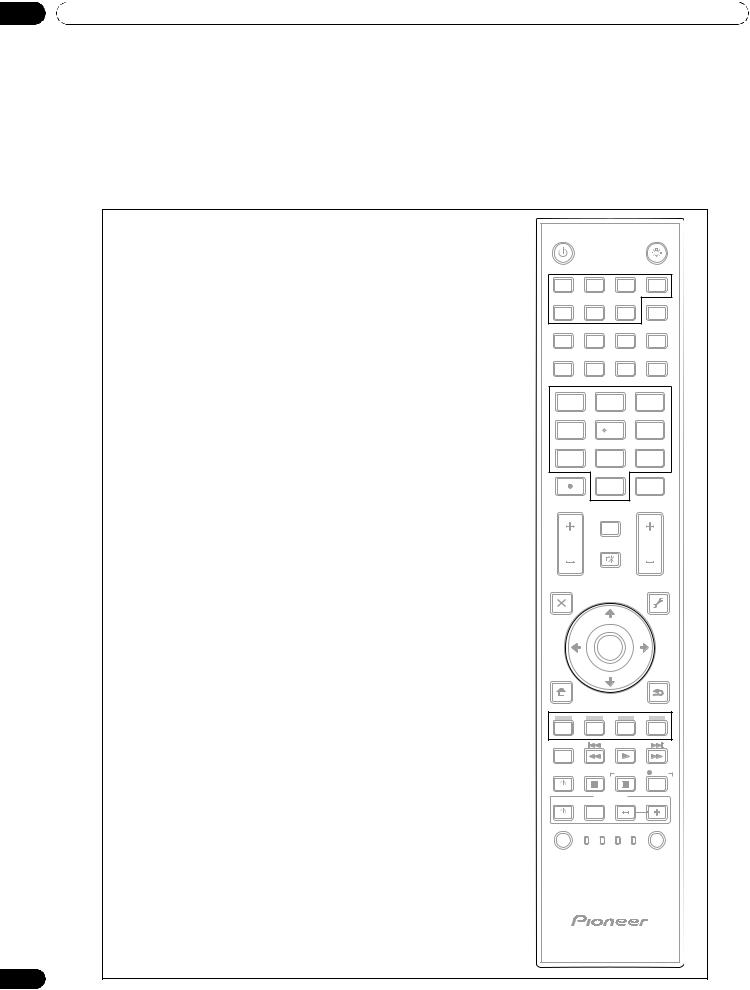
1.2.3 Buttons on the Remote Control
Except for a few options, commands available through the buttons on the flat panel TV are duplicated on the remote control. The remote control can be programmed to control other equipment such as a DVD Player, Surround Sound system, etc. A later section entitled “5 Use Other Equipment With Your Flat Panel TV” explains how to use the remote to control other equipment.
This section identifies and describes the buttons on the remote control.
Remote: Left side buttons (top to bottom, left to right)
TV : |
1 |
TV |
|
|
|
|
Turn On or place panel in Standby |
|
|
|
|
|
|
|
1 |
|
|
|
|
|
INPUT: |
2 |
|
|
|
|
|
|
INPUT |
|
|
|||
Select a source (INPUT 1 thru INPUT 7) |
|
1 |
2 |
3 |
|
4 |
PC: |
3 |
|
2 |
|
TV/DTV |
|
5 |
6 |
7 |
|
|
||
Select the PC terminal as an input source |
|
|
SELECTION |
DISPLAY |
SIZE |
|
|
|
3 |
AV |
|
|
SCREEN |
|
|
4 |
|
|
|
|
AV SELECTION: |
4 |
PC |
|
|
|
|
5 |
FREEZE |
|
|
|
||
Select audio/video settings |
|
6 |
SWAP |
|
SHIFT |
|
|
|
SPLIT |
|
|
||
AV Source: OPTIMUM, PERFORMANCE, MOVIE, |
|
|
|
|
|
|
PURE, GAME, SPORT, Standard |
|
1 |
2 |
|
|
3 |
PC Source: STANDARD, USER |
|
|
7 |
|
|
|
|
|
4 |
|
6 |
||
SPLIT: |
5 |
5 |
|
|
||
|
|
|
|
|
||
Cycle view thru single-screen, 2-screen, |
|
7 |
8 |
|
|
9 |
picture-in-picture |
|
8 |
0 |
|
|
CH |
|
|
|
|
|||
FREEZE: |
6 |
|
|
ENTER |
||
|
|
|
|
|
||
Freeze a frame from a moving image then |
|
|
CH RETURN |
|
|
|
press again to cancel the freeze function |
|
|
|
|
|
|
|
|
VOL |
MUTING |
|
CH |
|
Number buttons 0 thru 9: |
7 |
9 |
|
|
||
|
|
|
|
|
||
Select a channel |
|
|
|
|
|
|
•(dot): |
8 |
EXIT |
|
|
|
TOOLS |
SAT GUIDE |
|
|
|
|||
Enter a dot for selecting a sub-channel |
|
10 |
|
11 |
||
|
DVD |
|
||||
|
|
TOP MENU |
|
|||
|
|
|
|
|
|
|
VOL +/–: |
9 |
|
ENTER |
|
|
|
Set the volume |
|
|
|
|
||
|
|
|
|
|
|
|
EXIT: |
10 |
HOME |
|
|
|
RETURN |
MENU |
|
|
|
|||
Exit the menu to return to the normal screen |
|
12 |
|
|
|
|
|
|
SAT / DVD MENU |
|
|
|
|
Arrow buttons: |
11 |
|
13 |
|
|
|
Navigate the menu screens |
|
|
|
|
||
|
HDMI |
|
|
|
|
|
|
|
|
|
|
|
|
HOME MENU: |
12 |
CTRL |
|
|
|
|
14 |
|
|
|
|
||
Display the HOME MENU |
|
SOURCE |
|
STOP |
|
REC |
|
|
|
|
|
HMG |
|
|
|
|
|
|
|
|
Color buttons (Red, Green, Blue, Yellow): |
13 |
|
RECEIVER |
VOL |
||
|
|
|
|
|
||
Control a BD player for HDMI Control functions only |
|
|
INPUT |
|
|
|
|
SELECT |
|
|
|
EDIT/LEARN |
|
|
|
TV CBL |
DVD |
|||
HDMI CONTROL: |
14 |
15 |
|
|||
RCV SAT VCR DVR |
|
|||||
Select the HDMI Control functions |
|
|
|
|
|
|
SELECT: |
15 |
|
|
|
|
|
Select for TV/RCV, CBL/SAT, VCR, or DVD/DVR |
|
|
|
|
|
|
12
En

Introduction to the ELITE Series Flat Panel TVs |
01 |
Remote: Right side buttons (top to bottom, left to right)
TV |
|
|
|
|
16 |
: Lights up all buttons |
|
|
|
|
|
Lights turn off if no operations are performed within five |
|
|
|
|
|
16 |
|
|
|
INPUT |
|
|
seconds. This is used for remote control use in dark locations. |
||
|
|
|
|
|
||
1 |
2 |
3 |
|
4 |
17 |
TV/DTV: |
|
|
|
|
TV/DTV |
|
Select analog or digital TV channels |
5 |
6 |
7 |
|
17 |
18 |
DISPLAY: |
|
AV |
DISPLAY |
SCREEN |
|||
SELECTION |
SIZE |
|
Display the channel information |
|||
PC |
18 19 |
|
||||
FREEZE |
|
|
|
19 |
SCREEN SIZE: |
|
SPLIT |
|
SWAP |
|
SHIFT |
||
|
20 21 |
|
Select the screen size |
|||
|
|
|
|
|
|
|
1 |
2 |
|
|
3 |
20 |
SWAP: |
4 |
5 |
|
|
6 |
|
Switch between the two screens when |
|
|
|
viewing as 2-screen or picture-in-picture |
|||
|
|
|
|
|
|
|
7 |
8 |
|
|
9 |
21 |
SHIFT: |
|
|
|
|
|
||
|
|
|
|
CH |
|
Move the location of the small screen when |
|
0 |
|
|
22 |
|
|
|
|
|
ENTER |
|
viewing as picture-in-picture |
|
|
|
|
|
|
|
|
|
CH RETURN |
|
|
22 |
|
|
|
23 |
|
|
CH ENTER: |
||
VOL |
MUTING |
|
CH |
|
Change the channel |
|
|
|
25 |
|
|
||
|
24 |
|
|
23 |
CH RETURN: |
|
EXIT |
|
|
|
TOOLS |
|
Return to the previous channel |
|
|
|
|
|
||
SAT GUIDE |
|
|
26 |
24 |
MUTING: |
|
TOP MENU |
|
|
|
|||
|
|
|
|
|
Turn off the sound while the video continues to play |
|
DVD |
|
|
|
|
|
|
|
ENTER |
|
|
25 |
CH +/–: |
|
|
27 |
|
|
|
Cycle through channels |
|
HOME |
|
|
|
|
|
|
|
|
|
RETURN |
|
|
|
MENU |
|
|
|
26 |
TOOLS: |
|
|
|
|
|
28 |
||
SAT / DVD MENU |
|
|
|
|
Display the TOOLS Menu - refer to “3.6 Smart Starts for New |
|
|
|
|
|
|
||
|
|
|
|
|
|
Owners” |
HDMI |
|
|
|
|
27 |
ENTER: |
CTRL |
|
|
|
|
|
Execute a command |
|
|
STOP |
|
REC |
|
|
SOURCE |
29 |
|
30 |
28 |
RETURN: |
|
|
|
|
|
HMG |
|
|
|
RECEIVER |
VOL |
|
Return to the previous menu screen |
||
|
|
|
|
|
||
INPUT |
|
|
|
|
|
|
SELECT |
CBL |
|
|
EDIT/LEARN |
29 |
Player/Recorder Control: |
TV |
DVD |
|
Use buttons for control of connected equipment |
|||
RCV SAT VCR DVR |
|
|||||
|
|
|
|
|
30 HMG (Home Media Gallery): |
|
|
|
|
|
|
|
Display the Home Media Gallery menu |
|
|
|
|
|
|
Use this button to start recording (for VCR/DVD recorder only) |
13
En
02 Install Your Flat Panel TV
2 Install Your Flat Panel TV
There are several installation options for your flat panel TV. This chapter walks you through how to choose an installation site, the best mounting methods, and how to install your panel.
2.1 Choose a Location and the Mounting Method
Your flat panel TV is very thin. The panel needs a solid surface and some sort of support structure (a stand, table, etc.) to protect it from being tipped over or knocked down. Use installation accessories and parts included with the shipment. Pioneer recommends working with a qualified installer whenever possible.
Regardless of the mounting method, anchor or secure your flat panel TV using a combination of the mounting holes and/or supplied bolts.
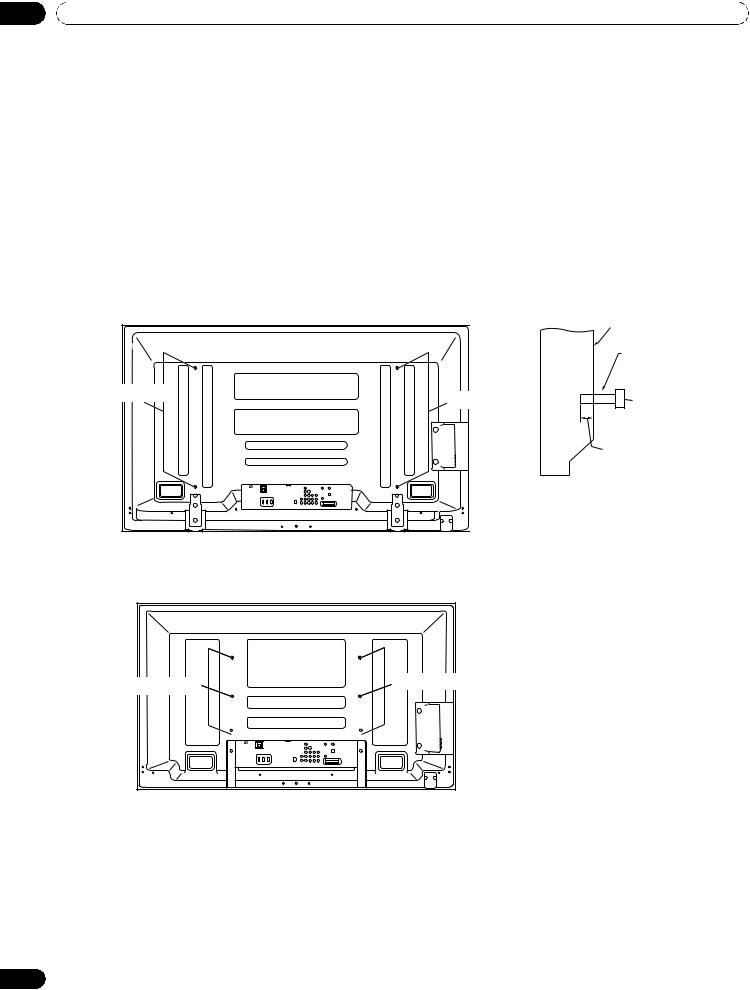
Rear view (PRO-151FD) |
|
Side view |
|
Mounting surface |
|
|
|
|
|
|
Mounting |
|
|
bracket (or |
|
|
equivalent item) |
Mounting hole |
Mounting hole |
M8 screw |
|
||
|
|
12 mm to 18 mm |
|
|
(0.5 inches to |
|
|
0.7 inches) |
Rear view (PRO-111FD)
W |
W |
Mounting hole |
Mounting hole |
|
|
W |
W |
T T
 W W
W W 
Note: Some installation options require a different type of bolt. Check with your installer or dealer to purchase the appropriate bolt(s).
14
En
Install Your Flat Panel TV |
02 |
2.1.1 Check the Location for Suitability
When choosing the location for your panel, there are several factors you need to keep in mind. The installation site should be out of direct sunlight and have sufficient ventilation around the flat panel TV to allow cooling. The diagram below is an example of a stand-mounted panel with proper ventilation.
|
|
|
|
|
|
|
Over 50 cm |
|
||
|
|
|
|
|
|
|
||||
|
|
|
|
|
|
|
(19 11/16 inches) |
|||
Over |
|
|
|
|
|
|
|
|
||
|
|
|
|
|
|
|
|
|||
10 cm |
|
|
|
|
|
|
|
The distance behind and above the panel |
||
(3 15/16 |
|
|
|
|
|
|
|
|||
|
|
|
|
|
|
|
changes depending on your choice of mount. |
|||
inches) |
|
|
|
|
|
|
|
|||
|
|
|
|
|
|
|
|
|
|
Consult with your dealer or professional |
|
|
|
|
|
|
|
|
|
|
installer for proper ventilation. |
|
|
|
|
|
|
|
|
|
|
|
|
|
|
|
|
|
|
|
|
|
|
|
|
|
|
|
|
|
|
|
|
|
|
|
|
|
|
|
|
|
|
|
|
|
|
|
|
|
|
|
|
|
|
|
|
|
|
|
|
|
|
|
|
|
|
Use the checklist below to judge possible installation sites.
Sufficient ventilation |
No danger of power overloads |
Safe from excessive vibrations |
Separate from other IR equipment |
Away from air conditioners |
Protected from hits or shocks |
Free of moisture or dampness |
Distance from heat sources |
No danger of splashing water |
Out of direct sunlight |
Route cords and cables safely |
Away from strong lighting sources |
For specific cautions and safety information, refer to “7.2 Physical Location & Temperature Considerations” and “7.7 Safety Precautions.”
2.1.2 Lift and/or Move Your Panel (the How To’s)
This flat panel TV is built for endurance but because of the technology, the panel must be handled with care. Use the handles attached to the rear of the flat panel TV to lift the unit. To avoid flexing or twisting the unit, you need at least two people to lift and move the panel. Do not move the flat panel TV by holding only a single handle or by dragging the panel by its handles.
Use the handles to move the panel. Do not move the panel by holding the color sensor, speaker or speaker brackets.
Note: Do not use the handles to hang the flat panel TV or as anchors to prevent the panel from slipping or tipping
after it is mounted.
15
En
02Install Your Flat Panel TV
2.2Install the Panel Using a Stand
2.2.1 Use or Remove the Included Stand
The PRO-111FD ships with the Pioneer table top stand (stand) attached. Attach the included stand to the panel for the PRO-151FD. For PRO-111FD, attach the falling prevention metal fittings after placing the panel to stand upright.
(PRO-111FD)
Installation screws (M4 × 35 mm: black)
Falling prevention metal fitting
Attach the Stand to the Panel
Do not handle the flat panel TV on a wagon or pallet that is smaller than its stand. The stand will bend.
1 ) Detach the speaker if it has already been added.
Refer to “Attach/Detach the Speaker” on page 19 for assistance.
2 ) Lay the flat panel TV down on a raised surface with the stand base hanging over the edge.
3 ) Place all stand parts on a soft cloth to avoid scratching.
If you are mounting the PRO-151FD continue with Steps 4 and 5. If you are mounting the PRO-111FD skip to Step 7.
4 ) Turn the base cover over so that the bottom is facing up. 5 ) Insert the stand supports (legs) into the base cover.
Please carefully install the supports (left and right) so that they are in the correct positions. Misaligned supports can damage the base and/or the supports.
6 ) Tighten the base screws to lock the supports in to place.
Screws
(4 x 10 mm: silver)
Screws
(4 x 10 mm: silver)
Rear
|
Front |
|
|
Completed |
|
|
stand |
|
|
Sheet |
Base cover |
|
|
|
|
Note: Assemble the stand with a soft sheet placed under the base cover. If a sheet is not laid before assembly, |
|
16 |
the front surface of the base cover may be scratched. |
|
|
|
|
En
Install Your Flat Panel TV |
02 |
7 ) After assembling the stand, attach the falling prevention metal fittings using the installation screws.
(PRO-151FD)
Installation screws (M4 x 35 mm: black)
Falling prevention metal fitting
8 ) With the flat panel TV still face down, insert the stand’s supports into the bottom of the panel then tighten the screws.
Line up the column supports with |
Installation bolts |
Installation bolts |
the bottom of the flat panel TV. |
(M6 x 20 mm) |
(M6 x 20 mm) |
Insert the stand supports into the flat panel TV so that the arrow marked “FRONT/FACE AVANT” on the bottom of the stand points down.
9 ) With the assistance of at least one other person, lift the panel upright then move it in to position.
17
En
02 Install Your Flat Panel TV
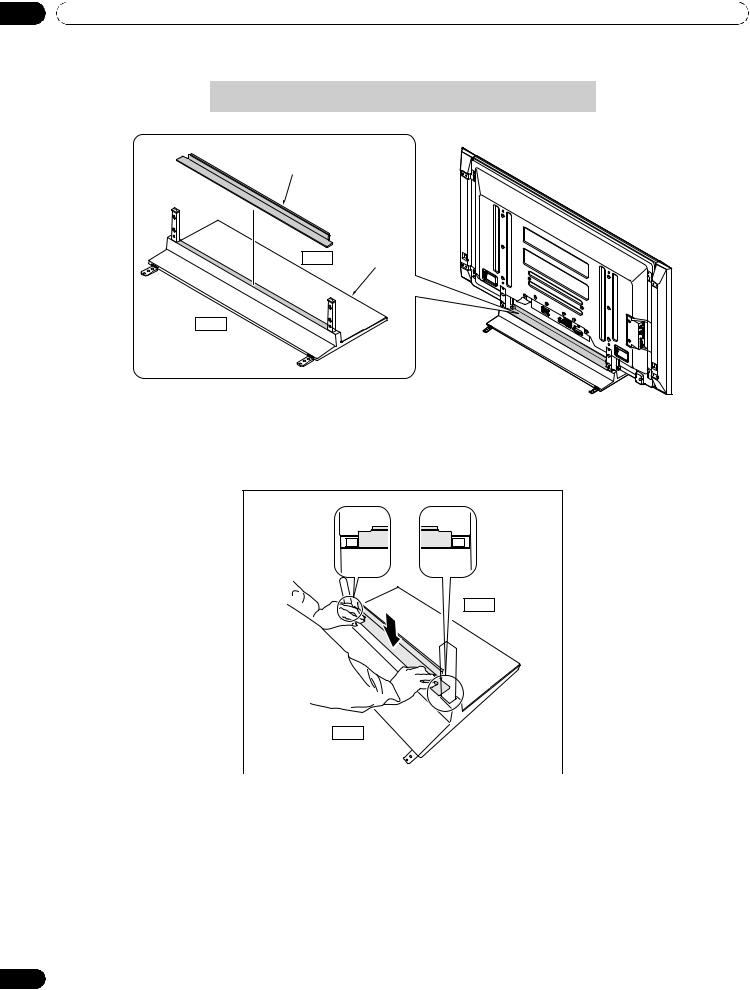
Attach the Light-Blocking Shield
Conduct after attaching the flat panel TV onto the stand.
Light-blocking shield
Front |
Base cover |
Rear
Note: Attach the light-blocking shield after anchoring the base cover on a flat stable place.
Peel off one side of the double-stick tape on the light-blocking shield and attach the shield onto the base cover.
Front
Rear
Note: Be careful that the light-blocking shield does not catch on the pipe insertion holes. Anchor the lightblocking shield so that there are no gaps. If there is a gap, the light-blocking shield may peel off.
18
En
Install Your Flat Panel TV |
02 |
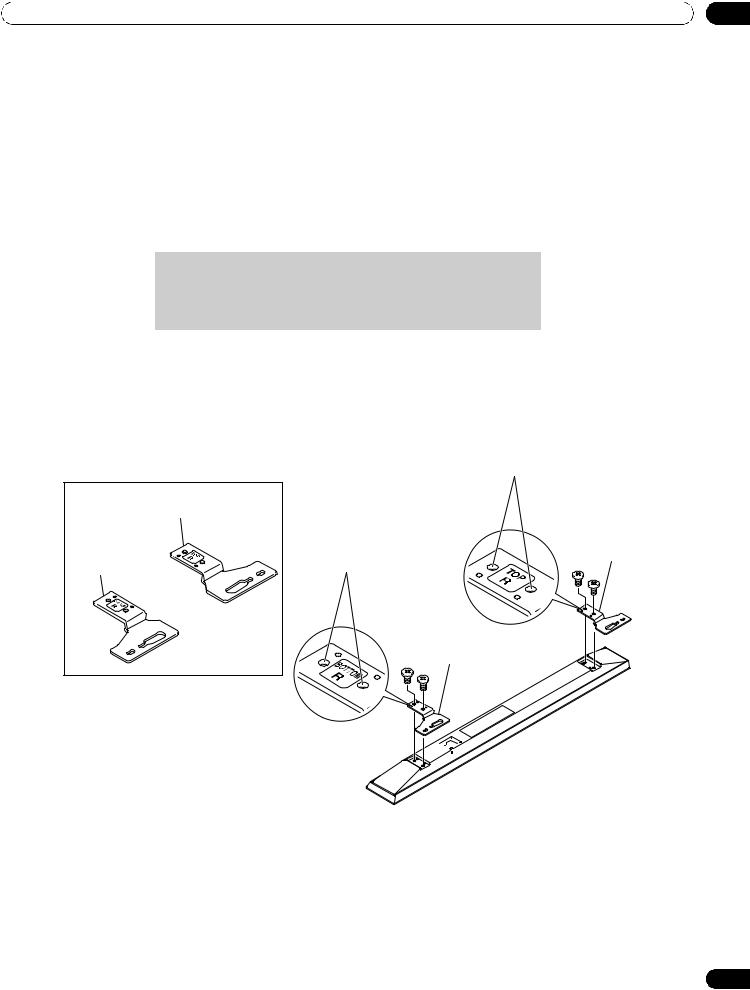
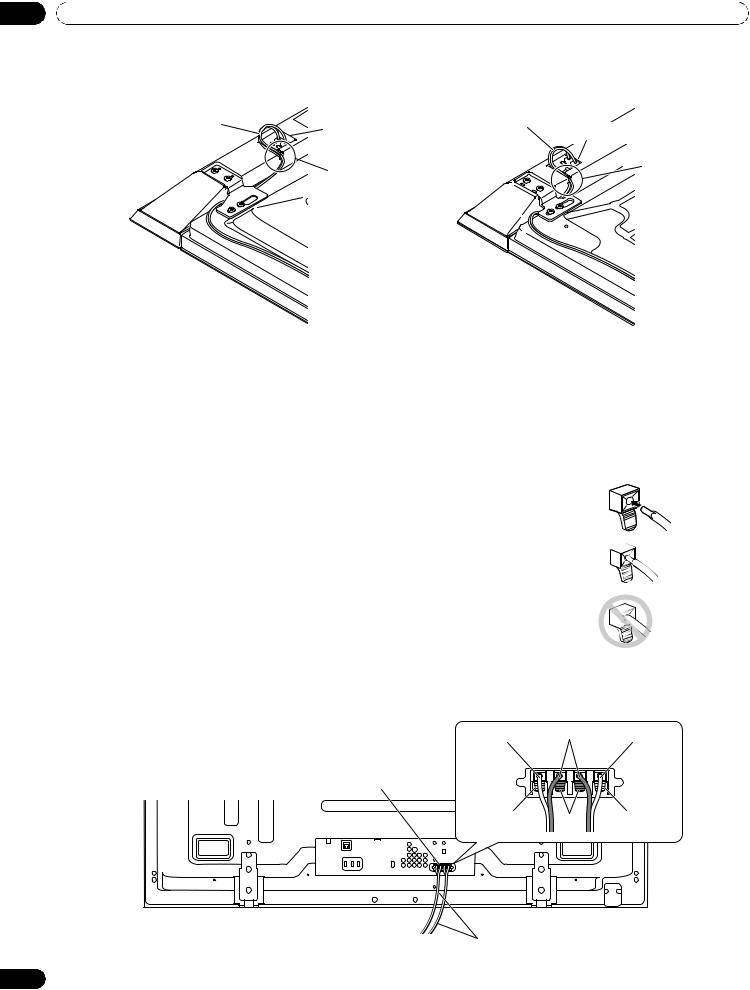
Attach/Detach the Speaker
The flat panel TV’s speaker delivers high-quality, clear sound. Although other devices can be added or removed from the mounted panel, physically attach the speaker last. Disconnect the cables from the Speaker and REMOVE THE SPEAKER before mounting or moving the panel.
Before attaching the speaker to your mounted panel, review the information below.
•Lay the panel face down on a stable surface when attaching speaker brackets.
•Use only the supplied screws and tighten securely before stepping away.
•Handle the speaker carefully to protect the cabinet and grille net from scratches and other damage.
•Placing a CRT monitor near the speaker can cause a blur on the flat panel TV. Keep the distance between the speaker and the monitor.
•Connecting these speakers to another panel or device can damage the unit or cause a fire.
•When using tone control to increase treble, avoid overamplifying the volume.
Note: Use the foam packing materials to protect the equipment from scratches or other damage during mounting.
Stand-Mounted Panel
1 ) Attach the appropriate speaker brackets (left and right) to the top and bottom on the back of the speakers using the supplied screws.
Screw holes
(PRO-151FD)
Speaker bracket (For TOP-Right)
Speaker bracket |
Speaker bracket |
(For TOP-Right) |
|
(For BOTTOM-Right) |
Screw holes |
|
Speaker bracket (For BOTTOM-Right)


 Place the speaker so its terminals (bottom) are facing you.
19
En
02 Install Your Flat Panel TV
(PRO-111FD) |
Screw holes |
|
|
Speaker bracket (For TOP-Right) |
|
|
Speaker bracket |
Speaker bracket |
(For TOP-Right) |
(For BOTTOM-Right) |
Screw holes |
Speaker bracket (For BOTTOM-Right)


 Place the speaker so its
terminals (bottom) are facing you.
2 ) Screw a supplied screw into the speaker bracket hole (lower of the two) at the top, rear of the panel.
Do not tighten it all the way yet. Leave it loose, with about 5 mm left to tighten.
Speaker |
Top, rear of |
mounting |
|
hole |
flat panel TV |
|
Top of flat panel TV |
|
5 mm |
Leave a space of about 5 mm
20
En
Install Your Flat Panel TV |
02 |
3 ) Hang the speaker bracket on the screw at the top by passing the wide part over it and lowering into the slot; screw in the lower screw temporarily.
After passing the wide part of the hole of the speaker bracket (top) over the screw, lower the speaker onto it.
(PRO-151FD) |
(PRO-111FD) |
After passing the wide part of the hole over the screw, lower the speaker.
Tighten with the provided screw the bottom speaker bracket to the flat panel TV temporarily (one place bottom). 
After passing the wide part of the hole over the screw, lower the speaker.
Tighten with the provided screw the bottom speaker  bracket to the flat panel
  TV temporarily (one place
  bottom).

4 ) Adjust the position of the speaker then tighten the upper and lower screws firmly.
5 ) Tighten the two screws at the top and bottom for each speaker.
(PRO-151FD) |
(PRO-111FD) |
6 ) Pass the supplied speaker cable between the speaker and the panel (below the speaker bracket) from below.
7 ) Connect the speaker cables to the speaker.
Refer to “ 2.2.2 Connect the Speaker Cables.”
21
En
02 Install Your Flat Panel TV
8 ) Insert the cable in the groove on the speaker.
|
(PRO-151FD) |
(PRO-111FD) |
Speaker cable |
Speaker |
Speaker cable |
|
terminal |
Speaker terminal |
|
|
|
|
Insertion |
Insertion |
|
in groove |
|
|
in groove |
|
9 ) Connect the other end of the speaker cables to the rear of the panel.
Refer to “ 2.2.2 Connect the Speaker Cables.”
Note: If the speaker needs to be repositioned (horizontally or vertically) after it is attached, loosen the speaker mounting screws first. Adjust the position then retighten the screws.
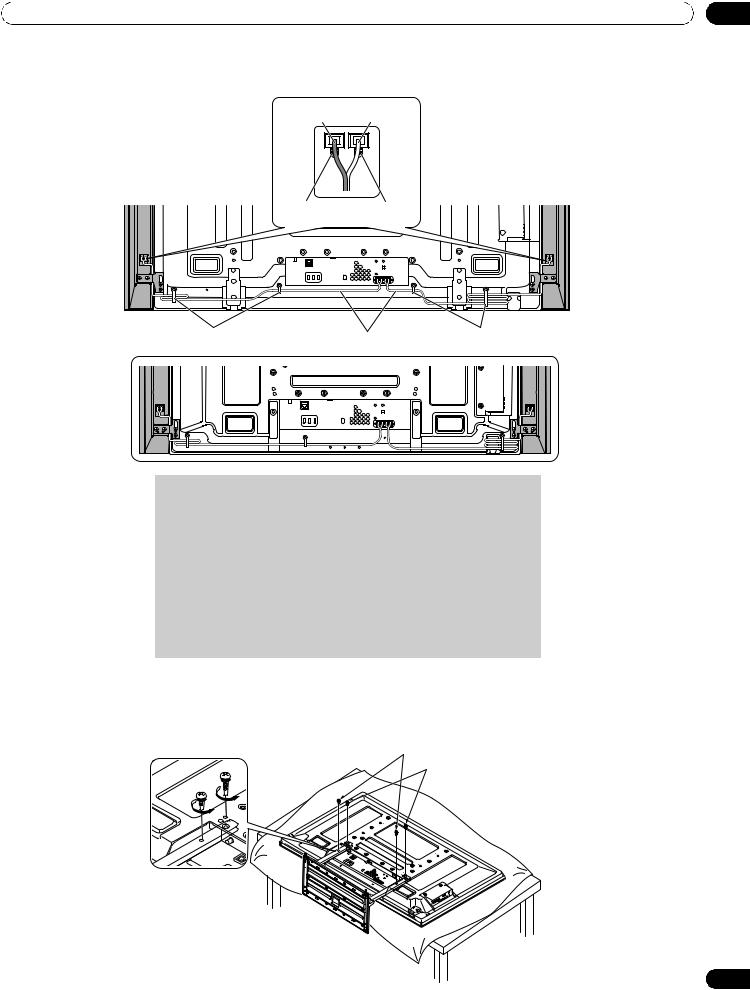
2.2.2 Connect the Speaker Cables
1 ) Press down on the tab.
2 ) Insert the appropriately colored wire into the opening.
3 ) Allow a small percentage of the cable’s bare wire to remain visible.
4 ) Release the tab to clamp the wire.
If the bare wire is hidden when the tab is released, repeat Steps 1 through 4 until the proper amount of cable is showing.
5 ) Repeat this process for each cable, matching the color of the wire to the appropriate terminal.
6 ) Connect the speaker cables to the speaker.
7 ) Bundle the speaker cables, power cord and other cables in the cable clamp then insert the clamp into an appropriate hole on the rear of the flat panel TV.
Refer to “2.7 Route then Bundle the Power Cord and Cables.” Use the clamps as necessary (see page 33).
tab 


Gray |
Black |
Gray |
Speaker terminal
Red |
Black |
Red |
|
|
(PRO-151FD)
Speaker cable
22
En
Install Your Flat Panel TV |
02 |
PRO-151FD with the speaker installed
Black Gray
Black Red
Cable clamp |
Speaker cable |
Cable clamp |
(PRO-111FD)
•Before connecting the speakers to the flat panel TV, unplug the panel from the power outlet. Connecting the speaker cable with the power cord plugged in can cause malfunction or damage to the panel if the cable’s bare wire touches other equipment. Plug in the power cord after connecting the speakers.
•Do not leave speaker cable wires bare and exposed at the terminals. Exposed wires can result in an electrical short causing malfunction or damage to the system.
•Do not connect any devices to the speaker terminals other than the speakers specified.
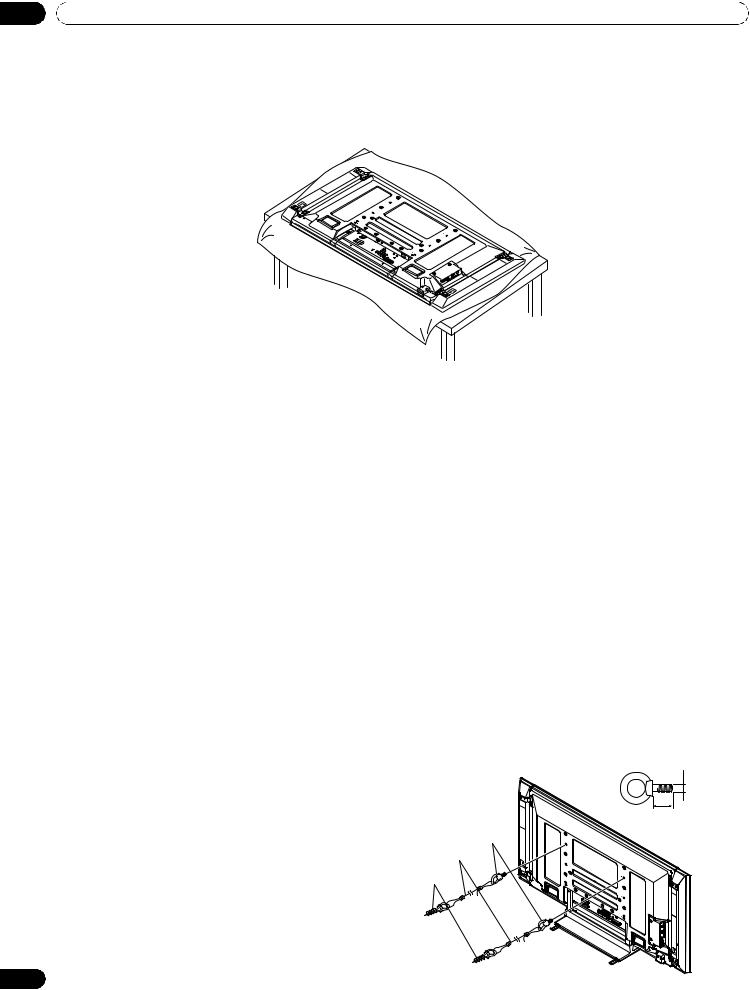
2.3Wall/Ceiling Mounting
Lay the 50” panel down on a raised surface then remove the stand.
Installation bolts (1)
Installation bolts (2)
23
En
02 Install Your Flat Panel TV
A common flat panel TV mounting option is to hang the panel on a sturdy wall or from a reinforced ceiling. When mounting in this way, some preparations must be completed first. Follow the steps below to prepare the panel for mounting.
1 ) Attach the speaker brackets to the speaker (see page 19). 2 ) Attach the speaker to the panel (see page 21).
(PRO-111FD)
3 ) Connect the speaker cables to the speakers then to the panel (see page 22).
4 ) Connect cables for any other devices to the panel.
When deciding on a location for your flat panel TV, consider other equipment in the room. Equipment such as a DVR, Receiver, VCR, etc. requires some way to communicate with the panel, either directly or through another device. Review the instructions that came with the other equipment for available ports and terminals.
After deciding which ports and terminals are needed, mark the connections on the flat panel TV for easier identification once the panel is mounted.
5 ) Temporarily bundle loose cables with rubber bands (not included).
6 ) Plug the flat panel TV’s power cord in to the panel but do NOT plug in to the power outlet.
7 ) Follow installation directions provided with your selected wall/ceiling mount.
For details, refer to the operating instructions supplied with the wall/ceiling mount unit.
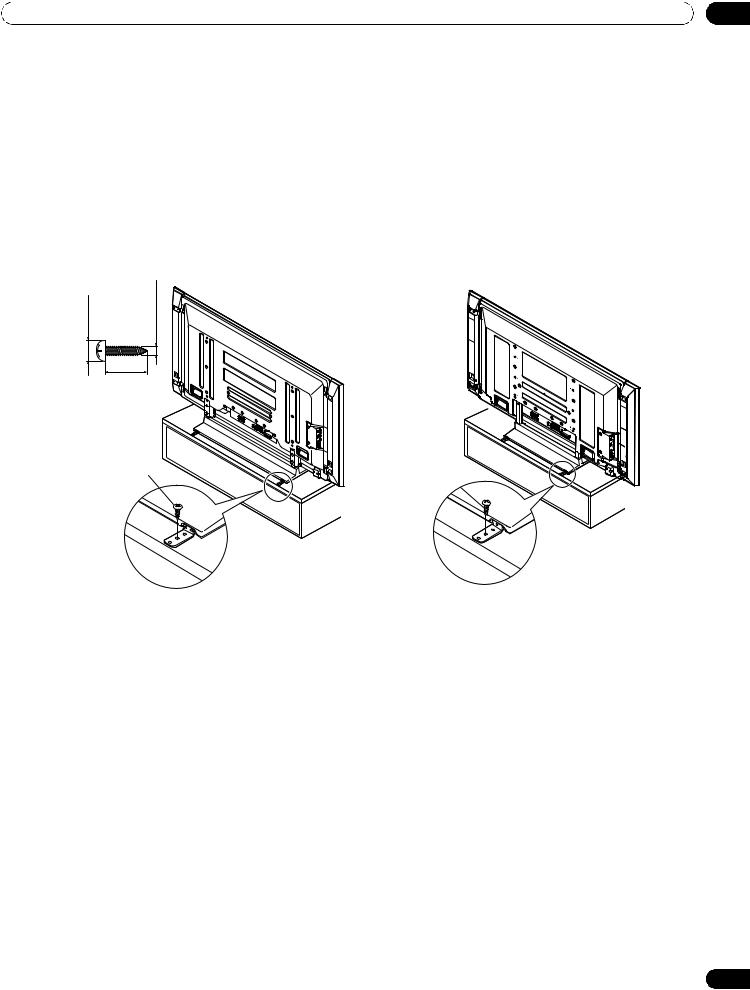
2.4 Mount the Flat Panel TV
Because your flat panel TV is slim but heavy, have at least two people mount and/or position the panel. The following sections provide instructions for the different mounting and anchoring options.
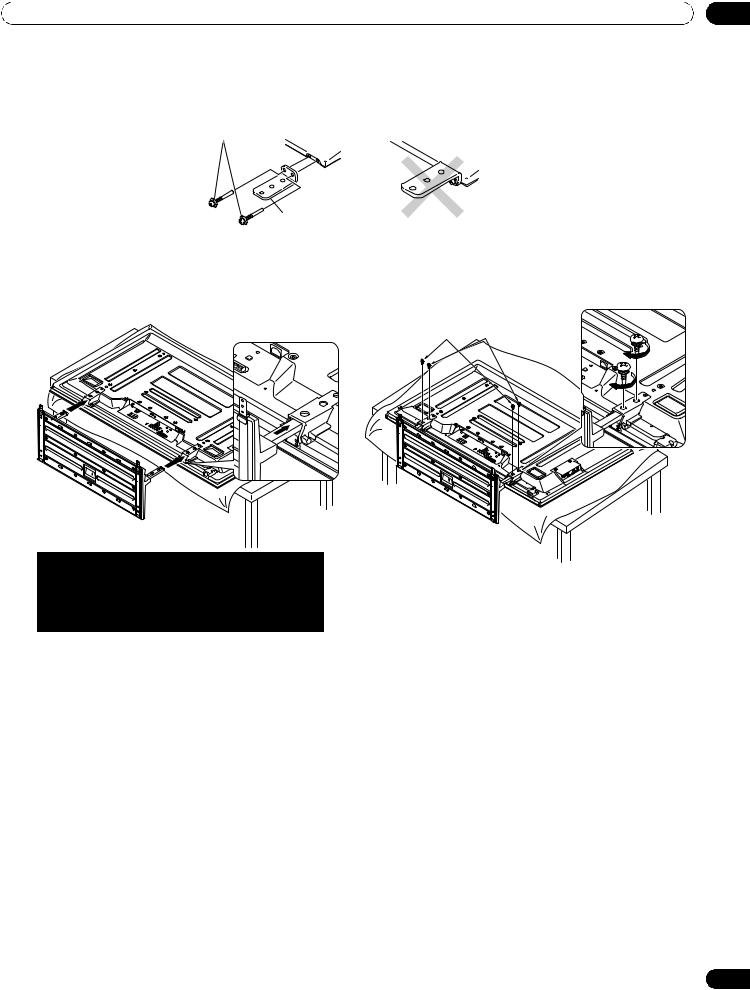
Anchor the Panel When Using a Stand
When using a stand, stabilize the panel to keep it from tipping over. Please use the supplied metal fittings and screws to anchor the panel to a wall or other solid support structure.
Another option is to purchase hooks, cords, and fittings through your installer or from your local hardware store. The hardware size and strength depends on the composition and thickness of the anchoring surface.
Recommended hook: Nominal diameter 8 mm (3/8 inch), length 12 mm to 18 mm (0.5 inches to 0.7 inches)
To anchor the panel when using the provided stand, follow the steps below.
1 ) Attach the hooks to the mounting holes on the back of the panel.
2 ) Sink the fittings into the wall or support structure.
3 ) Run cords between the hooks and the fittings.
4 ) Tighten the cords until the panel is anchored but not pulled off balance.
M8
12 mm to 18 mm
(0.5 inches to 0.7 inches)
1. Hook
2. Cord
Fitting
24
En
Install Your Flat Panel TV |
02 |
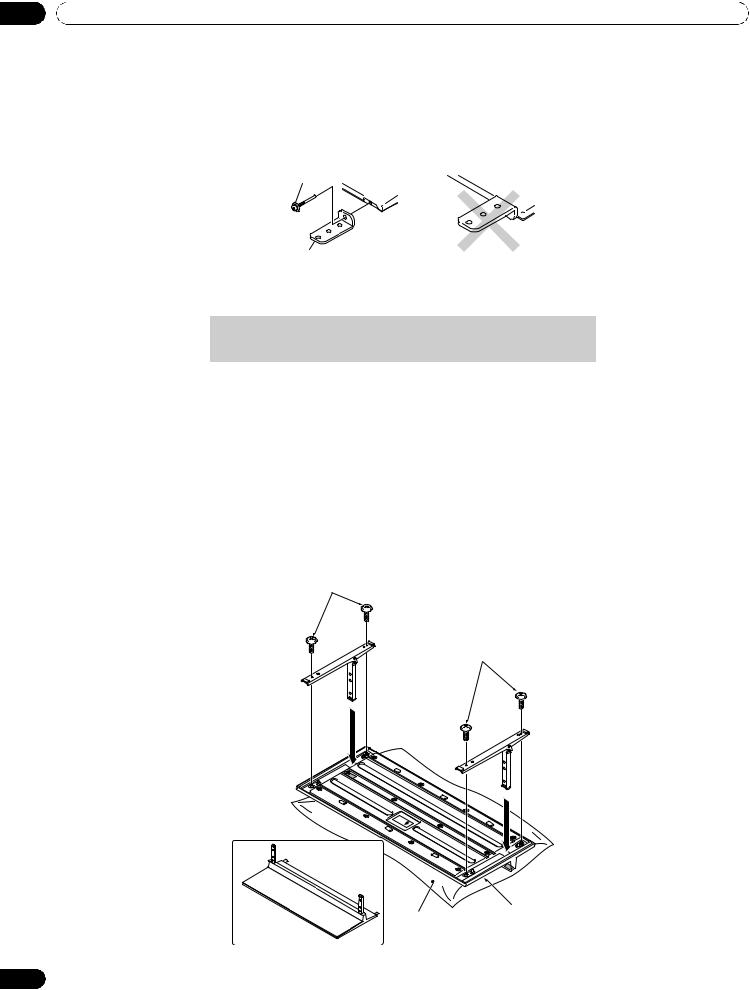
To stabilize the flat panel TV on a table or platform, use the supplied metal fittings and screws as well as commercially available wood screws. The wood screws are to anchor the metal fittings when mounting on a wooden surface. These screws should have a nominal diameter of 4 mm (5/32 inch) and are at least 20 mm (13/ 16 inch) long.
Notes: Avoid moving the table after the panel is attached.
Do not use bare wires for the cord. If any part of the wire is introduced into the ventilation port on the back of the display panel, fire or electrical shock could result.
Follow the steps below to secure your flat panel TV.
1 ) Mark locations for metal fittings and screws on the back edge of the table using the panel stand to determine placement.
8 mm to 15 mm (3/8 inch to 5/8 inch) |
4 mm (5/32 inch) |
20 mm (13/16 inch) min.
Wood screw (commercially available, 4 mm x 20 mm (5/32 inch x 13/16 inch) min.)
(PRO-151FD) |
(PRO-111FD) |
Wood screw (commercially available,
4 mm x 20 mm (5/32 inch x 13/ 16 inch) min.)
2 ) Drill holes in the table or platform edge at the marked locations.
3 ) Lift panel into place with the assistance with at least one other person.
4 ) Use wood screws (not included) to secure the metal fittings to the table.
25
En
02 Install Your Flat Panel TV
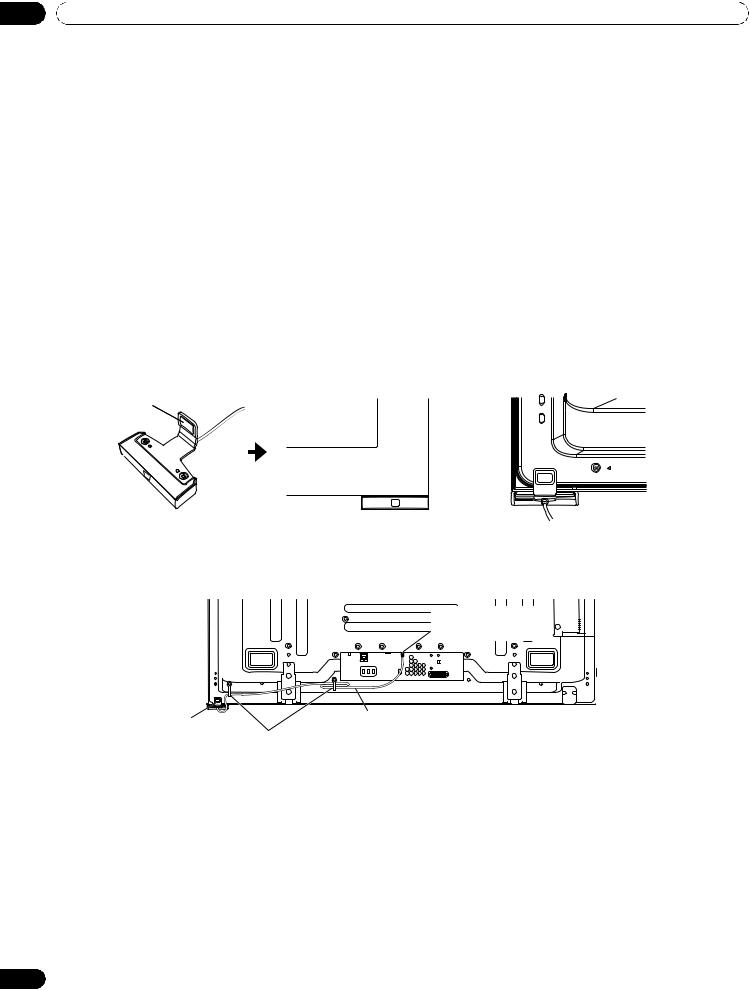
2.5 Attach the Color Sensor
When attached to your panel, the color sensor analyses the brightness of the environment to automatically optimize the picture quality according to the viewing condition. To activate this function, select OPTIMUM on the AV Selection menu, Mode 1 or Mode 2 on the Room Light Sensor menu (refer to “3.4.1 Adjust the Picture for Your Room Lighting.”
We strongly suggest you attach the color sensor to the bottom right of the front panel. It can be attached to the rear of the panel, but the color sensor may not operate properly depending on the conditions (refer to the Important bullets on page 28). For the actual procedure, follow the directions below.
Note: Do not connect any other external device, such as a keyboard to the color sensor terminal. Do not connect the color sensor cable to a PC.
To clean the sensor window, gently wipe with the supplied cleaning cloth. Do not use extension cables for the color sensor.
Do not disassemble or modify the color sensor.
Attach the Color Sensor to the Front Panel (recommended)
This is a simple and easy-to-attach method using a magnet.
1 ) Attach the color sensor at the bottom right of the front panel using a magnet.
Flat panel TV
Magnet
(Front) |
Color |
(Rear) |
|
sensor |
|||
|
|
2 ) Attach the color sensor along the bottom edge of the front panel flush with the right side.
3 ) Connect the cable to the color sensor terminal on the rear upper bank but do NOT plug in to the power outlet.
Color sensor terminal (upper bank)
Color sensor |
Color sensor cable |
|
Cable clamp |
||
|
Note: Use the cable clamps as necessary.
26
En
Install Your Flat Panel TV |
02 |
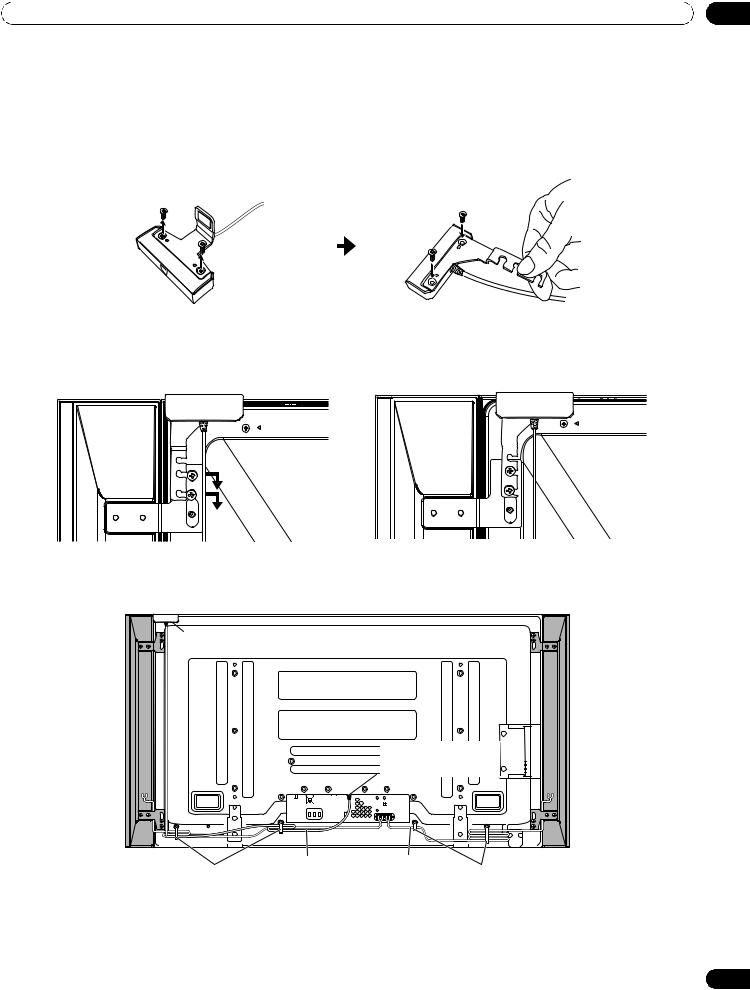
Attach the Color Sensor to the Rear Panel
Methods of attaching the color sensor to the rear panel differ depending on the panel with or without sidemounted speakers.
(when side-mounted speakers are installed)
1 ) Remove the screws of the color sensor then replace the bracket.
Use the removed screws again.
(Bracket for PRO-151FD)
2 ) Loosen the upper two (2) speaker bracket screws.
3 ) Fit the color sensor bracket’s lower grooves into the screws.
Adjust the color sensor/speaker bracket positions so as to stay in place.
The bracket is for PRO-151FD panel but the procedure is the same for PRO-111FD.
4 ) Fasten the screws.
5 ) Connect the cable to the color sensor terminal on the rear upper bank but do NOT plug in to the power outlet.
Color sensor
Color sensor terminal (upper bank)
|
|
|
|
|
|
|
|
|
|
|
|
|
|
|
|
|
|
|
|
|
|
|
|
|
|
|
|
|
|
|
|
|
|
|
|
|
|
|
|
|
|
|
|
|
|
|
|
|
|
|
|
|
|
|
|
|
|
|
|
|
|
|
|
|
|
|
|
|
|
|
|
|
|
|
|
|
|
|
|
|
|
|
|
|
|
|
|
|
|
|
|
|
|
|
|
|
|
|
|
|
|
|
|
|
|
|
|
|
|
|
|
|
|
|
|
|
|
|
|
|
|
|
|
|
|
|
|
|
|
|
|
|
|
|
|
|
|
|
|
|
|
|
|
|
|
|
|
|
|
|
|
|
|
|
|
|
|
|
|
|
|
|
|
|
|
|
|
|
|
|
|
|
|
|
|
|
|
|
|
|
|
|
|
|
|
|
|
|
|
|
|
|
|
|
|
|
|
|
|
|
|
|
|
|
|
|
|
|
|
|
|
|
|
|
|
|
Color sensor cable |
Speaker cable |
|
||||||||||||||||||
|
|
|
Cable clamp |
|
|
|
|
|
Cable clamp |
|
|||||||||||||||||||||||
Notes: Do not loosen the screws at the bottom of the panel. When attached to the rear panel, the sensor window
points upward. |
|
If the color sensor attached to the rear panel does not operate properly, attach it to the front panel. |
|
Do not use the supplied screws when attaching the color sensor using the speaker brackets. |
|
The color sensor may become hot due to a heat emitted from the panel. When using it in a high- |
|
temperature environment, attach the color sensor to the bottom of the front panel. |
27 |
|
En
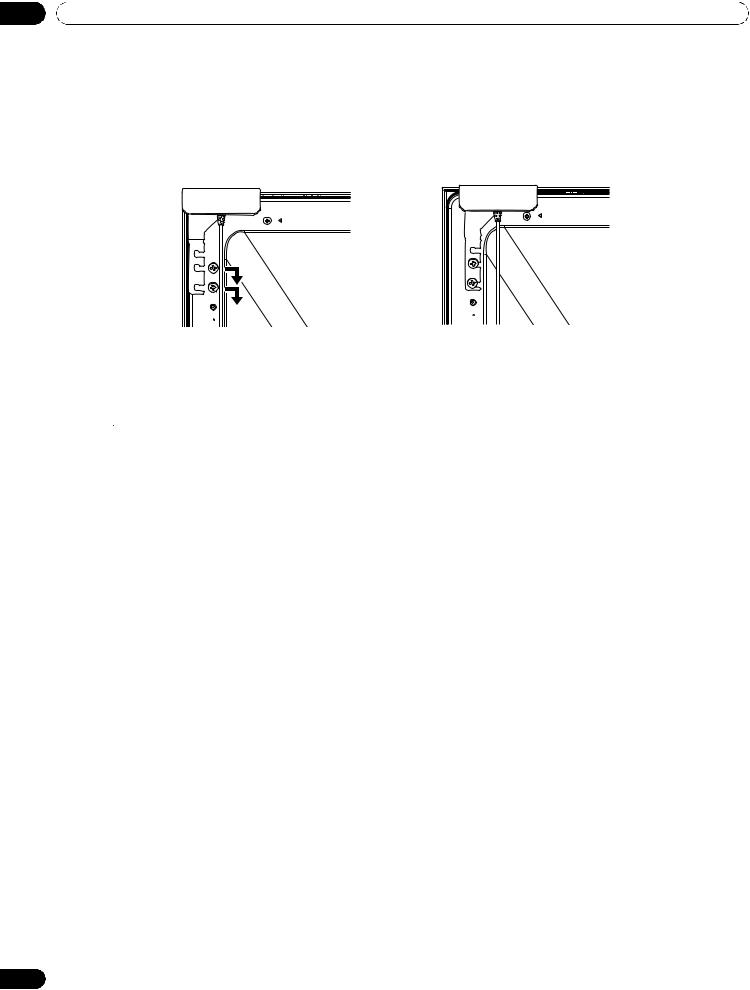
02 Install Your Flat Panel TV
(when side-mounted speakers are not installed)
1 ) Remove the screws of the color sensor then replace the bracket.
Use the removed screws again.
2 ) Finger tighten the supplied color sensor screws in the speaker screw holes.
3 ) Fit the color sensor bracket’s lower grooves into the screws.
Adjust the bracket position to stay in place.
The bracket is for PRO-151FD panel but the procedure is the same for PRO-111FD.
4 ) Fasten the screws.
5 ) Connect the cable to the color sensor terminal on the rear upper bank but do NOT plug in to the power outlet.
 Important
The color sensor may not operate properly:
•if attached by methods other than specified above
•if anything blocks light falling on the sensor window
•if light falls on only part of the sensor window
•if the light falling on the sensor window and the panel screen differs
Notes: If the color sensor attached to the rear panel does not operate properly, attach it to the front panel. The color sensor may become hot due to a heat emitted from the panel. When using it in a hightemperature environment, attach the color sensor to the bottom of the front panel.
Do not use the screws supplied for the speakers.
28
En
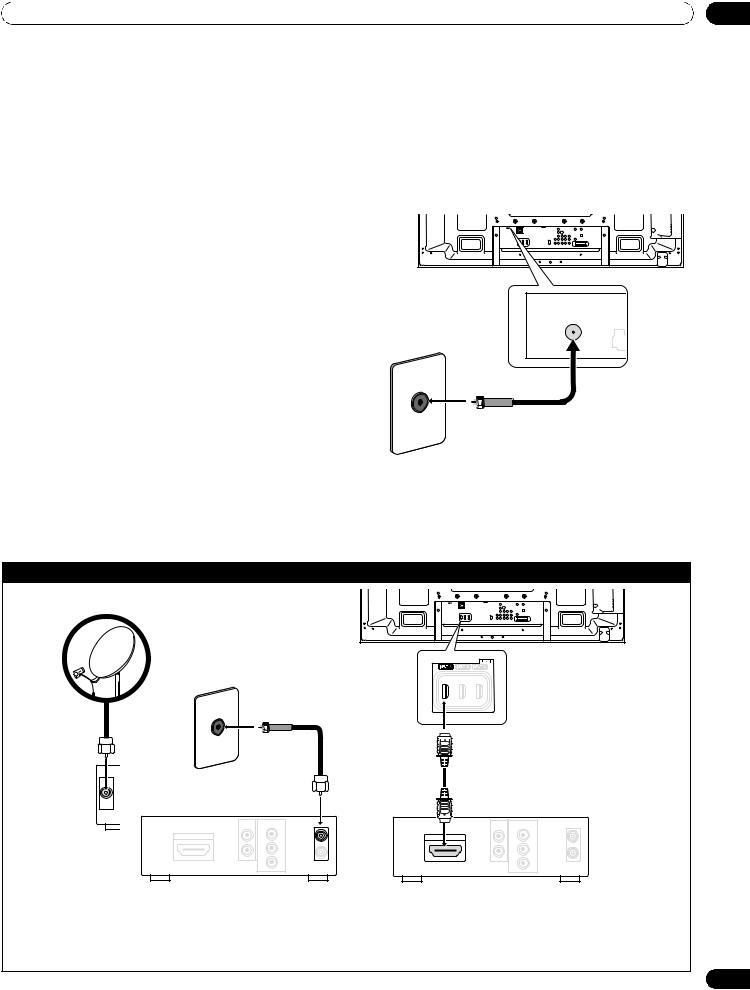
Install Your Flat Panel TV |
02 |
2.6 Connect to Broadcast TV & Other Devices (DVR, Receiver, BDR, etc.)
The type of equipment attached to your flat panel TV determines which panel ports are used. The following sections explain how to connect broadcast TV and playback equipment such as a DVD player, Surround Sound system, video recorder, etc. to the panel. If your equipment is not listed, please refer to the operating instructions that came with the device(s) for connection assistance.
2.6.1 Add Analog (conventional) and Digital TV Channels
Whether a TV station broadcasts in Analog or Digital, your flat panel TV shows the programs as long as the panel is programmed to accept the signal. To program your panel for broadcast TV, select terminal ANT.
The ANT terminal accepts both analog and digital |
T |
T |
|
W |
W |
broadcasts. Connect a VHF/UHF antenna and/or cable TV |
|
|
to the panel’s rear ANT terminal, then press TV/DTV on |
|
|
the remote control to toggle between analog and digital |
Rear view |
|
broadcasts. When watching analog TV channels, you can |
|
|
|
|
|
also use an outdoor antenna for the clearest analog |
|
|
picture. |
|
|
If your outdoor antenna uses a 75-ohm coaxial cable with an F-type connector, plug it into the panel’s antenna terminal on the back.
2.6.2 Connect Your Other Pioneer Equipment
This section provides cabling information for your other
Pioneer equipment when combined with the panel. Each diagram can also be used as a reference tool for non-Pioneer devices but port locations may differ or be unavailable.
Connect cable or Satellite using STB (Set Top Box):
T |
T |
W |
W |
Satellite antenna |
|
Rear view |
|
SAT IN
Cable STB/Satellite STB |
|
Cable STB/Satellite STB |
|||
AUDIO |
COMPONENT |
|
AUDIO |
COMPONENT |
|
OUT |
VIDEO OUTPUT |
|
OUT |
VIDEO OUTPUT |
|
HDMI OUT |
Y |
IN |
HDMI OUT |
Y |
IN |
|
|||||
|
PB |
OUT |
|
PB |
OUT |
|
|
|
|
||
|
PR |
|
|
PR |
|
When using a cable STB or Satellite STB, plug in to the antenna/cable TV wall outlet using the STB cable provided with your STB. If your STB has an HDMI terminal, use any of INPUT 4 through INPUT 6 (HDMI terminal) on the rear or INPUT 7 (HDMI terminal) on the side of the flat panel TV instead of making video connections. If you connect an antenna cable directly to TV, you must first connect the cable to a splitter. For details, refer to the operating manual that came with the STB.
29
En

02 Install Your Flat Panel TV
Connect HDMI equipment (INPUT 4 through INPUT 6): |
Connect HDMI equipment (INPUT 7): |
|
T |
T |
Left side view |
W |
W |
|
Rear view |
|
|
HDMI compliant |
Audio cable |
HDMI compliant |
(commercially |
cable (HDMI cable |
|
cable (HDMI cable |
available) |
having the HDMI |
having the HDMI |
Make this |
mark) |
mark) |
connection when |
|
|
inputting analog |
|
|
audio signals. |
HDMI equipment |
|
|
|
HDMI equipment |
|
|
INPUT 4 through INPUT 6 are HDMI terminals. Use |
Also use INPUT 7 (HDMI terminal) on the side of the |
|
INPUT 4 or INPUT 5 (HDMI) terminal when you also |
panel when connecting HDMI equipment. For details, |
|
input analog audio signals. For details, refer to “5.2 Use |
refer to “5.2 Use HDMI Inputs.” |
|
HDMI Inputs.” |
|
|
Connect a DVD player: |
Connect an AV receiver: |
||
T |
T |
T |
T |
W |
W |
W |
W |
Rear view |
|
Rear view |
|
|
|
This connection is |
|
|
|
AV cable |
|
not required when |
|
Optical digital |
|
Component |
connecting an AV |
AV cable |
cable |
||
(commercially available) |
amp equipped with |
(commercially |
|||
video cable |
(commercially |
||||
|
the surround |
available) |
|||
|
(commercially |
available) |
|||
|
available) |
function to a |
|
||
|
|
|
|||
|
|
subwoofer. |
|
|
|
|
DVD player |
Subwoofer |
AV receiver |
||
|
|
||||
Use INPUT 2 terminals when connecting a DVD player |
Use an optical digital cable to connect an AV receiver to |
||||
or other audiovisual equipment. If your DVD player has |
DIGITAL OUT terminal (optical). If your AV receiver does |
||||
an HDMI terminal, use this connection instead of |
not have a DIGITAL IN terminal (optical), you may |
||||
making video connections. For details, refer to the |
connect the panel’s AUDIO OUT terminal (audio) to the |
||||
operation manual that came with the DVD player. |
audio input terminal on the AV receiver. For details, refer |
||||
|
|
to the operation manual that came with the AV receiver. |
|||
30
En
 Loading...