


Operating Instructions
Blu-ray Disc PLAYER
2
En
Thank you for buying this Pioneer product.
Please read through these operating instructions so you will know how to operate your model properly. After you have finished reading the instructions, put them away in a safe place for future reference.
IMPORTANT
CAUTION
RISK OF ELECTRIC SHOCK
DO NOT OPEN
The lightning flash with arrowhead symbol, |
CAUTION: |
The exclamation point within an equilateral |
within an equilateral triangle, is intended to |
TO PREVENT THE RISK OF ELECTRIC |
triangle is intended to alert the user to the |
alert the user to the presence of uninsulated |
SHOCK, DO NOT REMOVE COVER (OR |
presence of important operating and |
"dangerous voltage" within the product's |
BACK). NO USER-SERVICEABLE PARTS |
maintenance (servicing) instructions in the |
enclosure that may be of sufficient |
INSIDE. REFER SERVICING TO QUALIFIED |
literature accompanying the appliance. |
magnitude to constitute a risk of electric |
SERVICE PERSONNEL. |
|
shock to persons. |
|
D3-4-2-1-1_En-A |
|
|
CAUTION
This product is a class 1 laser product, but this |
The following caution label appears on your unit. |
||||||||||||||||||||||||||||||||||
Location: inside of the unit |
|||||||||||||||||||||||||||||||||||
product contains a laser diode higher than Class 1. |
|||||||||||||||||||||||||||||||||||
|
|
|
|
|
|
|
|
|
|
|
|
|
|
|
|
|
|
|
|
|
|
|
|
|
|
|
|
|
|
|
|
||||
To ensure continued safety, do not remove any covers |
|
|
|
|
|
|
|
|
|
|
|
|
|
|
|
|
|
|
|
|
|
|
|
|
|
|
|
|
|
|
|
|
|||
or attempt to gain access to the inside of the product. |
|
|
|
|
|
|
|
|
|
|
|
|
|
|
|
|
|
|
|
|
|
|
|
|
|
|
|
|
|
|
|
|
|||
Refer all servicing to qualified personnel. |
|
|
|
|
|
|
|
|
|
|
|
|
|
|
|
|
|
|
|
|
|
|
|
|
|
|
|
|
|
|
|
|
|||
|
|
|
|
|
|
|
|
|
|
|
|
|
|
|
|
|
|
|
|
|
|
|
|
|
|
|
|
|
|
|
|
||||
|
|
|
|
|
|
|
|
|
|
|
|
|
|
|
|
|
|
|
|
|
|
|
|
|
|
|
|
|
|
|
|
|
|
|
|
|
|
|
|
|
|
|
|
|
|
|
|
|
|
|
|
|
|
|
|
|
|
|
|
|
|
|
|
|
|
|
|
|
|
|
|
|
|
|
|
|
|
|
|
|
|
|
|
|
|
|
|
|
|
|
|
|
|
|
|
|
|
|
|
|
|
|
|
|
|
|
|
|
|
|
|
|
|
|
|
|
|
|
|
|
|
|
|
|
|
|
|
|
|
|
|
|
|
|
|
|
|
|
|
|
|
|
|
|
|
|
|
|
|
|
|
|
|
|
|
|
|
|
|
|
|
|
|
|
|
|
|
|
|
|
|
|
|
|
|
|
|
|
|
|
|
|
|
|
|
|
|
|
|
|
|
|
|
|
|
|
|
|
|
|
|
|
|
|
|
|
|
|
|
|
|
|
|
|
|
|
|
|
|
|
|
|
|
|
|
|
|
|
|
|
|
|
|
|
|
|
|
|
|
|
|
|
|
|
|
|
|
|
|
|
|
|
|
|
|
|
|
|
|
|
|
|
|
|
|
|
|
|
|
|
|
|
|
|
|
|
|
|
|
|
|
|
|
|
|
|
|
|
|
|
|
|
|
|
|
|
|
|
|
|
|
|
|
|
|
|
|
|
|
|
|
|
|
|
|
|
|
|
|
|
|
|
|
|
|
|
|
|
|
|
|
|
|
|
|
|
|
|
|
|
|
|
|
|
|
|
|
|
|
|
|
|
|
|
|
|
|
|
|
|
|
|
|
|
|
|
|
|
|
|
|
|
|
|
|
|
|
|
|
|
|
|
|
|
|
|
|
|
|
|
|
|
|
|
|
|
|
|
|
|
|
|
|
|
|
|
|
|
|
|
|
|
|
|
|
|
|
|
|
|
|
|
|
|
|
|
|
|
|
|
|
|
|
|
|
|
|
|
|
|
|
|
|
|
|
|
|
|
|
|
|
|
|
|
|
|
|
|
|
|
|
|
|
|
|
|
|
|
|
|
|
|
|
|
|
|
|
|
|
|
|
|
|
|
|
|
|
|
|
|
|
|
|
|
|
|
|
|
|
|
|
|
|
|
|
|
|
|
|
|
|
|
|
|
|
|
|
|
|
|
|
|
|
|
|
|
|
|
|
|
|
|
|
|
|
|
|
|
|
|
|
|
|
|
|
|
|
|
|
|
|
|
|
|
|
|
|
|
|
|
|
|
|
|
|
|
|
|
|
|
|
|
|
|
|
|
|
|
|
|
|
|
|
|
|
|
|
|
|
|
|
|
|
|
|
|
|
|
|
|
|
|
|
|
|
|
|
|
|
|
|
|
|
|
|
|
|
|
|
|
|
|
|
|
|
|
|
|
|
|
|
|
|
|
|
|
|
|
|
|
|
|
|
|
|
|
|
|
|
|
|
|
|
|
|
|
|
|
|
|
|
|
|
|
|
|
|
|
|
|
|
|
|
|
|
|
|
|
|
|
|
|
|
|
|
|
|
|
|
|
|
|
|
|
|
|
|
|
|
|
|
|
|
|
|
|
|
|
|
|
|
|
|
|
|
|
|
|
|
|
|
|
|
|
|
|
|
|
|
|
|
|
|
|
|
|
|
|
|
|
|
|
|
|
|
|
|
|
|
|
|
|
|
|
|
|
|
|
|
|
|
|
|
|
|
|
|
|
|
|
|
|
|
|
|
|
|
|
|
|
|
|
|
|
|
|
|
|
|
|
|
|
|
|
|
|
|
|
|
|
|
|
|
|
|
|
|
|
|
|
|
|
|
|
|
|
|
|
|
|
|
|
|
|
|
|
|
|
|
|
|
|
|
|
|
|
|
|
|
|
|
|
|
|
|
|
|
|
|
|
|
|
|
|
|
|
|
|
|
|
|
|
|
|
|
|
|
|
|
|
|
|
|
|
|
|
|
|
|
|
|
|
|
|
|
|
|
|
|
|
|
|
|
|
|
|
|
|
|
|
|
|
|
|
|
|
|
|
|
|
|
|
|
|
|
|
|
|
|
|
|
|
|
|
|
|
|
|
|
|
|
|
|
|
|
|
|
|
|
|
|
|
|
|
|
|
|
|
|
|
|
|
|
|
|
|
|
|
|
|
|
|
|
|
|
|
|
|
|
|
|
|
|
|
|
|
|
|
|
|
|
|
|
|
|
|
|
|
|
|
|
|
|
|
|
|
|
|
|
|
|
|
|
|
|
|
|
|
|
|
|
|
|
|
|
|
|
|
|
|
|
|
|
|
|
|
|
|
|
|
|
|
|
|
|
|
|
|
|
|
|
|
|
D3-4-2-1-8_B_En
WARNING
To prevent a fire hazard, do not place any naked flame sources (such as a lighted candle) on the equipment.
VENTILATION CAUTION
When installing this unit, make sure to leave space around the unit for ventilation to improve heat radiation (at least 10 cm at top, 10 cm at rear, and 10 cm at each side).
WARNING
Slots and openings in the cabinet are provided for ventilation to ensure reliable operation of the product, and to protect it from overheating. To prevent fire hazard, the openings should never be blocked or covered with items (such as newspapers, table-cloths, curtains) or by operating the equipment on thick carpet or a bed.
D3-4-2-1-7b_A_En
Operating Environment
Operating environment temperature and humidity: +5 ºC to +35 ºC (+41 ºF to +95 ºF); less than 85 %RH (cooling vents not blocked)
Do not install this unit in a poorly ventilated area, or in locations exposed to high humidity or direct sunlight (or strong artificial light)
WARNING
This equipment is not waterproof. To prevent a fire or shock hazard, do not place any container filled with liquid near this equipment (such as a vase or flower pot) or expose it to dripping, splashing, rain or moisture.
WARNING
Before plugging in for the first time, read the following section carefully.
The voltage of the available power supply differs according to country or region. Be sure that the power supply voltage of the area where this unit will be used meets the required voltage (e.g., 230 V or 120 V) written on the rear panel.
CAUTION
The STANDBY/ON switch on this unit will not completely shut off all power from the AC outlet. Since the power cord serves as the main disconnect device for the unit, you will need to unplug it from the AC outlet to shut down all power. Therefore, make sure the unit has been installed so that the power cord can be easily unplugged from the AC outlet in case of an accident. To avoid fire hazard, the power cord should also be unplugged from the AC outlet when left unused for a long period of time (for example, when on vacation).
If the AC plug of this unit does not match the AC outlet you want to use, the plug must be removed and appropriate one fitted. Replacement and mounting of an AC plug on the power supply cord of this unit should be performed only by qualified
service personnel. If connected to an AC outlet, the cut-off plug can cause severe electrical shock. Make sure it is properly disposed of after removal.
The equipment should be disconnected by removing the mains plug from the wall socket when left unused for a long period of time (for example, when on vacation).
This product complies with the Low Voltage Directive 2006/95/EC and EMC Directive 2004/108/EC.
D3-4-2-1-9a_A_En
This product is for general household purposes. Any failure due to use for other than household purposes (such as long-term use for business purposes in a restaurant or use in a car or ship) and which requires repair will be charged for even during the warranty period.
POWER-CORD CAUTION
Handle the power cord by the plug. Do not pull out the plug by tugging the cord and never touch the power cord when your hands are wet as this could cause a short circuit or electric shock. Do not place the unit, a piece of furniture, etc., on the power cord, or pinch the cord. Never make a knot in the cord or tie it with other cords. The power cords should be routed such that they are not likely to be stepped on. A damaged power cord can cause a fire or give you an electrical shock. Check the power cord once in a while. When you find it damaged, ask your nearest PIONEER authorized
service center or your dealer for a replacement.
This product incorporates copyright protection technology that is protected by method claims of certain U.S. patents and other intellectual property rights owned by Macrovision Corporation and other rights owners. Use of this copyright protection technology must be authorized by Macrovision Corporation, and is intended for home and other limited viewing uses only unless otherwise authorized by Macrovision Corporation. Reverse engineering or disassembly is prohibited.
If you want to dispose this product, do not mix it with general household waste. There is a separate collection system for used electronic products in accordance with legislation that requires proper treatment, recovery and recycling.
Private households in the member states of the EU, in Switzerland and Norway may return their used electronic products free of charge to designated collection facilities or to a retailer (if you purchase a similar new one).
For countries not mentioned above, please contact your local authorities for the correct method of disposal.
By doing so you will ensure that your disposed product undergoes the necessary treatment, recovery and recycling and thus prevent potential negative effects on the environment and human health.
For U.K model:
Replacement and mounting of an AC plug on the power supply cord of this unit should be performed only by qualified service personnel.
IMPORTANT: THE MOULDED PLUG
This appliance is supplied with a moulded three pin mains plug for your safety and convenience. A 10 amp fuse is fitted in this plug. Should the fuse need to be replaced, please ensure that the replacement fuse has a rating of 10 amps and that it is approved by ASTA or BSI to BS1362.
Check for the ASTA mark |
|
|
or the BSI mark |
on the body of the fuse. |
|
|
If the plug contains a removable fuse cover, you must ensure that it is refitted when the fuse is replaced. If you lose the fuse cover the plug must not be used until a replacement cover is obtained. A replacement fuse cover can be obtained from your local dealer.
If the fitted moulded plug is unsuitable for your socket outlet, then the fuse shall be removed and the plug cut off and disposed of safely. There is a danger of severe electrical shock if the cut off plug is inserted into any 13 amp socket.
If a new plug is to be fitted, please observe the wiring code as shown below. If in any doubt, please consult a qualified electrician.
IMPORTANT: The wires in this mains lead are coloured in accordance with the following code:
Blue : Neutral Brown : Live |
|
|
As the colours of the wires in the mains lead of this appliance may not correspond with the coloured markings identifying the terminals in |
|
|
your plug, proceed as follows ; |
|
|
The wire which is coloured BLUE must be connected to the terminal which is marked with the |
|
|
letter N or coloured BLACK. |
|
|
The wire which is coloured BROWN must be connected to the terminal which is marked with the |
|
|
letter L or coloured RED. |
|
|
How to replace the fuse: Open the fuse compartment with a screwdriver and replace the fuse. |
3 |
|
D3-4-2-1-2-2_B_En |
||
En |
||
|

Contents
01 Before you start
Features . . . . . . . . . . . . . . . . . . . . . . . . . . . . . . . . . . . . . . . . . . . . 5 What’s in the box . . . . . . . . . . . . . . . . . . . . . . . . . . . . . . . . . . . . . 6
Putting the batteries in the remote control. . . . . . . . . . . . . . . . . . 6
Using the remote control . . . . . . . . . . . . . . . . . . . . . . . . . . . . . . . 6
Disc/content format playback compatibility . . . . . . . . . . . . . . . . . 7
File compatibility . . . . . . . . . . . . . . . . . . . . . . . . . . . . . . . . . . . . . 7 Titles and chapters. . . . . . . . . . . . . . . . . . . . . . . . . . . . . . . . . . . . 8 DVD-Video regions . . . . . . . . . . . . . . . . . . . . . . . . . . . . . . . . . . . . 8 BD-ROM regions . . . . . . . . . . . . . . . . . . . . . . . . . . . . . . . . . . . . . 8
02 Connecting up
Rear panel . . . . . . . . . . . . . . . . . . . . . . . . . . . . . . . . . . . . . . . . . . 9 Easy connections . . . . . . . . . . . . . . . . . . . . . . . . . . . . . . . . . . . . 10
Using other types of video output. . . . . . . . . . . . . . . . . . . . . . . . 10
Connecting for HDMI output . . . . . . . . . . . . . . . . . . . . . . . . . . . 11
Connecting using the component video output . . . . . . . . . . . . . 11 Changing the output video resolution . . . . . . . . . . . . . . . . . . . . 12 Connecting using an S-Video output . . . . . . . . . . . . . . . . . . . . . 12
Connecting for surround sound . . . . . . . . . . . . . . . . . . . . . . . . . 13 Network connection . . . . . . . . . . . . . . . . . . . . . . . . . . . . . . . . . . 14
Controlling this player via another Pioneer component . . . . . . . 14 Using an external IR receiver with this player. . . . . . . . . . . . . . . 15
03 Controls and displays
Front panel. . . . . . . . . . . . . . . . . . . . . . . . . . . . . . . . . . . . . . . . . 16 Front panel display. . . . . . . . . . . . . . . . . . . . . . . . . . . . . . . . . . . 16 Remote control . . . . . . . . . . . . . . . . . . . . . . . . . . . . . . . . . . . . . 17
04 Getting Started
Switching on and setting up . . . . . . . . . . . . . . . . . . . . . . . . . . . 18 Using the on-screen displays . . . . . . . . . . . . . . . . . . . . . . . . . . . 19 Setting up for network use . . . . . . . . . . . . . . . . . . . . . . . . . . . . . 19
Playing movies, music and photos . . . . . . . . . . . . . . . . . . . . . . . 20 Playing BD/DVD movies and Audio CD . . . . . . . . . . . . . . . . . . . 20
Playback controls. . . . . . . . . . . . . . . . . . . . . . . . . . . . . . . . . . . . 21 Frequently Asked Questions. . . . . . . . . . . . . . . . . . . . . . . . . . . . 24
05 Using the Disc Navigator
Introduction . . . . . . . . . . . . . . . . . . . . . . . . . . . . . . . . . . . . . . . . 25
Movie Navigator . . . . . . . . . . . . . . . . . . . . . . . . . . . . . . . . . . . . . 25
Photo Navigator . . . . . . . . . . . . . . . . . . . . . . . . . . . . . . . . . . . . . 26
Music Navigator. . . . . . . . . . . . . . . . . . . . . . . . . . . . . . . . . . . . . 28
06 Using the Home Media Gallery
Introduction . . . . . . . . . . . . . . . . . . . . . . . . . . . . . . . . . . . . . . . . 30 About network playback . . . . . . . . . . . . . . . . . . . . . . . . . . . . . . . 30 Using the Home Media Gallery . . . . . . . . . . . . . . . . . . . . . . . . . . 31 Movie Navigator . . . . . . . . . . . . . . . . . . . . . . . . . . . . . . . . . . . . . 31 Photo Navigator . . . . . . . . . . . . . . . . . . . . . . . . . . . . . . . . . . . . . 33 Music Navigator . . . . . . . . . . . . . . . . . . . . . . . . . . . . . . . . . . . . . 34
About Windows Media Player 11/Windows Media Connect . . . . 36
07 Video/Audio Adjust menu
Video Adjust . . . . . . . . . . . . . . . . . . . . . . . . . . . . . . . . . . . . . . . . 37 Audio Adjust . . . . . . . . . . . . . . . . . . . . . . . . . . . . . . . . . . . . . . . . 38
08 Initial Setup menu
Using the Initial Setup menu. . . . . . . . . . . . . . . . . . . . . . . . . . . . 39
About the audio output settings . . . . . . . . . . . . . . . . . . . . . . . . . 42
Speaker Setup. . . . . . . . . . . . . . . . . . . . . . . . . . . . . . . . . . . . . . . 43 Software updating. . . . . . . . . . . . . . . . . . . . . . . . . . . . . . . . . . . . 43
09 Additional information
Taking care of your player and discs . . . . . . . . . . . . . . . . . . . . . . 44
Screen sizes and disc formats. . . . . . . . . . . . . . . . . . . . . . . . . . . 45 Resetting the player . . . . . . . . . . . . . . . . . . . . . . . . . . . . . . . . . . 45
Setting up the remote to control your TV . . . . . . . . . . . . . . . . . . . 46
TV Preset code list. . . . . . . . . . . . . . . . . . . . . . . . . . . . . . . . . . . . 46 BD/DVD language code list. . . . . . . . . . . . . . . . . . . . . . . . . . . . . 47 BD/DVD country/area code list . . . . . . . . . . . . . . . . . . . . . . . . . . 47 Troubleshooting . . . . . . . . . . . . . . . . . . . . . . . . . . . . . . . . . . . . . 47 Glossary . . . . . . . . . . . . . . . . . . . . . . . . . . . . . . . . . . . . . . . . . . . 52 License . . . . . . . . . . . . . . . . . . . . . . . . . . . . . . . . . . . . . . . . . . . . 54 Specifications . . . . . . . . . . . . . . . . . . . . . . . . . . . . . . . . . . . . . . . 63
4
En

Chapter 1
Before you start
Features
BD-ROM playback
Blu-ray Disc is a next-generation video disc format featuring far higher disc capacity than conventional DVD. The higher capacity makes a whole range of new and enhanced features possible, such as support for high-definition video up to 1920 x 1080 pixels, high quality, surround sound audio, greater interactivity and richer content.
BD-ROM discs are commercially produced discs (Video Distribution format) that can contain movie and other video content, interactive content, enhanced menu features such as pop-up menus (press POPUP MENU/MENU during playback for these), full-colour, high-definition animated buttons and animated menu transition effects, button sounds (sounds are played when menu buttons are selected or activated), high-definition bitmap subtitles supporting full-colour images with frame-accurate animation effects up to full video frame rate, and so on.
While BD capacity is enough for most applications, the BD-ROM standard allows for content to be spread across several discs, removing the limit of one physical disc. Follow the on-screen instructions during playback when using these special kinds of discs.
BD-J application
The BD-ROM specification supports Java for interactive content. The Java specification for BD-ROM is known as BD-J. This allows content providers to put games and other interactive material linked to specific titles on to BD-ROM discs. (This player does not support downloadable BD-J content, direct connection to the Internet or the retrieval of content through the Internet.)
•Java and all Java-based trademarks and logos are trademarks or registered trademarks of Sun Microsystems, Inc. in the U.S. and other countries.
•© 2000-2007 Esmertec AG
Esmertec and Jbed are trademarks and/or registered trademarks of Esmertec AG.
01
HDMI digital interface
The HDMI (High-Definition Multimedia Interface) interconnect provides high quality digital audio and video, all from a single user-friendly connector. HDMI is the first consumer electronics interface to support uncompressed standard, enhanced, or high-definition video plus standard to multi-channel surround sound audio, all using one interface. You can easily connect to an HDMI-equipped AV receiver or audio-visual device for high quality audio and video.
•HDMI, the HDMI logo and High-Definition Multimedia Interface are trademarks or registered trademarks of HDMI Licensing LLC.
HDMI Control
By connecting this unit to a Pioneer plasma television, AV system (amplifier or AV receiver etc.), or HD AV Converter with an HDMI cable, you can control this unit from the connected plasma television, as well as have the connected plasma television, AV system or HD AV Converter automatically change inputs in response to this unit starting playback or having the GUI screen (ex. Disc Navigator) displayed (known as the Auto-select function). The connected plasma television can thereby have its power turned from off to on by this function.
You can also have this unit turn on automatically when you control this unit from a connected plasma television that is turned on (Simultaneous power function).
Additionally, when the language information from a connected plasma television is received, you can have this unit’s on-screen display language change automatically to that of the plasma television (only when playback is stopped and GUI screen is not displayed).
Refer to your plasma television’s operating manual for more information regarding how your plasma television transmits language information.
For more information about which operations can be carried out by connecting via HDMI cable, refer to the operating manual for your plasma television, AV system or HD AV Converter.
PureCinema
When you playback film material (24 frames/second) on a BD-ROM or DVD-Video disc, the progressive scan line automatically converts the film material to optimum quality (see PureCinema on page 37).
1080/50p, 1080/60p and 1080/24p output video
This player supports a variety of output video resolutions, up to 1080 lines/50 or 60 frames per second, progressive (HDMI only), making it ideal for playing high-definition Blu-ray Discs.
Connect to a local area network
Connect this player to one or more computers in your house via Ethernet and use them as media servers, streaming audio, video and still image files for playback on your TV and/or audio system.
5
En

01 |
High quality audio |
• HDMI cable |
|
|
• LAN cable
• Power cable
• Warranty card
Putting the batteries in the remote control
This player is compatible with Dolby TrueHD, Dolby Digital Plus, DTS-HD High Resolution Audio, Dolby Digital and DTS.
To enjoy Dolby TrueHD, Dolby Digital Plus or DTS-HD High Resolution Audio at the maximum performance, connect this player to a Dolby TrueHD, Dolby Digital Plus or DTS-HD High Resolution Audio-compatible AV amplifier using an HDMI cable. Then, after placing a Blu-ray Disc recording a material with Dolby TrueHD, Dolby Digital Plus or DTS-HD High Resolution Audio, open the disc menu and select “Dolby TrueHD”, “Dolby Digital Plus” or “DTS-HD High Resolution Audio” from the menu.
For the output conditions of various audio types, see About the audio output settings on page 42.
•Manufactured under license from Dolby Laboratories. “Dolby” and the double-D symbol are trademarks of Dolby Laboratories.
•“DTS” and “DTS Digital Surround” are registered trademarks of DTS, Inc.
Movie file playback
Video files encoded in the Windows Media™ Video (WMV), MPEG-1/ 2 formats are playable from DVD-R/-RW, or from a connected media server.
Music file playback
This player supports various audio formats, including Windows Media Audio (WMA), MP3 and WAV. You can play files stored on DVD-R/-RW, or from a connected media server.
Photo file playback
PNG, GIF and JPEG image files — including the popular EXIF format used by most digital cameras to store picture shooting information together with the JPEG image — are playable from DVD-R/-RW, or from a connected media server.
•Windows Media™ is a trademark of Microsoft Corporation.
•This product includes technology owned by Microsoft Corporation and cannot be used or distributed without a license from Microsoft Licensing, Inc.
What’s in the box
Please confirm that the following accessories are in the box along with these operating instructions when you open it:
•Remote control
•AA/R6P dry cell batteries x2
•Stereo audio cable (red/white plugs)
•Video cable (yellow plugs)
6
• Insert two AA/R6P batteries into the battery compartment following the indications ( , ) inside the compartment.
 Important
Incorrect use of batteries can result in hazards such as leakage and bursting. Please observe the following:
•Don’t mix new and old batteries together.
•Don’t use different kinds of batteries together — although they may look similar, different batteries may have different voltages.
•Make sure that the plus and minus ends of each battery match the indications in the battery compartment.
•Remove batteries from equipment that isn’t going to be used for a month or more.
•When disposing of used batteries, please comply with governmental regulations or environmental public instruction’s rules that apply in your country/area.
•WARNING
Do not use or store batteries in direct sunlight or other excessively hot place, such as inside a car or near a heater. This can cause batteries to leak, overheat, explode or catch fire. It
can also reduce the life or performance of batteries.
D3-4-2-3-3_En
Using the remote control
Please keep in mind the following when using the remote control:
•Make sure that there are no obstacles between the remote and the remote sensor on the unit.
•The remote has a range of about 7 m (at an angle of 30º from either side of the sensor). Use within this range in front of the remote control sensor on the front panel.
•Remote operation may become unreliable if strong sunlight or fluorescent light is shining on the unit’s remote sensor.
•Remote controllers for different devices can interfere with each other. Avoid using remotes for other equipment located close to this unit.
•Replace the batteries when you notice a fall off in the operating range of the remote.
•When the batteries run down or you change the batteries, the TV preset codes are automatically reset. See Resetting the player on page 45 to reset them.
En
Disc/content format playback compatibility
General disc compatibility
This player is compatible with a range of disc types (media) and formats. Compatible discs will usually feature one of the following logos on the disc and/or disc packaging. Note however that some disc types, such as recordable BD, DVD or CD, may be in an unplayable format — see below for further compatibility information.
Blu-ray Disc (BD)
– This player can also play DVD discs containing PC data. See below for the file compatibility.
• This player cannot play DVD-Audio and DVD-RAM discs.
CD compatibility
•This player can play CD-DA discs.
•PC files stored on CDs cannot be played back.
•Regarding copy protected CDs: This product is designed to conform to the specifications of the Audio CD format. This player does not support the playback or function of discs that do not conform to these specifications.
•The audio signals of a CD output at the DIGITAL AUDIO OUT (COAXIAL/OPTICAL) jacks of this player are protected from copying and cannot be copied on other external components.
DVD-Video |
DVD-R |
DVD-R DL |
DVD-RW |
||||
|
|
|
|
|
|
|
|
|
|
|
|
|
|
|
|
|
|
|
|
|
|
|
|
|
|
|
|
|
|
|
|
• “Blu-ray Disc” and 


 are trademarks.
• |
is a trademark of DVD Format/Logo Licensing |
Corporation.
•This player may not be able to play perfectly every disc that features one of the logos listed above. Please contact Pioneer if you find a disc that won’t play properly.
BD compatibility
•This player can play BD-ROM discs.
–BD-ROM discs should conform to BD-ROM Profile 1.
•This player can play BD-R discs.
–This player is compatible with Blu-ray Disc Recordable format Ver. 21.
–This player is not compatible with Blu-ray Disc Recordable format Ver. 12.
•This player can play BD-RE discs.
–This player is compatible with Blu-ray Disc Rewritable format Ver. 31.
–This player is not compatible with Blu-ray Disc Rewritable format Ver. 13 and Ver. 22.
•This player can play 12 cm discs, but cannot play 8 cm discs.
DVD compatibility
DualDisc playback
A DualDisc is a new two -sided disc, one side of which contains DVD content – video, audio, etc. – while the other side contains non-DVD content such as digital audio material.
The DVD side of a DualDisc will play in this product (excluding any DVD-Audio content).
The non-DVD, audio side of the disc is not compatible with this player.
It is possible that when loading or ejecting a DualDisc, the opposite side to that being played will be scratched. Scratched discs may not be playable.
For more detailed information on the DualDisc specification, please refer to the disc manufacturer or disc retailer.
PC-created disc compatibility
Discs recorded using a personal computer may not be playable in this unit due to the settings of the application software used to create the disc. Check with the software publisher for more detailed information.
 Important
•This player cannot play discs other than the ones listed in this chapter.
•Do not use 8 cm disc adapters with this player. 8 cm discs can be played directly by placing then in the 8 cm disc depression in the center of the disc tray.
File compatibility
•Compatible media: DVD-R, DVD-RW, media server on network (some formats may not be supported depending on the media server type).
•Even when they are in a supported format, some files may not play or display depending on the content.
•Even when playing a supported format, some functions may not operate properly depending on the content.
• This player can play DVD-ROM (DVD-Video)/-R/-RW discs. |
• DRM-protected contents on DVD-R/-RW discs or on media |
|
– This player can play DVD-R/-RW discs recorded as DVD-Video |
servers that do not support WMDRM, and otherwise |
|
incompatible files are skipped. |
||
format. |
||
|
||
– This player cannot play unfinalized DVD discs and VR mode |
|
|
DVD discs. |
|
 Note
Note
1 The standard for recording of BDMV format data.
2 The standard for recording of BDAV format data.
3 The standard that uses the provided cartridge.
01
7
En

•Please note, the following file naming structure needs to be
01adhered to when creating/renaming any digital media to be played on the unit (either through computer-created disc media, or the Home Media Gallery connection). This disclaimer does not apply to any media purchased at retail locations: Due to the coding system used, this player will only read/play files named using standard alphanumeric characters. Any other characters or symbols (e.g. characters with accents) used in naming the file will render it unreadable/unplayable by the unit. If you encounter any difficulties with playback of media, please rename the file in accordance to this standard.
Even when files have a supported file extension, some files may not play or display depending on the content or media server type.
Titles and chapters
BD and DVD movie discs are divided into one or more titles. Titles may be further subdivided into chapters.
Title 1 |
Title 2 |
Title 3 |
8
En
Supported video formats
Chapter 1 Chapter 2 Chapter 3Chapter 1 Chapter 1 Chapter 2
•Windows Media Video 9 (WMV9)1
–MP@HL
•Windows Media Video 9 (WMV9) Advanced Profile (VC-1)
–AP@L3
•MPEG-2 (PS/TS)
–MP@HL
•MPEG-1
Supported audio formats
DVD-Video regions
All commercially produced DVD movies (DVD-Video discs) carry a region mark on the case somewhere that indicates which region(s) of the world the disc is compatible with. This player also has a region mark, which you can find on the rear panel. Discs from incompatible regions will not play in this player. Discs marked ALL will play in any player.
The diagram below shows the various DVD regions of the world.
•Windows Media Audio 9 (WMA9)
– Bit rate: up to 192 kbps (constant bit-rate (CBR));
up to 384 kbps (variable bit-rate (VBR))
–Sampling rates: 44.1 kHz or 48 kHz
•Windows Media Audio 9 Professional (WMA9 Pro)
–Bit rate: up to 768 kbps
–Sampling rates: 44.1 kHz or 48 kHz
–Channels: up to 5.1ch
•MPEG-1 Audio Layer 3 (MP3)
–Sampling rates: 32 kHz, 44.1 kHz or 48 kHz
–Bit rate: up to 320 kbps
•Linear PCM (WAV)
–Sampling rates: 44.1 kHz or 48 kHz
Supported image formats
•JPEG
–File format: JFIF or Exif
–Resolution: up to 4096 x 4096 pixels
Baseline JPEG and progressive JPEG are supported
•PNG
–Resolution: up to 4096 x 4096 pixels
•GIF
–Resolution: up to 4096 x 4096 pixels
File extensions
The following file extensions should be used with this player:
•Video
‘.wmv’ ‘.mpg’ ‘.mpeg’
•Audio
‘.wma’ ‘.mp3’ ‘.wav’
•Image
‘.jpg’ ‘.jpeg’ ‘.png’ ‘.gif’
1
2 |
5 |
|
|
1 |
|
|
6 |
|
|
2 |
|
4 |
5 |
3 |
|
||
2 |
|
4 |
This player is region 2.
BD-ROM regions
Like DVD movies, BD movie discs (BD-ROM) also carry a region mark that indicates which region(s) of the world the disc is compatible with. This player also has a region mark, which you can find on the rear panel. Discs from incompatible regions will not play in this player. Discs marked ALL will play in any player.
The diagram below shows the various BD-ROM regions of the world.

 Region A

 Region B


 Region C
This player is region B.
 Note
Note
1 This player is not compatible with WMV9 Complex Profile.

Chapter 2 |
|
|
|
|
|
|
|
02 |
Connecting up |
|
|
|
|
|
|
|
|
|
|
|
|
|
|
|
|
|
Rear panel |
|
|
|
|
|
|
|
|
1 |
2 |
3 |
4 |
5 |
6 |
7 |
8 |
9 |
|
CONTROL |
IN |
|
|
|
|
|
|
|
|
|
|
|
|
|
|
|
|
|
AC IN |
IR |
|
|
|
|
|
|
AUDIO OUT |
AUDIO OUT |
|
|
|
Y |
|
|
|
(5.1ch) |
(2ch) |
|
|
|
IN |
|
|
|
|
|
|
|
|
|
VIDEO OUT |
|
|
|
CENTER |
SURROUND |
FRONT |
|
|
|
|
|
|
|
||||
|
|
|
|
|
DIGITAL AUDIO OUT |
|
L |
L |
|
|
SETTING 2 |
|
|
PB |
|
|
|
||
|
HDMI OUT |
LAN(100) |
|
|
|
|
|
||
|
|
|
|
|
|
|
|
||
|
SETTING 1 |
|
|
|
|
|
|
|
|
|
IR RECEIVER |
|
S |
PR |
|
|
|
|
R |
|
|
|
|
|
|
|
|||
|
|
|
|
COMPONENT |
COAXIAL |
OPTICAL |
SUB WOOFER |
R |
|
|
|
|
|
|
|
||||
|
|
|
|
VIDEO OUT |
|
|
|
|
|
10 11
1 AC IN
Connect the supplied power cord here, then plug into a power outlet.
2 CONTROL IN
Use to control this player from the remote sensor of another Pioneer component with a CONTROL OUT terminal and bearing the mark. Connect the CONTROL OUT of the other component to the CONTROL IN of this player using a mini-plug cord (page 14).
3 HDMI OUT
HDMI output providing a high quality interface for digital audio and video (page 11).
4 LAN (100)
Ethernet port for 100BASE-TX (100 Mbps) network connection (page 14).
5 VIDEO OUT and S-VIDEO OUT
Video output (composite) that you can connect to your TV or AV receiver using the supplied video cable (page 10).
S-Video output that you can use instead of the VIDEO OUT jacks (page 12).
6 COMPONENT VIDEO OUT
High quality video output for connection to a TV, monitor or AV receiver that has component video inputs.
Connect using a commercially available three-way component video cable (page 11).
7 DIGITAL AUDIO OUT (COAXIAL/OPTICAL)
Digital audio outputs for connection to a PCM, Dolby Digital, and/or DTS-compatible AV receiver (page 13).
8 AUDIO OUT (5.1ch)
Multi-channel (5.1ch) analog audio outputs for connection to an AV receiver with multi-channel analog audio inputs (page 13).
9 AUDIO OUT (2ch)
Stereo analog audio outputs for connection to your TV, AV receiver or stereo system (page 10).
10 IR IN
Jack for an external IR (infrared) remote control receiver (page 15).
11 IR RECEIVER switch
Switch to the setting compatible with your external IR remote control receiver (page 15).
 Tip
Tip
•When connecting this player to your TV, AV receiver or other equipment, make sure that all components are ‘switched off’ and ‘unplugged’.
•You may find it useful to have the manuals supplied with your other components handy when connecting this player.
9
En
02 |
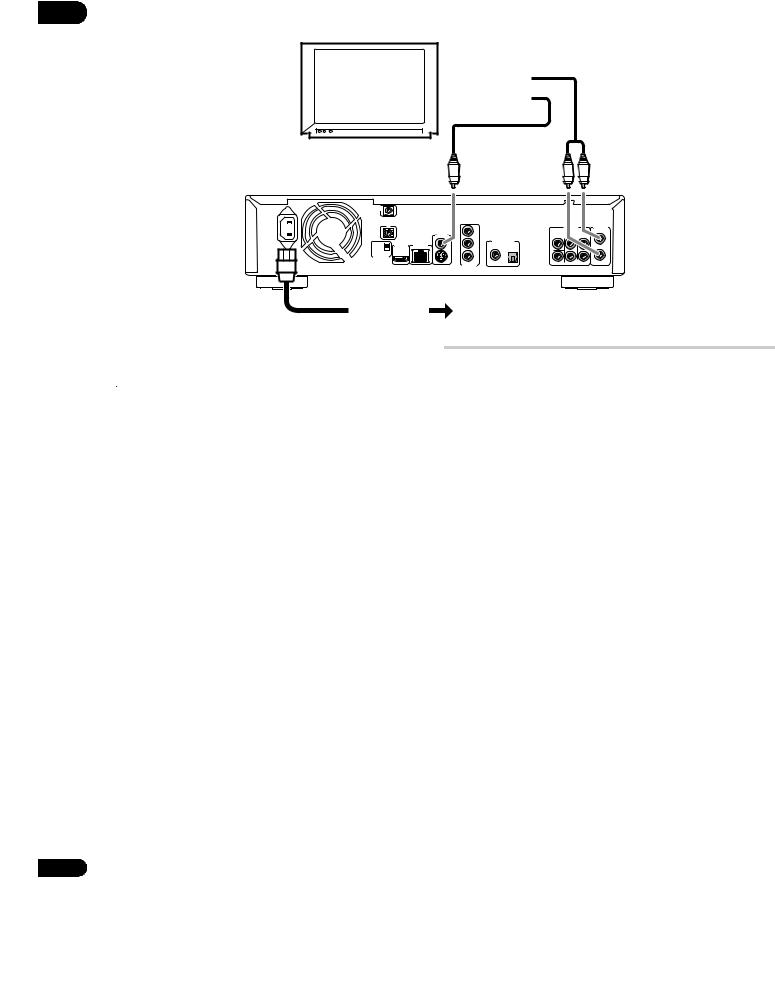
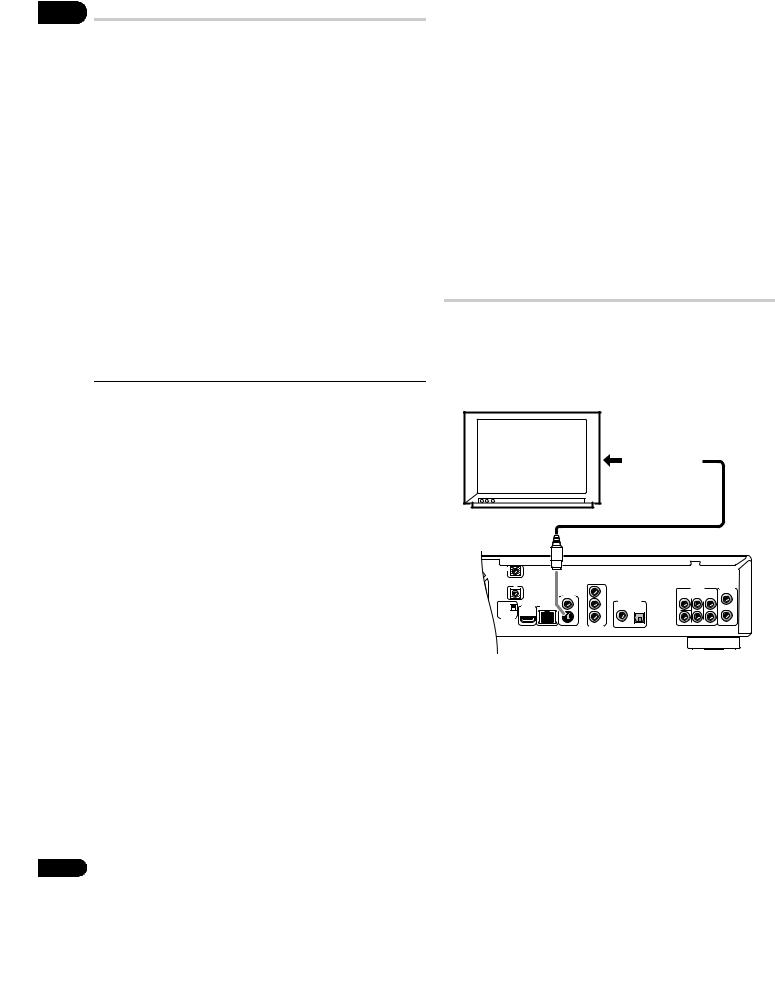
Easy connections |
TV |
 To audio input
  To video input
|
CONTROL |
IN |
|
|
|
|
|
|
|
|
|
|
|
|
|
|
|
|
|
AC IN |
IR |
|
|
|
|
|
|
AUDIO OUT |
AUDIO OUT |
|
IN |
|
Y |
|
|
|
(5.1ch) |
(2ch) |
|
|
|
VIDEO OUT |
|
|
|
CENTER |
SURROUND |
FRONT |
|
|
|
|
|
|
|
||||
|
|
|
|
|
DIGITAL AUDIO OUT |
|
L |
L |
|
|
SETTING 2 |
|
|
PB |
|
|
|
||
|
HDMI OUT |
LAN(100) |
|
|
|
|
|
||
|
|
|
|
|
|
|
|
||
|
SETTING 1 |
|
|
|
|
|
|
|
|
|
IR RECEIVER |
|
S |
PR |
|
|
|
|
R |
|
|
|
|
|
|
|
|||
|
|
|
|
COMPONENT |
|
|
SUB WOOFER |
R |
|
|
|
|
|
COAXIAL |
OPTICAL |
|
|
||
|
|
|
|
VIDEO OUT |
|
|
|
|
|
To power outlet
This is a basic setup that allows you to watch discs on your TV using just the cables supplied.
 Important
•This player is equipped with copy protection technology. Do not connect this player to your TV via a VCR using AV cables, as the picture from this player will not appear properly on your TV. (This player may also not be compatible with some combination TV/ VCRs for the same reason; refer to the manufacturer for more information.)
•Do not unplug the player from the power outlet while it is switched on.
•Do not plug this player into a switched power supply found on some amplifiers and AV receivers.
1 Connect the VIDEO OUT and one pair of AUDIO OUT (2ch) jacks to a set of audio/video inputs on your TV.
Use the supplied red/white stereo audio and yellow video cables. Make sure you match up the left and right audio outputs with their corresponding inputs for correct stereo sound.
See Using other types of video output below if you want to use a different type of connection.
2 Connect the supplied AC power cord to the AC IN inlet, then plug into a power outlet.
Using other types of video output
This player has standard (composite), S-Video and component video outputs, as well as an HDMI connector (for digital video/audio).
In order to be able to watch HD (high definition) BDs at their full resolution, you should connect the player to your TV using either the component video output, or (even better) the HDMI output.
An HDMI connection will additionally give you HD output when watching DVDs.
If your display has neither of these connection types, an S-Video jack is also provided, which should give slightly better video quality than using the standard video output.
10
En
Connecting for HDMI output
If you have an HDMI or DVI (with HDCP) equipped monitor or display, you can connect it to this player using the supplied HDMI cable.
The HDMI connector outputs uncompressed digital video, as well as most digital audio formats.
 Important
•This unit has been designed to be compliant with HDMI (High-Definition Multimedia Interface). Depending on the component you have connected, using a DVI connection may result in unreliable signal transfers.
•If you change the display connected to the HDMI output, you will also need to change the output video resolution settings to match the new display (see Changing the output video resolution on page 12 to do this).
•The HDMI connection is compatible with 8-channel linear PCM signals (44.1 kHz to 192 kHz1, 16 bit/20 bit/24 bit), Dolby Digital, Dolby TrueHD, Dolby Digital Plus, DTS-HD High Resolution Audio and DTS (5.1 channel signals) bitstreams.
•Depending on the HDMI cable being used, 1080p output may not appear correctly (The supplied HDMI cable is capable of outputting 1080p video).
•If you connect a DVI device to the HDMI output of this player, ensure that it is compliant with High-bandwidth Digital Content
Protection (HDCP). If you choose to connect to a DVI connector, you will need a separate adaptor (DVI HDMI) to do so. A DVI connection, however, does not support audio signals. Consult your local audio dealer for more information.
•Use an HDMI cable (supplied) to connect the HDMI OUT interconnect on this player to an HDMI interconnect on an HDMI-compatible display.
To HDMI interconnect
|
|
|
|
HDMI-compatible display |
||||
CONTROL |
IN |
|
|
|
|
|
|
|
|
|
|
|
|
|
|
|
|
IR |
|
|
|
|
|
|
AUDIO OUT |
AUDIO OUT |
|
IN |
|
Y |
|
|
|
(5.1ch) |
(2ch) |
|
VIDEO OUT |
|
|
|
CENTER |
SURROUND |
FRONT |
|
|
|
|
|
|
||||
|
|
|
|
DIGITAL AUDIO OUT |
|
L |
L |
|
SETTING 2 |
|
|
PB |
|
|
|
||
HDMI OUT |
LAN(100) |
|
|
|
|
|
||
|
|
|
|
|
|
|
||
SETTING 1 |
|
|
|
|
|
|
|
|
IR RECEIVER |
|
S |
PR |
|
|
|
|
R |
|
|
|
|
|
|
|||
|
|
|
COMPONENT |
|
|
SUB WOOFER |
R |
|
|
|
|
COAXIAL |
OPTICAL |
|
|
||
|
|
|
VIDEO OUT |
|
|
|
|
|
•The arrow on the cable connector body should be face up for correct alignment with the connector on the player.
After switching on the player you may need to set the output video resolution and HDMI colour space for compatibility with your 02 display. See Changing the output video resolution on page 12 and
HDMI Color Space in Using the Initial Setup menu on page 39.
About HDMI
HDMI supports both standard and high-definition video, plus standard and multi-channel surround-sound audio. HDMI features include uncompressed digital video, one connector (instead of several cables and connectors), and communication between the AV source and AV devices such as DTVs.
HDMI was developed to provide the technologies of High-bandwidth Digital Content Protection (HDCP) as well as Digital Visual Interface (DVI) in one specification. HDCP is used to protect digital content transmitted and received by DVI-compliant displays.
About HDMI Control
You can enable HDMI Control by turning the HDMI Control setting to On for all components connected via HDMI cable. Check the video output from this unit once you have completed making connections and settings for all components. You will need to check the video output each time you change connected components or remove the HDMI cable.
If you want to use an HDMI cable other than the supplied HDMI cable, use the one that supports the HDMI 1.3 specification (Category 2) or later. The HDMI Control functions may not operate properly if you do not use an HDMI cable that supports the HDMI 1.3 specification (Category 2) or later.
Connecting using the component video output
You can use the component video output instead of the standard video out jack to connect this player to your TV (or other equipment).
• Use a component video cable (not supplied) to connect the COMPONENT VIDEO OUT jacks to a component video input on your TV, monitor or AV receiver.
Be careful to match up the colours of the three jacks for correct connection.
|
|
|
|
|
|
To component |
||
|
|
|
|
|
|
video input |
|
|
TV |
|
|
|
|
|
|
|
|
CONTROL |
IN |
|
|
|
|
|
|
|
|
|
|
|
|
|
|
|
|
IR |
|
|
|
|
|
|
AUDIO OUT |
AUDIO OUT |
|
IN |
|
Y |
|
|
|
(5.1ch) |
(2ch) |
|
VIDEO OUT |
|
|
|
CENTER |
SURROUND |
FRONT |
|
|
|
|
|
|
||||
|
|
|
|
DIGITAL AUDIO OUT |
|
L |
L |
|
SETTING 2 |
|
|
PB |
|
|
|
||
HDMI OUT |
LAN(100) |
|
|
|
|
|
||
|
|
|
|
|
|
|
||
SETTING 1 |
|
|
|
|
|
|
|
|
IR RECEIVER |
|
S |
PR |
|
|
|
|
R |
|
|
|
|
|
|
|||
|
|
|
COMPONENT |
|
|
SUB WOOFER |
R |
|
|
|
|
COAXIAL |
OPTICAL |
|
|
||
|
|
|
VIDEO OUT |
|
|
|
|
|
Note |
11 |
1 There are some restrictions depending on the sampling rate. For more information see About the audio output settings on page 42. |
En |
02 |
Changing the output video resolution |
|
Use the OUTPUT RESOLUTION button located on both the front panel and the remote control to switch the output video resolution for the HDMI and component video outputs.
The table below shows the output settings.
Setting |
TV |
HDMI output |
Component |
Video/S-Video |
system |
output |
output |
||
|
|
|
|
|
AUTO |
PAL |
TV’s preferred |
TV’s preferred |
576/50i |
|
NTSC |
resolution1,2 |
resolution3 |
480/60i |
576i or |
PAL |
576/50i |
576/50i |
576/50i |
480i |
NTSC |
480/60i |
480/60i |
480/60i |
|
|
|
|
|
576p or |
PAL |
576/50p |
576/50p |
576/50i |
480p |
NTSC |
480/60p |
480/60p |
480/60i |
|
|
|
|
|
720p |
PAL |
720/50p |
576/50i |
576/50i |
|
NTSC |
720/60p |
720/60p 4,5 |
480/60i |
1080i |
PAL |
1080/50i |
576/50i |
576/50i |
|
NTSC |
1080/60i |
1080/60i4,5 |
480/60i |
1080p |
PAL |
1080/50p |
576/50i |
576/50i |
|
NTSC |
1080/60p |
480/60i |
480/60i |
|
|
|
|
|
Source |
PAL |
Dependent on |
Dependent on |
576/50i |
Direct |
NTSC |
source1,2 |
source 2,5,6, |
480/60i |
1.Refer to 24p output below for conditions.
2.The video output will be interrupted when switching the video output.
3.For resolutions that cannot be output by component output, video is output in the following resolutions:
PAL: 576/50i NTSC: 480/60i
4.Video output is 480i during copy protected DVD-Video playback.
5.Video output during BD-ROM playback is 576i/480i depending on the disc.
6.The frame frequency for 1080/24p is still 60 Hz.
 Note
Note
•Depending on your display, some of the settings may result in the picture disappearing. In this case, press
OUTPUT RESOLUTION repeatedly until the picture re-appears.
•720/50p, 1080/50i, 1080/50p, 1080/60p and 1080/24p output is only compatible with HDMI displays. They are not compatible with the component video output.
•When output video resolution is set to 720p, 1080i or 1080p, video is output in 16:9 format even if TV Aspect Ratio (page 39) is set to 4:3 (Standard).
•If the contours of the displayed subjects look jagged or blurred, try setting the output video resolution to 576i/480i. (If you connected this player to your TV with the HDMI connection and the picture disappears when you switch the output video resolution to 576i/480i, use the component connection with the 576i/480i output video resolution or S-Video, the standard composite connection instead.)
•Note that when using a Component Video connection with a TV or other AV component (not using HDMI), 480/60i video may be output in 480/60p, and 576/50i video may be output in 576/50p.
24p output
For smooth presentation of 1080/24p or 720/24p video with an HDMI-equipped display compatible with 1080/24p input, set 24p Direct Out (page 39) on this player to On.
This player will output 1080/24p video over HDMI in the following cases:
•1080/24p video: When the output video resolution is set to Auto or Source Direct.
•720/24p video: When the output video resolution is set to Auto.
 Note
Note
•Even when 24p Direct Out is set to On, if a TV not compatible with 1080/24p video is connected, the actual frame frequency of the video output will be 60 Hz.
•The video output will be interrupted when switching the video output from 1080/24p or 720/24p to other output video resolutions, or when switching to 1080/24p or 720/24p from other output video resolutions.
Connecting using an S-Video output
You can use the S-Video output instead of the VIDEO OUT jack to connect this player to your TV (or other equipment).
• Use an S-Video cable (not supplied) to connect the S-VIDEO OUT to an S-Video input on your TV, monitor or AV receiver.
Line up the small triangle above the jack with the same mark on the plug before plugging in.
|
|
|
|
|
To S-video input |
|
||
TV |
|
|
|
|
|
|
|
|
CONTROL |
IN |
|
|
|
|
|
|
|
|
|
|
|
|
|
|
|
|
IR |
|
|
|
|
|
|
AUDIO OUT |
AUDIO OUT |
|
IN |
|
Y |
|
|
|
(5.1ch) |
(2ch) |
|
VIDEO OUT |
|
|
|
CENTER |
SURROUND |
FRONT |
|
|
|
|
|
|
||||
|
|
|
|
DIGITAL AUDIO OUT |
|
L |
L |
|
SETTING 2 |
|
|
PB |
|
|
|
||
HDMI OUT |
LAN(100) |
|
|
|
|
|
||
|
|
|
|
|
|
|
||
SETTING 1 |
|
|
|
|
|
|
|
|
IR RECEIVER |
|
S |
PR |
|
|
|
|
R |
|
|
|
|
|
|
|||
|
|
|
COMPONENT |
|
|
SUB WOOFER |
R |
|
|
|
|
COAXIAL |
OPTICAL |
|
|
||
|
|
|
VIDEO OUT |
|
|
|
|
|
12
En
Connecting for surround sound
This player offers both analog and digital connections for surround sound. The digital outputs (coaxial and optical) provide a convenient way to connect this player to an AV receiver with built-in Dolby Digital and/or DTS decoders. The 5.1ch analog outputs can be used to connect to an AV receiver with multi-channel analog audio inputs.
Check the operating instructions that came with your AV receiver for more on these connections.
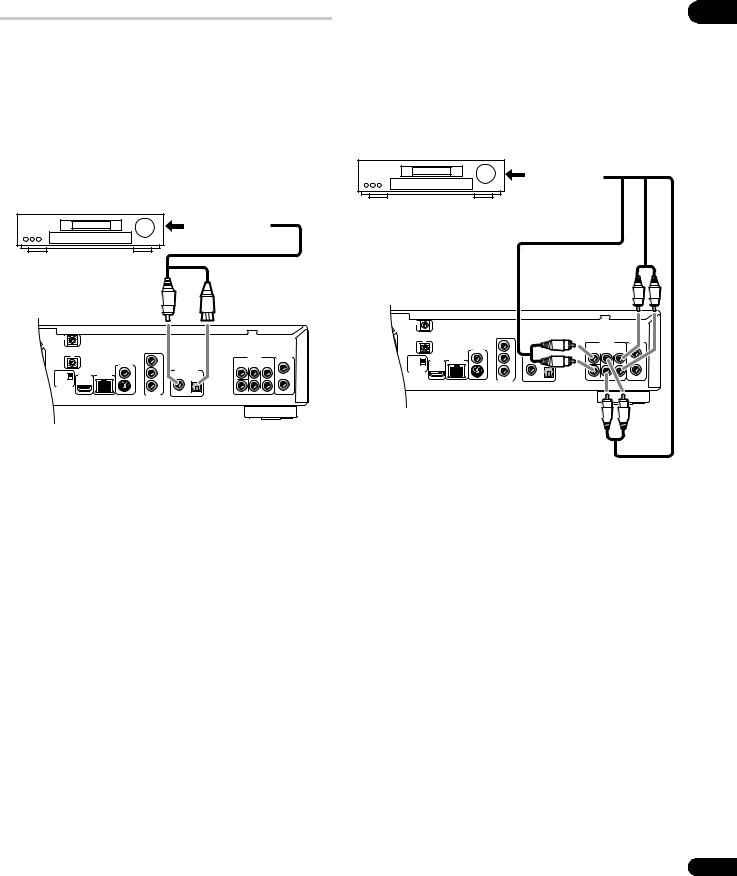
Digital connections
• Connect one of the DIGITAL AUDIO OUT (COAXIAL/ OPTICAL) jacks on this player to a digital input on your AV receiver.
To coaxial/optical digital input
AV receiver
CONTROL |
IN |
|
|
|
|
|
|
|
IR |
|
|
|
|
|
|
AUDIO OUT |
AUDIO OUT |
|
IN |
|
Y |
|
|
|
(5.1ch) |
(2ch) |
|
VIDEO OUT |
|
|
|
CENTER |
SURROUND |
FRONT |
|
|
|
|
|
|
||||
|
|
|
|
DIGITAL AUDIO OUT |
|
L |
L |
|
SETTING 2 |
|
|
PB |
|
|
|
||
HDMI OUT |
LAN(100) |
|
|
|
|
|
||
|
|
|
|
|
|
|
||
SETTING 1 |
|
|
|
|
|
|
|
|
IR RECEIVER |
|
S |
PR |
|
|
|
|
R |
|
|
|
|
|
|
|||
|
|
|
COMPONENT |
|
|
SUB WOOFER |
R |
|
|
|
|
COAXIAL |
OPTICAL |
|
|
||
|
|
|
VIDEO OUT |
|
|
|
|
|
Optical connection: Use an optical cable (not supplied) to connect the DIGITAL AUDIO OUT OPTICAL jack to an optical input on your AV receiver.
•When inserting the plug, the protective shutter will open and you should hear the plug click into position when fully inserted. Take care not to force the plug as this may damage the shutter, the cable and/or the player.
Coaxial connection: Use a coaxial cable (not supplied) to connect the DIGITAL AUDIO OUT COAXIAL jack to a coaxial input on your AV receiver.
 Note
Note
•Linear PCM audio output over the DIGITAL AUDIO OUT (COAXIAL/OPTICAL) jacks is limited to 2ch, 48 kHz.
Analog connections |
02 |
|
• Connect the AUDIO OUT (5.1ch) jacks on this player to the multi-channel analog inputs on your AV receiver.
Use a dedicated six-way cable (not supplied), or three sets of stereo cables (not supplied) to connect the six channels.
Check carefully that each channel is connected to its corresponding channel on the AV receiver.
After connecting, you can make settings for the number of speakers connected to your system — see the Speakers section of the Initial Setup menu on page 41 and Speaker Setup on page 43.
To multi-channel input
AV receiver
CONTROL |
IN |
|
|
|
|
|
|
|
|
|
|
|
|
|
|
|
|
IR |
|
|
|
|
|
|
AUDIO OUT |
AUDIO OUT |
|
IN |
|
Y |
|
|
|
(5.1ch) |
(2ch) |
|
VIDEO OUT |
|
|
|
CENTER |
SURROUND |
FRONT |
|
|
|
|
|
|
||||
|
|
|
|
DIGITAL AUDIO OUT |
|
L |
L |
|
SETTING 2 |
|
|
PB |
|
|
|
||
HDMI OUT |
LAN(100) |
|
|
|
|
|
||
|
|
|
|
|
|
|
||
SETTING 1 |
|
|
|
|
|
|
|
|
IR RECEIVER |
|
S |
PR |
|
|
|
|
R |
|
|
|
|
|
|
|||
|
|
|
COMPONENT |
|
|
SUB WOOFER |
R |
|
|
|
|
COAXIAL |
OPTICAL |
|
|
||
|
|
|
VIDEO OUT |
|
|
|
|
|
13
En

02 |
Network connection |
|
This player can be connected to a local area network (LAN) via the Ethernet port on the rear panel.
Connecting directly to a PC
If you only need to use one PC to act as a media server, you can connect this player directly to the PC using the included LAN cable.
After making the physical connection the player needs to be set up for network communication. This is done from the Initial Setup menu — see Setting up for network use on page 19 for detailed instructions.
For best performance, we recommend using a 100BASE-TX compatible PC and Ethernet hub.
CONTROL |
IN |
|
|
|
|
|
|
|
IR |
|
|
|
|
|
|
AUDIO OUT |
AUDIO OUT |
|
IN |
|
Y |
|
|
|
(5.1ch) |
(2ch) |
|
VIDEO OUT |
|
|
|
CENTER |
SURROUND |
FRONT |
|
|
|
|
|
|
||||
|
|
|
|
DIGITAL AUDIO OUT |
|
L |
L |
|
SETTING 2 |
|
|
PB |
|
|
|
||
HDMI OUT |
LAN(100) |
|
|
|
|
|
||
|
|
|
|
|
|
|
||
SETTING 1 |
|
|
|
|
|
|
|
|
IR RECEIVER |
|
S |
PR |
|
|
|
|
R |
|
|
|
|
|
|
|||
|
|
|
COMPONENT |
|
|
SUB WOOFER |
R |
|
|
|
|
COAXIAL |
OPTICAL |
|
|
||
|
|
|
VIDEO OUT |
|
|
|
|
|
Connecting via an Ethernet hub
If you already operate one or more PCs on a local area network, you can integrate this player by connecting it to the Ethernet hub using the included LAN cable.
In the example configuration below, this player would be able to access content from either of the PCs.
CONTROL |
IN |
|
|
|
|
|
|
|
|
|
|
|
|
|
|
|
|
IR |
|
|
|
|
|
|
AUDIO OUT |
AUDIO OUT |
|
IN |
|
Y |
|
|
|
(5.1ch) |
(2ch) |
|
VIDEO OUT |
|
|
|
CENTER |
SURROUND |
FRONT |
|
|
|
|
|
|
||||
|
|
|
|
DIGITAL AUDIO OUT |
|
L |
L |
|
SETTING 2 |
|
|
PB |
|
|
|
||
HDMI OUT |
LAN(100) |
|
|
|
|
|
||
|
|
|
|
|
|
|
||
SETTING 1 |
|
|
|
|
|
|
|
|
IR RECEIVER |
|
S |
PR |
|
|
|
|
R |
|
|
|
|
|
|
|||
|
|
|
COMPONENT |
|
|
SUB WOOFER |
R |
|
|
|
|
COAXIAL |
OPTICAL |
|
|
||
|
|
|
VIDEO OUT |
|
|
|
|
|
|
|
|
|
Ethernet hub |
1 |
2 |
3 |
4 |
(router with hub functionality) |
LAN(10/100) |
LAN(10/100) |
PC 1 |
PC 2 |
14
LAN(10/100)
PC
Controlling this player via another Pioneer component
The CONTROL IN jack allows you to control this player via the remote control sensor of another Pioneer component — typically an AV receiver — that has a CONTROL OUT jack. Remote control signals are passed through to the player from the remote sensor of the other component, allowing you greater freedom in the placement of your player.
• Use a miniplug cord (not supplied) to connect the CONTROL IN jack of this player with the CONTROL OUT jack of your other Pioneer component.
To CONTROL OUT
AV Receiver
CONTROL |
IN |
|
|
|
|
|
|
|
IR |
|
|
|
|
|
|
AUDIO OUT |
AUDIO OUT |
|
IN |
|
Y |
|
|
|
(5.1ch) |
(2ch) |
|
VIDEO OUT |
|
|
|
CENTER |
SURROUND |
FRONT |
|
|
|
|
|
|
||||
|
|
|
|
DIGITAL AUDIO OUT |
|
L |
L |
|
SETTING 2 |
|
|
PB |
|
|
|
||
HDMI OUT |
LAN(100) |
|
|
|
|
|
||
|
|
|
|
|
|
|
||
SETTING 1 |
|
|
|
|
|
|
|
|
IR RECEIVER |
|
S |
PR |
|
|
|
|
R |
|
|
|
|
|
|
|||
|
|
|
COMPONENT |
|
|
SUB WOOFER |
R |
|
|
|
|
COAXIAL |
OPTICAL |
|
|
||
|
|
|
VIDEO OUT |
|
|
|
|
|
•You will also need to connect a coaxial digital cable, analog audio cable, or video cable.
•When connected via System Control, point the remote control toward the connected component (such as an AV receiver). The remote will not work correctly when pointed at this unit.
•You cannot connect use System Control with components that do not have a System Control jack or with components manufactured by companies other than Pioneer.
En

Using an external IR receiver with this player |
02 |
|
If you prefer to keep your AV equipment in a closed cabinet, you can use an external IR receiver connected to the IR IN jack. You can thus have just the receiver outside of the cabinet and still be able to control the player.
IR receiver
CONTROL |
IN |
|
|
|
|
|
|
|
IR |
|
|
|
|
|
|
AUDIO OUT |
AUDIO OUT |
|
IN |
|
Y |
|
|
|
(5.1ch) |
(2ch) |
|
VIDEO OUT |
|
|
|
CENTER |
SURROUND |
FRONT |
|
|
|
|
|
|
||||
|
|
|
|
DIGITAL AUDIO OUT |
|
L |
L |
|
SETTING 2 |
|
|
PB |
|
|
|
||
HDMI OUT |
LAN(100) |
|
|
|
|
|
||
|
|
|
|
|
|
|
||
SETTING 1 |
|
|
|
|
|
|
|
|
IR RECEIVER |
|
S |
PR |
|
|
|
|
R |
|
|
|
|
|
|
|||
|
|
|
COMPONENT |
|
|
SUB WOOFER |
R |
|
|
|
|
COAXIAL |
OPTICAL |
|
|
||
|
|
|
VIDEO OUT |
|
|
|
|
|
 Tip
Tip
•You may need to set the IR RECEIVER switch (located under the IR IN jack) for this player to recognize the IR receiver correctly.
•This player does not supply power to the external IR receiver. Please see the operating instructions of the IR receiver for the power requirements.
15
En
03 |
Chapter 3 |
|
|
|
|
Controls and displays |
|
|
|||
|
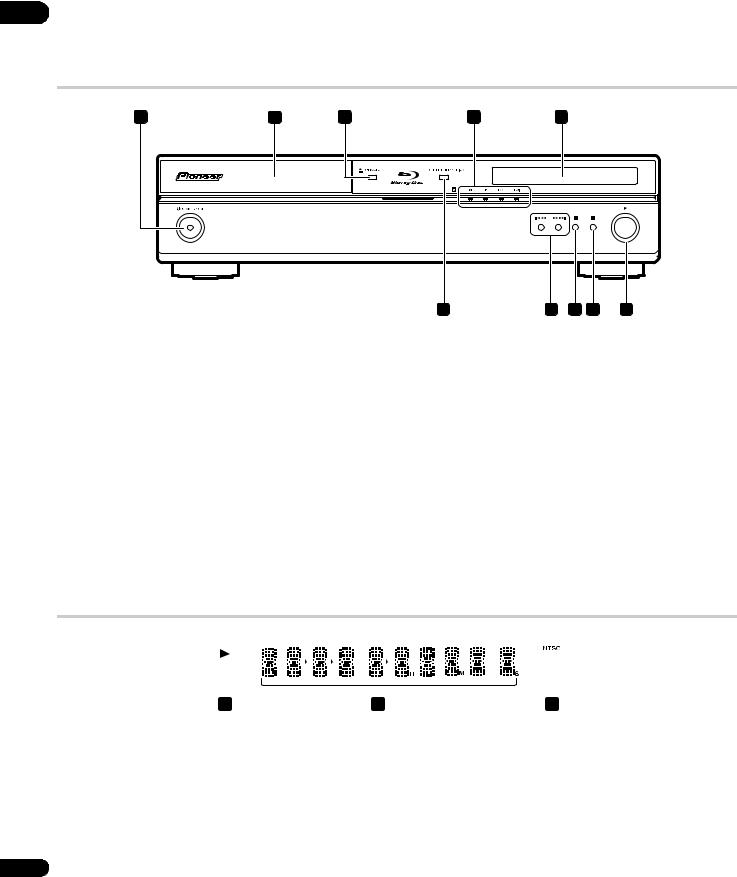
Front panel |
|
|
|
|
|
1 |
2 |
3 |
4 |
5 |
10 |
9 |
8 |
7 |
6 |
1 STANDBY/ON
Press to switch the player on (the power indicator and indicator in the middle of the unit light up when the power is on) or into standby.
2Disc tray
3OPEN/CLOSE
Press to open or close the disc tray.
4Indicators
•FL OFF – Lights when the display and other indicators are switched off.
•HD – Lights when the video output is 720p, 1080i or 1080p (HDMI), or 720p or 1080i (component).
•LAN – Lights when there is an active local area network (LAN) connection.
•HDMI – Lights when a device is connected via HDMI.
5Display
Shows disc status and playback information.
6 (play)
Press to start or resume playback.
7 (stop)
Press to stop playback (you can resume playback by pressing ).
8 (pause) (pause)
Press to pause playback. Press again to restart.
9Skip/scan buttons
•– Press to jump to the next chapter, track, etc. Press and hold for fast forward scanning.
•– Press to jump back to the beginning of the current chapter, track, etc. then to previous chapters, tracks, etc. Press and hold for fast reverse scanning.
10OUTPUT RESOLUTION
Press to switch the output resolution over HDMI and component video outputs. See Changing the output video resolution on page 12.
Front panel display
|
|
|
|
L |
|
|
|
|
|
|
|
|
|
|
|
|
|
|
|
|
|
|
|
|
|
|
|
|
|
1 |
2 |
3 |
|||
1
Lights during playback of a disc.
2 Character display
Shows various playback information — disc time, chapter and title number, etc.
3 NTSC
Lights when the video output signal format is NTSC.
16
En
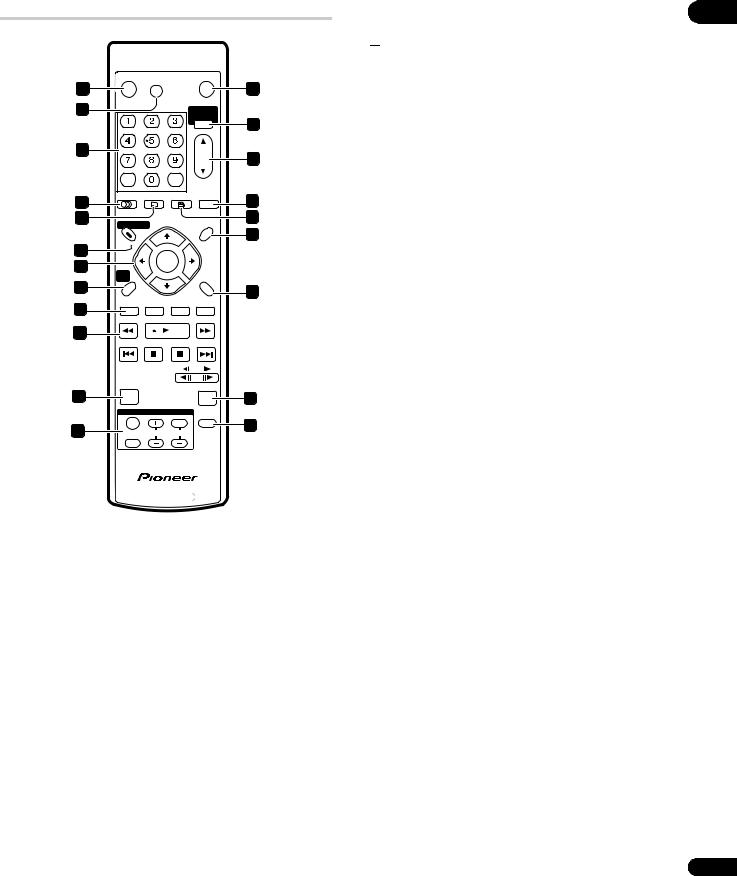
Remote control
|
STANDBY/ON FL |
OPEN/CLOSE |
|
1 |
DIMMER |
|
2 |
|
|
3 |
|
HOME MEDIA |
|
GALLERY |
|
|
|
5 |
4 |
|
6 |
|
|
|
CLEAR |
ENTER |
OUTPUT |
|
|
RESOLUTION |
7 |
AUDIO |
SUBTITLE |
ANGLE |
DISPLAY |
9 |
|
|
|
|
||
8 |
DISC NAVIGATOR |
|
POPUP MENU |
10 |
|
|
|
|
|||
|
|
|
|
MENU |
12 |
11 |
TOP MENU |
|
|
|
|
|
|
|
|
|
|
13 |
|
ENTER |
|
|
|
HOME |
|
|
|
|
|
|
|
|
RETURN |
|
|
14 |
MENU |
|
|
|
|
|
|
|
|
15 |
|
|
|
|
|
|
|
16 |
RED |
GREEN |
YELLOW |
BLUE |
|
|
|
|
|
|
|
17 |
|
|
|
|
|
|
PLAY MODE |
|
|
PHOTO ZOOM |
|
|
|
|
|
|
|
18 |
|
|
|
|
19 |
|
TV CONTROL |
|
VIDEO |
|
|
|
|
ADJUST |
|
||
|
|
|
|
|
|
21 |
|
|
|
|
20 |
INPUT |
CHANNEL |
VOLUME |
|
||
|
|
||||
SELECT |
|
|
|
|
|
BD PLAYER
1 STANDBY/ON
Press to switch the player on or into standby.
2 OPEN/CLOSE
Press to open or close the disc tray.
3 FL DIMMER
Press to change the brightness of the display. When the display and other indicators are off, the FL OFF indicator (page 16) lights.
4Number buttons
Use to enter title, chapter or track numbers, etc.
CLEAR: Press to clear a numeric entry, etc.
ENTER: Press to select an option or execute a command.
5HOME MEDIA GALLERY
Press to display the Home Media Gallery screen (see page 30).
6 OUTPUT RESOLUTION
Press to switch the output resolution over HDMI and component video outputs (see pages 12 and 23).
7  AUDIO
AUDIO
Press to select the audio channel or language (see page 23).
8  SUBTITLE
Press to select a subtitle display (see page 23).
9 DISPLAY
Press to display information (see page 23).
10 
 ANGLE
ANGLE
Press to change the camera angle during BD-ROM or DVD-Video movie multi-angle scene playback (see page 23).
11 DISC NAVIGATOR/TOP MENU
Press to display the top menu of a BD-ROM or DVD-Video disc. When playing a DVD-R/-RW disc, press to display/exit the Disc Navigator.
12 POPUP MENU/MENU
BD-ROM: Press to display/hide the pop-up menu. DVD-Video: Press to display the disc menu (if there is one).
13 / / / and ENTER
Use to navigate on-screen displays and menus. Press ENTER to select an option or execute a command.
14 HOME MENU
Press to display the player’s Home Menu, from which you can access most of the player’s functions.
15 RETURN
Press to return to a previous screen.
16 Red/Green/Yellow/Blue
Use to navigate BD-ROM menus.
When playing a movie file on a DVD-R/-RW disc or media servers, press the Blue button to switch the TV system frame rate (50 Hz/ 60 Hz) (see About NTSC/PAL TV systems on page 20).
17Playback controls
: Press to start reverse/forward scanning.
: Press to start or resume playback.
(pause): Press to pause playback; press again to restart.
: Press to stop playback (you can resume playback by pressing).
: Press to jump to the start of the previous/next chapter/ track.
/
 : Use for slow motion and step frame (see page 22).
18 PLAY MODE
Press to change the Play Mode (repeat play, for example) (see page 22).
19 PHOTO ZOOM
Press to zoom the screen when displaying a still image (see page 23).
20 VIDEO ADJUST
Press to display the Video Adjust screen (see page 37).
21TV CONTROL buttons
See also Setting up the remote to control your TV on page 46.
: Press to turn the TV on or into standby.
VOLUME +/–: Use to adjust the volume.
CHANNEL +/–: Use to select TV channel.
INPUT SELECT: Press to change the input function of the TV.
03
17
En
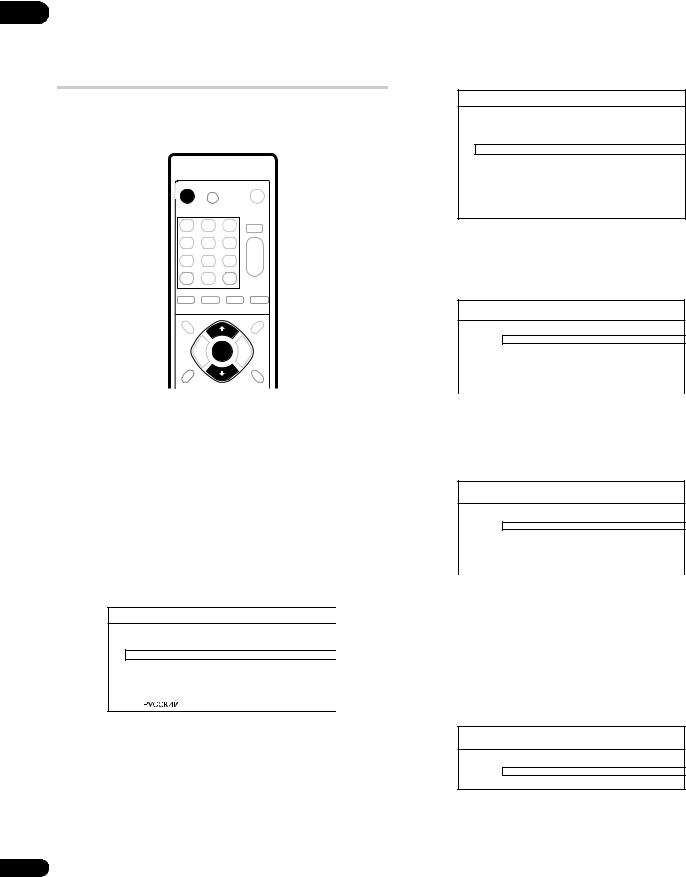
04 |
Chapter 4 |
Getting Started |
Switching on and setting up
When you switch the player on for the first time the Setup Navigator screen appears. We recommend using this to make a few basic player settings.
STANDBY/ON
4 Press ENTER to start setting up using the Setup Navigator.
Setup Navigator
Before using, make some simple settings for the BD player.
Star t
Cancel
Please use the Initial Setup if you want to make more detailed settings.
ENTER
1Switch on your TV and set the video input to this player.
2Press the STANDBY/ON button on the remote control or the front panel to switch on.
•It can take up to one minute for the unit to turn on.
•When you switch on for the first time, your TV should display the Setup Navigator screen. (If the Setup Navigator doesn’t appear, you can also access it from the Initial Setup menu; see page 41).
•When you have this unit connected to a plasma television that is compatible with HDMI Control, language settings are imported from the plasma television’s OSD settings before Setup Navigator begins.
3Use the / buttons to choose a language, then press
ENTER.
Setup Navigator
Language
 English
français Deutsch Italiano Español
If you don’t want to use the Setup Navigator, press to select Cancel, then press ENTER to exit the Setup Navigator.
5 Use the / buttons to select the output video resolution then press ENTER.
Setup Navigator
Output Video Resolution
 Auto
Auto
576i/480i
576p/480p
720p
1080i
1080p
Source Direct
If you connected this player to your TV using the HDMI connector, select from Auto, 576i/480i (interlaced), 576p/480p (progressive),
720p, 1080i, 1080p, or Source Direct, then skip to step 7 (the aspect ratio will automatically be set to 16:9 (Widescreen)). Generally, the Auto setting is recommended.
Setup Navigator
Output Video Resolution
S-Video/Video only
576i/480i
576p/480p
720p
1080i  Don't Know
If you’re using an S-Video or composite video connection, select S- Video/Video only.
If you’re using a component video connection, match the output setting with the capabilities of your TV. Select from: 576i/480i,
576p/480p, 720p, 1080i or Don’t Know. If you select 720p or
1080i, skip the next step since the aspect ratio will automatically be set to 16:9 (Widescreen).
6 Use the / buttons to select the aspect ratio of your TV then press ENTER.
Setup Navigator
TV Aspect Ratio
 16:9 (Widescreen)
4:3 (Standard)
If you have a widescreen TV, select 16:9 (Widescreen); if you have a standard size TV, select 4:3 (Standard).
18
En
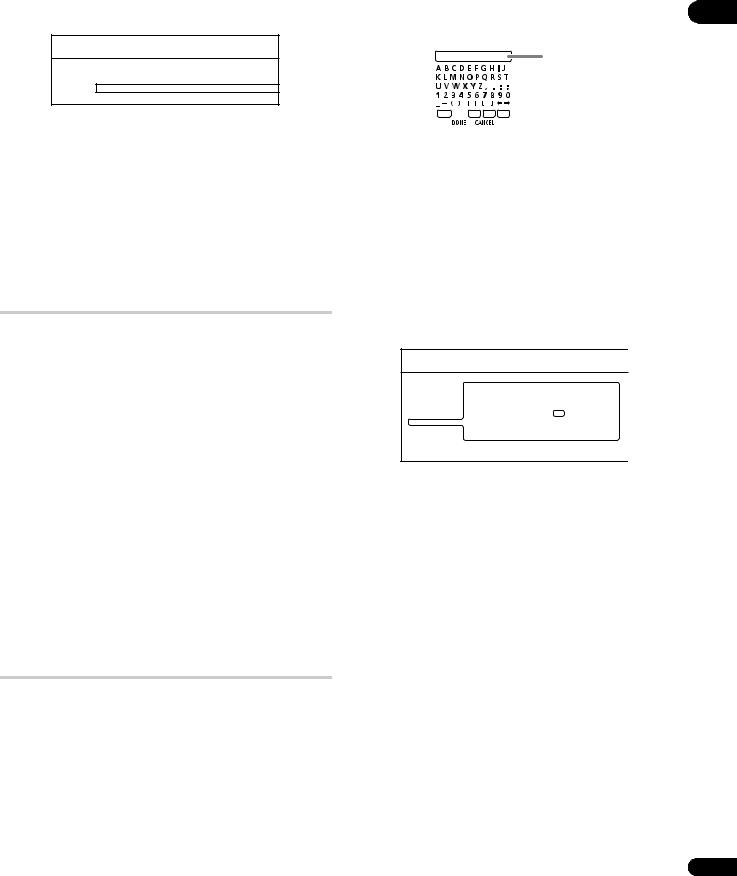
7 Select ‘Finish Setup’ to accept the settings and exit the Setup Navigator, or ‘Go Back’ to go through the settings again.
Setup Navigator
Setup is complete!
Enjoy using your BD player!
Finish Setup
Go Back
You can run the Setup Navigator at any time by selecting it from the Options menu — see page 41.
About the screen saver
If the player is stopped or paused for more than five minutes with no other operation, the screen saver starts.
Once the screen saver has started, pressing any button on the front panel or remote will clear it and return the player to normal operation.
The screen saver starts for CDs and music files after five minutes pass without any commands input, whether or not playback has been paused or stopped.
Using the on-screen displays
This player makes extensive use of graphical on-screen displays (OSDs). You should get used to the way these work as you’ll need to use them when setting up the player, using some of the playback features, and when making more advanced settings for audio and video.
All the screens are navigated in basically the same way, using the cursor buttons (/ / /) to change the highlighted item and
pressing ENTER to select it.
Button |
What it does |
HOME MENU |
Display/exit the on-screen display |
|
|
/ / / |
Changes the highlighted menu item |
|
|
ENTER |
Selects the highlighted menu item |
|
|
RETURN |
Returns to the previous menu or screen without |
|
saving changes |
|
|
 Tip
Tip
•Information at the bottom of an OSD screen explains the currently selected menu item and shows which buttons can be used for that screen.
Setting up for network use
If you’ve connected this player to a local area network (LAN) you may need to make a few settings before you can use the Home Media Gallery feature over the network.
1Press HOME MENU and select ‘Initial Setup’.
2Select ‘Network’.
3Select ‘Device Name’ then ‘Next Screen’.
4 Use the on-screen keypad to enter a name for the player.
This is how the player will appear to connected devices on the local 04 area network.
Device
name input
SHFT |
SPC DEL CLR |
•Use the / / / buttons and ENTER to select characters from the keypad.
•Select SHFT to toggle between upper and lower case.
•Select SPC to insert a space.
•Select DEL to delete the character at the current cursor position in the name field.
•Select CLR to clear the name field.
5Select ‘DONE’ to register the name and exit the input screen.
Select CANCEL to close the keypad without registering the name.
6Select ‘IP Configuration’ then ‘Next Screen’ to display the IP configuration screen.
Initial Setup
Video Out |
IP Configuration |
|
|
|
|
Audio Out |
Auto set IP Address |
Off |
|
||
Language |
|
||||
|
|
|
|
|
|
Parental Lock |
IP Address |
192 |
. 255 |
. 255 . |
0 |
Network |
Subnet mask |
255 |
. 255 |
. 255 . |
0 |
Speakers |
Default gateway |
192 |
. 168 |
. 1 . |
0 |
Options |
|
|
|
|
|
Set the IP address.
7 Set ‘Auto set IP Address’ to ‘On’.
If there is a DHCP server on the local area network (LAN), this player will automatically be allocated an IP address. If you’re using a broadband router or broadband modem that has a DHCP (Dynamic Host Configuration Protocol) server function, select On. The IP address will automatically be determined.
If there is no DHCP server on the network and you select On, this player will use its own Auto IP function to determine the IP address.
•If you want to set the IP address manually, select Off then set the IP Address, Subnet mask and Default gateway: Use the / / / buttons to select a field; use the number buttons to enter a value. Press ENTER to finish and exit the screen.
8 Press HOME MENU to exit the Initial Setup menu.
You should now be able to use the Home Media Gallery (accessible from the Home Menu). See Using the Home Media Gallery on page 30 for more.
•For information on DHCP refer to the network device’s operating instructions.
•You may need to contact your service provider or network administrator when manually entering an IP address.
19
En

04 |
Playing movies, music and photos |
|
Using this player, you can enjoy watching movies, listening to music and browsing photos, from DVD discs or from a media server on the network. How you navigate, browse and play content varies according to the format of the content and the media:
•To play a DVD movie disc (i.e., one containing DVD-Video application format), see Playing BD/DVD movies and Audio CD below.
•To play a DVD-R/-RW disc recorded with movie, music or photo files, turn to Using the Disc Navigator on page 25.
•To play content from a media server, please refer to Using the Home Media Gallery on page 30.
Playing BD/DVD movies and Audio CD
The basic playback controls for playing BD/DVD movies and Audio CD discs are covered here. Further functions are detailed in the next chapter.
STANDBY/ON |
OPEN/CLOSE |
POPUP MENU
TOP MENU |
MENU |
ENTER
1If the player isn’t already on, press STANDBY/ON to switch it on.
Also turn on your TV and make sure that it is set to the correct video input.
2Press OPEN/CLOSE to open the disc tray.
3Load a disc.
Load a disc with the label side facing up, using the disc tray guide to align the disc (if you’re loading a double-sided DVD-Video disc, load it with the side you want to play face down).
The player will take a short while to read the disc, after which the disc type will show up in the front panel display.
4Press to start playback.
•Use the (pause) and buttons to pause or stop playback. You can resume playback in either case by pressing . See also
Resuming playback on page 21.
•See Playback controls on page 21 for other controls available during playback.
20
When playing BD-ROM discs:
•Commercially produced BD-ROM movie discs often go straight to the disc menu when playback is started (sometimes preceded
by an opening sequence). Navigate through the disc menu using the cursor keys (/ / /) and the ENTER button. You can also use the number buttons to select numbered items in some menus.
•To get back to the top menu, press TOP MENU.
•Some BD-ROM discs feature pop-up menus that do not interrupt playback; press POPUP MENU/MENU to access these.
When playing DVD-Video discs:
•Commercially produced DVD movies often go straight to the disc menu when playback is started (sometimes preceded by an
opening sequence). Navigate the disc menu using the cursor (/ / /) and ENTER buttons. You can also use the number buttons to select numbered items in some menus.
•To get back to the top menu, press TOP MENU.
•To get back to the disc menu, press POPUP MENU/MENU.
When playing Audio CDs:
• For more information see Playback controls on page 21.
5 When you’ve finished using the player, eject the disc and switch the player back into standby.
•To open/close the disc tray, press OPEN/CLOSE. Remove the disc before putting the player into standby.
•Press STANDBY/ON to switch the player into standby.
About NTSC/PAL TV systems
•The TV system setting is set to PAL when you turn the player on. When video output in NTSC is played back, the TV system setting is automatically changed. When video is stopped, playback is resumed with video output in the last format used.
•When playing a movie file on a DVD-R/-RW disc or media servers, press the Blue button to switch the TV system frame rate (50 Hz/60 Hz). Each press of the button switches 50 Hz and 60 Hz alternately. “NTSC” shows up in the front panel display when NTSC is selected (it is not shown when PAL is selected).
En
 Loading...