


Prisma CD1
Compact Disc Player
Owners Manual

Perreaux Industries Limited makes no warranty for the use of its products, other than those expressly contained in the warranty detailed herein. The Company assumes no responsibility for any errors which may appear in this document, reserves the right to change products or specifications detailed herein at any time without notice, and does not make any commitment to updatethe information contained herein. No licenses to patents or other intellectual property of Perreaux are granted by the Company in connection with the sale of Perreaux products, expressly or by implication.
mboob^ru® is a registered trademark of Perreaux Industries Ltd.
Terms and product names in this document may be trademarks of others.
2

i
Introducing the Perreaux
CD1 Compact Disc Player
Features at a
Glance
Congratulations on your Perreaux CD1 purchase. To realise the full potential of your unit you need to appreciate all aspects of its operation.
Before installing the CD1 into your system, read the entire manual carefully. Endeavour to understand every detail by familiarising yourself with the controls and features as you read. You will find it easier to install using the relevant sections of this manual as a reference.
We have attempted to explain every feature and operational facet clearly and concisely. In the event that something is still unclear to you, your Perreaux dealer will be happy to assist you further.
Read this manual, install your unit correctly and realise the sonic significance of your investment in Perreaux.
Perreaux products are designed to provide the utmost in sonic realism and electronic reliability with a functional yet elegant appearance that reflects the care and craftsmanship applied during all stages of construction.
Rugged build quality
Multiple regulated power supplies
Burr Brown DAC
High speed processing with 96kHz over-sampling
Balanced analog outputs
Digital output
Full function infrared remote control
To maintain the consistently high quality that you expect from us, and we expect from ourselves, Perreaux products are handcrafted.
We maintain the human-link throughout, from design and construction, through to the ultimate test, your music, your system, your ears.
Because we too listen to our products, we know that with your Perreaux you will discover many more of the musical secrets we strive to reveal.
From all of us at Perreaux Industries Limited, thank you for choosing the Perreaux CD1 compact disc player.
3

ii Important Safety Instructions
Note: All safety and operation instructions should be read carefully before the CD1 is operated. Keep the Owners Manual in a safe place for future reference.
The CD1 should not be used near water, for example near a bathtub, kitchen sink, in a wet basement, near a swimming pool, etc.
The CD1 should be rack mounted only in a heavy-duty rack or stand that is recommended for audio equipment use.
Mounting to a wall or ceiling should be via a heavy-duty bracket or shelf designed for audio equipment use.
The CD1 should be situated away from heat sources such as radiators, stoves, or other appliances that produce excessive amounts of heat.
DO NOT place the CD1 directly onto carpeted surfaces.
Avoid exposing the CD1 to extremely high or low temperatures.
The CD1 should be connected to a mains power supply only of the type described in the operating instructions, or as marked on the rear of the unit.
DO NOT disconnect the mains earth from the system.
The mains power supply cord should be routed so that it is not likely to be walked on or pinched by items placed on or against it.
The power cord of the CD1 should be unplugged from the mains outlet when the unit is to be left unused for long periods or when attempting to connect or disconnect cables and before cleaning your unit.
Care should be taken so that objects and/or liquids do not accidentally fall inside the CD1.
Please keep electrical equipment out of reach of children.
Please unplug sensitive electronic equipment during electrical storms.
Please replace any fuse with the value and type specified.
Avoid operating the CD1 with the cover removed.
DO NOT bypass any fuse.
DO NOT attempt to repair the CD1. In the event of a problem, please contact your Perreaux dealer.
4

iii |
Table of Contents |
i ii iii 1 2 3 4 5 6 7 8 9 10 11 12 13 14 15
Introducing the Perreaux CD1 Compact Disc Player |
...............................................3 |
Important Safety Instructions ........................................................................................ |
4 |
Table of Contents.............................................................................................................. |
5 |
Unpacking and Placement.............................................................................................. |
6 |
Instant Install...................................................................................................................... |
7 |
Front Panel Functions...................................................................................................... |
8 |
Rear Panel Functions..................................................................................................... |
10 |
Remote Control Functions........................................................................................... |
13 |
Special Design Philosophies........................................................................................ |
16 |
Special Design Features................................................................................................ |
18 |
Maximising System Potential ...................................................................................... |
19 |
Care and Maintainance................................................................................................ |
20 |
Warranty Information and Obtaining Service........................................................ |
21 |
Extended Warranty Registration Form.................................................................... |
22 |
Faultfinding Your System............................................................................................. |
23 |
Specifications................................................................................................................... |
28 |
Physical Dimensions...................................................................................................... |
31 |
Contact Details................................................................................................................ |
32 |
5

1 Unpacking and Placement
|
The |
CD1 is packaged for maximum protection. Please carefully read the |
|
instructions below before proceeding to unpack the unit. Be extremely careful. |
|
Unpacking |
|
Inspect both ends of the cardboard box and open at the end without the |
Procedure |
|
central staple by slitting the reinforced tape at either side. |
|
|
Fold back the flaps and tip thepackage on end and the inner box will |
|
|
slide out. |
|
|
Lay the inner box down flat and upright, open it conventionally by |
|
|
separating the top tray from the bottom. |
|
|
The product can now be removed from the bottom packaging. This will |
|
|
be easier if you have someone to help you by holding the base of the |
|
|
box. |
|
|
Alternately, the bottom tray and player could be tipped upside down |
|
|
and the bottompackaging removed. If opened in this manner, please |
|
|
ensure that you turn the contents over again. |
|
|
|
Note: Be very careful to secure the unit if you are planning to flip the package |
||
|
upside down. |
|
|
|
|
Remove the two whitepolystyreneprotectors off either side of the player, leaving the black material covering.
Pull back the material and remove the protective black tissue from the front panel.
The player is now unpacked and ready for further installation.
Note: Please retain all packaging material for future transport.
Box 1 x CD1 Compact disc player
Contents 1 x CD1 Product manual
1x Perreaux remote control 2 x AAA batteries
1x Screwdriver
1x Detachable AC power cord
Placing The CD1 should generally be placed close to your amplifier, keeping the Your CD1 interconnect cabling short.
6

2 |
|
|
Instant Install |
|
|
|
If you are like us, the first thing you will want to do is to play your favourite |
|
|
|
|
|
|
|
piece of music through your new CD1. The following instructions are written to |
|
|
|
enable you to achieve this as quickly as possible. These are not comprehensive |
|
|
|
instructions, but are designed to enable you to play music now! |
|
Note: |
|
|
|
Please take the time to read the CD1 manual thoroughly as it |
||
|
|
|
incorporates many features, which will enhance its operation. |
|
|
|
|
|
|
|
Placement |
|
|
|
Best results will be achieved when placed on a solid surface. DO NOT place on |
|
|
|
a carpeted floor or cover the player! |
|
|
|
Turn off associated components |
|
|
|
This minimises the potential to damage any other components when connecting |
|
|
|
your CD1 into the system. |
|
|
|
Connect CD1 to amplifier |
|
|
|
Connect the output of the CD1 to the unbalanced (RCA) inputs at the rear of |
|
|
|
your amplifier. |
|
Note: |
|
|
|
Try to keep all interconnect cables as far from loudspeaker cables as |
||
|
|
|
possible and well away from all AC mains leads. |
|
|
|
|
|
|
|
Switch on CD1 |
|
|
|
After checking the supply voltage compatibility with the voltage rating on the |
|
|
|
CD1 rear panel, insert the power cord-set supplied into the rear of the unit and |
|
|
|
into the wall. Switch on the socket at the wall and power up the CD1 by setting |
|
|
|
the switch on the rear panel to ON ( I). |
|
|
|
Switch on your amplifier |
|
|
|
Make sureyour amplifier is connected to the mains and switch it on. |
|
|
|
Insert your favourite CD |
|
|
|
Open the disc drawer by pressing the ‘O/C’ button and insert your favourite CD. |
|
|
|
Press ‘PLAY’ on the CD1 |
|
|
|
Increase the volume |
|
|
|
Slowly increase the volume control of your amplifier to achieve a comfortable |
|
|
|
listening level. |
|
|
|
CONGRATULATIONS! |
|
|
|
Now that you have achieved your first objective, sit back, relax and please read |
|
|
|
the rest of the manual at your own pace, in your favourite armchair, whilst |
|
|
|
sipping a hot cup of coffee. You’ll find the whole experience much more |
|
|
|
pleasurable whilst listening to music. |
|
|
|
|
7
3 |
Front Panel Functions |
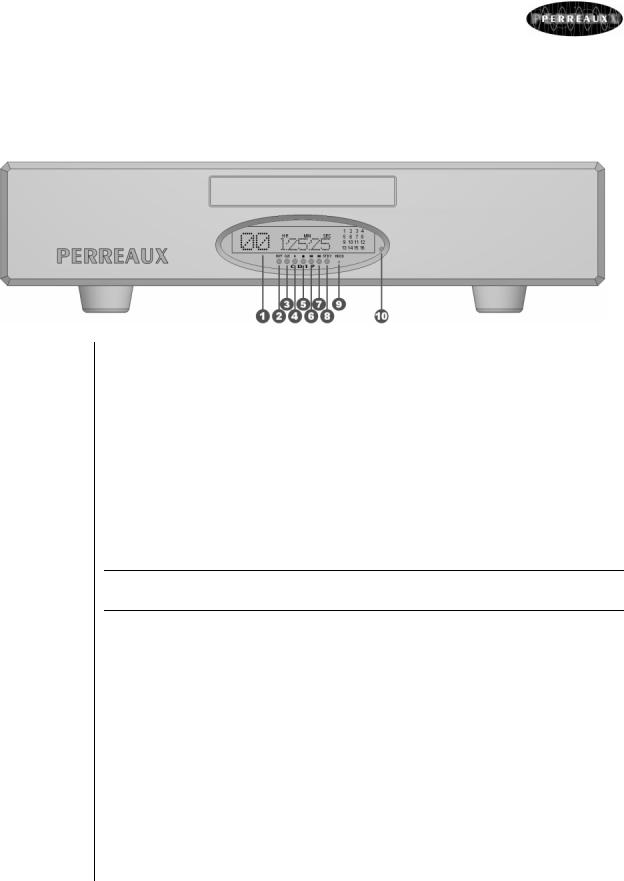
 Vacuum Fluorescent Display
Display provides information regarding the status of the CD1 and track/time information for the disc being played.
 ‘RPT’ Button
Allows you to repeat the current track or the entire disc continuously until the feature is cancelled by pressing the RPT button or pressing ‘■’. The RPT button steps sequentially through the available options. Pressing the button once repeats the current track, displaying REPEAT 1 in the display. Pressing a second time repeats the entire disc, displaying REAPEAT ALL in the display. Press a third time to cancel the REPEAT function.
Note: The REPEAT function is automatically cancelled when the disc drawer is opened.
 ‘O/C’ Button
When the disc drawer is closed, pressing this button opens the drawer. To close the drawer, press the button again. Pressing ‘►’ or lightly pushing on the drawer itself can also close the drawer. This can also be performed via the remote control.
When the drawer is open, the display reads ‘OPEN’. When it is closed with no disc, the display reads ‘NO DISC’. When the drawer closes with a disc inserted, the display will show the number of tracks and the total time of the disc.
 ‘►’ Button
Press this button to start playing the disc. If the disc drawer is open, it will close automatically. The number of the track being played and the and the elapsed time will be shown in the display, along with the PLAY indicator.
8

 ‘■’ Button
This button stops a disc that is playing and resets the player, i.e. if play is resumed, the disc will start over from the first track.
 ‘ ’ Button
Pressing this button returns to the beginning of the current track. Pressing twice quickly in succession returns to the beginning of the previous track. The new track number is shown in the display.
 ‘ ’ Button
Pressing this button advances to the beginning of the next track. The new track number is shown in the display.
 ‘STBY’ Button
This button puts the CD1 into STANDBY mode, as indicated by the red standby light. The display goes dark and the unit will not operate.
 HDCD Indicator
This light will illuminate to indicate that an HDCD encoded disc is being played.
 IR Sensor
This is the infrared sensor to receive commands transmitted from the remote control.
9
4 |
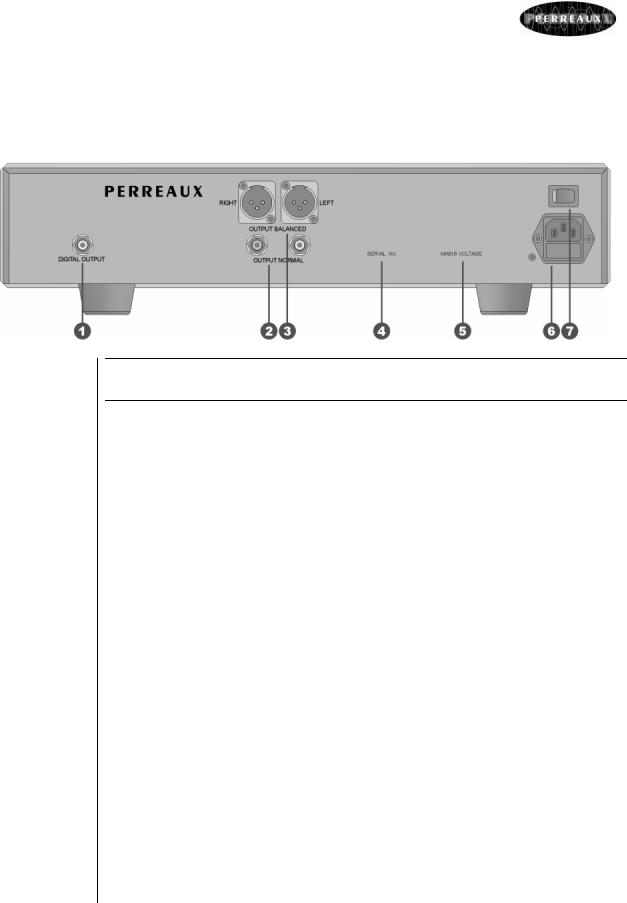
Rear Panel Functions |
Caution! Please make all changes at minimum volume setting. Only increase the volume after the connections have been made.
 Digital Output
Using a standard 75E coax digital cable with RCA termination, connect the digital output to the coax digital input on the external D/A converter.
These high quality gold plated sockets are highly conductive, corrosion resistant, and provide less potential for corrosion induced distortion.
Refer to Chapter 13 “Specifications” for more details.
 Unbalanced Analog Output
Standard single-ended outputs (RCA) supplying analog signals to the source inputs of an audio preamplifier, integrated amplifier or receiver.
Using quality audio interconnect cables, connect the left channel output of the CD1 to the left channel input on the preamplifier or other component and the right channel output to the right channel input on the preamplifier or other component.
Refer to Chapter 13 “Specifications” for more details.
 Balanced Analog Output
Balanced outputs (XLR) providing analog signals to drive a preamplifier, integrated amplifier or receiver equipped with a balanced input. Connection should be made with high quality cables fitted with XLR connectors.
Connect the left channel output of the CD1 to the left channel input on the preamplifier or other component and the right channel output to the right channel input on the preamplifier or other component.
10
 Loading...