


Digital Camera
Operating Manual
To ensure the best performance from your camera, please read the Operating Manual before using the camera.

Thank you for purchasing this PENTAX Digital Camera.
Please read this manual before using the camera in order to get the most out of all the features and functions. Keep this manual safe, as it can be a valuable tool in helping you to understand all the camera’s capabilities.
Regarding copyrights
Images taken using the PENTAX Digital Camera that are for anything other than personal enjoyment cannot be used without permission according to the rights as specified in the Copyright Act. Please take care, as there are even cases where limitations are placed on taking pictures even for personal enjoyment during demonstrations, performances or of items on display. Images taken with the purpose of obtaining copyrights also cannot be used outside the scope of use of the copyright as laid out in the Copyright Act, and care should be taken here also.
Regarding trademarks
•PENTAX and Optio are trademarks of PENTAX Corporation.
•


 The SD logo and the SDHC logo are trademarks.
•QuickTime™ and QuickTime logo are trademarks used under license. The QuickTime logo is registered in U.S. and other countries.
•All other brands or product names are trademarks or registered trademarks of their respective owners.
To users of this camera
•There is a possibility that recorded data may be erased or that the camera may not function correctly when used in surroundings such as installations generating strong electromagnetic radiation or magnetic fields.
•The liquid crystal panel used in the LCD display is manufactured using extremely high precision technology. Although the level of functioning pixels is 99.99% or better, you should be aware that 0.01% or fewer of the pixels may not illuminate or may illuminate when they should not. However, this has no effect on the recorded image.
This product supports PRINT Image Matching III, PRINT Image Matching enabled digital still cameras, printers and software help photographers to produce images more faithful to their intentions. Some functions are not available on printers that are not PRINT Image Matching III compliant.
Copyright 2001 Seiko Epson Corporation. All Right Reserved.
PRINT Image Matching is a trademark of Seiko Epson Corporation. The PRINT Image Matching logo is a trademark of Seiko Epson Corporation.
Regarding PictBridge
PictBridge allows the user to connect the printer and digital camera directly, using the unified standard for the direct printout of images. You can print images directly from the camera through a few simple operations.
Regarding ImageLink
ImageLink and the ImageLink print system logo are trademarks of Eastman Kodak Company used under license.
•There is a possibility that the illustrations and the display screen of the LCD monitor in this manual are different form the actual product.
Regarding Product Registration
In order to better service you, we request that you complete the product registration, which can be found on the CD-ROM supplied with the camera or the PENTAX website. Thank you for your cooperation.
Refer to the PC Connection Manual (bottom right of the front side) for more information.

FOR SAFE USE OF YOUR CAMERA
We have paid close attention to the safety of this product. When using this product, we request your special attention regarding items marked with the following symbols.
Warning
Caution
This symbol indicates that violating this item could cause serious personal injury.
This symbol indicates that violating this item could cause minor or medium personal injury, or material loss.
About the Camera
 Warning
•Do not attempt to take the camera apart or remodel the camera. High voltages are present within the camera, and there is therefore a danger of electric shocks if the camera is taken apart.
•If the inside of the camera should become exposed as a result of, for example, the camera being dropped, please do not under any circumstances touch such exposed portions, as there is a danger of receiving an electric shock.
•To avoid the risk of it being swallowed by mistake, keep the SD Memory Card out of the reach of small children. Seek medical attention immediately if a card is accidentally swallowed.
•Wrapping the strap of the camera around your neck is also dangerous. Please take care that small children do not hang the strap around their necks.
•Use an AC adapter that is of the power and voltage specified for exclusive use with this product. The use of an AC adapter other than that specified exclusively for use with this product may cause fire or electric shocks.
•If the camera emits smoke or a strange smell, or in the event of any other irregularity, stop using the camera immediately, remove the batteries or unplug the AC adapter, and contact your nearest PENTAX Service Center. Continued use of the camera may result in fire or electric shock.
1

 Caution
•Never try to disassemble or short the batteries. Also, do not dispose of the batteries in a fire, as they may explode.
•Do not charge any batteries other than rechargeable Ni-MH batteries. The batteries could explode or catch fire. Batteries for use with this camera other than Ni-MH batteries cannot be charged.
•Do not place your finger on the flash when it is discharging as there is a risk of burns.
•Do not discharge the flash while it is touching your clothing as there is a risk of discoloring.
•If any of the battery leakage should come in contact with your eyes, do not rub them. Flush your eyes with clean water and get medical attention immediately.
•If any of the battery leakage should come in contact with skin or clothes, wash the affected areas thoroughly with water.
•Remove the batteries from the camera immediately if it becomes hot or begins to smoke. Be careful not to burn yourself during removal.
•Some portions of the camera heat up during use, so please take care, as there is a risk of low temperature burns if such portions are held for long periods of time.
•Should the LCD be damaged, be careful of glass fragments. Also, be careful not to allow the liquid crystal to get on your skin or in your eyes or in your mouth.
Handling Precautions for Batteries
•This camera uses two AA alkaline, AA lithium, AA Ni-MH or AA nickel manganese batteries. Do not use batteries other than those specified here. Using some other type of battery may cause the camera to function poorly, or the batteries may rupture or cause a fire.
•AA alkaline, AA lithium and AA nickel manganese batteries cannot be recharged. Do not try to take the batteries apart. The batteries may rupture or leak if you try to charge them or take them apart.
•Do not remove the external seal of the battery. If the seal is removed, the battery may short and may cause a fire, rupture, leak or heat.
•When replacing the batteries, do not combine different brands, types or capacities. Also, do not combine old batteries with new ones. Doing so may cause the batteries to rupture or cause a fire.
•Do not insert the batteries with the positive (+) and negative (–) poles in the wrong orientation. Doing so may cause the batteries to rupture or cause a fire.
2

About the AC Adapter
 Caution
•Do not place heavy objects on the AC plug cord, allow heavy objects to drop onto it or allow the AC plug cord to become damaged due to excessive bending. If the AC plug cord becomes damaged, consult a PENTAX Service Center.
•Do not short or touch the output terminals of the product while it is still plugged in.
•Do not plug in the AC plug cord with wet hands. This can cause an electrical shock.
•Do not subject the product to strong impacts or allow it to drop onto a hard surface. This can cause a malfunction.
Care to be Taken During Handling
•Take the Worldwide Service Network listing that is included in the package with you when traveling. This will be useful if you experience problems abroad.
•When the camera has not been used for a long time, confirm that it is still working properly, particularly prior to taking important pictures (such as at a wedding or during traveling). Contents of the recording cannot be guaranteed if recording, playback or transferring your data to a computer, etc. is not possible due to a malfunction of your camera or recording media (SD Memory Card), etc.
•The lens on this camera is not interchangeable. The lens is not removable.
•Do not clean the product with organic solvents such as thinner, alcohol or benzene.
•Places of high temperature and humidity should be avoided. Particular care should be taken regarding vehicles, which can become very hot inside.
•Storing the camera where pesticides and chemicals are handled should be avoided. Remove from case and store in a well-ventilated place to prevent the camera from becoming moldy during storage.
•As this camera is not waterproof, do not use the camera where it may come in contact with rain, water or any other liquid.
•Ensure that the camera is not subjected to substantial vibrations, shock, or pressure. Use a cushion to protect the camera when it is subjected to the vibrations of a motorbike, car, ship, etc.
•The temperature range in which the camera can be used is 0°C to 40°C (32°F to 104°F).
3

•The liquid crystal display will become black at a high temperature but will return to normal when normal temperatures are returned to.
•The response speed of the liquid crystal display becomes slow at low temperatures. This is due to the properties of the liquid crystal and is not a fault.
•Periodic checks are recommended every 1 to 2 years in order to maintain high performance.
•If the camera is subjected to rapid temperature changes, condensation may form on the inside and outside of the camera. Therefore put the camera in a bag or plastic bag, and take the camera out when the difference in temperature has subsided.
•Be careful not to allow dirt, mud, sand, dust, water, toxic gases or salt to enter the camera as this may damage the camera. Wipe away any raindrops or water droplets and allow the camera to dry.
•Refer to “Precautions When Using an SD Memory Card” (p.28) regarding the SD Memory Card.
•Please note that formatting an SD memory card or built-in memory will delete all data; however it may still be possible to recover that data using off-the-shelf data recovery software. Please manage your camera’s memory at your own risk.
•Please do not press forcefully on the LCD monitor. This could cause breakage or malfunction.
•Be careful not to sit down with the camera in your back pocket as this may damage the exterior of the camera or the LCD monitor.
•When using a tripod with the camera, be careful not to overtighten the screw in the tripod socket on the camera.
4

Contents |
|
FOR SAFE USE OF YOUR CAMERA ............................................. |
1 |
Care to be Taken During Handling ................................................... |
3 |
Contents ........................................................................................... |
5 |
Composition of the Operating Manual ............................................ |
11 |
Camera Features................................................................................. |
12 |
Checking the Contents of the Package .......................................... |
14 |
Names of Parts............................................................................... |
15 |
Names of Operating Parts .............................................................. |
16 |
Monitor Indications ......................................................................... |
16 |
Getting Started |
19 |
Attaching the Strap............................................................................. |
19 |
Powering the Camera ......................................................................... |
20 |
Installing the Batteries .................................................................... |
20 |
Using the AC Adapter with a Household Power Supply ................. |
23 |
Using the AC Adapter Abroad ........................................................ |
24 |
Installing the SD Memory Card.......................................................... |
26 |
Recorded Pixels and Quality Level of Still Pictures........................ |
29 |
Recorded Pixels, Quality Level and Frame Rate of Movies ........... |
30 |
Turning the Camera On and Off ........................................................ |
32 |
Playback Only Mode....................................................................... |
33 |
Initial Settings ..................................................................................... |
34 |
Setting the Display Language......................................................... |
34 |
Setting the Date and Time.............................................................. |
37 |
Quick Start |
39 |
Taking Still Pictures............................................................................ |
39 |
Playing Back Still Pictures................................................................. |
41 |
Playing Back Images ...................................................................... |
41 |
Playing Back the Previous or Next Image ...................................... |
41 |
Rotating the Displayed Image ........................................................ |
42 |
Common Operations |
43 |
Understanding the Button Functions ............................................... |
43 |
AMode ......................................................................................... |
43 |
Q Mode ........................................................................................ |
45 |
5

Setting the Camera Functions ........................................................... |
47 |
Setting with the Menus ................................................................... |
47 |
Menu List ........................................................................................ |
50 |
Setting the Shooting Mode ............................................................. |
52 |
Calling Up a Specific Menu ............................................................ |
56 |
Setting the Playback Mode............................................................. |
58 |
Taking Pictures |
61 |
Taking Pictures ................................................................................... |
61 |
Letting the Camera Choose the Optimal Shooting Mode |
|
(Auto Picture Mode)........................................................................ |
61 |
Letting the Camera Choose the Optimal Settings |
|
(Program Mode) ............................................................................. |
62 |
Reducing Camera Shake and Blurring when Taking Pictures |
|
(Blur Reduction Mode).................................................................... |
63 |
Taking Pictures in the Basic Mode (Green Mode).......................... |
64 |
Taking Pictures of Dark Scenes (Night Scene Mode) .................... |
66 |
Framing Your Pictures (Frame Composite Mode).......................... |
67 |
Taking Pictures of People (Portrait Mode)...................................... |
69 |
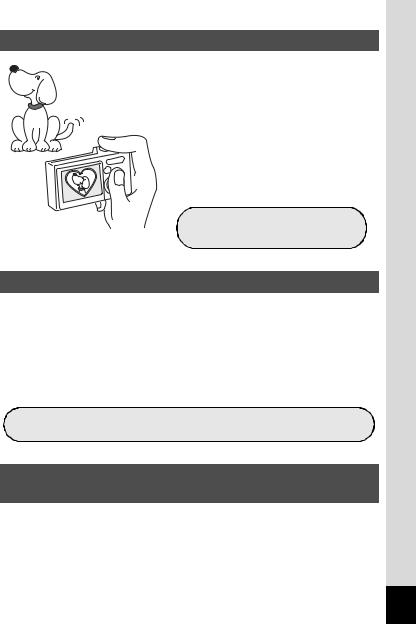
Taking Pictures of Your Pet (Pet Mode) ......................................... |
71 |
Using the Self-timer ........................................................................ |
72 |
Taking a Series of Pictures............................................................. |
73 |
Using the Zoom .............................................................................. |
74 |
Setting the Exposure (EV Compensation)...................................... |
76 |
Displaying Shooting Information ...................................................... |
77 |
Setting the Shooting Functions......................................................... |
79 |
Selecting the Focus Mode .............................................................. |
79 |
Selecting the Flash Mode ............................................................... |
81 |
Selecting the Recorded Pixels........................................................ |
83 |
Selecting the Quality Level ............................................................. |
85 |
Adjusting the White Balance........................................................... |
87 |
Changing the Focusing Area .......................................................... |
89 |
Setting the Sensitivity ..................................................................... |
90 |
Setting the Instant Review Time (Instant Review).......................... |
92 |
Setting the Image Sharpness (Sharpness)..................................... |
93 |
Setting the Color Saturation (Saturation)........................................ |
94 |
Setting the Image Contrast (Contrast)............................................ |
95 |
Saving the Settings (Memory) ........................................................... |
96 |
6

Recording Movies ............................................................................... |
98 |
Recording a Movie.......................................................................... |
98 |
Selecting the Recorded Pixels for Movies .................................... |
100 |
Selecting the Quality Level of Movies........................................... |
102 |
Selecting the Frame Rate............................................................. |
103 |
Recording Movies in Black and White or Sepia Tones |
|
(Color Mode)................................................................................. |
104 |
Setting the Movie Anti-Shake Function ........................................ |
105 |
Playing Back and Deleting Images |
106 |
Playing Back Images ........................................................................ |
106 |
Switching Between A Mode and Q Mode................................. |
106 |
Playing Back Still Pictures ............................................................ |
107 |
Nine-Image Display, Folder Display and Calendar Display.......... |
108 |
Zoom Playback............................................................................. |
110 |
Displaying Shooting Information in Playback Mode ..................... |
112 |
Slideshow ..................................................................................... |
113 |
Playing Back Movies ........................................................................ |
115 |
Playing Back a Movie ................................................................... |
115 |
Connecting the Camera to AV Equipment...................................... |
116 |
Deleting Images ................................................................................ |
117 |
Deleting Single Images/Sound Files............................................. |
117 |
Deleting Selected Images and Sound Files |
|
(from Nine-Image Display)............................................................ |
119 |
Deleting All Images....................................................................... |
121 |
Protecting Images and Sound Files from Deletion (Protect) ........ |
122 |
Editing and Printing Images |
124 |
Editing Images .................................................................................. |
124 |
Changing the Image Size and Quality (Resize)............................ |
124 |
Trimming Images.......................................................................... |
126 |
Copying Images and Sound Files................................................. |
127 |
Using the Digital Filters................................................................. |
129 |
Using the Brightness Filter ........................................................... |
130 |
Adding a Frame (Frame Composite) ............................................ |
131 |
Red-eye Compensation................................................................ |
133 |
Setting the Printing Service (DPOF)................................................ |
134 |
Printing Single Images.................................................................. |
134 |
Printing All Images........................................................................ |
136 |
7

Printing Using PictBridge ................................................................ |
137 |
Connecting the Camera to the Printer .......................................... |
137 |
Printing Single Images.................................................................. |
138 |
Printing All Images........................................................................ |
140 |
Printing Using the DPOF Settings ................................................ |
141 |
Disconnecting the Cable from the Printer..................................... |
141 |
Printing Using ImageLink.............................................................. |
141 |
Recording and Playing Back Sound |
143 |
Recording Sound (Voice Recording Mode).................................... |
143 |
Playing Back Sound ......................................................................... |
145 |
Adding a Voice Memo to Images..................................................... |
146 |
Recording a Voice Memo ............................................................. |
146 |
Playing Back a Voice Memo......................................................... |
147 |
Settings |
148 |
Camera Settings................................................................................ |
148 |
Formatting an SD Memory Card or the Built-in Memory .............. |
148 |
Changing the Sound Settings....................................................... |
149 |
Changing the Date and Time........................................................ |
151 |
Setting the World Time ................................................................. |
153 |
Changing the Display Language .................................................. |
155 |
Changing the Image Folder Name ............................................... |
156 |
Changing the USB Connection Mode........................................... |
157 |
Changing the Video Output Format.............................................. |
158 |
Automatically Adjusting the Brightness of the LCD Monitor |
|
(Auto LCD Dimmer) ...................................................................... |
159 |
Setting Auto Power Off ................................................................. |
160 |
Setting the Guide Display ............................................................. |
161 |
Resetting to Default Settings (Reset) ........................................... |
162 |
Changing the Start-up Screen ...................................................... |
163 |
Appendix |
164 |
List of World Time Cities.................................................................. |
164 |
Default Settings................................................................................. |
166 |
Functions Available for Each Shooting Mode................................ |
169 |
Optional Accessories ....................................................................... |
170 |
Messages........................................................................................... |
171 |
Troubleshooting................................................................................ |
173 |
Main Specifications .......................................................................... |
175 |
WARRANTY POLICY......................................................................... |
179 |
Index................................................................................................... |
184 |
8
The meanings of the symbols used in this operating manual are explained below.
1 |
indicates the reference page number for an explanation of the |
|||
related operation. |
|
|
||
|
|
|
|
|
|
indicates information that is useful to know. |
|
|
|
|
|
|
|
|
|
indicates precautions to be taken when operating the camera. |
|||
|
|
|
|
|
|
This is the mode for capturing still pictures and recording movies |
|||
|
and sound files. In this manual, the mode for taking still pictures |
|||
Amode |
is referred to as the “Still Picture Capture Mode”, the mode for |
|||
|
recording movies is referred to as the “dmode” and the mode |
|||
|
for recording sound files is referred to as the “O mode”. |
|
|
|
|
|
|
|
|
Q mode |
This is the mode for viewing still pictures and playing back movies |
|||
and sound files. |
|
|
||
|
|
|
||
|
|
|
|
|
s, b, R, A, |
The icons above the title show the shooting modes that can |
|||
d, O, q, <, |
activate the function. |
|
|
|
I, i, \, c, |
Ex. |
R cY |
||
Q, E, D, Y |
|
Setting the Image Sharpness (Sharpness) |
|
|
|
|
|
|
|
9

Memo
10

Composition of the Operating Manual
This operating manual contains the following chapters.
1 Getting Started –––––––––––––––––––––––––––––––––––––––––
This chapter explains what you need to do after purchasing the camera before you start taking pictures. Be sure to read it and follow the instructions.
2 Quick Start ––––––––––––––––––––––––––––––––––––––––––––
This chapter explains the simplest way to take pictures and play back images. Use it if you want to start taking pictures or playing back images straightaway.
3 Common Operations ––––––––––––––––––––––––––––––––––––
This chapter explains common operations such as the functions of the buttons and how to use the menus. For more details, refer to the respective chapters below.
4 Taking Pictures ––––––––––––––––––––––––––––––––––––––––
This chapter explains the various ways of capturing images and how to set the relevant functions.
5 Playing Back and Deleting Images–––––––––––––––––––––––––
This chapter explains how to view still pictures and movies on the camera or on a TV and how to delete images from the camera.
6 Editing and Printing Images ––––––––––––––––––––––––––––––
This chapter explains the various ways of printing still pictures and how to edit images with the camera. Refer to the PC Connection Manual for instructions on saving images to a computer and installing ACDSee for PENTAX, and refer to ACDSee for PENTAX Help for instructions on editing and printing images with a computer.
7 Recording and Playing Back Sound –––––––––––––––––––––––
This chapter explains how to record sound files or add sound (a voice memo) to an image, and how to play back sound files.
8Settings –––––––––––––––––––––––––––––––––––––––––––––––
This chapter explains how to set the camera-related functions.
9Appendix––––––––––––––––––––––––––––––––––––––––––––––
This section deals with troubleshooting and lists the optional accessories.
1
2
3
4
5
6
7
8
9
11

Camera Features
In addition to basic picture-taking, the Optio M20 has a variety of shooting modes to suit different situations. This section describes how to make the most of the key features of your camera. Together with the explanations of camera operations, it will enable you to enjoy your camera to the full.
Easy-to-Navigate Capture and Playback Functions!
The Optio M20 features an easy-to-see 2.5-inch LCD monitor. At 60 frames per second, the display quality is high, allowing you to frame your shots smoothly. In addition, settings for capture, playback and editing functions are easy to navigate. Simply select icons that appear on the LCD monitor.
If you are unsure of which shooting mode to use, first select b(Auto Picture) (p.61). The camera selects the appropriate shooting mode* depending on the scene.
A guide appears when you select an icon, allowing you to check the functions available in each mode and how to use them. (p.60)
*When you select b(Auto Picture mode), the shooting mode is selected from -(Standard mode), A(Night Scene mode), q (Landscape mode), and I (Portrait mode).
Let the camera choose the optimal settings.
Use the Green Mode to take pictures easily using standard settings. (p.64)
12
Choose a Frame Before Taking the Picture!
With the Optio M20, you can add a fun frame when taking a picture of a child or your pet, for example. (p.67) You can also add frames to pictures you have taken. Adjust the position of the subject in the picture or reduce or enlarge the picture size to match the frame shape and size. Now you no longer have to worry about the subject not being aligned in the frame.
For decorating your pictures with a frame.
Easy Printing without Using a Computer!
By connecting the camera to a printer that supports PictBridge using the USB cable, you can print images directly from the camera. In addition, by placing the supplied dock insert onto a Kodak EasyShare Printer Dock and then placing the camera on the printer dock, anyone can enjoy easily printing out images with the touch of a single button.
Gone are the days of not being able to print out pictures at home because operating the computer was too difficult!
Easily print out images without using a computer.
Display Images and Sound Files in Calendar
Format!
With the Optio M20, you can display recorded images and sound files by date in calendar format. (p.109) This lets you quickly find the image or sound file you want to play back.
13

Checking the Contents of the Package
Camera |
Strap |
Dock insert |
Optio M20 |
O-ST51 (*) |
O-DI58 |
Software (CD-ROM) |
USB cable |
|
AV cable |
S-SW58 |
I-USB7 (*) |
|
I-AVC7 (*) |
|
|
|
|
|
|
|
|
|
|
|
|
|
|
|
|
|
Two AA |
PC Connection Manual |
Operating Manual |
|
alkaline batteries |
|
(this manual) |
||
|
|
|
|
|
|
|
|
|
|
Quick Guide
Items marked with an asterisk (*) are also available as optional accessories. For other optional accessories, refer to “Optional Accessories” (p.170).
14

Names of Parts
Front
Strap lug
Shutter release button Ambient light sensor
Speaker
Power switch
Flash
Self-timer lamp (red) Microphone
Lens
DC coupler cable cover
PC/AV terminal
Back
LCD monitor
ImageLink Terminal
Battery/card cover
Tripod socket
15
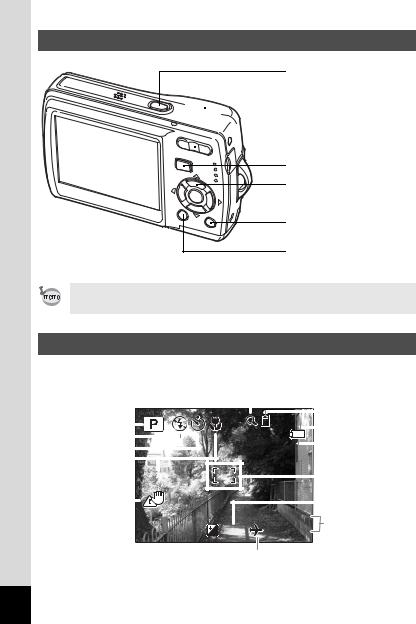
Names of Operating Parts
Power switch
 Shutter release button

 Zoom/w/x/f/y button
Q button
Four-way controller
 4/W button
Green/ibutton
3 button
Refer to Understanding the Button Functions (p.43 - p.46) for an explanation of the function of each button.
Monitor Indications
Normal Display in Still Picture Capture Mode
The display shows information such as the shooting conditions.
|
|
|
|
|
|
|
|
|
|
|
|
|
|
|
6 |
|
|
|
|
|
|
|
|
|
|
|
|
|
|
|
|
||
|
|
|
|
|
|
|
|
|
|
|
|
|
|
|
7 |
|
1 |
|
|
|
|
|
|
|
|
|
38 |
||||||
|
|
|
|
|
|
|
|
|
8 |
|||||||
|
|
|
|
|
|
|
|
|
||||||||
|
|
|
|
|
|
|
|
|
|
|
|
|
|
|||
2 |
|
|
|
|
|
|
|
|
|
|
|
|
|
|
9 |
|
|
|
|
|
|
|
|
|
|
|
|
|
|
|
|||
3 |
|
|
|
|
|
|
|
|
|
|
|
|
|
|
||
|
|
|
|
|
|
|
|
|
|
|
|
|
|
|
||
4 |
|
|
|
|
|
|
|
|
|
|
|
|
|
|
10 |
|
|
|
|
|
|
|
|
|
|
|
|
|
|
|
|||
5 |
|
|
|
|
|
|
|
|
|
|
|
|
|
|
||
|
|
|
|
|
|
|
|
|
|
|
|
|
|
|||
|
|
|
|
|
|
|
|
|
|
|
|
|
|
11 |
||
|
|
|
|
|
|
|
|
|
|
|
|
|
|
|||
|
|
|
|
|
|
|
|
|
|
|
|
|
||||
|
|
|
10/14/2006 |
|||||||||||||
|
|
|
|
|
|
|
|
|
|
12 |
||||||
+1.0 |
14:25 |
|||||||||||||||
|
||||||||||||||||
13
16

1 |
Shooting mode (p.52) |
8 |
Remaining image storage |
|
2 |
Flash mode (p.81) |
|
capacity |
|
3 |
Drive mode (p.72, p.73) |
9 |
Battery indicator (p.22) |
|
4 |
Focus mode (p.79) |
10 |
Focus frame (p.39) |
|
5 |
Camera shake icon (p.77) |
11 |
EV compensation (p.76) |
|
6 |
Digital zoom icon (p.74) |
12 |
Date and time (p.37) |
|
7 |
Memory status (p.32) |
13 |
World Time (p.154) |
|
|
+ : Built-in memory |
|
No icon : Hometown |
|
|
(without card) |
|
X |
: Destination |
|
a : SD Memory Card |
|
|
|
|
r : Card is write-protected |
|
|
|
Full Display in Still Picture Capture Mode
(All of the indications are displayed here for explanatory purposes.)
|
|
|
|
|
38 |
|
|
|
||
|
|
|
|
|
|
|
|
|
|
5 |
|
|
|
|
|
|
|
7M |
|
|
|
|
|
|
|
|
|
|
|
|
||
|
1 |
|
|
|
|
|
|
|
|
6 |
|
|
|
|
|
|
|
|
|
||
|
2 |
|
|
|
|
|
|
|
|
7 |
|
|
|
|
|
|
|
|
|
||
|
|
|
|
|
|
|
|
|
|
|
|
3 |
|
1/250 |
|
|
ISO 200 |
|
8 |
||
|
|
|
|
|
||||||
|
|
|
|
|
|
|
|
9 |
||
|
|
|
|
|
|
|
|
|||
|
4 |
|
F3.3 |
+1.0 |
|
|
|
|
|
|
|
|
|
|
|
|
|
|
|||
1 |
Bright portion (blinks red) |
6 |
Quality (p.85) |
|
||||||
2 |
Dark portion (blinks yellow) |
7 |
White balance (p.87) |
|||||||
3 |
Shutter speed |
|
8 |
Sensitivity (p.90) |
||||||
4 |
Aperture |
|
9 |
Histogram (p.78) |
||||||
5Recorded pixels (p.83)
*3 and 4 only appear when the shutter release button is pressed halfway.
About the Bright and Dark Portions
When there is an area in the frame that is so bright it appears white, the indicated area blinks red as a warning. Similarly, when there is an area that is so dark it appears black, the indicated area blinks yellow as a warning.
17

Full Display in Still Picture Playback Mode
(All of the indications are displayed here for explanatory purposes.)
The display shows information such as the shooting conditions. A1 to A11 appear when [Normal Display] or [Histogram + Info] is selected. B1 to B9 only appear when [Histogram + Info] is selected. (p.112)
A1
A2
A3
A4
A5
A6
A7
A8
A9
A11 |
|
|
|
|
|
|
|
|
|
|
|
|
|
|
|
|
|
|
|
A2 |
|||
|
|
|
|
|
|
|
|
|
|
|
|
|
|
|
|
|
|
|
|||||
|
|
|
|
|
|
|
|
|
|
|
|
|
|
|
|
|
|
|
|
|
|
|
A3 |
|
|
|
|
|
|
|
|
|
|
|
|
|
|
100-0038 |
|
|
|
||||||
|
|
|
|
|
|
|
|
|
|
|
|
|
|
|
|
|
|
||||||
A1 |
|
|
|
|
|
|
|
|
|
|
|
|
A4 |
||||||||||
|
|
|
|
|
|
|
|
|
|
|
|
|
|
|
|
|
|
||||||
B1 |
|
|
|
|
|
|
|
|
|
|
|
|
|
|
|
|
|
|
|
|
|
|
|
|
|
|
|
|
|
|
|
|
|
|
|
|
|
|
|
|
|
|
|
|
|
A5 |
|
B2 |
|
|
|
|
|
|
|
|
|
|
|
|
|
|
|
|
|
|
|
|
|
|
|
|
|
|
|
|
7M |
|
|
|
|
|
|
|
|
|
|
|
|
|
|
A6 |
|||
|
|
|
|
|
|
|
|
|
|
|
|
|
|
|
|
|
|
|
|
|
|
|
|
B3 |
|
|
|
|
|
|
|
|
|
|
|
|
|
|
|
|
|
|
|
|
|
|
A7 |
|
|
|
|
|
|
|
|
|
|
|
|
|
|
|
|
|
|
|
|
|
|
||
B4 |
|
|
|
|
|
|
|
|
|
|
|
|
|
|
|
|
|
|
|
|
|
|
A8 |
|
|
|
|
|
|
|
|
|
|
|
|
|
|
|
|
|
|
|
|
|
|
||
|
|
|
|
|
|
|
|
|
|
|
|
|
|
|
|
|
|
|
|
|
|
|
|
B5 |
|
|
|
|
|
|
|
|
|
|
|
|
|
|
|
|
|
|
|
|
|
B9 |
|
|
|
|
|
|
|
|
|
|
|
|
|
|
|
|
|
|
|
|
|
|
|||
B6 |
|
|
|
|
ISO 200 |
|
|
|
|
|
|
|
|
|
|
|
|
|
|||||
|
|
|
|
|
|
|
|
|
|
|
|
|
|
|
|
|
|||||||
|
|
|
|
|
|
|
|
|
|
|
|
|
|
|
|
|
|
||||||
|
|
1/250 |
|
|
|
|
10/14/2006 |
|
|
|
|
||||||||||||
|
|
|
|
|
|
|
|
|
|
|
|
|
|||||||||||
B7 |
|
|
|
|
|
|
A9 |
||||||||||||||||
F3.3 |
|
|
|
14:25 |
|
|
|
||||||||||||||||
|
|
|
|
|
|
|
|
|
|
|
|||||||||||||
B8 |
|
|
|
|
|
A10 |
|||||||||||||||||
|
|
|
|
|
|
|
|
|
|
|
|
|
|
|
|
|
|
|
|
|
|
||
Playback mode (p.58) |
|
|
A10 Four-way controller guide |
||||||||||||||||||||
Folder number (p.156) |
|
|
A11 Key lock icon (p.64) |
||||||||||||||||||||
File number |
|
|
|
|
|
|
|
|
B1 |
|
Bright portion (blinks red) |
||||||||||||
Protect icon (p.122) |
|
|
|
|
(p.17) |
|
|
|
|
||||||||||||||
Voice memo icon (p.147) |
|
|
B2 |
|
Recorded pixels (p.83) |
||||||||||||||||||
Battery indicator (p.22) |
|
|
B3 |
|
Quality (p.85) |
||||||||||||||||||
Volume icon (p.147) |
|
|
B4 |
|
White balance (p.87) |
||||||||||||||||||
Memory status (p.32) |
|
|
B5 |
|
Sensitivity (p.90) |
||||||||||||||||||
+ : Built-in memory |
|
|
B6 |
|
Dark portion (blinks yellow) |
||||||||||||||||||
(without card) |
|
|
|
|
(p.17) |
|
|
|
|
||||||||||||||
a : SD Memory Card |
|
|
B7 |
|
Shutter speed |
||||||||||||||||||
r : Card is write-protected |
|
|
B8 |
|
Aperture |
|
|
|
|
||||||||||||||
Captured date and time (p.37) |
|
|
B9 |
|
Histogram (p.78) |
||||||||||||||||||
In Normal Display, A6 and A9 disappear if no operation is performed in two seconds.
Guide Indications
A guide to available button operations appears on the LCD monitor during operation.
The buttons are indicated as shown below.
Four-way controller (2) |
2 |
Four-way controller (3) |
3 |
Four-way controller (4) |
4 |
Four-way controller (5) |
5 |
3 button |
MENU |
Zoom button |
|
4/Wbutton |
OK |
Shutter release button |
SHUTTER |
Green/ibutton |
|, i |
18
Getting Started
Attaching the Strap
Attach the strap (O-ST51) supplied with the camera.
2
1
1 Pass the narrow end of the strap through the strap lug.
2 Pass the other end of the strap through the loop and pull tight.
1 GettingStarted
19

1 GettingStarted
Powering the Camera
1
2
Installing the Batteries
Install the batteries into the camera. Use two AA alkaline, AA lithium, AA Ni-MH, or AA nickel manganese batteries.
1 Open the battery/card cover.
Pull the battery/card cover in the direction of 1and flip the cover open in the direction of 2.
2 Insert the batteries, making sure the (+) and (–) on the batteries match the (+) and (–) inside the battery compartment.
3 Close the battery/card cover and slide it back into place.
20

Use the AC adapter kit K-AC51 (optional) if you intend to use the camera for a long time. (p.23)
•AA alkaline, AA lithium and AA nickel manganese batteries are not rechargeable.
•Do not open the battery/card cover or remove the batteries while the camera is turned on.
•If you do not intend to use the camera for a long time, remove the batteries. If the batteries are left in the camera for a long time, they may leak.
•If the batteries have been removed from the camera for a long time, when they are reinserted and the camera is turned on, the message [Battery depleted] may appear. This can also happen when using the camera for the first time; however this is not a malfunction. Wait a minute and then turn the camera on again to reset the camera. The date and time may also be reset.
•Insert the batteries correctly. If the batteries are incorrectly oriented, malfunction may result. Wipe the ends of the batteries and insert them into the camera.
•Image Storage Capacity, Movie Recording Time, Sound Recording Time, and Playback Time
(at 23°C with the LCD monitor on and fresh batteries inserted)
Number of recordable images and playback time for different types of batteries.
|
Image |
Movie |
Sound |
Playback |
||
Battery Type |
Storage |
Recording |
Recording |
|||
Time* |
2 |
|||||
|
Capacity*1 |
Time*2 |
Time*2 |
|
||
AA lithium |
700 pictures |
300 min. |
1340 min. |
900 min. |
||
batteries |
||||||
|
|
|
|
|
||
AA NiMH |
460 pictures |
200 min. |
680 min. |
640 min. |
||
batteries |
||||||
|
|
|
|
|
||
AA nickel |
|
|
|
|
|
|
manganese |
330 pictures |
120 min. |
630 min. |
570 min. |
||
batteries |
|
|
|
|
|
|
AA alkaline |
220 pictures |
90 min. |
570 min. |
500 min. |
||
batteries |
||||||
|
|
|
|
|
||
*1: Recording capacity shows approximate number of shots recorded during CIPA-compliant testing (with LCD monitor on, flash used for 50% of the shots, and 23 degrees centigrade). Actual performance may vary according to operating conditions.
*2: According to the result of in-house testing.
1 GettingStarted
21

1 GettingStarted
•In general, battery performance may temporarily deteriorate as the temperature decreases. Be sure to take spare batteries when using the camera in a cold region and keep the batteries warm by placing them in your pocket or inside your coat. Battery performance that has deteriorated due to cold temperature will return to normal performance when the batteries reach room temperature.
•Due to their characteristics, AA alkaline batteries may not allow the camera to make full use of its capabilities, and therefore they are not recommended except for emergency use.
•Due to their characteristics, AA alkaline batteries and nickel manganese batteries may not allow the camera to make full use of its capabilities when used at cold temperatures. Use of AA lithium batteries is recommended when the camera is used at cold temperatures.
•Be sure to take spare batteries with you when traveling abroad or to a cold region, or if you intend to take a lot of pictures.
•Battery Level Indicator
You can check the battery level by the windicator on the LCD monitor.
Screen Display |
Battery Status |
w (green) |
Adequate power remains. |
x (green) |
Batteries are running low. |
y (yellow) |
Batteries are running very low. |
z (red) |
Batteries are exhausted. |
[Battery depleted] |
The camera will turn off after this message appears. |
Due to the characteristics of AA nickel manganese batteries, the battery level may not be displayed correctly when using these batteries. wmay be displayed for the battery level even if the batteries are running low. The camera may also turn off without warning even if wis displayed.
22

AC plug cord |
DC coupler cable cover |
|
||
6 |
|
|
|
|
|
|
|
1 |
|
AC adapter |
|
4 |
Getting |
|
5 |
|
3 |
||
|
2 |
|
||
|
DC coupler |
Started |
||
|
|
|||
|
|
DC coupler cable |
||
DC terminal |
1 |
DC input terminal |
||
|
||||
Using the AC Adapter with a Household Power Supply
Use of the AC adapter kit K-AC51 (optional) with a household power supply is recommended if you intend to use the camera for a long time or connect it to a computer.
(The AC adapter kit K-AC51 includes AC adapter D-AC5, DC coupler D-DC51, and AC plug cord D-CO2.)
1 Connect the DC terminal of the AC adapter to the DC input terminal of the DC coupler.
2 Make sure that the camera is turned off and open the battery/card cover.
Pull the battery/card cover in the direction of 1and flip the cover open in the direction of 2.
3 Insert the DC coupler into the battery compartment, making sure the (+) and (–) on the coupler match the (+) and (–) on the battery compartment.
4 Open the DC coupler cable cover, pass the DC coupler cable through the opening, and close the battery/card cover.
5
6
Slide the battery/card cover in the opposite direction of 1. Slide the battery/card cover all the way in to make sure it is securely closed.
Connect the AC plug cord to the AC adapter. Plug the AC plug cord into the power outlet.
23
1 GettingStarted
•Make sure that the camera is turned off before connecting or disconnecting the AC adapter.
•Make sure that the AC plug cord and the power cord connecting the AC adapter to the camera are inserted securely. The data may become lost if either cord becomes disconnected while data is being recorded.
•Use the AC adapter with due care to avoid fire or electric shock. Be sure to read “FOR SAFE USE OF YOUR CAMERA” (p.1) before using the AC adapter.
•Be sure to read the operation manual accompanying the AC adapter kit K-AC51 before using the adapter.
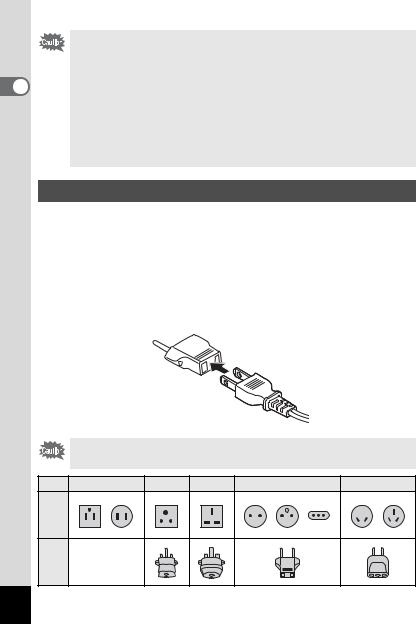
Using the AC Adapter Abroad
The AC adapter kit K-AC51 (optional) is designed to switch automatically to the voltage (100-240V) and frequency (50Hz, 60Hz) of the electricity supply in the country or region where used.
However, electrical socket shapes differ from country to country. Before traveling abroad, you are advised to check the socket shape in the country of your destination (see “Main Socket Types in the Major Countries and Regions of the World” (p.25)) and take an appropriately shaped adapter plug with you.

 Adapter plug
•Use of an off-the-shelf transformer may lead to defective operation.
•Unplug the adapter plug from the power outlet when not in use.
Type |
A |
B |
BF |
C |
S |
Shape |
|
|
|
|
|
Adapter plug |
— |
|
|
|
|
|
|
|
|
|
24

Main Socket Types in the Major Countries and Regions of the World
|
|
A |
B |
BF |
C |
S |
North America |
U.S.A., Canada |
9 |
|
|
|
|
Europe, |
Iceland, Ireland, Italy, Ukraine, Austria, |
|
|
|
|
|
Former Soviet |
Netherlands, Kazakhstan, Greece, Sweden, |
|
|
|
9 |
|
Union |
Denmark, Germany, Norway, Hungary, Finland, |
|
|
|
|
|
|
|
|
|
|
||
|
France, Belarus, Belgium, Rumania, Russia |
|
|
|
|
|
|
U.K. |
|
9 |
9 |
|
|
|
Spain |
9 |
|
|
9 |
|
|
Switzerland, Poland, Portugal |
|
9 |
|
9 |
|
Asia |
Taiwan, Japan |
9 |
|
|
|
|
|
Sri Lanka, Maldives |
|
9 |
|
|
|
|
Nepal, Bangladesh, Mongolia |
|
|
|
9 |
|
|
Vietnam |
9 |
|
|
9 |
|
|
India, Indonesia, Pakistan, Macau |
|
9 |
|
9 |
|
|
Thailand |
9 |
|
9 |
9 |
|
|
Korea |
9 |
9 |
|
9 |
|
|
Philippines |
9 |
|
|
9 |
9 |
|
Singapore, Hong Kong |
|
9 |
9 |
|
|
|
China |
9 |
9 |
9 |
9 |
9 |
|
Malaysia |
|
9 |
9 |
9 |
|
Oceania |
Australia, Tonga, New Zealand, Fiji |
|
|
|
|
9 |
|
Guam |
9 |
|
|
|
|
|
Tahiti |
|
|
|
9 |
|
Central and |
Colombia, Jamaica, Haiti, Panama, Bahamas, |
9 |
|
|
|
|
South |
Puerto Rico, Venezuela, Mexico |
|
|
|
|
|
America |
|
|
|
|
|
|
Brazil, Peru |
9 |
|
|
9 |
|
|
|
|
|
|
|||
|
Chile |
|
9 |
|
9 |
|
|
Argentina |
|
|
9 |
9 |
9 |
Middle East |
Israel, Iran |
|
|
|
9 |
|
|
Kuwait |
|
9 |
|
9 |
|
|
Jordan |
|
9 |
9 |
|
|
Africa |
Canary Islands, Guinea, Mozambique, Morocco |
|
|
|
9 |
|
|
Kenya, South Africa |
|
9 |
|
9 |
|
|
Algeria |
9 |
9 |
9 |
|
|
|
Egypt |
|
9 |
9 |
9 |
|
|
Zambia, Tanzania |
|
9 |
9 |
|
|
1 GettingStarted
25
1 GettingStarted
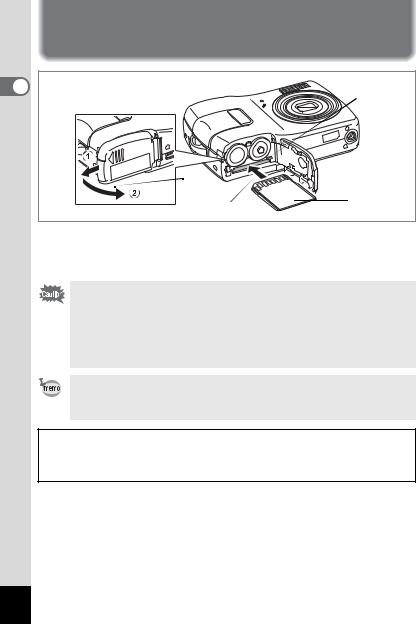
Installing the SD Memory Card
SD Memory
Card socket
1
2 |
SD Memory |
Card |
This camera uses an SD Memory Card. Captured images and sound files are saved on the SD Memory Card if a card is inserted in the camera. They are saved in the built-in memory if a card is not inserted. (p.32)
•Be sure to use this camera to format an SD Memory Card that is unused or has been used on another camera. Refer to “Formatting an SD Memory Card or the Built-in Memory” (p.148) for instructions on formatting.
•Make sure that the camera is turned off before inserting or removing the SD Memory Card.
The still picture storage capacity varies depending on the capacity of the SD Memory Card and the selected number of recorded pixels and quality level. (p.29)
Backing Up Data
The camera may not be able to access data in the built-in memory in the case of a malfunction. Use a computer or other device to back up important data in another location.
26

1 Open the battery/card cover.
Pull the battery/card cover in the direction of 1and flip the cover open in the direction of 2.
2 Insert the SD Memory Card into the SD Memory Card socket so that the label is facing toward the LCD monitor.
Push the card in until it clicks. Images and sound may not be recorded correctly if the card is not inserted all the way.
3 Close the battery/card cover and slide it back into place.
Removing the SD Memory Card
1 Open the battery/card cover.
2 Push the card into the SD Memory Card socket to eject it.
Pull the card out.
1 GettingStarted
27

1 GettingStarted
Precautions When Using an SD Memory Card
•The SD Memory Card is equipped with a write-protect switch. Setting the switch to LOCK protects the existing data by prohibiting recording of new data, deletion of existing data or formatting of the card.
r appears on the LCD monitor when the Write-protect switch card is write-protected.
•Care should be taken when removing the SD Memory Card immediately after using the camera, as the card may be hot.
•Do not remove the SD Memory Card or turn the camera off while data is being saved to the card, images or sound files are being played back, or the camera is connected to a computer with the USB cable, as this may cause the data to be lost or the card to be damaged.
•Do not bend the SD Memory Card or subject it to violent impact. Keep it away from water and store away from high temperature.
•Do not remove the SD Memory Card during formatting as this may damage the card and render it unusable.
•The data on the SD Memory Card may be deleted in the following circumstances. PENTAX does not accept any liability for data that is deleted
(1)when the SD Memory Card is mishandled by the user.
(2)when the SD Memory Card is exposed to static electricity or electrical interference.
(3)when the card has not been used for a long time.
(4)when the card is ejected or the batteries are removed while the data on the card is being recorded or accessed.
•The SD Memory Card has a limited service life. If it is not used for a long time, the data on the card may become unreadable. Be sure to regularly make a backup of important data on a computer.
•Avoid using or storing the card where it may be exposed to static electricity or electrical interference.
•Avoid using or storing the card in direct sunlight or where it may be exposed to rapid changes in temperature or to condensation.
•When using an SD Memory Card with a slow recording speed, recording may stop while you are taking movies even when there is adequate space in the memory, or shooting and playback may take a long time.
•For information on compatible SD Memory Cards, visit the PENTAX website or contact your nearest PENTAX Service Center.
28
 Loading...