


Pressure Side Pool Cleaner
Installation Guide
IMPORTANT SAFETY INSTRUCTIONS
READ AND FOLLOW ALL INSTRUCTIONS
SAVE THESE INSTRUCTIONS
LEGEND® PLATINUM II INSTALLATION MANUAL • MANUEL D’INSTALLATION LEGEND® PLATINUM II

Customer Service
If you have questions about ordering Pentair replacement parts, and pool products, please use the following contact information:
Customer Service, USA (8 A.M. to 5 P.M. — Eastern and Pacific Times)
Phone: (800) 831-7133
Fax: (800) 284-4151
Technical Support, USA
Sanford, North Carolina, USA (8 A.M. to 5 P.M. — Eastern Time)
Phone: (919) 566-8000
Fax: (919) 566-8920
Moorpark, California, USA (8 A.M. to 5 P.M. — Pacific Time)
Phone: (805) 553-5000 (Ext. 5591)
Fax: (805) 553-5515
Web site
visit www.pentairpool.com and www.staritepool.com to find information about our products
Pentair Water Pool and Spa Europe
Industriepark Wolfstee
Toekomstlaan 30
B-2200 Herentals
BELGIUM
Phone : +32 25 99 11
Fax : +32 25 99 73
© 2006 Pentair Water Pool and Spa, Inc. All rights reserved.
This document is subject to change without notice.
1620 Hawkins Ave., Sanford, NC 27330 • (919) 566-8000
10951 West Los Angeles Ave., Moorpark, CA 93021 • (805) 553-5000
Trademarks and Disclaimers. The Pentair Water Pool and Spa logoand the Legend Platinum II logoare registered trademarks of Pentair Water Pool and Spa, Inc. Other trademarks and trade names may be used in this document to refer to either the entities claiming the marks and names or their products. Pentair Water Pool and Spa, Inc. disclaims any proprietary interest in trademarks and trade names other than its own.
P/N 370260 Rev. A 7/31/06
LEGEND® PLATINUM II INSTALLATION MANUAL • MANUEL D’INSTALLATION LEGEND® PLATINUM II

LX 2000PMEU
Important Information:
The Legend® Platinum II automatic pool cleaner comes ready to connect into a female threaded 1-1/2" dedicated return line. Other connections are possible, but they require additional fittings. For more information, please contact our Technical Support Department at 1-800-831-7133. Also, if you have a chlorinator, solar system or other air inducing equipment, please contact our Technical Support Department before you install the Legend® Platinum II.
The following are important facts to remember before installing and operating the Legend® Platinum II.
1.Always disconnect the Legend® Platinum II from the pool wall when cleaning or back washing the pool filter.
2.After cleaning or back washing, let the filtration system run for at least five minutes before reconnecting the Legend® Platinum II.
3.New plumbing lines should be flushed out before installing the Legend® Platinum II.
4.The Legend® Platinum II should not be used to remove plaster dust in new pools.
5.Always remove the Legend® Platinum II before swimmers enter the pool.
6.Always handle the Legend® Platinum II with care. Do not let children or pets play with the unit: it is not a toy.
7.Always pick up the Legend® Platinum II by the Vacuum Tube especially when lifting the unit out of the water.
8.Unless checking the wheel RPM, do not handle the Legend® Platinum II while it is operating.
9.Always remove the Legend® Platinum II from the pool before chemical shock treatments. As a rule, any pool water that is unsafe for swimming is unsafe for the Legend® Platinum II.
10.Carefully cut the feed hose following the instructions on Page 3.
By following these simple guidelines, you can help protect against injury and prolong the life of your Legend® Platinum II.
Before the Legend® Platinum II is installed, please take a moment to record the serial number. This number is located on the back of the Legend® Platinum II near the rear jet. You will be asked this number when you contact our Technical Support Department.
SERIAL#__________________________________
LEGEND® PLATINUM II INSTALLATION MANUAL • MANUEL D’INSTALLATION LEGEND® PLATINUM II

TABLE OF CONTENTS
I. |
Introduction ...................................................................................................................... |
1 |
|
|
A. Thank You for Choosing the Legend® Platinum II ................................................... |
1 |
|
|
B. What to Expect from the Legend® Platinum II ......................................................... |
1 |
|
II. |
Installation Instructions .................................................................................................... |
2 |
|
|
A. Legend® Platinum II Components ........................................................................... |
2 |
|
|
B. Pool Connections ................................................................................................... |
2 |
|
|
C. Installing the Twist Lock Pressure Relief Valve (Wall Fitting).................................. |
2 |
|
|
D. Pressure Testing Instructions ................................................................................. |
3 |
|
|
E. Cutting the Feed Hose............................................................................................ |
3 |
|
|
F. Hooking Up the Legend® Platinum II ....................................................................... |
4 |
|
|
G. Checking Operation ............................................................................................... |
4 |
|
|
H. Fine Tuning the Legend® Platinum II ....................................................................... |
5 |
|
|
1. |
Thrust Jet Adjustment ....................................................................................... |
5 |
|
2. |
Sweep Hose Adjustment ................................................................................... |
5 |
|
3. |
Checking Wheel RPM ....................................................................................... |
5 |
III. Operation & Periodic Maintenance ................................................................................... |
7 |
||
|
A. Connecting/Disconnecting the Legend® Platinum II ................................................ |
7 |
|
|
B. Turning the Legend® Platinum II On/Off .................................................................. |
7 |
|
|
C. Cleaning the Sand & Silt Bag ................................................................................. |
7 |
|
|
D. Periodic Maintenance ............................................................................................. |
7 |
|
|
1. |
Wall Fitting Screen ............................................................................................ |
7 |
|
2. |
Tires & Bearings ............................................................................................... |
8 |
|
3. |
Roller Rings ...................................................................................................... |
8 |
|
4. |
Debris Bags ...................................................................................................... |
8 |
|
5. |
Sweep Hose...................................................................................................... |
8 |
|
6. |
Debris Valve...................................................................................................... |
8 |
|
E. Back Washing the Pool Filter.................................................................................. |
8 |
|
|
F. Storage and Winterizing ......................................................................................... |
9 |
|
|
G. Accessories ........................................................................................................... |
9 |
|
|
1. |
Leaf Bag ........................................................................................................... |
9 |
|
2. |
Step Adapter ..................................................................................................... |
9 |
IV. Troubleshooting and Performance Tips ...................................................................... |
10-12 |
||
|
Legend® Platinum II Parts List .............................................................................. |
13-14 |
|
|
Legend® Platinum II Exploded View ........................................................................... |
15 |
|
LEGEND® PLATINUM II INSTALLATION MANUAL • MANUEL D’INSTALLATION LEGEND® PLATINUM II

I. Introduction
A.Thank You for Choosing the Legend® Platinum II Pool Cleaner
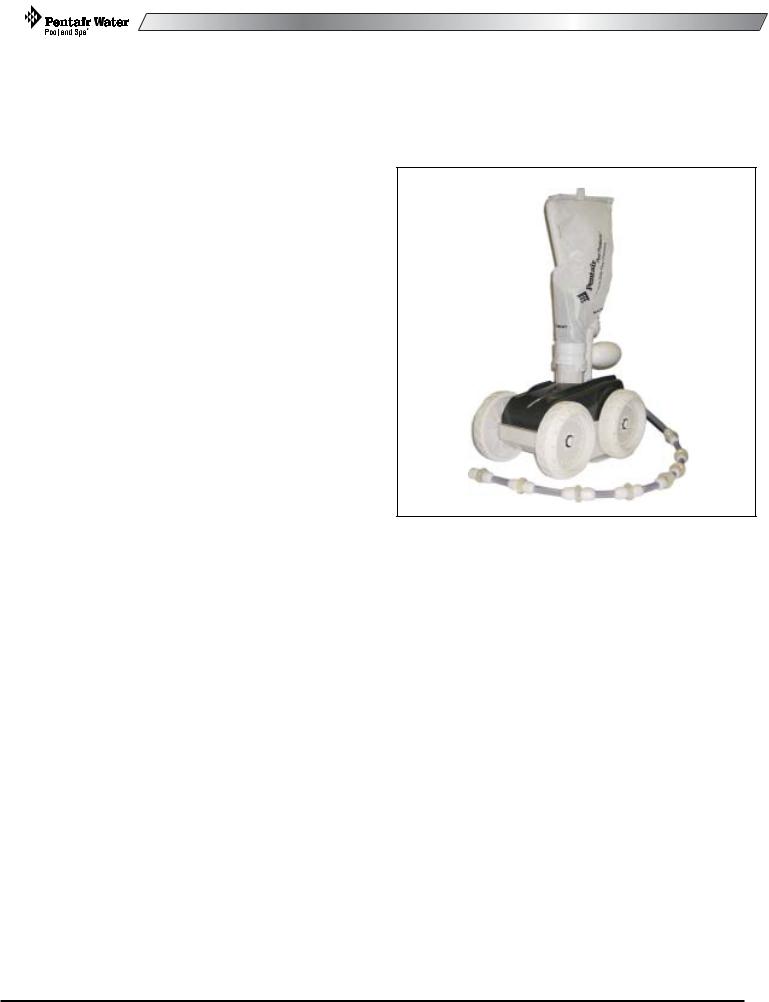
Congratulations on the purchase of your new automatic pool cleaner. The Legend® Platinum II is designed to give you years of dependable and efficient service. With the Legend® Platinum II, you and your family will spend more time relaxing and enjoying your pool and less time cleaning it.
The Legend® Platinum II has been designed and built with time proven features and patented innovations to create an automatic pool cleaner that will give you years of dependable service. The Legend® Platinum II is built with pride in the U.S.A., by people who care about the product using state of the art materials and backed by a limited warranty that protects against defects in parts and construction.
Like any mechanical device, the Legend® Platinum II requires some preventative maintenance and the replacement of certain working parts. We recommend that you have your Legend® Platinum II checked annually. For best results have your Legend® Platinum II installed by a qualified swimming pool professional.
For pool owners with plumbing and mechanical experience, installation instructions are included in this manual.
Please put safety first! Be sure to take your Legend® Platinum II out of your pool and store it carefully in a shaded area before anyone enters the pool.
B.What to Expect from the Legend® Platinum II
When operating correctly, the Legend® Platinum II will travel randomly throughout the pool, vacuuming and sweeping the bottom. The climbing ability of the Legend® Platinum II is dependent on the pools shape. It will climb better in pools without sharp angles or curves in the transition from the pool floor to the pool wall.
The Legend® Platinum II comes equipped with a Wall Fitting (Part# LXW22) that features a Twist Lock Automatic Pressure Relief Valve. If the Legend® Platinum II is receiving too much water pressure to the unit, the relief valve will automatically reduce water pressure.
Approximately every three minutes and 30 seconds the Legend® Platinum II will go into a back up mode. At this time the Back Up Valve will pull the Legend® Platinum II away from problem areas.
Occasionally some vinyl pools have steps installed so the unit may not climb and remains stationary until the Back Up Valve pulls the unit away from the steps. When this occurs you need to use the optional Step Adapter (Part# EU13) to prevent wearing the vinyl liner.
The Sweep Hose operates in a gentle sweeping motion to prevent debris from becoming trapped in hard to reach corners of the pool.
1
LEGEND® PLATINUM II INSTALLATION MANUAL • MANUEL D’INSTALLATION LEGEND® PLATINUM II
II. Installation Instructions
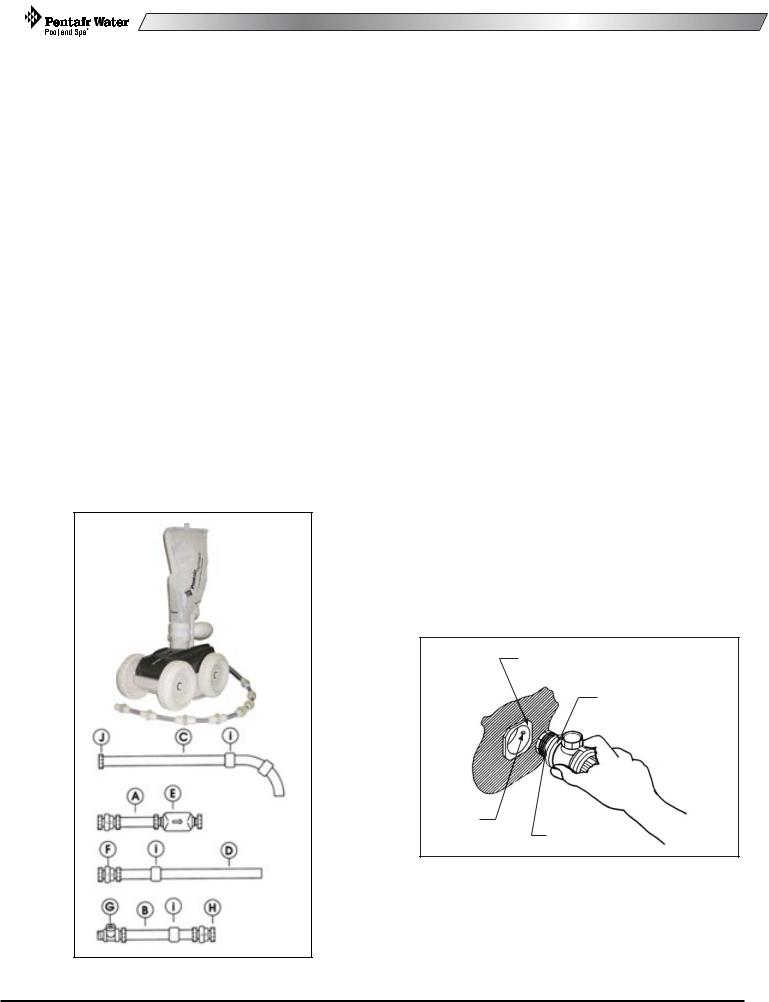
A. Legend® Platinum II Components
The Legend® Platinum II Box Contains:
1.Cleaner Head
2.Sand & Silt Bag
3.Sweep Hose
4.Complete Feed Hose
a.1 - 18 in. hose
b.1 - 2 ft. hose
c.1 - 4½ ft. hose
d.3 - 6 ft. hoses
e.1- Back-Up Valve
f.4 - Swivels
g.1 - Wall Fitting
h.12 - Mender Nuts
i.7 - Hose Floats
j.1 - Pressure Tester
2
B. Pool Connections
The Legend® Platinum II comes equipped to connect to a female threaded 1-1/2" dedicated return line. An adjustable gate valve with a pressure gauge should be installed to allow a regulated amount of water flow from your pool system to the Legend® Platinum II. For more information contact our Technical Support Department at 1-800-831-7133.
Also, if the pool doesn't have a dedicated cleaner line please contact our Technical Support Department also.
C.Installing the Twist Lock Pressure Relief Valve (Wall Fitting)
1.Take out any existing pool cleaner and/or wall fitting.
2.Turn on the filtration pump and flush out the plumbing line.
3.Turn off filter pump.
4.Remove the Wall Adapter from the Wall Fitting and screw Adapter by hand into the dedicated line. Turn until tight.
WALL ADAPTER
INSTALLED
QUICK DISCONNECT
QUICK
LOCK O-RING
PEG
5.Take the Wall Fitting and Twist Lock the Wall Fitting into the Wall Adapter 1/4 turn; to a snug fit. Once the Wall Adapter is secure, you can now twist lock and unlock to remove Wall Fitting with ease from the Wall Adapter.
LEGEND® PLATINUM II INSTALLATION MANUAL • MANUEL D’INSTALLATION LEGEND® PLATINUM II

D. Pressure Testing Instructions
1.Make sure the pool filter is clean before conducting this pressure test.
2.Twist lock the Wall Fitting with Feeder Hose into the Wall Adapter.
3.Have someone hold the Pressure Tester end of the Feed Hose beneath the water while you turn on the pool pump. Continue holding the hose under the water and cover the large hole of the pressure tester.
4.Reach down and feel around the Pressure Relief Valve on the Wall Fitting to see if the Relief Valve is releasing any water pressure. If valve is releasing water pressure go on to Section E. If it is not, the pool filtration pump may not have sufficient amount of water pressure to operate the Legend® Platinum II.
BEFORE YOU GO TO THE NEXT STEP, CONTACT OUR TECHNICAL SUPPORT DEPARTMENT AT: 1-800-831-7133
E. Cutting the Feed Hose
(See Hose Diagram on Page 11)
The Hose assembly comes in 6 sections covering approximately 30 ft. of the pool, which provides ample hose for most residential pools. For larger or smaller pools see Page 12 for instructions for Adding or Deleting Additional Feeder Hose.
1.Take Feeder Hose out of box and lay the hose straight in the sun for one day if possible, (this will take any memory out of the hose due to being coiled up in the box).
2.With the pool pump on, hold the free end of the Feeder Hose underwater. Gently pull the hose to the farthest end of the corner of the pool, do not stretch the hose. (The Legend® Platinum II usually will not climb the top step, so you do not need to include it in the measurement.) If the hose just reaches the farthest point of your pool, and without any excess hose hanging over the deck, then go to Section F.
3.If the Feeder Hose extends past the farthest end of the pool, mark the excess hose hanging over the deck, turn off your pool pump, and cut first 6 ft. section of hose, closest to the wall, the length of excess.
4.IMPORTANT: Please double check the hose length to insure you will be getting the maximum performance from your pool cleaner. The hose lengthens when under pressure (when your pump is on).
3
LEGEND® PLATINUM II INSTALLATION MANUAL • MANUEL D’INSTALLATION LEGEND® PLATINUM II
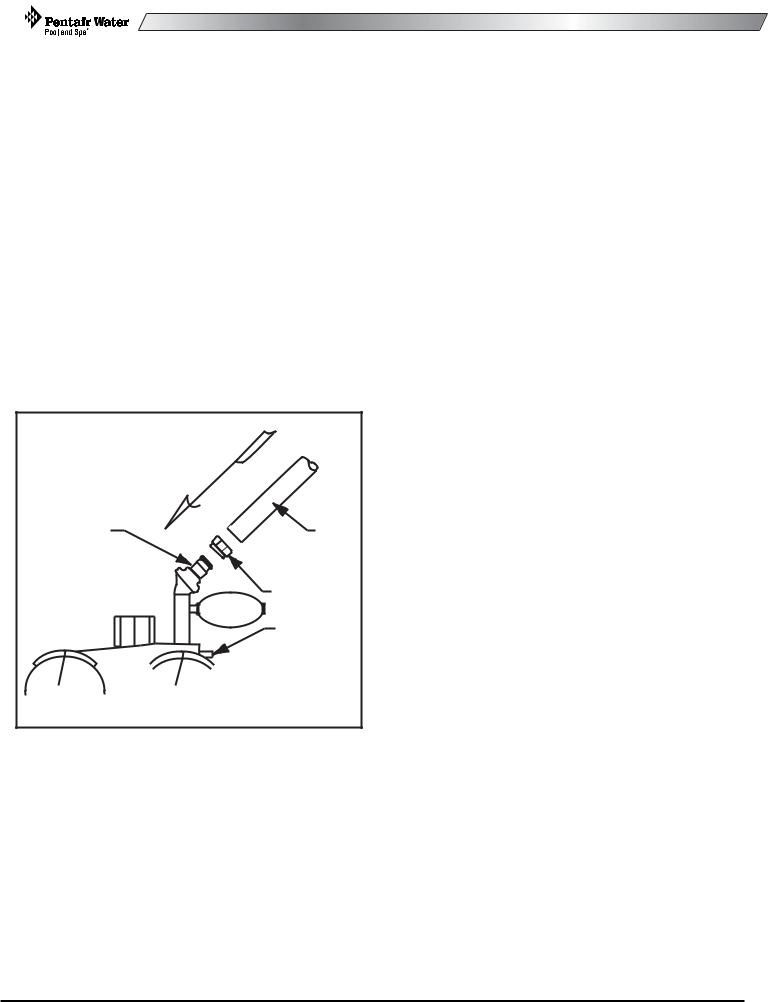
F. Hooking up the Legend® Platinum II
1.Remove the Pressure Tester from the free end of the Feeder Hose by unscrewing the Hose Nut. Left hand thread (reverse), (see illustration, previous page).
2.Place mender nut on Legend® Platinum II Swivel Mast. Connect the open end of the Feed Hose to the top of the Legend® Platinum II Swivel Mast and secure with the mender nut. The arch of the Feed Hose should align in the same direction as the Swivel Mast, there should be no twist in the Feed Hose after connection. (See illustration below.)
FEED MAST |
FEED |
SWIVEL |
HOSE |
|
MENDER |
HEAD FLOAT |
NUT |
|
THRUST |
|
JET |
4.Gently place the Legend® Platinum II in the pool. Turn on the pool filtration pump.
5.Check to make sure the wheel RPM is between 25-32. See page 5 for instructions on wheel RPM.
G. Checking Operation
When operating correctly, the Legend® Platinum II will travel in a random pattern throughout the pool, vacuuming and sweeping the bottom. The climbing ability of the Legend® Platinum II is dependent on the pools structure and water flow coming into the pool. It will perform more efficiently in pools without sharp angles or curves in the transition from the floor of the pool to the wall.
The Legend® Platinum II comes with a Twist Lock Pressure Relief Valve (Wall Fitting). If the Legend® Platinum II is receiving too much water pressure, the Pressure Relief Valve in the Wall Fitting will release the excess water pressure.
Approximately every three minutes and 30 seconds the Legend® Platinum II will go into a back-up mode. The Back-Up Valve cycle time, while in the back-up mode, is approximately 30 seconds, pulling the Legend® Platinum II from problem areas.
3.Carefully twist lock the Sand & Silt debris bag onto the top of the Legend® Platinum II Vacuum Tube. Make sure there is a Rubber Debris Valve attached to the top of the Vacuum Tube before locking on the Sand & Silt bag, (this valve is similar to a check valve to help keep debris inside the bag when the water pressure is off).
The Sweep Hose operates in a gentle sweeping motion to prevent debris from becoming trapped in hard to reach corners of the pools.
If the Legend® Platinum II does not travel to all areas of the pool, turn off the pool filtration pump and make the necessary adjustments from the instructions on the next page.
4
LEGEND® PLATINUM II INSTALLATION MANUAL • MANUEL D’INSTALLATION LEGEND® PLATINUM II

H. Fine Tuning the Legend® Platinum II
1. Thrust Jet Adjustment
There are two Thrust Jets located in the back of the Legend® Platinum II. These Thrust Jets alter the direction of the cleaner. The factory standard position for the jets is set slightly to the right. (See illustration below.)
In certain pools, altering the thrust jets can increase performance of the Legend® Platinum II. Moving the thrust jets up can increase climbing, and moving them down can decrease climbing. Moving the thrust jets to the left pushes the unit left and moving them to the right pushes the unit right.
3. Checking Wheel RPM
To determine whether the Legend® Platinum II is receiving the proper water pressure, turn off the pool pump, and carefully remove the Legend® Platinum II from the pool.
Patents Pending
2. Sweep Hose Adjustment
The Sweep Hose operates in a gentle sweeping motion. To increase or decrease the motion of the Sweep Hose, adjust the screw located on the Swivel Mast Barb below the Ballast Float. Turning the screw clockwise will decrease the motion and counter clockwise to increase the motion of the Sweep Hose.
Mark the front drive Tire/Wheel with a marker, or use the Logo located on the side of tire as a marker to count the rotations of the wheel per minute.
Have someone turn on pool pump while you place the Legend® Platinum II in the pool just beneath the water surface. (Be sure to hold onto the Sweep Hose to avoid getting wet.)
Count the rotations of the marked wheel for exactly one minute. (Be sure the Back-Up Valve isn't cycling at this time.) The rotations will give you the Revolutions Per Minute, (RPM).
For proper performance, the Legend® Platinum II operates between 25-32 RPM. If the RPM is below 25 then closely follow the instructions on the next page.
5
LEGEND® PLATINUM II INSTALLATION MANUAL • MANUEL D’INSTALLATION LEGEND® PLATINUM II
3. Checking RPM - (cont.)
1.Clean the Screen located inside the Wall Fitting. A small amount of debris will significantly affect the performance of the cleaner.
2.Clean the skimmer basket, pump basket and pool filter.
3.If an adjustable Gate (3-way) Valve has been installed, adjust the valve to increase water flow to the Legend® Platinum II.
4.If the RPM is more than 32, at the Wall Fitting, unscrew the Pressure Relief Valve slowly until the RPM falls between 25-32. Again, if an adjustable gate (3-way) valve has been installed, adjust the gate valve to decrease water flow to the Legend® Platinum II.
5.If you continue to have problems with either the water flow or obtaining the specified water pressure to operate the Legend® Platinum II, call your Professional Pool Dealer.
If you have any additional questions, please contact Pentair Water Pool and Spa, Inc., Technical Support Department at: 1-800-831-7133 (USA),
Monday through Friday.
6
LEGEND® PLATINUM II INSTALLATION MANUAL • MANUEL D’INSTALLATION LEGEND® PLATINUM II
III. Operation/Periodic Maintenance
A.Connecting/Disconnecting the Legend® Platinum II
Turn off pool pump. Then take the Wall Fitting and twist lock the Wall Fitting clockwise into the Wall Adapter. To disconnect the Legend® Platinum II, unlock and twist counter clockwise. The Wall Adapter should remain in the pool wall.
B. Turning On/Off the
Legend® Platinum II
The Legend® Platinum II operates off a filtration pump coming from the equipment pad, and can be turned on or off by merely turning on/off your pump time clock.
D. Periodic Maintenance
The following parts are wear items that should be checked, maintained or replaced as needed. Wear items are considered any working or moving part(s) being worn due to the use of the cleaner. Wear items are not covered under warranty.
1. Wall Fitting Screen
Inside the wall fitting is a filter screen that acts as a secondary filter. This screen is to keep debris that is passed by the pool filter out of the Legend® Platinum II.
Running the Cleaner without the filter screen can damage the Legend® Platinum II and will void the warranty.
C. Cleaning the Sand & Silt Bag
Carefully unlock the debris bag from the vacuum tube and open the Velcro® Brand fastener at the top of debris bag and dump debris.
If you have a lot of debris in your pool, especially after a storm, you can run your Legend® Platinum II in two shorter cycles per day and empty the debris bag between cycles.
Reconnect the debris bag to the vacuum tube. Do NOT over turn.
If the Velcro® Brand fastener on top of the debris bag does not stay secure, rinse well, let it dry and clean with a stiff brush.
A Helpful Hint: It is easier to empty the debris bag when it is dry. A second bag may be used while the full debris bag is drying.
It's best to empty the debris bag when it becomes half full. The Legend® Platinum II will have better performance if the bag is not overloaded.
A continuous plugged or dirty screen is a sign of problems in your pool filtration system and you need to contact your local pool professional.
To clean the filter screen, pull the screen out from inside the Wall Fitting and rinse thoroughly and push back inside the wall fitting.
Whenever cleaning, back washing or repairing filter, remove the wall fitting and flush out the dedicated line before using the Legend® Platinum II.
7
LEGEND® PLATINUM II INSTALLATION MANUAL • MANUEL D’INSTALLATION LEGEND® PLATINUM II

III.Operation/Periodic Maintenance - (cont.)
2. Tires & Bearings
The tires are designed to protect the bottom of your pool and provide better traction. You need to rotate the tires once per year.
The Wheel Bearings are warranted free of defects when shipped from Pentair Water Pool and Spa, Inc., and are considered a wear item. A good bearing will spin freely.
3. Roller Rings
Your Sweep Hose has a series of Roller Rings to protect the Sweep Hose. Replace the rings as needed. You can rotate the Roller Rings to prevent flat spots.
4. Debris Bags
Fine Mesh Sand & Silt Bag
The Legend® Platinum II comes with a Sand & Silt bag for general use in all pools. We do not recommend using the fine mesh bag to pick up leaves and twigs or other large debris for they have sharp points and edges that can poke holes and eventually rip the bag.
Optional Leaf Bag
The leaf bag is a larger mesh bag made to pick up heavier debris such as leaves. twigs, acorns, etc. This bag can be helpful especially after a storm.
A Helpful Hint: To prolong the life of bags, remove cleaner from pool before adding chemicals.
5. Sweep Hose
The Sweep Hose is provided to help keep the bottom and sides of your pool clean. The Sweep Hose is warranted free of defects when shipped from the factory, and is considered a wear item.
6. Debris Valve
This valve is located under the Debris Bag, it is designed to keep the debris inside the bag. It functions like a check valve to allow the debris to only enter through the bag one way. Replacement is needed when valve begins to stiffen.
E. Back Washing the Pool Filter
Always disconnect the Legend® Platinum II from the pool wall before cleaning or back washing the pool filter. After cleaning or back washing, let the pool filtration system run for a minimum of five minutes to flush out the return lines before reconnecting the Legend® Platinum II.
8
LEGEND® PLATINUM II INSTALLATION MANUAL • MANUEL D’INSTALLATION LEGEND® PLATINUM II
 Loading...