


 Loading...
I N S T A L L A T I O N
DX4500/DX4600 Series
Digital Video Recorder
C2673M-D (8/10)

Contents
Regulatory Notices . . . . . . . . . . . . . . . . . . . . . . . . . . . . . . . . . . . . . . . . . . . . . . . . . . . . . . . . . . . . . . . . . . . . . . . . . . . . . . . . . . . . . . . . . . . . . . . . . . . . 5
Description. . . . . . . . . . . . . . . . . . . . . . . . . . . . . . . . . . . . . . . . . . . . . . . . . . . . . . . . . . . . . . . . . . . . . . . . . . . . . . . . . . . . . . . . . . . . . . . . . . . . . . . . . . . 6
Features . . . . . . . . . . . . . . . . . . . . . . . . . . . . . . . . . . . . . . . . . . . . . . . . . . . . . . . . . . . . . . . . . . . . . . . . . . . . . . . . . . . . . . . . . . . . . . . . . . . . . . . . 7
Models and Features . . . . . . . . . . . . . . . . . . . . . . . . . . . . . . . . . . . . . . . . . . . . . . . . . . . . . . . . . . . . . . . . . . . . . . . . . . . . . . . . . . . . . . . . . . . . . . 7
Model Numbers . . . . . . . . . . . . . . . . . . . . . . . . . . . . . . . . . . . . . . . . . . . . . . . . . . . . . . . . . . . . . . . . . . . . . . . . . . . . . . . . . . . . . . . . . . . . . . . . . . 8
Maximum IPS Recording Rates . . . . . . . . . . . . . . . . . . . . . . . . . . . . . . . . . . . . . . . . . . . . . . . . . . . . . . . . . . . . . . . . . . . . . . . . . . . . . . . . . . . . . . 8
Before You Begin . . . . . . . . . . . . . . . . . . . . . . . . . . . . . . . . . . . . . . . . . . . . . . . . . . . . . . . . . . . . . . . . . . . . . . . . . . . . . . . . . . . . . . . . . . . . . . . . . . . . . . 9
Package Contents . . . . . . . . . . . . . . . . . . . . . . . . . . . . . . . . . . . . . . . . . . . . . . . . . . . . . . . . . . . . . . . . . . . . . . . . . . . . . . . . . . . . . . . . . . . . . . . . . 9
Parts List . . . . . . . . . . . . . . . . . . . . . . . . . . . . . . . . . . . . . . . . . . . . . . . . . . . . . . . . . . . . . . . . . . . . . . . . . . . . . . . . . . . . . . . . . . . . . . . . . . . . . . . . 9
Important Information Worksheet . . . . . . . . . . . . . . . . . . . . . . . . . . . . . . . . . . . . . . . . . . . . . . . . . . . . . . . . . . . . . . . . . . . . . . . . . . . . . . . . . . . 10
Front Panel . . . . . . . . . . . . . . . . . . . . . . . . . . . . . . . . . . . . . . . . . . . . . . . . . . . . . . . . . . . . . . . . . . . . . . . . . . . . . . . . . . . . . . . . . . . . . . . . . . . . . . . . . . 11
Back Panel . . . . . . . . . . . . . . . . . . . . . . . . . . . . . . . . . . . . . . . . . . . . . . . . . . . . . . . . . . . . . . . . . . . . . . . . . . . . . . . . . . . . . . . . . . . . . . . . . . . . . . . . . . 14
Remote Control . . . . . . . . . . . . . . . . . . . . . . . . . . . . . . . . . . . . . . . . . . . . . . . . . . . . . . . . . . . . . . . . . . . . . . . . . . . . . . . . . . . . . . . . . . . . . . . . . . . . . . 15
System Overview . . . . . . . . . . . . . . . . . . . . . . . . . . . . . . . . . . . . . . . . . . . . . . . . . . . . . . . . . . . . . . . . . . . . . . . . . . . . . . . . . . . . . . . . . . . . . . . . . . . . . 17
Equipment Placement and Rack Mounting . . . . . . . . . . . . . . . . . . . . . . . . . . . . . . . . . . . . . . . . . . . . . . . . . . . . . . . . . . . . . . . . . . . . . . . . . . . . . . . . . 18
Desktop Mounting . . . . . . . . . . . . . . . . . . . . . . . . . . . . . . . . . . . . . . . . . . . . . . . . . . . . . . . . . . . . . . . . . . . . . . . . . . . . . . . . . . . . . . . . . . . . . . . 18
Rack Mounting . . . . . . . . . . . . . . . . . . . . . . . . . . . . . . . . . . . . . . . . . . . . . . . . . . . . . . . . . . . . . . . . . . . . . . . . . . . . . . . . . . . . . . . . . . . . . . . . . . 18
Hardware Setup. . . . . . . . . . . . . . . . . . . . . . . . . . . . . . . . . . . . . . . . . . . . . . . . . . . . . . . . . . . . . . . . . . . . . . . . . . . . . . . . . . . . . . . . . . . . . . . . . . . . . . 19
Basic Connections. . . . . . . . . . . . . . . . . . . . . . . . . . . . . . . . . . . . . . . . . . . . . . . . . . . . . . . . . . . . . . . . . . . . . . . . . . . . . . . . . . . . . . . . . . . . . . . . 19
Connecting PTZ Cameras . . . . . . . . . . . . . . . . . . . . . . . . . . . . . . . . . . . . . . . . . . . . . . . . . . . . . . . . . . . . . . . . . . . . . . . . . . . . . . . . . . . . . . . . . . 20
Connecting Alarms . . . . . . . . . . . . . . . . . . . . . . . . . . . . . . . . . . . . . . . . . . . . . . . . . . . . . . . . . . . . . . . . . . . . . . . . . . . . . . . . . . . . . . . . . . . . . . . 21
Connecting Relay Outputs . . . . . . . . . . . . . . . . . . . . . . . . . . . . . . . . . . . . . . . . . . . . . . . . . . . . . . . . . . . . . . . . . . . . . . . . . . . . . . . . . . . . . . . . . 22
Overview of DX4500/DX4600 Setup Window. . . . . . . . . . . . . . . . . . . . . . . . . . . . . . . . . . . . . . . . . . . . . . . . . . . . . . . . . . . . . . . . . . . . . . . . . . . . . . . 23
Operation and Initial System Configuration . . . . . . . . . . . . . . . . . . . . . . . . . . . . . . . . . . . . . . . . . . . . . . . . . . . . . . . . . . . . . . . . . . . . . . . . . . . . . . . . 24
Powering On and Logging On to the DVR. . . . . . . . . . . . . . . . . . . . . . . . . . . . . . . . . . . . . . . . . . . . . . . . . . . . . . . . . . . . . . . . . . . . . . . . . . . . . . 24
Logging Off . . . . . . . . . . . . . . . . . . . . . . . . . . . . . . . . . . . . . . . . . . . . . . . . . . . . . . . . . . . . . . . . . . . . . . . . . . . . . . . . . . . . . . . . . . . . . . . . . . . . . 25
Turning Off the DVR . . . . . . . . . . . . . . . . . . . . . . . . . . . . . . . . . . . . . . . . . . . . . . . . . . . . . . . . . . . . . . . . . . . . . . . . . . . . . . . . . . . . . . . . . . . . . . 25
Selecting the Monitor. . . . . . . . . . . . . . . . . . . . . . . . . . . . . . . . . . . . . . . . . . . . . . . . . . . . . . . . . . . . . . . . . . . . . . . . . . . . . . . . . . . . . . . . . . . . . 26
Displaying Video on the Analog Monitor . . . . . . . . . . . . . . . . . . . . . . . . . . . . . . . . . . . . . . . . . . . . . . . . . . . . . . . . . . . . . . . . . . . . . . . . . 26
Displaying Video on the VGA Monitor. . . . . . . . . . . . . . . . . . . . . . . . . . . . . . . . . . . . . . . . . . . . . . . . . . . . . . . . . . . . . . . . . . . . . . . . . . . . 26
Setting the System Language. . . . . . . . . . . . . . . . . . . . . . . . . . . . . . . . . . . . . . . . . . . . . . . . . . . . . . . . . . . . . . . . . . . . . . . . . . . . . . . . . . . . . . . 27
Setting the System Time . . . . . . . . . . . . . . . . . . . . . . . . . . . . . . . . . . . . . . . . . . . . . . . . . . . . . . . . . . . . . . . . . . . . . . . . . . . . . . . . . . . . . . . . . . 29
Configuring Daylight Saving . . . . . . . . . . . . . . . . . . . . . . . . . . . . . . . . . . . . . . . . . . . . . . . . . . . . . . . . . . . . . . . . . . . . . . . . . . . . . . . . . . . . . . . . 31
Network Configuration . . . . . . . . . . . . . . . . . . . . . . . . . . . . . . . . . . . . . . . . . . . . . . . . . . . . . . . . . . . . . . . . . . . . . . . . . . . . . . . . . . . . . . . . . . . . 33
Configuring TCP/IP. . . . . . . . . . . . . . . . . . . . . . . . . . . . . . . . . . . . . . . . . . . . . . . . . . . . . . . . . . . . . . . . . . . . . . . . . . . . . . . . . . . . . . . . . . . 33
Configuring DDNS . . . . . . . . . . . . . . . . . . . . . . . . . . . . . . . . . . . . . . . . . . . . . . . . . . . . . . . . . . . . . . . . . . . . . . . . . . . . . . . . . . . . . . . . . . . 35
Client Software Installation . . . . . . . . . . . . . . . . . . . . . . . . . . . . . . . . . . . . . . . . . . . . . . . . . . . . . . . . . . . . . . . . . . . . . . . . . . . . . . . . . . . . . . . . 36
Recommended System Requirements. . . . . . . . . . . . . . . . . . . . . . . . . . . . . . . . . . . . . . . . . . . . . . . . . . . . . . . . . . . . . . . . . . . . . . . . . . . . 36
Installing the Client Application . . . . . . . . . . . . . . . . . . . . . . . . . . . . . . . . . . . . . . . . . . . . . . . . . . . . . . . . . . . . . . . . . . . . . . . . . . . . . . . . 36
Specifications . . . . . . . . . . . . . . . . . . . . . . . . . . . . . . . . . . . . . . . . . . . . . . . . . . . . . . . . . . . . . . . . . . . . . . . . . . . . . . . . . . . . . . . . . . . . . . . . . . . . . . . 37
Appendix . . . . . . . . . . . . . . . . . . . . . . . . . . . . . . . . . . . . . . . . . . . . . . . . . . . . . . . . . . . . . . . . . . . . . . . . . . . . . . . . . . . . . . . . . . . . . . . . . . . . . . . . . . . 38
Time Zone Conversion Chart. . . . . . . . . . . . . . . . . . . . . . . . . . . . . . . . . . . . . . . . . . . . . . . . . . . . . . . . . . . . . . . . . . . . . . . . . . . . . . . . . . . . . . . . 38
C2673M-D (8/10) |
3 |

List of Illustrations
1 Package Contents . . . . . . . . . . . . . . . . . . . . . . . . . . . . . . . . . . . . . . . . . . . . . . . . . . . . . . . . . . . . . . . . . . . . . . . . . . . . . . . . . . . . . . . . . . . . . . . . . 9 2 Front Panel . . . . . . . . . . . . . . . . . . . . . . . . . . . . . . . . . . . . . . . . . . . . . . . . . . . . . . . . . . . . . . . . . . . . . . . . . . . . . . . . . . . . . . . . . . . . . . . . . . . . . 11 3 Back Panel. . . . . . . . . . . . . . . . . . . . . . . . . . . . . . . . . . . . . . . . . . . . . . . . . . . . . . . . . . . . . . . . . . . . . . . . . . . . . . . . . . . . . . . . . . . . . . . . . . . . . . 14 4 Remote Control. . . . . . . . . . . . . . . . . . . . . . . . . . . . . . . . . . . . . . . . . . . . . . . . . . . . . . . . . . . . . . . . . . . . . . . . . . . . . . . . . . . . . . . . . . . . . . . . . . 15 5 Connecting Devices to the DX4500/DX4600 . . . . . . . . . . . . . . . . . . . . . . . . . . . . . . . . . . . . . . . . . . . . . . . . . . . . . . . . . . . . . . . . . . . . . . . . . . . 17 6 Attaching Chassis Brackets . . . . . . . . . . . . . . . . . . . . . . . . . . . . . . . . . . . . . . . . . . . . . . . . . . . . . . . . . . . . . . . . . . . . . . . . . . . . . . . . . . . . . . . . 18 7 Rack Mount Installation . . . . . . . . . . . . . . . . . . . . . . . . . . . . . . . . . . . . . . . . . . . . . . . . . . . . . . . . . . . . . . . . . . . . . . . . . . . . . . . . . . . . . . . . . . . 18 8 Basic Connections. . . . . . . . . . . . . . . . . . . . . . . . . . . . . . . . . . . . . . . . . . . . . . . . . . . . . . . . . . . . . . . . . . . . . . . . . . . . . . . . . . . . . . . . . . . . . . . . 19 9 Connecting PTZ Camera Serial Communication Lines . . . . . . . . . . . . . . . . . . . . . . . . . . . . . . . . . . . . . . . . . . . . . . . . . . . . . . . . . . . . . . . . . . . . 20 10 Connecting Alarm Devices . . . . . . . . . . . . . . . . . . . . . . . . . . . . . . . . . . . . . . . . . . . . . . . . . . . . . . . . . . . . . . . . . . . . . . . . . . . . . . . . . . . . . . . . . 21 11 Connecting Relays . . . . . . . . . . . . . . . . . . . . . . . . . . . . . . . . . . . . . . . . . . . . . . . . . . . . . . . . . . . . . . . . . . . . . . . . . . . . . . . . . . . . . . . . . . . . . . . 22 12 Setup Window . . . . . . . . . . . . . . . . . . . . . . . . . . . . . . . . . . . . . . . . . . . . . . . . . . . . . . . . . . . . . . . . . . . . . . . . . . . . . . . . . . . . . . . . . . . . . . . . . . 23 13 DX4500/DX4600 Power On Startup Screen . . . . . . . . . . . . . . . . . . . . . . . . . . . . . . . . . . . . . . . . . . . . . . . . . . . . . . . . . . . . . . . . . . . . . . . . . . . . 24 14 Application Window and Toolbar . . . . . . . . . . . . . . . . . . . . . . . . . . . . . . . . . . . . . . . . . . . . . . . . . . . . . . . . . . . . . . . . . . . . . . . . . . . . . . . . . . . . 24 15 Virtual Keyboard . . . . . . . . . . . . . . . . . . . . . . . . . . . . . . . . . . . . . . . . . . . . . . . . . . . . . . . . . . . . . . . . . . . . . . . . . . . . . . . . . . . . . . . . . . . . . . . . . 25 16 Setup Window: Camera Page. . . . . . . . . . . . . . . . . . . . . . . . . . . . . . . . . . . . . . . . . . . . . . . . . . . . . . . . . . . . . . . . . . . . . . . . . . . . . . . . . . . . . . . 27 17 Display Page Options . . . . . . . . . . . . . . . . . . . . . . . . . . . . . . . . . . . . . . . . . . . . . . . . . . . . . . . . . . . . . . . . . . . . . . . . . . . . . . . . . . . . . . . . . . . . . 28 18 OSD Settings. . . . . . . . . . . . . . . . . . . . . . . . . . . . . . . . . . . . . . . . . . . . . . . . . . . . . . . . . . . . . . . . . . . . . . . . . . . . . . . . . . . . . . . . . . . . . . . . . . . . 28 19 System Page . . . . . . . . . . . . . . . . . . . . . . . . . . . . . . . . . . . . . . . . . . . . . . . . . . . . . . . . . . . . . . . . . . . . . . . . . . . . . . . . . . . . . . . . . . . . . . . . . . . . 29 20 Date/Time Settings. . . . . . . . . . . . . . . . . . . . . . . . . . . . . . . . . . . . . . . . . . . . . . . . . . . . . . . . . . . . . . . . . . . . . . . . . . . . . . . . . . . . . . . . . . . . . . . 29 21 Date Setting Entry Box . . . . . . . . . . . . . . . . . . . . . . . . . . . . . . . . . . . . . . . . . . . . . . . . . . . . . . . . . . . . . . . . . . . . . . . . . . . . . . . . . . . . . . . . . . . . 30 22 DST Time Shift . . . . . . . . . . . . . . . . . . . . . . . . . . . . . . . . . . . . . . . . . . . . . . . . . . . . . . . . . . . . . . . . . . . . . . . . . . . . . . . . . . . . . . . . . . . . . . . . . . 31 23 Daylight Saving Settings . . . . . . . . . . . . . . . . . . . . . . . . . . . . . . . . . . . . . . . . . . . . . . . . . . . . . . . . . . . . . . . . . . . . . . . . . . . . . . . . . . . . . . . . . . 31 24 Network Page Options . . . . . . . . . . . . . . . . . . . . . . . . . . . . . . . . . . . . . . . . . . . . . . . . . . . . . . . . . . . . . . . . . . . . . . . . . . . . . . . . . . . . . . . . . . . . 33 25 TCP/IP Properties . . . . . . . . . . . . . . . . . . . . . . . . . . . . . . . . . . . . . . . . . . . . . . . . . . . . . . . . . . . . . . . . . . . . . . . . . . . . . . . . . . . . . . . . . . . . . . . . 34 26 DDNS User Name . . . . . . . . . . . . . . . . . . . . . . . . . . . . . . . . . . . . . . . . . . . . . . . . . . . . . . . . . . . . . . . . . . . . . . . . . . . . . . . . . . . . . . . . . . . . . . . . 35
List of Tables
A Product Models and Features . . . . . . . . . . . . . . . . . . . . . . . . . . . . . . . . . . . . . . . . . . . . . . . . . . . . . . . . . . . . . . . . . . . . . . . . . . . . . . . . . . . . . 7
B DX4500/DX4600 Model Numbers . . . . . . . . . . . . . . . . . . . . . . . . . . . . . . . . . . . . . . . . . . . . . . . . . . . . . . . . . . . . . . . . . . . . . . . . . . . . . . . . . . 8
C DX4500/DX4600 Maximum IPS Recording . . . . . . . . . . . . . . . . . . . . . . . . . . . . . . . . . . . . . . . . . . . . . . . . . . . . . . . . . . . . . . . . . . . . . . . . . . . 8
D Video Coaxial Cable Requirements . . . . . . . . . . . . . . . . . . . . . . . . . . . . . . . . . . . . . . . . . . . . . . . . . . . . . . . . . . . . . . . . . . . . . . . . . . . . . . . . 19
E Data Port Descriptions . . . . . . . . . . . . . . . . . . . . . . . . . . . . . . . . . . . . . . . . . . . . . . . . . . . . . . . . . . . . . . . . . . . . . . . . . . . . . . . . . . . . . . . . . . 20
F Alarm Terminal Block Description . . . . . . . . . . . . . . . . . . . . . . . . . . . . . . . . . . . . . . . . . . . . . . . . . . . . . . . . . . . . . . . . . . . . . . . . . . . . . . . . . 21
G Relay Terminal Block Description . . . . . . . . . . . . . . . . . . . . . . . . . . . . . . . . . . . . . . . . . . . . . . . . . . . . . . . . . . . . . . . . . . . . . . . . . . . . . . . . . 22
4 |
C2673M-D (8/10) |

Regulatory Notices
This device complies with Part 15 of the FCC Rules. Operation is subject to the following two conditions: (1) this device may not cause harmful interference, and (2) this device must accept any interference received, including interference that may cause undesired operation.
RADIO AND TELEVISION INTERFERENCE
This equipment has been tested and found to comply with the limits of a Class A digital device, pursuant to Part 15 of the FCC Rules. These limits are designed to provide reasonable protection against harmful interference when the equipment is operated in a commercial environment. This equipment generates, uses, and can radiate radio frequency energy and, if not installed and used in accordance with the instruction manual, may cause harmful interference to radio communications. Operation of this equipment in a residential area is likely to cause harmful interference in which case the user will be required to correct the interference at his own expense.
Changes and modifications not expressly approved by the manufacturer or registrant of this equipment can void your authority to operate this equipment under Federal Communications Commission’s rules.
In order to maintain compliance with FCC regulations shielded cables must be used with this equipment. Operation with non-approved equipment or unshielded cables is likely to result in interference to radio and television reception.
This Class A digital apparatus complies with Canadian ICES-003.
Cet appareil numérique de la classe A est conforme à la norme NMB-003 du Canada.
Video Quality Caution
FRAME RATE NOTICE REGARDING USER-SELECTED OPTIONS
Pelco systems are capable of providing high quality video for both live viewing and playback. However, the systems can be used in lower quality modes, which can degrade picture quality, to allow for a slower rate of data transfer and to reduce the amount of video data stored. The picture quality can be degraded by either lowering the resolution, reducing the picture rate, or both. A picture degraded by having a reduced resolution may result in an image that is less clear or even indiscernible. A picture degraded by reducing the picture rate has fewer frames per second, which can result in images that appear to jump or move more quickly than normal during playback. Lower frame rates may result in a key event not being recorded by the system.
Judgment as to the suitability of the products for user’s purposes is solely the user’s responsibility. Users shall determine the suitability of the products for their own intended application, picture rate and picture quality. In the event user intends to use the video for evidentiary purposes in a judicial proceeding or otherwise, user should consult with its attorney regarding any particular requirements for such use.
C2673M-D (8/10) |
5 |

Description
The DX4500/DX4600 Series digital video recorder (DVR) is the latest generation in entry-level DVRs. Equipped with an embedded operating system, the DVR offers camera capacity, features, and functionality exceeding other DVRs. The DX4500/DX4600 is designed for the entry-level market that requires 8 or 16 camera inputs; greater internal hard drive storage capacity; fast frame rate recording; and powerful playback, search, and export capability. The DX4500/DX4600 not only replaces the traditional VCR and multiplexer combination, but it also offers the benefits derived from the latest in digital video processing.
Designed to work with today’s broadband networks, the DX4500/DX4600 uses MPEG-4 compression, allowing you to view and control the DVR across local or wide area networks. Recording at resolutions of up to 704 x 480 (4CIF), the DX4500/DX4600 captures crystal clear pictures, creating effective footage for later use and retrieval. Exported video is easily reviewed at the DX4500/DX4600 server or remote client computer using the Export Viewer. Each DVR input channel can be configured individually to meet a specific security application requirement for video retention. Video critical to investigation and archiving is easily exported to a USB memory device or to an optional CD-RW or DVD±RW device.
Operation of the unit is made easy through the front panel, remote control keypad, or USB mouse. The remote DX4500/DX4600 Client application can interface with up to sixteen DX4500/DX4600 servers simultaneously. User-configurable disk partitioning is used to allocate specific hard disk space for storing continuous video data, and event-initiated video data. The retention time can be different for retaining continuous recorded video, and event-initiated recorded video.
For surveillance applications requiring pan/tilt/zoom (PTZ) capability, the DX4500/DX4600 addresses and controls PTZ equipment such as Spectra® domes and Esprit® positioning systems, or third-party cameras. An optional Pelco KBD300A keyboard can be connected to the DX4500/DX4600 to operate PTZ devices. The DX4500/DX4600 supports Pelco C (Coaxitron®), Pelco D, and Pelco P protocols. Pelco C allows you to operate Pelco PTZ cameras up to a distances of 1,500 feet (457m).
With the ability to trigger recording and response to events (such as alarm inputs, motion detection, and video loss), the DX4500/DX4600 Series becomes an automated monitoring system as well. The DX4600 Series DVR supports multi-event recording. Multi-event recording includes any single or combination of events associated with an alarm, motion, or instant recording event. The DX4600 allows you to schedule each camera to record in a single or multiple-event mode across a 24-hour timeline. You can also configure each camera to record at a specific resolution, quality, and image rate when an event is triggered.
The DX4500/DX4600 video outputs provide for efficient control and effective deterrence. The choice of VGA or composite main monitor output provides flexibility for the user. The main monitor output can be adjusted to display one, four, nine, or sixteen cameras, or it can be adjusted for a custom display. The DX4500/DX4600’s spot monitor output can be used for public viewing or alarm call-up.
The DX4500/DX4600 is designed to deliver robust and reliable performance for security professionals. From the incorporation of watermarking technology to prevent alterations to captured video, to the ability to capture log entries, to the inclusion of Pelco’s world renowned customer service promise, the DX4500/DX4600 embodies the ideal entry-level DVR to protect people and assets.
6 |
C2673M-D (8/10) |
FEATURES
•8- or 16-channel digital video recorder
•MPEG-4 compression
•Up to 704 x 480 (NTSC), 704 x 576 (PAL) recording resolution
•Up to 480 ips recording rate
•Up to 8 TB of internal storage
•DX4600 support for multi-event recording
•Play back exported video at the server
•Partition recording
•Channel resolution, quality, and frame rate settings configurable per individual camera
•Picture-in-picture display for live and playback video
•Remote client with administration functions
•Support for normal, motion, alarm, and scheduled recording
•Local, remote, and KBD300A PTZ control
•Pelco C, Pelco D, Pelco P, and third-party PTZ protocols
•Up to 4 audio inputs and 1 audio output
•Preand post-alarm recording
•Up to 16 alarm inputs and up to 4 relay outputs
•Main monitor for VGA or analog display, analog spot monitor
•Multilanguage on-screen display
•USB, CD-RW, or DVD±RW for video export
•Event notification by e-mail, emergency agent, or sound
•Time/date, event, bookmark, export, and pixel search
MODELS AND FEATURES
Table A. Product Models and Features
Feature |
DX4508 |
DX4516 |
DX4608 |
DX4616 |
|
|
|
|
|
IPS |
120 |
240 |
240 |
480 |
|
|
|
|
|
Multi-Event Recording |
No |
No |
Yes |
Yes |
|
|
|
|
|
Pixel Search |
No |
No |
Yes |
Yes |
|
|
|
|
|
Maximum Internal Storage (GB) |
4000 |
4000 |
8000 |
8000 |
|
|
|
|
|
Audio Inputs |
2 |
2 |
4 |
4 |
|
|
|
|
|
Alarms Inputs |
8 |
16 |
8 |
16 |
|
|
|
|
|
Relay Outputs |
2 |
2 |
2 |
4 |
|
|
|
|
|
Standard Optical Disk Drive |
None |
None |
CD-RW |
CD-RW |
|
|
|
|
|
Optional Optical Disk Drive |
CD-RW or DVD±RW |
CD-RW or DVD±RW |
DVD±RW |
DVD±RW |
|
|
|
|
|
C2673M-D (8/10) |
7 |

MODEL NUMBERS
The following table explains DX4500/DX4600 model numbers. For example, the model number for an 8-channel DX4500 with 250 GB of internal storage and an optional CD-RW optical drive is DX4508CD-250. The model number for a 16-channel DX4600 with 250 GB of internal storage and a CD-RW optical drive is DX4616CD-250.
Table B. DX4500/DX4600 Model Numbers
DX4XXXXXX – XXXX
|
Model |
|
|
|
|
|
|
|
|
|
|
|
|
Storage (GB) |
|||
|
|
|
|
|
|
|
|
|
|
|
|
|
|||||
|
Channels |
|
|
|
|
|
|
|
|
|
|
CD/DVD |
|||||
|
|
|
|
|
|
|
|
|
|
|
|
|
|
||||
|
|
|
|
|
|
|
|
|
|
|
|
|
|
|
|
|
|
Models |
|
Channels |
|
|
Disk Drive |
|
|
|
Storage In GB |
||||||||
|
|
|
|
|
|
|
|
|
|
|
|
|
|
|
|
|
|
5 (DX4500) |
|
8 |
|
|
|
|
|
|
CD-RW* |
|
|
|
250 |
||||
|
|
|
|
|
|
|
DVD±RW† |
|
|
|
|||||||
|
|
|
|
|
|
|
|
|
|
|
|
|
|
|
|||
6 (DX4600) |
|
16 |
|
|
|
|
|
|
DVD±RW† |
|
|
|
500 |
||||
— |
|
|
— |
|
|
— |
|
|
|
750 |
|||||||
|
|
|
|
|
|
|
|
|
|
|
|
|
|
|
|
|
|
— |
|
|
— |
|
|
— |
|
|
|
1000 |
|||||||
|
|
|
|
|
|
|
|
|
|
|
|
|
|
|
|
|
|
— |
|
|
— |
|
|
— |
|
|
|
1500 |
|||||||
|
|
|
|
|
|
|
|
|
|
|
|
|
|
|
|
|
|
— |
|
|
— |
|
|
— |
|
|
|
2000 |
|||||||
|
|
|
|
|
|
|
|
|
|
|
|
|
|
|
|
|
|
— |
|
|
— |
|
|
— |
|
|
|
4000 |
|||||||
|
|
|
|
|
|
|
|
|
|
|
|
|
|
|
|
|
|
— |
|
|
— |
|
|
— |
|
|
|
6000‡ |
|||||||
— |
|
|
— |
|
|
— |
|
|
|
8000‡ |
|||||||
MAXIMUM IPS RECORDING RATES
Table C. DX4500/DX4600 Maximum IPS Recording
|
|
|
NTSC IPS |
|
PAL IPS |
||
|
|
|
|
|
|
|
|
Model |
Format |
Total |
|
Per Camera |
Total |
|
Per Camera |
|
|
|
|
|
|
|
|
|
CIF |
120 |
|
15 |
100 |
|
12.5 |
|
|
|
|
|
|
|
|
DX4508 |
2CIF |
60 |
|
7.5 |
48 |
|
6 |
|
|
|
|
|
|
|
|
|
4CIF |
30 |
|
3 |
24 |
|
3 |
|
|
|
|
|
|
|
|
|
CIF |
240 |
|
15 |
200 |
|
12.5 |
|
|
|
|
|
|
|
|
DX4516 |
2CIF |
120 |
|
7.5 |
96 |
|
6 |
|
|
|
|
|
|
|
|
|
4CIF |
60 |
|
3 |
48 |
|
3 |
|
|
|
|
|
|
|
|
|
CIF |
240 |
|
30 |
200 |
|
25 |
|
|
|
|
|
|
|
|
DX4608 |
2CIF |
120 |
|
15 |
100 |
|
12.5 |
|
|
|
|
|
|
|
|
|
4CIF |
60 |
|
7.5 |
48 |
|
6 |
|
|
|
|
|
|
|
|
|
CIF |
480 |
|
30 |
400 |
|
25 |
|
|
|
|
|
|
|
|
DX4616 |
2CIF |
240 |
|
15 |
200 |
|
12.5 |
|
|
|
|
|
|
|
|
|
4CIF |
120 |
|
7.5 |
96 |
|
6 |
|
|
|
|
|
|
|
|
*Optional for the DX4500 and standard for the DX4600.
†Optional for the DX4500/DX4600. The DVD±RW drive supports double-layer recording.
‡Drive configurations for only the DX4600.
8 |
C2673M-D (8/10) |
Before You Begin
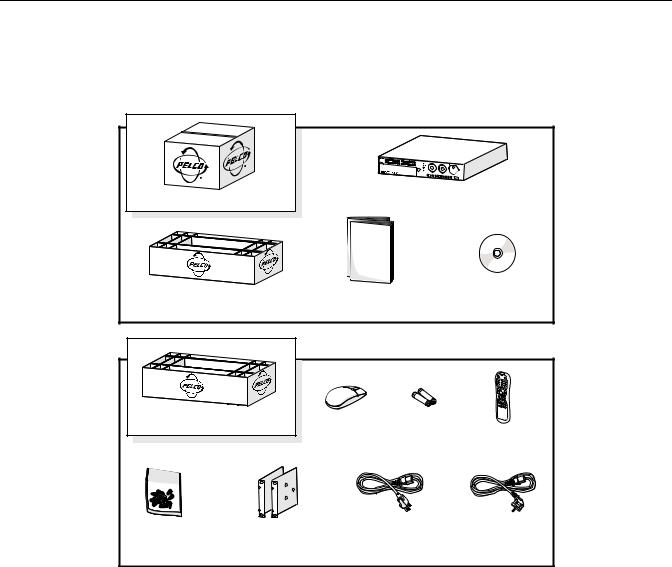
Before you install the DX4500/DX4600 DVR, thoroughly familiarize yourself with the information in this manual prior to installation and operation. Also, review the package contents to ensure that it contains all of the parts listed below.
PACKAGE CONTENTS
SHIPPING BOX |
|
DX4600 |
|
WITH OPTIONAL CD-RW OR DVD-RW |
|||
ACCESSORY PACK |
SAFETY INSTRUCTIONS |
RESOURCE CD |
|
INSTALLATION MANUAL |
|||
|
|
||
ACCESSORY PACK |
|
|
|
|
|
MOUSE |
AAA BATTERIES |
REMOTE CONTROL |
|
|
1 EA. |
2 EA. |
1 EA. |
|
|
|
USA |
EUROPEAN |
|
RACK HARDWARE |
RACK EARS |
STANDARD POWER |
STANDARD POWER |
|
2 EA. |
CORD (110 VAC) |
CORD (220 VAC) |
||
|
||||
|
|
1 EA. |
1 EA. |
Figure 1. Package Contents
PARTS LIST
Qty Description
1Digital video recorder with built-in hard disk drive. Some models contain two or more hard disk drives. Some models contain an optional writable CD drive (CD-RW) or DVD drive (DVD±RW)
2Power cords (1 USA standard, 1 European standard)
1 Remote control
1 Battery pack (2 AAA batteries) for the remote control 1 Mouse
1Rack mounting kit 2 Rack ears
6 Screws, 8-32 x 0.375-inch, Phillips, pan head with lock washers
1 Quick Start Installation guide
1 Installation manual
1 Resource CD (includes DX4500/DX4600 applications for the PC client, Client Emergency Agent, and Export Viewer)
C2673M-D (8/10) |
9 |
IMPORTANT INFORMATION WORKSHEET
Installing the DX4500/DX4600 DVR on a network will require support from your network administrator. The minimum network requirements for DX4500/DX4600 Series DVRs include a switched Ethernet LAN with a bandwidth of 100 Mbps. Contact your administrator to assist you in configuring the network features of the unit.
Before installing or operating the DX4500/DX4600, be sure to obtain, record, and save the following information from your network administrator:
1. A unique site name for each DVR. (Site names can be up to 25 characters and can include spaces.)
_____________________ _____________________
_____________________ _____________________
2. The TCP/IP port numbers that will be used by all DX4500/DX4600 servers and clients on the network. |
|
|
|||||||
|
|
|
|
|
|
|
9005 (fixed) |
|
13900 (fixed) |
|
Base Port |
|
Upgrade Port |
|
Emergency Agent Port |
|
Information Port |
|
Ping Port |
|
(Default = 9001) |
|
(Default = 9003) |
|
(Default = 9002) |
|
(Default = 9005) |
|
(Default = 13900) |
If your network is not configured for DHCP, be sure to obtain, record, and save the following information from your network administrator:
1.A unique IP address for each DVR. (For example, 10.0.0.101, 10.0.0.102, 10.0.0.103, and so forth.)
____.____.____.____ ____.____.____.____
____.____.____.____ ____.____.____.____
2.The subnet mask for each IP address. (For example, is 255.0.0.0.)
____.____.____.____ ____.____.____.____
____.____.____.____ ____.____.____.____
3.The default gateway IP address for each unit.
____.____.____.____ ____.____.____.____
____.____.____.____ ____.____.____.____
4.The Primary DNS Server IP address for each unit.
____.____.____.____ ____.____.____.____
____.____.____.____ ____.____.____.____
5.The Secondary DNS Server IP address for each unit.
____.____.____.____ ____.____.____.____
____.____.____.____ ____.____.____.____
6.The Multicast Group IP address.
____.____.____.____ ____.____.____.____
____.____.____.____ ____.____.____.____
10 |
C2673M-D (8/10) |

Front Panel
The DX4500/DX4600 front panel allows you to operate the DVR without having to use the remote control or mouse (refer to Figure 2).
Figure 2. Front Panel
Access Door: Provides access to the power switch and optical CD/DVD drive.
Channel and Camera Control Buttons:
•Button [1]: Only selects camera 1.
•Buttons [2–8], Eight-Channel Unit or [2–16], Sixteen-Channel Unit: Selects the respective camera and its alternate function. (Press the Shift button to access the alternate function).
[2]OSD: Toggles on and off the display of the toolbar.
[3]COPY: Copies recorded video data to the target media.
[4]MARK: Sets the beginning point from which to search recorded data.
[5]FOCUS-: Decreases camera focus.
[6]FOCUS+: Increases camera focus.
[7]IRIS-: Close camera iris.
[8]IRIS+: Opens camera iris.
[9]ALM OFF: Turns off active alarm state.
[10]INFO: Toggles on and off the display of system information.
[11]LOG: Toggles on and off the display of the log list.
[12] AUX: Sends an auxiliary command.
[13]SET: Starts the PTZ programming mode.
[14]CLR: Clears a programmed event.
[15]PATTERN: Assigns the recorded PTZ actions to the user-specified pattern number.
[16]PRESET: Assigns the position of the selected camera to a user-specified preset number.
Remote Sensor: Communicates between the DVR and remote control.
System Status Indicators:
•NET: Is lit when the network is connected.
•BACKUP: Is lit when the backup process is active.
•HDD: Blinks when the hard drive is accessed.
•ALARM: Is lit when the alarm out is in progress.
C2673M-D (8/10) |
11 |

Selection Control:
•Directional Arrows: (Up, down, left, and right) Navigate between the options of the Menu, Options, and Properties panes.
•Enter: Selects the highlighted option in the Menu, Option, and Properties panes.
Playback Controls:
Left Arrow: Provides two functions.
•Reverse: Searches recorded video at normal speed. Repeatedly press the button to search recorded video in the reverse direction at 2x, 3x, or 4x the normal speed.
•Reverse Skip: Activates when playback is paused. Press the button to play back video frame-by-frame, or press the button repeatedly to quickly skip through video in the reverse direction. Press and hold the button to go directly to the beginning of the recorded video.
Right Arrow: Provides two functions.
•Forward: Searches recorded video at normal speed. Repeatedly press the button to search recorded video in the forward direction at 2x, 3x, or 4x the normal speed.
•Forward Skip: Activates when playback is paused. Press the button to search video frame-by-frame, or press the button repeatedly to quickly skip through video in the forward direction. Press and hold the button to go directly to the end of the recorded video.
STOP: Stops playback.
PAUSE: Pauses playback.
Play: Provides an alternate playback function for viewing video. Press to start playback in forward direction; press again to play back video in the reverse direction.
Jog Control (inner dial): Navigates through various mode options.
•Menu Mode: Increases (clockwise) or decreases (counter-clockwise) the selected option values.
•Date/Time Search Mode: Increases (clockwise) or decreases (counter-clockwise) to select the start time from which to begin playback. Played back video is displayed in the picture-in-picture view. The picture-in-picture view is displayed in one or four panes.
•Event Search Mode: During the initial video playback mode, the inner jog dial does not change the playback parameters. Once the shuttle dial is used to pause played back video, the inner jog allows you to search forward (clockwise) or backward (counter-clockwise) through each frame.
•Bookmark Search Mode: Once the shuttle dial is used to pause played back video, the jog dial allows you to search forward (clockwise) or backward (counter-clockwise) through each frame.
•Pixel Search Mode: In the pixel search setup view, the jog dial navigates through the options. Once an option is selected, the jog dial increases (clockwise) or decreases (counter-clockwise) the option’s value.
Shuttle Dial (outer ring):
•Quick Lift and Release Action (clockwise or counter-clockwise): For any of the above search modes, the initial quick lift and release of the shuttle causes the played back video to pause. Subsequent quick lift and release actions searches the played back video in the forward (clockwise) or reverse (counter-clockwise) direction, one frame at a time.
•Turn and Hold Action (clockwise or counter-clockwise): Turn the shuttle a little further to search the played back video in the forward (clockwise) or reverse (counter-clockwise) direction faster, frame-by-frame. Turning the shuttle a full rotation in either direction searches the playback at the fastest rate. The playback returns to pause when the shuttle is released.
High-Speed USB 2.0 Ports: One port on the front and two on the back of the DVR.
LOGIN: Displays the login dialog box if a user is not logged on to the system. If a user is already logged on, pressing this button logs off the user. When a user is logged on, the button is lit blue; when a user is not logged on, the button is not lit. This button performs
the same function as the Login icon  on the toolbar.
12 |
C2673M-D (8/10) |
Loading...