


ENGLISH
ITALIANO
FRANÇAIS
Owner’s manual
DEUTSCH
271284

ENGLISH
Owner’s manual

Care of your keyboard
Your keyboard will give you years of playing pleasure if you follow the simple rules outlined below:
Do not expose the keyboard to high temperature, direct sunlight and excessively dusty places.
Avoid physical shocks caused by dropping, bumping, or placing heavy objects on the keyboard.
Never use cleaners such as alcohol or solvents to clean the keyboard.
Always turn the power off when making any connections.
Generalmusic web site: http://www.generalmusic.com
The information in this publication has been carefully prepared and checked. The manufacturers however decline all liability for eventual errors. All rights are reserved. This publication may not be copied, photocopied or reproduced in part or in whole without prior written consent from Generalmusic S.p.A. Generalmusic reserves the right to apply any aesthetic, design or function modifications it considers necessary to any of its products without prior notice. Generalmusic declines all liability for damage to property or persons resulting from improper use of the instrument.
Copyright Generalmusic © 1999. All rights reserved.

Contents |
|
Introduction .......................................................................................................... |
1 |
The GK310 features: ........................................................................................... |
1 |
Power supply ....................................................................................................... |
1 |
Using the AC adaptor .......................................................................................... |
1 |
Using batteries ..................................................................................................... |
1 |
To insert the batteries .......................................................................................... |
1 |
Important battery information ............................................................................... |
1 |
Connections ......................................................................................................... |
2 |
The Phones jack .................................................................................................. |
2 |
The Damper jack ................................................................................................. |
2 |
The Aux. Out jack ................................................................................................ |
2 |
The MIDI IN, MIDI OUT and MIDI THRU ports.................................................... |
2 |
Listen to the Demo Songs ................................................................................... |
2 |
Select a single Demo Song ................................................................................. |
3 |
Basic Operation ................................................................................................... |
4 |
Selecting & playing Voices .................................................................................. |
4 |
Play a single voice ............................................................................................... |
4 |
Select a Voice with the [–/OFF] and [+/ON] buttons ............................................ |
4 |
Select a Voice with the numeric keypad .............................................................. |
4 |
Keyboard percussion ........................................................................................... |
4 |
Dual voice (play two layered voices) ................................................................... |
5 |
Split keyboard ...................................................................................................... |
5 |
Play in Split mode with a Dual effect on the Upper keyboard .............................. |
5 |
To cancel Split mode ........................................................................................... |
5 |
The Performances ............................................................................................... |
6 |
Selecting the Performances ................................................................................ |
6 |
Balancing the Lower and Upper sections ............................................................ |
6 |
Muting the sections .............................................................................................. |
7 |
Instant Piano Voice .............................................................................................. |
7 |
Sustain effect ....................................................................................................... |
7 |
Add Pitch Bend to your playing ........................................................................... |
8 |
Styles - Auto-Accompaniment ............................................................................. |
8 |
What are the Styles? ........................................................................................... |
8 |
Selecting Style Mode ........................................................................................... |
8 |
Selecting the Styles using the [-/OFF] and [+/ON] buttons .................................. |
9 |
Selecting the Styles using the numeric keypad ................................................... |
9 |
Selecting the Styles by recalling the Performances ............................................ |
9 |
Playing the Styles ................................................................................................ |
9 |
Changing the Style Tempo ................................................................................ |
10 |
Restoring the memorized Tempo ....................................................................... |
10 |
GK310 Contents A

About the Chord Recognition Modes ................................................................. |
10 |
Using the Style Auto functions ........................................................................... |
10 |
Select the Fill In and change Style Variation ..................................................... |
10 |
Start the Style accompaniments with Key Start ................................................. |
11 |
Start the Style with an Intro pattern ................................................................... |
11 |
Stop the Style with an Ending phrase ................................................................ |
11 |
Balancing the Style accompaniment tracks with the Mixer ................................ |
11 |
Muting the Style tracks ...................................................................................... |
11 |
Using the Single Touch Play settings in Style mode .......................................... |
12 |
Selecting the S.T. Play settings ......................................................................... |
12 |
The Performance buttons and Store Performance ............................................ |
12 |
How to memorize e Performance ...................................................................... |
12 |
Changing the accompaniment Split Point .......................................................... |
13 |
The Octave Transposer ..................................................................................... |
13 |
Cancelling the Octave Transpose setting .......................................................... |
14 |
Record & Play - the Sequencer ......................................................................... |
14 |
Listen to the playback of a recorded Song ........................................................ |
14 |
The GK310 General functions ........................................................................... |
15 |
General function programming procedure ......................................................... |
15 |
The Percussion function - play the Drumpads ................................................... |
15 |
The Keyboard Transpose function ..................................................................... |
15 |
The Tune function .............................................................................................. |
16 |
The Pan function ............................................................................................... |
16 |
The MIDI function .............................................................................................. |
16 |
The Split Point function ...................................................................................... |
16 |
The Beat function .............................................................................................. |
17 |
Touch Response ................................................................................................ |
17 |
Practice using the Metronome ........................................................................... |
17 |
Specifications .................................................................................................... |
18 |
Music Stand ....................................................................................................... |
18 |
Index .................................................................................................................. |
19 |
B GK310 Contents
Introduction
Thank you for purchasing the new GEM GK310 electronic keyboard.
The GK310 offers the following features:
•61 note keyboard with Touch Response;
•132 PCM voices + 1 keyboard percussion kit;
•96 Styles (automatic accompaniments) with 2 Variations;
•Two chord recognition modes for the Styles: Fingered and One Finger;
•384 Single Touch Play settings;
•50 Demo songs with the play along feature;
•On-board Sequencer with Record, Play/Stop and Melody Off functions;
•MIDI compatibility.
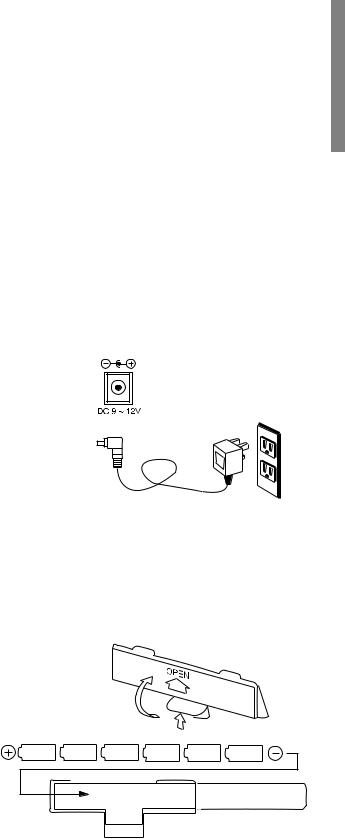
Power supply
This keyboard can be powered by current from a standard household wall outlet (using the specified AC adaptor) or by batteries.
Using the AC adaptor
Always ensure that the istrument is turned OFF when connecting or disconnecting the power adaptor. Applying power while the power switch in depressed may damage the components inside the unit.
Do not use adapters other than the one specified for this keyboard. The technical specifications of the adapter must be: 9~12V DC output, 1800MA, centre positive type.
Using batteries
Always make sure you turn the keyboard off before inserting new batteries or replacing old ones.
To insert the batteries
1.Carfully turn the instrument upside-down and remove the battery compartment cover.
2.Insert six D size (SUM-1 or R-20) batteries into the battery compartment, being careful to follow the polarity markings on the
cabinet.
3.Replace the compartment cover, making sure that it locks firmly in place, then turn the instrument the right way up.
Important battery information
CAUTIONS:
Use only the specified AC adaptor. Use of another type of adaptor creates the danger of fire and electric shock.
For safety sake, be sure to unplug the AC adaptor from the wall outlet whenever leaving the keyboard unattended for a long time.
Any of the following symptoms indicate low battery power. Replace the batteries as soon as possible whenever any of the following occurs.
•A dim and difficult-to-read LCD display.
•Abnormally low speaker/headphone volume.
•Distortion of the sound output.
•Sudden power failure when playing at high volume.
•Abnormal playing of the rhythms or demo songs.
•Dimming of the display when playing at high volume.
CAUTIONS:
Improper handling of the batteries can cause them to burst and leak, creating the danger of personal injury or damage of the keyboard. Be sure to take the following important precautions when using batteries:
•Never use batteries of different types.
•Never mix old batteries with new ones.
•Replace the batteries as soon as possible after any sign of discharge.
•Always make sure to remove the batteries from the keyboard’s battery compartment when the keyboard is not expected to be used for a long period of time.
GK310 1
Connections
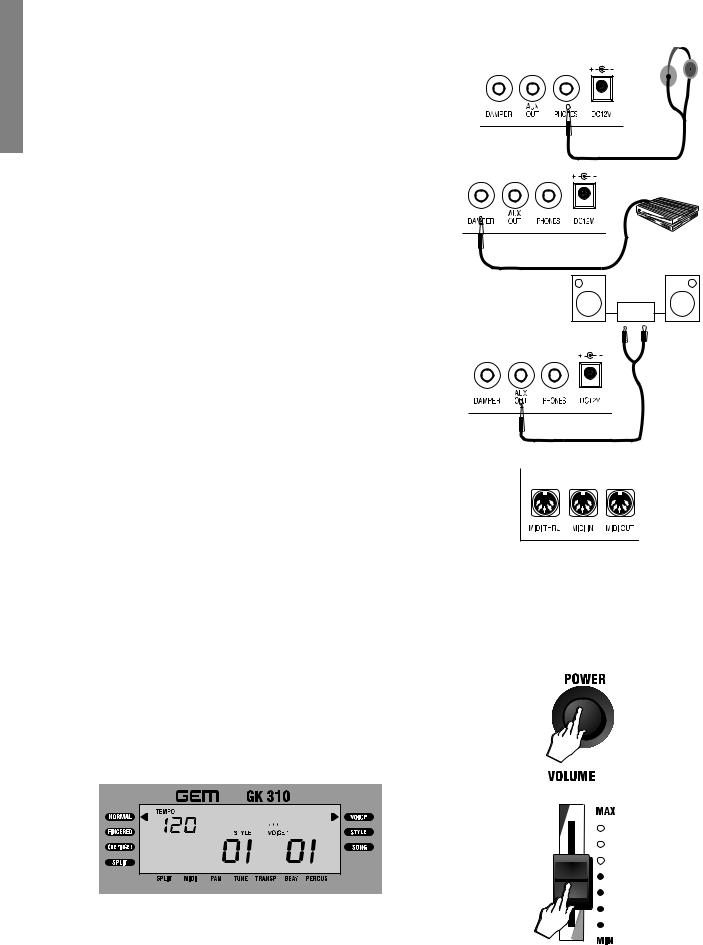
The Phones jack
If you prefer to play with headphones for high quality personal monitoring, plug a standard stereo headphone set into the rear panel PHONES jack. The internal speakers are automatically disconnected.
Use the VOLUME slider to adjust the headphone volume.
The Damper jack
An optional footswitch can be plugged into the DAMPER jack for sustain control. The footswitch operates like the damper pedal of an acoustic piano. Press for sustain, release for normal sound.
The Aux. Out jack
Connect the rear-panel AUX. OUT jack to amplified speakers, amplifiers or domestic hi-fi units for external amplification. Use audio cables with standard 1/4" jacks and plug the other end into the LINE IN or AUX. IN of the external amp. system. To use the external amp. system only and exclude the internal speakers of the GK310, plug a headphones jack into the PHONES jack.
The MIDI IN, MIDI OUT and MIDI THRU ports
The GK310 is fitted with a standard MIDI interface consisting of In, Out and Thru ports for MIDI connections.
The MIDI IN port receives MIDI data from an external MIDI device.
The MIDI OUT port transmits MIDI data to an external MIDI device.
The MIDI THRU port retransmits the same MIDI data received at the MIDI IN port to another external MIDI device.
Listen to the Demo Songs
You can listen to the automatic playback of your GK310 to get an idea of what the instrument is capable of doing. You can also play along with the demos in playback.
1.Turn the power ON by pressing the [POWER] switch.
After a short period, the display will appear showing the NORMAL playing mode with a piano sound (Piano1) ready to play across the full keyboard.
2.Set the volume of the instrument as a whole by using the [VOLUME] slider. A comfortable level is around the halfway mark.
This control increases or decreases the volume of the internal speakers, the headphones and the Aux. Out jack.
2 GK310 Owner’s manual

3.Press the [DEMO ALL] button to start a chained Demonstration. The display shows the first Demo Song number:
Playback starts automatically from the first Demo song and continues non stop until you either change demo or stop the playback.
4. Press the [DEMO ALL] button again to stop the playback.
Select a single Demo Song
1.Select SONG mode by pressing the [VOICE/STYLE/SONG] button as many times as necessary until the right display arrow points to the SONG function. The number of the first demo song available is shown as above.
2. Use the numeric keypad to input the two-digit number of a demo song.
For example, to select Song 35, LONG, LONG AGO, input 3 then 5.
 1
1
 2
2 
For a list of Demo Song names, refer to the Demo Songs table in Appendix C.
3.Press the [START/STOP] button to start the demo song.
You can also use the [DEMO ALL] button to start the playback.
If you use the [START/STOP] button to start the Song, it will play as an endless loop, restarting after it reaches the end. [DEMO ALL] starts the chained Demo Songs from the selected song.
During the demo playback, you can press the [+/ON] button to step to the next demo song or the [–/OFF]button to step back to the previous one.
While the demo plays, all the control panel buttons, except [DEMO ALL], [MELODY OFF] and the [+ON]/[–OFF]buttons, are temporarily disabled.
Play along with the Demo Song
1.While the demo song is playing, press the [MELODY OFF] button to turn off the melody and start to play on the keyboard.
This button is useful if you want to play the melody yourself, or if a singer wants to sing along with the backing only.
2.Use the [TEMPO ] buttons to adjust the Tempo of the selected demo song.
3.Press the [MELODY OFF] button again to restore the melody of the demo song.
4.Press the [START/STOP] or [DEMO ALL] button to stop the playback.
DECREASE |
INCREASE |
TEMPO |
TEMPO |
GK310 3
Basic Operation
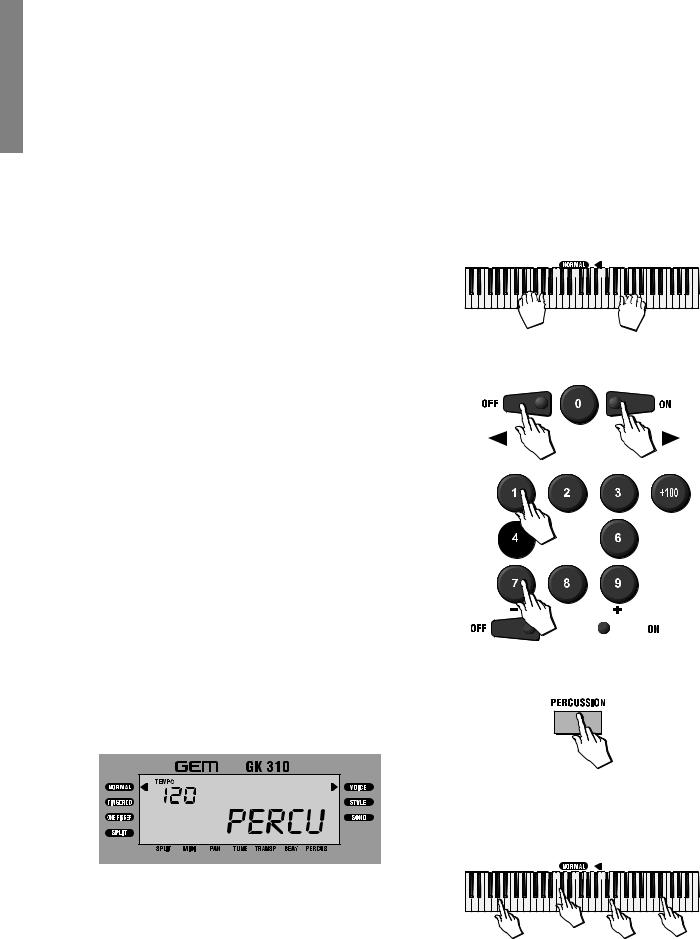
This section explains all the basic operations that you can carry out when the instrument is in NORMAL mode. If you are uncertain how to return the instrument to NORMAL mode, press the [MODE] button as many times as necessary until the left display arrowhead points to NORMAL.
Selecting & playing Voices
The GK310 has 132 PCM voices and 1 percussion kit that you can select and play on the keyboard.
After turning on, the GK310 sets to NORMAL/VOICE mode with the display showing a black arrow pointing to the NORMAL mode on the left and the VOICE mode on the right.
In VOICE mode, you can select and play voices.
Play a single Voice
If you play on the keyboard after turning the instrument on, you will hear a piano sound (in this example, Voice 01, “Piano 1”) play across the entire keyboard.
Select a Voice with the [–/OFF] and [+/ON] buttons
In VOICE mode, the [–/OFF]and [+/ON] buttons of the numeric keypad allow you to step through the individual Voices one by one. The [+/ON] button selects in increasing numerical order while the [–/OFF]button selects in reverse order.
Holding either button down scrolls rapidly forwards or backwards through all the voices. The selected voice number is shown in the bottom right hand corner of the display.
Select a Voice with the numeric keypad
Using the numeric keypad is the quickest way to go directly to the Voice you need, but first, you must know the exact number of the voice. The name and corresponding number of all the Voices in memory are silkscreened above the display on the right. You’ll see that they start from number 01 through to number 132.
Two-digit voice numbers are selected by entering the two digits in sequence.
For example, to select Voice number 17 (Organ 1), press button [1] then button [7].
Three digit voice numbers are entered by first pressing the [+100] button, then pressing the remaining two digits in sequence.
Keyboard percussion
To play drums and percussive instruments on the keyboard, press the [PERCUSSION] button.
In PERCUSSION mode, each note of the keyboard plays a different drum instrument. You can see what kind of percussive instrument each note plays by referring to the silkscreened markings on the rail under the keyboard.
Press the [PERCUSSION] button again to deactivate the function and return to NORMAL playing.
|
|
|
|
|
|
|
|
|
|
|
|
|
|
|
|
|
|
|
|
|
|
|
|
|
|
|
|
|
|
|
|
|
|
|
|
|
|
|
|
|
|
|
|
|
|
|
|
|
|
|
|
|
|
|
|
|
|
|
|
|
|
|
|
|
|
|
|
|
|
|
|
|
|
|
|
|
|
|
|
|
|
|
|
|
|
|
|
|
|
|
|
|
|
|
|
|
|
|
-----------------------< |
|
|
|
|
|
|
|
|
|
|
|
|
|
-----------------------PIANO 1 |
> |
|||||||||||||||||
|
|
|
|
|
|
|
|
|
|
|
|
|
|
|
|
|
|
|
|
|
|
|
|
|
|
|
|
|
|
|
|
|
|
|
|
|
|
|
|
|
|
|
|
|
|
|
|
|
|
|
|
|
|
|
|
|
|
|
|
|
|
|
|
|
|
|
|
|
|
|
|
|
|
|
|
|
|
|
|
|
|
|
|
|
|
|
|
|
|
|
|
|
|
|
|
|
|
|
 1
1
 2
2

|
|
|
|
|
|
|
|
|
|
|
|
|
|
|
|
|
|
|
|
|
|
|
|
|
|
|
|
|
|
|
|
|
|
|
|
|
|
|
|
|
|
|
|
|
|
|
|
|
|
|
|
|
|
|
|
|
|
|
|
|
|
|
|
|
|
|
|
|
|
|
|
|
|
|
|
|
|
|
|
|
|
|
|
|
|
|
|
|
|
|
|
|
|
|
|
|
|
|
|
|
|
------------< |
|
|
|
|
|
|
PERCUSSIVE SOUNDS |
-------------> |
|||||||||||||||||||||||||
4 GK310 Owner’s manual
Dual voice (play two layered voices)
To play the DUAL effect, (with two layered sounds), press the [DUAL] button. The word “VOICE 2” appears in the display as well as the voice number assigned to the layered section.
If you play on the keyboard, you will hear two sounds for every note played. In our example, you will hear the Piano voice (01) together with Slow Strings (50).
In DUAL mode, whatever voice selection you make will always correspond to the second voice.
To return to NORMAL single voice play, press the [DUAL] button again.
<----------------------- |
PIANO 1 ----------------------- |
> |
<----------------- |
SLOW STRINGS ----------------- |
> |
Split keyboard
To play on a split keyboard with one or two voices on the right hand side (UPPER keyboard) and one voice on the left (LOWER keyboard), press the [MODE] button as many times as necessary until the left display arrowhead points to the SPLIT function. The word “LOWER” appears in the display as well as the voice number assigned to the Lower section:
The keyboard splits into a Lower section and an Upper section. If you play on the keyboard, you will hear one sound on the right hand side of the keyboard and another sound on the left. Our example shows Strings (49) on the left and Piano 1 (01) on the right.
To change the voice of the Lower keyboard while you are still in SPLIT mode, simply enter two digits on the numeric keypad, or use the [+/ON] and [–/OFF]buttons.
The note that divides the two keyboard sections is called the SPLIT POINT and the factory setting corresponds to note F#3. The Lower keyboard extension starts from the lowest note on the left, C2, up to note F#3. The Upper keyboard extension covers the range G3 - C7.
It is also possible to modify the Split point and memorize the new setting to a Performance. See the section entitled “Changing the accompaniment Split Point” on page 13.
Play in Split mode with a Dual effect on the Upper keyboard
If you want to play with two layered sounds on the Upper keyboard and one on the Lower, simply press the [DUAL] button while you are in SPLIT mode.
If you want to change the voices on the Upper keyboard, you must cancel the SPLIT mode and return to NORMAL mode, then proceed as already described on the previous pages for Single and Dual voice selection.
To cancel Split mode
To escape Split mode and return to a full keyboard, press the [MODE] button once to select NORMAL mode.
Split Point (F#3)
|
|
|
|
|
|
|
|
|
|
|
|
|
|
|
|
|
|
|
|
|
|
|
|
|
|
|
|
|
|
|
|
|
|
|
|
|
|
|
|
|
|
|
|
|
|
|
|
|
|
|
|
|
|
|
|
|
|
|
|
|
|
|
|
|
|
|
|
|
|
|
|
|
|
|
|
|
|
|
|
|
|
|
|
|
|
|
|
|
|
|
|
|
|
|
|
|
|
|
|
|
|
|
|
|
|
|
|
|
|
|
|
|
|
|
|
|
|
|
|
--------------<-STRINGS->< |
--------------PIANO 1 |
> |
|||||||||||||||||||||||||||||||||||||
Split Point (F#3)
|
|
|
|
|
|
|
|
|
|
|
|
|
|
|
|
|
|
|
|
|
|
|
|
|
|
|
|
|
|
|
|
|
|
|
|
|
|
|
|
|
|
|
|
|
|
|
|
|
|
|
|
|
|
|
|
|
|
|
|
|
|
|
|
|
|
|
|
|
|
|
|
|
|
|
|
|
|
|
|
|
|
|
|
|
|
|
|
|
|
|
|
|
|
|
|
|
|
|
|
|
|
|
|
|
|
|
|
|
|
|
|
|
|
|
|
|
|
|
|
--------------<-STRINGS-> < |
|
|
|
|
--------------PIANO 1 |
> |
|||||||||||||||||||||||||||||||||
<-------- |
|
|
|
|
SLOW STRINGS -------- |
> |
|||||||||||||||||||||||||||||||||
GK310 5
 Loading...