Panasonic Pcf1, Pcv1 Operating Instructions

Manufactured by: |
81-IN3046-9922 |
for 


Before attempting to connect or operate this product, please read these instructions completely.
PRODUCT INSTRUCTIONS
MODEL: Miniature Camera
PCF1, PCV1
DESCRIPTION: Outdoor Pedestal Mount Housing,
Color Camera
STANDARD INSTALLATION PROCEDURE
INCLUDES MODELS: PCF1, PCV1
CONTENTS INCLUDE:
(1) Housing
(1) Weather hood
(1)Cover plate
(1)Cover plate gasket
(1)Allen wrench security head tool
(2)Stainless steel 6-32x1/2" captive Security head screws
(1)Camera mount bracket
(1)Camera bracket arm
(1) Bottom mount bracket with PC Board
(1)Top mount bracket with camera and lens
(2)4-40 x 1/4" screws
(2)Star washers
(4)2-56 x 3/16" screws
1.Remove the cover plate by loosening the 2 security head screws with the security tool.
2.If mounting the unit to a wall:
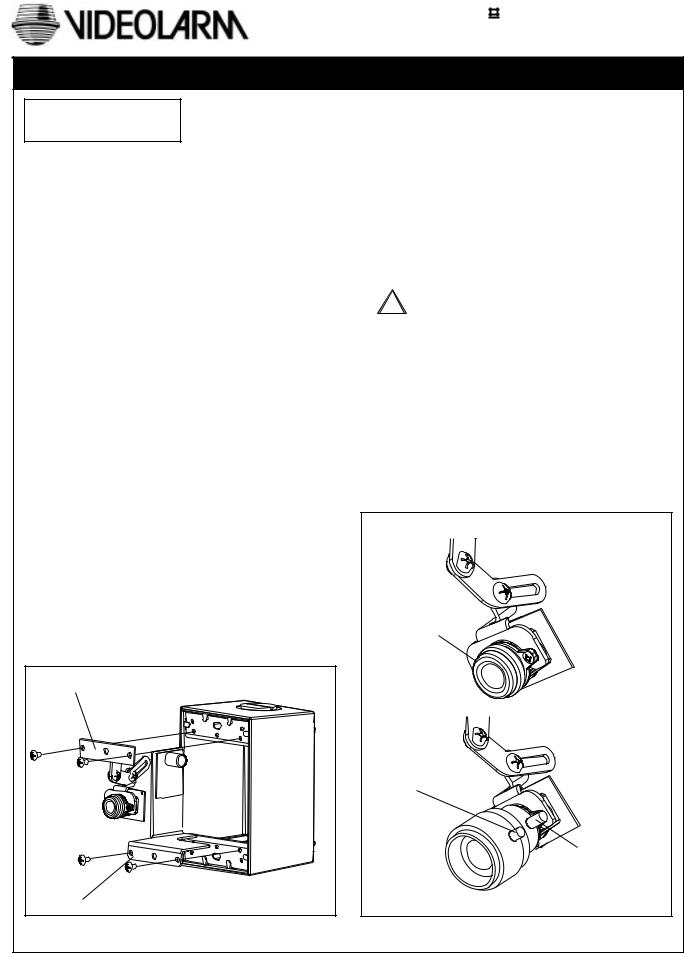
A.Remove the 2 Phillips head screws that secure the bottom mount bracket and PC Board to the housing, then remove the bracket. Repeat for the top mount bracket and camera.
B.Place the housing face down on a flat surface and use a hammer to remove the knockout located at the center of the back of the housing.
C.Use the 2 mounting holes and the appropriate hardware (not included)to secure the housing to the wall.
Top mount bracket and camera |
Bottom mount bracket and PC Board |
3.If mounting the unit on a pedestal:
NOTE: 3/4" conduit with a threaded end is required for this method of installation.
A.Install the conduit in the desired location; run the wiring through the conduit.
B.Place the PFC1/PCV1 housing onto the conduit, feed the wires through the bottom hole and thread the housing onto the conduit until tight.
N NOTE: Apply silicone sealant to the conduit threads and the hole plug to ensure a water tight seal.
4.Make the necessary connections to the PC Board and reattach the bottom bracket to the housing.
!USE CLASS 2 POWER ONLY
5.Hand place the top bracket and camera into the unit. Check the angle of the camera, remove the bracket/ camera and make any necessary adjustments. Once you have achieved the desired camera angle, reattach the top bracket and camera to the housing.
6.Fine focusing (see diagram below):
Fixed Lens: Manually rotate the lens until a clear picture is achieved.
Vari-Focal Lens: First, adjust the Magnification Lock Screw to the desired magnification (telephoto to wide angle). Tighten the Lock Screw. Next, adjust the Focus Lock Screw until a clear picture is achieved. Tighten the Lock Screw.
Camera Fine Focus
Fixed Lens Camera
(PCF1)
Manual focus
Vari-focal Lens Camera
(PCV1)
Focus Lock Screw
Magnification
Lock Screw
 Loading...