


Operating Instructions
Vacuum Cleaner
MC-E464, MC-E468, MC-E469
Shop  Panasonic
For Accessories and Consumables visit our web site at www.panasonic.co.uk
(for customers in the UK only)
Panasonic
We would recommend that you read these Operating Instructions before attempting to operate the unit and that you note the Important Safety Instructions.
Please keep in a safe place with your Authorised Dealer Service booklet. This product complies with the directives 73/23/EEC and 89/336/EEC.
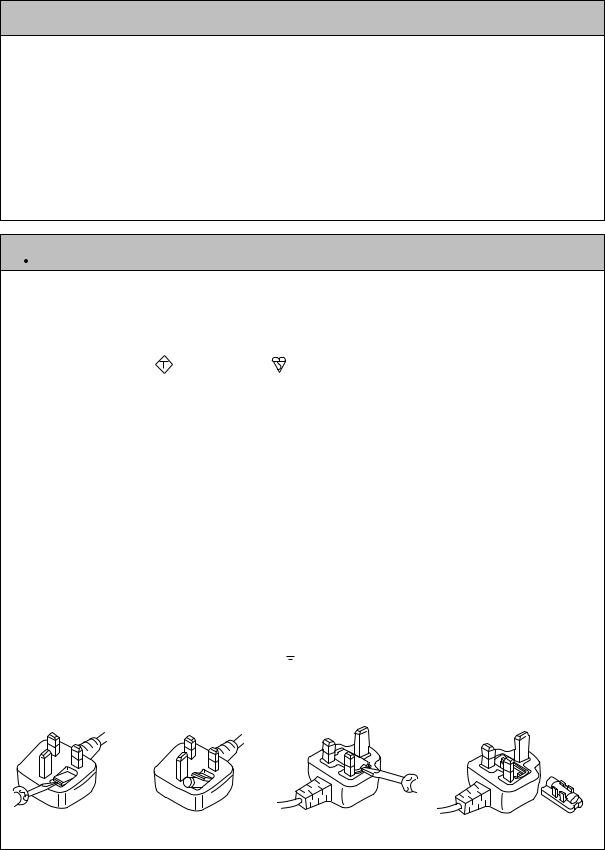
TABLE OF CONTENTS
Page
• Caution for AC Mains Lead (UK, IRL only) . . . . . .2
• Important Safety Instructions for the user . . . . . .3
• Cautions . . . . . . . . . . . . . . . . . . . . . . . . . . . . . . . .3
• Identification of main parts . . . . . . . . . . . . . . . . . .4 HOW TO ASSEMBLE / OPERATE YOUR CLEANER A) Handle assembly . . . . . . . . . . . . . . . . . . . . . . . .5 B) Power cord release / storage . . . . . . . . . . . . . . .5 C) ON/OFF Switch . . . . . . . . . . . . . . . . . . . . . . . . .5 D) Variable power control . . . . . . . . . . . . . . . . . . . .6 E) Handle adjustment by foot pedal . . . . . . . . . . . .6 F) Beater bar switch (except MC-E464) . . . . . . . . .7 G) Automatic height adjustment . . . . . . . . . . . . . . .7
|
Page |
H) Floor scratch prevention . . . . . . . . . . . . . . |
. . . .7 |
I) How to use the accessories . . . . . . . . . . . . . |
. . .8 |
J) Dust bag change indicator . . . . . . . . . . . . . . |
. . .8 |
MAINTENANCE AND SERVICING |
|
• How to change the dust bag . . . . . . . . . . . . . |
. . .9 |
• Filter care . . . . . . . . . . . . . . . . . . . . . . . . . . . . |
. . .9 |
• Blockages . . . . . . . . . . . . . . . . . . . . . . . . . . . . |
. .10 |
• Maintenance for the rotary brush . . . . . . . . . |
. .10 |
• Servicing and repairs . . . . . . . . . . . . . . . . . . . |
. .11 |
• Trouble shooting guide . . . . . . . . . . . . . . . . . |
. .12 |
• Specifications . . . . . . . . . . . . . . . . . . . . . . . . . |
. .12 |
• Consumables / Accessories . . . . . . . . . . . . . |
. .13 |
 CAUTION FOR AC MAINS LEAD ( UK, IRL only )
FOR YOUR SAFETY PLEASE READ THE FOLLOWING TEXT CAREFULLY
This appliance is supplied with a moulded three pin mains plug for your safety and convenience. A 13 amp fuse is fitted in this plug.
Should the fuse need to be replaced please ensure that the replacement fuse has a rating of 13 amps and
that it is approved by ASTA or BSI to BS1362. |
|
Check for the ASTA mark ASA or the BSI mark |
on the body of the fuse. |
If the plug contains a removable fuse cover you must ensure that it is refitted when the fuse is replaced. If you lose the fuse cover the plug must not be used until a replacement cover is obtained.
A replacement fuse cover can be purchased from your local Panasonic Dealer.
IF THE FITTED MOULDED PLUG IS UNSUITABLE FOR THE SOCKET OUTLET IN YOUR HOME THEN THE FUSE SHOULD BE REMOVED AND THE PLUG CUT OFF AND DISPOSED OF SAFELY.
THERE IS A DANGER OF SEVERE ELECTRICAL SHOCK IF THE CUT OFF PLUG IS INSERTED INTO ANY 13 AMP SOCKET.
If a new plug is to be fitted please observe the wiring code as shown below. If in any doubt please consult a qualified electrician.
IMPORTANT: The wires in this mains lead are coloured in accordance with the following code:
Blue : Neutral
Brown : Live
As the colours of the wire in the mains lead of this appliance may not correspond with the coloured markings identifying the terminals in your plug, proceed as follows:
The wire which is coloured BLUE must be connected to the terminal in the plug which is marked with the letter N or coloured BLACK.
The wire which is coloured BROWN must be connected to the terminal in the plug which is marked with the letter L or coloured RED.
Under no circumstances should either of these wires be connected to the earth terminal of the three pin plug, marked with the letter E or the Earth Symbol 
How to replace the Fuse:
• There are two types of the supplied AC Mains Lead : A and B as shown below. 1 Open the fuse compartment with a screwdriver.
2 Replace the fuse and fuse cover if detachable.
TYPE A |
TYPE B |
Fuse cover Part No.: AMC8D48C0000.
2
IMPORTANT SAFETY INSTRUCTIONS FOR THE USER
When using this vacuum cleaner, please observe these basic precautions.
WARNING: To reduce the risk of fire, electric shock, or injury:
•Do not leave the vacuum cleaner plugged in to mains socket. Unplug from the socket when not in use and before cleaning the appliance or undertaken maintenance operations.
•Electric shocks can occur if used outdoors or on wet surfaces.
•This appliance is not intended for use by young children or infirm persons without supervision; young children should be supervised to ensure that they do not play with the appliance.
•Do not use with damaged cord or plug. If the vacuum cleaner is not working as it should be, or has been dropped, damaged, left outdoors, or come into contact with water, consult an authorised Panasonic Service Centre.
•Do not pull or carry by power cord, use power cord as a handle, close a door on power cord, pull power cord around sharp edges or corners. Do not run vacuum cleaner over the power cord. Keep power cord away from heated surfaces.
•Do not handle plug or vacuum cleaner with wet hands.
•Do not put any object into openings. Do not use with any opening blocked; keep free of dust, lint, hair and anything that may block or reduce air flow.
•Keep hair, loose clothing, fingers, and all parts of body away from openings and moving parts.
•Do not use the vacuum cleaner without filters and / or dust bag in place. Never try to patch a broken dust bag.
•Turn off all controls before unplugging.
•Use extra care when cleaning on stairs.
•Do not use to pick up flammable or combustible liquids such as gasoline or use in areas where they may be present.
•This appliance should be serviced by an authorised Panasonic Service Centre, and only genuine Panasonic spare parts should be used.
•Keep feet, fingers and hands away from the beater bar. (It may cause injury).
NOTE: These vacuum cleaners are designed for general household use only and are not suitable for use in a garage, garden or to suck up liquids.
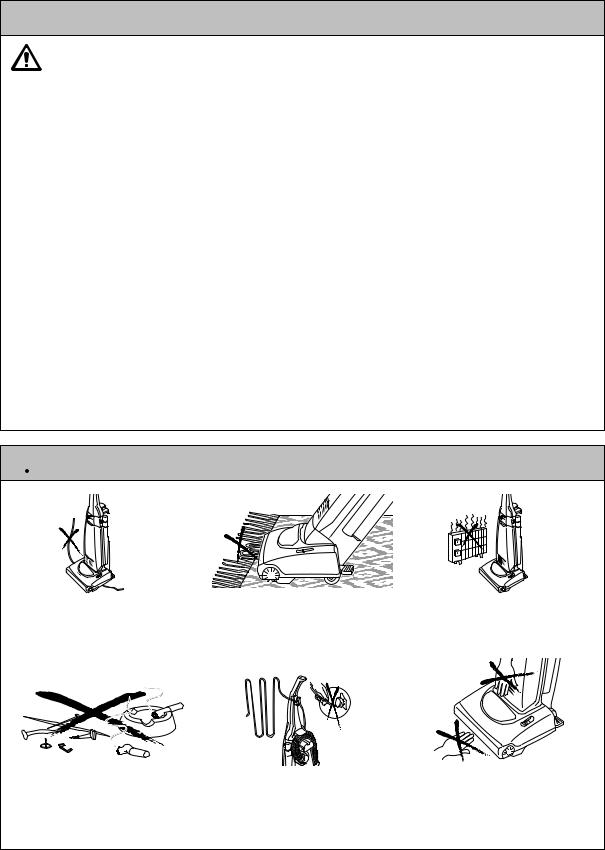
 CAUTIONS
CLEAN |
FILTER |
CLEAN |
|
FILTER |
1) To avoid any possible damage to the mains cable, never run over the power cord or allow it to become caught in the beater bar when using the vacuum cleaner.
2) Do not run the vacuum cleaner over tassels or fringes of rugs or mats as they could get caught up in the beater bar and may cause damage to the brush and belt.
3) Keep the vacuum cleaner away from heat sources such as radiators, fires, direct sunlight, etc.
4) To avoid damaging the machine or the dust bag, never let the vacuum cleaner pick up wet matter, mud, burning ashes or large and sharp objects.
5) Do not pull on power cord when disconnecting the appliance from the mains, always pull on the plug body itself.
6) To avoid injury, keep your fingers and hands away from the beater bar, and never put them between the cleaner bodies.
3
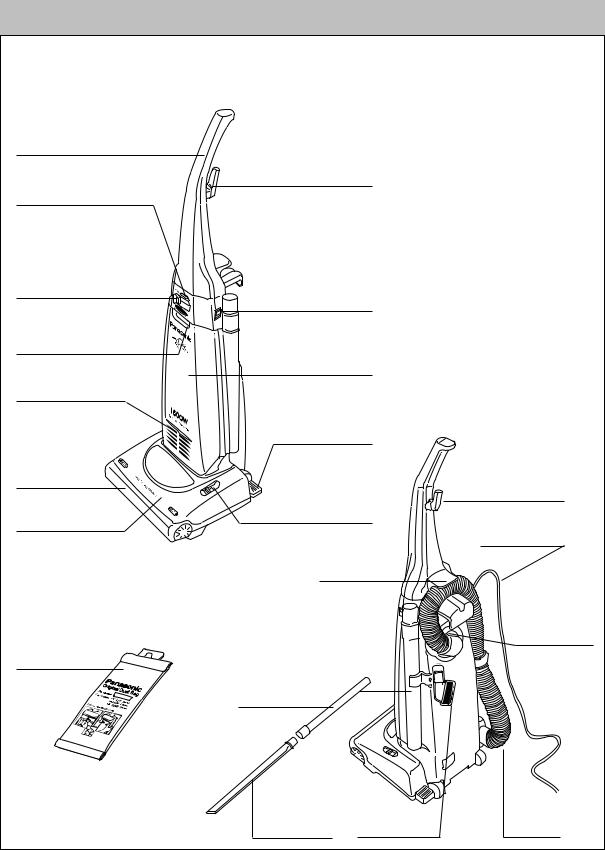
IDENTIFICATION OF MAIN PARTS |
|
|
A-1) Handle |
|
|
B-2) Cord clip |
|
|
J) Dust bag check indicator |
|
|
D) Variable power control |
|
|
(MC-E469 only) |
|
|
C) ON/OFF Switch |
|
|
Carrying handle |
|
|
Dust bag cover |
|
|
Clean air filter |
|
|
E) Foot pedal |
|
|
Furniture guard |
|
|
F) Beater bar switch |
A-3) Upper cord hook |
|
|
||
(except MC-E464) |
|
|
Cleaning head |
|
|
|
|
B-1) Power cord |
A-2) Hose clip |
|
|
|
|
A-3) Lower |
|
|
cord hook/ |
|
|
Carrying |
|
|
handle |
Paper dust bag |
|
|
Extension wand |
|
|
Crevice nozzle |
Dusting brush |
Hose |
4 |
|
|

HOW TO ASSEMBLE / OPERATE YOUR CLEANER
A) HANDLE ASSEMBLY
Upper cord hook
Hose clip
Lower cord hook/ Carrying handle
1) Insert the base of the handle into the top of the body of the machine as shown. Push in handle and tighten the screw.
IMPORTANT: Do not overtighten the screw.
2) Set the hose around the hose clip.
NOTE: Always place the hose in the clockwise direction.
3) Turn the upper cord hook in the upright position and wind the power cord around the upper and lower cord hooks.
B) POWER CORD RELEASE / STORAGE |
C) ON / OFF SWITCH |
1) Turn the |
hook to |
2) Fix the power |
release the |
for |
the cord clip to |
instant use. |
|
the cord during |
NOTE: To avoid any possible damage to the power cord, never run over the cord or allow it to become caught in the beater bar.
To start or stop the vacuum cleaner push the switch button to " I " to turn ON and to " O " to turn OFF.
5
 Loading...