


 Loading...
 BL-PA300
D-PLC
H
MASTER LAN
PLC
P
SETU
Operating Instructions 
PLC Adaptor Add-on Unit
Power Line Communication
Model No. BL-PA300A 
Operating Instructions .......................................................... |
2 |
Instrucciones de operación ................................................. |
27 |
Limited warranty ..................................................................... |
52 |
Customer services ................................................................. |
54 |
Table of Contents |
|
Introduction |
|
IMPORTANT SAFETY INSTRUCTIONS ....................................... |
4 |
Electrical environment information ................................................ |
5 |
Security information....................................................................... |
7 |
Security notices for when sending an adaptor for service............. |
8 |
Main unit........................................................................................ |
9 |
Installation |
|
Registration ................................................................................. |
11 |
Placing the adaptors.................................................................... |
13 |
Power Save Mode ....................................................................... |
13 |
Connecting adaptors to network devices..................................... |
14 |
Useful Information |
|
Testing a terminal’s network speed............................................. |
15 |
Understanding the indicators....................................................... |
17 |
Resetting an adaptor ................................................................... |
18 |
Troubleshooting ........................................................................... |
19 |
Specifications .............................................................................. |
22 |
Adaptor Maintenance Screen...................................................... |
24 |
FCC and other information .......................................................... |
25 |
IMPORTANT NOTES:
For best results, connect this product directly to a wall outlet. This product may not function normally in certain electrical environments.
See page 5 for more information.
Please read this document before use and save this document for future reference.

Introduction
Thank you for purchasing a Panasonic HD-PLC product.
Included items
Confirm that the following items are included with this product. Additional items can be ordered by calling 1-800-332-5368.
PLC Adaptor Add-on Unit.......... |
1 LAN Cable.................................... |
1 |
|
Order No.: PQJA10138Z |
|
300 |
|
|
BL-PA |
|
|
HD-PLC |
|
|
Getting Started ............................. |
1 Operating Instructions |
|
|
(this document)............................. |
1 |
Abbreviations
•This product is referred to as “the adaptor” in this document.
Trademarks
•Linux® is the registered trademark of Linus Torvalds in the U.S. and other countries.
•HD-PLC or HD-PLC mark is a registered trademark or trademark of Panasonic Corporation in Japan and in other countries.
•All other trademarks identified herein are the property of their respective owners.
[For assistance, please call: 1-800-272-7033] |
3 |

Introduction
IMPORTANT SAFETY INSTRUCTIONS
When using this product, basic safety precautions should always be followed to reduce the risk of fire, electric shock, or personal injury.
1.Read and understand all instructions. Keep this document for future reference.
2.Follow all instructions in this document and heed all warnings.
3.Do not install this product near any heat sources such as radiators, heat registers, stoves, or other devices (including amplifiers) that produce heat.
4.This product is used as the main disconnect device. Ensure that the AC outlet is installed near this product and is easily accessible.
5.The adaptor must remain connected at all times.
6.To prevent the risk of fire or electrical shock, do not expose this product to rain or any type of moisture, and do not plug it in upside-down (i.e., with the LAN jack pointing up).
7.Do not touch the product during lightning storms.
8.Unplug this product when unused for a long period of time.
9.Refer all servicing to qualified service personnel. Servicing is required when the unit does not operate normally, has been damaged in any way, or after the unit has been dropped.
10.Do not use this product outdoors.
11.Unplug this unit from power outlets if it emits smoke, an abnormal smell or makes unusual noise. These conditions can cause fire or electric shock. Confirm that smoke has stopped and contact an authorized service center.
SAVE THESE INSTRUCTIONS
4

Introduction
Electrical environment information
HD-PLC adaptors communicate with each other using the existing electrical wiring in your home, and may be affected by electrical noise or the length of your home’s wiring. Keep the following in mind when placing each adaptor.
AC outlets
For best results, we recommend connecting the adaptors directly to a wall outlet. Avoid connecting high power-consuming appliances to the same wall outlet. Additionally, connecting an adaptor to a uninterruptable power supply (UPS) or backup power supply device is not recommended.
While connecting the adaptors to a wall outlet is recommended, keep the following in mind if you must connect an adaptor to a power strip:
•Make sure the power strip does not have a noise filter or a surge protector, as these features may interfere with the performance of your adaptors.
•Do not connect the adaptor to a power strip that receives power from another power strip.
•Use a power strip with an AC cord that is as short as possible.
Electrical interference
Certain electrical devices emit electrical noise. If this noise is passed on to the electrical wiring in your home, it may interfere with the performance, speed, and reliability of your adaptors. For best results, we recommend connecting an electrical noise filter to noise emitting appliances.
The following appliances are more likely to produce noise:
•Battery chargers (including cell phone chargers)
•AC adaptors (including AC adaptors for modems, routers, notebook computers, etc.)
•Hair dryers
•Vacuum cleaners
•Lights or lamps which have a dimmer switch or a touch-sensitive on/off feature
•Power drills
Additionally, this product may interfere with the following appliances:
•Short wave radios
•Lights or lamps which have a touch-sensitive on/off feature
•Wireless devices (including wireless mice, etc.)
[For assistance, please call: 1-800-272-7033] |
5 |

Introduction
Electrical wiring
HD-PLC adaptors communicate with each other using the existing electrical wiring in your home. If 2 wall outlets are separated by a great length of electrical wiring, the adaptors connected to those outlets may not be able to communicate with each other.
For more information, refer to the troubleshooting section (see page 19) or access the Panasonic PLC Support Site at: http://panasonic.co.jp/pcc/products/en/plc/
After you have placed the adaptors where you plan to use them and plugged them into the wall outlets, test the terminal’s network speed (see page 15).
6

Introduction
Security information
1.With any network connection, security is a concern. The BL-PA300A provides security to prevent unauthorized access to your network.
•Only terminals that are registered to the master adaptor can communicate with the network.
•A terminal may be registered to the master only if the SETUP buttons on the master and terminal are pressed within 3 seconds of each other.
2.Data sent and received over the HD-PLC network employs AES 128-bit encryption, however we cannot guarantee that data will not be intercepted by a third party.
3.For security, reset your adaptors (see page 18) in the following situations.
•If you are concerned that another adaptor may have been accidentally registered to your master (for example, the adaptor of someone who lives in the same apartment building as you), reset each of your adaptors and register them again.
•If you discard an adaptor, give an adaptor to someone else to use, or send an adaptor for servicing, reset the adaptor first.
•If you lose an adaptor, reset your remaining adaptors and register them again.
4.The adaptor does not have a firewall feature. To prevent unauthorized external access to the network, we recommend performing the following steps.
•Setup security measures for the router and computers accessing the network.
•Change the default password on the Adaptor Maintenance Screen.
Refer to the Panasonic PLC Support Site
(http://panasonic.co.jp/pcc/products/en/plc/) for information about changing the default password.
[For assistance, please call: 1-800-272-7033] |
7 |

Introduction
Security notices for when sending an adaptor for service
Please note the following when sending an adaptor for servicing.
•Reset the adaptor before sending it for servicing.
•After your master adaptor is serviced, you must register all your terminals to the master again.
•After a terminal adaptor is serviced, you must register the terminal to the master again.
8

Introduction
Main unit
-PA300 BL
-PLC HD
TER |
MAS |
LAN |
PLC |
SETUP |
(1)(5)
(2)(6)
(3)(7)
(1)PLC Indicator
Lights to indicate that the adaptor is connected to the HD-PLC network. For more information, see page 17.
(2)LAN Indicator
Lights when a LAN cable is connected to the adaptor, and flashes when data is being sent or received. For more information, see page 17.
(3)MASTER Indicator
Lights when the adaptor is configured as the master. For more information, see page 17.
(4)SETUP Button
Used to register the adaptor (see page 11) or test the terminal’s network speed (see page 15).
(5)Mode Selector
The position of this selector during registration (see page 11) determines whether the adaptor is configured as the master or as a terminal.
(6)LAN Jack
Connects the adaptor to a network device, such as a broadband router, hub, computer, etc. (see page 14).
[For assistance, please call: 1-800-272-7033] |
9 |

Introduction
(7)FACTORY DEFAULT RESET Button
Used to reset the adaptor and erase its registration (see page 18).
10
Installation
Registration
Follow the procedure below when you want to:
•Add an additional terminal to your HD-PLC network.
•Re-register the master and terminal after resetting the master.
1.Confirm that the mode selector of the master adaptor is set to MASTER and the MASTER indicator is lit green.
2.Confirm that the mode selector of the terminal adaptor that you want to register is set to TERMINAL.
3.Plug the power strip into the same wall outlet that the master adaptor is plugged into.
•Registration may not be successful if the master and power strip are connected to different wall outlets during registration.
•Make sure the power strip is turned on. Do not use a power strip with a noise filter or surge protector feature.
4.Plug the terminal adaptor into the power strip.
MASTER |
|
MASTER TERMINAL |
|
MASTER TERMINAL |
TERMINAL |
5.Reset the terminal by pressing the FACTORY DEFAULT RESET button on the terminal for about 3 seconds (see page 18).
•Check the position of the adaptor’s mode selector (see page 9) and make sure that you reset the terminal adaptor (not the master).
6.Press the SETUP button on both adaptors for about 1 second. The order in which they are pressed does not matter.
•The PLC indicator of each adaptor will begin to flash in green.
•Make sure you press the SETUP button on each adaptor within 3 seconds of each other.
[For assistance, please call: 1-800-272-7033] |
11 |

Installation
7.When the PLC indicator of each adaptor lights in green, registration was successful.
•If the PLC indicators do not light in green, see page 19.
8.Wait about 30 seconds, then unplug the adaptors and place them where you plan to use them (see page 13).
Note
•While registering an additional terminal, communication between all other adaptors may be disrupted for about 10 seconds.
12
Installation
Placing the adaptors
Refer to the information on page 5 when selecting a location to place your adaptors.
Note
•If you have purchased additional adaptors, make sure you have registered them to the master (see page 11) before placing them where you plan to use them.
1.Connect the adaptor to a wall outlet in the room where you plan to use it.
2.Confirm that the PLC indicator of each adaptor lights in green when you plug the adaptors into the wall outlets.
•If the PLC indicators do not light in green, see page 19.
After you have plugged the adaptors into the wall outlets in the rooms where you plan to use them, test the terminal’s network speed (see page 15).
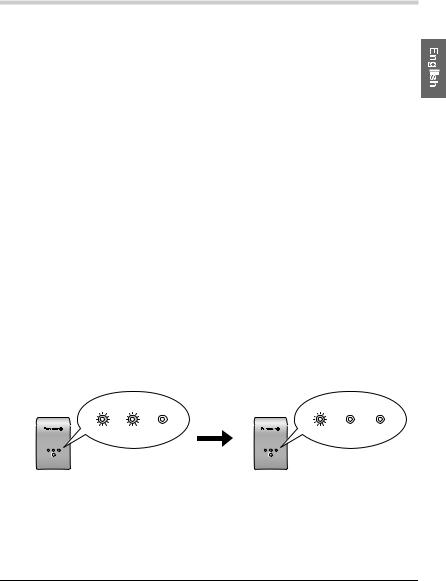
Power Save Mode
If a terminal’s LAN port is inactive for more than 20 minutes (i.e., if its LAN indicator is orange for more than 20 minutes), the terminal automatically enters Power Save mode, and its power consumption is reduced. While in Power Save mode, the adaptor’s LAN indicator is turned off.
Power Save mode is only activated for terminal adaptors that are linked to the HD-PLC network.
BL-PA300
HD-PLC
PLC LAN MASTER
SETUP
PLC LAN MASTER
(green) (orange)
about 20 minutes later
BL-PA300
HD-PLC
PLC LAN MASTER
SETUP
PLC LAN MASTER
(green)
Terminal Adaptor |
Power Save Mode |
Power Save is deactivated when:
-An active network device is connected to the terminal.
-A network device connected to the terminal is turned on.
-The adaptor’s SETUP button is pressed.
[For assistance, please call: 1-800-272-7033] |
13 |

Installation
Connecting adaptors to network devices
Once you have placed the adaptors where you plan to use them and are satisfied with the network speed test results for your terminals (see page 15), follow the procedure below to connect your adaptors to your
network devices (broadband router, hub, computer, network printer, network camera, etc.). This will integrate your HD-PLC network with your home network.
1.Confirm that each adaptor is plugged in correctly to the wall outlet.
•Do not plug adaptors in upside-down (i.e., with the LAN jack facing up).
2.Connect a LAN cable to each adaptor’s LAN jack.
•The LAN indicator of each adaptor turns green.
•If an adaptor’s LAN indicator does not turn green, see page 19.
3.Connect the other end of each LAN cable to a network device.
•Up to 16 adaptors can be connected to the same network. If a hub is used, up to 8 devices can be connected to each adaptor.
•Avoid connecting more than one adaptor to the same hub or router.
You are now ready to use your computers, network printers, network cameras, etc.
14
Useful Information
Testing a terminal’s network speed
Once you have connected the adaptors where you plan to use them, follow the procedure below to test the speed of each terminal’s network connection to the master. Make sure that the terminal has already been registered to a master (see page 11).
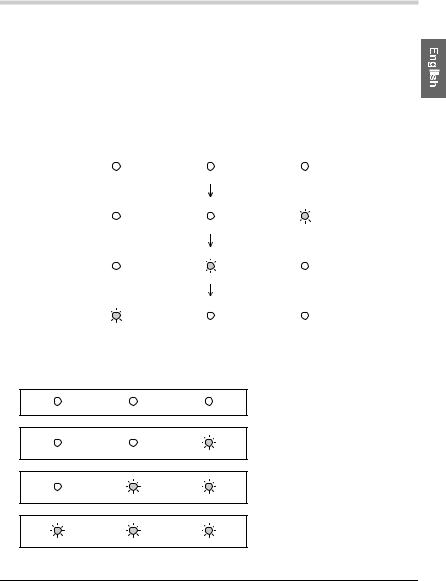
1.Press and hold the terminal’s SETUP button for about 1 second.
•The indicators light one at a time.
PLC |
LAN |
MASTER |
||||||
|
|
|
|
|
|
|
|
|
|
|
|
|
|
|
|
|
|
|
|
|
|
|
|
|
|
|
|
|
|
|
|
|
|
|
|
|
|
|
|
|
|
|
|
|
|
|
|
|
|
|
|
|
|
|
|
|
|
|
|
|
|
|
|
|
|
|
|
|
|
|
|
|
|
|
|
|
|
|
|
|
|
|
|
|
|
|
|
|
|
2.After a few seconds, the network speed test result is displayed.
3.Refer to the chart below to determine the network speed.
PLC |
LAN |
MASTER |
Result |
Speed |
|
|
|
No link |
— |
|
|
|
Good |
Less than |
|
|
|
10 Mbps*1 |
|
|
|
|
|
|
|
|
|
Better |
10 Mbps to |
|
|
|
30 Mbps*1 |
|
|
|
|
|
|
|
|
|
Best |
More than |
|
|
|
30 Mbps*1 |
|
|
|
|
|
[For assistance, please call: 1-800-272-7033] |
15 |

Useful Information
*1 Approximate data transmission speed when transmitting data using the UDP protocol.
4.If you are not satisfied with the speed test result, connect the terminal to a different wall outlet and repeat the test.
Note
•The fastest and slowest speeds are displayed by the indicators alternatively for about 6 seconds. If there is little difference between the fastest and slowest speeds, they will be displayed as the same speed.
•At least one indicator (“Good” network speed) must be lit in order to use the terminal.
•If you are not satisfied with the speed test result and have tried connecting the terminal to different wall outlets, refer to the troubleshooting section (see page 19).
•If the electrical conditions in your home change, network speed may also change.
Once you are satisfied with the terminal’s speed test result, you are ready to connect each adaptor to a network device (broadband router, hub, computer, network printer, network camera, etc.; see page 14).
16

|
|
Useful Information |
|
|
Understanding the indicators |
|
|||
|
|
|
|
|
PLC |
Green, lit |
The adaptor is successfully connected to the |
|
|
|
|
HD-PLC network. |
|
|
|
|
|
|
|
|
Green, flashing |
The terminal is being registered to the master. |
|
|
|
|
|
|
|
|
Green, flashes |
The adaptor is registered to the master, but it is |
|
|
|
once every 5 |
not connected to the HD-PLC network. |
|
|
|
seconds |
|
|
|
|
|
|
|
|
|
Red, lit for 5 |
There was an error during registration. Try |
|
|
|
seconds |
again. |
|
|
|
|
|
|
|
|
Red, lit |
The adaptor is not functioning properly and |
|
|
|
|
cannot communicate over the HD-PLC |
|
|
|
|
network. Contact an authorized Panasonic |
|
|
|
|
service center. |
|
|
|
|
|
|
|
|
Off |
The adaptor is not plugged in. |
|
|
|
|
The adaptor is not connected to the HD-PLC |
|
|
|
|
network (no other adaptors found, not |
|
|
|
|
configured, etc.). |
|
|
|
|
|
|
|
LAN |
Green, lit |
A LAN cable is connected to the adaptor. |
|
|
|
|
|
|
|
|
Green, flashing |
Data is being sent/received. |
|
|
|
|
|
|
|
|
Orange, lit |
There is no network device connected to the |
|
|
|
|
adaptor via the LAN cable, or the network |
|
|
|
|
device is not turned on. |
|
|
|
|
|
|
|
|
Off |
The adaptor is not plugged in. |
|
|
|
|
Power Save is active. (See page 13) |
|
|
|
|
|
|
|
MASTER |
Green, lit |
The adaptor is configured as the master. |
|
|
|
|
|
|
|
|
Green, flashes |
A terminal has been successfully registered to |
|
|
|
for 10 seconds |
the master. |
|
|
|
|
|
|
|
|
Off |
The adaptor is not configured as the master. |
|
|
|
|
|
|
|
[For assistance, please call: 1-800-272-7033] |
17 |
Loading...