


 Loading...
Operating Instructions/Mode d’emploi
Memory Card Drive/Lecteur de carte mémoire
Model No. AJ-PCD20
Model No. AJ-PCD20P
Model No. AJ-PCD20E
DEUTSCH |
Fur Erlauterungen in Deutsch, konsultieren |
|
Sie bitte die mitgelieferte CD-ROM. |
||
|
||
|
Per le istruzioni in italiano, vedere il CD- |
|
ITALIANO |
||
ROM in dotazione. |
||
|
||
|
Para la explicación en español, consulte |
|
ESPAÑOL |
||
el CD-ROM suministrado. |
||
|
||
|
|
Before operating this product, please read the instructions carefully and save this manual for future use.
Avant d’utiliser l’appareil, lire attentivement ce mode d’emploi, et le conserver a des fins de reference ulterieure.
“ ” _
_ 2 5
FRANÇAIS ENGLISH
F0606T2088 -F @ |
|
Printed in Japan |
VQT0X89-2 |

Read this first!
For AJ-PCD20P and AJ-PCD20E
WARNING:
zTO REDUCE THE RISK OF FIRE OR SHOCK HAZARD, DO NOT EXPOSE THIS EQUIPMENT TO RAIN OR MOISTURE.
zTO REDUCE THE RISK OF FIRE OR SHOCK HAZARD, KEEP THIS EQUIPMENT AWAY FROM ALL LIQUIDS. USE AND STORE ONLY IN LOCATIONS WHICH ARE NOT EXPOSED TO THE RISK OF DRIPPING OR SPLASHING LIQUIDS, AND DO NOT PLACE ANY LIQUID CONTAINERS ON TOP OF THE EQUIPMENT.
CAUTION:
TO REDUCE THE RISK OF FIRE OR SHOCK HAZARD AND ANNOYING INTERFERENCE, USE THE RECOMMENDED ACCESSORIES ONLY.
CAUTION:
THE AC RECEPTACLE (MAINS SOCKET OUTLET) SHALL BE INSTALLED NEAR THE EQUIPMENT AND SHALL BE EASILY ACCESSIBLE.
TO COMPLETELY DISCONNECT THIS EQUIPMENT FROM THE AC MAINS, DISCONNECT THE POWER CORD PLUG FROM THE AC RECEPTACLE.
AC Adapter
Disconnect the AC mains plug from the AC mains socket when not in use.
This apparatus must be earthed.
To ensure safe operation the three-pin plug must be inserted only into a standard three-pin power point which is effectively earthed through the normal house-hold wiring.
Extension cords used with the equipment must be three-core and be correctly wired to provide connection to earth. Wrongly wired extension cords are a major cause of fatalities.
The fact that the equipment operates satisfactorily does not imply that the power point is earthed and that the installation is completely safe. For your safety, if in any doubt about the effective earthing of the power point, consult a qualified electrician.


 indicates safety information.
E-1

Read this first! (continue)
For AJ-PCD20P
FCC NOTICE
Declaration of Conformity
Model Number: |
AJ-PCD20P |
Trade Name: |
PANASONIC |
Responsible Party:Panasonic Corporation of North America One Panasonic Way, Secaucus, |
|
|
NJ 07094 |
Support contact: |
Panasonic Broadcast & Television Systems Company 1-800-524-1448 |
This device complies with Part 15 of FCC Rules. Operation is subject to the following two conditions:
(1) This device may not cause harmful interference, and (2) this device must accept any interference received, including interference that may cause undesired operation.
To assure continued compliance, follow the attached installation instructions and do not make any unauthorized modifications.
CAUTION:
This equipment has been tested and found to comply with the limits for a Class B digital device, pursuant to Part 15 of the FCC Rules. These limits are designed to provide reasonable protection against harmful interference in a residential installation. This equipment generates, uses and can radiate radio frequency energy, and if not installed and used in accordance with the instructions, may cause harmful interference to radio communications. However, there is no guarantee that interference will not occur in a particular installation. If this equipment does cause harmful interference to radio or television reception, which can be determined by turning the equipment off and on, the user is encouraged to try to correct the interference by one of the following measures:
zReorient or relocate the receiving antenna.
zIncrease the separation between the equipment and receiver.
zConnect the equipment into an outlet on a circuit different from that to which the receiver is connected.
zConsult the dealer or an experienced radio/TV technician for help.
The user may find the booklet “Something About Interference” available from FCC local regional offices helpful.
FCC Warning: To assure continued FCC emission limit compliance, the user must use only shielded interface cables when connecting to host computer or peripheral devices. Also, any unauthorized changes or modifications to this equipment could void the user’s authority to operate this device.


 indicates safety information.
ENGLISH
E-2
Read this first! (continue)
For AJ-PCD20E
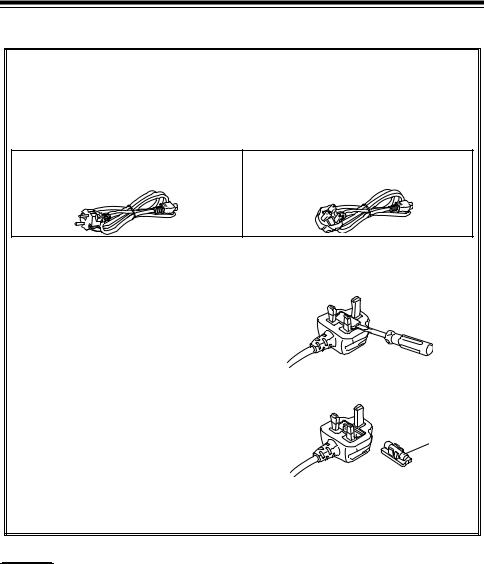
Caution for AC Mains Lead
FOR YOUR SAFETY PLEASE READ THE FOLLOWING TEXT CAREFULLY.
This product is equipped with 2 types of AC mains cable. One is for continental Europe, etc. and the other one is only for U.K.
Appropriate mains cable must be used in each local area, since the other type of mains cable is not suitable.
FOR CONTINENTAL EUROPE, ETC. |
FOR U.K. ONLY |
Not to be used in the U.K.
FOR U.K. ONLY
This appliance is supplied with a moulded three pin mains plug for your safety and convenience.
A 13 amp fuse is fitted in this plug. Should the fuse need to be replaced please ensure that the replacement fuse has a rating of 13 amps and that it is approved by ASTA or BSI to BS1362. Check for the ASTA mark  or the BSI mark
  on the body of the fuse.
If the plug contains a removable fuse cover you must ensure that it is refitted when the fuse is replaced.
If you lose the fuse cover the plug must not be used until a replacement cover is obtained.
A replacement fuse cover can be purchased from your local Panasonic Dealer.
How to replace the fuse
1.Open the fuse compartment with a screwdriver.
2. Replace the fuse.
Fuse


 indicates safety information.
E-3

Table of Contents
Read this first! . . . . . . . . . . . . . . . . . . . . . . . . . . . . . . . . . . . . . . . . . . . . . 1 Overview . . . . . . . . . . . . . . . . . . . . . . . . . . . . . . . . . . . . . . . . . . . . . . . . . 5 Features . . . . . . . . . . . . . . . . . . . . . . . . . . . . . . . . . . . . . . . . . . . . . . . . . . 5 Supplied Accessories (AJ-PCD20P/AJ-PCD20E) . . . . . . . . . . . . . . . . . . 5 Parts and their Functions . . . . . . . . . . . . . . . . . . . . . . . . . . . . . . . . . . . . . 6
Front Panel . . . . . . . . . . . . . . . . . . . . . . . . . . . . . . . . . . . . . . . . . . . . . . 6 Rear Panel . . . . . . . . . . . . . . . . . . . . . . . . . . . . . . . . . . . . . . . . . . . . . . 6 Inserting a P2 Card . . . . . . . . . . . . . . . . . . . . . . . . . . . . . . . . . . . . . . . . . 7 Write-protection of P2 Card . . . . . . . . . . . . . . . . . . . . . . . . . . . . . . . . . . . 7 Installation . . . . . . . . . . . . . . . . . . . . . . . . . . . . . . . . . . . . . . . . . . . . . . . . 7 To Connect the P2 drive to a Personal Computer for External Use . . . 8 To Mount the P2 drive in a Personal Computer 5-inch Bay . . . . . . . . 10 IEEE1394b Driver for Windows . . . . . . . . . . . . . . . . . . . . . . . . . . . . . . . 12 1) Before installation . . . . . . . . . . . . . . . . . . . . . . . . . . . . . . . . . . . . . . 12 2) Installation of the IEEE1394b driver . . . . . . . . . . . . . . . . . . . . . . . . 13 3) Confirmation of installation of the IEEE1394b driver . . . . . . . . . . . 13 IEEE1394b Driver for Macintosh . . . . . . . . . . . . . . . . . . . . . . . . . . . . . . 14 Installation of the IEEE1394b driver . . . . . . . . . . . . . . . . . . . . . . . . . . 14 Specifications . . . . . . . . . . . . . . . . . . . . . . . . . . . . . . . . . . . . . . . . . . . . . 15
Windows, Windows 2000, Windows XP and Windows Vista are trademarks of Microsoft Corporation of the United States.
Macnintosh and Mac OS X are trademarks of Apple Computer, Inc. of the United States. Other names of companies and products are trademarks or registered trademarks of the respective companies.
zIn these instructions, Microsoft® Windows®, Windows® 2000, Windows® XP Professional and Windows® Vista Business are given as “Windows”, “Windows 2000”, “Windows XP Professional” and “Windows Vista Business” respectively.
zSimilarly, in these instructions, Macintosh® and Mac OS® X are given as “Macintosh” and “Mac OS X” respectively.
Software information for this product
Customer advisory: This product includes software licensed under the GNU General Public License (GPL) and GNU Lesser General Public License (LGPL); customers have the right to download, modify, and redistribute source code for this software.
Descriptions of the GPL and LGPL are stored on the installation CD included with this camerarecorder. See the folder named \LDOC. (The description is the original (written in English)). To download the relevant source code, visit
http://panasonic.biz/sav/.
Please note that we cannot answer any questions you may have about the content, etc. of any source code you may obtain from the above Web site.
ENGLISH
E-4
While AJ-PCD20 is connected to the personal computer, install the required drivers from the CD-ROM.
For details, refer to the install manual and “IEEE1394b Driver for Windows” (page 12) or “IEEE1394b Driver for Macintosh” (page 14) in this document.
Overview
The AJ-PCD20 (hereinafter referred to as “P2 drive”) is a data transfer device that uses a USB 2.0 or IEEE1394b interface and is designed only for P2 cards.
The P2 drive is capable of making high-speed transfers of clip data shot with a memory card camera recorder for P2 cards to a personal computer (Windows/Apple Macintosh).
This device supports not only the transferring and copying of clips recorded on P2 cards, but also direct editing.
Features
zThe P2 drive features five card slots.
zIt enables high-speed data transfer using a USB 2.0 or IEEE1394b interface.
zIt can be used as either an external or an internal drive.
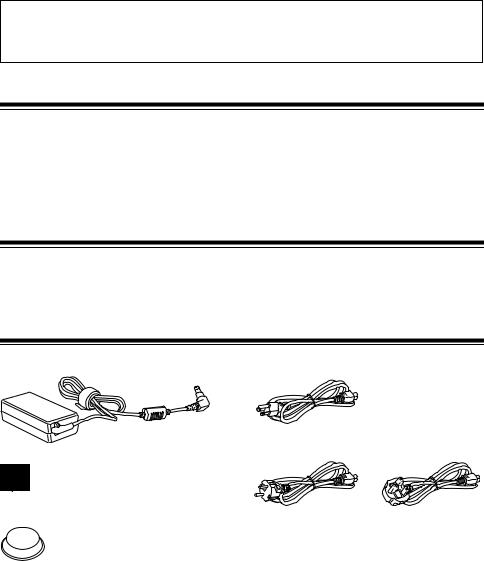
Supplied Accessories (AJ-PCD20P/AJ-PCD20E)
AC adapter |
Power cable for AC adapter |
For AJ-PCD20P
Mounting screws (8)
Rubber feet (4)
CD-ROM
For AJ-PCD20E |
For AJ-PCD20E |
(continental Europe,etc) |
(U.K.) |
(Driver for P2, P2 card manager, dedicated software for the respective P2 devices, install manual and operation manual)
Operation Manual (2)
(The Operating Instructions and the Installation Manual)
E-5
Parts and their Functions
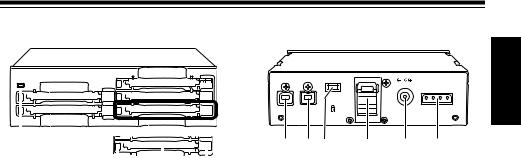
Front Panel
|
|
|
|
(1) |
(2) |
(3) |
(4) |
(1)Power Indicator
This indicator lights up in green when the P2 drive is running.
(2)Status Indicator
This indicator lights up in green during access
to a P2 card.
<Note>
Do not remove the P2 card during access of the card, otherwise files may be corrupted, or the P2 card may fail.
(3)Card Slots
The P2 drive’s card slots are designed for P2 cards.
The P2 drive does not operate with cards other than P2 cards.
(4)EJECT Button
To remove a P2 card, press this button so that
the button pops out, then press it in again.
<Notes>
zFor Windows 2000 only : Open “My Computer” and use the right button of your mouse to select the drive from which you want to remove a card, then select “EJECT” before operating the EJECT button.
zFor Macintosh only: To remove a P2 card, drag the icon of the P2 card to “Trash,” and then press the EJECT button after confirming that the P2 card icon disappears.
Rear Panel |
|
|
|
ENGLISH |
||
USB 2.0 |
IEEE 1394b |
|
|
|
|
|
|
|
|
|
|
||
|
|
|
|
DC IN 16V |
DC IN 12V |
|
|
|
|
|
|
|
|
(1) |
(2) |
(6) |
(5) |
(3) |
(4) |
|
The picture shows the rear panel with its cover removed.
(1)USB 2.0 connector (Type B)
This connects a USB cable. Use a USB cable (shielded) compliant with USB 2.0.
<Note>
The P2 drive supports USB 2.0 only. It does not support personal computers compliant with USB 1.1. For Macintosh, USB 2.0 operations are not guaranteed.
(2)IEEE1394b connector
This connects an IEEE1394b cable.
<Note>
When cables are connected to both the USB 2.0 connector and IEEE1394b connector, only the interface that was connected first after turning on the power is available.
(3)DC IN 16V Socket
For external use of the P2 drive, connect an AC adapter to this socket.
(4)DC IN 12V Socket
To use the P2 drive mounted in a personal computer, connect one of the power supply connectors inside the personal computer to
this socket. (See page 10)
<Note>
Do NOT supply power to both the DC IN 12V socket and DC IN 16V socket at the same time.
(5)Cable Clamp
Use this clamp to secure the AC adapter cable when connecting the P2 drive to a personal computer for external use of the Drive.
(6)Antitheft Lock
A commercially available antitheft cable can be connected to this lock.
E-6
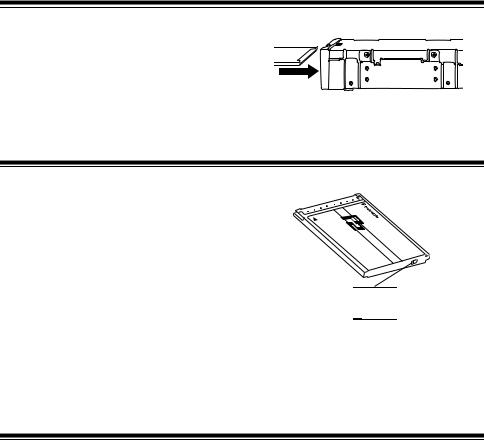
Inserting a P2 Card
When inserting a P2 card into the slot in the P2 drive, make sure you keep the card horizontal as you ease it in.
Forcing the card in on an angle may cause a problem.
Write-protection of P2 Card
A P2 card has a write-protect switch. Setting this
switch to “PROTECT” can prevent writing and deleting of data. Note: The write-protect switch is not effective when the P2 card is inserted in the P2 drive.
Make sure you remove the P2 card from the P2 drive, set the switch, then re-insert the card, in
order to effect the switch setting.
PROTECT 


Setting the writeprotect switch to “PROTECT” can prevent writing and deleting of data.
Setting the writeprotect switch to this side allows writing and deleting of data.
Installation
There are two ways to connect the P2 drive to a personal computer (Windows/Apple Macintosh) :
1.Using the P2 drive as an external drive connected to a personal computer (Windows/Apple Macintosh)
2.Mounting the P2 drive in a 5-inch bay of a desktop personal computer (Windows)
E-7
Installation (continue)
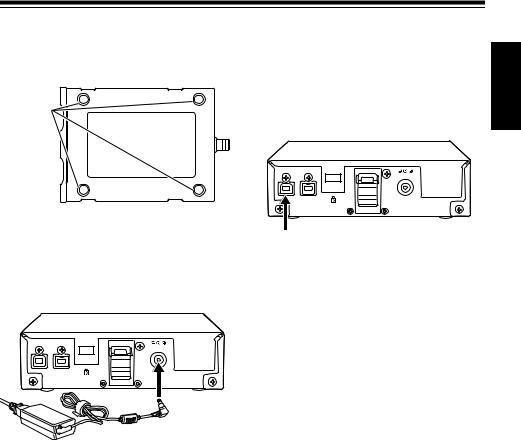
To Connect the P2 drive to a Personal Computer for External Use
1 Attach the rubber feet to the dimples on the base of the P2 drive.
Dimples
2 Start the personal computer.
3 Plug the AC adapter supplied with the P2 drive into the DC IN 16V socket on the P2 drive.
The P2 drive will start.
4 (To be connected by USB 2.0)
Plug a USB 2.0 cable B connector into the USB connector on the P2 drive. then plug the other end (A connector) of the USB 2.0 cable into the USB 2.0 port on the personal computer.
USB 2.0 connector
<Note>
No USB 2.0 cable is supplied with the P2 drive in the package. Use a commercially available USB 2.0 cable (shielded).
Take care to use a USB cable that is no longer than 3 metres. The P2 drive may not operate properly with a cable longer than 3 metres.
For Macintosh, USB 2.0 operations are not guaranteed.
ENGLISH
E-8
Installation (continue)
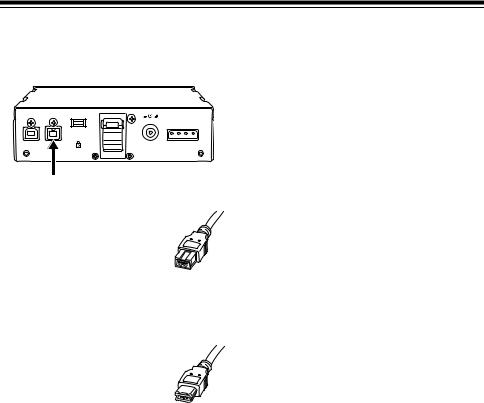
5 (To be connected by IEEE1394b) |
6 Verify that the personal computer recognises |
||||||
Connect the P2 drive to the personal |
the P2 drive. |
|
|
|
|||
computer with a IEEE1394b cable. |
<Notes> |
|
|
|
|
||
|
|
|
|
|
|
||
|
|
z In Windows XP or Windows Vista, some |
|||||
|
|
card slots of the P2 drive may be assigned |
|||||
USB 2.0 IEEE 1394b |
|
drive |
names that |
have |
already |
been |
|
|
assigned to existing networks. Reassign |
||||||
DC IN 16V |
DC IN 12V |
||||||
|
|||||||
|
|
network drive names if your personal |
|||||
|
|
computer does not display all five card |
|||||
|
|
slots. |
|
|
|
|
|
IEEE1394b connector |
|
z In Windows 2000 or Windows XP, to |
|||||
<Notes> |
|
remove a USB cable or an IEEE1394b |
|||||
|
cable, select “Safely Remove Hardware” in |
||||||
z No IEEE1394b cable is |
|
the “Task Tray” and stop the “Panasonic P2 |
|||||
supplied with the P2 drive |
|
Series USB/SBP2 Device” before removing |
|||||
in the package. Use a |
|
the cable. |
|
|
|
||
commercially available |
|
z In Windows Vista, to remove a USB cable |
|||||
IEEE1394b cable. |
1394b cable |
or an |
IEEE1394b |
cable, |
select |
“Safely |
|
z Do not apply force when |
Remove Hardware” in the “Task Tray” and |
||||||
9-pin type |
|||||||
connecting IEEE1394b |
|
stop the “Panasonic P2 Series USB/ |
|||||
cable to IEEE1394b |
|
MATSHITA AJ-PCD20 #N IEEE1394 |
|||||
connector as this may |
|
SBP2 Device” (“N” of this “#N” will be a |
|||||
damage the connector. |
|
numerical value in the range from 1 to 5) |
|||||
z When using 9-pin type |
|
before removing the cable. |
|
|
|||
1394b - 6-pin type 1394a |
|
z On an Apple Macintosh, to remove an |
|||||
converter cables, check the |
|
IEEE1394b cable, drag the icon of the P2 |
|||||
shape of the terminal |
|
card to “Trash” and then confirm that the |
|||||
before connecting the 6-pin |
1394a cable |
P2 card icon disappears before removing |
|||||
connector to the unit (PC). |
the cable. |
|
|
|
|||
6-pin type |
|
|
|
||||
Connecting a connector
upside down may damage the parts inside the unit and cause malfunctioning.
E-9

Installation (continue)
To Mount the P2 drive in a Personal Computer 5-inch Bay
1 Turn OFF the personal computer’s power. |
4 Plug a USB 2.0 cable B connector into the |
||
2 Undo the six screws and remove the cover. |
USB connector on the P2 drive. then plug the |
||
other end of the USB 2.0 cable into the USB |
|||
|
2.0 port on the personal computer. |
||
|
USB 2.0 IEEE 1394b |
|
|
|
|
DC IN 16V |
|
|
|
DC IN 12V |
|
|
USB 2.0 connector |
||
3 Mount the P2 drive in a 5-inch bay on the |
<Note> |
|
|
USB 2.0 connector pinouts vary according to |
|||
the type of motherboard type. Check your |
|||
personal computer. Use the screws supplied |
computer’s |
instruction manual before |
|
with the P2 drive for mounting. |
|||
purchasing |
a commercially available USB |
||
|
|||
Please refer to your computer’s |
2.0 cable (shielded). |
|
instruction manual for guidance in |
||
5 Connect the P2 drive to the internal power |
||
mounting to 5-inch bay drives. |
||
|
||
|
cable (4 pins) of the personal computer. |
ENGLISH
Holes for securing the screws (the other side is the same.)
<Notes>
zThe P2 drive may not be able to be fastened securely in some types of personal computers.
zIf all 5-inch bays are occupied, you will need to remove one of the built-in drives to make room for the P2 drive.
zThe P2 drive should be used in a personal computer whose design allows the front panel of the Drive to be manipulated.
USB 2.0 IEEE 1394b
DC IN 16V
DC IN 12V
Power cable
E-10

Installation (continue)
6 Start the personal computer and verify that it recognises the P2 drive.
<Note>
In Windows XP or Windows Vista, some card slots of the P2 drive may be assigned drive names that have already been assigned to existing networks. Reassign network drive names if your personal computer does not display all five card slots.
E-11

IEEE1394b Driver for Windows
This driver is for the IEEE1394b interface for the P2 card on this unit.
1) Before installation
System requirements for the IEEE1394b driver are as follows.
zOS: Windows XP Professional SP2 or later Windows Vista Business or higher
zRAM: 512 MB or more is recommended 1 GB or more is recommended for Windows Vista
zCPU: Pentium®4 1.5 GHz or higher is recommended
<Note>
The IEEE1394b connection in Windows 2000 is not supported.
ENGLISH
With Windows XP
Before installing the IEEE1394b driver, install the update program provided by Microsoft in accordance with the following procedures.
If the updates are not installed, a sufficient transfer rate may not be obtained.
1 Open the Web browser and navigate to the Microsoft website.
2 Enter “KB885222” in the search column on the website, and then press the search button.
3 Click the link for “Performance of 1394 devices may decrease after you install Windows XP Service Pack 2”, which is indicated as a search result.
4 Read the information on the displayed page, then download and install the update program on the personal computer.
With Windows Vista
Before installing the IEEE1394b driver, install the update program provided by Microsoft in accordance with the following procedures.
If the updates are not installed, operation may be unstable.
1 Open the Web browser and navigate to the Microsoft website.
2 Enter “KB929762” in the search column on the website, and then press the search button.
3 Click the link for “Download details: Update for Windows Vista (KB929762)”, which is indicated as a search result.
4 Read the information on the displayed page, then download and install the update program on the personal computer.
E-12

IEEE1394b Driver for Windows (continue)
2)Installation of the IEEE1394b driver
Install the IEEE1394b driver in accordance with the following procedures.
<Note>
The IEEE1394b driver is installed for each unit connected to a personal computer. If you use more than one unit on a single personal computer, install the drivers for the respective units separately. If the IEEE1394b driver are not installed, a sufficient transfer rate may not be obtained.
1 In accordance with the descriptions in “4. Installation of the P2 Software” (from pages 4 to 7 of the installation manual), install the software up to Procedure No. 9.
2 When the window shown in Figure 10 of Procedure No. 9 (page 7 in the installation manual) is displayed, select “AJ-PCD20 (P2 drive) 1394 driver” and then click OK.
3 When the message “Please connect AJPCD20 (P2 drive) by 1394” is displayed, connect this unit to the personal computer using IEEE1394b. Confirm that all five drive letters of this unit are displayed and then press Install.
<Note>
When the unit is connected to a personal computer through USB, remove the USB cable and then connect using IEEE1394b.
4 The warning box may be displayed; in such a case, click “Continue Anyway”. The warning box may be displayed two or more times.
5
3)Confirmation of installation of the IEEE1394b driver
Refer to “Checking the P2 card 1394b driver” (Page 15 and 16) of the installation manual.
<Note>
When using IEEE1394b, only one AJ-PCD20 can be connected to the personal computer. If two or more AJ-PCD20 units are connected simultaneously, operations cannot be guaranteed.
E-13

IEEE1394b Driver for Macintosh
This driver is for the P2 card on this unit.
Installation of the IEEE1394b driver
1 Insert the installation CD.
2 Double-click the Macintosh folder on the CD.
3 Double-click the AJ-PCD20 folder.
4 Double-click “P2Drive Install.dmg” in the
AJ-PCD20 folder.
5 Double-click “P2Drive Install.pkg”.
6 When driver installation starts, follow the instructions on the installation screen.
<Notes>
zBy installing this driver, it is possible to connect to this unit to the Macintosh using IEEE1394b (Firewire 800) to transfer data at a higher rate.
zWhen the P2 card is removed or the IEEE1394b cable is disconnected, drag the icon for the P2 card to Trash and confirm that the P2 card icon disappears before executing removal or disconnection.
zReinsert the P2 card if the P2 card icon is not displayed.
ENGLISH
E-14

Specifications
AC 100 V - 240 V, 0.9 A - 0.5 A, 50 - 60 Hz (AC adapter input)
DC 16 V, 0.6 A
(when used with AC adapter)
DC 12 V, 0.8 A
(when mounted in a personal computer)

 indicates safety items.
External dimensions (W a H a D)
148.4 mm a 42.5 mm a 199.5 mm
(5-7/8 inches a 1-11/16 inches a 7-7/8 inches) (excluding protruding parts)
Weight
1.2 kg (2.6 lb)
[Environmental conditions]
Operating temperature
0 °C to +40 °C (32 °F to +104 °F)
Operating humidity
0% to 90% (w/o condensation)
[Personal Computer System
Requirements]
OS (proper operation guaranteed)
Windows 2000 (SP4 or later)
Windows XP Professional (SP2 or later)
Windows Vista Business or higher
Mac OS X 10.4.8
Mac OS X 10.5.1
Main Memory
512 MB or more is recommended
1 GB or more is recommended for Windows Vista.
Interface
USB Ver. 2.0 compliant
IEEE1394b compliant
[Card slots]
PC card Type II a 5 (CardBus compliant)
Please note that specifications and appearance are subject to change, for improvement purpose, without notice.
E-15
Loading...