


MODELS/MODELOS/ |
6204& 6205 |
MODÈLES/MODELOS/ |
Instruction Booklet
6 -SLICE TOASTER OVEN WITH TOAST LOGIC ™
Manuel d’Instructions
TOASTLOGIC ™ FOUR GRILLEPAIN CAPACITÉ 6 TRANCHES
Manual de Instrucciones
HORNO TOSTADOR CON TOAST LOGIC ™ CAPACIDAD DE 6 REBANADAS
Manual de Instruções
TOAST LOGIC ™ FORNO TOSTADOR CAPACIDADE PARA 6 FATIAS

IMPORTANT SAFEGUARDS
When using electrical appliances, basic safety precautions should always be followed including the following:
•Read all instructions, product labels, and warnings before using the toaster oven.
•Do not touch hot surfaces. Always use oven mitts when handling hot materials, and allow metal parts to cool before cleaning. Allow the unit to cool thoroughly before putting in or taking off parts. Always use the oven handles when moving the unit.
•When the unit is not in use and before cleaning, unplug the toaster oven from the wall outlet.
Note: Make sure the oven is turned off before unplugging.
•To protect against risk of electrical shock, do not immerse the appliance or plug in water or other liquids.
•Close supervision is always necessary when this or any appliance is used near children. This appliance is not for use by children.
•Do not operate this or any appliance with a frayed or damaged cord or plug or after the appliance malfunctions or is dropped or has been damaged in any manner. Return the appliance to the authorized service facility on the last page for examination, repair or electrical or mechanical adjustment.
•Do not use attachments not recommended by the manufacturer; they may cause fire, electric shock or injury.
•Do not use outdoors or for commercial purposes. Do not use this appliance for other than intended use.
•Do not let the cord dangle over the edge of a table or counter or touch hot surfaces.
•Do not place the appliance near a hot gas or electric burner or in a heated oven.
•Extreme caution should be used when using containers constructed of other than metal or glass.
•A fire may occur if the toaster oven is covered or touching flammable materials, including curtains, draperies, walls, etc., when in operation. Do not store any items on top of the appliance when in operation.
•Do not store any materials, other than manufacturer’s recommended accessories, in this unit when not in use.
•Do not place any flammable materials in oven, such as paper, cardboard, plastic or any materials that may catch fire or melt.
•Do not cover crumb tray or any part of the oven with metal foil. This will cause overheating of the appliance.
•Oversize foods or metal utensils must not be inserted in the toaster oven as they may create a fire or risk of electrical shock.
•Do not clean with metal scouring pads. Pieces can break off the pad and touch electrical parts involving a risk of electrical shock.
•When broiling, use extreme caution when removing tray or disposing of hot grease.
•To turn this appliance off, return all controls to the "OFF" position or fully counter-clockwise.
2
SAVE THESE INSTRUCTIONS
This Unit for Household Use Only
Use of extension cords: a short power supply cord has been provided to reduce the risk of injury resulting from becoming entangled in or tripping over a longer cord. Extension cords are available from hardware stores and may be used with care. If an extension cord used, it must be rated for at least 125V, 13 AMP or 1625 WATTS. The cord should be arranged so that it will not drape over the counter or table top where it can be pulled by children or tripped over accidentally.
FOR PRODUCTS PURCHASED IN THE U.S. AND CANADA
To reduce the risk of electrical shock, this appliance has a polarized plug (one blade is wider than the other). This plug fits a polarized outlet only one way; if the plug does not fit fully into the outlet, reverse the plug. If it still does not fit, contact a qualified electrician. Do not attempt to defeat this safety feature.
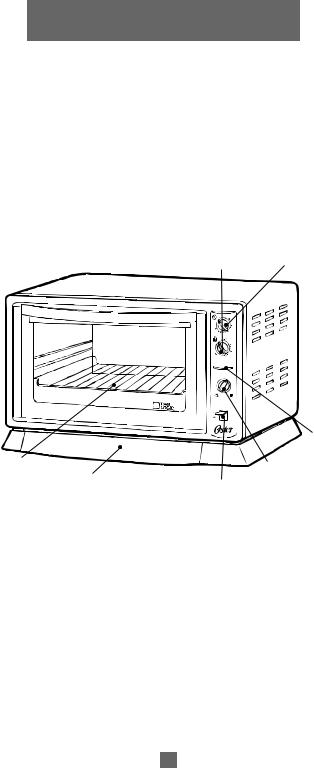
Thermostat |
Timer Dial |
Indicator Light
Removable Wire Rack
Toast Control Dial
Convenient Crumb Tray
Toast Lever
FEATURES
Timer Dial
Can be set for up to 60 minutes and will automatically turn the oven and broil/grill mode OFF at the end of the cooking time. Note, the timer must be set to begin heating the unit.
Thermostat Dial
1.Controls the temperature when baking.
2.Controls the broil/grill function. Turn the dial fully clockwise to the diagram for broiling/grilling.
Indicator Light
1.Light is on when the unit is plugged in and timer is set to begin baking. It always indicates that the unit is in use. When the temperature is reached the light will dim slightly. It will cycle slightly dimmer and brighter with the thermostat.
2.Light will remain on in the broiling/grilling and toasting functions as well.
3

Toast Control Dial
Allows the selection of toast color.
Toast Lever
Controls the toasting function and automatically turns the oven off when toasting is completed.
Non-Stick Interior Walls and Ceiling
Allows for easy cleaning.
Removable Wire Rack
The removable wire rack has 3 different settings. Place the rack in an upside-down "U" position closest to the top heating elements for broiling or melting toppings. NOTE: If you are cooking with a heavy dish, we suggest the upsidedown "U" position to increase the rack's rigidity.
Convenient Crumb Tray
For crumb or waste collection. Once unit has cooled, lift slightly to grasp crumb tray handle; pull and slide forward. Crumb tray can be removed completely for easy cleaning. To replace, simply lift unit slightly, re-align crumb tray in bottom track and slide in.
Cord Storage Bracket
Wraps the cord for convenient storage and ensures that the oven is not pushed too close to the wall.
Heavy Duty Baking Pan and Broiling/Grilling Tray
Use for all your baking, broiling and grilling needs.
Toast Logic™
Microchip adjusts toasting time based on voltage fluctuations and temperature inputs to make perfect toast time after time.
Cleaning the Toaster Oven
Before cleaning your Oster® deluxe toaster oven, unplug it and allow it to cool. To clean,
wipe manually with a soft cloth. Do not immerse in water! Make sure to use only mild soapy water. Benzene, cleaners, scrubbing brushes and chemical cleaners will damage the non-stick coating on this unit. Before re-using the unit, make sure it is completely dry.
Storage and Maintenance
Allow the appliance to cool completely before storing. Store the toaster oven in a dry location such as on a table or counter top, or in a cupboard shelf. Wind the electrical cord and secure with a twist fastener. Other than the recommended cleaning, no further user maintenance should be necessary. Return the toaster oven to our Bay Springs, MS, Service Center for servicing
or repairs. (See last page for shipping address.)
4

USING YOUR OSTER® TOASTER OVEN
Caution: Never place anything on top of your Toaster Oven as it can get very hot.
How to Bake/ Defrost
1.Place the wire rack in the desired position.
2.Select the required temperature. (Use the settings between "Warm" and 200°F (93ºC) for defrosting. Vary temperature based on size and type of food.)
3.To switch the oven “on”, turn the timer dial to the desired time. For best results, allow the oven to preheat for 4-5 minutes before using.
Note: If the oven door is opened beyond the first notch (approximately 1.4 inches), the unit will shut off. If there is still time remaining on the timer, it will resume baking/defrosting when the door is shut.
How to Broil/Grill
When broiling, only the top heating element is in use.
1.Position the removable rack in the top rack position.
2.Close the door to the first notch, leaving approximately 1.4 inch gap at the top. This will ensure adequate air flow during broiling/grilling.
3.To switch the broil/grill on, turn the temperature dial fully clockwise to the broil position and then set the timer dial to the required time. For best results, allow the oven to preheat 4-5 minutes before using.
4.Place the broiling/grill tray inside the baking pan, arrange the food and position the baking pan on the wire rack. Note door must be left ajar to allow proper air flow.
5.Be sure to turn food as it cooks.
How to Toast
No preheat period is required before toasting.
1.Place toast on low middle rack position and close the door.
2.Turn the toast control dial to the desired toast color.
3.Press the toast control lever fully down until it locks in position. At the end of the toasting cycle the control lever will return to its original position and shut the unit off. (Toasting time will vary depending on bread types and the number of slices.).
Note: 1. When toasting, DO NOT have the oven temperature control in the broil mode.
2.If the oven door is opened when toasting, the unit will shut off. Toasting will resume only if reset.
How to Top Brown
No preheat period is required before top browning.
1.Place wire rack in its highest position to accommodate food.
2.Select desired browning level by using the toast control dial.
3.Press the toast control lever until it locks in position. At the end of the cycle, the control lever will return to its original position and shut the unit off.
Note: Cooking times in your Toaster Oven will be shorter than in your larger stovetop oven. This is because a Toaster Oven can maintain its temperature better because it has a smaller space to heat. Be careful when following directions on packaged foods, or in recipe books.
5

1 YEAR LIMITED WARRANTY
Sunbeam Products Inc. warrants to the original purchaser, subject to the limitations and exclusions set forth below, that this product shall be free, in all material respects, of mechanical and electrical defects in material and workmanship from the date of purchase for one year. This warranty does not cover normal wear of parts or damage resulting from any of the following: negligent use or misuse of the product, use on improper voltage or current, use contrary to operating instructions or disassembly, repair or alteration by any person other than an authorized service center.
Our obligation hereunder is limited to repair or replacement, at manufacturer's option, of the product during the warranty period, provided that the product, along with the model number and original dated proof of purchase, is sent postage prepaid, directly to the following address:
For products purchased in the United States:
SUNBEAM APPLIANCE SERVICE STATION
117Central IndustrialRow
Purvis,MS 39475
For products purchased in Canada:
SUNBEAM APPLIANCE SERVICE STATION (KND)
Pleasecall1-800-667-8623oremailusat consumeraffairs@consumer.sunbeam.com
Do not return this product to the place of purchase or to the manufacturer; doing so may delay the processing of your warranty claim.
Answers to questions regarding this warranty or for your nearest authorized service location may be obtained by calling toll-free 1-800-597-5978 or by writing to Sunbeam – Consumer Affairs, at P.O. Box 948389, Maitland, FL 32794-8389. Answers to questions regarding this warranty or for your nearest Canadian authorized service location may be obtained by calling toll-free in Canada 1-800-667-8623. For warranty information or for an authorized service location outside of the United States and Canada, please see the warranty service card inserted in the product packaging.
DISCLAIMER
Product repair or replacement as provided under this warranty is your exclusive remedy.
SUNBEAM PRODUCTS, INC. SHALL NOT BE LIABLE FOR ANY INCIDENTAL OR
CONSEQUENTIAL DAMAGES FOR BREACH OF ANY EXPRESS OR IMPLIED WARRANTY ON THIS PRODUCT OR ANY PART THEREOF. EXCEPT TO THE EXTENT PROHIBITED BY APPLICABLE LAW, SUNBEAM PRODUCTS, INC. DISCLAIMS ANY IMPLIED WARRANTY OF MERCHANTABILITY OR FITNESS FOR A PARTICULAR PURPOSE OF THIS PRODUCT OR ANY PART THEREOF. Some states and provinces do not allow the exclusion or limitation of incidental or consequential damages, or allow limitations on how long an implied warranty lasts, so the above limitations or exclusions may not apply to you. This warranty gives you specific legal rights, and you may also have other rights, which vary from State to State or Province to Province.
6

PRÉCAUTIONS IMPORTANTES
Lors de l’utilisation d’appareils électriques, toujours prendre les précautions nécessaires, incluant celles qui suivent:
•Lire l’ensemble des instructions, étiquettes et avertissements avant d’utiliser le four grille-pain.
•Ne pas toucher les surfaces chaudes. Utilisez toujours des gants isolants pour manipuler du matériel brûlant et laisser refroidir les surfaces métalliques avant de les nettoyer. Laisser refroidir l’appareil avant de remonter ou de démonter des pièces. Toujours saisir l’appareil par les deux poignées pour le déplacer.
•Débrancher le four grille-pain de la prise murale lorsqu’il n’est pas utilisé ou avant de le nettoyer.
Remarque: Vérifier que le four est éteint avant de le débrancher.
•Pour écarter les risques d’électrocution, ne pas immerger le cordon, la fiche ou le grille-pain dans l’eau ni dans aucun autre liquide.
•Faites particulièrement attention lorsque l’appareil est utilisé par, ou en présence d’enfants. Cet appareil ne doit pas être utilisé par des enfants.
•Ne pas faire fonctionner un appareil dont le fil ou la fiche est endommagé ou après que l’appareil ait mal fonctionné, qu’il ait été échappé ou endommagé d’une façon quelconque. Retourner l’appareil au centre de service autorisé aux fins d’inspection, de réparation, de réglage électrique ou mécanique.
•L’utilisation d’accessoires non conseillés ou vendus par le fabricant présente des risques d’incendie, d’électrocution ou de blessure.
•Ne pas utiliser à l’extérieur ou à des fins commerciales. Ne pas utiliser cet appareil à des fins autres que celles pour lesquelles il est conçu.
•Ne pas laisser le fil pendre de la table ou d’un comptoir et éviter qu’il touche à une surface chaude.
•Ne pas placer sur ou près d’un brûleur à gaz ou électrique, ou dans un four chaud.
•Faire preuve d’une extrême prudence en utilisant des récipients en matériau autre que le métal ou le verre.
•Pour écarter les risques d’incendie pendant la marche du four, ne pas le couvrir ni le placer au contact de matières inflammables, notamment rideaux, tentures, cloisons, etc. Ne ranger aucun objet sur le dessus de l’appareil pendant qu’il fonctionne.
•Ne ranger aucun objet autre que les accessoires conseillés par le fabricant dans le four lorsqu’il n’est pas utilisé.
•Ne placer aucune matière inflammable dans le four, notamment papier, carton, plastique ou tout autre matériau susceptible de s’enflammer ou de fondre.
•Ne pas couvrir le ramasse-miettes, ni aucune autre partie du four, de papier aluminium. Ceci provoquerait une surchauffe de l’appareil.
•En raison des risques d’incendie ou d’électrocution, ne pas introduire d’ustensiles de cuisine ni d’aliments de taille excessive dans le grille-pain.
•Ne pas utiliser de tampon métallique pour le nettoyage. Le tampon métallique peut perdre des morceaux susceptibles de venir au contact d’éléments sous tension et de créer un risque d’électrocution.
•Durant le rôtissage, faire preuve d’un extrême prudence en sortant le ramasse-miettes et en jetant les graisses chaudes.
•Pour éteindre l'appareil, ramener toutes les commandes en position "arrêt" ou les tourner jusqu'a bout dans le sens inverse des aiguilles d'une montre.
7
CONSERVER CES INSTRUCTIONS
Cet Appareil Est Conçu Pour Usage Domestique Seulement
Utilisation d’une rallonge; l’appareil est livré avec un cordon d’alimentation court pour réduire les risques d’enchevêtrement ou de trébuchement accidentel. Les rallonges électriques, en vente dans les quincailleries, sont à utiliser avec prudence. Si nécessaire, utiliser une rallonge électrique d’une capacité nominale
de 125 V/13 A ou 1625 W au minimum. Placer le cordon d’alimentation de manière à ce qu’il ne pende pas du plan de travail ou de la table, où il pourrait être accessible aux enfants ou provoquer
un trébuchement accidentel.
PRODUITS ACHETÉS AUX ÉTATS-UNIS ET AU CANADA UNIQUEMENT:
Pour réduire le risque de choc électrique, cet appareil est doté d’une fiche polarisée (une broche est plus large que l’autre). Cette fiche ne va que dans un sens seulement sur une prise de courant polarisée. Si la fiche ne s’enfonce pas complètement dans la prise, la retourne et essayer de nouveau. Si elle ne s’adapte toujours pas à fond, consulter un électricien qualifié. Veillez à respecter les mesures de securité de la prise polarisée.
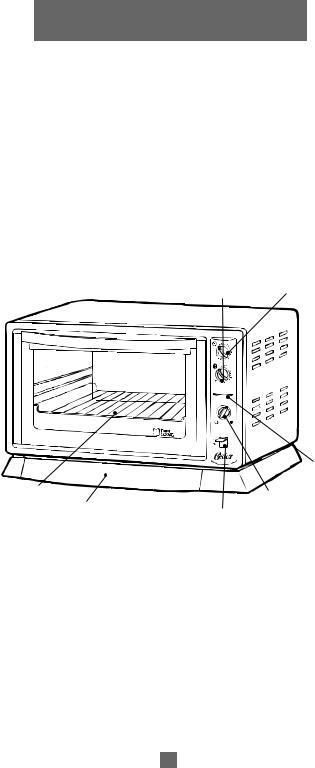
Bouton de Thermostat |
Bouton de Minuterie |
Voyant Lumineux
Grille Amovible
Bouton de Réglage du Grille-Pain
Ramasse-Miettes Pratique
Manette de Grille-Pain
CARACTÉRISTIQUES
Bouton de Minuterie
D’une durée réglable juqu’à 60 minutes, la minuterie coupe automatiquement le four et le gril à la fin du temps de cuisson. Remarque : La minuterie doit être enclenchée pour que l’appareil commence à chauffer.
Bouton de Thermostat
1.Contrôle la température du four.
2.Contrôle la fonction gril. Tourner complètement ce bouton dans le sens des aiguilles d’une montre jusqu’au symbole du gril.
8
 Loading...