


User Manual
Manual de Instruccio nes
6-Slice Toaste r Oven
Horno Tostador para 6 Rebanadas
MODEL/MODELO 6057,6058,
6059
Visit us at www.oster.com |
P.N. 119311 Rev.F |
IMPO RTANT SAFEGUARDS
SAVE AND READ THESE INST RUCT IONS
When using electrical appliances, basic safety precautions should always be followed including the following:
•READ ALL INSTRUCTIONS, PRODUCT LABELS AND WARNINGS BEFORE USING THE TOASTER OVEN.
•Do not touch hot surfaces. Always use oven mitts when handling hot materials and allow metal parts to cool before cleaning. Allow the unit to cool thoroughly before putting in or taking off parts. Always use the oven handles when moving the unit.
•When the unit is not in use and before cleaning, unplug the toaster oven from the wall outlet. Note: Make sure the oven is turned off before unplugging.
•To protect against risk of electrical shock, do not immerse the appliance in water or any other liquids.
•Close supervision is always necessary when this or any appliance is used near children. This appliance is not for use by children.
•Do not operate this or any appliance with a frayed or damaged cord or plug or after the appliance malfunctions or is dropped or has been damaged in any manner. Return appliance to the nearest authorized service facility for examination, repair or adjustment.
•Do not use attachments not recommended by the manufacturer; they may cause fire, electric shock or personal injury.
•Do not use outdoors or for commercial purposes.
•Do not use this appliance for other than its intended use.
•Do not let the cord dangle over the edge of a tabletop or countertop or touch hot surfaces.
•Do not place the appliance near a hot gas or electric burner or in a heated oven.
•Extreme caution should be used when using containers constructed of material other than metal or glass.
•A fire may occur if the toaster oven is covered or touching flammable materials, including curtains, draperies, walls, etc., when in operation. Do not store any items on top of the appliance when in operation.
•When using toaster oven, pull the unit out a minimum of 6 inches away from walls on all sides. Remove cords from other products from behind toaster oven.
•Do not store any materials, other than manufacturer’s recommended accessories, in this unit when not in use.
•Do not place any flammable materials in oven, such as paper, cardboard, plastic or any materials that may catch fire or melt.
•Do not cover the crumb tray or any part of the oven with metal foil. This will cause overheating of the appliance.
•Oversized foods or metal utensils must not be inserted in the appliance as they may create a fire or risk of electrical shock.
•Do not clean with metal scouring pads. Pieces can break off the pad and touch electrical parts involving a risk of electrical shock.
•Use extreme caution when removing tray or disposing of hot grease.
•To turn this appliance off, press Stop/Cancel button twice.
•Todisconnect, pressStop/Cancel buttontwiceto turnunit off,then remove plug fromwalloutlet.
THIS UNI T IS FOR HOUSEH OLD USE ONLY
SHORT POWER SUPPLY CORD INSTRUCTION S
A short power-supply cord is provided to reduce the risk resulting from becoming entangled in or tripping over a longer cord. An extension cord may be used if care is exercised in its use. If an extension cord is used, the electrical rating of the cord must be at least as great as the electrical rating of the appliance. The extension cord should be arranged so that it will not drape over the countertop or tabletop where it can be pulled on by children or tripped
over unintentionally.
English-1
For Products Purchased in the United States and Canada Only
To reduce the risk of electrical shock, this appliance has a polarized plug (one blade is wider than the other). This plug fits a polarized outlet only one way; if the plug does not fit fully into the outlet, reverse the plug. If it still does not fit, contact a qualified electrician. Do not attempt to modify the plug in any way.
SAVE THESE INSTRUCTIONS
Welcome
Congratulations on your purchase of an OSTER® Toaster Oven!
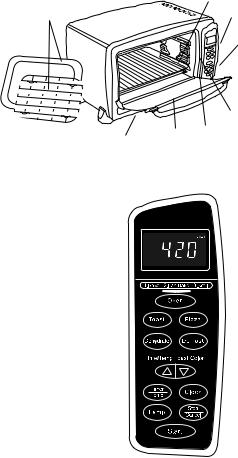
Features of Your Toaster Oven
1. |
Removable Wire Rack |
|
|
1 |
2. |
Time Display |
|
|
|
8 |
|
|
||
3. |
Control Buttons |
|
|
|
|
|
|
||
4. |
Three Rack Positions |
|
|
|
5. |
Easy Clean Interior Walls |
|
|
|
6. |
Glass Door |
|
|
|
7. |
External Removable Crumb Tray |
|
|
|
8. |
Baking Pan and Broiling Rack |
|
|
|
|
|
7 |
6 |
5 |
|
|
|
||
Control Buttons |
|
|
||
|
|
|
||
1.Function Buttons – |
|
|
|
|
|
Oven – Select to Bake, |
|
|
|
|
Convection (Fan Bake), Broil. |
|
|
|
|
Toast – Select to toast bread, bagels, etc. |
|
|
|
|
Pizza – Select to bake 9-12” pizza. |
|
|
|
|
Dehydrate – Select to dehydrate foods. |
|
|
|
|
Defrost – Select to defrost foods. |
|
|
|
|
>< – Adjusts time, temperature or toast shade. |
|
|
|
Timer/Temp – Use this button to change between time and temperature when Bake, Convection Bake or Broil have been selected.
Clock – Sets the Oven Clock. Lamp – Turns on Interior Lamp.
Stop/Cancel – Stops heating or cancels function. Start – Starts baking/cooking process.
2
3
4
English-2
Preparing To Use Your Toaster Oven for the First Time
If you are using your toaster oven for the first time, please be sure to: Remove any stickers from the surface of the oven.
Open oven door and remove all printed documents and paper from inside the toaster oven.
Clean the rack, tray, and pan with hot water, a small amount of dishwashing liquid and a non-abrasive sponge or cleaning pad.
DO NOT IMMERSE THE BODY OF THE UNIT IN WATER.
Dry the unit thoroughly before using.
Select a location for the toaster oven. The location should be in an open area on a flat counter where the plug will reach an outlet.
Plug the toaster oven into a 120 Volt AC electrical outlet.
Using Your Toaster Oven
Setting the Clock
Push the Clock button and hold for three seconds. The clock will flash. Use the arrow keys to set the hour. Push the Clock button again.
Use the arrow keys to set the minutes.
Push the Clock button once more and the time will be set.
Preheating the Oven
Place oven rack into the desired position before heating the oven.
(See “Positioning Rack” Section)
Push oven button once.
Use arrows to set desired temperature.
Push Timer/Temp button, then the down arrow until seven minutes is displayed. Push the Start button.
To Use the Bake Function
Place oven rack into the desired position before heating the oven.
(See “Positioning Rack” Section)
Arrange food on the wire rack or in the baking pan.
Push the Oven button once. Use the arrow keys to select desired temperature. Push Timer/Temp button. Use the arrow keys to select desired time.
Push the Start button.
NOTE – Both heating elements will cycle ON and OFF to maintainthe desired temperature. When baking is completed, open door fully and remove food carefully.
To Use the Convection Fan Bake Function
When you select the Fan Bake the convection fan will turn on and circulate air allowing the food to cook evenly and faster.
Place oven rack into the desired position before heating the oven.
(See “Positioning Rack” Section)
Arrange food on the wire rack or in the baking pan.
Push the Oven button two times until “Fan Bake” lights up on display. Use the arrow keys to select desired temperature.
Push Timer/Temp button. Use the arrow keys to select desired time. Push the Start button.
NOTE – Both heating elements will cycle ON and OFF to maintainthe desired temperature. When baking is completed, open door fully and remove food carefully.
English-3

To Use the Broil Function
Place oven rack into the desired position before heating the oven.
(See “Positioning Rack” Section)
Place broil rack in oven pan to make broiler pan. Arrange food on broiler pan.
Place broiler pan on oven rack.
Push Oven button three times until the word “Broil” lights up on display. Push Timer/Temp button. Use arrows to select the desired time.
Push the Start button.
NO TE – The top heating element will cycle ON and OFF to maintain desired temperature. When broiling is completed, open door fully and remove food carefully.
WARN ING : DO NOT LEAVE TOASTER OVEN UNATTENDED.
To Use the Toast Function
Place oven rack into the desired position before heating the oven.
(See “Positioning Rack” Section)
NOTE – Differenttypes of bread require different settings. Lighter breads and waffles require a lighter setting. Darker breads, muffins, and English muffins require a darker setting. Arrange food on the wire rack.
Push the Toast button. Use arrows to select Toast Shade. Press the Start button.
When toasting is completed, open door fully and remove food carefully.
To Use the Pizza Function
Place oven rack into the desired position before heating the oven.
(See “Positioning Rack” Section)
Arrange pizza on the wire rack.
Push the Pizza button and 20:00 default time will appear. Use arrow keys to adjust the time as desired. Push the Start button.
NO TE – The Pizza function temperature is set at 400°F and cannot be adjusted. If different temperature is desired, cancel Pizza function and use Bake function.
Dehydrating Function
Push Dehydrate button. Temperature Control is already set to 185°F. Use arrow keys to set desired time.
Push the Start button.
Defrosting Function
When defrosting do not preheat oven. Temperature Control is already set to 150°F. Push the defrost button. Use arrow keys to adjust time. Allow 15 to 20 minutes per side for meats or fish to defrost. Always cook food promptly after thawing.
Push the Start button.
Positioning Rack
To accommodate a wide variety of foods, the oven has three rack positions. (See Figure 3) Positioning of the rack will depend on the size
of the food and desired browning.
Before removing the rack, allow the unit to cool. PLEAS E NO TE – For best toast and pizza results, position the rack in the up position on the middle rack guide.
FIGUR E 3 |
English-4
 Loading...