


starBlast 4.5 EQ
INSTRUCTION MANUAL
IN 260 Rev. B 01/09
Providing Exceptional Consumer Optical Products Since 1975
Customer Support (800)-676-1343
E-mail: support@telescope.com
Corporate Offices (831)‑763‑7000
89 Hangar Way, Watsonville, CA 95076
Orion
®
StarBlast
™
4.5 EQ
#9798 Equatorial Newtonian Reflector Telescope
2
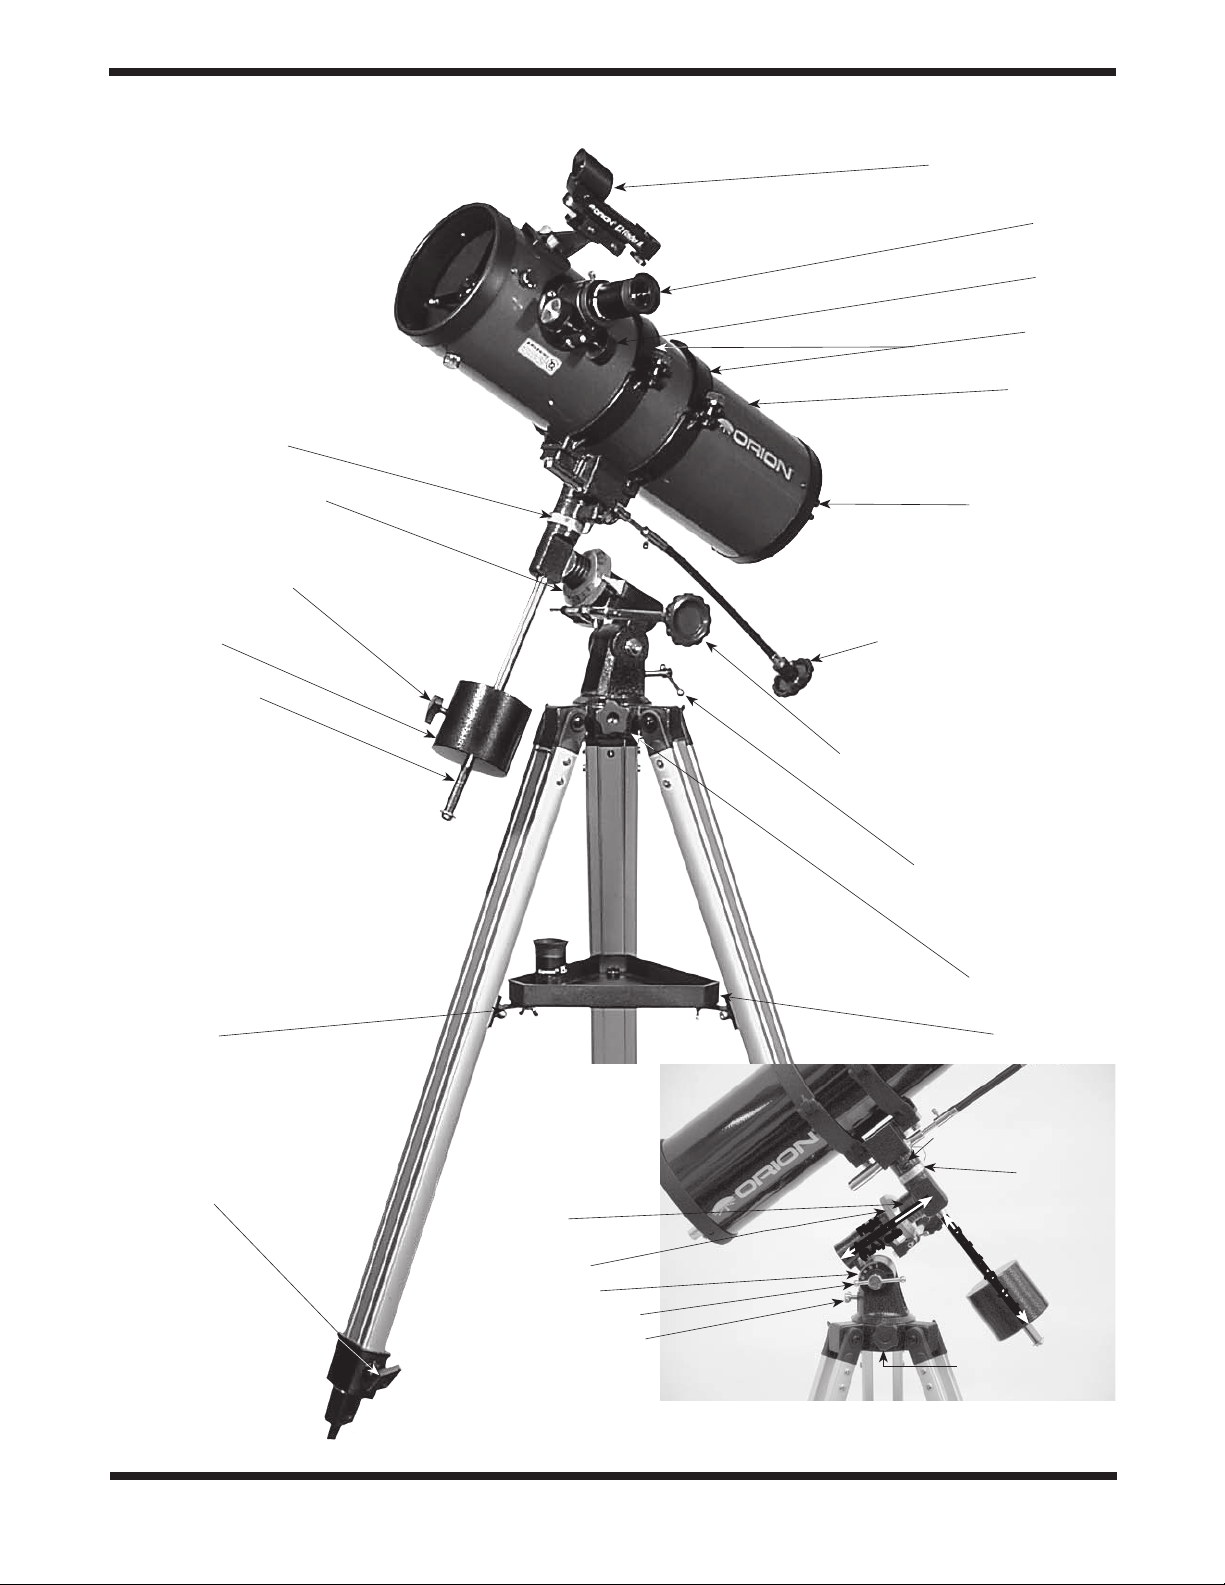
Figure 1a.
The StarBlast 4.5 EQ
EZ Finder II reflex sight
Eyepiece
Focuser
Tube rings
Optical tube
Primary mirror cell
Declination slow-motion control
Right ascension slow-motion control
Latitude adjustment T-bolt
Azimuth lock knob
Accessory tray
Declination setting circle
Right ascension setting circle
Counterweight lock knob
Counterweight
Counterweight shaft
Accessory tray
bracket
Leg lock knob
Figure 1b. The StarBlast 4.5’s equatorial mount.
Right ascension
lock knob
Right ascension
setting circle
Latitude scale
Latitude lock T-bolt
Latitude adjustment
T-bolt
Declination lock knob
Declination
setting circle
Azimuth lock knob
Declination (Dec.) axis
Right
Ascension
(R.A.) axis

3
Table of Contents
1. Unpacking 3
2. Parts List 3
3. Assembly 3
4. Getting Started 4
5. Setting Up and Using the
Equatorial Mount 6
6. Collimating the Optics
(Aligning the Mirrors) 9
7. Astronomical Observing 11
8. Care and Maintenance 13
9. Specifications 14
1. Unpacking
The entire telescope system will arrive in one box. Be careful
unpacking the box. We recommend keeping the original ship-
ping containers. In the event that the telescope needs to be
shipped to another location, or returned to Orion for warranty
repair, having the proper shipping containers will help ensure
your telescope will survive the journey intact.
Make sure all the parts in the Parts List are present. Be sure
to check boxes carefully, as some parts are small. If any-
thing appears to be missing or broken, immediately call Orion
Customer Support (800-676-1343) for assistance.
2. Parts List
Qty. Description
1 Optical tube assembly
2 Tube mounting rings
1 Equatorial mount
1 Latitude adjustment T-bolt
2 Slow-motion control cables
3 Tripod legs connected to accessor y
tray bracket
1 Tripod accessory tray
1 Counterweight shaft
1 Counterweight
1 EZ Finder II reflex sight with mounting
bracket
1 15mm Expanse eyepiece
1 6mm Expanse eyepiece
1 Collimating cap
3. Assembly
Assembling the telescope for the first time should take
about 30 minutes. All screws should be tightened secure-
ly to eliminate flexing and wobbling, but be careful not to
over-tighten or the threads may strip. Refer to Figures 1a.
and 1b. during assembly.
During assembly (and anytime, for that matter), Do not touch the
surfaces of the telescope mirrors or the lenses of the EZ Finder
II or eyepieces with your fingers; the optical surfaces have coat-
ings on them that can be damaged. Never remove any lens
assembly from its housing for any reason, or the product war-
ranty and return policy will be void.
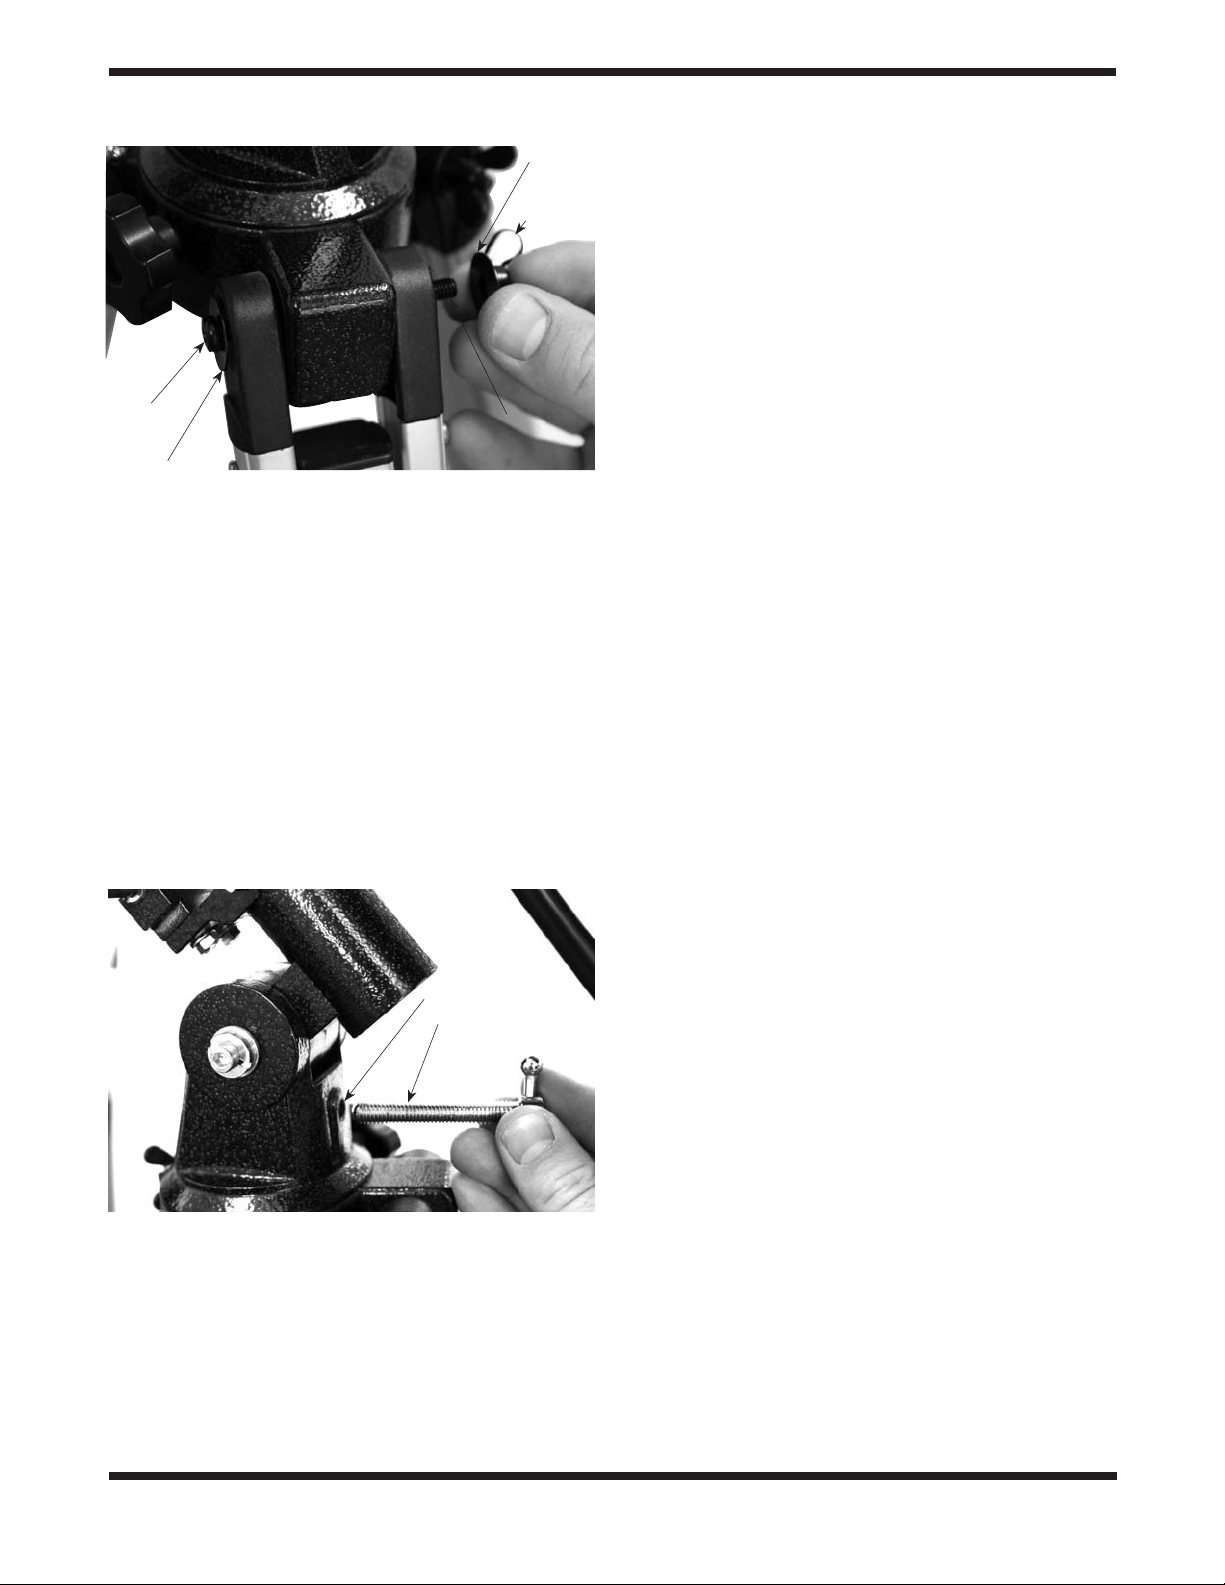
1. Lay the equatorial mount on its side. Attach the tripod legs
one at a time to the mount using the screws installed in
the tops of the tripod legs. Remove the screws, washers,
and wingnuts from the tripod legs, then line up the holes
in the tops of the tripod legs with the holes in the base
of the mount. Reinstall the screws so they pass through
the legs and the mount. Place one washer on each screw
before doing this. After the screws are though the legs and
mount, place a washer and wingnut on each screw end
(Figure 2). Tighten the wingnuts only finger-tight, for now.
2. Tighten the leg lock knobs on the bottom braces of the
tripod legs. For now, keep the legs at their shortest (fully
retracted) length; you can extend them to a more desir-
able length later, after the tripod is completely assembled.
3
Congratulations on your purchase of an Orion telescope.Your new StarBlast 4.5 EQ is a terrific starter
instrument for exploring the exotic wonders of the night sky. Designed to be compact and easy to use, it
will provide many hours of enjoyment for the whole family.
If you have never owned a telescope before, we would like to welcome you to amateur astronomy. Take
some time to familiarize yourself with the night sky. Learn to recognize the patterns of stars in the major
constellations. With a little practice, a little patience, and a reasonably dark sky away from city lights,
you’ll find your telescope to be a never-ending source of wonder, exploration, and relaxation.
These instructions will help you set up, properly use, and care for your telescope. Please read them over
thoroughly before getting started.
WARNING: Never look directly at the Sun through
your telescope—even for an instant—without a
professionally made solar filter that completely
covers the front of the instrument, or permanent
eye damage could result. Young children should use
this telescope only with adult supervision.
4 4
3. Stand the tripod and mount upright and spread the tripod
legs apart as far as they will go, until the accessory tray
bracket is taut. Connect the accessory tray to the acces-
sory tray bracket with the three wing screws already
installed in the tray. Do this by pushing the wing screws
up through the holes in the accessory tray bracket and
threading them into the holes in the accessory tray.
4. Next, tighten the screws at the tops of the tripod legs,
so the legs are securely fastened to the mount. Use the
Phillips head screwdriver and your fingers to do this.
5. Install the latitude adjustment T-bolt into the threaded hole
in the rear of the mount (Figure 3).
6. Orient the equatorial mount as it appears in Figure 1b. To
do this, first loosen the latitude lock T-bolt, and turn the lati-
tude adjustment T-bolt until the latitude scale pointer and
the “40” on the latitude scale line up. Then retighten the
latitude lock T-bolt. The declination (Dec.) and right ascen-
sion (R.A.) axes will need re-positioning (rotation) as well.
Be sure to loosen the R.A. and Dec. lock knobs before
doing this. Retighten the R.A. and Dec. lock knobs once the
equatorial mount is oriented as shown in Figure 1b.
7. Thread the counterweight shaft into the equatorial mount
at the base of the declination axis until tight.
8. Remove the screw and washer on the bottom of the coun-
terweight shaft and slide the counterweight onto the shaft.
Make sure the counterweight lock knob is adequately
loosened to allow the counterweight shaft to pass through
the hole. Position the counterweight about halfway up the
shaft and tighten the lock knob. Replace the screw and
washer on the end of the shaft.
9. Attach the two tube rings to the equatorial mount using
the hex head screws that come installed in the rings.
Remove the screws, then push them, with the washers
still attached, up through the holes in the tube ring mount-
ing plate (on the top of the equatorial mount) and rethread
them into the bottom of the tube rings. Tighten the screws
securely with the included wrench. Open the tube rings by
loosening their knurled ring clamps.
10. Attach the two slow-motion control cables to the R.A. and
Dec. worm gear shafts of the equatorial mount by posi-
tioning the thumbscrew on the end of the cable over the
indented slot on the worm gear shaft and then tightening
the thumbscrew. We recommend the shor ter cable be
used on the R.A. worm gear shaft and the longer cable
on the Dec. worm gear shaft. You can install slow-motion
control cable on either end of the R.A. worm gear shaft;
use whichever end is most convenient.
11. Loosen and remove the reflex sight securing thumbnuts
from the optical tube assembly. Place the holes in the base
of the EZ Finder’s bracket over the two threaded shafts
coming out of the optical tube. Replace the thumbnuts to
secure the reflex sight to the optical tube. Refer to Figure
1a for the proper orientation of the EZ Finder II.
13. Remove the cap from the focuser and insert the 15mm
Expanse eyepiece into the focuser drawtube. Secure it in
place with the thumbscrews on the end of the drawtube.
Your StarBlast 4.5 EQ is now fully assembled and should resem-
ble Figure 1a. Leave the dust cover on the front of the optical
tube when it is not in use.
4. Getting Started
Now that the StarBlast 4.5 is assembled, the next things to do
are to balance the telescope about its axes of motion, and to
align the reflex sight with the telescope.
Balancing the Telescope
To insure smooth movement of the telescope on both axes of the
equatorial mount, it is imperative that the optical tube be properly
balanced. First balance the telescope with respect to the R.A.
axis, then the Dec. axis.
Figure 2. Attach the tripod legs to the mount with the screws that
come installed in the tops of the tripod legs. One washer should go
between the screw head and tripod leg and the other washer should
go between the wingnut and tripod leg.
Figure 3. The latitude adjustment T-bolt goes into the threaded
hole in the rear of the mount.
Washer
Wingnut
Screw end
Screw
head
Washer
Threaded hole
Latitude
adjustment T-bolt

55
1. Keeping one hand on the telescope optical tube, loosen
the R.A. lock knob. Make sure the Dec. lock knob is locked,
for now. The telescope should now be able to rotate freely
about the R.A. axis. Rotate it until the counterweight shaft
is parallel to the ground (i.e., horizontal).
2. Now loosen the counterweight lock knob and slide the
weight along the shaft until it exactly counterbalances the
telescope (Figure 4a). That’s the point at which the shaft
remains horizontal even when you let go of the telescope
with both hands (Figure 4b).
3. Retighten the counterweight lock knob. The telescope is
now balanced on the R.A. axis.
4. To balance the telescope on the Dec. axis, first tighten the
R.A. lock knob, with the counterweight shaft still in the hori-
zontal position.
5. With one hand on the telescope optical tube, loosen the
Dec. lock knob. The telescope should now be able to rotate
freely about the Dec. axis. Loosen the knurled tube ring
clamps a few turns, until you can slide the telescope tube
forward and back inside the rings (Figure 4c). Using a slight
twisting motion on the optical tube can help move the tube
within the rings.
6. Position the telescope so it remains horizontal when you
carefully let go with both hands (Figure 4d). This is the
balance point. Before clamping the tube rings tight again,
rotate the telescope so the eyepiece is at a convenient
angle for viewing. When you are actually observing with
the telescope, you can adjust the eyepiece position by
loosening the tube rings and rotating the optical tube.
7. Retighten the tube ring clamps.
The telescope is now balanced on both axes. Now when you
loosen the lock knob on one or both axes and manually point the
telescope, it should move without resistance and should not drift
from where you point it.
Focusing the Telescope
With the 15mm Expanse eyepiece in the focuser, move the tele-
scope so the front (open) end is pointing in the general direction
of an object at least 1/4-mile away. Now with your fingers, slowly
rotate one of the focusing knobs until the object comes into sharp
focus. Go a little bit beyond sharp focus until the image starts to
blur again, then reverse the rotation of the knob, just to make
sure you’ve hit the exact focus point.
Figure 4.
Proper usage of the equatorial mount requires the telescope tube to be balanced on both the R.A. and Dec. axes. (a) With the
R.A. lock knob released, slide the counterweight along the counterweight shaft until it just counterbalances the tube. (b) When you let go
with both hands, the tube should not drift up or down. (c) With the Dec. lock knob released, loosen the tube ring lock clamps a few turns and
slide the telescope forward or back in the tube rings. (d) When the tube is balanced about the Dec. axis, it will not move when you let go.
4b.4a.
4c. 4d.
 Loading...