


INSTRUCTION MANUAL
Orion®
SpaceProbe™ 3 EQ
#9843 Equatorial Reflector Telescope
|
|
|
|
|
Customer Support (800) 676-1343 |
|
|
|
|
|
E-mail: support@telescope.com |
|
|
|
|
|
Corporate Offices (831) 763-7000 |
|
|
|
|
|
|
Providing Exceptional Consumer Optical Products Since 1975 |
P.O. Box 1815, Santa Cruz, CA 95061 |
||||
IN 208 Rev. B 10/02
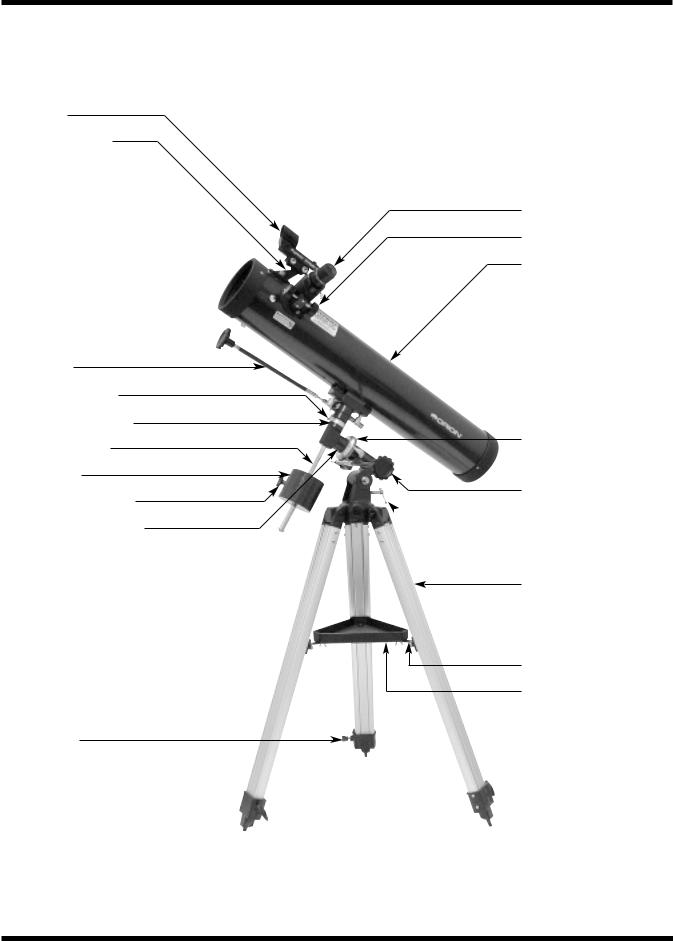
EZ Finder II
EZ Finder II bracket
Declination slow-motion control cable
Declination lock knob
Declination setting circle
Counterweight shaft
Counterweight
Counterweight lock knob
Right Ascension lock knob (not shown)
Leg lock knob
Eyepiece
Focuser
Optical tube assembly
Right Ascension setting circle
Right Ascension slow-motion control cable
 Latitude adjustment T-bolt
Tripod leg
Accessory tray bracket
Accessory tray
Figure 1. The SpaceProbe 3 EQ.
2
®
Welcome to the exciting world of amateur astronomy! Your SpaceProbe 3 EQ is a high-quality optical instrument designed for nighttime stargazing. With its precision optics and equatorial mount, you’ll be able to locate and enjoy fascinating denizens of the night sky, including the planets, Moon, and a variety of deep-sky objects. Lightweight and easy to use, this scope will provide many hours of enjoyment for the whole family.
These instructions will help you set up, properly use, and care for your telescope. Please read them over thoroughly before getting started.
Table of Contents
1. Unpacking . . . . . . . . . . . . . . . . . . . . . . . 3
2. Parts List . . . . . . . . . . . . . . . . . . . . . . . . 3
3. Assembly . . . . . . . . . . . . . . . . . . . . . . . . 3
4. Getting Started . . . . . . . . . . . . . . . . . . . . 4
5. Setting up and Using the
Equatorial Mount . . . . . . . . . . . . . . . . . . 6
6. Using your Telescope . . . . . . . . . . . . . . . 8
7. Care and Maintenance . . . . . . . . . . . . . 10
8. Specifications . . . . . . . . . . . . . . . . . . . . 11
Appendix A: Collimation
(Aligning the Mirrors) . . . . . . . . . . . . . . 12
Appendix B: Cleaning the Optics . . . . . 14
1. Unpacking
The entire telescope system will arrive in one box. Be careful unpacking the box. We recommend keeping all original packaging. In the event that the telescope needs to be shipped to another location, or returned to Orion for warranty repair, having the proper packaging will help ensure that your telescope will survive the journey intact.
Make sure all the parts in the Part List are present. Be sure to check the box carefully, as some parts are small. If anything appears to be missing or broken, immediately call Orion Customer Support (800-676-1343) for assistance.
Warning: Never look at the sun with your telescope or its finderscope—even for an instant—without a professionally made solar filter that completely covers the front of the instrument, or permanent eye damage could result. Young children should use this telescope only with adult supervision.
2. Parts List
Qty. Description
1Optical tube assembly
1Equatorial mount
3Tripod legs with accessory tray bracket attached
2Slow-motion control cables
1 |
Counterweight |
1 |
Counterweight shaft |
1 |
EZ Finder II with bracket |
1 |
Accessory tray with attachment wing screws |
3Tripod attachment screws with wing nuts and washers
3 Leg lock knobs
1 25mm Explorer II eyepiece
1 10mm Explorer II eyepiece
1 Dust cover
1 Collimation cap
3. Assembly
Assembling the telescope for the first time should take about 30 minutes. You will need a Phillips head screwdriver to assemble the telescope. All screws should be tightened securely to eliminate flexing and wobbling, but be careful not to over-tighten or the threads may strip. Refer to Figure 1 during the assembly process.
During assembly (and anytime, for that matter), DO NOT touch the surfaces of the telescope mirrors or the lenses of the finder scope or eyepiece with your fingers. The optical surfaces have delicate coatings on them that can easily be damaged if touched inappropriately. NEVER remove any lens assembly from its housing for any reason, or the product warranty and return policy will be voided.
1.Lay the equatorial mount on its side. Attach the tripod legs, one at a time, to the base of the mount by sliding a tripod leg attachment screw through the top of a leg and through the holes in the base of the mount. The washers should be
3
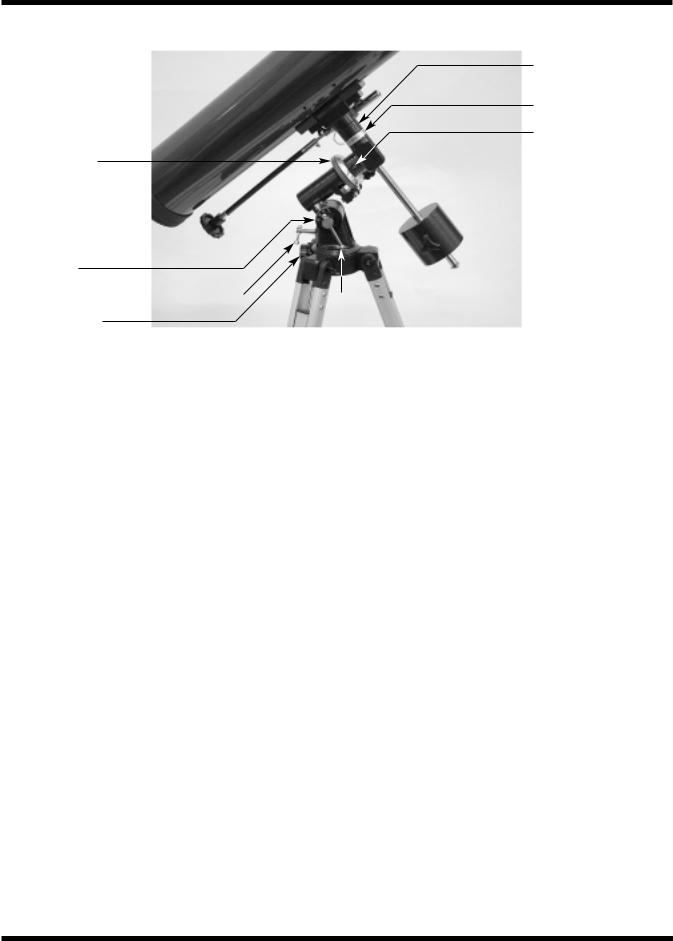
Declination lock knob (not shown)
Declination setting circle
R.A. lock knob
R.A. setting circle
Latitude scale
Latitude adjustment T-bolt |
|
|
|
Latitude lock T-bolt |
|
||||
|
|
Azimuth lock knob
Figure 2. The equatorial mount of the SpaceProbe 3 EQ.
on the outside of the tripod legs. Secure the wing nuts fin- ger-tight.
2.Install and tighten the leg lock knobs on the bottom braces of the tripod legs. For now, keep the legs at their shortest (fully retracted) length; you can extend them to a more desirable length later, after the tripod is completely assembled.
3.Stand the tripod and mount upright and spread the tripod legs apart as far as they will go, until the bracket is taut. Connect the accessory tray to the accessory tray bracket with the three wing screws already installed in the tray. Do this by pushing the wing screws up through the holes in the accessory tray bracket and threading them into the holes in the accessory tray.
4.Next, tighten the screws at the tops of the tripod legs, so the legs are securely fastened to the mount. Use the Phillips head screwdriver and your fingers to do this.
5.Orient the equatorial mount as it appears in Figure 2, at a latitude of about 40°, i.e., so the pointer next to the latitude scale is pointing to the hash mark at “40.” To do this, loosen the latitude lock t-bolt, and turn the latitude adjustment t- bolt until the pointer and the “40” line up. Then retighten the latitude lock t-bolt. The declination (Dec.) and right ascension (R.A.) axes may need re-positioning (rotation) as well. Be sure to loosen the R.A. and Dec. lock knobs before doing this. Retighten the R.A. and Dec. lock knobs once the equatorial mount is properly oriented.
6.Thread the counterweight shaft into the equatorial mount at the base of the declination axis until tight.
7.Remove the screw and washer on the bottom of the counterweight shaft and slide the counterweight onto the shaft. Make sure the counterweight lock knob is adequately loosened to allow the counterweight shaft to pass through the hole. Position the counterweight about halfway up the shaft
and tighten the lock knob. Replace the screw and washer on the end of the shaft.
8.Remove the two wingnuts from the optical tube assembly. Place the optical tube assembly on top of the equatorial mount and secure it with the wing nuts. Refer to Figure 1 for orientation of the tube.
9.Attach the two slow-motion cables to the R.A. and Dec. worm gear shafts of the equatorial mount by positioning the thumbscrew on the end of the cable over the indented slot on the worm gear shaft and then tightening the thumbscrew. We recommend that the shorter cable be used on the R.A. worm gear shaft and the longer cable on the Dec. worm gear shaft.
10.Remove the two metal thumbnuts located near the focuser at the front of the optical tube. Place the bracket of the EZ Finder II on the tube so that the holes in the bracket slide over the two threaded posts on the tube. The EZ Finder should be oriented so that it appears as in Figure 1. Thread the thumbnuts back onto the posts to secure the EZ Finder II in place.
11.Insert the 25mm Explorer II eyepiece into the focuser drawtube and secure it in place with the thumbscrew.
Your telescope is now fully assembled and should appear as it does in Figure 1.
4. Getting Started
Balancing the Telescope
To insure smooth movement of the telescope, it should be properly balanced. This is done by positioning the counterweight on its shaft at a point where it is balanced on the R.A. axis.
1.Keeping one hand on the optical tube, loosen the R.A. lock knob. Make sure the declination lock knob is locked. The
4

®
Battery casing
Azimuth knob 
a.
Power knob
b.
Figure 3. Proper operation of the equatorial mount requires balancing the telescope tube on the R.A. axis (a). With the R.A. lock knob released, slide the counterweight along the counterweight shaft until it just counterbalances the tube (b). When you let go with both hands, the tube should not drift up or down.
telescope should now be able to rotate freely about the R.A. axis. Rotate it until the counterweight shaft is parallel to the ground (i.e., horizontal)
2.Now loosen the counterweight lock knob and slide the weight along the shaft until it exactly counterbalances the telescope (Figure 3a). That’s the point at which the shaft remains horizontal even when you let go of the telescope with both hands (Figure 3b).
3.Retighten the counterweight lock knob. The telescope is now balanced in the right ascension axis. The telescope is already balanced in the declination axis.
Now when you loosen the lock knob on one or both axes and manually point the telescope, it should move without resistance and should not drift from where you point it.
Focusing the Telescope
Insert the 25mm Explorer II eyepiece into the focuser and secure with the thumbscrew. Move the telescope so the front (open) end is pointing in the general direction of an object at least 1/4-mile away. Now with your fingers, slowly rotate one of the focusing knobs until the object comes into sharp focus. Go a little bit beyond sharp focus until the image starts to blur
Altitude |
Metal |
knob |
thumbnuts |
Figure 4. The EZ Finder II.
again, then reverse the rotation of the knob, just to make sure you’ve hit the exact focus point.
Do You Wear Eyeglasses?
If you wear eyeglasses, you may be able to keep them on while you observe. In order to do this, your eyepiece must have enough “eye relief” to allow you to see the entire field of view with glasses on. You can try this by looking through the eyepiece first with your glasses on and then with them off, and see if the glasses restrict the view to only a portion of the full field. If the glasses do restrict the field of view, you may be able to observe with your glasses off by just refocusing the telescope the needed amount.
If your eyes are astigmatic, images will probably appear the best with glasses on. This is because a telescope’s focuser can accommodate for nearsightedness or farsightedness, but not astigmatism. If you have to wear your glasses while observing and cannot see the entire field of view, you may want to purchase additional eyepieces that have longer eye relief.
Operating the EZ Finder II reflex finder
The EZ Finder II reflex finder (Figure 4) works by projecting a tiny red dot onto a lens mounted in the front of the unit. When you look through the EZ Finder II, the red dot will appear to float in space, helping you locate even the faintest of deep space objects. The red dot is produced by a light-emitting diode (LED), not a laser beam, near the rear of the sight. A replaceable 3-volt lithium battery provides the power for the diode.
To use the EZ Finder II, turn the power knob clockwise until you hear a “click” indicating that power has been turned on.
5
 Loading...