


EN
Remote Thermometer Sensor |
|
Model: THN122N |
|
USER MANUAL |
|
CONTENTS |
|
Introduction .............................................................. |
1 |
Product Overview .................................................... |
2 |
Remote Sensor (THN122N) ................................... |
2 |
Getting Started ......................................................... |
3 |
Batteries ................................................................. |
3 |
Remote Sensor (THN122N) ..................................... |
3 |
Setup Sensor ......................................................... |
3 |
Safety and Care ........................................................ |
4 |
Warnings ................................................................... |
4 |
Troubleshooting ....................................................... |
5 |
Specifications ........................................................... |
5 |
Remote Sensor Dimensions .................................. |
5 |
Remote Sensor (THN122N) ................................... |
5 |
Power ..................................................................... |
5 |
About Oregon Scientific .......................................... |
6 |
EC-Declaration of Conformity ................................. |
6 |
INTRODUCTION
Thank you for selecting the Oregon Scientific™ Remote Thermometer Sensor (THN122N). This product is compatible with various wireless weather station products, such as the RAR621 and BAR623P.
Keep this manual handy as you use your new product. It contains practical step-by-step instructions, as well as technical specifications and warnings you should know.
1
THN122N_EN_R3 |
1 |
12/4/04, 3:14 PM |
P/N: 086-003693-016 EN REV1 1/8

EN
PRODUCT OVERVIEW
REMOTE SENSOR (THN122N)
|
|
|
|
|
|
|
|
|
|
|
|
|
|
|
|
|
|
|
|
|
|
|
|
|
|
|
|
|
|
|
|
|
|
|
|
|
|
|
|
|
|
|
|
|
1. |
Wall mount hole |
||||||||
|
2. |
RESET hole |
||||||||
|
3. |
CHANNEL number (1-3) |
||||||||
|
4. |
Battery compartment |
||||||||
1. LED status indicator |
|
(Battery compartment cover not shown) |
||||||||
|
2 |
|
|
|
|
|
|
|
|
|
THN122N_EN_R3 |
2 |
|
|
|
|
12/4/04, 3:14 PM |
||||
P/N: 086-003693-016 EN REV1 2/8
EN
GETTING STARTED
BATTERIES
Remote unit |
2 x UM-4 (AAA) 1.5V batteries |
Insert batteries before first use, matching the polarity (+ and -) as shown in the battery compartment. For best results, install batteries in the remote sensor before the main unit. Press RESET after each battery change.
NOTE Do not use rechargeable batteries.
NOTE It is recommended that you use alkaline batteries with this product for longer performance.
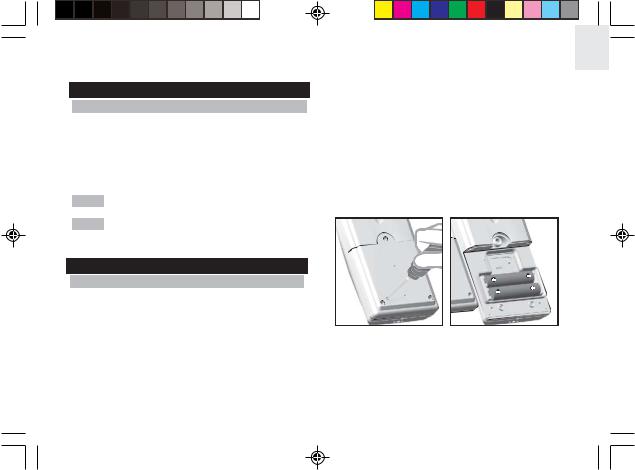
REMOTE SENSOR (THN122N)
SETUP SENSOR
1.Open the remote sensor battery compartment with a small Phillips screwdriver.
2.Insert the batteries, matching the polarity (+ and -) as shown in the battery compartment.
3.Set the channel switch to any channel. The switch is located in the battery compartment.
3
4.Place the sensor near the main unit. Press RESET on the sensor. Then, press the appropriate main unit button (as specified in the main unit manual) to initiate signal sending between the sensor and the main unit. The reception icon on the main unit will blink for approximately 3 minutes while it is searching for the sensor.
5.Close the remote sensor battery compartment.
6.Secure the sensor in the desired location using the wall mount or table stand.
Installing the batteries:
THN122N_EN_R3 |
3 |
12/4/04, 3:14 PM |
P/N: 086-003693-016 EN REV1 3/8
 Loading...