


Radio-Controlled Projection Clock
with Indoor / Outdoor Temperature
Model: RMR329P
USER MANUAL

Radio-Controlled Projection Clock
with Indoor / Outdoor Temperature
Model: RMR329P
USER MANUAL |
|
CONTENTS |
|
Introduction.............................................................. |
2 |
Clock overview ........................................................ |
2 |
Front view.............................................................. |
2 |
Back view .............................................................. |
2 |
Remote sensor...................................................... |
3 |
Getting started ......................................................... |
3 |
Power supply......................................................... |
3 |
Remote sensor......................................................... |
3 |
Sensor data transmission...................................... |
4 |
Clock......................................................................... |
4 |
Clock reception..................................................... |
4 |
Manually set clock................................................. |
4 |
Alarm ........................................................................ |
5 |
Temperature ............................................................. |
5 |
Projector and backlight........................................... |
5 |
Reset......................................................................... |
6 |
Precautions .............................................................. |
6 |
Specifi cations.......................................................... |
7 |
About Oregon Scientifi c ......................................... |
7 |
EU-Declaration of conformity................................. |
7 |
EN
1

EN
INTRODUCTION
Thank you for selecting this Oregon Scientific™ Radio-Controlled Projection Clock with Indoor / Outdoor Temperature. Please keep this manual for instructions and information you should know about.
CLOCK OVERVIEW
FRONT VIEW
1
 5
5
2 |
6 |
3 |
|
4 |
|
1.SNOOZE: Snooze alarm; activate backlight; rotate dual line projection display by 180°
2.ALARM: View alarm status; set alarm
3.CLOCK: Change display; set clock
2
4. /
/  : Toggle set ting options; activate / deactivate clock reception
5.Projector (LED Aperture)
6.TEMP: Toggle in / out temperature settings
BACK VIEW
1 |
|
|
|
|
|
3 |
|||
|
|
|
|
|
|
||||
|
|
|
|
|
|
4 |
|||
|
|
|
|
|
|
5 |
|||
2 |
|
|
|
|
|
|
|
6 |
|
|
|
|
|
|
|
|
|||
|
|
|
|
|
|
||||
|
|
|
|
|
|
|
|||
|
|
|
|
|
|
|
|||
|
|
|
|
|
|
||||
|
|
|
|
|
|
|
|
7 |
|
|
|
|
|
|
|
|
|||
|
|
|
|
|
|
||||
|
|
|
|
|
|
||||
|
|
|
|
|
|
|
|||
|
|
|
|
|
|
|
|||
|
|
|
|
|
|
|
|
8 |
|
|
|
|
|
|
|
|
|
||
|
|
|
|
|
|
|
|||
|
|
|
|
|
|
|
|
||
|
|
|
|
|
|
|
|
||
|
|
|
|
|
|
|
|||
|
|
|
|
|
|
9 |
|||
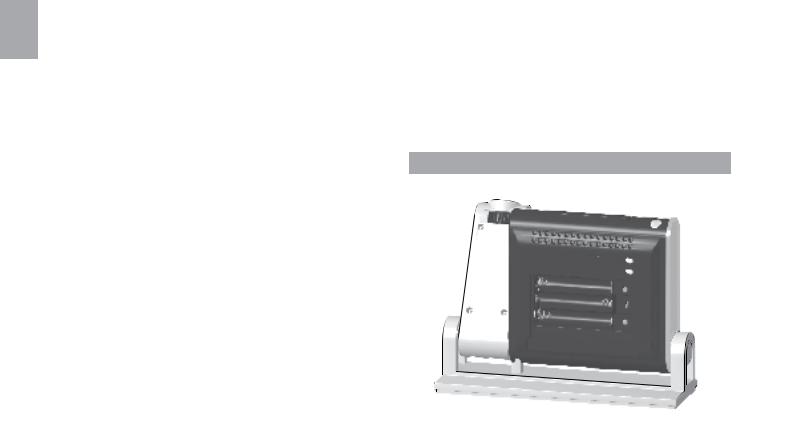
1.FOCUS: Focus the projected image
2.Battery compartment
3.Light sensor
4.PROJECTION: ON / OFF switch
5.LIGHT: Backlight ON / OFF switch
6.°C / °F: Select temperature unit
7.EU / UK: Radio signal switch
8.RESET: Reset settings to default
9.Adapter socket

REMOTE SENSOR
2
1
4
3 |
5 |
|
|
|
|
|
|
|
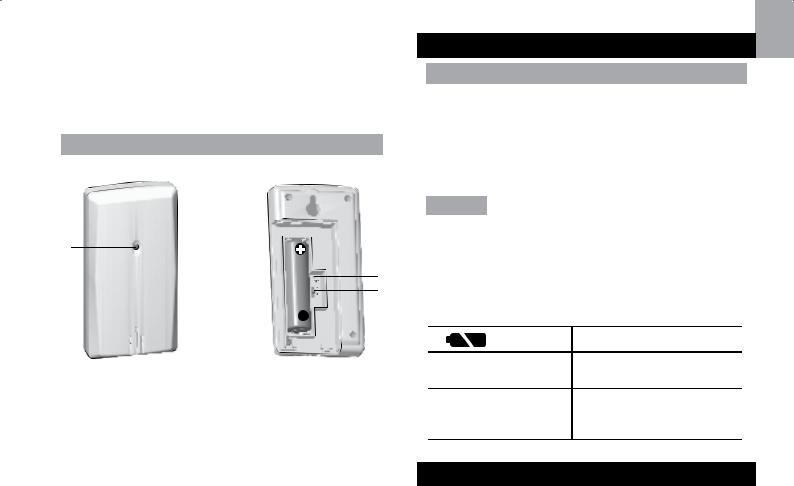
1.LED status indicator
2.Wall mount hole
3.Battery compartment
4.RESET hole: Reset unit to default settings
5.CHANNEL button: Select channel 1
GETTING STARTED
POWER SUPPLY
Batteries serve as a back-up power supply. For continuous use of projector and backlight, install adapter. The socket-outlet shall be installed near the
equipment and shall be easily accessible
NOTE  will appear when power supply is not connected.
To insert batteries:
1.Remove the battery compartment and insert batteries, matching polarities.
2.Press RESET after each battery change.
LOCATION |
MEANING |
|
Clock / alarm area |
Main unit batteries low |
|
Outdoor / indoor |
Sensor batteries low |
|
temperature area |
||
|
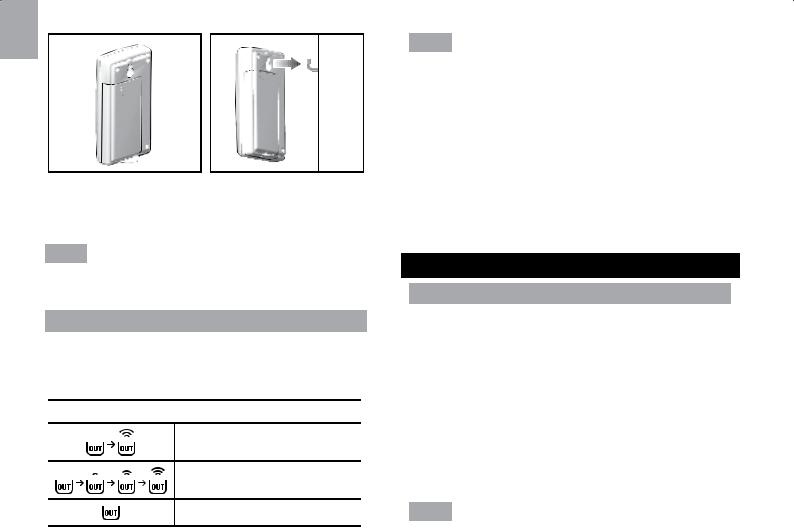
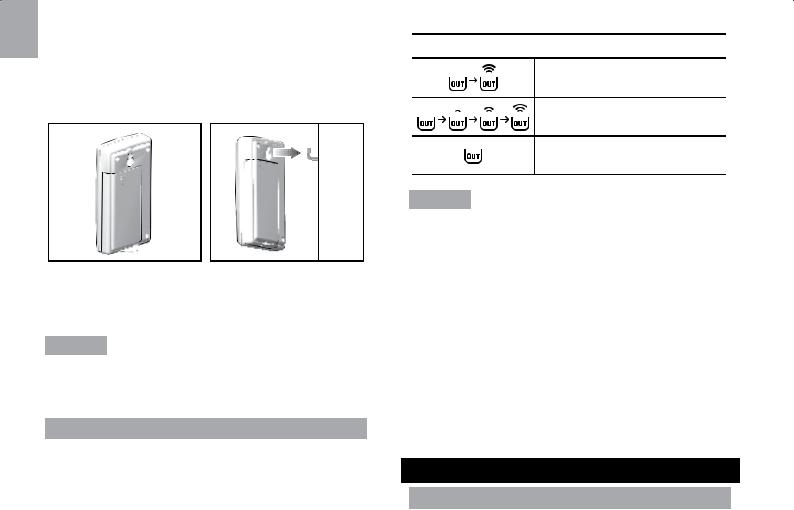
REMOTE SENSOR
To set up the sensor:
1.Open the battery compartment, and insert batteries, matching polarities.
2.Place the sensor within 30 m (98 ft) of the main unit using the table stand or wall mount.
The transmission range may vary depending on many factors. You may need to experiment with various locations to get the best results.
EN
3

EN
NOTE We recommend that you use alkaline batteries with this product for longer usage and consumer grade lithium batteries in temperatures below freezing.
SENSOR DATA TRANSMISSION
Outdoor sensor
The main unit will automatically search for the outdoor sensor. The sensor reception icon in the remote sensor area shows the status:
ICON  DESCRIPTION
Main unit is searching for sensor(s)
A channel has been found
The sensor cannot be found.
NOTE If the sensor is not found, check the batteries, obstructions, and remote unit location.
For best results:
•Place the sensor out of direct sunlight and moisture.
•Position the sensor facing main unit, minimizing obstructions.
•Place the sensor in a location with a clear view to the sky, away from metallic or electronic objects.
•Position the sensor close to the main unit during cold winter months.
CLOCK
CLOCK RECEPTION
This product is designed to synchronize its clock automatically with a clock signal.
S lide EU / UK to select the signal received.
•EU: DCF-77 signal: within 1500 km (932 miles) of Frankfurt, Germany.
•UK: MSF-60 signal: within 1500 km (932 miles) of Anthorn, England.
To enable / disable signal reception:
Press and hold  to enable, or
  to disable signal reception.
NOTE Reception takes 2-10 minutes. If the signal is weak, it can take up to 24 hours to get a valid signal.
Clock signal reception indicator:
STRONG |
WEAK |
NO |
SIGNAL |
SIGNAL |
SIGNAL |
MANUALLY SET CLOCK
1.Press and hold CLOCK for 2 seconds.
2.Press  or
or  to change the settings.
3.Press CLOCK to confi rm.
4

4.The setting order is: time zone offset, 12/24-hr format, hour, minute, year, day / month format, month, day and language.
NOTE Time zone offset sets the clock +/- 23 hours from the received clock signal time.
NOTE The language options are (E) English, (F) French,
(D) German, (I) Italian, and (S) Spanish.
To select display mode:
Press CLOCK to choose between clock with seconds and clock with weekday.
ALARM
To set the alarm:
1.Press and hold ALARM for 2 seconds to enter alarm-setting mode.
2.Press  /
/  to set hour / minute.
3.Press ALARM to confi rm.  indicates alarm is ON.
To toggle alarms ON / OFF:
1.Press ALARM to display alarm time.
2.Press ALARM again to turn alarm ON / OFF.
To silence the alarms
•Press SNOOZE to silence it for 8 minutes OR
•Press any other key to turn the alarm off and activate it again after 24 hours.
EN
TEMPERATURE
To toggle temperature unit
Press °C / °F.
To toggle between outdoor / indoor sensor readings
Press TEMP.  /
/  indicates indoor and outdoor temperature.
To auto-scan between sensors
Press and hold TEMP for 2 seconds to display the sensor’s data for 5 seconds.
To deactivate auto-scan function press TEMP.
PROJECTOR AND BACKLIGHT
To activate Projection function
•Slide PROJECTION switch to ON to illuminate projection continuously.
To activate Backlight function:
•Slide LIGHT switch to ON to illuminate backlight
continuously. OR
•Press SNOOZE to turn on projector and backlight for 5 seconds.
•Press repeatedly to fl ip dual line projection image by 180 degrees.
NOTE If projection is illuminated, do not look directly
into the projector.
5

EN
NOTE To save battery life, the projector and backlight will only operate continuously when adapter is installed. The light sensor will turn off the projector automatically when it detects external light sources.
RESET
Press RESET to return to the default settings.
PRECAUTIONS
•Do not subject the unit to excessive force, shock, dust, temperature or humidity.
•Do not cover the ventilation holes with any items such as newspapers, curtains etc.
•Do not immerse the unit in water. If you spill liquid over it, dry it immediately with a soft, lint-free cloth.
•Do not clean the unit with abrasive or corrosive materials.
•Do not tamper with the unit’s internal components. This invalidates the warranty.
•Only use fresh batteries. Do not mix new and old batteries.
•Images shown in this manual may differ from the actual display.
•When disposing of this product, ensure it is collected separately for special treatment.
•Placement of this product on certain types of wood may result in damage to its fi nish for which Oregon Scientifi c will not be responsible. Consult the furniture manufacture’s care instructions for information.
•The contents of this manual may not be reproduced without the permission of the manufacturer.
•Do not dispose old batteries as unsorted municipal waste. Collection of such waste separately for special treatment is necessary.
•Please note that some units are equipped with a battery safety strip. Remove the strip from the battery compartment before fi rst use.
NOTE The technical specifi cations for this product and the contents of the user manual are subject to change without notice.
6

SPECIFICATIONS
TYPE |
DESCRIPTION |
MAIN UNIT |
|
|
|
L x W x H |
155 x 50 x 112 mm |
|
(6.1 x 1.97 x 4.41 in) |
Weight |
240 g (8.5 oz) |
|
without battery |
Temperature Unit |
°C / °F |
Temperature range |
-5°C to 50°C |
|
(23°F to 122°F) |
Resolution |
0.1°C (0.2°F) |
Signal frequency |
433 MHz |
Power |
3 x UM-4 (AAA) 1.5V batteries / |
|
4.5V AC / DC adapter |
REMOTE UNIT (THN132N) |
|
|
|
L x W x H |
92 x 60 x 20 mm |
|
(3.6 x 2.4 x 0.8 in) |
Weight |
62 g (2.22 ounces) |
Transmission range |
30 m (98 ft) unobstructed |
Temperature range |
-30°C to 60°C |
|
(-22°F to 140°F) |
Power |
1 x UM-3 (AA) 1.5V battery |
EN
ABOUT OREGON SCIENTIFIC
Visit our website (www.oregonscientifi c.com) to learn more about Oregon Scientifi c products. If you’re in the US and would like to contact our Customer Care department directly, please visit:
www2.oregonscientifi c.com/service/support
OR
Call 1-800-853-8883.
For international inquiries, please visit: www2.oregonscientifi c.com/about/international.
EU-DECLARATION OF CONFORMITY
Hereby, Oregon Scientifi c, declares that this RadioControlled Projection Clock with Indoor / Outdoor
Temperature (Model: RMR329P) is in compliance with the essential requirements and other relevant provisions of Directive 1999/5/EC. A copy of the signed and dated Declaration of Conformity is available on request via our Oregon Scientifi c Customer Service.
COUNTRIES RTTE APPROVAL COMPLIED
All EU countries, Switzerland CH and Norway N
7

Reloj Proyector Radiocontrolado
con Temperatura Interior / Exterior
Modelo: RMR329P
MANUAL DE USUARIO |
|
ÍNDICE |
|
Introducción............................................................. |
2 |
Resumen del reloj.................................................... |
2 |
Vista frontal .......................................................... |
2 |
Vista trasera .......................................................... |
2 |
Sensor remoto....................................................... |
3 |
Para empezar ........................................................... |
3 |
Suministro de corriente ......................................... |
3 |
Sensor remoto ......................................................... |
3 |
Transmisión de datos del sensor .......................... |
4 |
Reloj.......................................................................... |
4 |
Recepción de la señal radiocontrolada................ |
4 |
Ajuste manual del reloj.......................................... |
5 |
Alarma ...................................................................... |
5 |
Previsión meteorológica......................................... |
5 |
Temperatura ............................................................. |
6 |
Reinicio..................................................................... |
6 |
Precaución ............................................................... |
6 |
Ficha técnica............................................................ |
7 |
Sobre Oregon Scientifi c.......................................... |
8 |
EU-Declaración de conformidad ............................ |
8 |
ES
1

ES
INTRODUCCIÓN
Gracias por elegir el Reloj Proyector Radiocontrolado con Temperatura Interior / Exterior de Oregon Scientifi c™. Sírvase guardar este manual para disponer de las instrucciones y la información que debería conocer.
3.CLOCK: Cambiar pantalla; confi gurar reloj
4. /
/  : Alternar opciones de configuración; activar o desactivar la recepción del reloj
5.Proyector
6.TEMP: Alternar mostrar temperatura interior / exterior
RESUMEN DEL RELOJ
VISTA FRONTAL
1
 5
5
2 |
6 |
3 |
|
4 |
|
1. SNOOZE: Repetición de alarma; activar la retroiluminación; girar 180° la pantalla de proyección de doble línea
2. ALARM: Ver estado de la alarma; ajustar la alarma
2
VISTA TRASERA
1 |
|
|
|
|
|
3 |
|||
|
|
|
|
|
|
||||
|
|
|
|
|
|
4 |
|||
|
|
|
|
|
|
5 |
|||
2 |
|
|
|
|
|
|
|
6 |
|
|
|
|
|
|
|
|
|||
|
|
|
|
|
|
|
|||
|
|
|
|
|
|
|
|||
|
|
|
|
|
|
|
|||
|
|
|
|
|
|
||||
|
|
|
|
|
|
|
|
7 |
|
|
|
|
|
|
|
|
|||
|
|
|
|
|
|
||||
|
|
|
|
|
|
||||
|
|
|
|
|
|
|
|||
|
|
|
|
|
|
|
|||
|
|
|
|
|
|
|
|
8 |
|
|
|
|
|
|
|
|
|
||
|
|
|
|
|
|
|
|||
|
|
|
|
|
|
|
|
||
|
|
|
|
|
|
|
|
||
|
|
|
|
|
|
|
|||
|
|
|
|
|
|
9 |
|||
1. FOCUS: Enfoca la imagen proyectada
2 . Compartimento para las pilas
3.Sensor de luz
4.PROJECTION: Interruptor ON/OFF
5.LIGHT : Interruptor ON/OFF de la retroiluminación
6.°C / °F: Selección unidad de temperatura
7.EU / UK: Selector señal radiocontrolada
8.RESET: La unidad vuelve a los ajustes predeterminados
9.Adaptador de corriente
REMOTE SENSOR
2
1
4
3 |
5 |
|
|
|
|
|
|
|
1.Indicador LED de estado
2.Orifi cio para montaje en pared
3.Compartimento para las pilas
4.Orifi cio deREINICIO: La unidad vuelve a los ajustes predeterminados
5.Botón CANAL: Selección del canal 1
ES
PARA EMPEZAR
SUMINISTRO DE CORRIENTE
Las pilas son una fuente de energía de refuerzo. Para utilizar el proyector y la retroiluminación de modo continuo, instale el adaptador. El enchufe debe estar
cerca del equipo y ser de fácil acceso
NOTA  aparecerá cuando el adaptador de corriente no esté conectado.
Para introducir las pilas:
1.Retire la tapa del compartimento para pilas e introduzca las pilas respetando la polaridad.
2.Pulse REINICIO cada vez que cambie las pilas.
 UBICACIÓN
Área de reloj / alarma
SIGNIFICADO
Las pilas de la unidad principal están casi gastadas
Área de Temperatura |
Sensor de pilas |
Exterior / Interior |
agotadas |
SENSOR REMOTO
Para confi gurar el sensor:
1.Abra el compartimento para pilas e introduzca las pilas respetando la polaridad.
2.Coloque el sensor en un radio de 30 m (98 pies) de la unidad principal usando el montaje de pared o el soporte para la mesa.
3
ES
El alcance de transmisión puede variar debido a muchos factores. Es la posible que tenga que probar varias ubicaciones para obtener los mejores resultados.
NOTA Recomendamos utilizar pilas alcalinas con este producto para que funcione durante más tiempo, y el uso de pilas de litio en temperaturas bajo cero.
TRANSMISIÓN DE DATOS DEL SENSOR
Sensor exterior:
La unidad principal buscará automáticamente al sensor exterior. El icono de recepción del Área del sensor remoto muestra el estado:
ICONO  DESCRIPCIÓN
La unidad principal está buscando sensor(es).
Se ha encontrado un canal
No se encuentra el sensor.
NOTA Si no ha encontrado el sensor, compruebe las pilas, obstrucciones y la localización de la unidad remota.
Cómo conseguir los mejores resultados
•Coloque el sensor en un lugar en que no esté expuesto a la luz directa ni a la humedad.
•Coloque el sensor de cara a la unidad principal evitando los obstáculos.
•Coloque el sensor en un lugar al descubierto debajo del cielo, alejado de objetos metálicos o electrónicos.
•Coloque el sensor cerca de la unidad principal durante los meses de invierno.
RELOJ
RECEPCIÓN DE LA SEÑAL RADIOCONTROLADA
Este producto ha sido diseñado para sincronizar automáticamente su reloj con una señal radiocontrolada. Deslice el interruptor EU / UK para elegir la señal
•UE: señal DCF-77 a 1500 m (932 millas) de Frankfurt, Alemania.
•Reino Unido: señal MSF-60: a 1500 m (932 millas) de Anthorn, Inglaterra.
Para activar la recepción de la señal radiocontrolada
Pulse TUNE  o TUNE
  y manténgalo pulsado para desactivar la recepción de la señal.
NOTA La recepción tarda entre 2 y 10 minutos. Si la
4

señal de radio es débil, puede tardarse hasta 24 horas en conseguir una señal válida.
Indicador de la recepción de la señal radiocntrolada del reloj:
SEÑAL |
SEÑAL |
NO SE |
|
RECIBE |
|||
FUERTE |
DÉBIL |
||
SEÑAL |
|||
|
|
AJUSTE MANUAL DEL RELOJ
1.Pulse CLOCK y manténgalo pulsado durante 2 segundos.
2.Pulse  o
o  para modifi car la confi guración.
3.Pulse CLOCK para confi rmar.
4.La secuencia de confi guración es: huso horario, formato de 12 ó 24 horas, hora, minuto, año, formato día / mes, mes, día e idioma de pantalla.
NOTA La zona horaria ajusta el reloj a + / -23 horas de la hora recibida por la señal del reloj.
NOTA Las opciones de idioma son (E) inglés, (D) alemán, (F) francés, (I) italiano y (S) español.
Cómo seleccionar el formato de pantalla:
Pulse RELOJ para alternar entre Reloj con segundos y Reloj con día de la semana.
ES
ALARMA
Para confi gurar la alarma:
1.Pulse ALARM y manténgalo pulsado durante 2 segundos para acceder al modo de confi guración de alarma.
2.Pulse  /
/  para confi gurar hora / minuto.
3.Pulse ALARM para confirmar. El símbolo  que la alarma está ACTIVADA.
Para activar / desactivar alarmas:
1.Pulse ALARM para mostrar la hora de la alarma.
2.Pulse ALARM de nuevo para encender/apagar la alarma.
Para apagar la alarma
•Pulse SNOOZE para apagarla durante 8 minutos. O bien
•Pulse cualquier tecla para apagar la alarma y que se active de nuevo pasadas 24 horas.
TEMPERATURA
Selección de unidad de temperatura
Pulse °C / °F.
Para alternar entre las lecturas de los sensores exterior e interior
Pulse TEMP.  /
/  muestra si la temperatura es interior o exterior.
Para escanear automáticamente entre sensores
Pulse TEMP y manténgalo pulsado durante 2
5

ES
segundos para mostrar los datos del sensor durante 5 segundos.
Para desactivar la función de escaneado automático, pulse TEMP.
PROYECTOR Y RETROILUMINACIÓN
Para activar la función de proyección
•Deslice el interruptor PROJECTION a ON para iluminar la proyección continuamente.
Para activar la función de retroiluminación:
•Deslice el interruptor LIGHT a ON para iluminar la retroiluminación continuamente.
O bien
•Pulse SNOOZE para iluminar la pantalla y activar la retroiluminación durante 5 segundos.
•Pulse repetidamente para rotar 180° la pantalla de proyección dual.
 A Si la proyección está encendida, no mire
directamente al proyector.
NOTA Para ahorrar pilas, el Proyector y la Retroiluminación solamente operarán continuamente si el adaptador está instalado. El sensor de luz apagará automáticamente el Proyector si detecta fuentes de luz externas.
REINICIO
Pulse RESET para volver a la configuración predeterminada.
PRECAUCIÓN
•No exponga el producto a fuerza extrema, descargas, polvo, fl uctuaciones de temperatura o humedad.
•No cubra los orifi cios de ventilación con objetos como periódicos, cortinas, etc.
•No sumerja el dispositivo en agua. Si se vertiera líquido en la unidad, límpiela con un paño suave y sin electricidad estática.
•No limpie la unidad con materiales abrasivos o corrosivos.
•No manipule los componentes internos. De hacerlo se invalidaría la garantía.
•Use siempre pilas nuevas. No mezcle pilas viejas con pilas nuevas.
•Las imágenes de esta guía para el usuario puede ser distintas al producto en sí.
•Cuando elimine este producto, asegúrese de que no vaya a parar a la basura general, sino
6

separadamente para recibir un tratamiento especial.
•La colocación de este producto encima de ciertos tipos de madera puede provocar daños a sus acabados. Oregon Scientifi c no se responsabilizará de dichos daños. Consulte las instrucciones de cuidado del fabricante para obtener más información.
•Los contenidos de este manual no pueden reproducirse sin permiso del fabricante.
•No elimine las pilas gastadas con la basura normal. Es necesario desecharlo separadamente para poder tratarlo.
•Tenga en cuenta que algunas unidades disponen de una cinta de seguridad para las pilas. Retire la cinta de compartimiento para pilas antes de usarlo por primera vez.
NOTA La ficha técnica de este producto y los contenidos de este manual de usuario pueden cambiarse sin aviso.
ES
FICHA TÉCNICA
TIPO |
DESCRIPCIÓN |
UNIDAD PRINCIPAL |
|
|
|
L x A x A |
155 x 50 x 112 mm |
|
(6.1 x 1.97 x 4.41 pulgadas) |
Peso |
240 g sin pilas |
Unidad de |
°C / °F |
temperatura |
|
Rango de |
-5°C a 50°C |
temperatura |
(23°F a 122°F) |
Resolución |
0,1°C (0,2°C) |
Frecuencia de la |
433 MHz |
señal |
|
Alimentación |
3 pilas UM-4 (AAA) de 1,5V / |
|
Adaptador 4,5V AC / CC |
UNITÀ REMOTA (THN132N) |
|
|
|
L x A x A |
92 x 60 x 20 mm |
|
(3,6 x 2,4 x 0,8 pulgadas) |
Peso |
62 g (2,2 oz) |
Cobertura de |
30 m (98 pies) sin |
transmisión |
obstáculos |
Rango de |
-30°C a 60°C |
temperatura |
(-22°F a 140°F) |
Alimentación |
1 pilas UM-3 (AA) de 1,5V |
7

ES
SOBRE OREGON SCIENTIFIC
Visite nuestra página web (www.oregonscientifi c.com) para conocer más sobre los productos de Oregon Scientifi c.
Si está en EE.UU y quiere contactar directamente con nuestro Departamento deAtención al Cliente, por favor visite www2.oregonscientifi c.com/service/support.asp o llame al 1-800-853-8883.
Si está en España y quiere contactar directamente con nuestro Departamento de Atención al Cliente, por favor visite www.oregonscientifi c.es o llame al 902 338 368.
Para consultas internacionales, por favor visite www2.oregonscientifi c.com/about/international.asp.
EU - DECLARACIÓN DE CONFORMIDAD
Por medio de la presente Oregon Scientifi c declara que el Reloj Proyector Radiocontrolado con Temperatura Interior / Exterior (Modelo: RMR329P) cumple con los requisitos esenciales y cualesquiera otras disposiciones aplicables o exigibles de la Directiva 1999/5/CE. Tiene a su disposición una copia firmada y sellada de la Declaración de Conformidad, solicítela al Departamento de Atención al Cliente de Oregon Scientifi c.
PAÍSES BAJO LA DIRECTIVA RTTE
Todos los países de la UE, Suiza CH y Noruega N
8

Funkgesteuerte Projektionsuhr
mit Innen- / Außentemperatur |
|
Modell: RMR329P |
|
BEDIENUNGSANLEITUNG |
|
INHALT |
|
Einleitung ................................................................. |
2 |
Uhr - Übersicht......................................................... |
2 |
Vorderansicht ........................................................ |
2 |
Rückansicht........................................................... |
2 |
Funksendeeinheit.................................................. |
3 |
Erste Schritte ........................................................... |
3 |
Stromversorgung................................................... |
3 |
Funksendeeinheit .................................................... |
3 |
Datenübertragung ................................................. |
4 |
Funkuhr .................................................................... |
4 |
Zeitsignalempfang ................................................ |
4 |
Die Uhr manuell einstellen .................................... |
5 |
Alarm ........................................................................ |
5 |
Temperatur ............................................................... |
6 |
Projektor und Hintergrundbeleuchtung ................ |
6 |
Reset......................................................................... |
6 |
Vorsichtsmaßnahmen ............................................. |
7 |
Technische Daten .................................................... |
7 |
Über Oregon Scientifi c............................................ |
8 |
EU-Konformitätserklärung...................................... |
8 |
DE
1
DE
EINLEITUNG
Wir danken Ihnen, dass Sie sich für diese funkgesteuerte Projektionsuhr mit Innen- / Außentemperatur von Oregon Scientifi c™ entschieden haben. Halten Sie bitte diese Anleitung bereit, da sie Anweisungen und wichtige Hinweise für den Umgang mit diesem Gerät enthält.
2.ALARM: Alarmstatus anzeigen; Alarm einstellen
3.CLOCK: Anzeige ändern; Uhr einstellen
4. /
/ : Zwischen Einstellungsoptionen wechseln; Zeitsignalempfang aktivieren / deaktivieren
5.Projektor
6.TEMP: Temperaturanzeige ein- / ausblenden
UHR - ÜBERSICHT
VORDERANSICHT
1
 5
5
2 |
6 |
3 |
|
4 |
|
1.SNOOZE: Schlummeralarm; Hintergrundbeleuchtung aktivieren; zweizeilige Projektionsanzeige um 180° drehen
RÜCKANSICHT
1 |
|
|
|
|
|
3 |
|||
|
|
|
|
|
|
||||
|
|
|
|
|
|
4 |
|||
|
|
|
|
|
|
5 |
|||
2 |
|
|
|
|
|
|
|
6 |
|
|
|
|
|
|
|
|
|||
|
|
|
|
|
|
|
|||
|
|
|
|
|
|
|
|||
|
|
|
|
|
|
|
|||
|
|
|
|
|
|
||||
|
|
|
|
|
|
|
|
7 |
|
|
|
|
|
|
|
|
|||
|
|
|
|
|
|
||||
|
|
|
|
|
|
||||
|
|
|
|
|
|
|
|||
|
|
|
|
|
|
|
|||
|
|
|
|
|
|
|
|
8 |
|
|
|
|
|
|
|
|
|
||
|
|
|
|
|
|
|
|||
|
|
|
|
|
|
|
|
||
|
|
|
|
|
|
|
|
||
|
|
|
|
|
|
|
|||
|
|
|
|
|
|
9 |
|||
1. FOCUS: Projiziertes Bild scharfstellen
2. Batteriefach
3.Lichtsensor
4.PROJEKTION: ON- / OFF-Schalter
5.LIGHT: ON- / OFF-Schalter für Hintergrundbeleuchtung
2
6.°C / °F: Temperatureinheit auswählen
7.EU / UK: Schalter für Funksignal
8.RESET: Einstellungen auf Standardwerte zurücksetzen
9.Anschluss für Netzadapter
FUNKSENDEEINHEIT
2
1
4
3 |
5 |
|
|
|
|
|
|
|
1.LED-Statusanzeige
2.Öffnung für Wandmontage
3.Batteriefach
4.RESET-Öffnung: Gerät auf Standardeinstellungen zurücksetzen
5.CHANNEL-Taste: Kanal 1 auswählen
DE
ERSTE SCHRITTE
STROMVERSORGUNG
Die Batterien dienen lediglich als Sicherung der Stromversorgung. Schließen Sie den Netzadapter für eine dauerhafte Verwendung des Projektors und der Hintergrundbeleuchtung an. Die Steckdose sollte
sich in der Nähe des Geräts befinden und leicht zugänglich sein
HINWEIS  erscheint, wenn das Netzteil nicht angeschlossen ist.
So legen Sie die Batterien ein:
1.Öffnen Sie das Batteriefach, legen Sie die Batterien ein und achten Sie auf die Übereinstimmung der Polaritäten.
2.Drücken Sie nach jedem Batteriewechsel auf RESET.
STELLE |
BEDEUTUNG |
|
Uhr- / Alarmbereich |
Batterien der Basiseinheit |
|
sind schwach |
||
|
||
Außen- / |
Batterie der |
|
Innentemperatur- |
Funksendeeinheit |
|
Bereich |
ist schwach |
FUNKSENDEEINHEIT
So richten Sie die Funksendeeinheit ein:
1. Öffnen Sie das Batteriefach, legen Sie die Batterien
3
DE
ein und achten Sie auf die Übereinstimmung der Polaritäten.
2.Platzieren Sie die Funksendeeinheit mit dem Tischaufsteller oder der Wandaufhängung innerhalb von 30 m von der Basiseinheit.
Die Übertragungsreichweite kann von mehreren Faktoren abhängen. Sie müssen eventuell mehrere Standorte testen, um optimale Ergebnisse zu erzielen.
HINWEIS Wir empfehlen, dass Sie bei diesem Produkt Alkaline-Batterien für eine längere Betriebsdauer sowie Lithium-Batterien für Einsatz bei Temperaturen unter dem Gefrierpunkt verwenden.
DATENÜBERTRAGUNG
Funksendeeinheit:
Die Basiseinheit sucht automatisch nach der Funksendeeinheit. Das Empfangssymbol auf dem Uhrendisplay zeigt den Status an:
4
SYMBOL  BESCHREIBUNG
Basiseinheit sucht
Funksendeeinheit(en)
Ein Kanal wurde gefunden
Es konnte keine Funksendeeinheit gefunden werden.
HINWEIS Wenn die Funksendeeinheit nicht gefunden wurde, überprüfen Sie die Batterien, etwaige Hindernisse sowie den Standort der externen Einheit.
Für optimale Ergebnisse
•Platzieren Sie die Funksendeeinheit entfernt von direkter Sonneneinstrahlung und Feuchtigkeit.
•Positionieren Sie die Funksendeeinheit so, dass sie auf die Basiseinheit ausgerichtet ist, und vermeiden Sie Hindernisse.
•Platzieren Sie die Funksendeeinheit an einem Standort mit freier Sicht auf den Himmel, und stellen Sie sie nicht in die Nähe von metallischen Gegenständen oder elektronischen Geräten.
•Positionieren Sie die Funksendeeinheit während der kalten Wintermonate in der Nähe der Basiseinheit.
FUNKUHR
ZEITSIGNALEMPFANG
Dieses Produkt synchronisiert seine Uhr automatisch
 Loading...