


C8314A(DCF MSF)
Size: 148 x 105(mm)
Radio Controlled Projection Alarm
Model: EW96
USER MANUAL

EN
Radio Controlled Projection Alarm
Model: EW96
USER MANUAL |
|
CONTENTS |
|
Brief Introduction ............................................ |
2 |
Overview .......................................................... |
2 |
Receiver ..................................................... |
2 |
LCD Display ................................................ |
3 |
Operating the Main Unit .................................. |
4 |
Reception of Radio Controlled Time Signal..... |
4 |
Signal Reception Indicator ........................... |
4 |
Time and Calendar Manual Setting ............... |
4 |
Alarm Time Setting .......................................... |
5 |
Using Alarm Function .................................... |
5 |
To Silence the Alarm ........................................ |
6 |
Using the Projector ....................................... |
6 |
Battery Replacement ...................................... |
6 |
Precautions ................................................ |
7 |
Specifications ................................................ |
8 |
About Oregon Scientific ................................. |
8 |
EU-Declaration of Conformity....................... |
8 |
FCC Statement .............................................. |
9 |
Declaration of Conformity .............................. |
9 |
1
EN
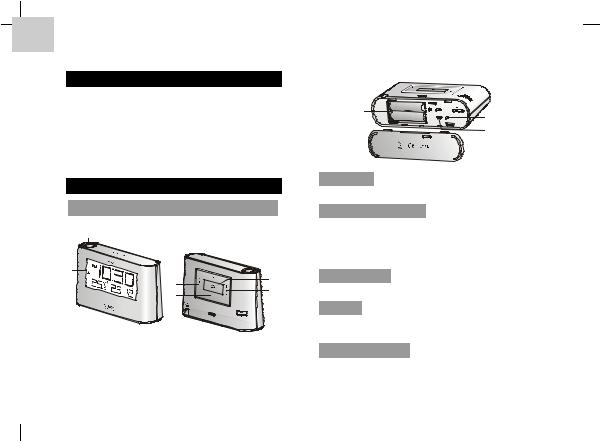
BRIEF INTRODUCTION
Thank you for your purchase of this Radio Controlled Projection Alarm. Please read these instructions carefully and keep the manual well for future reference.
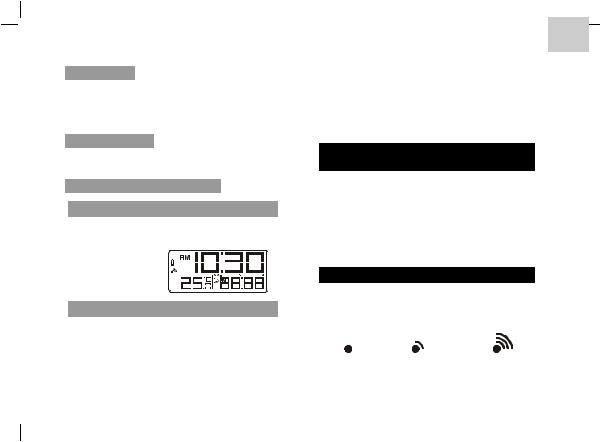
The receiver unit has a clear display that shows the indoor temperature, time and date.
OVERVIEW
RECEIVER
1 |
2 |
|
|
|
|
3 |
4 |
8 |
|
||
|
5 |
|
|
9 |
|
|
6 |
|
|
|
|
|
7 |
10 |
|
|
|
12 13 14 |
11 |
15 |
|
16 |
|
17 |
|
18 |
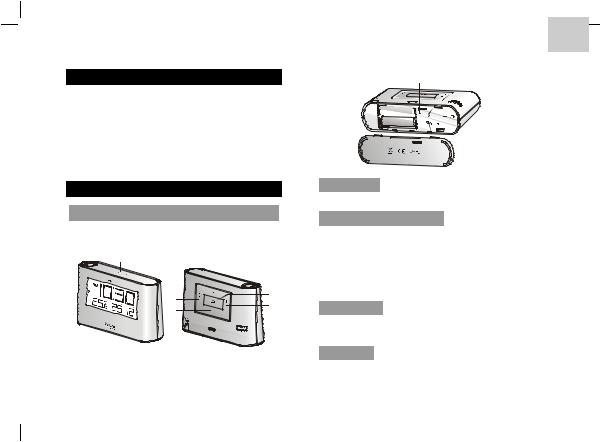
1.Projector:
∙ Use it to project the time.
2.SNOOZE/LIGHT key:
∙In normal time mode, press it once to turn on the backlight for 5 seconds.
∙Press it to silence the current alarm when it is going and enter the snooze mode for 8 minutes.
3.LCD display:
∙ Display time, indoor temperature and date.
4.+ key:
∙In time setting mode, press it to increase the setting values.
5.SET CLOCK key:
∙In normal time mode, press it once to enter the normal time mode.
2

∙In normal time setting mode, press it to step the setting items. Press and hold it to exit the setting mode in any step.
6.- key:
∙In time setting mode, press it to decrease the setting values.
7.DC jack:
∙ Plug DC adaptor to power the clock.
8.ALARM ON/OFF key:
∙Press it once to turn on the backlight and display the alarm time for 5 seconds.
∙Press it again to turn on/off the alarm.
9.SET ALARM key:
∙Press it once to turn on the backlight for 5 seconds, and at the same time to enter the alarm time setting mode.
∙In alarm time setting mode, press it to step the setting items.
10.FOCUS turning knob:
∙ Focus the projected image.
11.BATTERY COMPARTMENT:
∙ Accommodates 2 AA size batteries.
EN
12.RESET key:
∙Press it to return all values to default values.
∙In case of malfunction, the unit may be required to reset.
13.°C/°F slide switch:
∙ Slide it to switch between Celsius and Fahrenheit.
14.PROJECTION ON/OFF slide switch: ∙ Slide it to turn on/off the projector.
15.180° FLIP key:
∙ Press it to rotate the projected image by 180°.
16.RCC key:
∙In normal time mode, press it once to receive the RC signal for reception testing.
∙During the reception period, press and hold it for 8 seconds to stop the reception.
17.UK/EU slide switch:
∙Slide it to select the country version between EU (Germany) and UK (England).
18.BATTERY DOOR
LCD DISPLAY
1. Low battery indicator
3
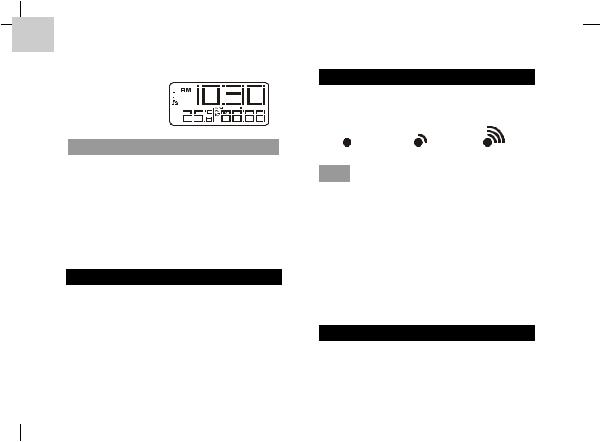
EN
2.Signal reception indicator
3.Indoor temperature
4. Time |
1 |
|
|
|
|
|
4 |
5. Alarm time & Date 2 |
|
|
|
|
5 |
||
|
|
|
|
||||
|
3 |
|
|
|
|
||
|
|
|
|
|
|
||
OPERATING THE MAIN UNIT
1.Remove the battery door and slide “UK/EU” switch to select the desired country version.
2.Insert 2 new AA size batteries as per the polarity information marked on the battery compartment.
3.Press “RESET” key to restart the clock.
4.Slide “°C/°F” switch to select between Celsius and Fahrenheit.
5.Replace the battery door.
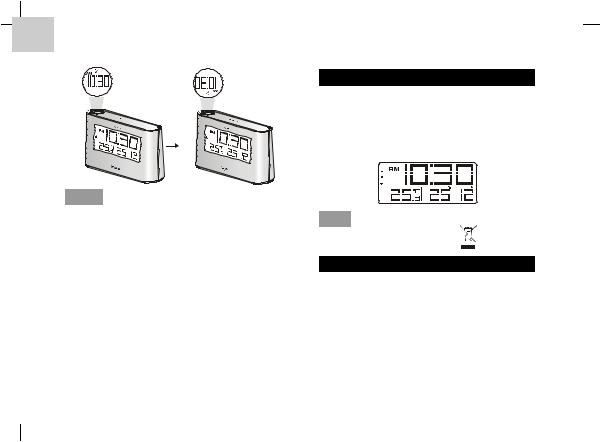
RECEPTION OF RADIO CONTROLLED TIME SIGNAL
The time and calendar are radio-controlled. The current time and calendar are automatically synchronized with time signal transmitted from Germany/England.
When used for the first time (after inserting batteries or pressing “RESET” key), the clock will start to receive the time signals and the signal reception indicator will be flashing for 5 minutes.
SIGNAL RECEPTION INDICATOR
The wave segment flashing means time signals are being received. The signal quality could be classified into 3 types:
No signal |
Weak signal Excellent signal |
Note
1.The unit will automatically search for the time signal at 2:00 (3:00 or 4:00 is also available if the signal is not received at 2:00), 8:00, 14:00 and 20:00 each day.
2.Always place the unit away from interfering sources such as TV set, computer, etc.
3.Avoid placing the unit on or next to metal plates.
4.Closed area such as airport, basement, tower block or factory is not recommended.
5.Do not start reception in moving articles such as vehicles or trains.
TIME AND CALENDAR MANUAL SETTING
If you are out of reach of the Radio Controlled sensor or if the reception is not reachable, the time
4
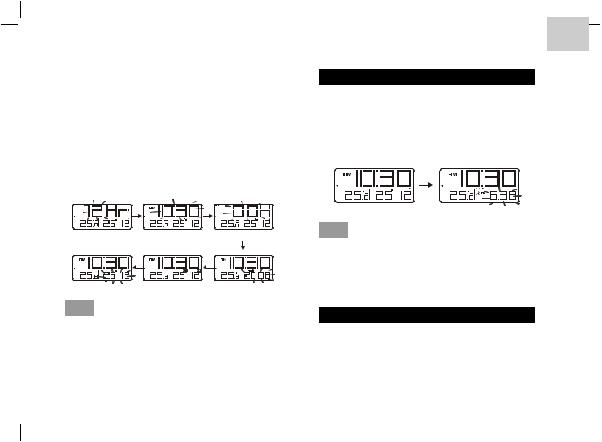
and calendar can be set manually. As soon as the signal of sensor is received again, the clock will automatically synchronize with the exact time and calendar.
1.In normal time mode, press “SET CLOCK” key once to enter the time setting mode.
2.Press “+” or “-” key to change the settings.
3.Press “SET CLOCK” to confirm. The setting order is: 12/24-hr format, time, +/-23 hours time difference, year, day/month format, date.
4.Press “SET CLOCK” key to save and exit the setting mode.
12/24 Hr setting |
Time setting |
Time difference setting |
Month-Date setting |
MD/DM setting |
Year setting |
Note
1.During the setting period, press and hold “+” or “-” key to speed up the change of settings.
2.Through “+/-23 hours time difference” setting, the precise time of another area will be shown.
EN
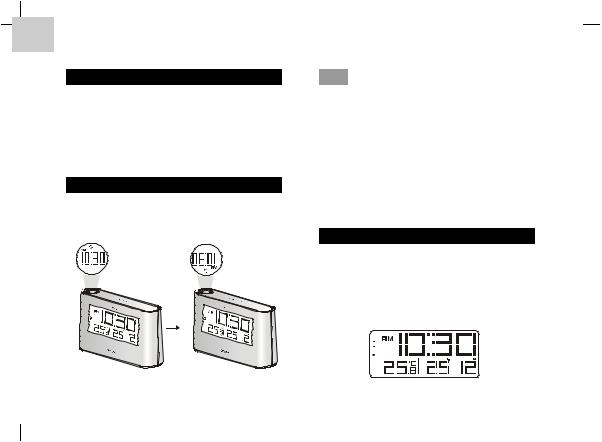
ALARM TIME SETTING
1.In normal time mode, press “SET ALARM” key once to enter the alarm time setting mode.
2.Press “+” or “-” key to set hour/minute.
3.Press “SET ALARM” key to save and exit the setting mode. “ ” indicates alarm is ON.
Normal time mode |
Alarm time setting |
Note
1.The alarm will be automatically turned on when you set the alarm time.
2.During the alarm time setting period, press and hold “+” or “-” key to speed up the change of settings.
USING ALARM FUNCTION
1.Set the alarm time as the above section.
2.In normal time mode, press “ALARM ON/OFF” key once to display the current alarm time.
3.Press it again to turn alarm ON/OFF.
5
EN
TO SILENCE THE ALARM
1.Press “SNOOZE/LIGHT” to silence the alarm for 8 minutes. The “ ” will be flashing.
2.Press “ALARM ON/OFF” key to turn the alarm off and activate it again after 24 hours.
3.If no key is pressed within 120 seconds, the alarm will be turned off and be activated again after 24 hours.
USING THE PROJECTOR
Slide “PROJECTION ON/OFF” to turn on/off the projector, and project to a dark background within 1-4 meters so that the time will be shown as below:
Note
1.Slide “PROJECTION ON/OFF” to turn on the projection function.
2.Press “SNOOZE/LIGHT” to turn on the projector for 5 seconds.
3.When using DC power adapter, the projector will be turned on all the time.
4.If alarm is turn on, the alarm icon “ ” will also be projected.
5.Press “180 FLIP” to rotate the projected image by 180°.
6.Turn “FOCUS” knob to focus the projected image.
BATTERY REPLACEMENT
If the low battery indicator “ ” displays beside the time, it indicates that battery power of main unit is not enough and you should replace with 2 new AA size batteries at once.
Low battery indicator
6
Note: Attention! Please dispose of the used unit or batteries in an ecologically safe manner.
PRECAUTIONS
This product is engineered to give you years of satisfactory service if you handle it carefully. Here are a few precautions:
∙Do not cover the ventilation holes. Make sure items that are nearby such as newspapers, tablecloths, curtains etc cannot accidentally cover the ventilation holes.
∙Do not subject the unit to excessive force, shock, dust, temperature or humidity, which may result in malfunction, shorter electronic life span, damaged battery and distorted parts.
∙Placement of this product on wood surfaces with certain types of ûnishes, such as clear varnish, may result in damage to the ûnish. Consult the furniture manufacturer’s care instructions for direction as to the types of objects that may safely be placed on the wood surface. Oregon Scientiûc shall not be responsible for any damage to wood surfaces from contact with this product.
∙Do not immerse the unit in water. If you spill liquid over it, dry it immediately with a soft, lint-free cloth.
EN
∙Do not clean the unit with abrasive or corrosive materials.
∙Do not tamper with the unit’s internal components. Doing so will invalidate the warranty on the unit and may cause unnecessary damage. The unit contains no user-serviceable parts.
∙Only use fresh batteries as speciûed in the user’s instructions. Do not mix new and old batteries.
∙Due to printing limitations, the displays shown in this manual may differ from the actual display.
∙The contents of this manual may not be reproduced without the permission of the manufacturer.
∙Do not dispose this product as unsorted municipal waste. Collection of such waste separately for special treatment is necessary.
Note
The technical speciûcations for this product and the contents of the user manual are subject to change without notice.
7
EN
SPECIFICATIONS
TYPE |
DESCRIPTION |
|
MAIN UNIT |
|
|
L x W x H |
138 x 42 x 82 mm |
|
(5.43 x 1.65 x 3.23 in) |
||
|
||
|
|
|
Weight |
183g |
|
|
|
|
Temperature |
-5°C to 50°C (23°F to 122°F) |
|
range |
||
|
||
|
|
|
Temperature |
0.1°C (0.2°F) |
|
resolution |
||
|
||
|
|
|
Power |
2 x AA 1.5V batteries |
|
|
|
ABOUT OREGON SCIENTIFIC
Visit our website (www.oregonscientific.com) to learn more about Oregon Scientific products such as digital cameras; MP3 players; children’s electronic learing products and games; projection clocks; health and fitness gear; weather stations; and digital and conference phones. The website also includes contact information for our Customer Care department in case you need to reach us, as well as frequently asked questions and customer downloads.
We hope you will find all the information you need on our website, however if you’re in the US and would like to contact the Oregon Scientific Customer Care department directly, please visit: http://www2.oregonscientific.com/service/default.asp
OR
Call 1-800-853-8883.
For international inquiries, please visit: www2.oregonscientific.com/about/international.asp
EU-DECLARATION OF CONFORMITY
Hereby, Oregon Scientific, Radio Controlled Projection Alarn Clock (Model EW96) is in compliance with the essential requirements and other relevant provisions of Directive 1999/5/EC.
A copy of the signed and dated Declaration of Conformity is available on request via our Oregon Scientific Customer Service.
COUNTRIES RTTE APPROVAL COMPLIED
ALL EU countries, Switzerland CH and Norway N
8

FCC STATEMENT
This device complies with Part 15 of the FCC Rules. Operation is subject to the following two conditions:
(1) This device may not cause harmful interference, and (2) This device must accept any interference received, including interference that may cause undesired operation.
WARNING Changes or modifications not expressly approved by the party responsible for complance could void the user’s authority to operate the equipment.
NOTE This equipment has been tested and found to comply with the limits for a Class B digital device, pursuant to Part 15 of the FCC Rules. These limits are designed to provide reasonable protection against harmful interference in a residential installation. This equipment generates, uses and can radiate radio frequency energy and, if not installed and used in accordance with the instructions, may cause harmful interference to radio communications. However, there is no guarantee that interference will not occur in a particular installation. If this equipment does cause harmful interference to radio or television reception, which can be determined by turning the equipment off and on, the user is encouraged to try to correct the interference by one or more of the following measures:
EN
∙Reorient or relocate the receiving antenna.
∙Increase the separation between the equipment and receiver.
∙Connect the equipment into an outlet on a circuit different from that to which the receiver is connected.
∙Consult the dealer or an experienced radio / TV technician for help.
DECLARATION OF CONFORMITY
The following information is not to be used as contact for support or sales. Please call our customer service number (listed on our website at www.oregonscientific.com or on the warranty card for this product) for all inquiries instead.
We |
|
Name: |
Oregon Scientific, Inc. |
Address: |
19861 SW 95th AVe., Tualatin, |
|
Oregon 97062 USA |
Telephone No.: |
1-800-853-8883 |
Declare that the product |
|
Product No.: |
EW96 |
Product Name: |
Radio Controlled Projection |
Alarm |
|
Manufacturer: |
IPM Concepts Limited |
9
EN
Address: |
Block C, 9/F, Kaiser Estate, |
|
Phase 1,41 Man Yue St., |
|
Hung Hom, Kowloon, |
|
Hong Kong |
is in conformity with Part 15 of the FCC Rules. Operation is subject to the following two conditions:
1)This device may not cause harmful interference.
2)This device must accept any interference received, including interference that may cause undesired operation.
10

IT
Orologio radiocontrollato con proiezione dell'ora
Modello: EW96
MANUALEPERL’UTENTE |
|
INDICE |
|
Introduzione ................................................. |
2 |
Panoramica ................................................... |
2 |
Ricevitore ................................................... |
2 |
Display LCD .............................................. |
4 |
Funzionamento Dell'orologio........................... |
4 |
Ricezione del Segnale Orario Radiocontrollato |
|
.................................................................... |
4 |
Indicatore Della Ricezione Del Segnale ......... |
4 |
Impostazione Manuale di Ora e Data ............. |
5 |
Impostazione Dell’ora Della Sveglia ............... |
6 |
Utilizzo Della Sveglia .................................. |
6 |
Silenziamento Della Sveglia ......................... |
6 |
Uso Dell'orologio ....................................... |
6 |
Sostituzione Delle Batterie ............................ |
7 |
Precauzioni ................................................ |
7 |
Dati Tecnici ................................................. |
8 |
Informazioni Su Oregon Scientific ................ |
9 |
Dichiarazione di Conformita’UE .................. |
9 |
1

INTRODUZIONE
Grazie per aver acquistato questo Orologio radiocontrollato con proiezione dell'ora. Leggere attentamente queste istruzioni e conservare il manuale per riferimento futuro.
L’unità ricevente permette la chiara visualizzazione di temperatura interna, ora e data.
PANORAMICA
RICEVITORE
|
1 |
2 |
|
|
|
|
|
3 |
|
4 |
8 |
|
|
5 |
|
|
|
|
6 |
9 |
|
|
7 |
10 |
|
IT
|
12 13 14 |
11 |
15 |
|
16 |
|
17 |
|
18 |
1.Proiettore:
∙ Consente di proiettare l’ora.
2.Tasto SNOOZE / LIGHT:
∙In modalità normale, premerlo una volta per attivare la retroilluminazione per 5 secondi.
∙Premerlo per silenziare la sveglia e attivare la modalità snooze per 8 minuti.
3.Display LCD:
∙Visualizza le rilevazioni della temperatura interna, ora e data.
4.Tasto +:
∙In modalità impostazione dell’ora, premerlo per aumentare i valori dell’impostazione.
2

IT
5.Tasto SET CLOCK:
∙In modalità normale, premerlo una volta per accedere alla modalità di impostazione normale dell’ora.
∙In modalità impostazione normale dell’ora, premere per scorrere le voci delle impostazioni. Tenere premuto per abbandonare la modalità di impostazione in qualsiasi momento.
6.Tasto -:
∙In modalità impostazione dell’ora, premere per diminuire i valori dell’impostazione.
7.Ingresso DC:
∙ Inserire l’alimentatore DC per alimentare
8.Tasto ALARM ON/OFF:
∙Premerlo una volta per attivare la retroilluminazione e visualizzare l’ora della sveglia per 5 secondi.
∙Premere nuovamente per attivare / disattivare la sveglia.
9.Tasto SET ALARM:
∙Premere una volta per attivare la retroilluminazione per 5 secondi e
contemporaneamente accedere alla modalità di impostazione della sveglia.
∙In modalità di impostazione dell’ora della sveglia, premere per accedere alle voci di impostazione
10.Manopola FOCUS:
∙Consente di mettere a fuoco l’immagine proiettata.
11.VANO BATTERIE:
∙Predisposto per 2 batterie di tipo AA.
12.Tasto RESET:
∙Premerlo per ripristinare tutti i valori predefiniti.
∙In caso di malfunzionamento, può rendersi necessario ripristinare l’unità tramite il tasto reset.
13. Predisposto per °C / °F:
∙Spostarlo per selezionare l'unità di visualizzazione della temperatura (gradi Celsius o gradi Fahrenheit).
14. Levetta PROJECTION ON/OFF:
∙ Spostarla per attivare o disattivare la proiezione.
15. Tasto 180° FLIP:
∙ Premere per ruotare l’immagine proiettata di 180°.
3
16.Tasto RCC:
∙In modalità normale, premerlo una volta per ricevere il segnale RC per testare la ricezione.
∙Durante la ricezione del segnale tenere premuto il pulsante per 8 secondi per interrompere la ricezione
17.Levetta UK/EU:
∙Spostarla per scegliere il proprio fuso orario tra EU e UK (o Portogallo).
18.COPERTURA VANO BATTERIE
DISPLAY LCD
1.Indicatore di batteria in esaurimento
2.Indicatore della ricezione del segnale orario
3. Temperatura interna |
|
|
|
4 |
||
4. Ora |
1 |
|
|
|
|
|
|
|
|
|
|||
5. Ora della sveglia |
2 |
|
|
|
|
5 |
|
|
|
|
|||
3 |
|
|
|
|
||
& data |
|
|
|
|
||
|
|
|
|
|||
|
|
|
|
|
|
|
FUNZIONAMENTO DELL'OROLOGIO
1.Rimuovere la copertura del vano batterie e spostare la levetta EU/UK “UK/EU” per scegliere il paese tra EU (Germania) e UK (Inghilterra).
IT
2.Inserire 2 batterie nuove di tipo AA rispettando la polarità indicata sul vano.
3.Premere “RESET” per riavviare l’unità principale.
4.Spostare la levetta “°C/°F” per scegliere tra gradi Celsius o Fahrenheit.
5.Riposizionare la copertura del vano batterie.
R I C E Z I O N E D E L S E G N A L E O R A R I O RADIOCONTROLLATO
Ora e data sono radiocontrollate. L’ora e la data correnti si sincronizzano automaticamente con il segnale orario trasmesso da Germania/Inghilterra. Al primo utilizzo (dopo l’inserimento delle batterie o dopo aver premuto il tasto “RESET”), l’orologio comincerà a ricevere i segnali orari e l’indicatore della ricezione del segnale lampeggerà per 5 minuti.
INDICATORE DELLA RICEZIONE DEL SEGNALE
Il segmento delle onde che lampeggia indica che vengono ricevuti i segnali orari. La qualità del segnale può essere classificata in tre livelli:
Nessun segnale |
Segnale debole |
Segnale ottimo |
4
IT
NOTA
1.L’unità avvia automaticamente la ricerca del segnale orario ogni giorno alle 2:00 (se il segnale non viene ricevuto alle 2:00, anche alle 3:00 o alle 4:00), alle 8:00, alle 14:00 e alle 20:00.
2.Collocare sempre l’unità lontano da fonti di interferenze come televisori, computer etc.
3.Evitare di collocare l’unità sopra o vicino a piastre metalliche.
4.Non è consigliato l’uso in aree chiuse come aeroporti, cantine, grattacieli o fabbriche.
5.Non dare inizio alla ricezione su un mezzo in movimento, come un’automobile o un treno.
IMPOSTAZIONE MANUALE DI ORA E DATA
Se ci si trova fuori dal raggio d’azione del segnale di radiocontrollo,ora e data possono essere impostate manualmente. Non appena il segnale del sensore viene nuovamente ricevuto, l’orologio sincronizza automaticamente ora e data esatte.
1.In modalità normale, premere una volta “SET CLOCK” per accedere alla modalità di impostazione dell’ora.
2.Premere “+” o “-” per modificare le impostazioni.
3.Premere “SET CLOCK” per confermare. L’ordine delle impostazioni è:
formato ora 12-24, ora, differenza oraria +/- 23, anno, formato giorno/mese, data.
4.Premere “SET CLOCK” per salvare e uscire dalla modalità di impostazione.
Impostazione del |
Impostazione dell'ora |
Impostazione |
formato 12/24 ore |
|
differenza oraria |
Impostazione mese-data |
Impostazione MG/GM |
Impostazione dell'anno |
NOTA
1.Durante l’impostazione, tenere premuto “+” o “-” per velocizzare la modifica delle impostazioni.
2.Attraverso l’impostazione “differenza oraria +/ -23” viene visualizzata l’ora esatta di un’altra zona.
5

IMPOSTAZIONE DELL’ORA DELLA SVEGLIA
1.In modalità normale, premere una volta “SET ALARM” per accedere alla modalità di impostazione dell’ora.
2.Premere “+” o “-” per impostare ora/minuti.
3.Premere “SET ALARM” per salvare e uscire
dalla modalità di impostazione. Il simbolo “  ” indica che la sveglia è attiva.
Modalità normale dell'ora |
Modalità di impostazione |
|
della sveglia |
NOTA
1.La sveglia si attiva automaticamente quando si imposta l’ora della sveglia.
2.Durante l’impostazione dell’ora della sveglia, tenere premuto “+” o “-” per velocizzare la modifica delle impostazioni.
UTILIZZO DELLA SVEGLIA
1.Impostare l’ora della sveglia come spiegato in precedenza.
IT
2.In modalità normale dell’ora, premere una volta “ALARM ON/OFF” per visualizzare l’ora corrente della sveglia.
3.Premere nuovamente per attivare / disattivare la sveglia.
SILENZIAMENTO DELLA SVEGLIA
1.Premere “SNOOZE/LIGHT” per silenziare la sveglia per 8 minuti. Il simbolo "insert the allarm icon" comincerà a lampeggiare.
2.Premere qualsiasi altro tasto per spegnere la sveglia e per attivarla nuovamente dopo 24 ore.
3.Se non viene premuto nessun tasto entro 120 secondi, la sveglia si spegnerà e si riattiverà dopo 24 ore.
USO DELL'OROLOGIO
Spostare “PROJECTION ON/OFF” per attivare/ disattivare la proiezione e proiettare su uno sfondo scuro entro 1-4 metri in modo che l’ora venga visualizzata come qui sotto:
6
IT
NOTA
1.Spostare “PROJECTION ON/OFF” per attivare la funzione di proiezione.
2.Premere “SNOOZE/LIGHT” per attivare la proiezione per 5 secondi.
3.Quando si usa l’alimentatore DC, la proiezione rimane attiva continuamente.
4.Se la sveglia è attiva, verrà proiettata anche l’icona della sveglia “ ” .
” .
5.Premere “180 FLIP” per ruotare l’immagine proiettata di 180°.
6.Ruotare la manopola “FOCUS” per mettere a fuoco l’immagine proiettata.
SOSTITUZIONE DELLE BATTERIE
Se compare l’indicatore di batteria in esaurimento visualizzato con l’icona “  ” accanto alla ora, significa
che è necessario sostituire le batterie dell’unità principale con 2 batterie nuove di tipo AA.
Indicatore di batteria in esaurimento
NOTA Attenzione! Smaltire l’unità o le batterie usate nel pieno rispetto dell’ambiente.
PRECAUZIONI
L’unità è stata progettata per fornire un servizio soddisfacente per diversi anni, purché manipolata con attenzione. Di seguito sono riportate alcune importanti precauzioni:
∙Non sottoporre il prodotto a forza eccessiva, urti, polvere, sbalzi eccessivi di temperatura o umidità.
7
∙Non otturare i fori di aerazione con oggetti comegiornali, tende, etc.
∙Non immergere l’unità in acqua. Se si versa del liquidosul prodotto, asciugarlo imme diatamente con un pannomorbido e liscio.
∙Non pulire l’unità con materiali abrasivi o corrosivi.
∙Non manomettere i componenti interni. In questo modo si invalida la garanzia.
∙Oregon Scientific declina ogni responsabilità per eventuali danni alle finiture causati dal posizionamento del prodotto su determinati tipi di legno. Consultare le istruzioni fornite dal fabbricante del mobile per ulteriori informazioni.
∙Utilizzare solo batterie nuove. Non mescolare batterie nuove con batterie vecchie.
∙Non smaltire le batterie vecchie come rifiuto indifferenziato. È necessario che questo rifiuto vengasmaltito mediante raccolta differenziata per esseretrattato in modo idoneo.
∙Alcune unità sono dotate di una striscia di sicurezzaper le batterie. Rimuovere la striscia dal vano batterieprima del primo utilizzo.
∙Al momento dello smaltimento del prodotto, attenersi alla nota relativa in allegato.
∙Il contenuto di questo manuale non può essere
IT
ristampato senza l’autorizzazione del fabbricante.
∙Le immagini del manuale possono differire dalla realtà.
NOTA
Le specifiche tecniche di questo prodotto e il contenuto del manuale sono soggetti a modificare senza preavviso.
DATI TECNIC
TIPO DESCRIZIONE
UNITÀ PRINCIPALE
B x P x A |
138 x 42 x 82 mm |
|
(5.43 x 1.65 x 3.23 in) |
||
|
||
|
|
|
Peso |
183g |
|
|
|
|
Campo di misurazi- |
-5°C to 50°C (23°F to 122°F) |
|
one temp. Interna |
|
|
Alimentazione |
2 x AA 1.5V |
|
|
|
8
IT
INFORMAZIONI SU OREGON SCIENTIFIC
Per avere maggiori informazioni sui nuovi prodotti Oregon
Scientific visita il nostro sito internet www.oregonscientific.
it, dove potrai trovare tutte le informazioni di cui hai bisogno.
Per ricerche di tipo internazionale puoi visitare invece il sito www2.oregonscientific.com/about/international.asp.
DICHIARAZIONE DI CONFORMITA’ UE
Con la presente Oregon Scientific dichiara che questo prodotto (Modello EW96) è conforme ai requisiti essenziali ed alle altre disposizioni pertinenti stabilite dalla direttiva 1999/5/ CE. Una copia firmata e datata della Dichiarazione di Conformità è disponibile, su richiesta, tramite il servizio clienti della Oregon Scientific.
PAESI CONFORMI ALLA DIRETTIVA R&TTE
Tutti i Paesi Europei, Svizzera CH
e Norvegia N
9
FR
Réveil Projecteur Radio Piloté |
|
Modèle : EW96 |
|
MANUEL DE L’UTILISATEUR |
|
TABLE DES MATIERES |
|
Introduction ........................................ |
2 |
Vue D’ensemble ............................................. |
2 |
Récepteur ................................................. |
2 |
Ecran LCD ................................................ |
4 |
Fonctionnement ........................................... |
4 |
Réception Du Signal de L’heure Radio-Pilotée |
|
. . . . . . . . . . . . . . . . . . . . . . . . . . . . . . . . . . . . . . . . . . . . . . . . . . . |
4 |
Indicateur de Réception Du Signal .................. |
5 |
Réglage Manuel de L’heure Et Du Calendrier .... |
5 |
Réglage de L’heure de L’alarme ...................... |
6 |
Utilisation de La Fonction Alarme .................... |
6 |
Pour Couper Le Son de L’alarme ..................... |
6 |
Avec Projecteur ............................................. |
7 |
Remplacement Des Piles ................................ |
7 |
Precautions .................................................. |
8 |
Caracteristiques ........................................... |
9 |
A Propos D’oregon Scientific ......................... |
9 |
Eu-deci Aration de Conformité ....................... |
9 |
1
INTRODUCTION
Nous vous remercions pour avoir fait l’acquisition de ce Réveil Projecteur Radio Piloté. Veuillez lire attentivement ces instructions et conserver ce manuel pour toute référence ultérieure.
Le récepteur est équipé d’un écran clair affichant les relevés de température intérieure, heure & date.
VUE D’ENSEMBLE
RÉCEPTEUR
|
1 |
2 |
|
|
|
|
|
3 |
|
4 |
8 |
|
|
5 |
|
|
|
|
6 |
9 |
|
|
7 |
10 |
|
FR
12 13 14
11


 15
15


 16
16
17  18
18
1.Projecteur:
∙ Utilisez le projecteur pour projeter l’heure.
2.Touche SNOOZE / LIGHT:
∙En mode d’heure standard, appuyez une fois pour activer le rétro-éclairage pendant 5 secondes.
∙Appuyez sur cette touche pour couper le son de l’alarme actuelle et pour activer le mode snooze (rappel d’alarme) pendant 8 minutes.
3.Ecran LCD:
∙Affiche les relevés de température intérieure, heure & date.
4.Touche +:
∙En mode de réglage de l’heure, appuyez sur cette touche pour augmenter les valeurs.
2

FR
5.Touche SET CLOCK:
∙En mode d’heure standard, appuyez une fois sur cette touche pour entrer dans le mode de réglage de l’heure standard.
∙En Mode de réglage de l’heure standard, appuyez sur cette touche pour entrer dans les éléments de réglage. Appuyez et maintenez-la pour sortir du mode réglage dans toutes les situations.
6.Touche - :
∙En Mode de réglage de l’heure, appuyez sur cette touche pour diminuer les valeurs.
7.Prise CC:
∙Branchez l’adaptateur secteur CC pour alimenter l’horloge.
8.Touche ALARM ON/OFF:
∙Appuyez une fois sur cette touche pour activer le rétro-éclairage et afficher l’heure de l’alarme pendant 5 secondes.
∙Appuyez une nouvelle fois pour désactiver / activer l’alarme.
9.Touche SET ALARM :
∙Appuyez une fois pour activer le rétro éclairage pendant 5 secondes et en même temps entrer dans le mode de réglage de l’alarme
∙En Mode de réglage de l’heure de l’alarme, appuyez sur cette touche pour entrer dans les éléments de réglage.
10.Molette FOCUS:
∙ Mise au point de l’image projetée.
11.Compartiment des piles:
∙Contient 2 piles AA.
12.Touche RESET :
∙Appuyez pour rétablir tous les réglages à leurs valeurs par défaut.
∙Il se peut que vous deviez réinitialiser l’appareil en cas de dysfonctionnement.
13.Encoche °C / °F :
∙Faites glisser l’encoche pour alterner entre les Celsius et Fahrenheit.
14.Encoche PROJECTION ON / OFF:
∙Faites glisser l’encoche pour désactiver / activer le projecteur.
15.Touche 180° FLIP:
∙Appuyez sur cette touche pour faire tourner l’image projetée à 180°.
3
 Loading...