


Dear customer,
Thank you for choosing the Oregon Scientific ATC-2K.
Designed and engineered with extreme precision,
the Oregon Scientific ATC-2K allows you to record cool action movie footage. We recommend parents help their children with their
Oregon Scientific ATC-2K. This manual is designed using technical information to allow you to achieve the best results.
Some children may require your guidance setting up,
learning and understanding how to use the different aspects of the ATC-2K.
OREGON SCIENTIFIC and associated trademarks and trade dress are owned by OREGON SCIENTIFIC, Inc. © 2006 OREGON SCIENTIFIC, Inc. All Rights Reserved.
Oregon Scientific ATC-2K
I . Camera Precautions |
1 |
• Waterproof Feature |
2 |
II . Technical Specifications |
5 |
III . Computer System Requirements |
6 |
IV . Camera Description |
7 |
V . Camera Mounting Description |
9 |
VI . Quick Start |
11 |
•Battery Installation 
 11
11
•Turning On/Off the Camera 
 12
12
•Inserting/Removing the SD Card
 13
13
•Taking Video Footage
 14 VII . Menu Settings
 15
15
•Resolution
 17
17
•Sound Recording 
 19
19
•Deleting video footage 
 19
19
•Setting Date/Time 
 20
20
•SD Memory Card 
 22 VIII . Connecting to PC
 24 IX . Playing back video footage on a TV
 25 X . Troubleshooting
 26
26

I) Camera Precautions
Notice the following guidelines when using your camera
• ATC-2K is not shock-proof. You should avoid dropping it.
• For your safety, do not press the buttons on the camera during sports activities.
• Do not place the camera in a damp or dusty location for extended periods of time. This may cause a fire or an electrical shock.
• Do not leave the camera in places exposed to extremely high temperatures, such as under direct sunlight for extended periods of time. This may affect the camera housing and internal components.
• Clean the lens with a blower (typically a small device with a rubber bulb attached to one end that you pump to produce a stream of air out the other end), or wipe it with a soft cloth in a spiraling motion to remove fingerprints or dust.
• We recommend using Alkaline batteries in temperatures between 32° F to 104° F (0°C to 40°C).
• The working temperature range of a normal Alkaline AA battery is 32° F to 104° F (0°C to 40°C). Above or below this temperature may cause the batteries to malfunction. We recommend using Lithium batteries in temperatures below 32° F (0°C).
• Turn off the camera before removing the batteries and the memory card. The card and the data may be damaged if the memory card is inserted or removed while the camera is still on.
• Remove the batteries and memory card before storing the camera for long periods of time, then keep it in a well-ventilated place to prevent mould.
• Under the following circumstances, have the camera repaired by qualified personnel: a) The plug is damaged or worn.
b) The device has been dropped and/or the housing has been damaged. c) Liquid has entered the camera.
Disclaimer: Oregon Scientific will not, under any circumstances, be responsible for injuries or property damages incurred during participation of any high-risk sport/activity not endorsed or recommended by Oregon Scientific. Should the camera malfunction under these circumstances, it would not be covered by the warranty. The warranty will cover manufacturing defects.
Notes on copyright: Users are asked to note that the transfer of memory containing photos or data protected under copyright laws is only permissible within the restrictions imposed. Users assume all responsibility in the event that copyrights are violated by the use of this camera.
Waterproof Feature
This ATC-2K camera is waterproof up to 3m. Oregon Scientific will not assume any responsibility for malfunction of the camera caused by water getting inside as a result of misuse by the user.
Precaution:
Follow the steps below to keep the camera waterproof.
Step 1: Apply silicon grease (included).
Take out the o-ring and use your fingers to gently rub on a thin layer of silicon grease onto the surface of the o-ring. The silicon grease needs to be applied on the o-ring evenly.
1 |
2 |
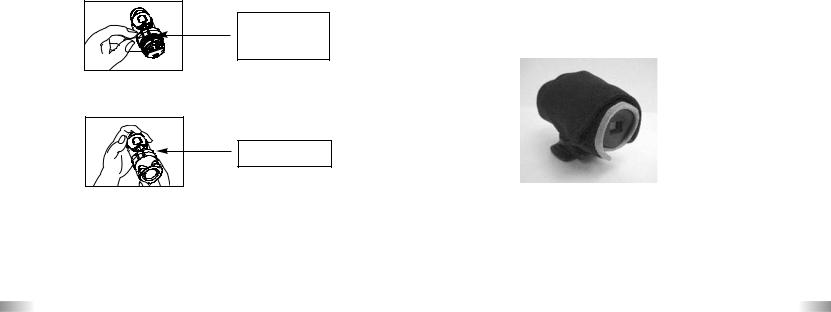
Step 2: Add one extra o-ring for more protection.
Add one extra o-ring for more protection, follow the same instruction as Step 1.
Step 3: Replace the cover.
Make sure the cover is firmly closed.
Water may get inside the camera if the battery cover is not firmly closed
•If the camera gets wet, wipe the water off as soon as possible with a dry cloth.
•Other camera accessories are not waterproof.
Cold Weather Product Accessories
The pouch (not included) would help you use the ATC-2K in cold weather. For information, please visit us at www2.oregonscientic.com
3 |
4 |

II) Technical Specifications
• Sensor resolution 640x480 VGA CMOS sensor
• Built-in memory 32MB
• SD memory card drive supports cards of up to 2GB (Not included)
• Movie storage:
640 x 480 pixels (30* or 15 frames per second) 320 x 240 pixels (30* or 15 frames per second) 160 x 120 pixels (30* or 15 frames per second)
• Status LCD 2-digit B/W on top for functions
• Focusing Fixed range from 1.5m~infinity
• Movie images AVI
• File format of Interface USB (1.1)
• Delete image All / last one
• Auto Shut-Off 30 minutes
• Battery 2 x AA alkaline batteries
• Dimensions 40mm diam. x 110mm long
• Operation system WIN2000/XP
III) Computer System Requirements
Minimum System Requirements
• Pentium III 800 MHz or higher
• Windows XP, Windows 2000
• 128 MB RAM
• 800 MB Free hard disk space
• SVGA 800 x 600 resolution video support (32 bit)
• 16 bit Windows compatible sound device
*In some cases, the frame rate may be automatically reduced to maximize the memory usage.
5 |
6 |
IV) Camera Description
1.Lens
2.Camera grip
3.Screw
4.Nut
5.Handlebar grip
6.Helmet grip
7.O-ring
8.USB cable
9.AV cable
10.Rubberized patch
11.Velcro patch
12.Short Velcro strap
13.Long Velcro strap
14.Silicon rubber head strap
15.Bolt
16.Silicon grease container
|
|
|
|
|
16 |
|
|
|
|
|
|
|
7 |
8 |
|
|
|
|
|
|
|
||
|
|
2 |
|
|
|
|
|
|
|
|
|
|
|
9 |
|
|
1 |
15 |
|
|
|
|
|
5 |
|
|
|
|
|
|
|
|
3 |
|
|
|
|
|
|
|
|
|
|
|
|
||
|
|
|
|
|
|
||
|
|
|
|
|
|
||
|
|
|
|
|
|
|
|
|
|
10 |
|
11 |
|||
|
|
4 |
|
|
12 |
|
|
|
|
|
|
|
|
|
|
6 |
|
|
|
|
|
|
|
|
|
13 |
|
|
|
||
14
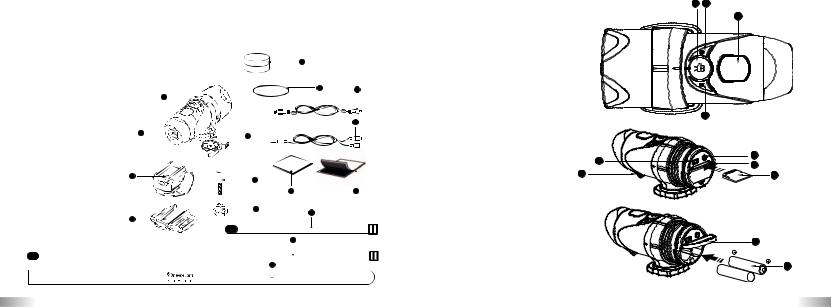
17.LCD display
18.ON/OFF & Enter button
19.Movie shutter button
20.Menu button
21. Microphone
22. Mini-USB port
23. AV port
24. SD card slot
25. SD card (not included)
26. Battery door
27. Batteries (not included)
22
21
19 |
18 |
|
17 |
20 |
23
24
25
26
27
7 |
8 |

V) Camera Mounting Description
The camera can be mounted in a number of ways using the straps and the Velcro patch provided. Please follow the methods of mounting as suggested below:
Fixing the position of the camera |
Turn it clockwise to |
unscrew. |
a)Turn it anti-clockwise to screw the camera tight to fix it into position.
b)Turn it clockwise to unscrew the camera.
Mounting the camera onto the helmet using the silicon rubber strap
1. Attach the rubberized patch to the bottom of the helmet grip. 2.+3. Thread the silicon rubber strap through the helmet grip.
4.Mount the helmet grip to the helmet using the silicon rubber strap.
5.Slide the camera into the helmet grip.
6.Adjust the angle of the camera making sure it's tight.
7.To avoid damaging the camera, the mount lock at the base must be loosened before twisting the camera.
Turn it anti-clockwise to screw tight.
#1 |
#2 |
#3 |
Mounting the camera using the velcro strap:
1. |
Attach the rubberized patch to the bottom of the helmet grip. |
|
|
2+3. Place the helmet grip on the helmet, and thread the velcro strap |
|
||
|
through the helmet grip. |
|
|
4. |
Secure the velcro strap by fastening |
|
|
|
it through the helmet vents. |
|
|
5. |
Slide the camera into the helmet grip, |
|
|
|
and adjust the angle of the camera |
|
|
|
making sure it's tight |
#1 |
#2 |
#3 |
#4 |
#5 |
Mounting the camera using the handlebar grip:
1.Place the handlebar grip on the handlebar.
2.Add the screw and nut to hold the handlebar grip securely.
3.Slide the camera into the handlebar grip and make sure the handlebar grip is locked with the camera.
4.Adjust the angle of the camera.
9 |
#4 |
#5 |
#6 |
#1 |
#2 |
#3 |
#4 |
10 |
|
|
|
|
|
|
|
 Loading...