


|
|
URC-9990 |
UK |
Universal Touch Screen Remote |
. . . . . . . . . . . . . P.2 |

User guide
Bedienungsanleitung
Mode d’emploi
p.2
S.44
p.86
ONE FOR ALL MOSAIC URC-9990
DD-0201
701571

Table Of Contents
INTRODUCTION . . . . . . . . . . . . . . . . . . . . . . . . . . . . . . . . . . . . . . . . . . . . . . . . . . . . . . . . . . . . . 3
INSTALLING BATTERIES . . . . . . . . . . . . . . . . . . . . . . . . . . . . . . . . . . . . . . . . . . . . . . . . . . . . . . . 3
LOW-BATTERY INDICATOR. . . . . . . . . . . . . . . . . . . . . . . . . . . . . . . . . . . . . . . . . . . . . . . . . . . . . 3
USING THE TOUCH SCREEN . . . . . . . . . . . . . . . . . . . . . . . . . . . . . . . . . . . . . . . . . . . . . . . . . . . 4
DEVICE SET-UP . . . . . . . . . . . . . . . . . . . . . . . . . . . . . . . . . . . . . . . . . . . . . . . . . . . . . . . . . . . .
BY BRAND . . . . . . . . . . . . . . . . . . . . . . . . . . . . . . . . . . . . . . . . . . . . . . . . . . . . . . . . . . . . . 5
BY SEARCH . . . . . . . . . . . . . . . . . . . . . . . . . . . . . . . . . . . . . . . . . . . . . . . . . . . . . . . . . . . . 7
BY CODE. . . . . . . . . . . . . . . . . . . . . . . . . . . . . . . . . . . . . . . . . . . . . . . . . . . . . . . . . . . . . . 8
DELETE . . . . . . . . . . . . . . . . . . . . . . . . . . . . . . . . . . . . . . . . . . . . . . . . . . . . . . . . . . . . . . . 9
NEW CODES (IN CASE OF UPGRADE) . . . . . . . . . . . . . . . . . . . . . . . . . . . . . . . . . . . . . . . . . . . . 10
PERSONALIZATION . . . . . . . . . . . . . . . . . . . . . . . . . . . . . . . . . . . . . . . . . . . . . . . . . . . . . . . . . . .
MACROS . . . . . . . . . . . . . . . . . . . . . . . . . . . . . . . . . . . . . . . . . . . . . . . . . . . . . . . . . . . . . 12
MOVE KEY . . . . . . . . . . . . . . . . . . . . . . . . . . . . . . . . . . . . . . . . . . . . . . . . . . . . . . . . . . . . 19
LEARN . . . . . . . . . . . . . . . . . . . . . . . . . . . . . . . . . . . . . . . . . . . . . . . . . . . . . . . . . . . . . . 22
LABEL KEYS . . . . . . . . . . . . . . . . . . . . . . . . . . . . . . . . . . . . . . . . . . . . . . . . . . . . . . . . . . . 25
KEY MAGIC . . . . . . . . . . . . . . . . . . . . . . . . . . . . . . . . . . . . . . . . . . . . . . . . . . . . . . . . . . . 27
VOLUME LOCK . . . . . . . . . . . . . . . . . . . . . . . . . . . . . . . . . . . . . . . . . . . . . . . . . . . . . . . . . . 30
VIEW/DELETE . . . . . . . . . . . . . . . . . . . . . . . . . . . . . . . . . . . . . . . . . . . . . . . . . . . . . . . . . . 32
HOME THEATER . . . . . . . . . . . . . . . . . . . . . . . . . . . . . . . . . . . . . . . . . . . . . . . . . . . . . . . . . 33
SYSTEM . . . . . . . . . . . . . . . . . . . . . . . . . . . . . . . . . . . . . . . . . . . . . . . . . . . . . . . . . . . . . . . . . . .
UPGRADE (ADDING NEW CODES) . . . . . . . . . . . . . . . . . . . . . . . . . . . . . . . . . . . . . . . . . . . . . . . 36
LCD . . . . . . . . . . . . . . . . . . . . . . . . . . . . . . . . . . . . . . . . . . . . . . . . . . . . . . . . . . . . . . . 37
SOUND ON/OFF . . . . . . . . . . . . . . . . . . . . . . . . . . . . . . . . . . . . . . . . . . . . . . . . . . . . . . . . . 38
LOCK SETTINGS . . . . . . . . . . . . . . . . . . . . . . . . . . . . . . . . . . . . . . . . . . . . . . . . . . . . . . . . . 39
USER RESET. . . . . . . . . . . . . . . . . . . . . . . . . . . . . . . . . . . . . . . . . . . . . . . . . . . . . . . . . . . 40
LANGUAGE . . . . . . . . . . . . . . . . . . . . . . . . . . . . . . . . . . . . . . . . . . . . . . . . . . . . . . . . . . . . 41
ABOUT . . . . . . . . . . . . . . . . . . . . . . . . . . . . . . . . . . . . . . . . . . . . . . . . . . . . . . . . . . . . . . 42
CUSTOMER SERVICE . . . . . . . . . . . . . . . . . . . . . . . . . . . . . . . . . . . . . . . . . . . . . . . . . . . . . . . . 43
CODES . . . . . . . . . . . . . . . . . . . . . . . . . . . . . . . . . . . . . . . . . . . . . . . . . . . . . . . . . . . . . . . . . . .
TELEVISION . . . . . . . . . . . . . . . . . . . . . . . . . . . . . . . . . . . . . . . . . . . . . . . . . . . . . . . . . . . 128
VIDEO RECORDERS . . . . . . . . . . . . . . . . . . . . . . . . . . . . . . . . . . . . . . . . . . . . . . . . . . . . . . 135
SATELLITE RECEIVERS . . . . . . . . . . . . . . . . . . . . . . . . . . . . . . . . . . . . . . . . . . . . . . . . . . . . 138
CABLE CONVERTERS . . . . . . . . . . . . . . . . . . . . . . . . . . . . . . . . . . . . . . . . . . . . . . . . . . . . . 141
VIDEO ACCESSORIES . . . . . . . . . . . . . . . . . . . . . . . . . . . . . . . . . . . . . . . . . . . . . . . . . . . . . 141
CD/MINI DISC . . . . . . . . . . . . . . . . . . . . . . . . . . . . . . . . . . . . . . . . . . . . . . . . . . . . . . . . 141
PHONO . . . . . . . . . . . . . . . . . . . . . . . . . . . . . . . . . . . . . . . . . . . . . . . . . . . . . . . . . . . . . 142
HOME AUTOMATION . . . . . . . . . . . . . . . . . . . . . . . . . . . . . . . . . . . . . . . . . . . . . . . . . . . . . . 142
AMPLIFIERS . . . . . . . . . . . . . . . . . . . . . . . . . . . . . . . . . . . . . . . . . . . . . . . . . . . . . . . . . . 142
AMP/TUNERS . . . . . . . . . . . . . . . . . . . . . . . . . . . . . . . . . . . . . . . . . . . . . . . . . . . . . . . . . 142
CASSETTE PLAYERS . . . . . . . . . . . . . . . . . . . . . . . . . . . . . . . . . . . . . . . . . . . . . . . . . . . . . . 143
LASER DISC . . . . . . . . . . . . . . . . . . . . . . . . . . . . . . . . . . . . . . . . . . . . . . . . . . . . . . . . . . 143
DAT . . . . . . . . . . . . . . . . . . . . . . . . . . . . . . . . . . . . . . . . . . . . . . . . . . . . . . . . . . . . . . . 143
DVD . . . . . . . . . . . . . . . . . . . . . . . . . . . . . . . . . . . . . . . . . . . . . . . . . . . . . . . . . . . . . . . 143
2 |
www.oneforall.com |
Introduction
Your ONE FOR ALL MOSAIC is designed to let you use one remote to operate your Video and Audio equipment; any device designed to be operated by an infrared signal. This also includes those devices which operate over 100 kHz. You can choose any combination of 15 devices you would like to operate. The ONE FOR ALL MOSAIC comes available with the world’s largest and most efficient database of infrared codes for device compatibility. It is further enhanced by ONE FOR ALL’s patented upgradeability. Also, what makes the MOSAIC even more unique is the "Learning" feature which allows you to customise any of the special functions of your original remote control onto the keypad of your new ONE FOR ALL.
The following pages explain in simple steps how to customize the ONE FOR ALL MOSAIC to your home entertainment needs.
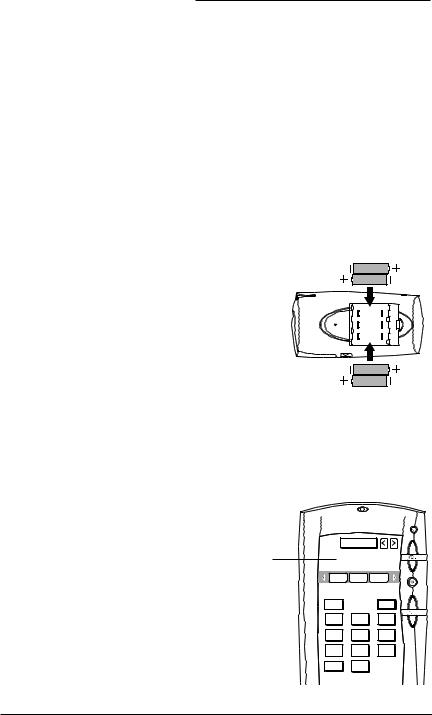
Installing Batteries
Your MOSAIC needs 4 new "AA/LR6" alkaline batteries .
1.Remove the battery cover from the back of the ONE FOR ALL MOSAIC by pressing down on the tab.
2. Match the batteries to the + and – marks inside the battery case, then insert the batteries.
3. Press the battery cover back in place.
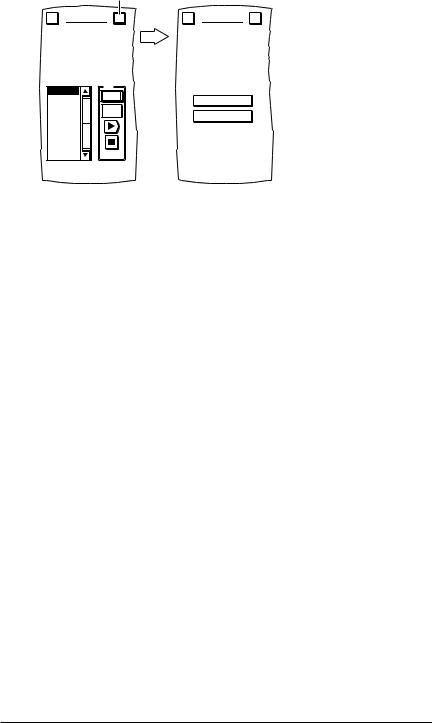
Low-Battery Indicator
Whenever the batteries need replacement,
the MOSAIC will emit a "beep sound" (even if the sound is turned off). The MOSAIC will indicate this as well on the top portion of the screen with a "Battery Low" message.
At this point, only the control functions will work and all of the MOSAIC’s DEVICE SETUP and PERSONALIZATION parameters will be disabled to prevent accidental loss of any entered commands should the batteries run out.
Simply replace the batteries as soon as possible. Press any IR key and the MOSAIC will be restored to its full functionality, complete with your favourite settings.
Low Battery
Indicator
Setup |
THEATER |
|
|| Battery Low || |
||
TV |
CBL |
VCR |
AV |
|
PWR |
1 |
2 |
3 |
4 |
5 |
6 |
7 |
8 |
9 |
-/-- |
0 |
|
www.oneforall.com |
3 |

Using the touch screen
MOSAIC features a Touch Screen that responds to touch commands, whether you use the supplied Stylus or your finger tip. Each time you tap on the screen, you’ll see the LED blink and hear a beep tone, which serve as visual and audio confirmation of your command.
Setup |
THEATER |
|
TV |
CBL |
VCR |
AV |
|
PWR |
1 |
2 |
3 |
4 |
5 |
6 |
7 |
8 |
9 |
After 20 seconds of inactivity, MOSAIC will turn off the |
-/-- |
0 |
|
LCD screen to conserve battery life.
URC - 9990
Tap on |
Setup |
THEATER |
next |
|
|
device. |
|
|
|
TV |
CBL VCR |
Current |
|
|
active |
|
|
device |
AV |
PWR |
|
|
1 
 2
2 
 3
3
4 
 5
5 
 6
6
7 
 8
8 
 9
9
-/-- 0
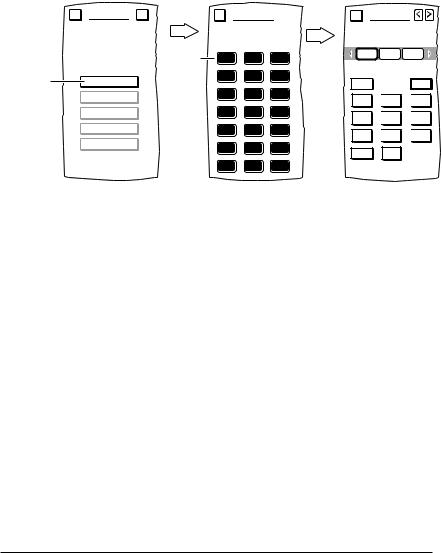
Current active device
 Tap on scroll arrow to see other devices.
Remote Control Keys for active device
Setup |
THEATER |
TV |
CBL VCR |
TV/VCR |
PWR |
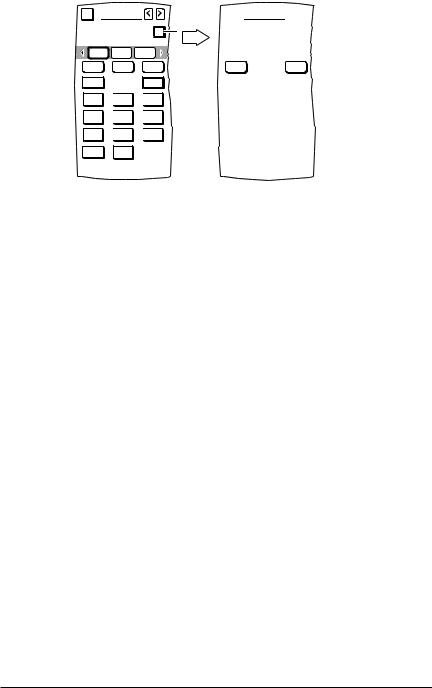
Tap on pages to see more Remote Control Keys.
NOTE: By pressing the ? key you will obtain additional information about the displayed menu.
|
LED |
|
IR Learning |
|
(for Visual Confirmation) |
|
Eye |
|
|
IR Signal |
|
|
(Hard Keys) |
Emitters |
|
|
|
|
|
|
BACKLIGHT |
|
Stylus |
|
On/Off |
|
and |
|
VOLUME |
|
Housing |
|
|
|
|
|
Up/Down |
|
|
Touch Screen |
MUTE |
|
Piezo Speaker |
(Soft Keys) |
On/Off |
|
|
|
(for Audio |
||
|
|
|
|
|
CHANNEL |
Contrast |
Confirmation) |
|
Control |
|
|
|
Up/Down |
|
|
|
(for |
|
|
|
|
|
|
|
|
Touch Screen) |
|
|
|
Battery |
|
|
|
Cover |
|
|
|
Tab |
Phono Jack |
|
|
(to release |
|
|
|
(for future |
|
|
|
Battery Cover) |
|
|
|
computer |
|
|
|
|
|
|
URC - 9990 |
|
connection) |
4 |
www.oneforall.com |

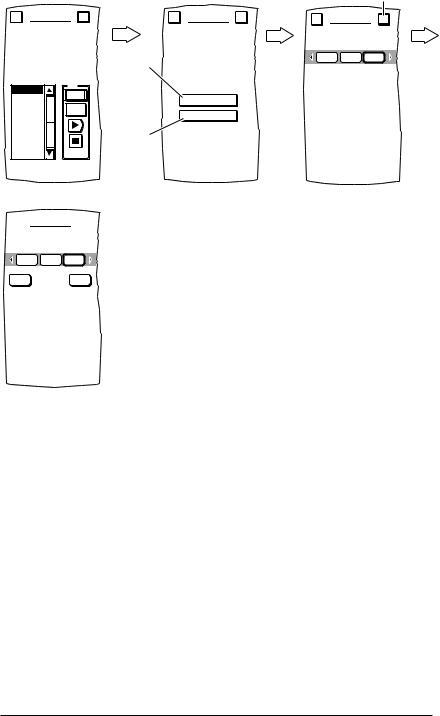
Device Setup
BY BRAND
The easiest way to add devices to MOSAIC is to perform a setup by manufacturer brand. With this method you select a device to add, select the brand you own, and MOSAIC automatically finds the correct manufacturer’s code to correctly control the device.
Example: to Set-Up your Video Recorder (brand: Nokia):
NOTE: To return to a previous menu, tap on the ESC key. To return to last-displayed Device Screen, press down on ESC or MUTE for at least 2 seconds. For help, tap the ? key.
Tap on |
Setup |
THEATER |
|
|
SETUP |
|
|
|
|
|
Welcome to Setup! |
|
|
|
|
|
What would you like to configure? |
|
CBL |
VCR |
|
|
|
|
AV |
|
PWR |
|
Tap on |
|
1 |
2 |
3 |
Tap on |
DEVICE SETUP |
|
4 |
5 |
6 |
|
PERSONALIZATION |
|
|
|
|||
|
7 |
8 |
9 |
|
SYSTEM |
|
|
|
|||
|
-/-- |
0 |
|
|
|
DEVICE SETUP
Welcome to Device Setup! What method
would you like to use?
BY BRAND
BY SEARCH
BY CODE
DELETE
Then, tap on
BRAND SET
Select the device.
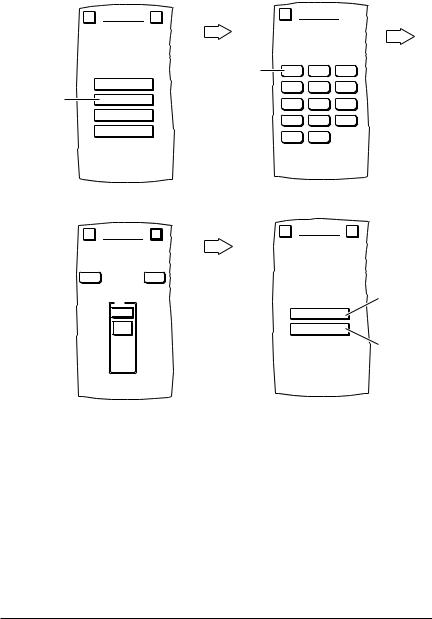
Tap on
BRAND SET
Use the letters or the bar to scroll to your brand.
VCR
ASAAdventura
AVP
Adelsound
Adventura
Adyson
Aiwa
Akai
Akiba
Akura
Alba
First, tap on brand
Scroll
Bars
BRAND SET
Use the letters or the bar to scroll to your brand.
VCR
NEC
Neckermann
Nesco
Nikkia
Nokia
Nordmende
Oceanic
Okano
Olympus
Optimus
A-E |
N-R |
Alphabet Keys
www.oneforall.com |
5 |
BRAND SET
Your brand has multiple types; use the scroll bars to try each one in turn.
BRAND SET
Would you like to ADD the device or REPLACE
it with an existing one?
Tap on
BRAND SET
Press OK to confirm.
CBL VCR VCR
|
|
Tap on |
|
Nokia |
Test |
if 2nd VCR |
|
VCR 1 |
|
||
PWR |
|
||
VCR 2 |
ADD |
||
VCR 3 |
1 |
||
|
|||
VCR 4 |
REPLACE |
||
VCR 5 |
|
||
VCR 6 |
|
Tap on |
|
|
|
||
|
|
if 1st VCR |
BRAND SET
Relabel the device?
CBL VCR VCR
•To relabel the device key, tap on the YES key and you will see the LABEL Menu (see explanation on page 25 step 6).
•To keep the label the same, tap on the NO key.
You will see a confirmation screen that says the key has been successfully programmed. To program another device, tap on the ESC key. To return to the Device Screen, press on ESC or MUTE for at least 2 seconds.
To test remote control of the newly-added device, tap on its key on the Device Selection Strip. Try using the Hard Keys to adjust volume and change channels. Try tapping on the Page Arrows to access other remote control functions and then try tapping on the soft keys on each page to test them.
NOTE: Remember to press the correct device key before operating your device. Only one device (CD, amplifier, cassette, etc.) can be assigned to a device key. If your original remote operates more than one device (for example, a receiver, CD player and cassette player in one remote), you need to set up each device separately.
6 |
www.oneforall.com |
SETUP BY SEARCH
As an alternative method, you can use MOSAIC’s search program to find the correct manufacturer’s codes to set up your entertainment devices. With this method you first select a device you want to add, then you perform a code test, advancing through one or more types, to find the one that works.
Example: to use the search method for your television:
DEVICE SETUP
Welcome to Device Setup! What method
would you like to use?
SEARCH
Select the device.
Tap on
Tap on
To check previous code, tap on 
BY BRAND
BY SEARCH
BY CODE
DELETE
SEARCH
Use the test keys to find your device type. Press OK to save.
TV
Test
First, tap on  PWR
PWR 

1
 If device does not respond, tap and repeat test.
SEARCH
Would you like to ADD the device or REPLACE
it with an existing one?
Tap on
if 2nd TV
ADD
REPLACE
Tap on if 1st TV
Tap on the OK key to confirm your choice. MOSAIC will ask if you want to relabel the newly-added device.
•To relabel it, tap on the YES key and you will see the LABEL Menu (see explanation on page 25 step 6).
•To keep the label the same, tap on the NO key.
You will see a confirmation screen that says the key has been successfully programmed. To program another device, tap on the ESC key. To return to the Device Screen, press on ESC or MUTE for at least 2 seconds.
To test remote control of the newly-added device, tap on its key on the Device Selection Strip. Try using the Hard Keys to adjust volume and change channels. Try tapping on the Page Arrows to access other remote control functions and then try tapping on the soft keys on each page to test them.
www.oneforall.com |
7 |

SETUP BY CODE
Find the code for your device in the Set-Up Code section (starting on page 128). Codes are listed by device type and brand name. The most popular code is listed first. Make sure your device is switched on (not in standby). Newly captured Manufacturer’s codes are available for customer access on our web site www.oneforall.com.
1.Tap on Setup key (upper left corner).
2.Tap on DEVICE SETUP.
NOTE: To return to a previous menu, tap on the ESC key. To return to last-displayed Device Screen, press down on ESC or MUTE for at least 2 seconds. For help, tap the ? key.
Tap on
First, enter code.
page 128-143
DEVICE SETUP |
|
CODE SETUP |
Welcome to Device Setup!
What method Select the device. would you like to use?
Tap on
BY BRAND
BY SEARCH
BY CODE
DELETE
CODE SETUP
Enter the 4 digit code, press OK to save.
Device Code
_
1 
 2
2 
 3
3
4 
 5
5 
 6
6
7 
 8
8 
 9
9
0
Then tap on
CODE SETUP
Enter the 4 digit code, press OK to save.
Device Code
1234
1 
 2
2 
 3
3
4 
 5
5 
 6
6
7 
 8
8 
 9
9
0
CODE SETUP
Would you like to ADD the device or REPLACE
it with an existing one?
Tap on
if 2nd TV
ADD
REPLACE
Tap on if 1st TV
3.Tap on the OK key to confirm your choice. MOSAIC will ask if you want to relabel the newly-added device.
•To relabel it, tap on the YES key and you will see the LABEL Menu (see explanation on page 25 step 6).
•To keep the label the same, tap on the NO key.
You will see a confirmation screen that says the key has been successfully programmed. To program another device, tap on the ESC key. To return to the Device Screen, press on ESC or MUTE for at least 2 seconds.
To test remote control of the newly-added device, tap on its key on the Device Selection Strip. Try using the Hard Keys to adjust volume and change channels. Try tapping on the Page Arrows to access other remote control functions and then try tapping on the soft keys on each page to test them.
8 |
www.oneforall.com |
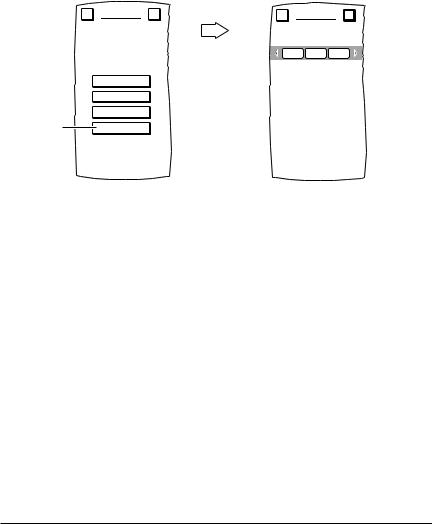
DELETING A DEVICE
If you no longer use a certain device or it has been incorrectly added to the Device Selection Strip, use the following procedure to delete it from MOSAIC’s memory.
1.Tap on Setup key (upper left corner).
2.Tap on DEVICE SETUP.
NOTE: To return to a previous menu, tap on the ESC key. To return to last-displayed Device Screen, press and hold down ESC for at least 2 seconds. For help, tap the ? key.
3.Tap on the DELETE key. You will see the DELETE DEVICE Menu which shows the current Device Selection Strip.
|
DEVICE SETUP |
|
Welcome to Device Setup! |
|
What method |
|
would you like to use? |
|
BY BRAND |
|
BY SEARCH |
|
BY CODE |
Tap on |
DELETE |
DELETE DEVICE
Which device would you like to delete?
TV CBL VCR
4.Using the Device Selection Strip, tap the device key you want to delete. If needed, tap the left/right scroll arrows to display other device choices. When you have selected a device, it will become highlighted as YES and NO keys appear.
•To delete the selected device, tap on the YES key. You will see a confirmation screen that says the key has been successfully deleted. To delete another device, tap on the ESC key to return to the DELETE DEVICE Menu, or press down on ESC or MUTE for at least 2 seconds to return to the last-displayed Device Screen.
•To cancel deleting the selected device, tap on the NO key. MOSAIC will return to the Device Selection Strip with no devices selected to start the process over. If you’re done, tap on the ESC to return to the DEVICE SETUP Menu, or press down on ESC or MUTE for at least 2 seconds to return to the last-displayed Device Screen.
www.oneforall.com |
9 |
NEW CODES
NOTE: This section only applies after you have performed a download of new device codes (see SYSTEM – UPGRADE on page 36).
NOTE: Make sure the device you want to add is turned on (not in standby).
After downloading, MOSAIC will store the new device codes in memory. An additional soft key, labelled NEW CODES, will appear on the DEVICE SETUP Menu which you will use to find a working code for a selected device.
1.Tap on Setup key (upper left corner).
2.Tap on DEVICE SETUP.
3.Tap on the NEW CODES key. You will see the UPGRADE Test Menu.
NOTE: To return to a previous menu, tap on the ESC key. To return to last-displayed Device Screen, press and hold down ESC for at least 2 seconds. For help, tap the ? key.
|
DEVICE SETUP |
|
Welcome to Device Setup! |
|
What method |
|
would you like to use? |
|
BY BRAND |
|
BY SEARCH |
|
BY CODE |
|
DELETE |
Tap on |
NEW CODES |
Tap on
UPGRADE
Use the scroll bar to try each one in turn.
TV1VCR 2 |
Test |
|
PWR |
||
TV2 |
||
TV3 |
1 |
|
TV4 |
||
TV5 |
|
|
VCR1 |
|
|
VCR2 |
|
|
VCR3 |
|
|
VCR4 |
|
|
VCR5 |
|
4.Tap on the first code in the list (e.g., TV 1), aim MOSAIC at the desired device (e.g., television), and tap on the PWR key. The device should turn off. If it does not respond, tap on the next code in the list (e.g., TV 2), then tap on the PWR key again. If the device still does not respond, repeat this process by testing each code until you find one that works.
NOTE: Depending on your download, the code list may include more than one device type.
5.To save a code that works, tap on the OK key. You will see the UPGRADE ADD/REPLACE menu that lists two choices.
10 |
www.oneforall.com |
Tap on
UPGRADE
Use the scroll bar to try each one in turn.
TV1VCR 2 |
Test |
|
PWR |
||
TV2 |
||
TV3 |
1 |
|
TV4 |
||
TV5 |
|
|
VCR1 |
|
|
VCR2 |
|
|
VCR3 |
|
|
VCR4 |
|
|
VCR5 |
|
UPGRADE
Would you like to ADD the device or REPLACE
it with an existing one?
ADD
REPLACE
•Use the ADD key when setting up a new device (e.g., a DVD player) that is not currently on the Device Selection Strip (if needed, refer to USING THE TOUCH SCREEN – on page 4). The remaining instructions assume you will be adding a new device.
•Use the REPLACE key when replacing a device (e.g., a TV set) that is currently on the
Device Selection Strip.
6.Tap on the ADD key to add the device to MOSAIC’s memory. You will see the default device label being added to the Device Selection Strip.
NOTE: If you tap on the REPLACE key instead, MOSAIC will ask you to select the device to be replaced and, after your selection, if you want to relabel it. However, if the device to be replaced has programmed keys, MOSAIC will first ask if you want to keep or clear the settings.
7.Tap on the OK key to confirm your choice. MOSAIC will ask if you want to relabel the newlyadded device.
•To relabel it, tap on the YES key and you will see the LABEL Menu (see explanation on page 25 step 6).
•To keep the label the same, tap on the NO key.
8.You will see a confirmation screen that says the key has been successfully programmed. To program a function of the same type, tap on the ESC key. To return to the Device Screen, press on ESC or MUTE for at least 2 seconds.
9.To test remote control of the newly-added device, tap on its key on the Device Selection Strip. Try using the Hard Keys to adjust volume and change channels. Try tapping on the Page Arrows to access other remote control functions and then try tapping on the soft keys on each page to test them.
10.If desired, repeat all steps to add other devices that appeared in the new codes list of step 3.
www.oneforall.com |
11 |

Personalization
MACROS
MOSAIC includes a powerful Macro feature that memorizes and plays back a series of key strokes at any time with the tap of one key. Up to 21 macros can be defined, each containing a maximum of 32 keystrokes. Once defined, a macro must be placed on a Device Screen to be used. MOSAIC allows placement of up to four “global” macro keys across the top of every Device Screen. Also, you may place additional macros in specific Device Screens using empty locations or by overriding existing key functions.
ADDING A MACRO
As an instruction aid, we’ll create an example “Power On” macro that turns on the Cable Box and TV power and then tunes in a favorite channel in this exact order:
1.Select the Cable Box and power it on.
2.Add a 2-second delay.
3.On the Cable Box, select channel 28.
4.Select the TV and power it on.
6.Add a 1-second delay.
7.On the TV, select channel 3 to view the modulated signal from the Cable Box.
Each command counts as one macro keystroke, except when selecting a device key which counts as two. In this example, the total keystroke count is eleven.
NOTE: Adding delays allow devices to power up to their full operating state. In most cases, 1 to 2 seconds is sufficient, but MOSAIC will accept up to 8 seconds and only count it as one keystroke.
12 |
www.oneforall.com |
1.Tap on Setup key (upper left corner).
2.Tap on PERSONALIZATION.
NOTE: To return to a previous menu, tap on the ESC key. To return to last-displayed Device Screen, press down on ESC or MUTE for at least 2 seconds. For help, tap the ? key.
3.Tap on the MACROS key. You will see the MACROS Menu.
4.Tap on the ADD key. You will see the ADD MACROS Menu.
5.Tap on an open Macro key (i.e., a macro key that is not labelled). You will see the ADD MACROS Screen (as shown below) which looks similar to a Device Screen.
|
MACROS |
|
Program a sequence of |
|
keystrokes onto one key. |
Tap on |
ADD |
|
VIEW |
|
COPY |
|
DELETE |
|
DELETE ALL |
ADD MACROS |
|
ADD MACROS |
Select a Macro key. |
Begin recording the |
|
keystrokes. |
||
Tap on |
TV |
CBL VCR |
|
|
|
an open |
|
|
key |
AV |
PWR |
|
||
1 
 2
2 
 3
3
4 
 5
5 
 6
6
7 
 8
8 
 9
9
-/-- 0
6.At this point, we’ll record the example keystrokes listed on page 12. But first make sure the Cable Box and TV are turned off (in standby).
a.Tap on the CBL key on the Device Selection Strip.
b.Tap on the PWR key.
c.Tap on the DELAY key twice for 2-second delay.
NOTE: Each DELAY keystroke is equal to 1 second.
d.Tap on the 2 key followed by the 8 key to enter channel 28.
e.Tap on the TV key on the Device Selection Strip.
f.Tap on the PWR key.
g.Tap on the DELAY key once for 1-second delay.
h.Tap on the 0 key followed by the 3 key to enter channel 3.
i.Aim MOSAIC at the Cable Box/TV and tap on the TEST key. You should see the LED blink as commands are sent to power on the Cable Box and tune it to channel 28, followed by TV power on and tuning it to channel 3. If the macro did not work correctly, tap on the CLEAR key and repeat steps 6a through 6i.
www.oneforall.com |
13 |
7.To save the macro, tap on the OK key. You will see the ADD MACROS Screen (as shown below).
ADD MACROS |
T |
Press TEST to check the macro, OK to save or CLEAR to start over.
TV CBL VCR
AV |
PWR |
1 
 2
2 
 3
3
4 
 5
5 
 6
6
7 
 8
8 
 9
9
-/-- 0
ADD MACROS
Relabel the key?
8.To label the saved macro, tap on the YES key. You will see the ADD MACROS Label Screen. Follow the procedure that is similar to the one starting with step 3 on page 25 to label the macro as TV On and tap the OK key when you’re done.
NOTE: If you tap on the NO key, the macro will be labelled using the default labeling system which labels macros in ascending numerical order (e.g., M1, M2, M3, etc.).
9. MOSAIC will ask you where you want to copy the macro.
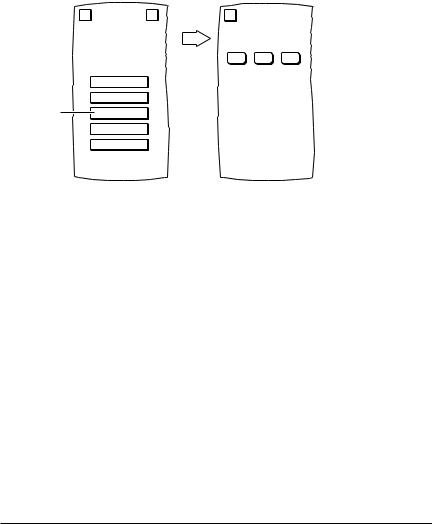
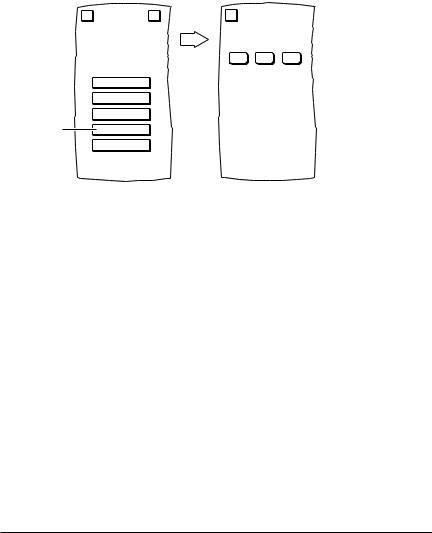
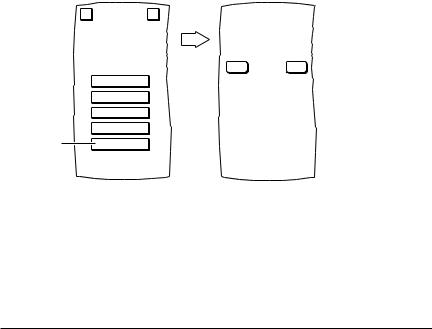
•To have it appear on all Device Screens, tap on the ALL DEVICES key. You will see a row of up to four empty keys appear which correspond to the space directly below Device Selection Strip. Tap on any empty key to assign it or tap on an existing one to override it. MOSAIC will display a confirmation screen.
•To have it appear on a specific Device Screen, tap on the SPECIFIC DEVICE key. You will see the last-displayed Device Screen. Using the Device Selection Strip, tap on the desired device key. If needed, tap on left/right scroll arrows to view other device choices. The Device Screen will display all keys on all pages for the selected device. Tap on any empty key. MOSAIC will display a confirmation screen.
NOTE: To return to a previous menu, tap on the ESC key. To return to last-displayed Device Screen, press down on ESC or MUTE for at least 2 seconds. For help, tap the ? key.
10. Repeat steps 1 through 9 for each new macro you want to create.
14 |
www.oneforall.com |

VIEWING MACROS
To see what commands are stored in a macro, perform the following steps:
1.On the Device Screen in the upper left corner, tap on Setup. You will see the main SETUP Menu that greets you and asks,“What would you like to configure? ”
2.Tap on the PERSONALIZATION key. You will see the PERSONALIZATION Menu.
NOTE: To return to a previous menu, tap on the ESC key. To return to last-displayed Device Screen, press down on ESC or MUTE for at least 2 seconds. For help, tap the ? key.
3.Tap on the MACROS key. You will see the main MACROS Menu.
4.Tap on the VIEW key. You will see the VIEW MACROS Menu.
|
MACROS |
|
|
VIEW MACROS |
|
Program a sequence of |
|
|
|
||
keystrokes onto one key. |
Select a Macro key. |
||||
|
ADD |
Tap on |
VIEW |
|
COPY |
|
DELETE |
|
DELETE ALL |
5.Tap on any displayed Macro key (e.g., M1, M2, etc.). You will see the commands that make up the selected macro. To return to previous menu, tap on the ESC key. To return to the Device Screen, press down on ESC or MUTE for at least 2 seconds.
www.oneforall.com |
15 |
COPYING MACROS
To copy a macro, perform the following steps:
1.On the Device Screen in the upper left corner, tap on Setup. You will see the main SETUP Menu that greets you and asks,“What would you like to configure? ”
2.Tap on the PERSONALIZATION key. You will see the PERSONALIZATION Menu.
NOTE: To return to a previous menu, tap on the ESC key. To return to last-displayed Device Screen, press down on ESC or MUTE for at least 2 seconds. For help, tap the ? key.
3.Tap on the MACROS key. You will see the main MACROS Menu.
4.Tap on the COPY key. You will see the COPY MACROS Menu.
|
MACROS |
|
|
COPY MACROS |
|
Program a sequence of |
|
|
|
||
keystrokes onto one key. |
Select a Macro key. |
||||
|
ADD |
|
VIEW |
Tap on |
COPY |
|
DELETE |
|
DELETE ALL |
5.Tap on the macro key you want to copy. MOSAIC will ask you where you want to copy the macro.
•To have it appear on all Device Screens, tap on the ALL DEVICES key. You will see a row of up to four empty keys appear which correspond to the space directly below Device Selection Strip. Tap on any empty key to assign it or tap on an existing one to override it. MOSAIC will display a confirmation screen.
•To have it appear on a specific Device Screen, tap on the SPECIFIC DEVICE key. You will see the last-displayed Device Screen. Using the Device Selection Strip, tap the desired device key. If needed, tap the left/right scroll arrows to view other device choices. The Device Screen will display all keys on all pages for the selected device. Tap on any empty key and MOSAIC will display a confirmation screen.
NOTE: To return to a previous menu, tap on the ESC key. To return to last-displayed Device Screen, press down on ESC or MUTE for at least 2 seconds. For help, tap the ? key.
16 |
www.oneforall.com |
DELETING A MACRO
To delete a single macro, perform the following steps:
1.On the Device Screen in the upper left corner, tap on Setup. You will see the main SETUP Menu that greets you and asks,“What would you like to configure? ”
2.Tap on the PERSONALIZATION key. You will see the PERSONALIZATION Menu.
NOTE: To return to a previous menu, tap on the ESC key. To return to last-displayed Device Screen, press down on ESC or MUTE for at least 2 seconds. For help, tap the ? key.
3.Tap on the MACROS key. You will see the main MACROS Menu.
4.Tap on the DELETE key. You will see the DELETE MACROS Menu.
|
MACROS |
|
DELETE MACROS |
||
|
|
|
|
|
|
Program a sequence of |
Select a Macro key. |
||||
keystrokes onto one key. |
|||||
|
ADD |
|
VIEW |
|
COPY |
Tap on |
DELETE |
|
DELETE ALL |
5.Tap on the Macro key you want to delete. You will see a confirmation screen that says the macro key has been successfully deleted from all device screens and the main MACROS Menu.
NOTE: Use VIEW/DELETE (see PERSONALIZATION – VIEW/DELETE on page 32) to delete macros from Device Screens but keep them intact on the main MACROS Menu for future copying.
To delete another macro key, tap on the ESC key to return to the DELETE MACROS Menu, or press down on ESC or MUTE for at least 2 seconds to return to the last-displayed Device Screen.
www.oneforall.com |
17 |
DELETING ALL MACROS
To delete all macros, perform the following steps:
1.On the Device Screen in the upper left corner, tap on Setup. You will see the main SETUP Menu that greets you and asks,“What would you like to configure? ”
2.Tap on the PERSONALIZATION key. You will see the PERSONALIZATION Menu.
NOTE: To return to a previous menu, tap on the ESC key. To return to last-displayed Device Screen, press down on ESC or MUTE for at least 2 seconds. For help, tap the ? key.
3.Tap on the MACROS key. You will see the main MACROS Menu.
4.Tap on the DELETE ALL key. MOSAIC will ask you to confirm your choice.
•To delete all macros, tap on the YES key. You will see a confirmation screen that says all macros have been successfully deleted on all device screens and the main MACROS Menu. Tap on the ESC key to return to the DELETE MACROS Menu.
NOTE: Use VIEW/DELETE (see Personalization - View/Delete on page 32) to delete macros from Device Screens but keep them intact on the main MACROS Menu for future copying.
•To cancel deletion of all macros, tap on the NO key. MOSAIC will return to the main MACROS Screen. If you want to delete a single macro, see the previous section, Deleting A Macro on page 17, or see View/Delete on page 32.
NOTE: To return to a previous menu, tap on the ESC key. To return to last-displayed Device Screen, press down on ESC or MUTE for at least 2 seconds. For help, tap the ? key.
|
MACROS |
|
|
MACROS |
|
Program a sequence of |
Are you sure you want to |
||||
keystrokes onto one key. |
|
DELETE ALL? |
|||
|
ADD |
|
VIEW |
|
COPY |
|
DELETE |
Tap on |
DELETE ALL |
18 |
www.oneforall.com |
 Loading...