


User’s
Guide
Document Title and Part Number
Microline 320/321 Turbo/n User’s Guide
Rev. 1.1
Disclaimer
Every effort has been made to ensure that the information in this document is complete, accurate, and up-to-date. Oki Data assumes no responsibility for the results of errors beyond its control. Oki Data also cannot guarantee that changes in software and equipment made by other manufacturers and referred to in this guide will not affect the applicability of the information in it. Mention of software products manufactured by other companies does not necessarily constitute endorsement by Oki Data.
Copyright Information
Copyright 2007 by Oki Data. All rights reserved.
February, 2007
Written and produced by the Oki Data Training and Publications Department.
Contact Information
Please address any comments on this publication to:
Mailing Address
Oki Data Americas, Inc.
Training & Publications Dept.
2000 Bishops Gate Blvd.
Mt. Laurel, NJ 08054-4620
e-Mail Address
pubs@okidata.com
Web Site
Please visit Oki Data’s multilingual web site at: http://www.okiprintingsolutions.com
Trademark Information
OKI and MICROLINE are registered trademarks of Oki Electric Industry Company, Ltd.
Epson is a registered trademark of Epson America, Inc.
IBM is a registered trademark of International Business Machines Corp.
Microsoft and Windows are either registered trademarks or trademarks of Microsoft Corporation in the United States and other countries.
2 | Microline 320/321 Turbo/n

Contents |
|
Helpful Hints ............................................................... |
8 |
Saving Money ........................................................................ |
9 |
Saving Money: Forms Tear-Off ............................................ |
9 |
Saving Money: Draft Mode ................................................. |
9 |
Saving Time ......................................................................... |
10 |
Saving Time: Internet Support .......................................... |
10 |
Saving Time: Draft Mode .................................................. |
10 |
Saving Time: Paper Park .................................................... |
10 |
Saving Time: Moving Through the Menu ........................ |
10 |
Operation Tips ...................................................................... |
11 |
Operation Tip: Top of Form ............................................... |
11 |
Operation Tip: Turning the Platen Knob ........................... |
12 |
Operation Tip: Using the Parallel Port .............................. |
12 |
Operation Tip: Control Access to the Printer ..................... |
12 |
Introduction .............................................................. |
1 3 |
Printer Features ..................................................................... |
14 |
Parts Identification .................................................. |
15 |
Printer Serial Number ........................................................... |
15 |
Parts Identification: Rear Feed (Continuous Forms) ............ |
16 |
Parts Identification: Top Feed (Single-Sheet) ...................... |
17 |
Front Panel Lights ................................................................ |
18 |
Front Panel Keys .................................................................. |
19 |
User’s Guide: English | 3
Installation ................................................................ |
2 0 |
Installation Hints .................................................................. |
20 |
Installation Overview ........................................................... |
21 |
Installation Location ............................................................ |
21 |
Customizing the Installation ................................................ |
22 |
Unpacking the Machine ....................................................... |
24 |
Shipping Restraints .............................................................. |
25 |
Ribbon Cartridge .................................................................. |
26 |
Ribbon Cartridge Handling ............................................... |
27 |
Ribbon Cartridge Emergency First Aid ............................. |
27 |
Power Connections ............................................................... |
28 |
Paper Loading ...................................................................... |
29 |
Testing the Printer ................................................................ |
33 |
Font Sample Test ................................................................ |
34 |
Rolling ASCII Test ............................................................. |
35 |
Local Printer Installation ...................................................... |
36 |
Installing Printer Software ................................................. |
36 |
Windows 95, 98, Me, NT4.0 ............................................ |
36 |
Windows 2000 ................................................................. |
37 |
Network Printer Installation ................................................. |
38 |
Connecting the Network Cable ......................................... |
38 |
Network Installation .......................................................... |
39 |
Connecting to the Parallel Port ............................................ |
40 |
Product Registration ............................................................ |
41 |
my.okidata.com .................................................................. |
41 |
Registering Your Printer ..................................................... |
41 |
4 | Microline 320/321 Turbo/n
Using Your Printer ................................................... |
42 |
Top of Form (TOF) ................................................................ |
42 |
Top of Form (TOF) and Forms Tear-Off .............................. |
43 |
Forms Tear-Off Status (ON or OFF) .................................... |
43 |
Setting Top of Form, Forms Tear-Off ON (Step A) ............. |
44 |
Setting Top of Form, Forms Tear-Off OFF (Step B) ............ |
46 |
Temporary Top of Form Change ........................................ |
48 |
Reset Top of Form to Factory Default ................................ |
49 |
Printer ON ........................................................................ |
49 |
Printer OFF ....................................................................... |
49 |
Forms Tear-Off ...................................................................... |
50 |
Changing the Forms Tear-Off Setting ................................ |
51 |
Automatic Forms Tear-Off .................................................. |
52 |
TEAR Key and Automatic Forms Tear-Off ...................... |
53 |
Manual Forms Tear-Off ...................................................... |
54 |
TEAR Key ............................................................................ |
55 |
Forms Tear-Off set OFF ...................................................... |
55 |
Forms Tear-Off set ON ........................................................ |
55 |
Paper Park ............................................................................. |
56 |
Changing Paper Paths .......................................................... |
57 |
Continuous-forms to single-sheet feed .............................. |
57 |
Single-sheet feed to continuous forms .............................. |
57 |
Printhead Gap ....................................................................... |
58 |
Expanded Printhead Gap ................................................... |
59 |
Print Quality ......................................................................... |
63 |
Super Speed Draft ............................................................... |
64 |
Printer Reset ......................................................................... |
64 |
Character Pitch ..................................................................... |
65 |
Emulations ........................................................................... |
66 |
Printer Drivers ....................................................................... |
67 |
Selecting Printer Drivers .................................................... |
67 |
Obtaining Drivers ............................................................... |
68 |
Installing Printer Drivers .................................................... |
68 |
Menu Mode .......................................................................... |
69 |
Moving Through the Menu ............................................... |
70 |
Moving Forward .............................................................. |
70 |
Moving Backward ........................................................... |
70 |
Resetting Menu to Factory Defaults .................................. |
71 |
Printing the Menu Settings ................................................ |
71 |
Changing the Menu Settings ............................................. |
72 |
Menu Settings Table .......................................................... |
73 |
Explanations of Menu Items .............................................. |
78 |
Maintenance ............................................................. |
81 |
Replacing the Ribbon Cartridge .......................................... |
81 |
Printer Cleaning ................................................................... |
82 |
Paper Jams ............................................................................ |
83 |
User’s Guide: English | 5
Troubleshooting ....................................................... |
8 8 |
General Information ............................................................. |
88 |
Internet Support ................................................................. |
88 |
List of Problems .................................................................... |
89 |
Problem 1: |
|
My word processor files do not print the way I have the |
|
menu and front panel set. ............................................... |
90 |
Problem 2: |
|
Nothing happens when I turn on the printer. .................. |
91 |
Problem 3: |
|
The printer does not print when the computer |
|
sends data. ...................................................................... |
91 |
Problem 4: |
|
I'm getting strange symbols, incorrect fonts, etc., when I |
|
try to print a document. .................................................. |
91 |
Problem 5: |
|
Ink smears on the paper when I print on narrow forms. .. |
92 |
Problem 6: |
|
I've installed a new ribbon and the printing is smeared and |
|
streaked. .......................................................................... |
92 |
Problem 7: |
|
The ALARM light is flashing. ........................................ |
92 |
Problem 8: |
|
The ALARM light is on and the Character Pitch 10 light is |
|
flashing. .......................................................................... |
92 |
Problem 9: |
|
The ALARM light is on and the Character Pitch 15 light is |
|
flashing. .......................................................................... |
93 |
Problem 10: |
|
The printer needs paper, but the ALARM light is not on |
|
and I cannot load the paper. ........................................... |
93 |
Problem 11: |
|
The Print Quality and Character Pitch keys on the front |
|
panel don't work. ............................................................ |
93 |
Problem 12: |
|
Continuous-form paper sticks to the paper separator. .... |
94 |
Problem 13: |
|
Nothing happens when I print to the parallel port. ........ |
94 |
6 | Microline 320/321 Turbo/n
Specifications ............................................................ |
9 5 |
Service and Support .............................................. |
100 |
General Information .......................................................... |
100 |
Documentation .................................................................. |
101 |
Purchase Location ............................................................. |
101 |
Internet Support ................................................................. |
102 |
www.okidata.com ......................................................... |
102 |
my.okidata.com ............................................................ |
102 |
Telephone Support ............................................................ |
103 |
Service Centers .................................................................. |
104 |
Service and Support: United States and Canada ............... |
105 |
Service and Support: Latin America ................................. |
106 |
Accessories ............................................................. |
107 |
Purchasing Accessories ...................................................... |
107 |
Accessories: Part Numbers ................................................ |
108 |
Consumables: Part Numbers ........................................... |
108 |
Options: Part Numbers .................................................... |
108 |
Replacement Parts: Part Numbers ................................... |
109 |
Documentation ............................................................... |
110 |
Printer Control Codes .......................................... |
111 |
Epson FX Commands ........................................................ |
112 |
IBM Proprinter III Commands ........................................... |
114 |
Oki Data MICROLINE Standard Commands .................... |
116 |
Warranty, Regulatory, and Safety Information 118
Limited Warranty: United States and Canada ................... |
118 |
Limited Warranty: Latin America ...................................... |
120 |
Service and Support: United States and Canada ............... |
121 |
Sales and Service Dealers: United States and Canada . 121 |
|
Telephone Support: United States and Canada ............ |
122 |
Service and Support: Latin America ................................. |
123 |
Sales and Service Centers: Latin America .................... |
123 |
Customer Support Professionals: Latin America .......... |
123 |
Oki Data on the Internet .................................................... |
124 |
www.okidata.com ......................................................... |
124 |
my.okidata.com ............................................................ |
124 |
Oki Data Service Centers ................................................... |
125 |
Material Safety Data Sheet (MSDS) .................................. |
126 |
Emergency Information: MSDS ...................................... |
126 |
Safety Information .......................................................... |
130 |
Regulatory Information ..................................................... |
131 |
Year 2000 Compliance ................................................... |
131 |
Energy Star® ................................................................... |
131 |
Federal Communications Commission (FCC) ................ |
132 |
Industry Canada (IC) ....................................................... |
133 |
European Union Council of the European Communities 134 |
|
Index ........................................................................ |
135 |
User’s Guide: English | 7
 Helpful Hints
Your printer has many features and capabilities that will help you
•save money
•save time
•operate the machine
This section summarizes the features and capabilities directly connected to saving money and time.
Details for these features and capabilities are provided in other sections of this document.
You may want to use some of our Helpful Hints when working with your machine.
8 | Microline 320/321 Turbo/n
Saving Money
Saving Money: Forms Tear-Off
The Forms Tear-Off feature allows a printed page (rear feed, continuous form) to be torn off without wasting paper or adjusting the printer.
Forms Tear-Off automatically moves the paper from the initial printing position (print start position) to the tear-off position, after a time interval (which you select through the menu).
The top of the page (perforation) is even with the tear bar. The tear bar is located under the clear top of the access cover.
Paper remains in the tear-off position until the printer receives more data. Then, the paper moves back down for printing (retracts to the initial print position).
When printing stops, the paper will advance to the tear-off position.
This feature is normally turned off.
Forms Tear-Off and the Top of Form settings interact.
For more information, refer to “Using Your Printer, Forms Tear-Off” and “Using Your Printer, Top of Form.”
Saving Money: Draft Mode
When printing drafts of documents, use either the High Speed Draft or Super Speed Draft mode. These modes use less ink than the Utility or Near Letter Quality Modes, thus extending the life of your ribbon. The draft modes also print at high speeds, reducing the time required to complete a print job.
For more information, refer to “Using Your Printer, Print Quality.”
User’s Guide: English | 9
Saving Time
Saving Time: Internet Support
Oki Data provides support via the Internet.
Oki Data’s main web site, www.okidata.com, is the gateway to Oki Data’s products and services.
my.okidata.com is a powerful area of Oki Data’s web site designed to help you personalize the information and service you get from Oki Data.
You can find information at your convenience, at any time.
For more information, refer to “Service and Support, Internet Support.”
Saving Time: Draft Mode
When printing drafts of documents, use either the High Speed Draft or Super Speed Draft mode. The draft modes print at high speeds, reducing the time required to complete a print job. These modes also use less ink than the Utility or Near Letter Quality Modes, thus extending the life of your ribbon.
For more information, refer to “Using Your Printer, Print Quality.”
Saving Time: Paper Park
Your printer’s paper park feature allows you to print a single sheet (cut-sheet) page without removing continuous feed paper from the printer.
For more information, refer to “Using Your Printer, Paper Park.”
Saving Time: Moving Through the Menu
When the printer is in Menu Mode, you can move forward or backwards through the menu.
To move forward, press GROUP, ITEM, or Set, whichever is appropriate.
To move backward, press and hold SHIFT, then GROUP, ITEM, or Set, whichever is appropriate.
For more information, refer to “Using Your Printer, Menu Mode.”
10 | Microline 320/321 Turbo/n
Operation Tips
Operation Tip: Top of Form
!If you turn the platen knob when the printer is turned on, you will cause the Top of Form to mis-align. Always
turn the printer off before turning the platen knob!
!Always determine the status of the Forms Tear-Off menu setting BEFORE setting the Top of Form. Refer to
“Using Your Printer, Top of Form, Forms Tear-Off Status (ON or OFF).”
Top of Form sets the print start position for the printer. It is adjustable in increments of 1/144 of an inch. The amount of adjustment is limited to avoid paper jams.
The Top of Form may be left at the factory default (1 inch), changed for a single print job, or set to a new (permanent) default.
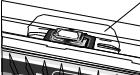
The first line prints at the red line of the plastic paper shield
(1) on the printhead.
The Top of Form and Forms Tear-Off settings of your printer interact.
How you set the Top of Form depends on the status of the Forms Tear-Off menu setting.
For more information, refer to “Using Your Printer, Top of Form (TOF).”
1
M
User’s Guide: English | 11
Operation Tip: Turning the Platen Knob
!If you turn the platen knob when the printer is turned on, you will cause the Top of Form to mis-align. Always
turn the printer off before turning the platen knob!
Operation Tip: Using the Parallel Port
!If you want to use the parallel port, you MUST remove the Network Card from the printer.
See the OkiLAN 6120e User’s Guide for details.
Operation Tip: Control Access to the Printer
You can control access to the printer by changing the setting for the Operator Panel Function (in the Menu).
When the Operator Panel Function is set to Full Operation (the factory default), all keys on the front panel operate.
When the Operator Panel Function is set to Limited Operation, the PRINT QUALITY and CHARACTER PITCH keys don’t work. This prevents these settings from being changed from the control panel when several people are using the printer.
For more information, refer to “Using Your Printer, Menu Mode, Menu Settings Table, Setup, Operator Panel Function.”
12 | Microline 320/321 Turbo/n
 Introduction
Thank you for purchasing this printer.
This rugged 9-pin network printer can meet the needs of harsh and demanding environments. The expanded printhead gap, zero-tear capability, and multiple paper feed paths allow the printer to handle a wide variety of media, including 6- part forms. Your printer will provide years of dependable and efficient service.
In addition to the many standard features, options can expand the machine’s capabilities.
For information on the options, see “Accessories.”
Oki Data on the Internet
The Oki Data Web Sites provide the most current information available on your product.
An on-line version of this document is available for viewing and downloading via Oki Data’s Web Sites.
You may reach Oki Data via the Internet at:
•www.okidata.com
•my.okidata.com
For more information on the Oki Data Web Sites, refer to “Service and Support, Internet Support.”
User’s Guide: English | 13
Printer Features
•Super reliable, durable operation: 10,000 hours Mean Time Between Failures (MTBF)!
•Expandable head gap for handling forms up to 0.031" (0.79 mm) thick through the bottom feed path using the optional push and/or pull tractor.
•Advanced paper handling, with built-in rear push tractor and zero-tear forms capability.
•Blazing print speeds:
—300 characters per second (cps) in Utility mode
—390 cps in High Speed Draft (HSD) mode
—435 cps in Super Speed Draft (SSD) mode
14 | Microline 320/321 Turbo/n
 Parts Identification
The parts identified here are parts of the unit that you will use during normal operation.
For accessories (consumables, options, replacement parts, and documentation), refer to “Accessories.”
Printer Serial Number
The serial number of your machine is on a label on the back of your machine.
The label says “S/N.”
An example serial number is: 401A0154693.
!You will need your printer serial number if your machine requires servicing.
A written receipt for the product, showing the date of purchase, dealer’s name, and both the model and serial numbers of the product must accompany any request or claim for work to be performed under Limited Warranty.
User’s Guide: English | 15
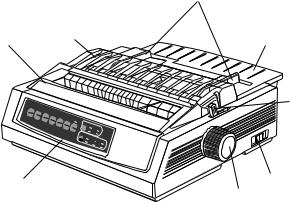
Parts Identification: Rear Feed
(Continuous Forms)
1Paper Guides
2Paper Separator
3Paper Lever
4On-Off Switch
5Platen Knob
6Control Panel
7Acoustic Cover
8Access Cover
!Move the paper lever to the position marked “REAR.” For rear feed, the paper lever is towards the front of the
printer.
7
|
SEL |
|
|
|
SEL |
|
|
MENU |
LF |
||
EXIT |
SHIFT |
||
|
Micro |
||
POWER |
|
DownFeed |
|
ALARM |
GROUP |
||
|
|||
|
1 |
8 |
2 |
|
3
FF/LOAD |
|
TEAR |
|
|
|
|
|
Micro |
Feed |
|
|
|
|
||
Up |
|
PARK |
|
QUALITY |
|
||
ITEM |
|
|
QUIET |
|
|
||
|
SET |
|
|
HSD |
UTL |
||
MENU |
TOF |
|
NLQ |
||||
|
|
|
|
|
CHARACTER |
SSD |
|
|
|
|
|
|
|
||
|
|
|
|
|
10PITCH |
|
|
1712
20 15
PROP
4
6
5
16 | Microline 320/321 Turbo/n
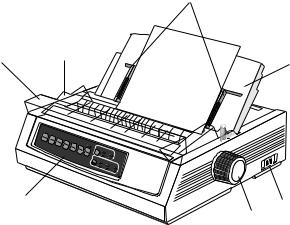
Parts Identification: Top Feed (Single-Sheet)
1 |
Paper Guides |
|
|
|
|
|
|
|
|
|
|
2 |
Paper Separator |
7 |
|
|
8 |
|
|
|
|
|
|
|
|
|
|
|
|
|
|
|
|
|
|
3 |
Paper Lever |
|
|
|
|
|
|
|
|
|
|
4 |
On-Off Switch |
|
|
|
|
|
|
|
|
|
|
5 |
Platen Knob |
|
|
|
|
|
|
|
|
|
|
6 |
Control Panel |
MENU |
|
|
|
|
|
|
|
|
|
|
|
|
SEL |
|
|
|
|
|
|
|
|
|
|
|
SEL |
|
|
|
|
|
|
|
|
|
|
EXIT |
SHIFT |
LF |
|
|
|
|
|
|
|
|
|
|
DownFeed FF/LOAD |
|
|
|
|
|
|||
|
|
|
Micro |
|
|
|
|
|
|
|
|
7 |
Acoustic Cover (open) |
POWER |
ALARM |
GROUP |
Micro |
Feed |
|
TEAR |
|
|
|
|
Up |
|
PARK |
QUALITY |
|
||||||
|
ITEM |
|
|
|
SSD |
||||||
|
|
|
|
|
|
CHARACTER |
|||||
|
|
|
|
|
MENU |
SET |
TOF |
NLQ |
UTL |
||
|
|
|
|
|
|
|
|||||
|
|
|
|
|
|
|
|
|
10PITCH |
|
|
8 |
|
|
|
|
|
|
|
|
17 |
12 |
15 |
Access Cover |
|
|
|
|
|
|
|
|
20 |
||
|
|
|
|
|
|
|
|
|
PROP |
||
|
|
6 |
|
|
|
|
|
|
|
|
|
!Move the paper lever to the position marked “TOP.” The paper lever is towards the back of the printer.
1
2
 3
3
4
5
User’s Guide: English | 17
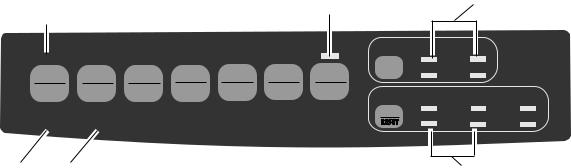
Front Panel Lights |
|
|
|
|
2 |
|
3 |
|
|
1 |
|
|
|
|
|
|
|
|
|
|
|
|
|
|
|
|
|
|
|
|
|
|
|
|
|
|
PRINT QUALITY |
UTL |
|
SEL |
|
|
|
|
|
|
HSD |
|
|
|
|
|
|
|
|
|
|
|
|
SEL |
|
LF |
FF/LOAD |
TEAR |
PARK |
QUIET |
NLQ |
SSD |
|
|
|
|
|
||||||
MENU |
SHIFT |
Micro Feed |
Micro Feed |
|
|
TOF |
CHARACTER PITCH |
|
|
Down |
Up |
|
|
|
|
||||
EXIT |
|
GROUP |
ITEM |
SET |
|
10 |
12 |
15 |
|
|
|
17 |
20 |
PROP |
|||||
POWER |
ALARM |
|
MENU |
|
|
|
|||
|
|
|
|
|
|
|
|||
45
1SEL: Glows = printer selected, ready to receive data Flashes = printer in Print Suppress Mode
Not lit = printer deselected (cannot receive data)
2QUIET: Glows = printer is in Quiet state.
3HSD / UTL / NLQ / SSD: Indicate print quality selected.
4POWER: Glows = printer is turned on.
6
5ALARM: Glows = error condition exists:
•out of paper (no other lights blinking)
•paper jam if 15 cpi light is also blinking
•paper lever is set to wrong position if 10 cpi light is also blinking.
•Blinks = error condition. Turn printer off, then on; if light still flashes, contact service dealer.
610 / 12 / 15 / 17 / 20 / PROP: Indicate selected character pitch.
18 | Microline 320/321 Turbo/n
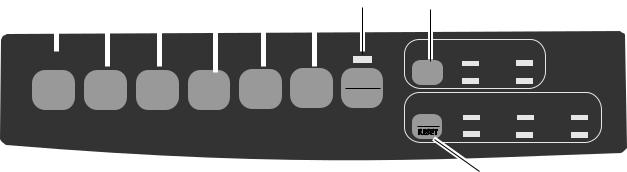
Front Panel Keys
1 |
2 |
3 |
4 |
5 |
6 |
7 |
8 |
|
|
|
|
|
|
|
|
|
|
|
|
|
|
|
|
|
|
|
|
|
|
|
|
|
|
|
|
|
|
|
|
|
|
|
|
|
SEL |
|
|
|
|
|
|
|
|
|
|
|
|
|
|
|
||
|
|
|
|
|
|
|
|
|
|
|
|
|
|
|
|
|
|
SEL |
|
|
|
|
LF |
|
FF/LOAD |
|
|
TEAR |
|
PARK |
|||||
MENU |
SHIFT |
Micro Feed |
Micro Feed |
|
|
|
|
|
|||||||||
Down |
Up |
|
|
|
|
|
|||||||||||
|
|
|
|
|
|
|
|
|
|
|
|||||||
EXIT |
|
|
|
GROUP |
ITEM |
SET |
|||||||||||
POWER |
ALARM |
|
|
|
|
MENU |
|
|
|
|
|
||||||
1 |
SEL: Selects/deselects printer (printer on-line / off-line). |
5 |
|
|
When held on power up, or with SHIFT key, engages |
|
|
|
Menu Mode. |
6 |
|
|
|
||
2 |
SHIFT: Press and hold while pressing another key to |
7 |
|
|
engage the alternate function for that key (e.g., “Micro |
||
|
|
||
|
Feed Down” for LF key). |
8 |
|
3 |
LF: Moves paper up one line: press and hold for |
||
9 |
|||
|
repetitive line feeds. When held on power up, activates |
||
|
|
Font Test.
4FF/LOAD: Loads/ejects single sheet of paper; loads continuous-form paper or feeds it to next page.
|
PRINT QUALITY |
UTL |
|
|
HSD |
|
|
QUIET |
NLQ |
SSD |
|
|
|
|
|
TOF |
CHARACTER PITCH |
|
|
|
10 |
12 |
15 |
|
17 |
20 |
PROP |
9
TEAR: Moves continuous-form paper up for tear-off or back down for printing.
PARK: Retracts continuous-form paper from the path.
QUIET: Turns Quiet Mode on and off. When held on power up, activates Rolling ASCII Test.
PRINT QUALITY: Selects print quality and font.
CHARACTER PITCH: Selects the character pitch. Used with SHIFT key to reset the printer and clear the buffer.
User’s Guide: English | 19
 Installation
Installation Hints
•Read the setup and operating instructions in this document carefully. Be sure to save this document for future reference.
•Read and follow all warning and instruction labels on the printer itself.
•Place your printer on a firm, solid surface. If you put in on something unsteady, it might fall and be damaged. If you place it on a soft surface (such as a rug, sofa, or bed) the vents may be blocked, causing it to overheat.
•The printer must be installed near a power outlet which will remain easily accessible.
•The printer must be installed near a network outlet which will remain easily accessible.
•Be certain that your power source matches the rating listed on the back of the printer. If you are not sure, check with your dealer or with your local power company.
•Your printer has a grounded, 3-prong plug as a safety feature, and it will only fit into a grounded outlet. If you can not plug it in, chances are that you have an older, nongrounded outlet. Contact an electrician to have it replaced with a grounded outlet. Do not use an adapter to defeat the grounding.
•To avoid damaging the power cord, do not put anything on it or place it where it will be walked on. If the cord becomes damaged or frayed, replace it immediately.
20 | Microline 320/321 Turbo/n
•If you’re using an extension cord or power strip with the printer, make sure that the total of the amperes required by all the equipment on the extension is less than the extension’s rating. Generally, the total ratings of all equipment plugged into any one power line should not exceed 15 amperes. Don’t exceed this unless you know that the power line your equipment is plugged into has a rating above 15 amperes.
•To protect your printer from overheating, make sure no openings on the printer are blocked. Do not put the printer on or near a heat source, such as a radiator or heat register. If you put the printer in any kind of enclosure, make sure it is well ventilated.
Installation Overview
To install your printer, follow the instructions in this section. You must complete these steps for your printer to operate properly.
If you have purchased an option package for your printer, refer to the documentation you received with that option for installation instructions.
Installation Location
•Place your printer on a firm, solid surface.
•Allow enough space on each side of the machine to easily access the platen knob and the various paper feed paths.
•Make sure a power outlet is available nearby.
•If you are using the network connection, make sure a network connection is available nearby.
User’s Guide: English | 21
Customizing the Installation
Your printer has many settings (defaults) that do not need to be adjusted as part of a standard installation.
However, you may need to adjust settings to fit your standards.
Some settings you may need to adjust as part of your installation are:
•Top of Form (TOF)
•Paper Path
•Printhead Gap
To adjust these settings, refer to the appropriate section in “Using Your Printer.”
22 | Microline 320/321 Turbo/n
Top of Form (TOF)
!If you turn the platen knob when the printer is turned on, you will cause the Top of Form to mis-align. Always
turn the printer off before turning the platen knob!
!The factory default setting for the Top of Form (where the printing should begin) is one inch down from the top
of the page.
!Your software may print the first line of print above or below where TOF is set. You may need to adjust the
TOF to meet your software’s needs. Use the procedures in “Using Your Printer, Top of Form, Forms Tear-Off Status (ON or OFF).”
!The first line prints at the red line of the plastic paper shield (1) on the printhead.
1
M
The Top of Form and Forms Tear-Off settings of your printer interact.
How you set the Top of Form depends on the status of the Forms Tear-Off menu setting.
If Forms Tear-Off is activated (set to ON), set the Top of Form using “Using Your Printer, Setting Top of Form, Forms TearOff ON (StepA).”
If Forms Tear-Off is NOT activated (set to OFF), set the Top of Form using “Using Your Printer, Setting Top of Form, Forms Tear-Off OFF (Step B).”
PRIN
User’s Guide: English | 23
Unpacking the Machine
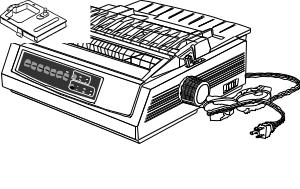
Before you begin, be sure that all the items listed below are included in your package.
!If any items are missing, contact your dealer immediately. Keep you packing materials and carton in
case you ever need to ship or transport the unit.
1Printer
2Ribbon Cartridge
3Power Cord
1
|
SEL |
|
|
|
|
|
|
|
|
|
|
SEL |
|
|
|
|
|
|
|
|
|
MENU |
LF |
|
|
|
|
|
|
|
|
|
EXIT |
SHIFT |
FF/LOAD |
|
|
|
|
|
|
|
|
|
DownFeed |
|
|
|
|
|
|
|
||
|
Micro |
|
|
|
|
|
|
|
|
|
POWER |
ALARM |
GROUP |
MicroUp Feed |
|
TEAR |
|
|
|
|
|
|
ITEM |
|
PARK |
QUIET |
QUALITY |
|
|
|||
|
|
|
MENU |
SET |
TOF |
|
HSD |
|
UTL |
|
|
|
|
|
|
NLQ |
|
||||
|
|
|
|
|
|
|
CHARACTER |
|
SSD |
|
|
|
|
|
|
|
|
10PITCH |
|
|
|
|
|
|
|
|
|
|
17 |
|
12 |
15 |
|
|
|
|
|
|
|
|
|
20 |
|
|
|
|
|
|
|
|
|
|
|
PROP |
3
2
24 | Microline 320/321 Turbo/n
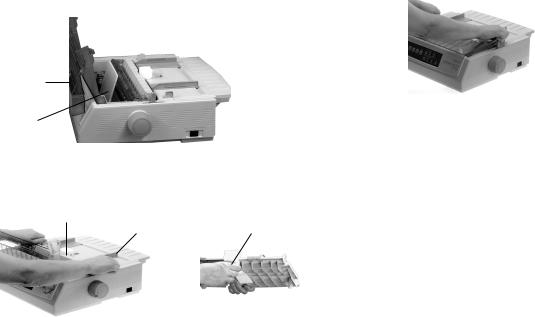
Shipping Restraints
1Open the access cover (1). Remove the printhead shipping restraint (2) and tape.
1
2
2Grasp the tabs and lift off the paper separator (1). Remove the shipping restraint (2).
2
1 |
2 |
3 Install the paper separator.
!Keep your packing materials and carton in case you ever need to ship or transport the unit.
User’s Guide: English | 25
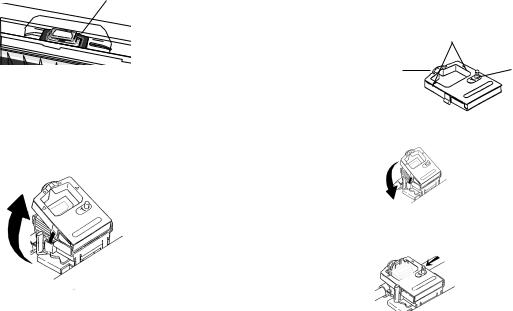
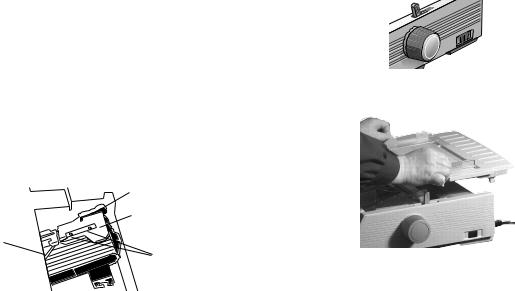
Ribbon Cartridge
1Make sure the printer is turned OFF.
2Center the printhead (1).
1
M
3If you are replacing the ribbon: swing the front of the cartridge up off the printhead, then lift the cartridge out and discard it.
! Caution! The printhead may be HOT!
4 Unpack the ribbon cartridge.
!Important! DO NOT remove the ribbon shield from the ribbon!
1 Ribbon Shield
2 |
Grip Points |
2 |
3 |
Take-up Knob |
|
|
1 |
3 |
5Install the new ribbon cartridge.
6Turn the take-up knob in the direction of the arrow to take up any ribbon slack.
26 | Microline 320/321 Turbo/n
Ribbon Cartridge Handling |
Ribbon Cartridge Emergency First Aid |
•Leave unused ribbon cartridges in their packages until needed.
•When replacing a ribbon cartridge, re-use the packaging to dispose of the old ribbon cartridge.
•Be careful when removing the ribbon cartridge. Do not let it touch your clothing or porous materials. The ribbon ink may cause permanent stains.
•Ribbon ink on skin or clothing can usually be removed with soap and water.
Contact occurs with eyes.
Flush eyes with large quantities of water for 15 minutes, keeping eyelids open with fingers. Seek medical attention.
Contact occurs with skin
Wash thoroughly with soap and water.
For more information
Refer to the Material Safety Data Sheet in “Warranty, Regulatory, and Safety Information.”
User’s Guide: English | 27
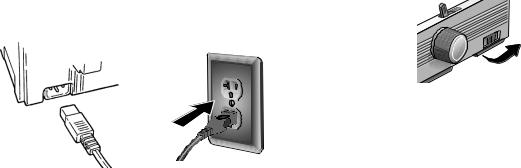
Power Connections
1 Make sure both the printer and the computer are OFF. |
3 Turn on the printer. |
2 Plug the power cord into the back of the printer (1), then into a grounded outlet (2).
2
1
28 | Microline 320/321 Turbo/n
Paper Loading
Rear Feed, Continuous Forms
Use the rear-feed path for printing on single-thickness, |
1 |
Move the paper lever to the position marked “REAR.” |
|
continuous-form paper. |
|
|
|
Use the single-sheet path (top feed) for graphics or charts. |
|
|
|
! |
If you have paper in the paper path, be sure to remove it |
|
|
before installing rear-feed paper. |
2 |
|
|
|
|
Grasp the tabs and lift off the paper separator. |
|
1Lock Lever
2Upper Tractor Cover
3Pins
4Lower Tractor Cover
1
2
4
3
User’s Guide: English | 29
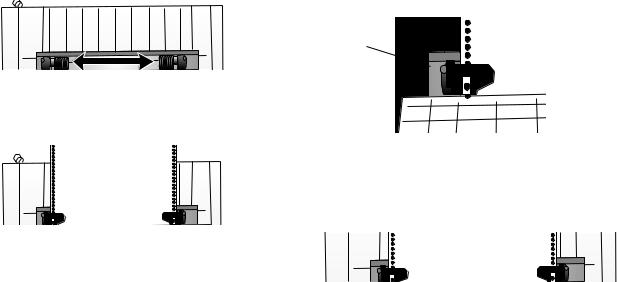
3Pull up on the lock levers and open the tractor covers. Then, move the right tractor to fit the width of the paper.
4Place the first two holes in the paper over the tractor pins on either side. Close the tractor covers.
32T-29.eps |
5 Move the left tractor to align the edge of the paper with the appropriate reference mark (1). Then, push back the lock lever.
1
6 Adjust the position of the right tractor to center the holes in the paper on the pins. Then, push back the right lock lever.
32T-29.eps
30 | Microline 320/321 Turbo/n
 Loading...