


 Loading...
C3520 / C3530MFP
User’s Guide

PREFACE
Every effort has been made to ensure that the information in this document is complete, accurate, and up-to-date. Oki assumes no responsibility for the results of errors beyond its control. Oki also cannot guarantee that changes in software and equipment made by other manufacturers and referred to in this guide will not affect the applicability of the information in it. Mention of software products manufactured by other companies does not necessarily constitute endorsement by Oki.
While all reasonable efforts have been made to make this document as accurate and helpful as possible, we make no warranty of any kind, expressed or implied, as to the accuracy or completeness of the information contained herein.
The most up-to-date drivers and manuals are available from the Oki web site:
http://www.okiprintingsolutions.com
Copyright © 2007 Oki Europe Ltd.
Oki and Microline are registered trademarks of Oki Electric Industry Company, Ltd.
Energy Star is a trademark of the United States Environmental Protection Agency.
Microsoft, MS-DOS and Windows are registered trademarks of Microsoft Corporation.
Other product names and brand names are registered trademarks or trademarks of their proprietors.
As an Energy Star Program Participant, the manufacturer has determined that this product meets the Energy Star guidelines for energy efficiency. (3520MFP only)
This product complies with the requirements of the Council Directives 89/336/EEC (EMC), 73/23/EEC (LVD) and 1999/5/EC (R&TTE), as amended where applicable, on the approximation of the laws of the member states relating to Electromagnetic Compatibility, Low Voltage and Radio & Telecommunications Terminal Equipment.
Please note that Microsoft Windows XP was used to produce all screenshots in this manual. These screenshots may vary if you are using any other operating system, but the principle is the same.
Preface > 2

EMERGENCY FIRST AID
Take care with toner powder:
If swallowed, induce vomiting and seek medical attention. Never attempt to induce vomiting if person is unconscious.
If inhaled, move the person to an open area for fresh air. Seek medical attention.
If it gets into the eyes, flush with large amounts of water for at least 15 minutes keeping eyelids open. Seek medical attention.
Spillages should be treated with cold water and soap to help reduce risk of staining skin or clothing.
IMPORTER TO THE EU
Oki Europe Limited (trading as OKI Printing Solutions)
Central House
Balfour Road Hounslow TW3 1HY
United Kingdom
For all sales, support and general enquiries contact your local distributor.
ENVIRONMENTAL INFORMATION
Emergency First Aid > 3
CONTENTS
Preface . . . . . . . . . . . . . . . . . . . . . . . . . . . . . . . . . . . . 2 Emergency First Aid . . . . . . . . . . . . . . . . . . . . . . . . . . 3 Importer to the EU . . . . . . . . . . . . . . . . . . . . . . . . . . . 3 Environmental Information. . . . . . . . . . . . . . . . . . . . . 3 Contents . . . . . . . . . . . . . . . . . . . . . . . . . . . . . . . . . . . 4 Notes, Cautions and Warnings . . . . . . . . . . . . . . . . . . 7
Introduction . . . . . . . . . . . . . . . . . . . . . . . . . . . . . . . . 8
MFP overview. . . . . . . . . . . . . . . . . . . . . . . . . . . . . 11 Front view . . . . . . . . . . . . . . . . . . . . . . . . . . . . . . . 11 Rear view . . . . . . . . . . . . . . . . . . . . . . . . . . . . . . . 12 The Operator Panel . . . . . . . . . . . . . . . . . . . . . . . . . 13 Languages Supported: . . . . . . . . . . . . . . . . . . . . . . 15
Getting Started . . . . . . . . . . . . . . . . . . . . . . . . . . . . . 16
Installing MFP drivers and Utilities . . . . . . . . . . . . . . 16 Twain and Printer Drivers . . . . . . . . . . . . . . . . . . 16 Fax Printer driver (C3530MFP only) . . . . . . . . . . . 19 Hotkey Utility. . . . . . . . . . . . . . . . . . . . . . . . . . . 19 MFP Setup tool. . . . . . . . . . . . . . . . . . . . . . . . . . 21
Scanner/copier Section . . . . . . . . . . . . . . . . . . . . . . 24 Printer section . . . . . . . . . . . . . . . . . . . . . . . . . . . . 25 Paper recommendations . . . . . . . . . . . . . . . . . . . 25 Cassette tray . . . . . . . . . . . . . . . . . . . . . . . . . . . 26 Multi purpose tray . . . . . . . . . . . . . . . . . . . . . . . 26 Face down stacker . . . . . . . . . . . . . . . . . . . . . . . 27 Face up stacker . . . . . . . . . . . . . . . . . . . . . . . . . 28 Loading Paper . . . . . . . . . . . . . . . . . . . . . . . . . . . . 28 Cassette tray . . . . . . . . . . . . . . . . . . . . . . . . . . . 28 Multi purpose tray . . . . . . . . . . . . . . . . . . . . . . . 33
Configuring your machine..... . . . . . . . . . . . . . . . . . . |
35 |
General . . . . . . . . . . . . . . . . . . . . . . . . . . . . . . . . . |
35 |
Fax Receiving (C3530MFP) . . . . . . . . . . . . . . . . . |
35 |
Setting the Date/Time . . . . . . . . . . . . . . . . . . . . |
35 |
Setting the Country Code (C3530MFP) . . . . . . . . . |
36 |
Fax Sender ID (C3530MFP) . . . . . . . . . . . . . . . . . |
37 |
Ring Response (C3530MFP). . . . . . . . . . . . . . . . . |
37 |
Access Control . . . . . . . . . . . . . . . . . . . . . . . . . . |
38 |
Logout operation . . . . . . . . . . . . . . . . . . . . . . . . |
39 |
Operation Time-out . . . . . . . . . . . . . . . . . . . . . . |
39 |
Contents > 4
The Scanner/Copier section . . . . . . . . . . . . . . . . . . . 40 Minimum Configuration Requirements. . . . . . . . . . 40 Internet Communication Features . . . . . . . . . . . . 40 Pre-Installation Information. . . . . . . . . . . . . . . . . 40
Menu Structure . . . . . . . . . . . . . . . . . . . . . . . . . . . . . 45
Copy function. . . . . . . . . . . . . . . . . . . . . . . . . . . . . 45 Scan/Scan to function . . . . . . . . . . . . . . . . . . . . . . . 46 Email . . . . . . . . . . . . . . . . . . . . . . . . . . . . . . . . 46 Network PC . . . . . . . . . . . . . . . . . . . . . . . . . . . . 47 PC . . . . . . . . . . . . . . . . . . . . . . . . . . . . . . . . . . 47 Fax function (C3530MFP). . . . . . . . . . . . . . . . . . . . . 48 Menu function . . . . . . . . . . . . . . . . . . . . . . . . . . . . 48
Operation . . . . . . . . . . . . . . . . . . . . . . . . . . . . . . . . . 57
Loading Document(s) for copying . . . . . . . . . . . . . . . 57 Using the ADF . . . . . . . . . . . . . . . . . . . . . . . . . . 57 Placing Document(s) in the ADF . . . . . . . . . . . . . . . . 58 Placing Document(s) on the Glass . . . . . . . . . . . . . . 59 Copy Mode. . . . . . . . . . . . . . . . . . . . . . . . . . . . . . . 59 Setting up . . . . . . . . . . . . . . . . . . . . . . . . . . . . . 59 Operation . . . . . . . . . . . . . . . . . . . . . . . . . . . . . 62 Scan Mode. . . . . . . . . . . . . . . . . . . . . . . . . . . . . . . 62 Operation . . . . . . . . . . . . . . . . . . . . . . . . . . . . . 62 Scan to E-mail option. . . . . . . . . . . . . . . . . . . . . 62 Scan to USB Memory . . . . . . . . . . . . . . . . . . . . . 68 Scan to Network PC option. . . . . . . . . . . . . . . . . . 69 Scan to PC option. . . . . . . . . . . . . . . . . . . . . . . . 70 Fax Mode (C3530MFP) . . . . . . . . . . . . . . . . . . . . . . 73 Operation . . . . . . . . . . . . . . . . . . . . . . . . . . . . . 73 Setting up . . . . . . . . . . . . . . . . . . . . . . . . . . . . . 73 Fax Receiving . . . . . . . . . . . . . . . . . . . . . . . . . . 76
Maintenance . . . . . . . . . . . . . . . . . . . . . . . . . . . . . . . 81
Replacing consumable items . . . . . . . . . . . . . . . . . . 81 Consumable order details . . . . . . . . . . . . . . . . . . . . 82 Toner cartridge replacement . . . . . . . . . . . . . . . . . . 83 Image drum replacement . . . . . . . . . . . . . . . . . . . . 88 Transfer belt replacement . . . . . . . . . . . . . . . . . . . . 92 Fuser replacement . . . . . . . . . . . . . . . . . . . . . . . . . 98 Cleaning the LED head . . . . . . . . . . . . . . . . . . . . . .102
Troubleshooting . . . . . . . . . . . . . . . . . . . . . . . . . . . |
104 |
Clearing paper jams . . . . . . . . . . . . . . . . . . . . . . . |
.104 |
In the Scanner ADF section.... . . . . . . . . . . . . . . |
.104 |
In the Printer section.... . . . . . . . . . . . . . . . . . . . |
105 |
Contents > 5
Fax problems (C3530MFP) . . . . . . . . . . . . . . . . . . . .113
Installing additional memory . . . . . . . . . . . . . . . . . 116
Memory upgrade . . . . . . . . . . . . . . . . . . . . . . . . . .116 Checking the Memory status . . . . . . . . . . . . . . . . . .121
Colour Printing . . . . . . . . . . . . . . . . . . . . . . . . . . . . 122
Factors that affect the appearance of prints . . . . . . . .122 Tips for printing in colour. . . . . . . . . . . . . . . . . . . . .124 Printing photographic images. . . . . . . . . . . . . . . .124 Printing from Microsoft Office applications . . . . . . .124 Printing specific colours (e.g. a company logo) . . .124
Adjusting the brightness or intensity of
a print . . . . . . . . . . . . . . . . . . . . . . . . . . . .124 Accessing the colour matching options . . . . . . . . . . .125 Setting the colour matching options . . . . . . . . . . . . .125 Using the Colour Swatch feature. . . . . . . . . . . . . . . .127 Using the Colour Correct Utility . . . . . . . . . . . . . . . .128
Specifications . . . . . . . . . . . . . . . . . . . . . . . . . . . . . 129 Index. . . . . . . . . . . . . . . . . . . . . . . . . . . . . . . . . . . . 135 Oki contact details . . . . . . . . . . . . . . . . . . . . . . . . . 137
Contents > 6

NOTES, CAUTIONS AND WARNINGS
NOTE:
A note provides additional information to supplement the main text.
CAUTION!
A caution provides additional information which, if ignored, may result in equipment malfunction or damage.
WARNING!
A warning provides additional information which, if ignored, may result in a risk of personal injury.
For the protection of your product, and in order to ensure that you benefit from its full functionality, this model has been designed to operate only with genuine Oki Printing Solutions toner cartridges. These can be identified by the Oki Printing Solutions trademark. Any other toner cartridge may not operate at all, even if it is described as "compatible", and if it does work, your product's performance and print quality may be degraded.
Specifications subject to change without notice. All trademarks acknowledged.
Notes, Cautions and Warnings > 7
INTRODUCTION
Congratulations on choosing this Multi Function Product (MFP). It has been designed with advanced features, to give you clear, vibrant colour prints and crisp black and white pages at high speed, on a range of office print media.
With this MFP, you can instantly scan paper-based documents and deliver the electronic image to various destinations including email addresses, printers, ftp servers, facsimile machines, USB memory stick, or someone else's computer on the network.
Your MFP includes these features:
>ProQ2400 Multi-level technology produces subtle tones and smooth gradations of colour to lend photographic quality to your documents.
>Hotkey utility - enables the MFP to receive one key touch commands from a locally connected computer (“Pull Scan”).
>Printing:
Up to 12 pages per minute (ppm) (C3520MFP) or 16 ppm (C3530MFP) in full colour - for fast printing of high impact colour presentations and other documents.
Up to 16 ppm (C3520MFP) or 20 ppm (C3530MFP) at 300 dpi in black and white - for fast and efficient printing of all general purpose documents not requiring colour.
>Copying
Up to 12 copies per minute (cpm) (C3520MFP) or 16cpm (C3530MFP) at 300 dpi, in full colour - for fast copying.
Up to 6 cpm (C3520MFP) or 20 cpm(C3530MFP) at 300 dpi in black and white - for fast and efficient copying of all general purpose documents not requiring colour.
>600 x 600dpi and 1200 x 600dpi (dots per inch) print resolution for high quality image production.
>600 x 600dpi x 2bit print resolution for high quality image production showing the finest detail (ProQ2400).
Introduction > 8
>300 x 300 (standard) and 600 x 600dpi (high) copy resolution.
>Banner Printing (C3530MFP).
>Single Pass Colour Digital LED technology for high speed processing of your printed pages.
>High speed USB 2.0 interface.
>10Base-T and 100Base-TX network connection lets you share this resource among users on your office network.
>“Ask Oki” (Windows only)– a user-friendly function that provides a direct link from your printer driver screen (not always illustrated in this guide) to a dedicated web site specific to the exact model you are using. This is where you’ll find all the advice, assistance and support you could need to help you get the best possible results from your Oki printer.
>Scan to E-mail - Connected to an Ethernet network and a SMTP server, this MFP allows you to transmit document(s) over the internet via e-mail. With a touch of the e-mail key and the selection of your recipients' e-mail addresses, the document(s) is/are first scanned and converted into an image file, and then transmitted to remote recipients within minutes.
>Scan to FTP - Allows you to send scanned documents to a server or a personal computer's file folder over an intranet with FTP (File Transfer Protocol), HTTP (Hypertext Transfer Protocol), CIFS (Common Internet File System) protocol. The scan to filing feature removes the need for the mail server to handle large attachments.
>Scan to Fax (C3530MFP) - Allows you to send and receive scanned documents to/from another facsimile machine.
>Scan to memory - Scan to USB memory.
>Digital Copying - An intuitive control panel, makes digital copying fast and easy.
>Network/PC Printing - When connected to a Network, the MFP is able to perform network or PC printing (available in “Scan-to” mode”).
Introduction > 9
>Multiple Pages Sending - With the Auto Document Feeder, the MFP allows a stack of up to 50 page document(s) to be continuously scanned.
>Simplified Operator panel
>Address Book/Profiles Managing - This provides a convenient way to manage all the e-mail addresses and profiles (filing destinations). Simply typing the machine's IP address in the URL field of your browser will prompt the MFP web page. This web page allows you to create up to 100 e-mail addresses and several filing destinations to manage your document.
The following optional feature is available:
>C3530MFP only - 256MB additional memory, to allow the printing of more complex pages.
Introduction > 10
MFP OVERVIEW
FRONT VIEW
1 2 3
4
5

 6 9
6 9 
8 
7 
1.Scanner bed.
2.Automatic Document Feeder (ADF) Unit.ADF Paper Tray. Max. 50 sheets A4 at 60 - 120g/m².
3.ADF Paper Tray. Max. 50 sheets A4 at 60 - 120g/m².
4.Document Cover.
5.Operator Control Panel.
6.Output stacker, face down. Standard printed copy delivery point. Holds up to 150 sheets of 80g/m².
7.Standard paper tray with level indicator. Holds up to 250 sheets of 80g/m².
8.Multi purpose feeder tray (shown closed). Used for feeding heavier paper stocks, envelopes and other special media. Also used for manual feeding of single sheets when required and Banner printing.
9.USB Memory port
Introduction > 11
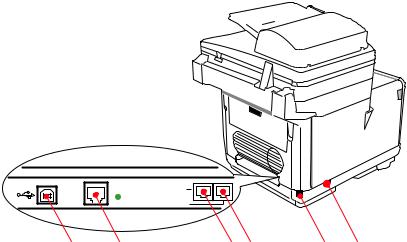
REAR VIEW
This view shows the connection panel and the rear output stacker.
7 

8 
LAN |
TEST |
TEL |
|
|
|
|
|
LINE |
1 2 3 4 5 6
1. |
USB connection. |
5. |
IEC (CE22) AC power connection. |
2. |
Local Area Network |
6. |
AC Power ON/OFF switch. |
|
connection. |
|
|
3.Local Telephone handset 7. Automatic Document Feeder (ADF). connection.
4.Telephone line connection. 8. Rear paper stacker (closed).
When the rear paper stacker is folded down, paper exits through the rear of the printer and is stacked here face up. This is mainly used for heavy print media. When used in conjunction with the multi purpose feed tray, the paper path through the printer is essentially straight. This avoids bending the paper around curves in the paper path and enables feeding of up to 203g/m² media.
Introduction > 12
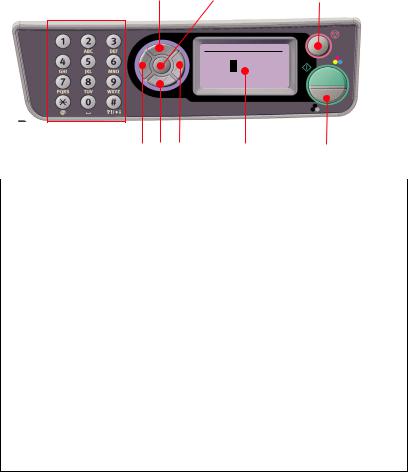
THE OPERATOR PANEL
3 5
abcd@d Done
a b c d e f g h i j k l m n o p q r s t u v w x y z
|
|
|
|
|
|
7 |
|
|
|
|
|
|
|
|
|
|
|
|
|
|
1 |
2 |
4 |
6 |
|||
9
 8b
8b
8a
1. |
Key Pad |
Used to enter numbers, upper-case/lower-case letters and |
|
|
symbols in the Entry Line. |
|
|
|
2. |
LEFT key |
When in switching Mode: |
|
|
Returns the display to the Function Selection screen or Scan |
|
|
Sub Function Selection screen from the Stand-by screen. |
|
|
When Setting up: |
|
|
Increments the value of the tree structure. |
|
|
|
3. |
UP Key |
When setting up or in switching Mode: |
|
|
Moves the cursor UP. |
|
|
|
4. |
DOWN Key |
When setting up or in switching Mode: |
|
|
Moves the cursor DOWN. |
|
|
|
5. |
ENTER Key |
When switching Mode: |
|
|
Used to confirm the Mode selected. |
Used to start Push Scan (If Push Scan is selected, the Executing Push Scan screen appears).
When Setting up:
Decrements the value of the tree structure.
Increments the value of the tree structure as the set value is confirmed.
When entering PIN ID:
Used to confirm the PIN ID entered.
Introduction > 13

3 5
abcd@d Done
a b c d e f g h i j k l m n o p q r s t u v w x y z
|
|
|
|
|
|
7 |
|
|
|
|
|
|
|
|
|
|
|
|
|
|
1 |
2 |
4 |
6 |
|||
9
 8b
8b
8a
6. RIGHT Key |
When in switching Mode: |
|
Used to confirm the Mode selected. |
|
Used to start Push Scan (If Push Scan is selected, the |
|
Executing Push Scan screen appears). |
|
When Setting up: |
|
Decrements the value of the tree structure. |
|
Increments the value of the tree structure as the set value is |
|
confirmed. |
|
|
7. LCD display |
128 x 64 dot. |
|
|
8. START Key |
When entering PIN ID, used to confirm the PIN ID entered. |
(a = colour; |
Executes the function selected. |
b= monochrome) |
Executes Copy. |
|
|
|
Executes Scan to E-mail/ USB Memory/ Server. |
|
Executes Fax Send. |
|
Executes Fax Manual Receive. |
|
Recovery from Error/Warning states. |
|
When pressed from the Screen Entry screen, confirms the |
|
characters or functions selected. |
|
|
9. STOP Key |
Stops the function being executed. |
|
Stops Copy. |
|
Stops Scan to E-mail/ Memory/ Server. |
|
Stops Fax Send. |
|
Cancels Print Job. |
|
Recover from Error/Warning states: |
|
Used to confirm error messages (when an error that does not |
|
need recovery operation has occurred). |
|
Recovering from Error/Warning states. |
|
Forces a return to the Mode Selection screen from each |
|
Stand-by screen (all settings shown on the Stand-by screen |
|
return to User Default values). |
|
|
Introduction > 14

LANGUAGES SUPPORTED:
English |
German |
French |
Italian |
Spanish |
Swedish |
Norwegian |
Danish |
Dutch |
Portuguese |
Greek |
Brazilian Portuguese |
Russian |
Polish |
Turkish |
Czech |
Hungarian |
Finnish |
NOTES:
1.This list is not exhaustive or conclusive.
2.See the information enclosed with the product (the Panel Language Setup utility) on the procedure for changing the language setting.
Introduction > 15

GETTING STARTED
INSTALLING MFP DRIVERS AND UTILITIES
NOTE:
You must be logged on as an administrator or a member of the Administrators group in order to complete this procedure. If your computer is connected to a network, network policy settings may also prevent you from completing this procedure.
TWAIN AND PRINTER DRIVERS
The TWAIN driver is used for "Pull Scanning", i.e. Initiating a scan from your PC via software. Compare this to "Push Scanning" where you start the scan by pressing a button on the MFP's front panel. The TWAIN driver only works via USB connections. This means it's not possible to control the scanner over the network from your PC.
There are two different ways of installing the TWAIN and printer drivers:
1.Plugging the printer in first and performing a "Plug and play" type of installation. In this case you must install the TWAIN driver first.
2.Not plugging the printer in yet, but running the Oki driver installer program from the CD-ROM. This installs the TWAIN (scanner printer driver) and printer drivers. Once the printer is switched on and plugged in, the installation is complete.
Plug and play installation
The MFP is a "dual device" - Windows sees it as a scanner and a printer. This means when the MFP is plugged into a PC using a USB cable, you'll be prompted to install 2 different drivers; the TWAIN (scanner printer) driver first and then the printer driver.
1.Attach the printer to a USB port of your computer.
2.Switch on the Printer.
3.Insert the Drivers & Utilities CD.
Getting Started > 16
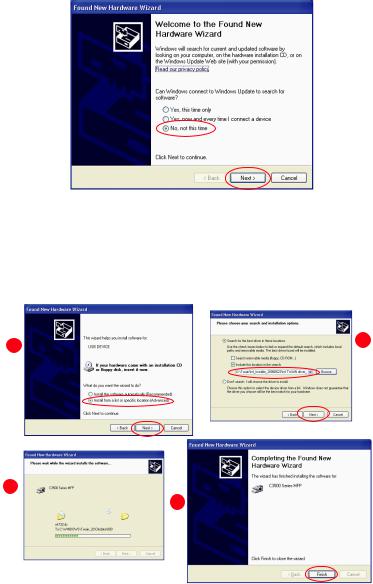
If CD autoboots, cancel the dialogue.
The ‘New Hardware Found' dialogue will appear on the screen.
If you do not see the ‘New Hardware Found' dialogue, please check that power and USB cables are connected properly, and the printer is switched on.
4.Install Twain driver first
a |
b |
c
d
Getting Started > 17
5.Next install the Printer driver
a |
b |
|
c
d
Getting Started > 18

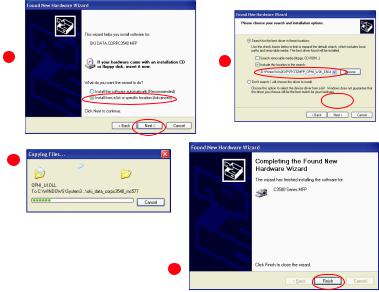
FAX PRINTER DRIVER (C3530MFP ONLY)
The Fax Printer Driver allows you to send faxes directly from your computer without printing the document first.
Windows XP has built-in fax support - you can use your computer's modem to send faxes directly from your computer.
With Oki's fax driver you are sending the fax data from your computer to the MFP, and then the MFP automatically sends the document.
Installing the fax printer driver
This is installed as part of the Oki driver installer wizard.
HOTKEY UTILITY
The Hotkey utility enables the MFP to receive one key touch commands from a locally connected computer (“Pull Scan”).
Installation of the Hotkey utility is optional and can be found on the Driver/Utilities CD under the Utilities folder.
Information on using the Hotkey utility can be found in “Scan to PC option.” on page 70.
Setting up the Hotkey Utility
1.Install the Hotkey utility from the CD:
Set-up will place a “Hotkey” icon on your desktop.
2.Double-click this icon to open the Hotkey console.
Getting Started > 19
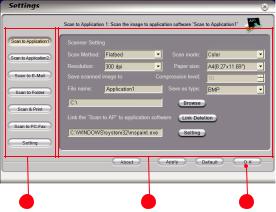
3.Select Settings. The following screen will appear.
1 |
2 |
3 |
4.Select the function you want to set in section (1).
5.Set the parameters for this function in section (2).
6.When you have completed settings, press OK (3).
The Utility will return to the Hotkey console (para. 2 above).
Getting Started > 20
MFP SETUP TOOL
Installation of the MFP setup utility is optional and can be found on the Driver/Utilities CD under the Utilities folder.
The setup program does not automatically place an icon on your desktop. If you wish, you can drag and drop this icon on to your desktop for ease of future use.
The MFP setup tool can discover C3520/C3530MFP devices over USB or network connections. This only detects Oki C3520/ C3530MFP devices.
There are 6 main functions included in this software;
>MFP Settings
>Colour Adjustment
>Address Book Manager
>Phone Book Manager
>Profile Manager
>PIN Manager.
Each of these functions is described below.
Getting Started > 21
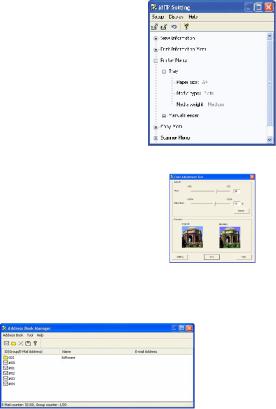
1.MFP Settings: Allows you to change most of the same settings as you'd see on the MFP's operator panel, on a locally connected PC.
The settings include an Admin. menu. This is password protected and hidden by default. To enable the Admin menu, select: Setting>MFP Setting>Display > Administrator menu and enter the MFP's password.
2.Colour Adjustment: Changes the Hue and Saturation of the MFP's copy function. It doesn't affect the print or scan colour.
3.Address Book Manager: Adds names, email addresses, assign them to IDs (for scan to email feature of MFP)
>Arrange people into groups.
>Import and export settings to CSV files.
>Import settings from other Oki MFP devices.
Getting Started > 22
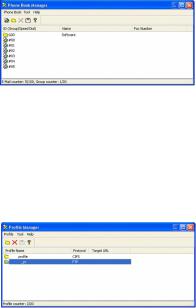
4.Phone Book Manager (C3530MFP only):
For managing people and fax numbers (for "scan to fax" feature of MFP). Add names, fax numbers, assign them to speed dial numbers.
>Arrange people into groups.
>Import and export settings to CSV files.
>Import settings from other Oki MFP devices.
5.Profile Manager: A profile is a set of saved settings for scanning to a networked PC. A profile consists of the following:
>Details for connecting to the networked PC (protocol, port, user name, password etc)
>Paper size
>File format to scan to (PDF, TIFF, JPEG) and format settings such as resolution, compression
>Import and export settings to CSV files
>Import settings from other Oki MFP devices
Getting Started > 23
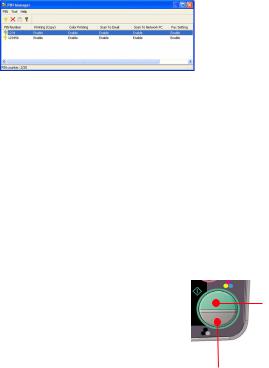
6.PIN Manager: The MFP can have access control switched on the front panel. If this is the case, a PIN (Personal Identification Number) is required to use the MFP. The PIN Manager creates PIN numbers and assigns them rights such as whether they can copy, print, scan to email, scan to network PC or fax.
>Import and export settings to CSV files.
>Import settings from other Oki MFP devices.
SCANNER/COPIER SECTION
The MFP can scan/copy/send document(s) either using the ADF (Automatic Document Feeder) or manually on the glass.
If you wish to scan/copy/send multiple pages, use the ADF. The ADF can hold up to 50 pages at one time.
If you wish to scan/copy/send pages from books, newspaper clippings, or paper with wrinkles or curls, use the glass.
An instant single copy, in monochrome (8a) or colour (8b), can be made by pressing the
appropriate button on the operator panel. |
8b |
|
8a
Getting Started > 24
PRINTER SECTION
PAPER RECOMMENDATIONS
Your MFP will handle a variety of print media, including a range of paper weights and sizes. This section provides general advice on choice of media, and explains how to use each type.
The best performance will be obtained when using standard 75~90g/m² paper designed for use in copiers and laser printers. Suitable types are:
>Arjo Wiggins Conqueror Colour Solutions 90g/m²;
>Colour Copy by Neusiedler.
Use of heavily embossed or very rough textured paper is not recommended.
Pre-printed stationery can be used, but the ink must not offset when exposed to the high fuser temperatures used in the printing process.
Envelopes should be free from twist, curl or other deformations. They should also be of the rectangular flap type, with glue that remains intact when subjected to hot roll pressure fusing used in this type of printer. Window envelopes are not suitable.
Transparencies should be of the type designed for use in copiers and laser printers. We strongly recommend Oki transparencies (Order No. 01074101). In particular, avoid office transparencies designed for use by hand with marker pens. These will melt in the fuser and cause damage.
Labels should also be of the type recommended for use in copiers and laser printers, in which the base carrier page is entirely covered by labels. Other types of label stock may damage the printer due to the labels peeling off during the printing process. Suitable types are:
>Avery White Laser Label types 7162, 7664, 7666 (A4), or 5161 (Letter);
Business cards recommended are produced by Oki (Order No. 09002985).
Getting Started > 25

CASSETTE TRAY
The Cassette Tray can handle paper weights of 64g/m² to 176g/ m². The Cassette Tray is ideal for printing A4 documents of more than 1 page in length.
SIZE |
DIMENSIONS |
WEIGHT (G/M²) |
|
|
|
|
|
A6 |
105 x 148mm |
|
|
|
|
|
|
A5 |
148 x 210mm |
|
|
|
|
|
|
B5 |
182 x 257mm |
|
|
|
|
Light |
64-74g/m² |
Executive |
184.2 x 266.7mm |
||
|
|
Medium75-90g/m² |
|
A4 |
210 x 297mm |
||
|
|
Heavy |
91-120g/m² |
Letter |
215.9 x 279.4mm |
||
|
|
|
|
Legal 13in. |
216 x 330mm |
|
|
|
|
|
|
Legal 13.5in. |
216 x 343mm |
|
|
|
|
|
|
Legal 14in. |
216 x 356mm |
|
|
|
|
|
|
If you have identical paper stock loaded in the multi purpose tray, you can have the printer automatically switch to the other tray when the current tray runs out of paper. When printing from Windows applications, this function is enabled in the driver settings. When printing from other systems, this function is enabled in the Print Menu.
MULTI PURPOSE TRAY
The multi purpose tray can handle the same media sizes as the cassette trays but in weights of 75g/m² to 203g/m². For very heavy paper stock, use the face up (rear) paper stacker. This ensures that the paper path through the printer is almost straight.
The multi purpose tray can feed paper widths as small as 105mm and lengths up to 1200mm (banner printing - C3530MFP only).
For paper lengths exceeding 356mm (Legal 14in.) use paper stock between 90g/m² and 128g/m² and the face up (rear) paper stacker.
When using the Multi Purpose Tray, feed each sheet of paper or envelope one-by-one, rather than stacking them. This helps to avoid paper jams.
Watermarked or headed paper should be loaded print side up and top edge into the printer.
Getting Started > 26

C3520
SIZE |
DIMENSIONS |
WEIGHT (G/M²) |
||
|
|
|
|
|
A6 |
105 x 148mm |
|
|
|
|
|
|
|
|
A5 |
148 x 210mm |
|
|
|
|
|
|
|
|
B5 |
182 x 257mm |
Light: |
64-74g/m² |
|
|
|
|||
Executive |
184.2 x 266.7mm |
|||
Medium: 75-90g/m² |
||||
|
|
|||
A4 |
210 x 297mm |
|||
Heavy: |
91-120g/m² |
|||
|
|
|||
Letter |
215.9 x 279.4mm |
|||
Ultra |
|
|||
|
|
|
||
Legal 13in. |
216 x 330mm |
|
||
heavy: |
121-176g/m² |
|||
|
|
|||
Legal 13.5in. |
216 x 343mm |
|
|
|
|
|
|
|
|
Legal 14in. |
216 x 356mm |
|
|
|
|
|
|
|
|
Custom sizes |
216 x 356mm |
|
|
|
|
|
|
|
|
C3530 |
|
|
|
|
SIZE |
DIMENSIONS |
WEIGHT (G/M²) |
||
|
|
|
|
|
A6 |
105 x 148mm |
|
|
|
|
|
|
|
|
A5 |
148 x 210mm |
|
|
|
|
|
|
|
|
B5 |
182 x 257mm |
|
|
|
|
|
|
|
|
Executive |
184.2 x 266.7mm |
|
|
|
|
|
|
|
|
A4 |
210 x 297mm |
Light: |
64-74g/m² |
|
|
|
|||
Letter |
215.9 x 279.4mm |
|||
Medium: 75-90g/m² |
||||
|
|
|||
Legal 13in. |
216 x 330mm |
|||
Heavy: |
91-120g/m² |
|||
|
|
|||
Legal 13.5in. |
216 x 343mm |
|||
Ultra |
|
|||
|
|
|
||
Legal 14in. |
216 x 356mm |
|
||
heavy: |
121-176g/m² |
|||
|
|
|||
Custom sizes |
216 x 356mm |
|
|
|
|
|
|
|
|
COM-9 Envelope |
98.4 x 225.4mm |
|
|
|
|
|
|
|
|
COM-10 Envelope |
104.7 x 241.3mm |
|
|
|
|
|
|
|
|
Monarch Envelope |
98.4 x 190.5mm |
|
|
|
|
|
|
|
|
C5 |
162 x 229mm |
|
|
|
|
|
|
|
|
FACE DOWN STACKER
The face down stacker on the top of the printer can hold up to 150 sheets of 80g/m² standard paper and can handle paper stocks up to 120g/m². Pages printed in reading order (page 1 first) will be sorted in reading order (last page on top, facing down).
Getting Started > 27
FACE UP STACKER
The face up stacker at the rear of the printer should be opened and the tray extension pulled out when required for use. In this condition paper will exit via this path, regardless of driver settings.
The face up stacker can hold up to 10 sheets of 80g/m² standard paper and can handle stocks up to 203g/m².
Always use this stacker and the multi purpose feeder for paper stocks heavier than 120g/m².
LOADING PAPER
CASSETTE TRAY
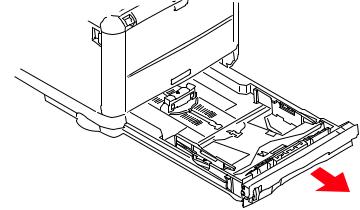
1.Remove the paper tray from the machine.
Getting Started > 28

2.Fan the paper to be loaded at the edges (a) and in the middle (b) to ensure that all sheets are properly separated, then tap the edges of the stack on a flat surface to make it flush again (c).
a
b
c
3.Load the tray with paper.
Use the level indicators (a and b) as a guide. For letter headed paper load face down with top edge towards the front of the printer.
b
a
Getting Started > 29
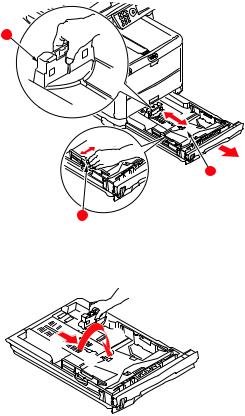
4.Adjust the rear stopper (a) and paper guides (b) to the size of paper being used. A6 paper uses area (c).
a
c
b |
5.If you are using A6 paper, re-position the rear paper guide to the front slot.
Getting Started > 30
Loading...